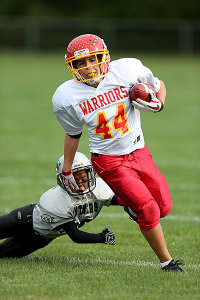
The action is almost always more dramatic when it is coming towards the photographer.
One of the most popular subjects people photograph is their children. Everyone is always showing off photos of their little ones. And when those little ones grow bigger, we photograph their activities. One of the more challenging children’s activities to photograph is youth sports.
With a few exceptions, sports tend to take place on large fields, where a photographer will have limited ability to get close to his subject. Couple that fact with a lack of control over lighting, and sports of any level can be a challenge to photograph.
The biggest issue most beginners seem to have with sports is stopping action. Motion blur, caused by using too slow a shutter speed, frustrates many new sports photographers. The bottom line here is very simple: a minimum shutter speed of 1/500 is needed to freeze action. The longer the lens, the faster the shutter speed needs to be. So while 1/500 is the minimum, if your focal length is 600mm, you will need a shutter speed of at least 1/640. Faster is better.
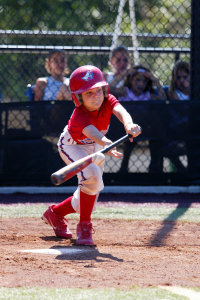
Using a faster shutter speed ensures stopping the motion of the ball as it hits the bat.
The next issue to contend with is the backgrounds. Youth sporting events take place in parks, at schools, or in other places where the background is less than pleasing. It could be a parking lot, a building, or you may just have a lot of spectators in the background that can cause your subject to get lost in the mess. Photographers have two options here. The first is to move to an area where the backgrounds are cleaner. Since that may not be an option, the second becomes much more important. Shoot your images at the widest aperture possible with the lens you are using.
Pro sports photographers typically use wide aperture lenses with apertures of f/2.8 and f/4 for a variety of reasons. One reason is because they allow more light into the camera, thus allowing for faster shutter speeds. The second reason is that a wide aperture creates a shallow depth of field- meaning while your subject will be sharp, the background will be nicely blurred, eliminating distractions.
Lens choice is another important part of the equation when shooting sports. Not everyone will have access to a 400mm f/2.8 lens, but great sports shots can be captured with a variety of lenses- not just the big telephotos. A 70-300mm zoom lens, which is typically one of the more popular telephoto lenses available, makes a great choice for shooting you sports. While not as fast as a lens with an f/2.8 aperture, as long as the light is good enough to get a fast shutter speed, these lenses do just fine. The 300mm focal length will get you enough reach to get closer to the action, but remember to stay disciplined. Let the action come to you. Shooting across the field will simply result in lots of pictures where the athletes don’t fill the frame, and the dramatic impact is greatly diminished. For on-field action, typically a lens with a focal length of at least 300mm will be needed. Most pros use anything from 300mm f/2.8 up to a 600mm f/4.
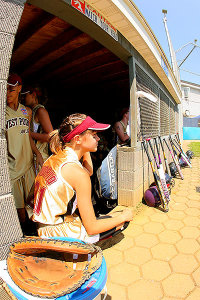
A wide angle lens is useful for situations where you want to show the complete context of where the athlete is. In this case, a fisheye lens shows the entire dugout as well as the player sitting on the steps.
Most people don’t think of wide angle lenses as good sports lenses, but there are several times where a wide angle can be the perfect lens. Generally, wide angles work well when the photographer can be close to the athletes, be it for a team huddle on the sidelines, a post-game handshake, or a portrait taken on the bench with spectators in the background. For those who can get access and don’t mind putting their gear at risk, a soccer or hockey “net cam” is a great use for a wide angle lens. When pros do this they use a protective housing for the camera. It is NOT recommended that a photographer mount their camera in a goal without being protected. The effort can be worth it. Some of the most dramatic soccer and hockey photos come from cameras mounted in the goal with a wide angle lens.
When shooting action on the field, working with the available light becomes incredibly important. Most of these outdoor games take place in midday sun, which is often harsh. Add in helmets, hats, or other headgear which can cast shadows over faces, and you’ve got a lighting nightmare. With sports such as football or baseball, with hats and helmets on the athletes, use of exposure compensation can be helpful in opening up the shadows on faces. A setting of +1/3 or +2/3 is a good starting point. For later afternoon or early morning games, shooting backlit can add a bit of drama to the lighting, with the sunlight creating a nice rim light on the athletes. Exposure compensation can help open up the shadows again to maintain detail in the faces.
For indoor sports, the use of flash can be problematic. Always be sure the use of flash is permitted, first and foremost. In many sports, such as gymnastics, use of flash is strictly forbidden. If the available light allows, it’s best to try to shoot without flash. This is where today’s extreme high ISOs and the outstanding noise performance of today’s DSLR’s is especially handy. Photographers often find themselves in school gyms with ISOs set to 3200, 6400, or higher. Fast lenses with apertures of f/2.8 or larger are also useful in these situations. The same rule for stopping action applies, using a shutter speed of at least 1/500 or faster.
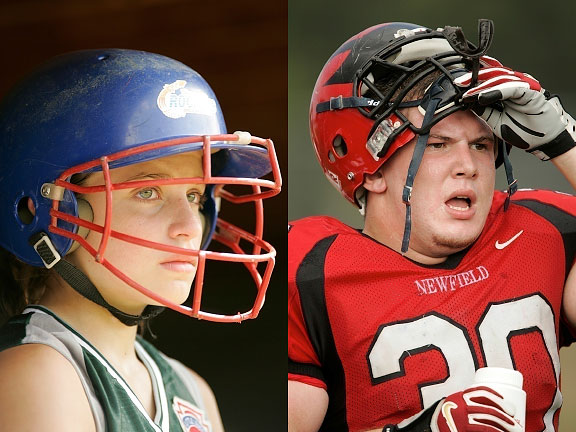
Sideline portraits can sometimes be more impactful that the action on the field. Don't be afraid to turn away from the action and photograph the intensity on the sidelines.
Athletes tend to move quickly, so you’ll want to make sure your autofocus is set to Servo or Continuous (dependent on what brand of camera you use). This allows the camera to refocus as the athlete moves towards or away from the camera. Setting the drive to continuous will also allow the camera to take multiple photos by holding down the shutter button, ensuring that peak action is captured.
Today’s cameras offer a variety of AF arrays, from 9 or 11 AF points on entry level models, all the way up to 61 AF points on high end models. Generally speaking, it is easiest to select one AF point and keep it on your subject, though some cameras are especially good at using all available AF points to track a moving subject. Photographers should experiment and practice to find which settings work best for them.
Sports offer a variety of photo opportunities aside from the action on the field. The sidelines are great for shots of players interacting with each other, coaches instructing players, and sideline portraits. With all the ups and downs of competition, the emotion on the sidelines makes a great subject all by itself. Don’t be afraid to turn away from the action during the moments to catch the emotion in the bench area.
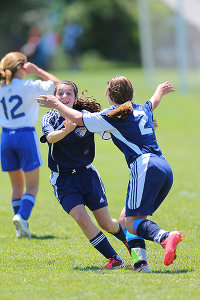
Jubilation shots can be some of the most rewarding and sought after shots. It takes discipline to remember to continue shooting even after the play has ended.
In addition, the pomp and circumstance that goes with many youth sporting events also make for great photo ops. Watch for the halftime performances of cheerleaders and bands at various school sports. The more devoted “fans” in the stands also make for great opportunities.
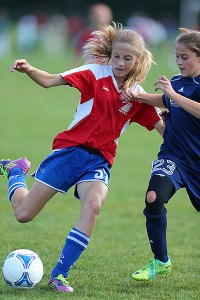
Telephoto lenses with wide apertures blur the background nicely, eliminating anything unsightly or distracting in the background.
Knowing where to stand is one of the most important parts of sports photography. Each sport is different and the games have their own flow of action. Photographers want to be where the action is going, not where it has been. Each sport generally offers a ton of options as far as where a photographer can stand.
Personal knowledge of the sport, as well as the teams being photographed is especially helpful. Photographic knowledge is only half of the battle when shooting sports. When a photographer knows a team’s tendencies, and even individual athlete’s tendencies, he can anticipate the play, as well as reactions and get something special from it. Shooting the same team repeatedly makes this easier. The added bonus is that the team also gets to know the photographer, making them more comfortable and willing to be open in front of the camera, in much the same way people open up to their friends.
Post originally from: Digital Photography Tips.
Check out our more Photography Tips at Photography Tips for Beginners, Portrait Photography Tips and Wedding Photography Tips.
Catching The Action: Photographing Youth Sports


Digital Photography School


