Blog

  • Understanding Natural Light Part 2: Color of Light

    Light has different Properties, and by understanding those differences and using them in your favor, you can become a better image maker.
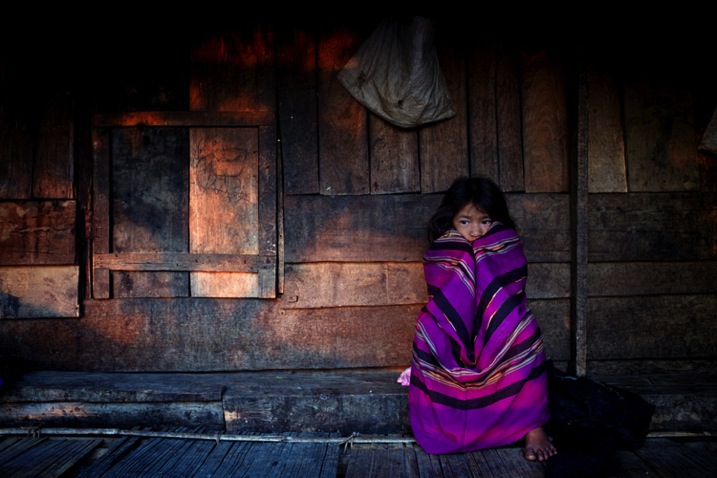
    Gold1

    Golden light of late day, mixed with cool light in the shadows.

    Chapter Two: Understanding color in natural light

    In this chapter, we will:

    • Explore how color can affect the viewer’s emotional response.
    • Understand how the color of natural light changes throughout the day.
    • Learn how to mix light colors to create depth.
    • Practice using exercises.

    Please note that as a portrait photographer, I will be discussing portraits and using them as examples. However, this knowledge applies to any type of photography.

    Color as a visual storytelling element

    What we perceive as color is actually our brain’s interpretation of light reflected off objects and transmitted to the brain via our optic nerves. Under the field of color psychology, a range of studies have shown that colors can deeply affect how we experience the world around us, from the taste of the food we eat, to how we respond to new brand packaging on supermarket shelves. Colors affect how we feel, and this is precisely why understanding color is so important to you as a photographer.

    There are many ways you can control or change the colors in your images, such as by editing, with the use of filters, or adjusting the White Balance. But as we are here to discuss natural light, so let us delve deeper into understanding how to create an emotional response by using the right color of natural light.
    Mix2

    Because color is an amorphous concept (we all see colors slightly differently), there is a standard way to define color tone; this is called color temperature. We will not discuss the technical definition of color temperature for two reasons: first, it will make you very sleepy and second, it will not make your photos better. The important thing to know about color temperature is that it is a standard that is measured in degrees of Kelvin (now you understand what the “K” symbol means in your White Balance menu). Color temperatures below 4000K are considered warm (red and yellow) and color temperatures above 4000K are considered cool (blue).

    Plan your shooting time

    In the previous article, Understanding Natural Light Part 1: Quality of Light, you learned to forget the concept of good or bad lighting, and think in terms of suitable or less suitable. It is your responsibility to shoot under the most suitable light for the visual story you wish to create, and this concept applies to the color of light as well. Now, let’s get familiar with how the color of the light changes throughout the day.

    Blue Light (about 11000K)
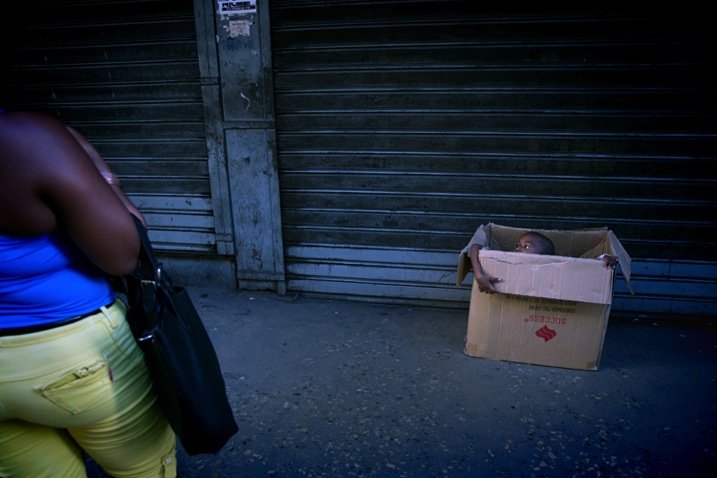
    Blue light

    • When: Before sunrise and after sunset.
    • Common emotional effect: Glum and mysterious, with a sense of coldness.
    • Take it to the next level: If you are in an urban environment, try mixing the natural blue light with the artificial orange light from street lamps to create an amazing color combination and depth (which will be later explained).
    • Please note: Due to the low level of light during this time of day, pay close attention to your shutter speed to avoid blurry images.

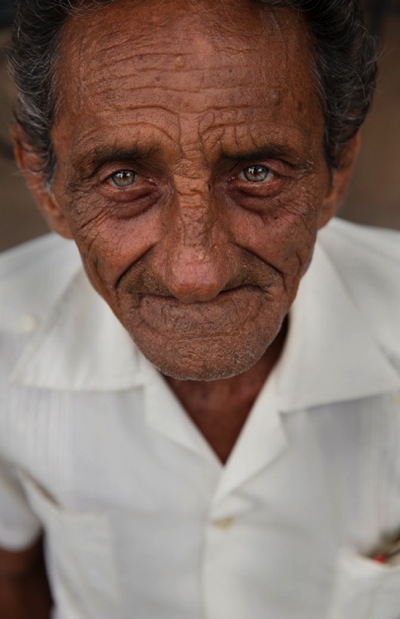
    Golden Light (about 3500K)

    • When: It depends on your location on earth, but golden light is usually around sunrise and sunset.
    • Common emotional effect: Praised by photographers as the golden or magic hours, with soft, pastel-like warm colors of red and yellow. Portraits and landscape images will seem almost magical.
    • Take it to the next level: By standing higher than your subject, shooting from an angle of 45 degrees, you can achive a wonderful catch light (a spark of light in the eyes of the subject) due to the reflection of the sky in the subject’s eyes. (see image below)
    • Please note: As with any type of magic, you need to be swift and efficient. Plan your daily schedule carefully. For example, if you want to shoot during the golden light of sunrise, you must get up early. Very early.
    Gold2

    Midday Light (between 5000-6500K)

    • When: It depends on your location on earth, but usually from one hour after sunrise until one hour before sunset.
    • Common emotional effect: This light seems neutral in color to the eye, even though it’s considered a cold color in terms of Kelvin degrees. The contrasts caused by midday light will amplify objects’ colors. So, vibrant objects will seem even more vibrant and vice versa.
    • Please note: You can enjoy the amplifying benefits of midday light without the harshness if you place your subject indoors near a window.

    Mid day

    Cloudy Day (about 7000K)

    • When: When the sky is heavily overcast.
    • Common emotional effect: Similar to that of blue light with a glum, winter-like feeling, but stronger and brighter, allowing you to work with faster shutter speeds.
    • Please note: The biggest benefit of working on a cloudy day is the continuity of color tone throughout the day. This means there’s less pressure on you to work as fast as possible, as you would need to do at other times of the day, like the golden hours.

    Clouds1

    Mixing colors

    You can achieve very satisfying results by mixing cold with warm color tones. For example, by placing warmer colors in the foreground and colder colors in the background, you can add volume and depth to make an interesting image.

    You can do this by either working during the border of two periods of the day, or by mixing natural and artificial light.

    Working during the border of two time frames

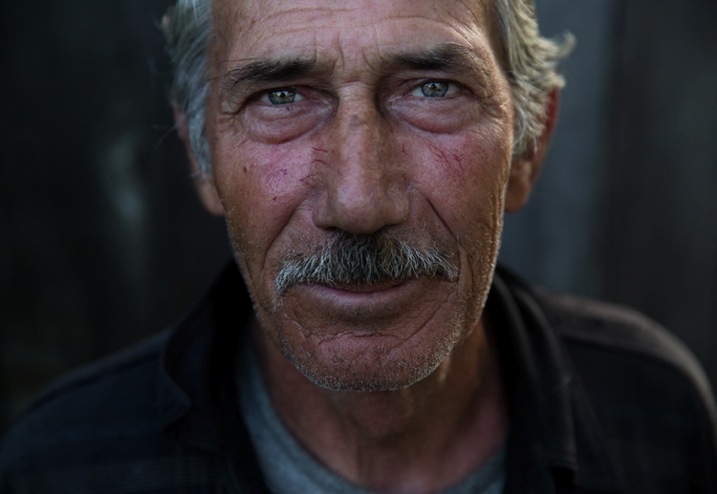
    For example, if you choose to shoot at dusk, which I heard National Geographic photographer William Albert Allard refer to as the “The time between dogs and wolves”, you can combine the warm colors of the golden light, with the cold colors of the blue light. Here is an examples:
    Mix1

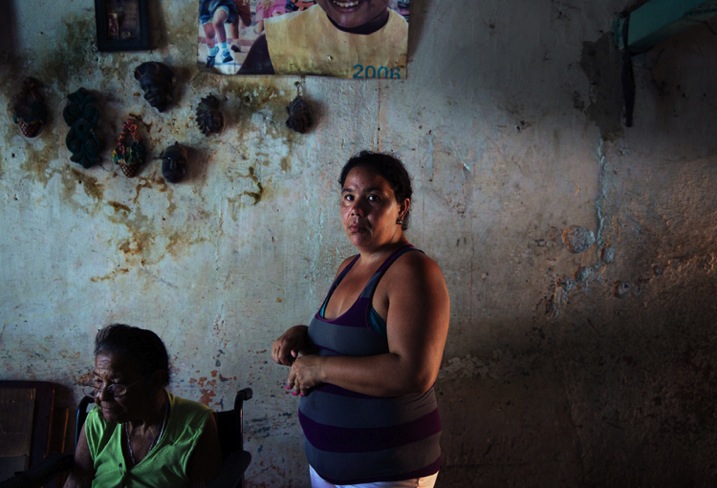
    Mixing natural and artificial light

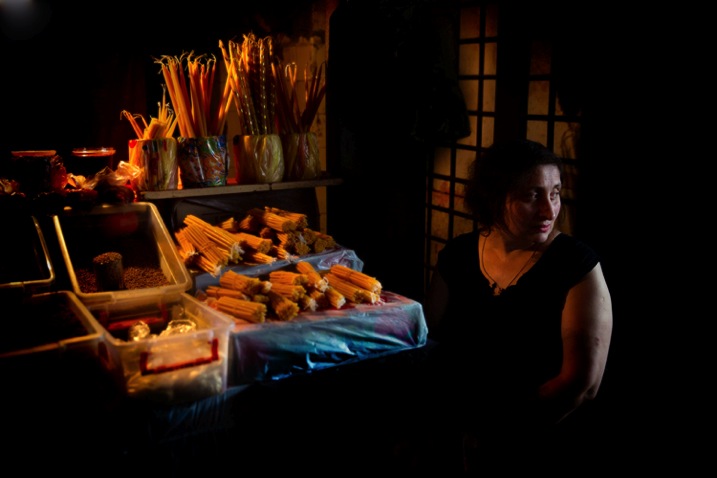
    If you choose to mix light sources, the sky’s the limit. In this image: on one side (camera left), this lady was illuminated with the warm orange light of the shop’s light bulbs and on the other, with the blue cold light of a cloudy day (camera right).
    Mix3

    Or in this image where I mixed the warm natural light of fire with the blue artificial light from the projector in the background.

    Mix4

    Exercise #1: Study other photographer’s work

    Search the web and gather 20 images from your favorite photographer. Analyze his or her color choices:

    • Are there themes or common colors choices?
    • What is the light source: natural or artificial?
    • Are there specific time frames when this photographer works (golden hour, midday, etc.)?

    Exercise #2: Shoot with the wrong White Balance

    To make it short, White Balance is how you help your digital camera create a more accurate representation of the colors in your image. By telling your camera the lighting conditions (cloudy, sunny, flash, etc.) you help the camera adjust to neutralize the color balance in the image.

    For this exercise, I will ask you to go to the White Balance menu in your camera and shoot with the wrong setting. For example, if it’s a sunny day, choose the Cloudy setting, which will make your photo look much warmer. Or shoot in the Tungsten or Incandescent setting to make it really cool.
    F11A9441

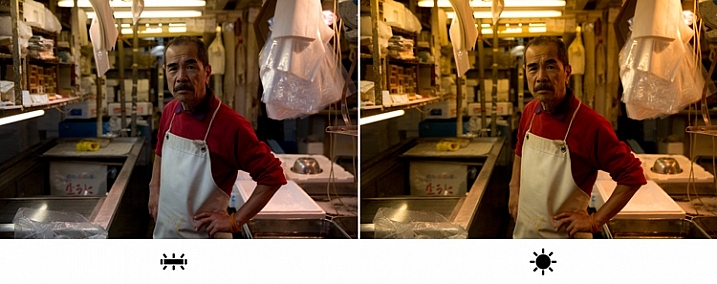
    I took this image in Tokyo’s Fish Market, under the white light of Fluorescent. On the left image, I went for the Fluorescent white balance preset, which is indeed more faithful to the original lighting situation in the market. But, on the right image, I selected the “wrong” white balance ( daylight preset), which made the image much warmer, in color and feel. Which one is better in your opinion?

    If you are shooting in the RAW image format as opposed to JPEG, the White Balance setting is not that relevant, as you can easily change it in post-processing. This is one of the characteristics of RAW files. But this exercise allows you to understand how, by intentionally changing the image’s color tone, you can create different and interesting emotional effects using color.

    The author would like to thank Nicholas Orloff for his assistance in writing this article.

    googletag.cmd.push(function() {
    tablet_slots.push( googletag.defineSlot( “/1005424/_dPSv4_tab-all-article-bottom_(300×250)”, [300, 250], “pb-ad-78623” ).addService( googletag.pubads() ) ); } );

    googletag.cmd.push(function() {
    mobile_slots.push( googletag.defineSlot( “/1005424/_dPSv4_mob-all-article-bottom_(300×250)”, [300, 250], “pb-ad-78158” ).addService( googletag.pubads() ) ); } );

    The post Understanding Natural Light Part 2: Color of Light by Oded Wagenstein appeared first on Digital Photography School.
    Digital Photography School

  • 6 Tips for Protecting Your Gear from Any Hazard and Being Prepared

    There is no such thing as a magic camera, lens, filter, flash, or tripod that does it all – hence the variety of brands, focal lengths, composite materials, etc., that are available is endless. Actually, part of the fun is not just having what you need, but sometimes what you want. Like something different, even though it doesn’t have the best reviews and specs by others, or something to experiment with, to broaden your creative horizons.

    Tiffany Joyce

    By Tiffany Joyce

    But, there is one thing we all must consider when going out for a shoot, and that is what to bring, or even more importantly, what NOT to bring. Oh that agonizing decision of going through the pros and cons of each widget you could bring. There countless variables depending on personal tastes, what you will be shooting, and how long you will be on your photo shoot, just to mention a few.

    There is one constant though, stuff goes wrong, things break, bags get lost, and it is not always easy to get a replacement in time, or even at all. Most of us don’t have sponsors who pay for our gear, and that last lens you just picked up was a financial hardship (that you were happy to endure). So, there are some simple pieces of advice that I have picked up from my own stupid mistakes, and from others, professionals and avid amateurs alike, which might save you and your gear in a pinch.

    There are many articles on, what’s in my bag, and while it is fun to see what others are doing, the real question is what should you be doing? How much of everything do you want, and what specifics are you really going for? Do you want to bring your best gear, or will something more average do just fine with much less worry? Here are some tips for protecting your gear and being prepared for anything.

    001 UV filter

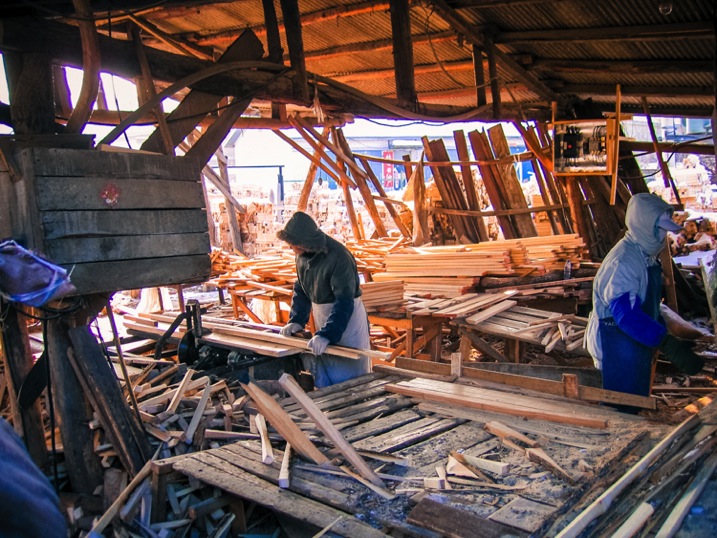
    In the far NE of China this longing village was cutting down full trees, and making them into dowels to be shipped to the US to make hammers. With all the flying wood chips and dust, a UV filter was added protection.

    1 – UV Filters

    Better than me telling you the answer here, you can google, “Should I Use a UV Filter on my lens?”. You will find results galore, and many varying opinions. But, let me show you a picture and it may just persuade you to use one.

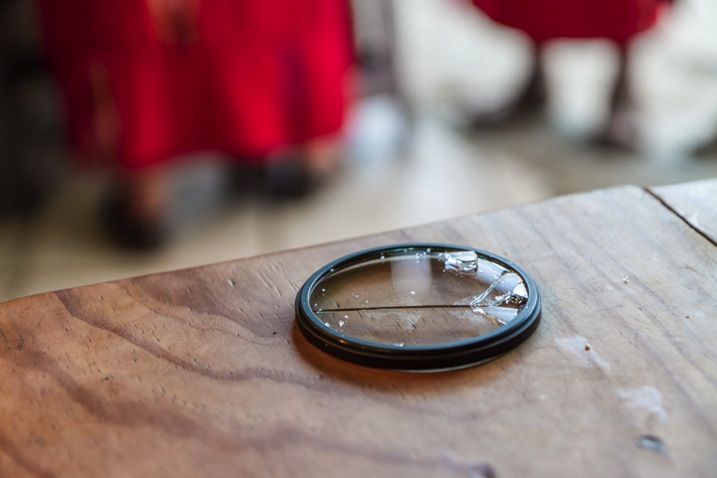
    My lens hood was on, but I had just turned it backwards to save space while I was going to eat. My lens cap was also on. Sitting down on a street market bench to indulge, I brushed the lens cap pinching the hinges just enough that the cap popped off. Then, as momentum carried me down, a steel bench post smashed into my camera and I heard glass break. My heart sank, as horrible thoughts of my lens dying raced through my head.

    It could have been my front lens element, but it wasn’t! It was my $ 35 UV filter, not my $ 900 dollar lens. For casual use, keep a UV filter on! If it breaks like mine did, a circular polarized filter can be a great backup too. Just don’t forget to turn it, to make sure you are getting the best out of your filter.

    002 UV filters

    This is the glass that broke and saved my front lens element. I was in a small mountain town in central Guatemala with no possibility of replacing the lens.

    2 – Lens Hoods

    When I generally think of my lens hoods, image quality is what first comes to mind. Less glare, less flair, better saturation and contrast, etc. Sometimes the tulip hoods look nice on a lens, so cosmetically it can be pleasing as well. But they do add significant length, and even when screwed on backwards, not protruding outwards, they increase the diameter, especially on larger lenses, making it tough to cram into your travel bag.

    Recently, in Cuba I ran across another amateur photographer, and one of his first comments after exchanging pleasantries was, where is the hood for your lens? The 70-200mm f2.8 IS is a big lens, and making it 25% longer while trying to not impose on subjects, was my deciding factor for leaving the hood at the hotel. I replied, “I have my UV filter on.” He quietly said to me that he was a glass engineer, and he politely suggested, with total altruistic intention, to keep my lens hood on. It has been on ever since.

    Protection value is even better than a UV filter and image quality improvements are worth it!

    003 lens hood

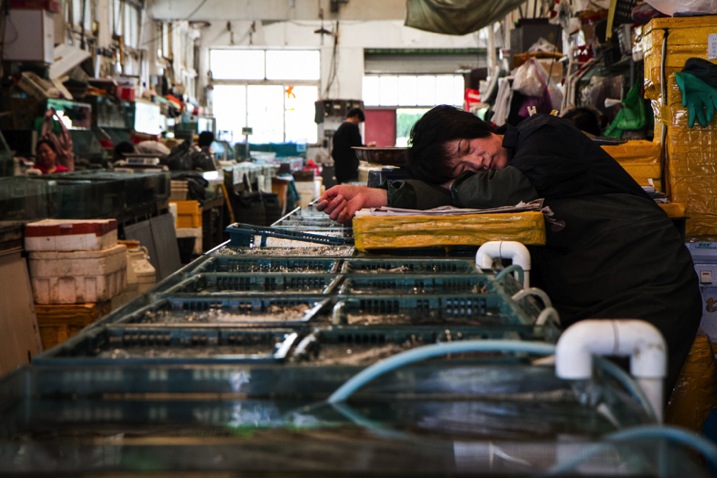
    In a seafood market in a coastal city in NE China, squirming fish, spitting clams and twitching shrimp will definitely get salt water on your lens. Only a UV filter would leave you with water spots, but a lens hood helps keep the salt water off of the front element.

    004 lens hood and UV

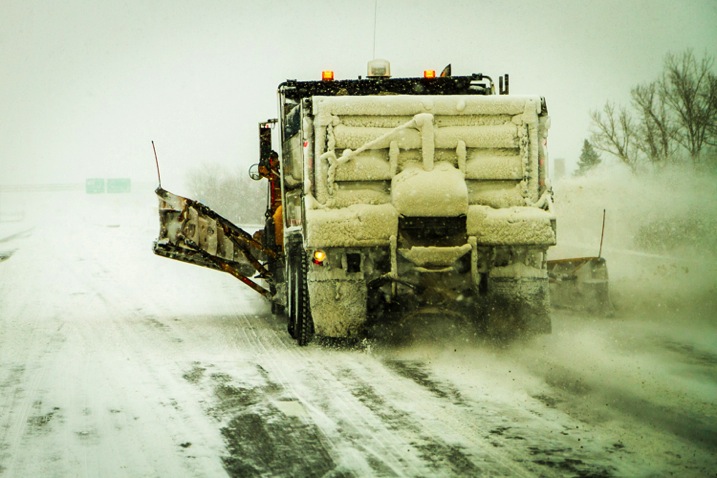
    In New York State during the 2015 super snow year, following this plow, that lays gravel and salt, with my camera out the window is dangerous for a front lens element. Having all the protection of a lens hood and a UV filter is important to protect your gear.

    3 – Lens Cap (front and rear)

    The little lens cap: This one goes out to amateurs more than the enthusiast. If you are not shooting, keep your lens cap on. This is a very good line of defence for your front lens element. A doctor doesn’t examine a patient without protective gloves, nor should a photographer leave his lens exposed, while enjoying carnival rides or waterfalls. Keeping your lens protected is most important, but clean is essential as well.

    Also, if you are switching lenses, keep an extra cap for the back of your lens in your bag. They are all the same size, unlike the front lens cap, so if you lose one it is no big deal as one size fits all. Cleaning dust, dirt, hair or oil from the inside of the lens is a nightmare.

    4 – Extra things to think about when travelling

    Access to your camera shop or online retailer is not possible when you’re away from home. Maybe your favorite online shop could overnight you something in any developed country, but outside the US, Canada, and some parts of Western Europe, you are out of luck.

    UV filters can be found at many small electronic stores at a 20% markup or so, but the sizes available may be limited. Kit lenses these days usually have a 58m or 67mm thread size, and maybe you might get lucky if they have a 72mm filter. Anything in the 77mm or higher range will be near impossible to find. Underdeveloped nations don’t have the ability to hold stock for the occasional guy who smashed his fancy gear, (that which could feed a whole village for a week). Thus, don’t bring more, simplify. Think how you can adapt if something breaks? Like using a polarized filter or an ND filter if your UV filter bites the dust. Using an ND filter and bringing your tripod might just help you broaden your portfolio for the trip; a little blessing in disguise.

    5 – CF cards

    It used to be no film, no picture. Now it is no memory, no picture. Recently, I was in Central America and one trip got cancelled, and another one came up. It was a photographer’s delight, Cuba! I didn’t have my computer, and didn’t want to plug my gear into a sketchy internet bar computer. The solution in a developed country is to just stock up on a few more CF cards.

    The reality is that in developing markets CF cards are not available. Finding a name brand CF card that will have 30mb/second or more, is near impossible. Developing nations are still using basic point and shoot cameras, if they have any at all, and even more popular are mobile phones with mini SD’s in them. SD cards are abundant, along with mini SD cards with adapters, but that does you no good for the higher end DSLRs. CF cards are relatively cheap and tiny compared to lenses, camera bodies and flashes. Stuff a couple extra in your bag.

    IMG 9188 bw

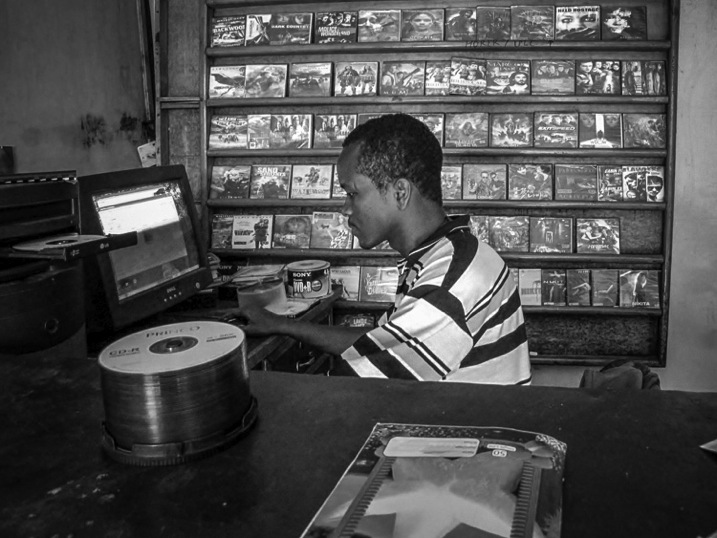
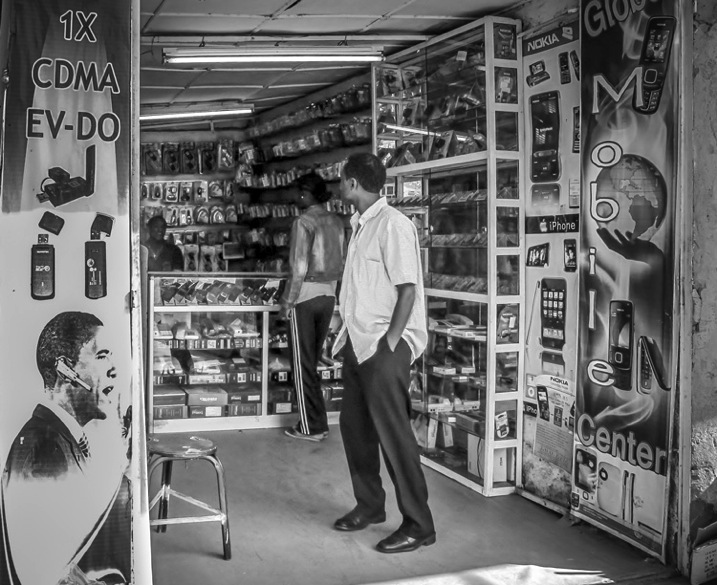
    In northern Ethiopia this was the one of two stores that carried electronic goods. Most items are mobile phone related.

    Getting into other parts of the world, like SE Asia and China, both of which are still in the developing stage, you will find much better luck. CF cards are available, and SD cards are going to be much cheaper. UV filters will also be available for any size. If they don’t have them in that store, ask them to get you one by the end of the day, and they will call up partner stores and send them over on the back of a moped. But you know the catch, it might not be real despite how legit it looks. In a bind, strike a deal, and you will have solved your solution at least temporarily.

    006 Electronic store 2bw

    This was my second option for electronics. A desktop computer which was used for burning pirated movies and music. No possibility of finding higher end camera supplies.

    6 – The Lens Pen

    A final item that is a must is the lens pen. These are so compact, and convenient, to keep your front and rear lens elements clean. Make sure you use the brush first, then the moistened concave end for smudges. Ideally you would have air to blow off the lens first, but don’t use your mouth. No matter how careful you are particles of your saliva will appear on the lens giving you double duty. The lens pens are tiny and do wonders. Keep one in your bag, and one in your pocket, so you can get up close and personal to the crashing waves, market activity, or the big sports event. By the way, these lens pens can be found all over the world now. Grab a couple before you go, but if you lose one, or give one away to a local photographer, you may be able to find another.

    Bottom line

    So, when you are off on your next photo shoot, be prepared. You can’t anticipate everything, but even combined, all of the items on this list could easily fit in your pant’s pocket. Put all of them in a sturdy Ziploc bag, and you just added another element of protection. Wrap your camera or lens in the bag in really treacherous situations.

    These tips provide a pretty good insurance policy for keeping your gear safe, and in proper working condition. Keeping your gear protected in harsh environments lets you focus on your creative ability to see and capture your favorite photographic styles, and do it with confidence too. Now, you still need to decide what major pieces of gear you want: super wide angle lens, telephotos, primes, single flash or multiple flashes, tripod, and the list goes on.

    But be sure you have your UV filters screwed on, your hoods attached, your front and rear lens caps, and some extra memory, along with the most portable and simple cleaning lens pens.

    What essentials do you have in your bag when you leave for a long photo shoot out of your home range?

    googletag.cmd.push(function() {
    tablet_slots.push( googletag.defineSlot( “/1005424/_dPSv4_tab-all-article-bottom_(300×250)”, [300, 250], “pb-ad-78623” ).addService( googletag.pubads() ) ); } );

    googletag.cmd.push(function() {
    mobile_slots.push( googletag.defineSlot( “/1005424/_dPSv4_mob-all-article-bottom_(300×250)”, [300, 250], “pb-ad-78158” ).addService( googletag.pubads() ) ); } );

    The post 6 Tips for Protecting Your Gear from Any Hazard and Being Prepared by Branson Quenzer appeared first on Digital Photography School.

    Digital Photography School

  • Brief aus der ruhigen Stadt

    © Kate Smuraga

    Ein Beitrag von: Kate Smuraga

    Hallo, mein lieber unbekannter Freund! Oh, es ist schwer, ehrlich zu sich selbst zu sein. Um meine Geschichte zu erzählen, muss ich ganz vorn beginnen.
    kwerfeldein – Fotografie Magazin | Fotocommunity

  • Fujifilm’s latest financials show strong sales of Instax products, shrinking sales of digital cameras

    It’s the season for pre-holiday financial earnings reports, and Fujifilm’s latest numbers tell a familiar story – digital camera sales are down on the whole, with steady sales of higher-end products. Despite that, Fuji’s imaging solutions division saw an increase in operating income, up to 12.4 billion yen in the first half of the financial year, marking a 2.7x improvement year-on-year. Read more

    Articles: Digital Photography Review (dpreview.com)

  • How to Create a Surreal Look in Photoshop Using Hue Adjustment

    When you start learning photoshop it is scary to see all those different tools you can choose from. It is often said there are seven ways to achieve the same results, using different tools in photoshop. So, it means you have to find the one that suits you perfect, in order to give to your pictures the look that you want.

    In this article I want to show you how you can change colors in your pictures using Photoshop. This is a very easy method that you can use, either you are a beginner or you are a more advanced user.

    You could add a surreal twist to your images, or remove colors you do not feel like comfortable working with (I am sure we can all relate to this, because as artists we have our favorite and least favorite colors- the ones we struggle to work with!). You can use this technique for anything from changing the color of a dress or any other prop, to changing the forest tones to enhance the autumn feeling, or creating it if you want to create an autumn picture even though it is still spring.

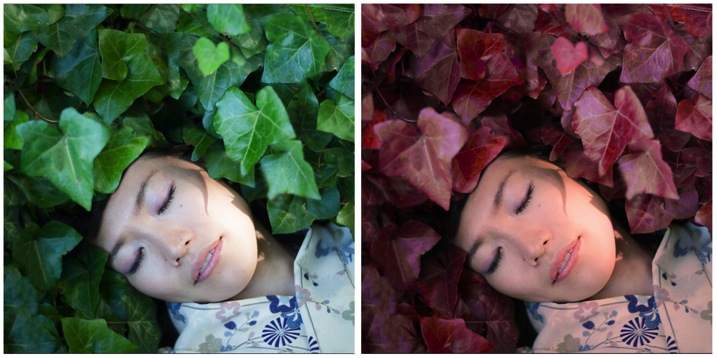
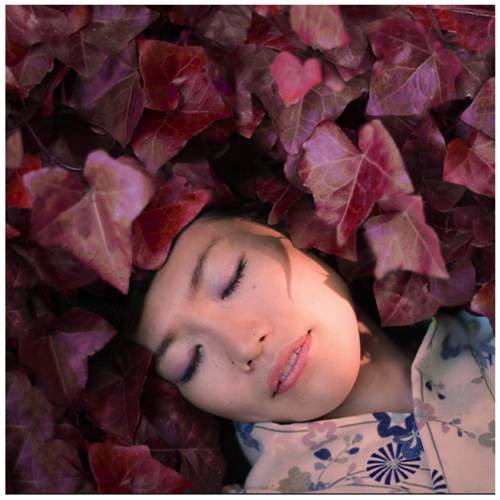
    This is the before and after color change:

    Picture01 before after

    Create a color adjustment with Hue/Saturation

    You can get to the Curves dialog in two ways:

    1. Image adjustment: By choosing Image > Adjustments > Hue/Saturation or Click the Hue/Saturation icon in the Adjustments panel.
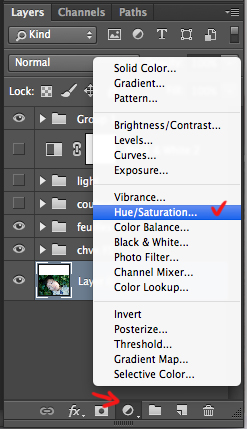
    2. As an adjustment layer: Layer > New Adjustment Layer > Hue/Saturation, or in your layers panel use the shortcut: New adjustment layer> Hue/Saturation.

    Picture02 new adjustment layer shortcut

    I strongly recommend working with layers. It allows you to come back to the adjustment and to erase it, or modify it, as many times as needed. Especially when you make big changes, you may want to be able to have full control. Layers can be scary at the beginning, but trust me, they will become your best friend once you overcome this fear.

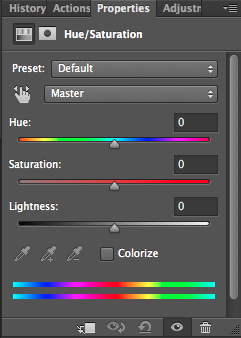
    Creating a new layer you will have the following Hue/Saturation dialog box:

    Picture03 HueSaturation dialog box

    Select the color you want to change.

    The more different you want your original color to be, the more important this selection is so that the color change does not affect areas do not want to shift. Removing a general color cast is usually a very light change. But, a total different color requires you to be more careful when selecting, and sometimes require several color adjustments.

    When your object has a very clear color – as to say all red, one red tone – it is easy. When your object has different color shades it is tricky but not impossible.

    In this case we are changing the color of ivy leaves, with different tones of green, blue, and even yellow.

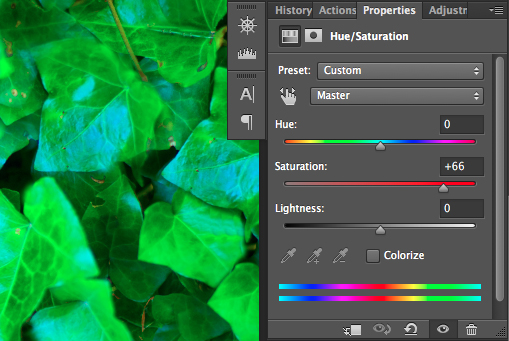
    First step: Make the color selection:

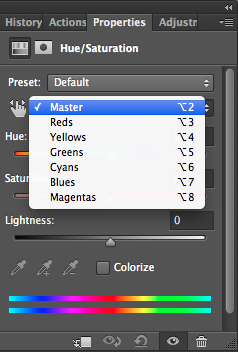
    You can choose Master to adjust all colors at once, or one of the other preset color ranges listed for the color you want to adjust (reds, yellows, greens, cyans, etc.).

    Picture04 Master or preset color

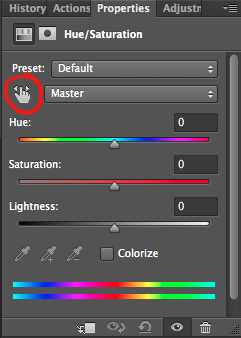
    Or you can also choose the Targeted Adjustment Tool (the little white hand) – this is the easy way to select color if the area/object you want to change is a mix of several color tones.

    Picture06 On image adjustment tool

    Click on the Targeted Adjustment Tool and put your cursor on your image, the eyedropper tool appears. Drag it on your image, and click on the color tone you want to select.

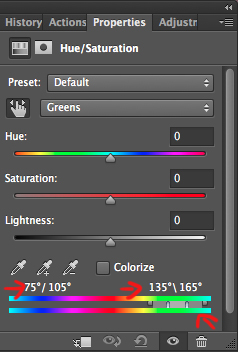
    Picture05 color values

    Four color values appear in degrees in your properties panel. If you click again, you change the selected colors.

    Second step: Refine your selection

    To check your selection, grab the saturation slider and move it to the right to increase saturation. The idea here is to see what you have selected, and make sure you have the right colors, therefore helping you adjust the selection. For example, when editing a portrait, you want to make sure it doesn’t affect the skin tones of your subject. If editing a forest you want to make sure you have selected the leaves, but not the tree trunks (or anything in the background).

    Picture07 increase saturation to check selected colors

    As you can see there is still a lot of blue of the leaves, that is not included in the selection. To add those blue tones you will drag the adjustment sliders to expend your selected colors, and change the color value (appearing in degrees in your properties panel).

    There are four sliders. The ones in the middle allow you to expend or shorten the selected color ranges. The two sliders on both sides are to adjust the range of color and fall-off. Play with those sliders until you find a good selection. Don’t worry if it’s not perfect, you can still make a second hue/saturation adjustment layer, or mask this layer.

    Third step: Change the color

    In your properties window, drag the hue slider to the left or right depending on the new color tone you want to give to your selection. Then you can play with adding or removing saturation by dragging that slider either way.

    Picture01 after

    Learning to use hue/saturation will give you more creative options when editing your images in Photoshop. Share any images that you’ve changed the color on, or any other methods you use for doing this technique.

    googletag.cmd.push(function() {
    tablet_slots.push( googletag.defineSlot( “/1005424/_dPSv4_tab-all-article-bottom_(300×250)”, [300, 250], “pb-ad-78623” ).addService( googletag.pubads() ) ); } );

    googletag.cmd.push(function() {
    mobile_slots.push( googletag.defineSlot( “/1005424/_dPSv4_mob-all-article-bottom_(300×250)”, [300, 250], “pb-ad-78158” ).addService( googletag.pubads() ) ); } );

    The post How to Create a Surreal Look in Photoshop Using Hue Adjustment by Amélie Berton appeared first on Digital Photography School.

    Digital Photography School

  • Blooming Street Lights: Giant Flowers Interact with the City

    [ By Steph in Art & Street Art & Graffiti. ]

    flower lights 1

    Step beneath these massive red flowers in Jerusalem’s Vallero Square and they’ll bloom before your eyes, offering light after dark and shelter from the rain. The interactive installation by HQ Architects reacts to pedestrians and traffic, their crimson textile petals filling with air when motion is sensed nearby.

    flower lights 2

    flower lights 3

    Standing 30 feet tall in two pairs on opposite ends of the square, the flowers can be seen from afar, providing an eye-catching visual for visitors to a busy nearby market. In addition to functioning as public art and street lights, the flowers provide cover to commuters getting on and off the tram.

    flower lights 4

    flower lights 5

    flower lights 6

    flower lights 7

    When the square is full of action, the flowers billow, creating a sense of movement. They go still when all is quiet late at night, their petals closing. An air compressor is built into the top of each one. Named the ‘Warde Project,’ the installation is part of an effort to revitalize a square that felt a little shabby. [Photos by Dor Kedmi]

    Share on Facebook


    [ By Steph in Art & Street Art & Graffiti. ]

    [ WebUrbanist | Archives | Galleries | Privacy | TOS ]


    WebUrbanist

  • 7 Benefits of Doing Microstock Photography

    I have to confess, it took me a while to get myself to do the exercise of actually sitting down and filtering through my old photos, to find those suitable to submit to a microstock agency to start selling. Finally, I did it, but boy how I wished I did it much earlier, back when I heard about microstock photography, the very first time.

    DPS 1

    But wait a minute, what’s microstock?

    Unlike large stock photo agencies like Getty, microstock agencies are where photographers can license their photos to be sold as royalty-free images. This means buyers can use the photos they bought, without having to pay a royalty (or licensing fee) every time they use them. I won’t get into much detail on this, as you’ve probably heard of thing called “Google” by now, go ahead and read more about it.

    For us as photographers, what are the real benefits to selling our work as microstock? Below are seven benefits from my own experience. However, you may find even more benefits yourself. So here we go:

    1. It improves the overall quality of your photography

    The reason for this is simple: Microstock agencies have strict guidelines for accepting submitted photos, in order to maintain quality. Guess what that means? Yep, you will have to actually put some efforts into taking those photos.

    Every microstock agency is different, but generally speaking, things like noise, bad composition, bad lighting, weird color cast (wrong White Balance), out of focus, and blurry are pretty common reasons of rejection. This will definitely keep you on your toes as a photographer, and will force you to pixel peep your images carefully before submitting them. If that’s what the reviewers do, why waste time submitting a photo that won’t get approved? I can’t tell you how much it improved me as a photographer.

    DPS 2

    2. It pushes your creativity to new levels

    There comes a point as you go through a microstock website, searching for similar photos when you think, “oh man, is there any idea that’s not thought about already?” This will make force you to actually brainstorm more creative ideas, to come up with images that no other contributor has submitted yet. Do I have to tell you how drastically this will improve your overall photography thinking process? Forget stock, this trains your eyes to see differently, and your brain cells to sprint a little harder.

    3. It makes use of unused photos

    While some shots you will need to purposely take for stock, others are just what you can find in your archives. If you are anything like me, you probably have hundreds, if not thousands, of unused photos laying around, taking up more disk space, let alone backup drives and cloud services. While these extra hard drives and backup services are becoming cheaper every day, the cost still adds up with time. It won’t be long before you realize you have terabytes of RAW and JPEG files, not to mention the hassle of fiddling with many hard disks.

    DPS 4

    Have you ever thought about putting your unused photos to a good use? Well, you know the saying, “One man’s trash is another man’s treasure”. You won’t believe how many of those photos can be used by others. They could save someone’s day somewhere on this planet. So, instead of keeping them buried down in the hard drives, dust them off, polish them a little, and if you think they meet the criteria, put them to a good use. Who knows, they might end up paying for their own recurring cloud backup expenses.

    4. It gives your hobby a purpose

    Hobbyist or not, you are likely into photography because it’s what you love to do. If you are not a pro who is getting paid to do photography, justifying staying up late editing your photos to your non-photographer spouse, or explaining slowing down on that family dream vacation to your kids, can be a little too difficult to do.

    DPS 5

    Let’s be honest, this is an expensive hobby, so selling your photos to microstock agencies is probably the easiest way to not only make a few extra bucks on the side, but to add a goal and purpose to your photography. On the other hand, if you are a pro, I’m sure those extras shots that you couldn’t sell and don’t need anyone’s approval to use, will hold some commercial value, so why not?

    5. It is as demanding as you want it to be

    Selling your photos as microstock is, well, almost like running your own mini-business, minus all the struggles that come with a full-blown business, while keeping some of the advantages. As is the case with running your own business, it’s up to you how much time and effort you want to pour into it, and subsequently, how much return you will get. The good news is, you can speed up or slow down as conveniently as you want. You are in complete control of the process, especially when this is not your main income. What’s not to like about it?

    DPS 6

    6. It can bring you satisfaction and fame

    Have you heard of Google Images search? Once you started selling your photos, go ahead and search on Google using one of your images and see for yourself where, and how many times those photos of yours are being used. Your mind will be blown away by the places that your photo might end up. Don’t be surprised if a friend one day sends you a snap of a famous magazine with your photo beautifully used in it. Go ahead and brag about that to your heart’s content, use it to your advantage, and show the world that you have published work.

    7. It gives you a little bit of extra cash on the side, almost indefinitely!

    I kept this for last for two reasons:

    1. I didn’t want you to just focus on the money part and miss the other amazing benefits.
    2. I wanted to keep the best for last! Not only will selling your photos as microstock make you a better photographer and bring you satisfaction, it will also give you a few extra bucks on the side.

    Did you notice how I bolded and underlined the word “few”? Unless you have a big team of professional models, makeup artists, wardrobe artists, and are doing this as your main job, you will probably not make that much money, because after-all, microstock agencies in general don’t pay very much. For instance, as a contributor to shutterstock.com, I only get paid 25 cents per download. Don’t get me wrong, I’m not complaining, in fact, if you think about it, this is only per download per image. If you have enough high quality images, with high commercial value, you will soon witness the numbers add up.

    DPS 7

    To put things in perspective, if those few extra bucks at least pay the cloud backup charges instead of draining you, or give you some extra cash to buy some accessories online, then this whole thing is very much worth it. Here’s the good news, your portfolio will continue to grow over time and with that, your photos will continue to bring you cash during your sleep almost indefinitely.

    Why almost, you ask? Well, because some photos may go out of style, or will be overused by so many designers, blogs, and publications, so you will need to keep updating and adding more photos to your portfolio to keep it fresh. This should keep the income flow somewhat steady, if not improve it over time, especially when you start to analyze and learn the ins and outs and what sells more than others.

    Conclusion

    I wish I had someone open my eyes to these benefits a long time ago – so here you go, I hope I’m opening yours. If you are already a microstock photographer, or can think of other benefits, I would love to hear and discuss them with you in the comments section below, maybe you will open my eyes to something I’ve not seen before myself.

    googletag.cmd.push(function() {
    tablet_slots.push( googletag.defineSlot( “/1005424/_dPSv4_tab-all-article-bottom_(300×250)”, [300, 250], “pb-ad-78623” ).addService( googletag.pubads() ) ); } );

    googletag.cmd.push(function() {
    mobile_slots.push( googletag.defineSlot( “/1005424/_dPSv4_mob-all-article-bottom_(300×250)”, [300, 250], “pb-ad-78158” ).addService( googletag.pubads() ) ); } );

    The post 7 Benefits of Doing Microstock Photography by Momen Khaiti appeared first on Digital Photography School.

    Digital Photography School

  • Manfrotto and Lastolite brands combine and launch new Speed-Lite softbox and Perspective Backgrounds

    The accessory brands Lastolite and Manfrotto, both of which are owned by the Vitec Group, have combined to form the new brand ‘Lastolite By Manfrotto’. The new brand name will eventually encompass the entire Lastolite product range, but for now it includes a new version of the Ezybox Speed-Lite softbox for hotshoe flash units and three new scene-painted backgrounds. Read more

    Articles: Digital Photography Review (dpreview.com)

  • Ugly Architecture: 15 of the World’s Most Hideous Buildings

    [ By Steph in Architecture & Offices & Commercial. ]

    ugly architecture elephant 3

    Some buildings are so ugly, the only thing that could possibly improve them is a wrecking ball. It’s even worse when the structures are high-profile and expensive, making you wonder how many people who had to sign off at each stage of planning and construction actually thought to themselves, “Yes, this looks good.” Here are 15 examples of astonishingly ugly architecture that only a mother (or rather, the designers responsible) could love.

    The Rock, Wellington International Airport, New Zealand
    ugly architecture the rock

    Perhaps this addition to the Wellington International Airport by Warren and Mahoney was designed to resemble a robotic cockroach in order to remind us of what will rise up and take our places on earth once we’ve succeeded in making ourselves extinct.

    Renmin Ribao Building, Beijing, China
    ugly architecture penis building

    Beijing’s ‘penis building’ aka the headquarters of the communist People’s Daily newspaper has drawn wonder and incredulity from local residents, as well as worldwide notoriety. But the building will soon be sheathed, as the architect decided to give it a makeover after all the backlash. There’s probably a joke about state-sponsored journalism in there somewhere.

    Frank Gehry’s Australian Blunder
    ugliest buildings gehry 1

    ugliest buildings gehry 2

    “The building so ugly, it has to wear a paper bag” is Frank Gehry’s first project in Australia, inspired by a mashup of Sydney architecture and a treehouse. The curving structure was created using 320,000 custom-designed bricks.

    ArcelorMittal Orbit Sculpture, London, England
    ugly architecture arcelor mittal

    ugly architecture arcelor mittal 2

    Famed artist Anish Kapoor teamed up with engineer Cecil Balmond to create a sky-high tower in London that looks like a tangle of junk you pulled out of a drawer in your garage. The ArcelorMittal Orbit is a 376-foot-tall sculptural observation point overlooking the Queen Elizabeth Olympic Park.

    The Elephant Building, Bangkok, Thailand
    ugly architecture elephant building 2

    ugly architecture elephant building
    Shaped like Thailand’s national animal, the Elephant Building in Bangkok is a 32-story mixed-use complex housing condos, offices and a language school.
    Next Page – Click Below to Read More:
    Ugly Architecture 15 Of The Worlds Most Hideous Buildings

    Share on Facebook


    [ By Steph in Architecture & Offices & Commercial. ]

    [ WebUrbanist | Archives | Galleries | Privacy | TOS ]


    WebUrbanist

  • 2. November 2015

    Das Bild des Tages von: no/st

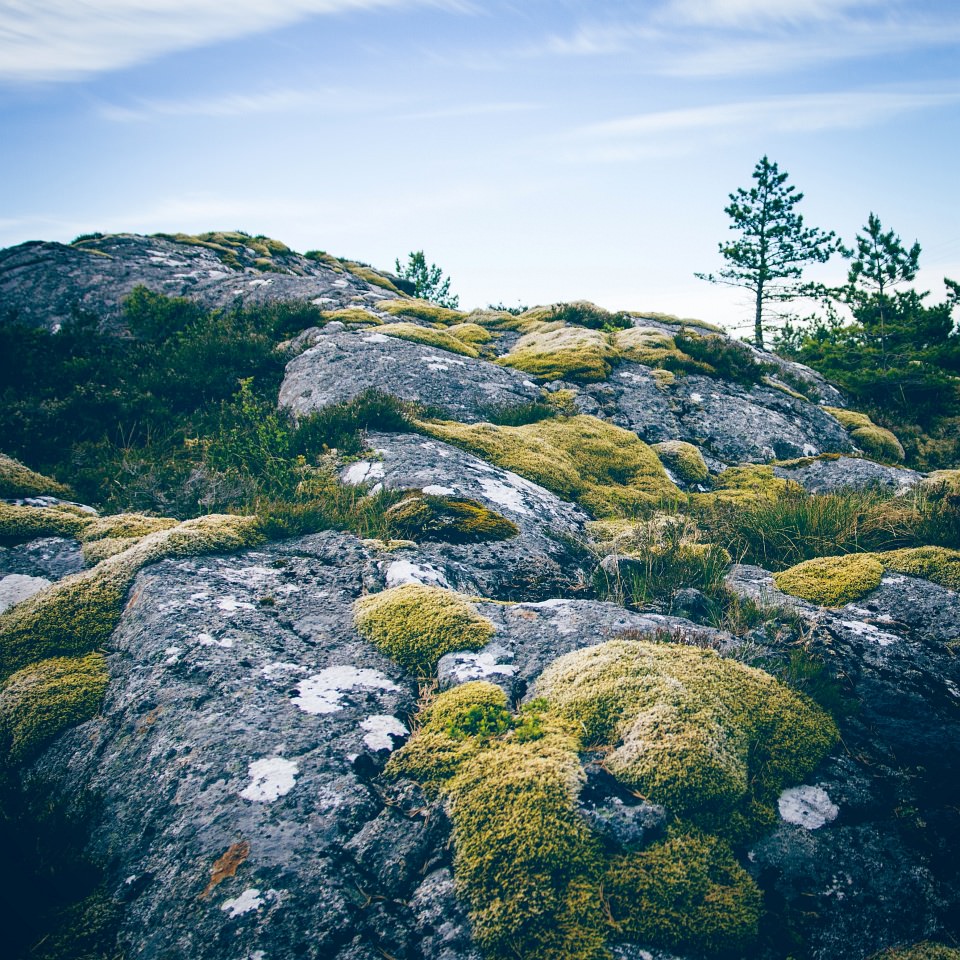
    Landschaft mit moosbewachsenen Felsen.

    Im Ausblick: Analoge Fotografen, eine Kriegsfotografin und Künstler auf Instagram.
    kwerfeldein – Fotografie Magazin | Fotocommunity