Blog

  • Kayaking the White Salmon river with Rush Sturges and the Panasonic Lumix DC-S1H

    The Panasonic Lumix DC-S1H is a powerful video camera, designed for enthusiast and professional filmmakers.

    A more specialized tool than the DC-S1 and S1R, the S1H is packed with video-centric features including 4:2:2 10-bit internal shooting, 400Mbps recording and unlimited record time, plus a wide range of compression and high-speed shooting options. Featuring a stabilized 24MP sensor, the S1H can shoot video at up to 6K. But really, this is a 4K powerhouse, intended for serious professional use.

    Join cinematographer and lifelong kayaker Rush Sturges as he takes the S1H to the White Salmon river, to see what it can do.

    S1H sample images by Rush Sturges

    $ (document).ready(function() { SampleGalleryV2({“containerId”:”embeddedSampleGallery_3236969856″,”galleryId”:”3236969856″,”isEmbeddedWidget”:true,”selectedImageIndex”:0,”isMobile”:false}) });


    This is sponsored content, created with the support of Amazon and Panasonic. What does this mean?

    Articles: Digital Photography Review (dpreview.com)

  • PhotoPlus announces it’s going digital as it cancels its in-person expo this year

    PhotoPlus announced this morning it is canceling its in-person event, opting instead to host its annual photo conference online due to the COVID-19 pandemic.

    PhotoPlus 2020 was originally set to take place at the Javits Center in New York City from October 22–24. Despite numerous other photo conferences being canceled, PhotoPlus insisted the in-person event was still taking place, until today. In a press release, event director Joseph Kowalsky said:

    ‘The difficult decision was made after consulting our community partners and supporters and closely monitoring the ongoing progression of the COVID-19 pandemic in the U.S.’

    To replace the in-person event, PhotoPlus announced PhotoPlus+, which will be an ‘online experience and community bringing together visual storytellers with the tools and services they need to create.’ The event is designed to be a broader event, with product showcases, live demos, gear launches, networking events and more taking place starting November 1, 2020.

    You can find out more information and register for the online PhotoPlus+ event on the PhotoPlus website.

    Articles: Digital Photography Review (dpreview.com)

  • A New Adobe Lightroom Update Just Deleted Customers’ Photos and Presets

    The post A New Adobe Lightroom Update Just Deleted Customers’ Photos and Presets appeared first on Digital Photography School. It was authored by Jaymes Dempsey.

    new lightroom update mobile

    Last week, Adobe released Lightroom 5.4.0, a routine update meant for the iPad and iPhone Lightroom app.

    But it soon became clear that the update was far more than users bargained for when customers who installed Lightroom 5.4.0 found that their photos and presets had disappeared.

    Lightroom users immediately reported their situation on forums, explaining the data loss and asking Adobe for help.

    One user wrote, “After the automatic update to Lightroom mobile 5.4…my whole library is lost.” Another wrote, “I can’t believe I lost 2+ years of edits due to the Lightroom mobile update.”

    Note that presets were also affected; a Redditor explained how, upon launching Lightroom, “Not only were most of my photos gone, but also hundreds of my presets, some of which I worked on for the past couple of years.”

    Adobe soon issued Lightroom 5.4.1, as well as an official response:

    Some customers who updated to Lightroom 5.4.0 on iPhone and iPad may be missing photos and/or presets. This affected customers using Lightroom mobile without a subscription to the Adobe cloud. It also affected Lightroom cloud customers with photos and presets that had not yet synced to the Adobe cloud.

    A new version of Lightroom mobile (5.4.1) for iOS and iPadOS has now been released that prevents this issue from affecting additional customers. 

    Installing version 5.4.1 will not restore missing photos or presets for customers affected by the problem introduced in 5.4.0.

    We know that some customers have photos and presets that are not recoverable. We know how frustrating and upsetting this will be to people affected and we sincerely apologize.

    Some customers affected by this issue might be able to use iPhone and iPad backups to recover photos and presets.

    Many users were understandably upset upon learning that their photos and presets were unrecoverable. It seems that much of the data is gone forever, though a few users did manage to regain some or all of their missing data via device backups.

    While it’s deeply frustrating that Adobe would make such a mistake, this error hammers home the importance of having multiple backups of your photos at all times. I recommend having at least three, including at least one physical backup (e.g., an external hard drive), as well as a cloud-based backup. And, once you have the backups, you must update them regularly; it’s the only way to ensure that your precious images stay safe!

    Now over to you:

    Were any of you affected by this Lightroom update? If so, were you able to recover your images? And for those who weren’t affected, do you plan to change your image backup practices? Share your thoughts in the comments!

    The post A New Adobe Lightroom Update Just Deleted Customers’ Photos and Presets appeared first on Digital Photography School. It was authored by Jaymes Dempsey.


    Digital Photography School

  • Dealer’s Choice: It’s new card time. Is that such a bad thing?

    If you buy a new high-end camera, you’ll probably have to stock up on new memory cards. And card readers. CFexpress Type A is one of the options, but will it take off, or remain an expensive outlier?

    It’s sometimes hard to recognize when life’s been treating you well until things take a turn for the worse. Like it or not, we’re not returning to the halcyon days you may have taken for granted at the time.

    I’m talking, of course, about memory card formats. But you knew that, right?

    For much of the last ten years, the SD card has held sway over most cameras’ card slots. Its dominance has never been absolute, Compact Flash held on in the higher end until the short-lived CFast and XQD formats usurped them, but the chances are that the camera you had ten or fifteen years ago took SD cards and the one you use now does, too. The days of xD, Memory Stick and multiple flavors of Smart Media seemed to be in the past.

    An interesting side-effect of this hegemony is that many of us have forgotten what it’s like to have to buy new memory cards (and readers) every time we buy a camera. As if picking a brand (or, more sensibly, a lens system) wasn’t hard enough, the next time you upgrade you may also have to commit to a new media format, with no guarantee that the format will last beyond that next camera body.

    A comparatively short life: neither XQD and CFast (the latter mostly used in pro video cameras) have shown much longevity compared to the venerable SD and CF formats.

    New cameras, new formats

    But change does appear to be here, with both Canon and Nikon settling on the same high-end media format (CFexpress Type B) for the first time in eight years. Meanwhile, in its latest camera, Sony has opted for the similar-sounding but physically incompatible CFexpress Type A.

    There are advantages to this: CFexpress is based on a much faster interface than current SD cards, and the cards themselves are more physically durable. But, as is usual with electronics, ‘faster’ plus ‘new’ does not equal ‘cheap.’

    Oddly unnecessary

    What’s interesting (and I may be using that word entirely inappropriately), is that the move to CFexpress isn’t strictly necessary.

    CFexpress is based around the use of PCIe 3.0 NVMe technology, an interface used for computer SSDs. But the Secure Digital Association has set out a version of SD based on the same technology. It’s even mapped out a PCIe 4.0 version which could theoretically hit 4 GB/s (the maximum currently promised by CFexpress).

    However, SD Express is two generations ahead of the UHS-II cards and slots that are only now becoming common on cameras, and would only be backward compatible at UHS-I speeds. It’ll be interesting to see whether brands such as Fujifilm, Leica and Olympus will skip UHS-III entirely to adopt SD Express, or whether they too will jump aboard one of the CFexpress trains.

    A little legacy support

    All of the manufacturers using these cards seem keen to accommodate existing card owners: Canon by providing an SD card slot alongside CFexpress B, Nikon and Panasonic by continuing to support XQD as well as CFexpress B and Sony by designing slots that can accept either SD or CFexpress A cards. But in all instances, you need to adopt the newer format to squeeze the most out of the new cameras (in many instances, it’s video modes that require the faster card types, perhaps the one concrete example of video features adding to photographers’ costs).

    No more making do

    On the plus side, the move toward new card formats reduces the temptation to try to make-do with those older, slower cards you’d already bought. No more winging it to see if your particular U3 card can reliably maintain the sustained 90MB/s read/write of an actual V90 card, just because it says ‘300MB/s’ on the front. No more hiccoughing continuous bursts because you grabbed a 10-year old Class 1 ‘Extreme’ card as you left the house.

    So yes, there’s every chance you’re going to have to dig a bit deeper next time you buy a fancy new camera. New cards, new card readers, perhaps at rather inflated prices if you jump in too soon. But think about it, how much have you spent during the lifetime of your camera on SD cards you’ve lost, that have become corrupted or have broken just enough that they won’t eject properly anymore?

    What’s holding you back?

    Look at it this way: it’s a great way of being certain your camera is able to work to its full potential, and aren’t a lot of us buying more camera than we need, to ensure it’s never the factor holding us back? And with the three biggest camera makers settling on variants of CFexpress, there’s only a slight risk that you’re investing heavily in the next xD or Memory Stick.

    Articles: Digital Photography Review (dpreview.com)

  • A Non-Techie User Guide to Installing GIMP Plugins

    The post A Non-Techie User Guide to Installing GIMP Plugins appeared first on Digital Photography School. It was authored by Ana Mireles.

    Have you heard all about how GIMP is free and open-source, but you’ve struggled to embrace the program? Well, I was like that at first; that’s why I decided to make this guide on installing GIMP plugins from one non-techie to another.

    GIMP supports third party plugins

    My first few attempts to use GIMP were quite off-putting, and when I tried to install a plugin I ended up completely frustrated. But now I actually prefer GIMP to Photoshop for certain edits. Hopefully, this article can save you some time and turn you into an avid GIMP user, as well.

    What is open-source software?

    When a developer builds software, they write lines of text in a specific programming language. This forms the software’s source code.

    In commercial software, this code is protected by copyright. You have to pay a license to use such a program, and you can’t change it in any way.

    Instead, an open-source program can be used, modified, and distributed by anyone. Also, most of the time it is free. Sounds great, right?

    GIMP is open source

    Well, it is. That’s why everybody keeps telling you GIMP is amazing because it’s “open source.” On the other hand, GIMP is not as user-friendly as other programs. So you might need some time to get used to it. Here’s an introductory guide to get you started.

    What are plugins?

    A plugin is an add-on that gives more functions to a program. It can be a filter, a tool, or a library that isn’t included in the original source code. As a result, the software gets more powerful and gains more capabilities.

    installing GIMP plugins GIMP features

    Commercial software has plugins, too (Photoshop, for example).

    Since we are already talking about expanding the capabilities of software, scripts are another essential add-on to be aware of. You’ve probably heard of Photoshop actions and Lightroom presets, both of which are scripts.

    Well, GIMP has scripts to automate processes and save you time and effort. So while you might find GIMP to be somewhat basic at first, once you start adding plugins and scripts you’ll see that it really has a lot to offer.

    Where can you find GIMP plugins?

    This is where it starts to get more tricky. Because neither GIMP nor the plugins are made by one developer, there isn’t a website that you can go to find a list with links.

    GIMP's plugins are no longer in registry installing GIMP plugins

    There used to be one registry that held all the plugins, scripts, images, and files, but it’s not active anymore. Fortunately, in this day and age, you can find anything just by Googling.

    As you know, search engines like Google will show you a lot of results; some of it can be outdated, other results can even be a virus, so be careful with what you download.
    Here are some tips to make your search more efficient:

    Look for tutorials

    Start by searching for guides or tutorials on what you want to do, for example: “How to do Content Aware Resizing in GIMP?”

    These results will give you suggestions for different plugins that have this functionality, and often they’ll even share the link so you can download it. Since you know that the recommendation comes from a plugin user, you know it’s safe and you can also see if it’s what you’re looking for.

    Always look at the date the recommendation was published and click on the most recent suggestions. If you find an article that’s too old, you might not find the plugin anymore, or the plugin may not be compatible with your GIMP version.

    Look for reviews on blogs

    There are tons of websites that make lists and reviews about these kinds of things. You can search for “The best plugins of this year for GIMP.”

    This way, you’ll also find safe downloads and you don’t have to worry about the plugins being useful. If they weren’t, they wouldn’t be on such a list, right?

    Installing GIMP plugins

    Download your file

    Once you find the plugin you want, download it to your computer. I’ll use the Resynthesizer plugin as an example, which you can download here. Please keep in mind that you need to find the right file for your operating system. Everything you see here is done on a Mac.

    Downloading and installing GIMP plugins

    Resynthesizer downloads in a zip file, so double-click on it to extract the files. Leave this Finder window open. You’ll need it again in a moment.

    Find GIMP’s plugin folder

    Now open GIMP. Click on the GIMP menu and choose Preferences. This will open a pop-up window.

    In the left column, find the Folders menu and click on it. This will display all the folders that hold GIMP’s information, so just look in there for the one called Plugins.

    Find the folder with the plugin resources. It should be called something like this: GIMP-2.10.app/Contents/Resources/lib/gimp/2.0/plug-ins.

    Of course, the GIMP version may be different for you; mine is 2.10.

    Find the folder for installing GIMP plugins

    Now click on the square button in the top right of the window. If you hover on top of the button, it should say Show file location in the file manager. This will open the folder that contains the plugin files.

    Copy the plugin to GIMP

    Now you should have the two folders open:

    On one side, the Finder window with the folder of the plugin you downloaded.

    On the other side, the window you just opened from GIMP with the folder that contains the plugins.

    Select the files from the new plugin and drag them into GIMP’s plugin folder.

    Copy-Paste files for installing GIMP plugins

    Restart GIMP

    That’s it. Now you only have to restart GIMP to find the new tools ready for use.

    In the case of the Resynthesizer plugin, it adds the filters Enlarge & Sharpen, Heal Selection, Heal Transparency, Sharpen by Synthesis, and Uncrop.

    GIMP's resynthesizer plugin installed

    Conclusion

    That’s it. As you can see, installing GIMP plugins is basically a copy-paste operation, so it’s really not as complicated as you might think.

    The only hassle is finding the right files and locations. With the tricks I showed you in this article, it will hopefully get easier.

    In the end, it’s worth the effort.

    Now over to you:

    Share in the comments your experiences with GIMP plugins, as well as any plugins or scripts you recommend.

    The post A Non-Techie User Guide to Installing GIMP Plugins appeared first on Digital Photography School. It was authored by Ana Mireles.


    Digital Photography School

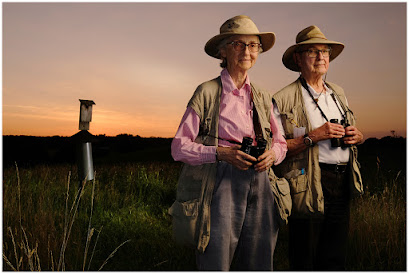
  • SLC-2L-13: Shoot Through Your Sunset

    Whenever you have control over the time of day in which you'll be shooting a location portrait, always remember that the hour that wraps around sunset will offer you at least five different lighting environments in which to work. 

    And for today's portrait of birders Jo (left) and Bob Solem, we're going to use three of them. 

    Read more »
    Strobist

  • Video: Scientists records insects taking flight at 3,200fps

    Dr. Adrian Smith, an Assistant Professor at North Carolina State, has shared an incredible slow-motion video on his YouTube channel Ant Lab that showcases various insects taking off for flight at 3,200 frames per second (fps) with a Phantom Miro LC321s.

    To keep the video interesting, Smith opted to record ‘the weird stuff.’ In other words, rather than bees, house flies and more common insects, Smith chose less-photographed bugs. Specifically, the video covers (in order): plume moth, firefly, painted lichen moth, leafroller moth, rosy maple moth, common stonefly, mayflies, fishflies, aphid, scorpionfly and lacewing.

    In addition to the incredible visuals throughout the eight-and-a-half minute video, Smith also shares facts about insect flight and discusses the different flying mechanisms different insects use. Smith also shared the following tweet showing off what gear he used to capture this video.

    You can find more insect videos from Smith on his Ant Lab YouTube channel and follow him on Twitter.

    Articles: Digital Photography Review (dpreview.com)

  • 13 Tips for Improving Outdoor Portraits

    The post 13 Tips for Improving Outdoor Portraits appeared first on Digital Photography School. It was authored by Guest Contributor.

    Outdoor portraits present portrait photographers with a variety of challenges and opportunities. Today, James Pickett suggests 13 tips to help you with your outdoor portrait work.

    13 Tips for Improving Outdoor Portraits

    When I bought my very first digital SLR, there was a sigh of relief. Everything was going to be so much easier, and I wouldn’t have to think anymore.

    You know the scenario: You pull the camera out, charge the batteries, go for a walk around the house and down the street, taking the same pictures you have taken every time a new camera came into your life.

    “This is great,” you think to yourself. “This is going to make my life so much easier!” I was wrong. In fact, I was dead wrong.

    There are three very simple things that improve all photography, including portraits. To this day, there is no trick I have found that replaces the need for proper exposure, white balance, and sharp focus.

    1) Never select all of the focus points for portraits; pick one

    When you pick the autofocus option that allows the camera to select focus points, you are doing your portraits a terrible disservice.

    This feature of a camera is usually designed to pick whatever is closest to the lens and focus there. In some cases, like with my 1DS Mark III, the camera will choose a cluster of focus points and make a “best guess” based on averaging the distance between all of the chosen points. Using one focus point gives you, the photographer, ultimate control.

    2) Always focus on the eyes

    The eyes are the windows to the soul and should be the focal point of any good portrait. Not only are the eyes the most important part of a good portrait, but they are the sharpest element on the face and should be left that way.

    When you are shooting with a wide aperture value and you’re focused on the eyes, the lens’s bokeh will aid in softening the skin, as well.

    13 Tips for Improving Outdoor Portraits

    3) Shoot wide open for shallow depth of field

    There are quite a few reasons to invest in a fast lens capable of wide aperture values; the most common is for shallow depth of field.

    If you can shoot at ƒ/2.8 or ƒ/4, you should use it. Most fantastic natural light portraits are from wide aperture values, and it is all because of the wonderful smooth background blur we call “bokeh.”

    4) Never, ever shoot a portrait at less than 50mm; try to stay at 70mm or higher

    The last thing you want to hear from a client is “Why does my head look swollen?”

    Any focal length below 70mm can distort your subject. However, it doesn’t become very noticeable until you are below 50mm. The compression effect of a telephoto lens will also increase the blur of bokeh. Most of my portraits are done between 120mm and 200mm.

    5) Always shoot in RAW

    These words have bellowed from my mouth a thousand times, and they will surely come out a million more. Raw is an unmodified compilation of your sensor’s data during the time of exposure. It is your digital negative. When you shoot in JPG format, everything but what the image processor needs to make a shell representation of the image you intended to capture is stripped away. For every edit you make to a JPG, you lose more data. With RAW, you can make a vast range of edits before creating the JPG.

    How can this make you portrait better? Think about the last time your white balance was set incorrectly and you tried for hours to remove the color cast, only to destroy the image with every attempt. RAW would have saved you by allowing you to fix the color before opening the image for retouching.

    6) Always bring a gray card or a piece of a gray card for white balance

    Gray cards aren’t free. However, $ 5.95 US for a cardboard Kodak gray card is darn close. To avoid confusion, I am going to explain this backward. When opening Adobe Camera Raw or any other RAW image editing application, there is always a way to select a custom white balance. Usually, it is an eyedropper of some kind that you can use to click on what you think is neutral gray in your image.

    Imagine a world where your photoshoot involved 4 locations and a total of 800 images, and all day the camera was set to Auto White Balance. That is 800 different white balance values, a post-production nightmare.

    If at each location you have your subject hold the gray card on the first shot, you will save hours of work. When you open images from the first location in your favorite post-production application, all you have to do is click the eyedropper on the gray card, select all the photos, and synchronize the rest. Precious hours will be saved.

    (If you plan on taking your time, it may be wise to do this once every 30 minutes or so to compensate for the changing light of day.)

    7) Shoot in the shade (avoid direct sunlight)

    Direct sunlight is harsh, makes your subject squint, and creates hard directional shadows and unpredictable white balance conditions. When shooting in the shade, there are no more harsh shadows, only smooth, milky shadows created by your subject’s natural features. With proper exposure and white balance, you can make these shots look amazing.

    8) Shooting carefully on an overcast day.

    Nature’s softbox is a giant blanket of clouds. A good heavy blanket of cloud cover can help you enrich your colors, and make some very smooth and pleasing shadows.

    9) If you must use hot, hard, bright light…

    Always try to control the direction, use some kind of reflector, and try to mimic a studio light. Putting the sun directly behind your subject isn’t a good idea, unless you are trying to make a silhouette.

    When the sun is at my back, I have the subject look off-camera (away from the sun) and get very nice results. Another great trick is to wait for a cloud to move in front of the sun; this usually creates a very bright-yet-contrasted look.

    13 Tips for Improving Outdoor Portraits

    10) Use an existing reflector

    For example, my guess is that about 75% of the delivery trucks on the planet are white. These big, white delivery trucks can make amazing fill light reflectors as long as they weren’t painted with an off-white. (A yellow tint can change the white balance in your shadows.) Picture framing outlets and craft stores always have medium-to-large-sized pieces of foam core lying around that have been left for scrap. They are usually more than happy to part with these scraps and, if not, chances are that there are pieces by the dumpster.

    11) Learn the sunny ƒ/16 rule

    Why?

    So you have a baseline for proper exposure in your mind to work with if no other tools are present.

    The sunny ƒ/16 rule states that on a sunny day, with your aperture value set to ƒ/16, your shutter speed will be the inverse of the current ISO speed. For example, if your camera is set to ISO 100, and your aperture value is ƒ/16, your shutter speed will be 1/100th of a second. On a cloudy day (or when in the shade), you simply use ƒ/8 instead. If you own an incident light meter or gray card, use either for the most accurate exposure instead.

    (Note: the procedure for metering exposure with a gray card is not the same as a custom white balance.)

    12) Bring a sheet and a few spring clamps from home

    Leave the expensive 200-thread-count sheets on the bed. You already got them? Well, go put them back. You know that cheap old sheet you stuck in the corner of the closet to use as a drop cloth the next time you paint? Go get it.

    (Another option is to buy the cheapest low-thread-count white top sheet you can find.)

    A queen-sized sheet is an amazing, cheap diffuser. Sort of a seven-foot softbox for the sun. Wrap an edge of the sheet around a branch or clothesline and clamp for a sidelight.

    (Anchor the bottom corners with rocks to keep the sheet from blowing into your image.) Clamp all four corners to anything you can above your subject for an overhead light.

    13) Keep the powerlines and signs out!

    We have already discussed keeping your camera focused on the eyes, but you must also keep the viewer’s mind focused on the image as a whole. Powerlines, signs, long single blades of grass, single pieces of garbage, and sometimes even trees can be serious distractions from the overall focus of the image: the person you are photographing.

    Last, and most important, have a great time shooting! Enjoy what you’re doing, and it will show in your work (as well as in the expression of your subject).

    13 Tips for Improving Outdoor Portraits

    A few bonus tips for shooting on cloudy days

    Clouds are wonderful. They create a giant blanket of natural sunlight diffusion that makes your images rich and powerful. The clouds can fool your mind in ways you can’t imagine, much like your mind corrects for the natural white balance throughout the day.

    When you are shooting on an overcast day, using your camera’s custom white balance is especially important. Every day is completely different for color, and that color depends on two things. First, the time of day; most people understand white balance and how it changes throughout the day. Second, you have to account for all of the wonderful things that light has to pass through before it hits your subject.

    Pollution changes the color of the light from minute to minute. Even if your eyes don’t see it, your camera does. On a cloudy day, pollution particles are being carried around in the sky by tiny water droplets. Now your sunlight is passing through nature’s prism and reflecting off of pollution particles in infinite directions.

    Don’t forget to white balance with that six-dollar piece of cardboard, your Kodak gray card.

    The ultimate secret to shooting on a cloudy day is a compass. (You either tipped your head like a confused Chihuahua or just had an epiphany.) I am an experienced, internationally-published photographer, and rarely can I see where the sun is coming from on an overcast day. The light isn’t omnipresent; it’s just diffused, softened, and scattered. Sunlight on a cloudy day is still directional, and your subject still has a dark side. Use a compass to find out where the sun is, put it at your back, and shoot like mad. Never again will you look at an image after and wonder why the sky was blown out when it was so cloudy, or why the clouds look great but your subject is dark.

    The post 13 Tips for Improving Outdoor Portraits appeared first on Digital Photography School. It was authored by Guest Contributor.


    Digital Photography School

  • DPReview TV: We review six popular photo backpacks

    We compare six of the most popular camera backpacks on the market: the Wandrd Prvke, the Peak Design Travel Backpack, the Shimoda Explore, the Manfrotto Manhattan Mover, the CosySpeed PhotoHiker and the Atlas Athlete.

    Subscribe to our YouTube channel to get new episodes of DPReview TV every week.

    • Introduction
    • Meet the backpacks
    • How much can you pack?
    • Comfort and features
    • The rain test
    • Standing water test
    • Which pack is right for you?

    Articles: Digital Photography Review (dpreview.com)

  • Zhiyun announces Crane 2S gimbal, promising improved speed and precision

    Zhiyun has announced a new handheld gimbal, the Crane 2S. While many modern cameras and lenses offer good stabilization performance, amateurs and professionals alike still flock to gimbals for even more stable handheld video. The Crane 2S includes numerous improvements over the Crane 2.

    The Zhiyun Crane 2S is stronger than its predecessor and can hold video rigs such as the Black Magic BMPCC 6K, Panasonic S1H, Sony A9, Nikon D850 or Canon EOS 1DX Mark II. You can view a full list of compatible cameras and lenses by clicking here. Further, the latest version of the Crane 2S’s Instune Algorithm has been refined to deliver quick and smooth gimbal performance.

    In terms of setup speed, the Crane 2S features a brand new FlexMount System. This system simplifies the setup process while also ensuring that your gear is secure. The system incorporates a double safety mechanism and has a user-adjustable safety lock. If you want to record vertical video, such as for social media needs, the Crane 2S comes with a vertical quick release mount and safety knob.

    Additional features of the gimbal’s design include an upgraded axis locking mechanism, dubbed Axis Locking Mechanism 2.0, guaranteeing ‘zero swinging of the gimbal during traveling or storage.’ To keep the Crane 2S light and strong, the handle is constructed of carbon fiber. The Crane 2S uses 3 removable Li-ion batteries, delivering a total run time of 12 hours.

    The Crane 2S includes six gimbal modes: Pan Following, Locking, Following, Full-Range POV, Vortex and Go mode. The gimbal also includes special modes for aiding in the creation of panoramas, timelapse, motionlapse and long exposure timelapse.

    The Crane 2S supports digital and manual focus control via a built-in focus wheel on the gimbal itself. Zhiyun states that the focus control ability offers improved speed and precision as well, allowing for easier focus pulls when shooting. You can refer to the compatibility sheet linked above to see which cameras and lenses are compatible with the Crane 2S’s focus wheel.

    The gimbal includes a new 0.96″ OLED display, allowing easy control of important settings and simple menu navigation. If you’d like to use a bigger display, the Crane 2S includes a dedicated slot for installing an image transmitter and with Zhiyun’s TransMount Image Transmission System, you can attach a monitor for live monitoring. The TransMount system also allows for the use of various accessories, such as quick setup kits, a monopod, servo zoom and focus motors and more.

    Zhiyun Crane 2S. Shown with Panasonic S1H. Image credit: Zhiyun

    The Zhiyun Crane 2S is available now with the standard package retailing for $ 599 USD. For additional information on the Crane 2S and finding a retailer, click here. Zhiyun streamed a full presentation earlier today for the debut of the Crane 2S. You can view a replay of the stream below.

    Articles: Digital Photography Review (dpreview.com)