Image sharing platform Flickr has announced today its app for the Samsung Gear VR virtual reality headset. It allows you to view the tens of thousands of 360-degree panorama images that have been uploaded by Flickr users in an immersive way that allows for panning by moving your head. Read more
Blog
-
Painstaking Paper Plane: Model Made from 100 Manila Folders
[ By Steph in Art & Sculpture & Craft. ]

It only took 100 manila folders, 50 X-Acto blades, a bottle of glue and 1,000 hours of time to create one 1:60 scale model of a Singapore Airlines A380 airplane featuring fully operational sliding doors and properly folding landing gear. This isn’t Luca Iaconi-Stewart’s first model airplane – the 23-year-old, New York-based designer is known for a series of paper planes with amazingly complex parts.


The artist first started building his own miniatures after finding a highly detailed diagram of an Air India 777-300ER online. He replicated the forms in Adobe Illustrator, printed them onto manila and sliced them out with his X-Acto knife. It took Iaconi-Stewart five years to complete a scale model of a Boeing 777, with an entire summer dedicated to perfecting the seats. While economy seats can be finished in a mere 20 minutes, first class seats take eight hours each.


The new Singapore Airlines model consists of 3,000 pieces of folded and cut paper, the smallest being a 2.5 x 1mm pin used to hold each business class seat together. The artist notes that manila folders are surprisingly strong when engineered correctly.


Considering that Iaconi-Stewart spent a month designing the engines and fourth months assembling them, perhaps it’s no surprise that his classes at Vassar soon started getting in the way, and he ultimately dropped out to focus on full time model-making. He’s now known as the world’s best paper airplane maker. You can follow his creations on Flickr.
Want More? Click for Great Related Content on WebUrbanist:

Paper People: Hand-Cut Zig-Zag Photorealistic Portraits
Tiny slivers are sliced away from a single, oversized sheet of white paper in a zig-zag pattern to reveal portraits of public figures, from Audrey Hepburn to …
Click Here to Read More »»

Magic Circle: Laser-Cut Paper Sculptures Inspired by Nature
An artist known for spending untold hours painstakingly hand-cutting tiny paper sculptures inspired by diatoms, bacteria, viruses, coral and other natural …
Click Here to Read More »»
Macro to Micro: Intricate Paper Cut Art Inspired by Nature
What starts as a scientific study takes on a life of its own, guided only by the imagination of artist Rogan Brown as he transforms a sheet of paper into a …
Click Here to Read More »»


[ By Steph in Art & Sculpture & Craft. ]
[ WebUrbanist | Archives | Galleries | Privacy | TOS ]
-
Sci-Fi Skyscrapers: 14 Futuristic Visions for Vertical Cities
[ By Steph in Architecture & Cities & Urbanism. ]

As the global population grows and the world’s largest metropolises evolve into mega-cities, skyscrapers stretching higher than ever before could hold our transit hubs, parking garages, parks, museums and even food production systems. Some of these concept designs seem feasible for the near future while others could serve as the settings for science fiction.
Light Park Floating Skyscraper

This concept for a floating skyscraper takes a similar tack, reacting to the infrastructure problems caused by rapid, unchecked urbanization by literally having no earthly footprint at all. The Light Park features a helium-filled cap and solar-powered propellers keeping it looming over Beijing like a ghost ship, and it contains parks, sports fields, green houses, restaurants and other public facilities.
Alternative Car Park Tower


With all of its spiraling open levels, this parking garage tower envisioned for Hong Kong seems chaotic and unstructured, but it’s actually a well-thought-out automatic system that automatically sweeps cars from the ground floor to parking spots surrounding a central atrium.
Flex Towers for NYC


An overflowing, overpopulated New York City could be in dire need of new technology to meet energy needs by the year 2040, as designer Paolo Venturella imagines with his ‘Flex Tower.’ This moving skyscraper tilts and rotates itself to follow the sun to perfectly position its envelope of solar panels at all times of the day.
The Tall Tower by Project Hieroglyph

Sci-fi author Neal Stephenson, known for cyberpunk classics like ‘Snow Crash’ and ‘Quicksilver,’ has teamed up with the Center for Science and Imagination to design an incredible 12.4-mile-tall tower capable of launching rockets into space. 24 times the height of the Burj Khalifa, which is currently the world’s tallest building, Tall Tower would scrape the bottom of the stratosphere.
Twin Taiwan Towers


Tangled with lush greenery, these tall, narrow twin towers stretch up to an observatory and sky park looking down over Taiwan. The base is inhabited by a set of museums focusing on the nation’s past, present and future, while the stems contain four different kinds of hanging gardens as well as high-end residences.
Next Page – Click Below to Read More:
Sci Fi Skyscrapers 15 Futuristic Visions For Vertical Cities
Want More? Click for Great Related Content on WebUrbanist:

Vertical Cities: 12 Towers Take Urban Density to the Skies
Taking advantage of virtually endless vertical space within urban centers, entire cities-within-cities could spring up into the skies, packing in thousands of …
Click Here to Read More »»
Towers of Trash: 5000-Foot Junk Skyscrapers to Fuel Cities
Instead of burying our legacy under the Earth’s surface, these structures showcase the impact of the millions of tons of trash major cities produce on an …
Click Here to Read More »»

Vertical Forests: 2 Lush Urban Towers Support 16,000 Plants
Skeptics of improbably green skyscraper concepts might want to take a moment of silence to appreciate the successful construction of these two beautiful …
Click Here to Read More »»
[ By Steph in Architecture & Cities & Urbanism. ]
[ WebUrbanist | Archives | Galleries | Privacy | TOS ]
-
Lightroom plug-in for Pentax 645Z tethered shooting now available

Ricoh has announced a software plug-in for Adobe Lightroom supporting tethered shooting with the Pentax 645Z medium-format camera. Creative Cloud Lightroom subscribers can also take advantage of integration with Lightroom Mobile, making it possible to comment on and adjust photos remotely via the cloud. The Pentax Tethered Capture Plug-In is available now from Ricoh.
Press release:
Ricoh Imaging Delivers Tethered Capture to its Acclaimed PENTAX 645Z Camera
Highly requested software plug-in to enhance the PENTAX 645Z’s in-studio photo-shooting with Adobe® Lightroom® capabilities available today
DENVER, December 9, 2015 – Ricoh Imaging Americas Corporation today announced the immediate availability of the highly anticipated PENTAX Tethered Capture Plug-In for use with Adobe® Lightroom®. The software plug-in enhances the tethered capture capabilities of the PENTAX 645Z medium-format camera by enabling files to easily be uploaded into Adobe Lightroom during a studio session, where they can readily be viewed, shared and edited.
Adobe Lightroom is the digital photo processing and editing software favored by many professional and advanced amateur photographers, making the use of the new PENTAX Tethered Capture software both cost effective and efficient as there is no additional software package to purchase and learn. In addition, with the new capabilities of Lightroom Mobile, uploaded images may be viewed and adjusted by a photographer’s colleagues or clients from any remote location, anywhere in the world.
“Since Lightroom is already the de-facto standard for many photographers to edit and develop their images, this new plug-in is especially welcome. It makes studio use of the PENTAX 645Z camera easier, more efficient and, ultimately, faster than ever,” said Chris Knight, a New York-based portrait photographer. “Using Lightroom, I am able to quickly share photos with my clients, who are even able to view and comment from remote locations.”
Since its launch in June 2014, the PENTAX 645Z camera has been embraced by a wide range of photographers. The PENTAX Tethered Capture Plug-In is being offered to further enhance the user experience, and is a free option that can be downloaded starting today at: http://www.ricohimaging.co.jp/english/support/download_digital.html
Main Features
- The PENTAX 645Z camera supports industry-standard Adobe DNG (Digital Negative) RAW files, which ensures optimal image quality. The in-camera DNG file format effectively eliminates any RAW file incompatibility issues, thus allowing the photographer to confidently import DNG RAW files during a tethered session.
- Adobe Lightroom Creative Cloud users can use Lightroom Mobile to connect to tethered sessions via cloud services to comment and adjust photographs and return those edits to the photographer from anywhere in the world.
- Adobe Lightroom offers an exceptional cataloging system that allows photographers to capture and catalog tethered sessions with confidence.
- The PENTAX Tethered Capture Plug-in for Adobe Lightroom is an easy-to-install, powerful and streamlined tethering solution that allows any photographer to manage their own workflow from capture to output.
- Adobe Lightroom users can download and apply presets to any tethered capture session thus eliminating the need to process every raw file individually.
-
Book Review: The Visual Palette by Brian Matiash
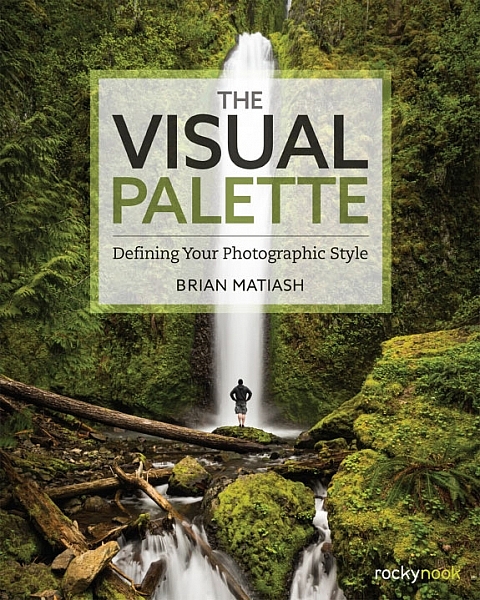
Brian Matiash is a photographer based in Portland, Oregon. The Visual Palette is his first book published by Rocky Nook.
As the title suggests this is not a technical book. It’s aimed at evolving photographers who grasp the basics, but need some guidance in developing the creative side of their photography. The book is divided into three sections – Composition, Post-Processing and Stylization, and Sharing Your Work and Your Brand. Each section builds on the lessons learned in the one before.
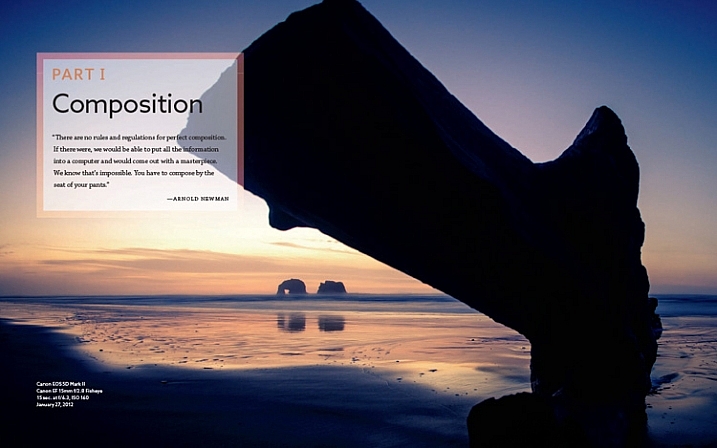
Screenshot from The Visual Palette
The book starts with composition. How you see, compose, and tell stories with photos is a major factor that sets your work apart from another. This section covers techniques like the rule-of-thirds, creating depth and using leading lines, as well as giving tips for photographing familiar subjects and learning to see.
The book continues with post-processing and stylization. This is where you bring further individuality to your work by the style in which you chose to process. It suggests separating photo editing into two distinct skills – post-processing and stylization.
- Post-processing is the preparation work – preparing a clean image that gives an accurate representation of the scene.
- Stylization is the process of adding your own artistic interpretation to the image.
I really like this idea, and think there is a lot to be gained by separating the concepts.
The book covers the tools you can use to achieve both skills. Be forewarned – there is a lot of grungy HDR in this section, and the processing may look a bit over the top for those of you not into this style of photography.
On the other hand, Brian does explain how he has moved from a grungy HDR style to a more natural one over the years – a journey that many photographers will probably identify with.

Screenshot from The Visual Palette
The final part of the book explores the process of sharing your work and building your personal brand. This will appeal to a wide spectrum of readers, from those who simply want to share their photos on Flickr or 500px, to professional photographers who need to build a brand to promote their work. If you haven’t put much thought much into how you share and promote your work, then you will find this section very useful.
Personal stories
As Brian explores the ideas in the book he relates his own experiences, giving you an insight to his thought processes, and his development as a photographer.
It could be argued that dividing the book into three topics results in a lightweight treatment of each. In a way that’s true – if you want to learn more about composition, for example, you would be better off buying a book dedicated to the topic. However, the aim of this book is to give you a primer in each of the areas it covers. You can then follow up by buying a book that explores the topics that interest you most in more depth.
For these reasons, The Visual Palette is more likely to appeal to beginners than advanced photographers.
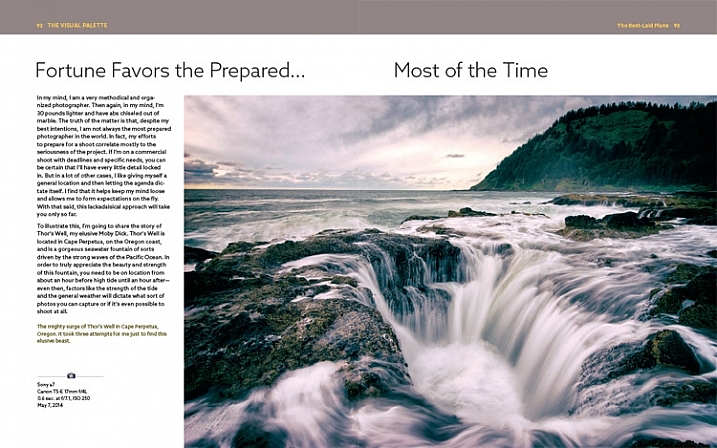
Screenshot from The Visual Palette.
Annoyances and niggles
The review copy was provided in PDF form, and there were a couple of problems that stopped me fully enjoying the experience of reading it.
The first is related to layout. In iBooks or Acrobat Reader (on an iPad) you can only view one page at a time (on a computer you can view page spreads in Reader). Given that the book is designed as a series of double page spreads, and that many photos cross the gutter, this prevented me from seeing the photos properly. You can’t look at, and appreciate the photo, when it is split into two by the formatting. It greatly lessened the enjoyment of the book, and to be honest, put me off buying another ebook from Rocky Nook.
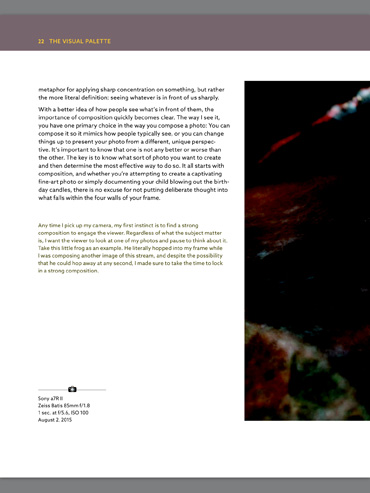
Here’s an example of what I mean. This is a screenshot from iBooks, which presents the pages one at a time. Not good when you have lot of photos that cross the gutter.
The solution would be to format the book especially for viewing on the iPad (and other tablets), so that each page in the PDF document contains a double page spread from the book. ILEX do this already with their ebooks (note: ILEX don’t publish PDF ebooks any more, restricting ebook sales to the Amazon Kindle store), and I’d like to see Rocky Nook follow suit.
It is possible to see spreads in Goodreader, but that brings me to the next point.
The second annoyance relates to color management. Adobe Acrobat Reader is the only PDF reader that accurately displays the colors and tones of the photos in the book on an iPad. However, Acrobat Reader only lets you view one page at a time, so we are back to the first problem.

This screenshot is from Adobe Acrobat Reader. Now we can see the photo with the correct brightness and contrast. But you can’t view two pages together, and the photo is still cut off.
In Goodreader and iBooks the photos are too dark, have too much contrast, and the colors are inaccurate.
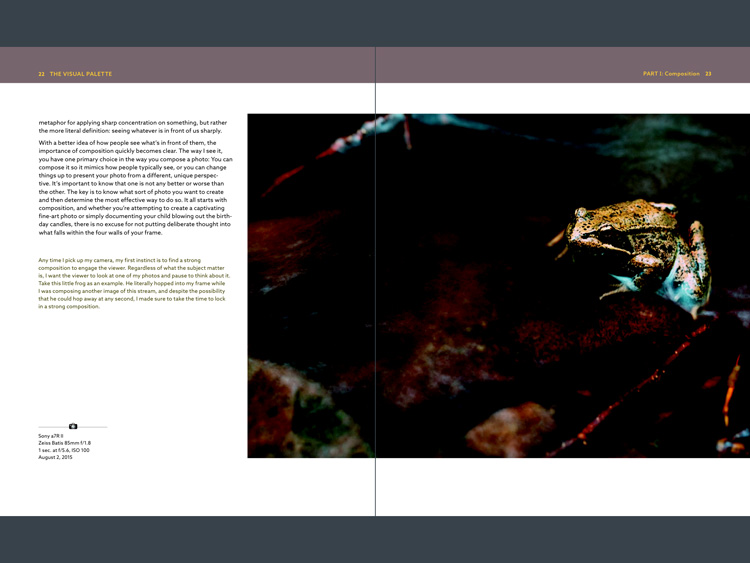
This is a screenshot from Goodreader, which can display two pages together, as the designer intended them to be seen. Great – now you can see the entire photo. But that’s not much use when the photo is too dark to see properly.
I hope someone from Rocky Nook reads this and takes some action to put it right. Anybody who buys the PDF version of this book and tries to view it in iBooks or Goodreader will be disappointed with the quality.
Conclusion
The Visual Palette is well written, well thought out, and full of useful ideas. While little of the content will be new to advanced photographers, most of it will be useful to people starting out.
There are some good photos in the book (and unfortunately a few weak ones), although the heavy-handed treatment of some of them may put readers off who feel that there is a little more to stylization than using HDR techniques. However, if you ignore that, you’ll find a lot of good ideas in the written content.
I’m giving this book three and a half stars for the content. I recommend the printed book over the PDF ebook which is virtually unreadable in its current format.
Given my experience with the PDF version of this book I thought it would be interesting to ask your opinion about ebooks in general. Have you bought any? What did you think of the design? What format do you prefer, PDFs or epub/mobi? What feedback would you give publishers regarding design and content?
And of course, if you have read The Visual Palette and would like to let us know what you think, or if you have any questions regarding the book, please let us know in the comments below.
googletag.cmd.push(function() {
tablet_slots.push( googletag.defineSlot( “/1005424/_dPSv4_tab-all-article-bottom_(300×250)”, [300, 250], “pb-ad-78623” ).addService( googletag.pubads() ) ); } );googletag.cmd.push(function() {
mobile_slots.push( googletag.defineSlot( “/1005424/_dPSv4_mob-all-article-bottom_(300×250)”, [300, 250], “pb-ad-78158” ).addService( googletag.pubads() ) ); } );The post Book Review: The Visual Palette by Brian Matiash by Andrew S. Gibson appeared first on Digital Photography School.
-
HandeVision announces five lenses for its Iberit family – full frame lenses for mirrorless cameras

German/Chinese optics brand HandeVision is set to introduce five new lenses next year that are designed for full-frame mirrorless cameras. Each with a maximum aperture of F2.4, the focal lengths the company is planning to release in its Iberit series will be 24mm, 35mm, 50mm, 75mm and 90mm.
The company says it has concentrated on making the lenses small and lightweight to suit small and light cameras, but has used brass, aluminum and stainless steel in the construction of the barrels and mounts.
The lenses, which look more than a little like Leica M lenses, are all manual focus and offer aperture rings with markings for F2.4-16. Although they have a 44mm imaging circle that covers a full frame sensor, the lenses will be released with mounts for APS-C cameras, such as the Sony NEX and Fuji X system. These lenses will offer electronic aperture control. The 35mm, 50mm and 75mm lenses have six-blade apertures, while the iris in the 90mm uses 10. There is no specification as yet for the 24mm lens.

The first set of lenses will be made for Leica M, Sony E and Fuji X cameras, though the company doesn’t specify what other mounts will be available eventually. A Micro Four Thirds mount Ibelux 40mm F0.85 lens already exists, but there is no mention of whether MFT mount versions of these new models will be introduced at any point.
January 2016 is given as the launch date for the 35mm, 50mm and 75mm lenses, and the 24mm and 90mm lenses will be available ‘later in the year.’ Prices are a bit vague at the moment, but HandeVision says the lenses will cost between $ 480 and $ 660 depending on the model.
HandeVision is a brand created through cooperation between German lens manufacturer IB/E Optics and the Chinese company Shanghai Transvision Photographic Equipment Co – the company behind the Kipon brand.
For more information visit the HandeVision website.
Focal Length 35mm 50mm 75mm 90mm Angle of View 63.4 46.8 32.2 27 Aperture 2.4-16 2.4-16 2.4-16 2.4-16 Close Focus (M/NEX,FX) 0.7/0.35m 0.7/0.6m 0.7/0.6m 0.7m Iris Blades 6 6 6 10 Length
(M/NEX, FX)35/45mm 55/65mm 35/75mm 69/79mm Diameter 58mm 58mm 58mm 58mm Filter Thread M49x0.75 M49x0.75 M49x0.75 M49x0.75 Weight (M/NEX, FX) NA 250/310g 270/330g NA Elements/Groups 6/6 6/6 5/5 4/4 -
9. Dezember 2015
Das Bild des Tages von: michel nguie

Im Ausblick: Surreales, der Ätna und der NSU-Prozess.
kwerfeldein – Fotografie Magazin | Fotocommunity -
Master of one: Mitakon Speedmaster 135mm F1.4 pre-production sample gallery

You might remember us getting our hands on the Mitakon Speedmaster 135mm F1.4 at the Photo Plus Expo back in October. We handled the lens and wrote up some quick impressions at the show, but we were lucky enough to be given one of the prototype lenses to take home to Seattle with us.
Our sample is an engineering prototype of the E-mount version of this beastly lens, and we’ve spent the past few weeks gathering samples both in our studio and out and about around Seattle, to give you an idea of what it can do.

The 135mm F1.4 is a massive piece of glass, and in its E-mount flavor, absolutely dwarfs Sony’s a7 bodies. With a 105mm thread, fully manual operation and a weight of over six pounds (about 2.7kg), it can be rather intimidating, and is near impossible to use hand-held. With the proper support in place though it isn’t difficult to use at all, and can reward patient use with dramatic, unique results.
When viewing our samples, it’s worth bearing a couple of things in mind. Firstly, this lens is one-of-a-kind. Almost literally. So it has no direct competitors that we can shoot alongside. Also note what we said earlier – we were using an engineering prototype that was not cosmetically final, and may not be completely representative, optically, of the finished shipping lenses when they become available (although it’s likely to at least be extremely close)
With that in mind, take a look, and enjoy with us this truly unique hunk of metal and glass. Let us know what you think in the comments!
Take a look at our Mitakon Speedmaster 135mm F1.4 Pre-production Sample Gallery
-
How to Reduce Editing Time by Automating Your Lightroom Workflow
Don’t you hate when you realize that you spend more time in front of the computer than actually taking photographs? The realization is even more depressing when you are a travel and landscape photographer and, by definition, you are supposed to travel and discover the world’s beauty.

The Crisis
This is how I felt about 12 months ago during my second ever processing crisis as a photographer.
The first crisis happened about 10 years ago when I became more serious about photography, and started taking more photos. This was a time when 100% of my editing was done in Photoshop, which quickly led me to feel like I was drowning in gigabytes of digital images. What I did not realize at the time was that a majority of photographers who had switched to the digital realm, shared my pain.
This is when Adobe saved us all by releasing Lightroom, an application designed specifically for digital photographers. Lightroom not only offered non-destructive photo editing but a complete digital photography workflow with streamlined digital asset management as well.
I immediately embraced Lightroom by starting with the beta version, which allowed me to cut my photo editing time in half. With every new version, Lightroom became more sophisticated and versatile, almost completely replacing Photoshop in my workflow. After Adobe released Lightroom 6, I recognized that I could complete 90% of my processing in Lightroom, and my need for Photoshop was minimal (10%).
But, sophistication and versatility had its own price. Lightroom became much slower and its complexity skyrocketed.
Another factor that contributed to my second processing crisis was my switch from a Canon DSLR, to a Sony mirrorless. The new Sony camera (A6000) had a bigger sensor and produced much bigger file sizes, which slowed my editing down even more.
After a long trip to Hawaii, California, and the Southwest, I brought back more than 5,000 brand new photos. The process of Lightroom editing was slow and painful, making it obvious that I had to come up with the completely new workflow to reflect a higher volume of larger files.
The Solution
I started by analyzing my Lightroom editing habits, and soon enough, I made a discovery that became the foundation for my new workflow. Perhaps less of a discovery and more like a simple realization, I noticed that 80% of my edits are identical for every single photo I process, with only 20% varying from photo to photo.
The solution was obvious. By automating the 80%, I could radically reduce the time I spend in front of the computer. The use of preset functionality in Lightroom was an obvious choice.
I dove into my Lightroom Portfolio Collection and selected the images that best reflected my personal style and artistic vision. I then created presets based on those selected photos.
At that point, I faced a challenge. As you have probably noticed, LR presets usually do not work out of the box; their settings are too specific for a particular photo to work with every image. Depending on the lighting condition of the scene, contrast level, shadow depth, and color saturation, the same preset can produce a completely different result across different images.
I managed to overcome this challenge by separating my presets into two categories, and using a two-level editing approach.
- Level One: I use presets from a STYLE category, to define an artistic style or the “LOOK” in a photograph. For example: cool or warm, cross processed or natural, contrasted or soft.
- Level Two: I use ADJUSTMENT presets to fine-tune a photo, compensating for the lighting of the scene, without changing the STYLE that I defined in the previous step.
Okay, enough theory, let’s get to the practical demonstration – here’s my new Lightroom editing workflow in action:
Here is a photo I took in Hawaii at sunrise. This is a typical landscape photo featuring the open sky and water, mountains, and foreground vegetation. In order to preserve the details in the highlights, I set the exposure for the sky area, as I normally do for the majority of landscapes. It resulted in an underexposed capture.
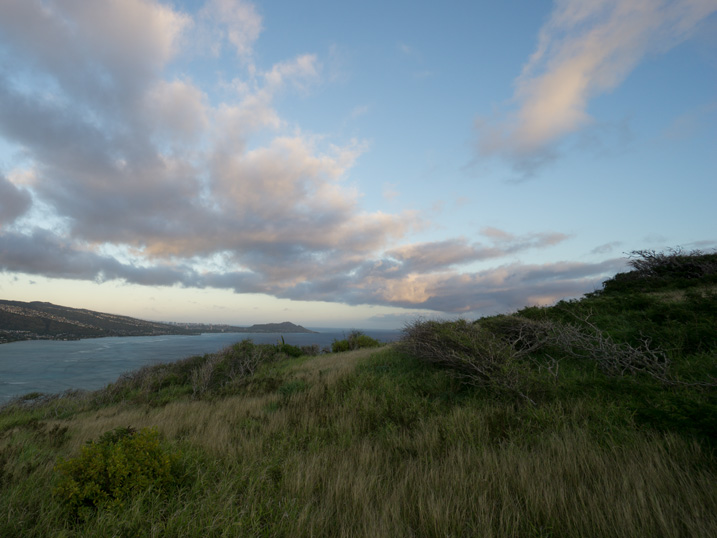
The goal here is to correct the exposure, recover the shadows, and bring back the rich colors of the tropical sunrise.
STEP ONE
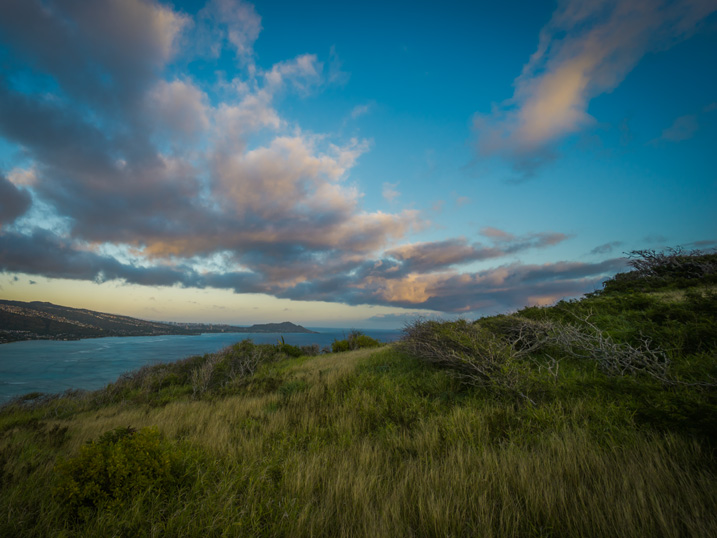
I always start my landscape editing by trying to achieve a natural look first by applying the NATURAL preset from my STYLE collection.
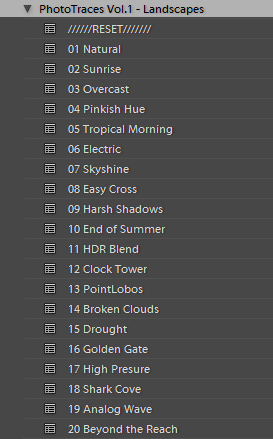
Even though I managed to boost the colors and define the sky, the result is far from exciting, as the photo is much too dark.
STEP TWO
This is when my ADJUSTMENT collection, which I call the TOOLKIT, comes into play.
The TOOLKIT is a selection of 40 presets where each is responsible for changing only one specific parameter, without changing the style of the image. Together, they help to fine-tune different aspects of the photo.
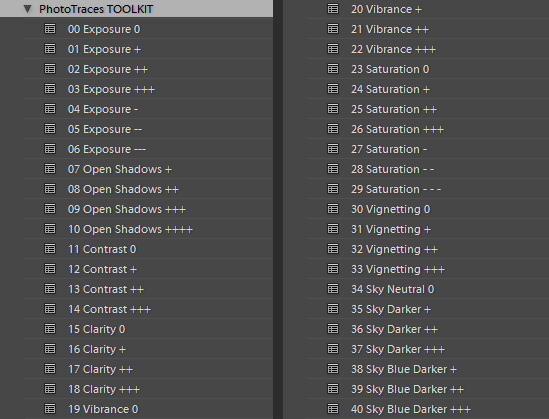
The TOOLKIT presets are stackable, which means that you can apply multiple presets to the image without the presets overwriting each other.
- To make the image brighter, I apply preset 02. Exposure ++
- To open up the shadows, I apply preset 10. Open Shadows +++
- To increase the local contrast, I apply preset 17. Clarity ++
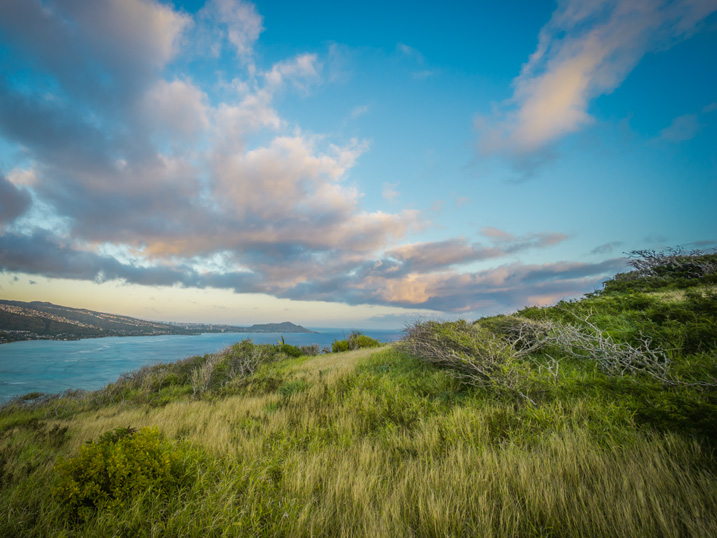
This is all I had to do. As you can see, I managed to complete 80% of my entire editing in five clicks, without touching the right panel of Lightroom where all of the editing tools are housed.
STEP THREE
The last step is to record the editing steps. I use the Snapshot functionality of Lightroom to save my editing steps as a new Snapshot. For the name, I use “Lightroom Editing Formula”.
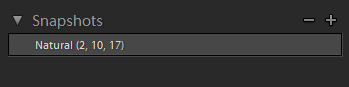
The Lightroom Editing Formula starts with the name of the preset and follows with the numbers inside the brackets, where each number represents a specific ADJUSTMENT preset from the TOOLKIT collection.
If I edit a photo for my blog, I might stop here and export it as a JPEG; but, if I am working on a portfolio piece, I try to explore a variety of artistic styles. I follow a similar approach by going through the three steps of my workflow, but each time select a different STYLE preset.
Every time I achieve a result I like, I save it as another Snapshot.
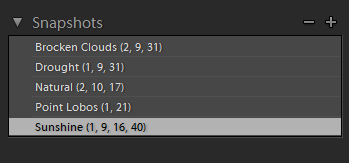
By the time I am done, I might have anywhere from four to five different editing versions for the same image.
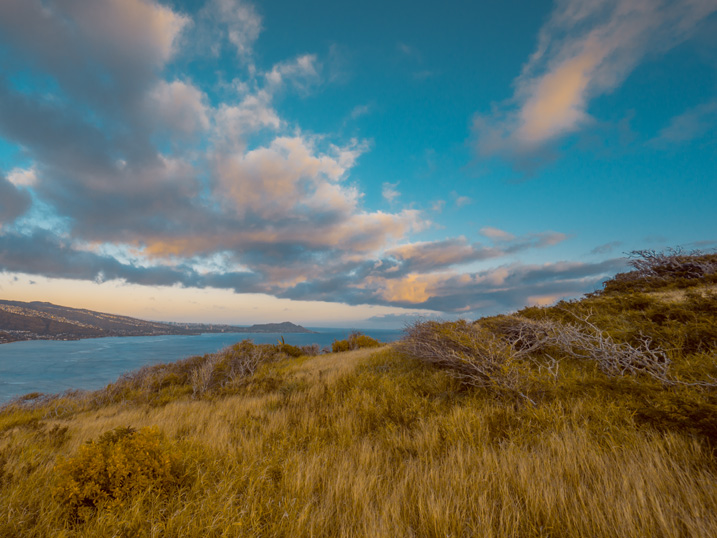
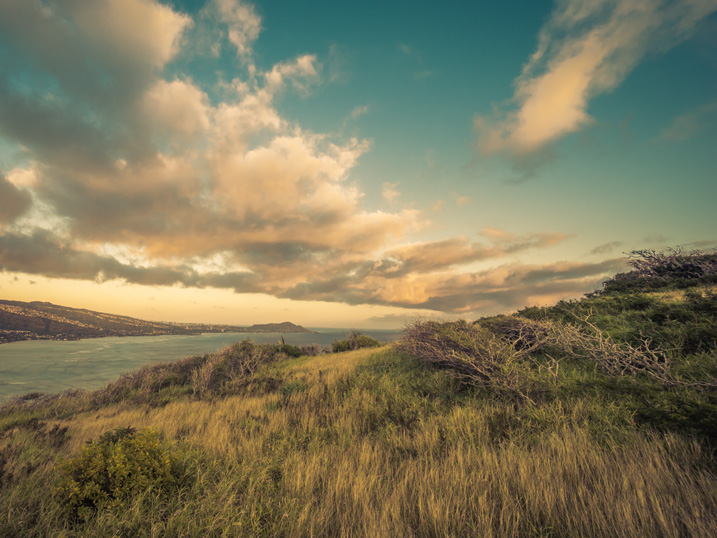
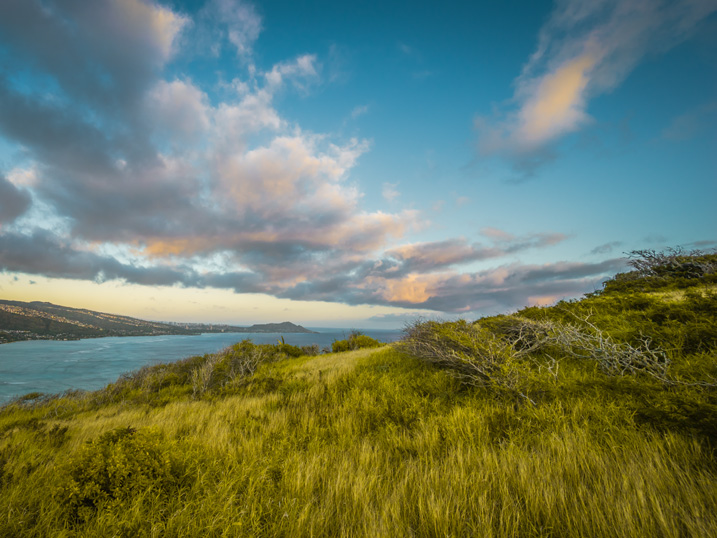
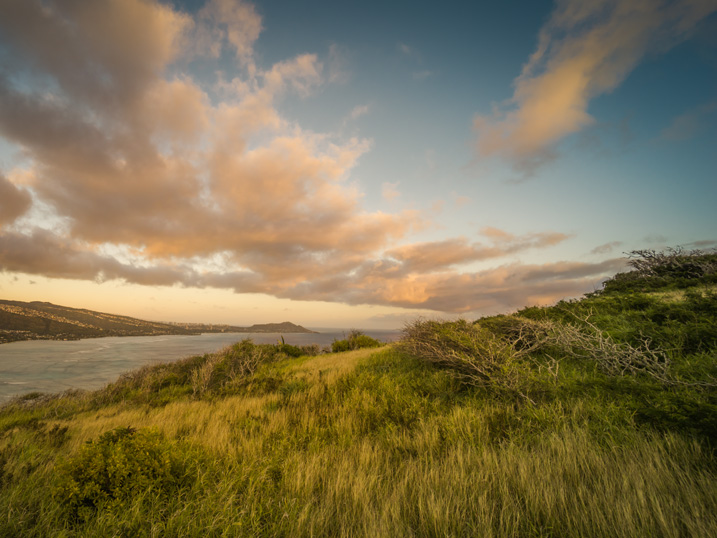
Here is the most exciting part; I get to select the most interesting version for my portfolio and perhaps another one for Instagram.
From here, I normally jump to Photoshop and perform the remaining 20% or so of the editing process. In Photoshop, I mostly clean up the image with the help of the Stamp Tool, and do noise reduction using Topaz DeNoise plugin.
Conclusion
The entire process of producing five different versions of the featured photo took me less than 10 minutes, and all without having to touch the main editing tools in Lightroom. I call it Lightroom Rapid Editing.
By streamlining and automating my Lightroom workflow, I managed to reduce the total editing time by more than half.
How can you use these tips to reduce your editing time? Do you have any other time savers you’d like to share? Please do so in the comments below.
googletag.cmd.push(function() {
tablet_slots.push( googletag.defineSlot( “/1005424/_dPSv4_tab-all-article-bottom_(300×250)”, [300, 250], “pb-ad-78623” ).addService( googletag.pubads() ) ); } );googletag.cmd.push(function() {
mobile_slots.push( googletag.defineSlot( “/1005424/_dPSv4_mob-all-article-bottom_(300×250)”, [300, 250], “pb-ad-78158” ).addService( googletag.pubads() ) ); } );The post How to Reduce Editing Time by Automating Your Lightroom Workflow by Viktor Elizarov appeared first on Digital Photography School.
-
My Favorite and ONLY Lens: The Canon EF 50mm f/1.2 L USM
I operate my photography business on a shoe string budget. This started out of necessity, but continued because it became abundantly clear to me early on, that I would rather spend the money I earn from photography towards black t-shirts, home décor, five dollar lattes, and bills. Mainly bills, but no sense in pretending the other indulgences don’t factor into my take-home pay.
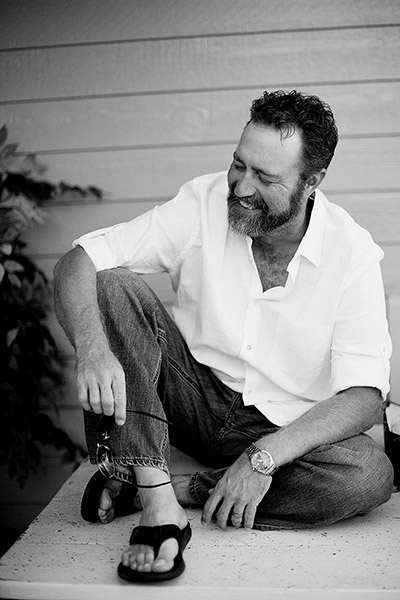
I started my portrait business with a Canon Rebel, kit glass, and a prayer. As my business grew I invested in a 30D, and later a 5D. One particularly good tax refund, and a little generosity from my mother around my birthday, found me the proud new owner of a Canon 50mm L-series lens. I didn’t even know what the L stood for (to be honest, I still don’t), I just knew that all the photography blogs I read at the time called it the end-all, be-all lens. The It Lens. The Portrait Lens. I also had a seasoned pro tell me that I should spend as much money as possible on good glass, and it doesn’t get any better than this one.
It’s also important to mention that I was at a place with both photography, and my confidence, that I would listen to just about anyone who even pretended they knew what they were talking about. Had she told me that my pictures would be better if I carried a frog in my pocket, I would have carried two, and a lizard in my shoe just in case.

I am going to tell you all a secret. I am going to answer the question I always get asked when I pull out my big, fancy lens that is mounted to my camera body, which to be clear is the Canon 5D model from 4 models ago: does that snazzy lens make photos better? Brace yourselves because, yes. Yes, it does. So much so in fact that I don’t even own another lens.
I had a fixed 24mm lens for a few years, but it did nothing more than take up space in my bag. Space that I prefer to give to gum and bug spray. So I sold it to increase my coffee and black yoga pants budget. Zoom lenses have never been my favorite, so that narrows down my choices considerably, and a 50mm just feels like the right length for me—I’m close to my subjects but not breathing in their face, even if my breath is minty fresh from my bulk gum purchases.

Can you live without a lens that costs three times what my first car did? You bet. But I’ll tell you another thing—you can live without an entire bag of lenses just as easily. A back-up body and lens is nice—some may even say essential (particularly if you are a wedding photographer), and I suppose if you do certain types of photography, you may need a few different lenses. But I am here to tell you that I have operated a very successful portrait and wedding photography business with my one, albeit super fancy, lens and done just fine, thank you very much. I can count on one hand the times I’ve needed a different lens, and each time it was easy to either borrow or rent, and much more cost effective.

I know my 50. I named my 50, if we are being honest (its name is Seth—it work well with Nancy my MacBook, and Monte my iMac). At this point it just feels like an extension of my arm, or eyeball. I know what I will see in the viewfinder by the time I get my camera to my face. Since my feet are the zoom, I know exactly where I need to stand to get the frame I want.
Prime lenses are fast and sharp. If this means I have to walk around a bit more, then I can call it my exercise for the day (okay, fine: week) as well. The bulk of my business is photographing kids, so no matter what, I am going to be on the move. I’d just rather know that upfront, than mess with a zoom and continuously risk less than tack-sharp focus. This isn’t even counting the fact that by not spending a great deal on equipment I am able to be well caffeinated on expensive coffee during shoots, and sit at a very pretty desk while I edit.

The other plus of counting on one great lens for everything? I invest my money back into my business in other places, beyond expensive equipment. Places that I feel reach farther than a bag full of stuff. I have a bold website and eye-catching business cards. My clients get their images in top-of-the-line professional packaging. I have a ShootSac and buy lollipops in bulk. I wear the most expensive contact lenses on the market, and you should see my hair tie-back selection.
I can only afford these things because I’m not up to my expensive contact lens-wearing eyeballs in debt over fancy equipment. Additionally, my fees are not so outrageous that my client base is only a select few. My overhead being lower than average, allows me to continue photographing the families that supported my business when I was just starting. Families that otherwise may not be able to afford my services if I was dealing with extraordinary costs.
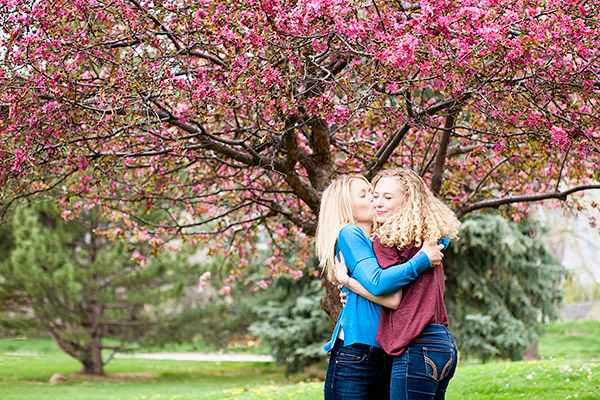
My mom taught me to buy quality; to save my money and buy a good pair of jeans, instead of the cheapest pair that fit. Sadly this lesson didn’t stick and at this very moment I am dressed head to toe in Target. However, it’s true here; buy the nicest lens you can afford and make it work for you. It’s your paintbrush, your potters wheel, your knives (I’ve heard big-time chefs bring their own knives to everything); make it the best possible one and make it the only one you need.

Have you invested in top quality lenses or “glass”? What is your go-to lens and why?
googletag.cmd.push(function() {
tablet_slots.push( googletag.defineSlot( “/1005424/_dPSv4_tab-all-article-bottom_(300×250)”, [300, 250], “pb-ad-78623” ).addService( googletag.pubads() ) ); } );googletag.cmd.push(function() {
mobile_slots.push( googletag.defineSlot( “/1005424/_dPSv4_mob-all-article-bottom_(300×250)”, [300, 250], “pb-ad-78158” ).addService( googletag.pubads() ) ); } );The post My Favorite and ONLY Lens: The Canon EF 50mm f/1.2 L USM by Lynsey Mattingly appeared first on Digital Photography School.