Blog

  • DPReview Gear of the Year Part 6: Richard’s choice – Fujinon 56mm F1.2R APD

    My Gear of the Year isn’t a product launched in 2015. Nor is it necessarily the absolute best option available. However, it is the product that I’ve grabbed whenever I wasn’t committed to something else we’ve been testing, and it’s a product I’ve really enjoyed.

    What I love

    • Classic portrait focal length 85mm equivalent field-of-view
    • Bright maximum aperture for shallow depth-of-field or low light work
    • Apodization filter to ensure smoother bokeh
    • Well built solid-feeling without being too heavy

    I’ve always liked the idea of classic 85-135mm equivalent portrait lenses but they’ve tended to be somewhat thin on the ground for the APS-C cameras I seem to end up testing. So I’m delighted to see Fujifilm go the extra mile and create a fast 85mm equivalent.

    Better still, the APD version of the lens is specifically designed to offer pleasant bokeh. None of this ‘X rounded blades to give pleasing bokeh’ nonsense, the APD version actually has a radial gradient neutral density filter to smooth off the bright edges of the out-of-focus rendering. I’ve taken the availability of this very specialized tool as encouragement to practice and improve my portraiture.

    A quick re-process in camera and there’s a JPEG ready to send to my patient volunteer.

    Fujinon 56mm F1.2R APD
    F1.2, 1/35sec, ISO 800 

    The Fujifilm 56 isn’t the only tool I could have used: the Zeiss Batis 85mm F1.8 would give very similar depth of field and, mounted on a Sony a7 series camera, would result in a fairly similarly sized package. However, although both have been present in the DPReview offices, it’s been hard to justify taking them out of the hands of the people reviewing and testing them, just to experiment. So it just happens to have ended up that I’ve spent more time enjoying the Fujinon.

    Beyond the lens’s inherent properties, there’s another reason I’ve tended to grab the 56 and it relates to winning my subjects over and helping them feel comfortable with being photographed. 

    While shooting, I’ve been using Fujifilm’s Wi-Fi system to send my favorite shot along to my subjects’ phones, letting them see the results and ensuring they have an image to walk away with. Lots of modern cameras have Wi-Fi of course, but it’s the combination of in-camera Raw processing and one of my favorite JPEG engines that makes it particularly useful. It’s relatively easy to choose the most appropriate Film Simulation mode, fine-tune the white balance and tone curve and arrive at a file I can comfortably share before I get a home to Lightroom. That ability to put the images quickly into the hands of my subjects has helped maintain their enthusiasm for standing around and being photographed.

    The 56mm F1.2 APD is sharp where you want it and pleasantly smooth where you don’t. The X series cameras can place the focus with a good degree of accuracy, too.

    Fujinon 56mm F1.2 APD
    F1.2, 1/550sec, ISO 400

    Furthermore, the relatively small size of an X-T10 with the 56mm mounted to it isn’t quite so intimidating as a full frame DSLR and has the advantage that I can continue to shoot when I’ve taken the camera away from my eye, to talk to my subject.

    It’s not all dreamy bokeh and pretending to be David Hemmings*, of course.

    The 56mm F1.2 APD is an expensive lens. For a start, it’s a rather specialized lens, meaning fewer buyers to share the development costs across. But equally, it’s likely that Fujifilm understands the mystique conveyed by the idea of a bokeh-smoothing filter and being able to etch the numbers 1:1.2 into the front of the lens, allowing them to charge a substantial premium.

    Autofocus is also rather slow. The design appears to have a lot of glass to shift around when focusing, which slows things down, as does the loss of on-sensor phase detection, which would be confused by the lens’s internal filter. However, so long as the subject doesn’t move too fast or unpredictably (which is a reasonable expectation in semi-posed portraits), this isn’t a fatal drawback and is at least partially made up for by the accuracy and consistency of the focus.

    It’s not just for close-up head shots, of course.

    Fujinon 56mm F1.2 APD
    F1.8, 1/1000sec, ISO 200

    So why, when I know the 56mm is far from perfect, is it my Gear of the Year? On a technical level, it’s very good: it’s impressively sharp where it’s in focus and pleasantly smooth where it’s not, but the reason it’s my Gear of the Year is because I’ve enjoyed shooting with it and it’s encouraged me to go out and take photos.

    I’m certainly not even going to claim the 56mm F1.2 APD has magically made me a great portrait photographer, but it’s certainly increased the number of my friends using my images to represent them on social media. And knowing the lens will take lovely images has left me able to concentrate on developing the soft skills for relaxing and posing the people I’m shooting. Now, where’s my reflector?


    *I very seldom pretend to be David Hemmings.
    Articles: Digital Photography Review (dpreview.com)

  • How to Create a Vintage Look for Your Image Using Photoshop

    Creating a vintage look for an image is now easy, without having to shoot with an old film camera. Although I would recommend any photo enthusiastic to try! I have a an Agfa camera ISOLA that I use every now and then. I love the contrasty, grainy black and white pictures it allows me to shoot. I usually ask advice regarding the film I can use depending on the sought-after result (contrast- grain – ISO).

    With a few easy steps in Photoshop you can make a textured, desaturated vintage look for any of your pictures. I’m going to show you how I did it with a self-portrait, but you can really do it with any picture as this technique really creates a great feeling to any image, whether it is a portrait or a landscape.
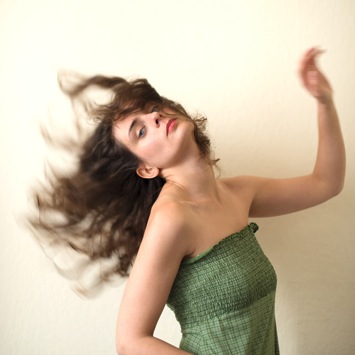
    Vintage images are usually not so sharp, so I chose an image with some motion blur. You can add some directly in camera playing with slow shutter speeds and creating some motion. To edit this image, we are going to change the color using a gradient map adjustment, add some textures, and finally add a vignette to get a vintage look image.

    Setting the mood for creation before Setting the mood for creation after

    Step one: Modifying the color tones using gradient map

    There are many ways to desaturate an image. I love the gradient map adjustment because it allows me to desaturate the image, to add some color tones, and also to adjust its contrast. Hopefully, you will love this tool if you haven’t tried it yet.

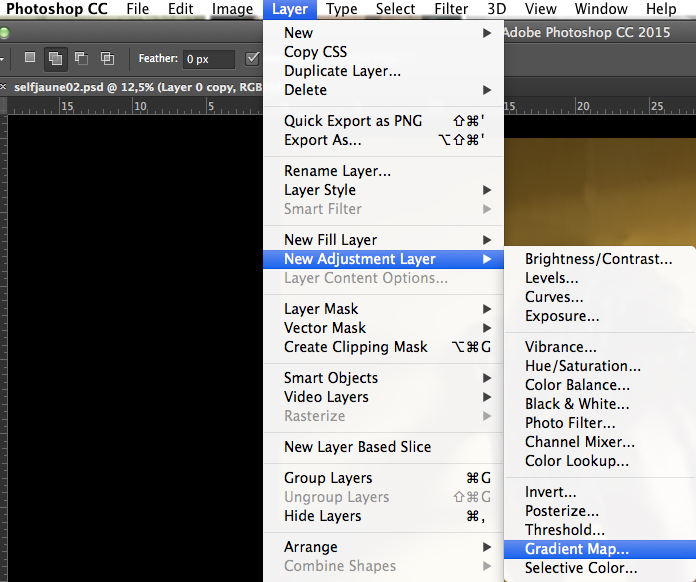
    Vintage images are usually desaturated – it could also be sepia. To get the desaturation you can go to Layer > New adjustment layer > Gradient Map (as shown below).

    01

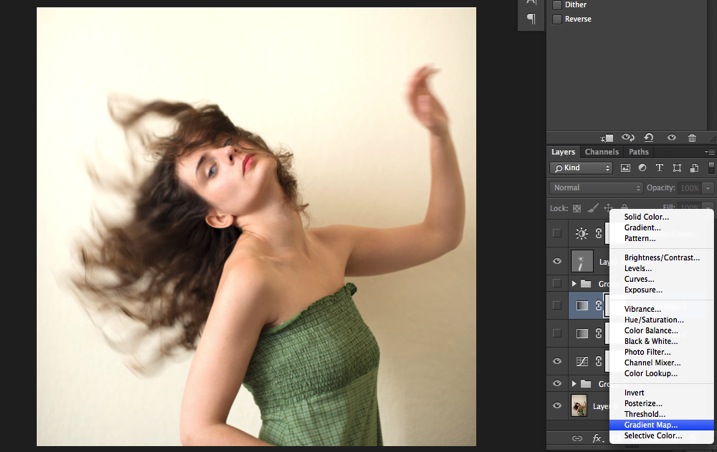
    Or you can go to your layer tab and select new Gradient Map layer (as below).

    02

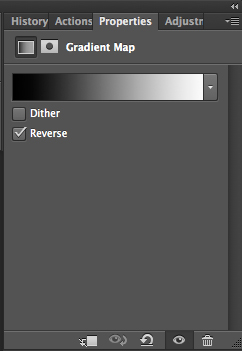
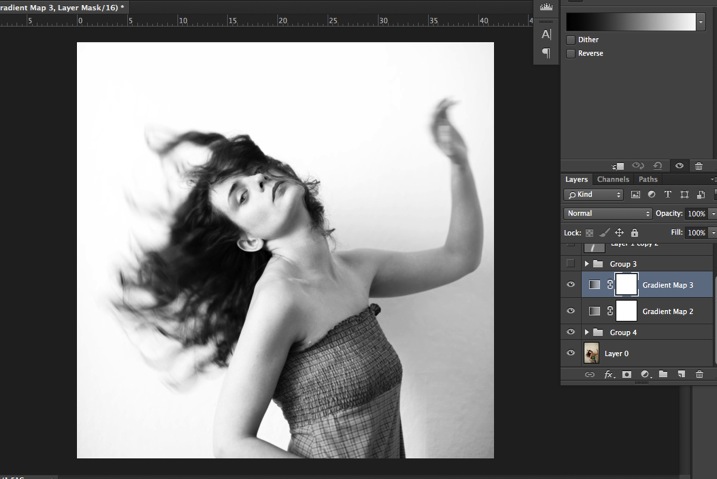
    In the properties tab (screenshot below) you can see what gradient has been applied. By default it will be a foreground to background color, so usually black and white (the color squares on the bottom of your tools bar). You can also set the gradient color by changing your background and foreground color.

    03

    Photoshop then offers you 2 different options:

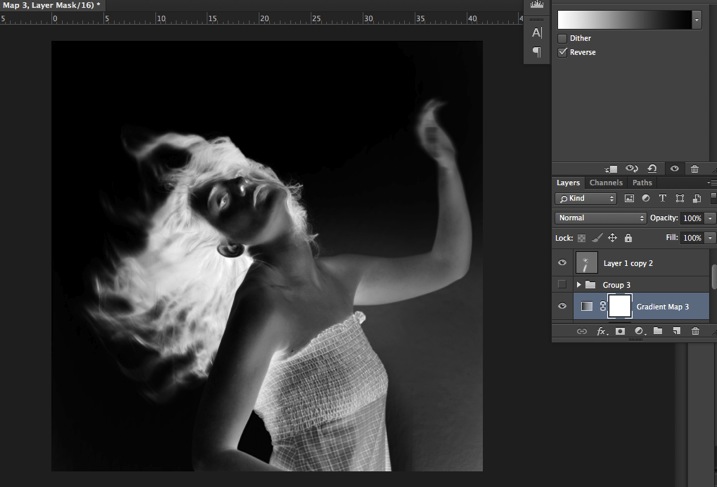
    • The Reverse option will change the gradient and give you a negative of your image, as in this case I add white into the black and black into the white (below).04
    • The Dither option will mix in noise to help blend the gradient more smoothly. So you can check any of those options depending on the effect you want to achieve.

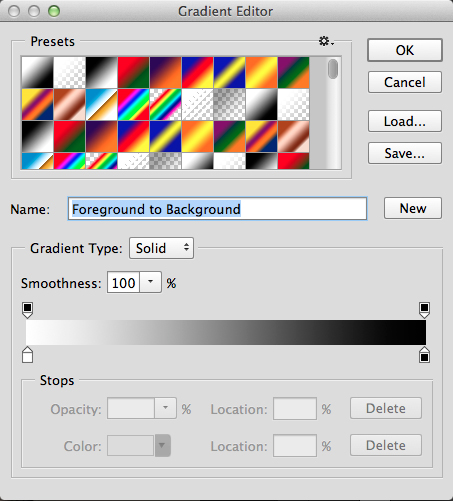
    Edit your gradient by clicking on it (click on the gradient color bar); the gradient editor will then open.

    05

    The gradient editor window shows you on the left the color applied to your blacks, and on the right the color applied to your whites. To modify the gradient you have two options:

    First option, you choose one of the available presets. You click on a preset to apply it to your image. Second option is to create a custom gradient. Simply double click on one of the color stops, and choose a new color among the color pop-up menu.

    You can also create a new color stop/intermediate by clicking below the gradient bar to define another one wherever you want (remember on the left are your shadows/black tone – in the middle mid-tones, and on the right your highlights/white tones). Once the new color stop is set you can also move it so it affects more of your dark or light tones.

    In case you want to save the created gradient as a preset, name it, then click New after you have finished. It will then appear in your presets.

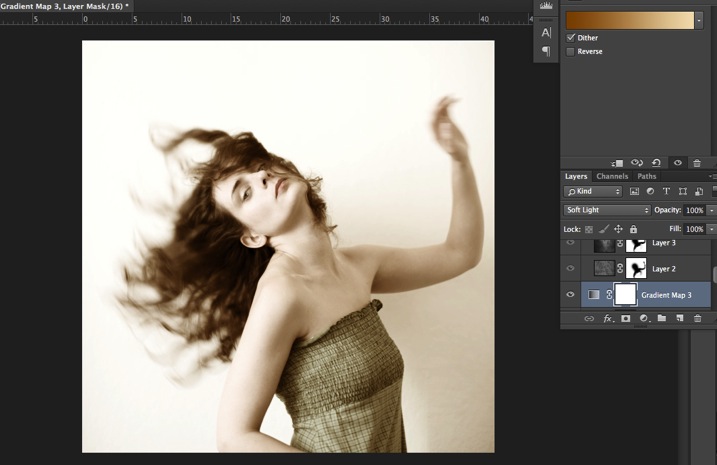
    This is a powerful tool to adjust any color tone in your images. In this case I will first use the black and white gradient. When using this option the image is then turned into a black and white picture.

    06

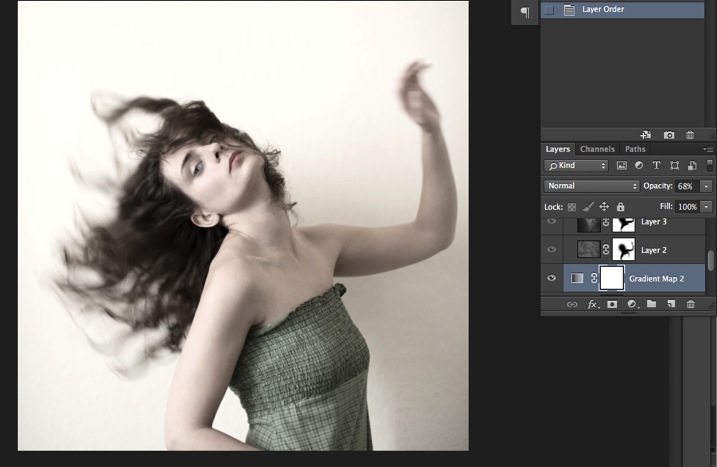
    As it is not what we intended to do, lower the opacity of the adjustment layer.

    07

    I set it to 68% in this case, but you can choose whatever number gives a nice look to your image – play with the opacity to decide which one best suits the image you are editing.

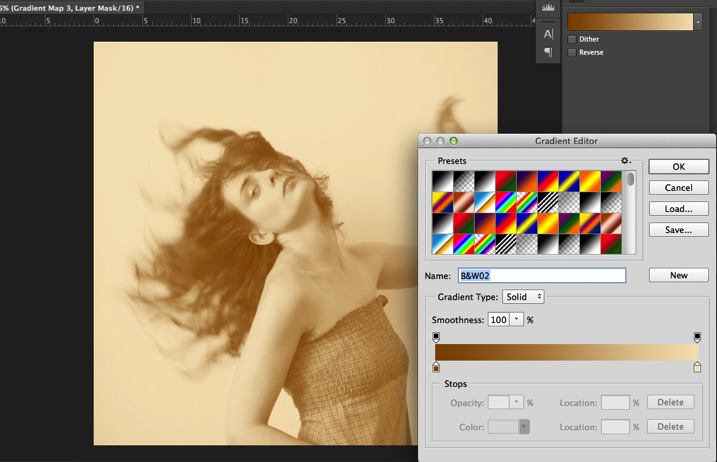
    You can add also a touch of color. Keep it very soft to achieve a vintage look. To bring back some color, you can add a second Gradient Adjustment layer. After you add another layer, click on your gradient and choose a yellowish/brownish option to get a sepia tone, one in the presets or make a custom one.

    08

    Once again you can lower the opacity of the adjustment layer to have a softer effect.

    09

    You can also add a different color according to the mood you want to set in your image. In this case I decided not to add further color tones so I added only the black and white gradient.

    Step two: Adding texture to give the image a vintage feel

    Now that you have achieved the color you want, it is time to add some texture to your image.

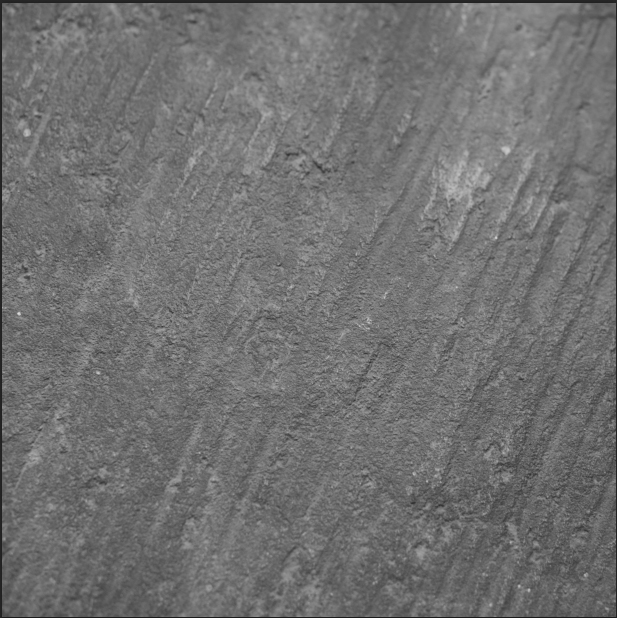
    Personally I always shoot my own textures, but you can also find great textures on the internet on stock image sites. Or shoot your own pictures: walls, old paintings, grounds, wood, leaves, etc., any textured surface you can find. It is very easy, and can help you find some inspiration.

    10

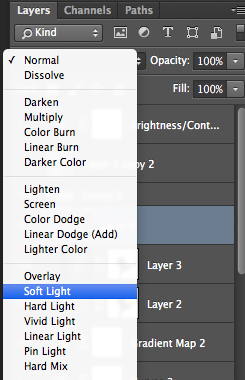
    You drag and drop using your move tool or copy and paste a textured photo on top of your main picture. Then mix it by using the layer Blending Mode, try Overlay or Soft Light. I really recommend you to go through all the blending options to see how they blend the texture with your image (each image is different, and each mode can create a different look).

    11

    I always add textures to my personal works to give a painterly effect to my images. To have a lighter effect you can lower the opacity of your layer. To have a stronger effect you can repeat this step and add several textured layers.

    You can modify the effect by adjusting your texture image. Select the texture in your layer’s tab and go to: Image > Adjustment > Curves/Levels.

    12

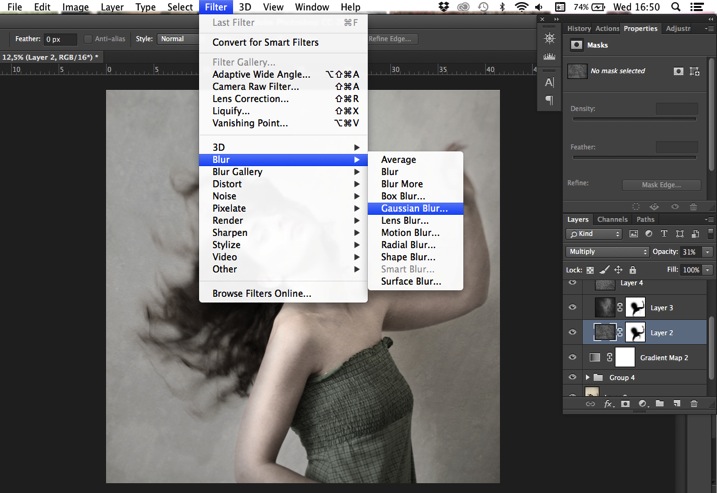
    Playing with Curves or Levels will help you to bring back, or soften, some details in the texture. You also can add a Gaussian Blur filter if there are details that are too sharp in your texture image.

    13

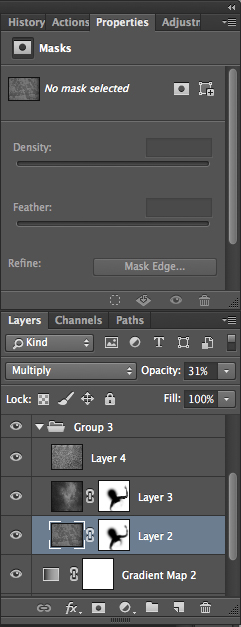
    Select the area where you want to show or not show the texture. You can add a layer mask on the texture layer and by painting with black or white on the layer mask, you add (show) or remove (hide) areas where the texture appears.

    Select your texture layer and click on add a layer mask. Lower the opacity of your brush tool, and keep its hardness to 0% to get very smooth edges. Now you can start painting in black over the areas where you want less or no texture.

    14

    Everything is in the details, and Photoshop allows you a full control over your images. Usually to still have a “clean” image, and not to lose some details, you can mask areas such as skin, eyes, lips, etc., when editing a portrait.

    So take your time to play with your textures. Try different types of shapes and contrasts. You can desaturate your textured image, or keep it in color. I find it easier when the texture is desaturated so you can fully control the color tones of your image separately, but it is up to you, and to the image you have in mind. As with any creative exercise, it is a matter of taste and style.

    Step three: Finishing your image by adding a vignette

    Vignetting can be an unintended, and undesired effect, caused by camera settings or lens limitations. However, you can also introduce it for creative effect, such as to draw attention to the center of the frame. You can choose a lens which is known to produce a vignette, or a filter to obtain the same effect.

    Obviously, as we are going to do now, you can also add a vignette by post-processing your image in Photoshop. You have many options in Photoshop to vignette your images. In this case we are doing something very uneven so the vignette also helps to create a strange atmosphere.

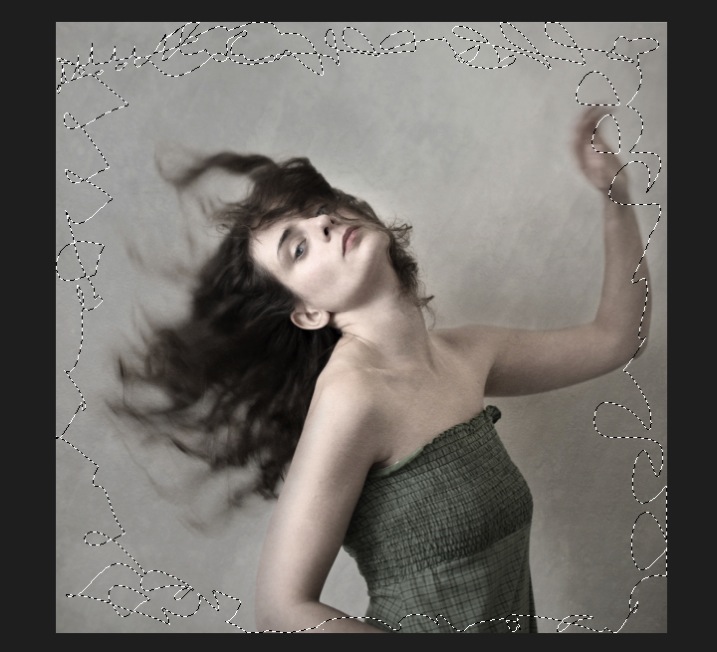
    Grab your lasso tool and draw very random lines around the edges of your image. It looks weird, but it is quite effective.

    15

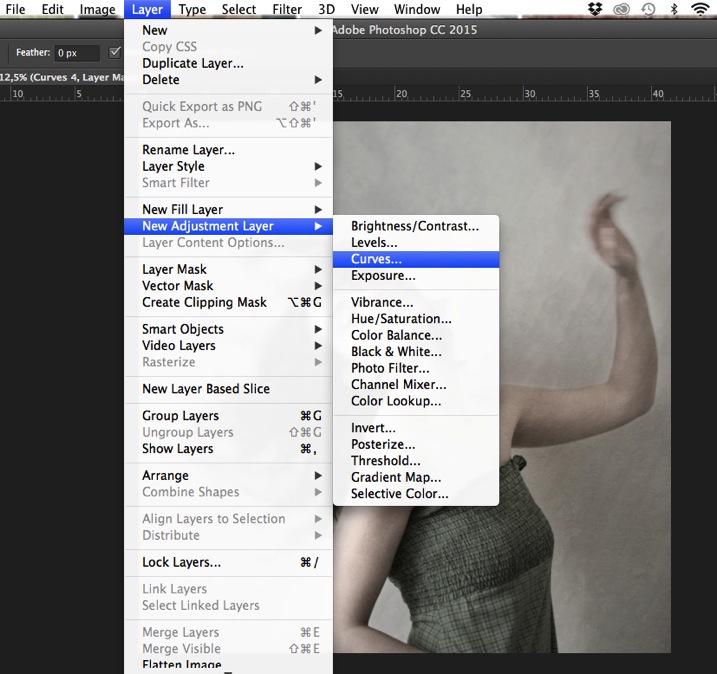
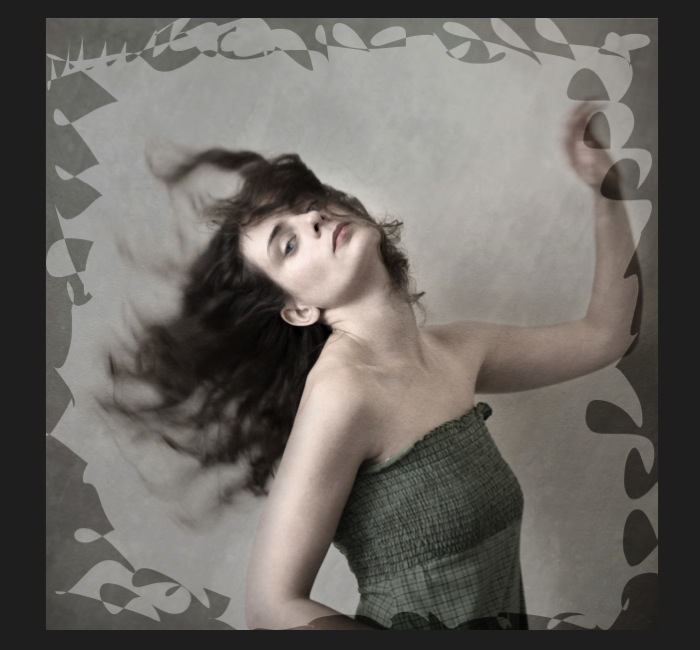
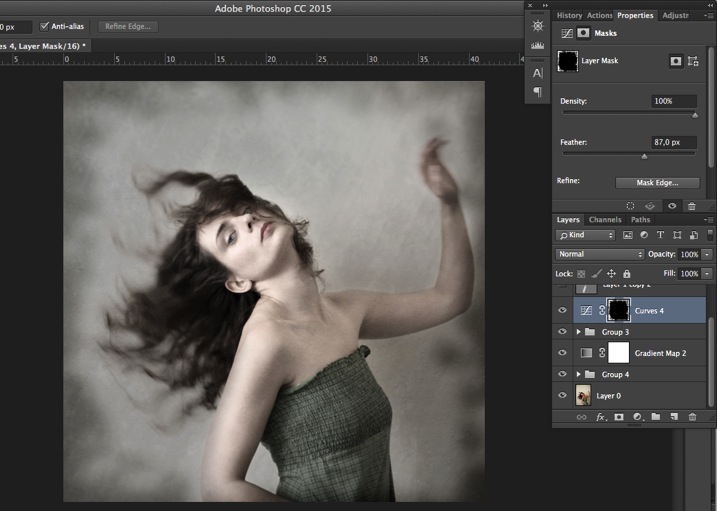
    Go to Layer > New adjustment layer > curves. Darken your mid-tones by pulling down your curves to about one third (or to any darker/lighter spot according to your taste).

    16

    Whenever you select an area of your image, and have this selection active when you create a new adjustment layer, Photoshop automatically creates a layer mask on the new layer from your active selection.

    Remember – on your layer mask white is where the effect will be applied, and black where the effect will not be applied. Here you want to apply the effect on the edges of the image, not in the center- if need be invert your layer mask by selecting the layer mask and pressing: CMD/CTRL+I.

    Then double click on your Curves layer mask and feather your selection (around 87 pixels here).

    17

    You can once again play with the opacity of your layer to lighten the vignette.

    I hope you enjoyed this article. Feel free to share in the comments your usual steps to crete a vintage look to your images. Share your images as well using this technique if you give it a go.

    googletag.cmd.push(function() {
    tablet_slots.push( googletag.defineSlot( “/1005424/_dPSv4_tab-all-article-bottom_(300×250)”, [300, 250], “pb-ad-78623” ).addService( googletag.pubads() ) ); } );

    googletag.cmd.push(function() {
    mobile_slots.push( googletag.defineSlot( “/1005424/_dPSv4_mob-all-article-bottom_(300×250)”, [300, 250], “pb-ad-78158” ).addService( googletag.pubads() ) ); } );

    The post How to Create a Vintage Look for Your Image Using Photoshop by Amélie Berton appeared first on Digital Photography School.


    Digital Photography School

  • Skywalking Stockholm: Bridged Green-Roof Parks to Span Downtown

    [ By WebUrbanist in Architecture & Cities & Urbanism. ]

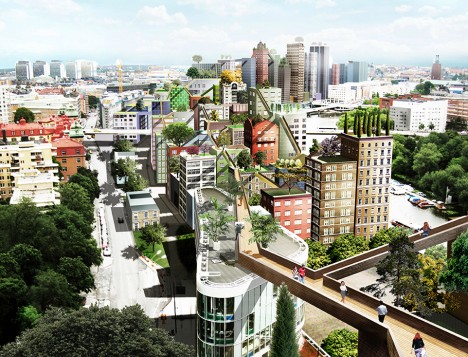
    stockholm building connected parks

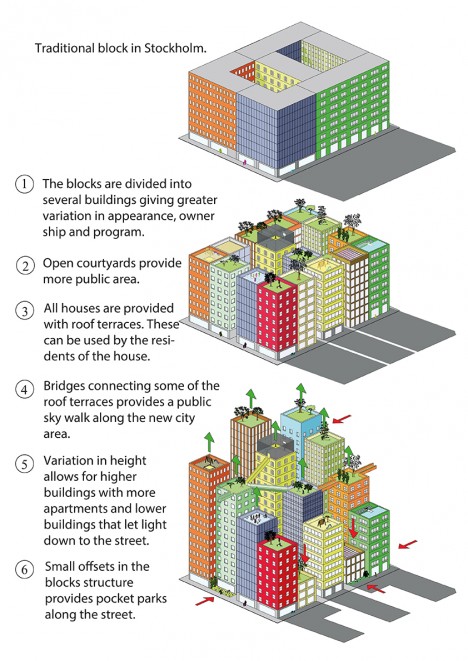
    Fusing height, light, density and greenery with regional vernacular architecture, this ambitious urban Sky Walk plan aims to turn the tops of downtown buildings into a extensive series of connected green-roof parks connected by aerial walkways.

    stockholm sky walk

    Anders Berensson Architects was commissioned to develop a design that would accommodate Stockholm’s growing population and associated housing needs, but their solution goes above and beyond conventional urban planning, literally and otherwise.

    stockholm downtown core paths

    Their proposal takes advantage of existing infrastructure and tightly-packed buildings, creating green community spaces essentially out of thin air, all while respecting zoning regulations and building codes dictating heights and usages.

    stockholm elevated greenery

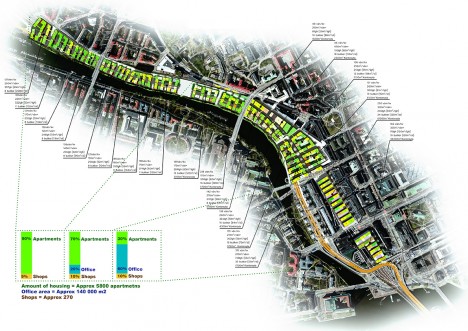
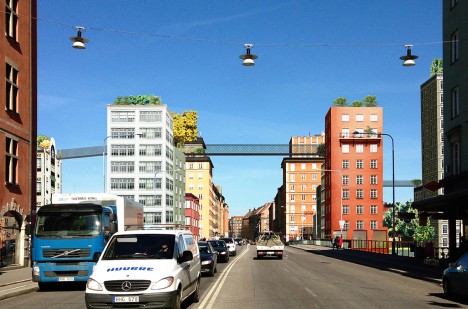
    The heights of new buildings in the scheme would be tuned to the aspirations of the aerial component, aimed to facilitate the desired connections across streets and between blocks, ultimately creating a long meandering walkway along the city’s riverfront.

    stockholm downtown master plan

    Views and light orientations are also taken into consideration, with residential units aimed as much as possible with natural daylight in mind.

    stockholm urban aerial walkways

    The thin profiles of the perforated-metal Sky Walk structures will minimize shading from these components as well.

    stockholm vertical green roofs

    From the architects: “The design makes larger parts of the area accessible to the public since both courtyards and roof terraces is crossed by public paths. The sky walk on the roof terraces will be one of the longest parks in Stockholm with best view in town. The new city area will host about approximately 5800 apartments, 8000 work places and about 300 shops.”

    Share on Facebook


    [ By WebUrbanist in Architecture & Cities & Urbanism. ]

    [ WebUrbanist | Archives | Galleries | Privacy | TOS ]


    WebUrbanist

  • DxOMark Mobile Report added to our iPhone 6s Plus review

    DxOMark has just released its full report into the technical ins and outs and real-world performance of the iPhone 6s Plus’s 12MP camera. We’ve added DxO’s findings into our previously-published in-depth review of the iPhone 6s Plus and you can read the whole thing over at connect.dpreview.com

    Articles: Digital Photography Review (dpreview.com)

  • DxO brings OpticsPro extensions to Apple’s Photos software for OSX

    DxO is bringing its OpticsPro software to Apple’s consumer-friendly Photos software for OSX. This $ 10 extension for Apple’s Photos app gives users full access to all of DxO’s Optics Modules, which can correct optical distortion and aberrations as well as improving dynamic range and removing haze from landscapes.

    Also introduced is a free Photos extension for users of DxO’s ONE camera, which offers the same features mentioned above and supports the camera’s SuperRAW files.

    Both extensions are available for download now from the Mac App Store. Mac OS X 10.11 (El Capitan) or later is required in order to use Photos.


    Press release:

    DxO OpticsPro for OS X Photos extensions add powerful one-click corrections to Apple’s OS X El Capitan

    DxO’s renowned RAW image processing now available to Mac users as an extension to Apple’s Photos app.

    PARIS and SAN FRANCISCO—December 22, 2015—DxO announced today the immediate availability of two new extensions for OS X El Capitan, DxO OpticsPro for OS X Photos and DxO OpticsPro for OS X Photos – DxO ONE Camera Only, that provide DxO’s advanced image processing within Apple Photos. DxO OpticsPro for OS X Photos adds seamless access to tens of thousands of DxO Optics Modules that enable DxO’s unrivaled automatic optical corrections for distortion, vignetting, chromatic aberration and lens softness for virtually all popular cameras and lenses. The extension is also available as a free download, designed exclusively to support RAW and SuperRAWTM images captured by the award-winning DxO ONE connected camera for iPhone and iPad. Both versions also feature simple, yet powerful one-click corrections that automatically improve white balance, dynamic range, reduce noise, and remove landscape haze to make your best photos look even better.

    “By leveraging the new extensions in OS X El Capitan, we were able to provide Mac users with a streamlined workflow for their RAW images,” said Frédéric Guichard, co-founder and chief image scientist at DxO. “Photographers can now apply world renowned DxO OpticsPro technologies, such as Smart Lighting, ClearView, and PRIME to enhance their favorite images with no more than a click or two, and without ever leaving the Apple Photos app.”

    DxO OpticsPro for OS X Photos is a paid download from the Mac App Store, which when installed automatically appears as an extension that can be accessed via the editing tools in Apple Photos. Launching the extension displays a deceptively simple, yet incredibly powerful user interface and includes access to all DxO Optics Modules currently supported by DxO’s advanced image processing software. The DxO Optics Modules automatically identify the camera and lens used to capture each photo, then use this information to instantly correct for a variety of optical flaws, such as distortion, chromatic aberration, vignetting, and lens softness.

    Other corrections include: Smart Lighting (improves overall dynamic range), ClearView (instantly removes haze and smog from distant landscapes), and white balance. Users can modify the intensity of each correction in three simple levels. The extension also provides access to PRIME, the industry-leading denoising technology that analyzes thousands of neighboring pixels to remove noise while leaving important details untouched.

    DxO ONE owners are invited to freely download and install the D xO OpticsPro for OS X Photos – DxO ONE Camera Only version that automatically applies these same advanced corrections to DxO ONE photos. When applied to a DxO ONE SuperRAWTM image, PRIME employs additional temporal noise reduction to render an amazingly clean, high-resolution photograph from the four RAW images embedded in each SuperRAW file.

    Pricing & Availability

    The DxO OpticsPro for OS X Photos extension, with support for tens of thousands of camera and lens combinations is available today at a special introductory price of $ 9.99/£7.99 via the Mac App Store.

    The DxO OpticsPro for OS X Photos – DxO ONE Camera Only extension is available today as a free download via the Mac App Store for the DxO ONE.

    Articles: Digital Photography Review (dpreview.com)

  • Ricoh launches Theta+ Video app for iPhone

    Ricoh Imaging has announced THETA+ Video for Apple’s iPhone. The app allows for editing of 360° footage and time-lapse videos that have been captured with one of Ricoh’s THETA cameras. You can trim video clips, choosing from four viewing formats including Little Planet, which “projects” the video on a small planet floating in space, and apply 10 different filters. Read more on connect.dpreview.com

    Articles: Digital Photography Review (dpreview.com)

  • Field Test: Brad Puet and the Fujifilm X-T10

    In our most recent Field Test, we took Fujifilm’s X-T10 out onto the streets of Seattle with local photographer Brad Puet. After capturing our street portraits we went about making some prints, first with Fujifilm’s lovely SP-1 Instax printer, and then something a little bigger. See for yourself how the X-T10’s images stand up to exhibition-quality printing.

    Articles: Digital Photography Review (dpreview.com)

  • Improve Your Photography by Having Go-To Places to Shoot

    There is a spot about 25 minutes west of the city. It is a spot right along the highway with a big sign that says, “Scenic Viewpoint”. Naturally it draws a lot of photographers. A quick look on Google will show a lot of sunsets shots, most with the guard rail along the bottom.

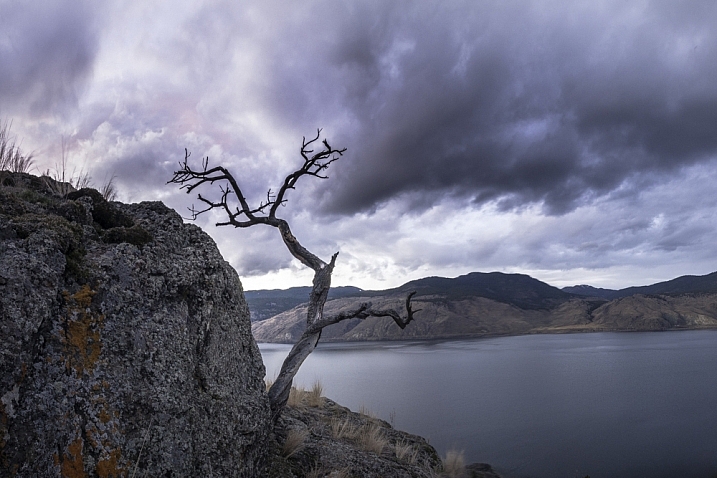
    tree-on-cliff-2

    Having 45 minutes before sunset, with a 20 minute drive, plus 10 minute walk, leaves no time to find and compose a shot. Being able to walk into the spot, set up and shoot makes some shots possible.

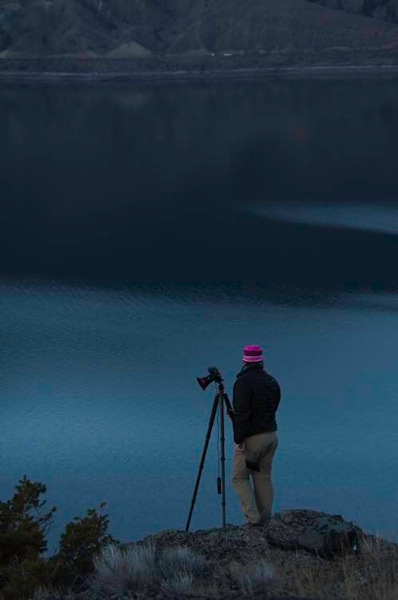
    I know, I am one of them, making the scramble to get set up. Of course, it’s natural not to know the cool little spots when you are just passing through the area. However, after living in a place for some time, you start to learn of some go-to spots. You know, those places you can confidently walk into as the light is building, set up, and be there when the shot happens? If you don’t have a list of go-to spots you may want to consider making one, it can help you improve your photography.

    Over the past couple of years that I’ve been shooting, I have developed a lengthy list of very specific spots (down to where the tripod stands) that all have their ideal season, weather, and time of day combination.

    Peterson

    After an hour of walking this area, I found the spot that aligns the features of this shot. This way if it looks like a certain shot might have good light, I can save myself a ton of hassle and just get to where I need to be quickly.

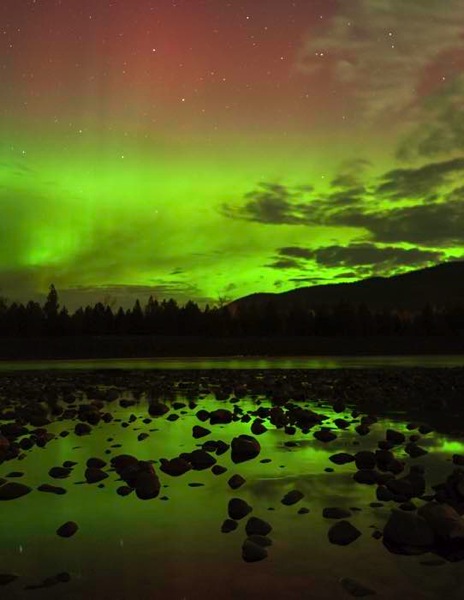
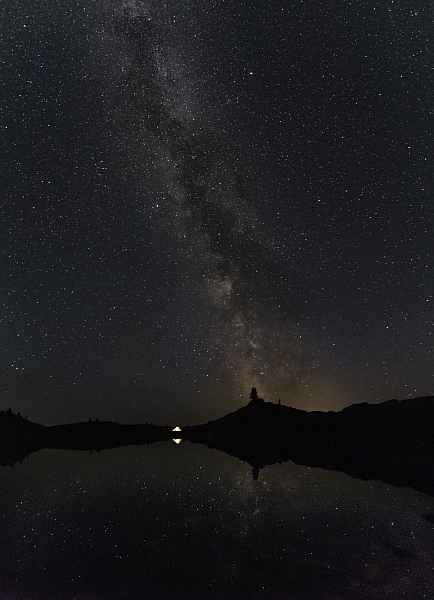
    This is particularly important when shooting at night, the Milky Way, northern lights, etc. Night photography requires a lot of planning. To make an interesting shot, having good foreground and mid-ground objects is key, and just cannot be done blindly in the dark. Thus a lot of mediocre shots are required while scouting a new area. Learning the angles to line up items in your shot with features in the sky.

    River aurora

    This photo was taken on the third trip in to this spot. I knew everything would work, so when the auroras started up I was ready.

    The whole process takes some time, but as you revisit locations you will become so confident about it being right, that you can walk up to that certain rock and set up. There’s no second guessing, and wasting time repositioning for a better composition.

    Building your list of go-to spots

    Most places I shoot, I return to many times. The first trip in is often just to gather info, and shoot some images to use for planning purposes. Here are a few tools that I use:

    1. Facebook:

    Yes Facebook can be useful, I am part of several Facebook photography groups and specifically one for my local area. Going out to photograph with other people, is a great way to learn an area. Just be careful not to poach another photographers exact go-to spot. I also find groups for other places that I plan to visit.

    Ryanfisher2

    Being invited along to an area with another photographers is a privilege. Be sure not to steal their go-to spot.

    2. Google Maps and Images:

    I use Google all the time to find new areas, specifically Maps, for looking into an area to see the lay of the land. The terrain is critical as to how the natural light will play into the shot. If a waterfall only shoots facing north, but you want the sunset behind it, then that will quickly rule out this spot for that shoot. However, it might make a fantastic spot to photograph the auroras.

    3. The Photographer’s Ephemeris:

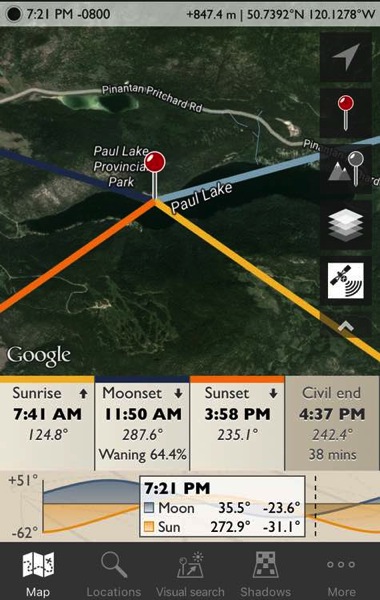
    I use the Photographer’s Ephemeris to place celestial events. I won’t go into the ins and outs of the Ephemeris, but it will allow planning of moonrise, sunset, sunrise, etc., type of shots. It shows the azimuth, and time when certain events occur for any day of the year. Very handy if you plan to photograph the moonrise in a notch along a ridge, or something.

    Ephemeris

    If you are interested in getting a shot of the sun rising at the end of the lake you will have to wait.

    4. Boots on the ground:

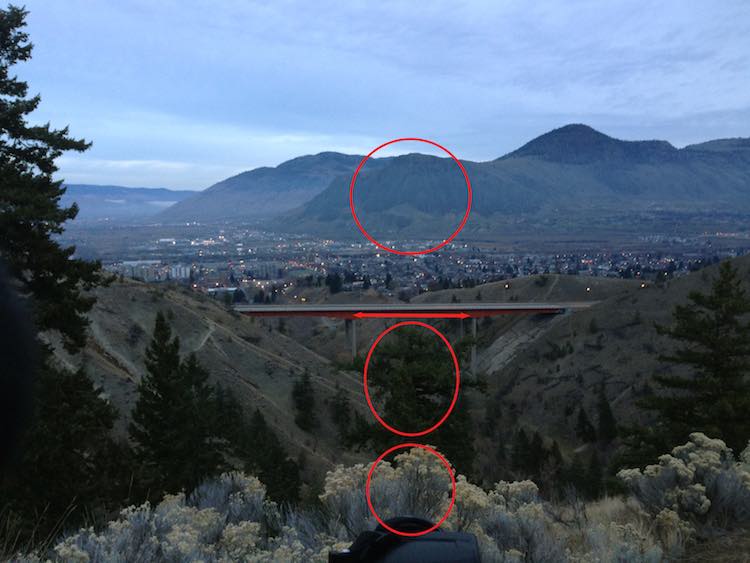
    Research can only take you so far before you have to get your feet dirty. Making day hikes into a new area is by far the best way to explore a specific spot. Just make sure to get off the beaten path, if possible, to see what others might miss. This is also the time to get some shots which I call taking notes. The images can even be iPhone shots, because their purpose is to gather info. I always look at my images and quickly see better positions to shoot from, or a feature that went unnoticed.

    Timing is everything when lining up celestial objects. Knowing your go to spot can help you get the most out of your shots. I wasn't by chance that the Milky Way lines up with that point of rock.

    Timing is everything when lining up celestial objects. Knowing your go to spot can help you get the most out of your shots. I wasn’t by chance that the Milky Way lines up with that point of rock.

    You get the idea. I guess there is a fifth note, and that is to just keep going into places and taking shots. I always see better positions to shoot from while going through my images. Having a lot of go-to spots is the result of simply going to a lot of places. Remembering how each spot shoots, and knowing when the conditions will work best.

    Although I am a landscape and nature photographer, who focuses on night sky photography, I also know the value of go-to spots for portrait and wedding photographers as well. Knowing when and where to shoot can make or break your shots. Being able to reduce harsh shadows and wrong angles to make more of your shots usable.

    Do you have any go-to spots near where you live? Share your images and comments with us below.

    googletag.cmd.push(function() {
    tablet_slots.push( googletag.defineSlot( “/1005424/_dPSv4_tab-all-article-bottom_(300×250)”, [300, 250], “pb-ad-78623” ).addService( googletag.pubads() ) ); } );

    googletag.cmd.push(function() {
    mobile_slots.push( googletag.defineSlot( “/1005424/_dPSv4_mob-all-article-bottom_(300×250)”, [300, 250], “pb-ad-78158” ).addService( googletag.pubads() ) ); } );

    The post Improve Your Photography by Having Go-To Places to Shoot by Dave Markel appeared first on Digital Photography School.


    Digital Photography School

  • How to Use the Canon Camera Connect App

    Cameras with built-in Wi-Fi connectivity are all the rage today, but not necessarily the most intuitive feature to unlock. Luckily, Canon seems to have listened to 6D owners, and increased the ease of use of their Wi-Fi platform by switching up the free mobile phone app that comes with the 6D. Previous versions of the app where called EOS Remote and Canon CameraWindow, but earlier this year, a new improved app called Canon Camera Connect, became the main app endorsed by Canon.

    This is a visual tutorial on how the new app works. Please note that the tutorial is written assuming you already know how to enable Wi-Fi shooting on your particular device.

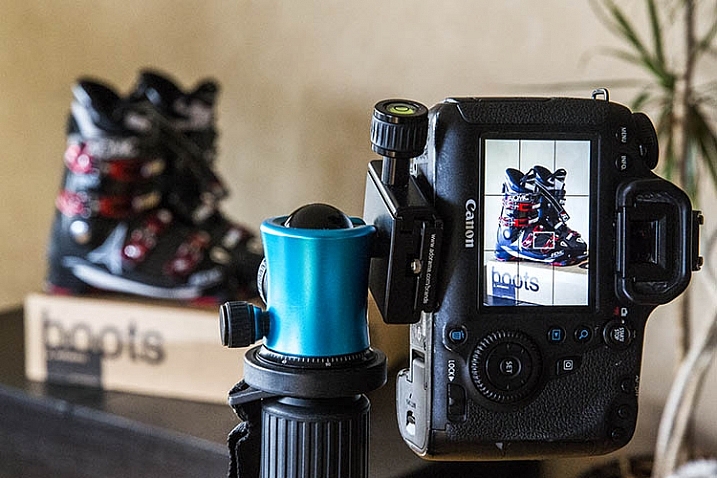
    Canon Wi-Fi App

    Step 1: Check for compatibility and download the app

    Currently, Canon Camera Connect is a free app available for download on Android and iOS devices. The app is compatible with a limited range of Canon digital cameras, including select PowerShot point and shoot cameras, the EOS M2, and the EOS 70D and 6D. You can check full compatibility specs here. This tutorial was created using the Canon 6D camera, and a Moto X Android phone.

    Step 2: Enable the Wi-Fi function on your camera

    This step will likely vary depending on your model of camera. For the Canon 6D, this is a somewhat complicated process that merits its own tutorial, but the methodology can be summarized as such: you are effectively turning your Canon 6D into a Wi-Fi hotspot, that your phone must connect to as a means of communicating with your camera, for either remote shooting or downloading images. Thus, you must first activate the Wi-Fi hotspot on the 6D (or one of the compatible models), then connect to it via your phone’s Wi-Fi networks. Be aware that this WILL temporarily disable your phone’s functionality until you disable the connection with your camera.

    Step 3: Explore the interface of the Canon Camera Connect App

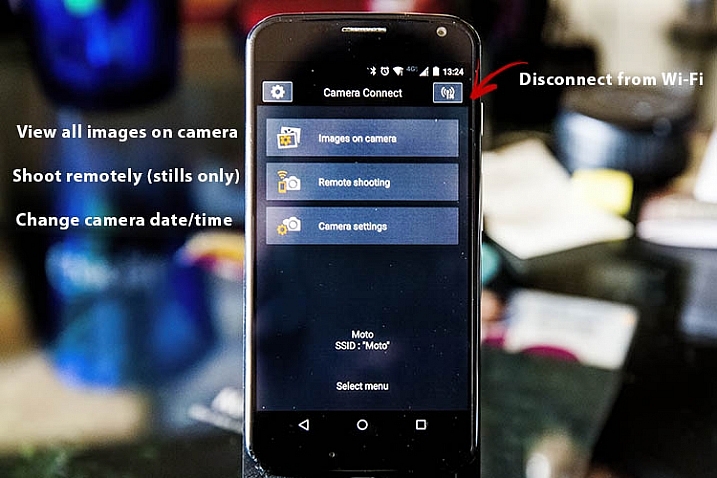
    After you have successfully connected your phone to your camera, the app should launch, and show you the opening screen, as seen below. The app’s menu is minimal, and pretty straightforward. You will most likely stick to the top two options, which are described in more detail below.

    Canon Wi-Fi App

    Images on camera

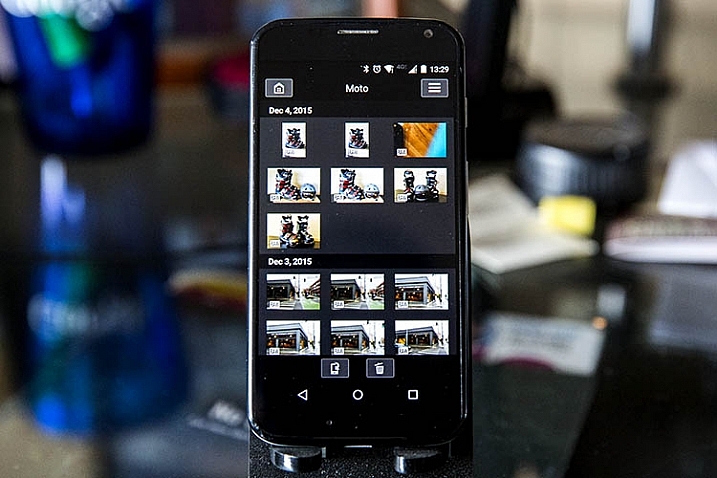
    Pressing this will show you a gallery of all of the images on your connected camera, sorted by the date they were taken. To zoom in to any image, simply tap it with your finger. Three options will then appear at the bottom of the image: Save to phone, favorite (star), or trash. If you wish to share an image via email or social media, remember that you can’t do so without first disconnecting your phone from your camera. To work around this, choose the Save to camera option to store the photo on your phone, and then upload it when your phone has internet connectivity again.

    Canon Wi-Fi App

    Canon Wi-Fi App

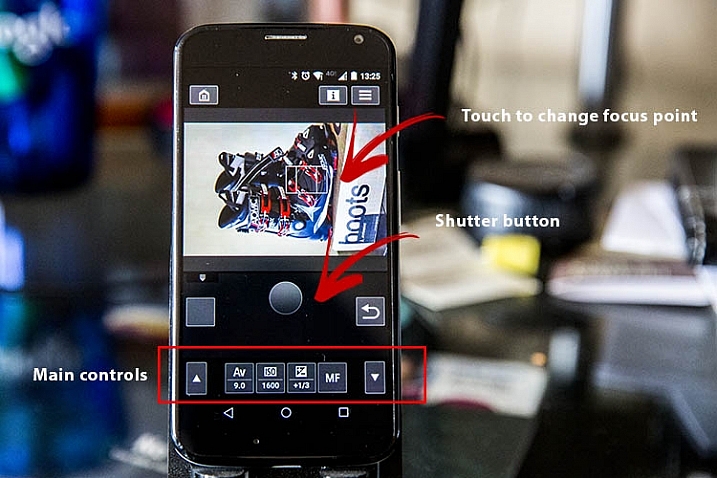
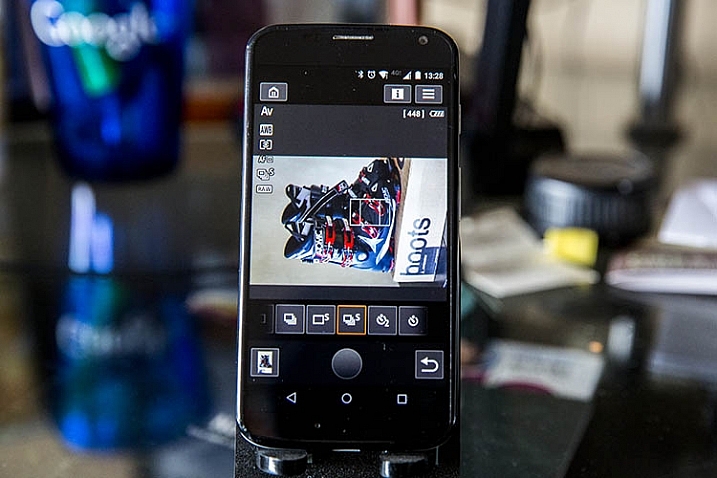
    Remote shooting

    Selecting this option enables live view on your connected camera, and lets you control most of the settings from your phone. Controllable settings include: changing the shutter speed, aperture, ISO, exposure compensation, drive mode, focus mode, and of course the activating the shutter button to take a photo. All the controls can be adjusted and activated using touch screen control. There are a few shortcomings to the remote control settings as listed below, but off the bat the app provides quite a few options for remote shooting.

    Canon Wi-Fi App

    Canon Wi-Fi App

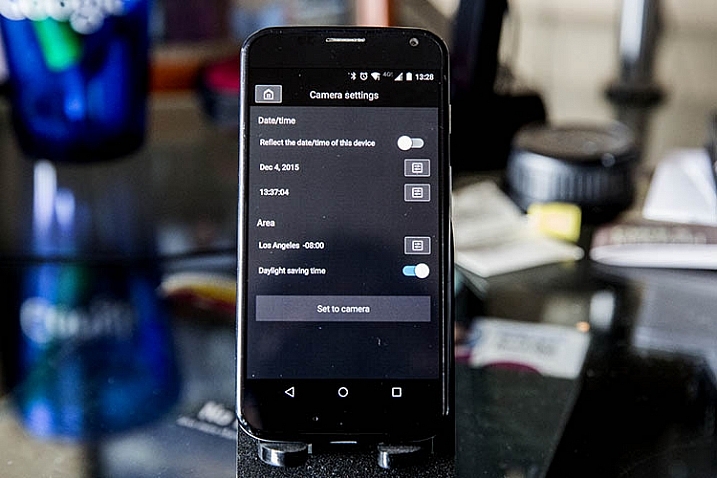
    Camera settings

    The third and final main menu option in Canon Camera Connect app is probably the most useless: it allows you to set the date, time, and time zone of your camera. This is a feature you probably won’t use often unless you take your camera traveling a lot.

    Canon Wi-Fi App

    What the app does

    Shoots in JPG or RAW

    The app is very quick and responsive, even when shooting in large RAW files. Also, it easily resizes RAW files to JPGs when you save images to your phone.

    Will read JPG files taken from any camera

    If you have JPG files taken from any other devices, the Canon Camera Connect will likely be able to read, and transfer them to your phone or tablet. I’ve done this using photos shot from an Olympus Tough TG-2 point and shoot, Fujifilm x100s mirrorless camera, and Canon 5D Mark III, so I would assume it would also hold true for other camera models.

    What the app does not do

    These are shortcomings, specific to using the app with the Canon 6D; some of these issues may not be points of contention when using the app with other compatible camera models.

    Adjust to portrait mode while remote shooting

    If the app does allow this, the user interface needs to be adjusted to make this feature more obvious. As is probably obvious from some demo shots above, I haven’t figured out how to enable it.

    Remote shoot video

    Whenever the Wi-Fi function on your Canon 6D is enabled, you cannot simultaneously activate video recording, so unfortunately remote video shooting cannot be achieved.

    Time lapse

    While you can set your camera to shoot in continuous or self timer mode with the app, there is not the option to shoot time lapses. This is a feature that Canon will hopefully implement in future iterations of the app.

    Hopefully this overview will help you see if this app is useful for you. If you have one of the compatible cameras listed, give it a try and let me know what you think. Do you have any other uses for remote apps I haven’t thought of or mentioned?

    googletag.cmd.push(function() {
    tablet_slots.push( googletag.defineSlot( “/1005424/_dPSv4_tab-all-article-bottom_(300×250)”, [300, 250], “pb-ad-78623” ).addService( googletag.pubads() ) ); } );

    googletag.cmd.push(function() {
    mobile_slots.push( googletag.defineSlot( “/1005424/_dPSv4_mob-all-article-bottom_(300×250)”, [300, 250], “pb-ad-78158” ).addService( googletag.pubads() ) ); } );

    The post How to Use the Canon Camera Connect App by Suzi Pratt appeared first on Digital Photography School.


    Digital Photography School

  • DxOMark Mobile Report added to our iPhone 6s Plus review

    DxOMark has just released its full report into the technical ins and outs and real-world performance of the iPhone 6s Plus’s 12MP camera. We’ve added DxO’s findings into our previously-published in-depth review of the iPhone 6s Plus and you can read the whole thing over at connect.dpreview.com

    Articles: Digital Photography Review (dpreview.com)