Blog

  • Hands on: Sony FE 50mm F1.8 and 70-300mm F4.5-5.6

    Hands on: Sony FE 50mm F1.8 and 70-300mm F4.5-5.6

    Sony’s already had a busy year, and it just got even busier with the announcement of an update to its RX10 series and two new FE lenses: the 50mm F1.8 and 70-300mm F4.5-5.6 OSS. We got to take a first look at them at a press event in San Francisco. 

    Hands on: Sony FE 50mm F1.8 and 70-300mm F4.5-5.6

    The FE 70-300mm F4.5-5.6 is the first full-frame E-mount lens to reach 300mm. It offers SteadyShot stabilization, as evidenced by the OSS on/of switch seen here. 

    Hands on: Sony FE 50mm F1.8 and 70-300mm F4.5-5.6

    The 70-300mm offers a minimum focus distance of 0.9m/2.9ft, a zoom locking mechanism and dust and moisture resistance. It’s fairly compact when used at the wide end…

    Hands on: Sony FE 50mm F1.8 and 70-300mm F4.5-5.6

    …and extends quite a bit to reach that 300mm mark. For the extremely curious, we noted that the lens maintains its widest F4.5 aperture until the 85mm mark, when F5 becomes the widest option. This changes again at 157mm, at which point it stops down to F5.6.

    Hands on: Sony FE 50mm F1.8 and 70-300mm F4.5-5.6

    Sony has posted MTF charts for the 70-300mm, and they show that this lens might be a cut above the typical telezoom. The 70-300 will go on sale in May for $ 1200.

    Hands on: Sony FE 50mm F1.8 and 70-300mm F4.5-5.6

    And now, something a little different: the Sony FE 50mm F1.8. At $ 250 it’s going to be a much more wallet-friendly option than its 55mm F1.8 Zeiss-branded counterpart.

    Hands on: Sony FE 50mm F1.8 and 70-300mm F4.5-5.6

    The 50mm features a 7-blade circular aperture and offers a 0.45m/1.45ft minimum focus distance. Sony emphasizes its compact and lightweight design and indeed, the lens weighs in at a svelte 186g/6.6oz.

    Hands on: Sony FE 50mm F1.8 and 70-300mm F4.5-5.6

    Here’s another view of that 7-blade aperture. The lens comprises six elements in five groups, including one aspherical element. Like the 70-300mm, it’s expected to ship in May. 

    Articles: Digital Photography Review (dpreview.com)

  • Flickr may be up for sale as Yahoo Board of Directors looks to shed web properties

    The future of Yahoo and its many operations, including the photo sharing behemoth Flickr, is uncertain. According to reports, the company’s board is now accepting bids for its web properties, with a deadline of two weeks to submit proposals.

    While Yahoo has not specifically said which operations are up for sale, they have given hints to what a new, slimmed-down Yahoo might look like. According to Reuters, if the board’s restructure goes through as planned, Yahoo will center around Yahoo Search, Mail and Tumblr, as well as four ‘digital content strongholds,’ which include News, Sports, Finance and Lifestyle.

    This seems to indicate that at least according the company’s board, Flickr has no place in the future of Yahoo. But not so fast – there are several other factors at play that could put the kibosh on a sale altogether.

    One of these factors is an attempted hostile takeover of Yahoo’s board by activist investor Starboard Value. Many shareholders, unhappy with financial results, have run out of patience with the current boards plan to turn Yahoo around. This is where Starboard Value comes in. Last Thursday, they announced their intent to overthrow CEO Marissa Mayer, and presented a list of nine alternative board members to replace the current board at the annual shareholder meeting in June.

    If Yahoo is unable to get the ball rolling on sales of its assets before June, there’s a chance that a new board will be ushered in, and move the company in a different direction entirely.

    On the other hand, more than 40 companies have expressed interest in owning a piece of Yahoo, including Microsoft, Verizon, AT&T, Comcast, Time and many more. Whether or not any of those companies specifically have an interest in Flickr is difficult to say. As of June 2015, Flickr had a formidable 112 million active users. That’s not quite the 400 million users Instagram claims to have, but its still a sizable community. For the record, Flickr was first purchased by Yahoo back in 2005, for $ 25 million.

    All the while, Mayer is sticking to her plan for turning around the company, which includes laying off 15 percent of the company’s workforce, closing unprofitable ventures, all while spinning off Yahoo’s stake in Alibaba Group as well as Yahoo Japan into a separate company.

    Needless to say, if you’re in the market for a photo sharing site, now’s the time to bust out the checkbook and make an offer. We just hope if Flickr does make its way into new hands that it goes to a good home.

    Via Reuters and The Associated Press

    Articles: Digital Photography Review (dpreview.com)

  • 3 Reasons Why Mirrorless Cameras are Better than Digital SLRs for Focusing

    Mirrorless cameras and focusing

    A lot has been written about the drawbacks of autofocus performance from mirrorless cameras. Most of this focuses on the tracking of moving subjects – an area where the phase detection autofocus found in digital SLRs is still superior (although the gap is closing).

    But when it comes to focusing on still subjects, the mirrorless camera is a better tool. Surprised? If you’ve never used a mirrorless camera, you may be. Let’s take a look at the reasons why.

    1. Phase detection versus contrast detect autofocus

    Mirrorless cameras have a different autofocus system than digital SLRs.

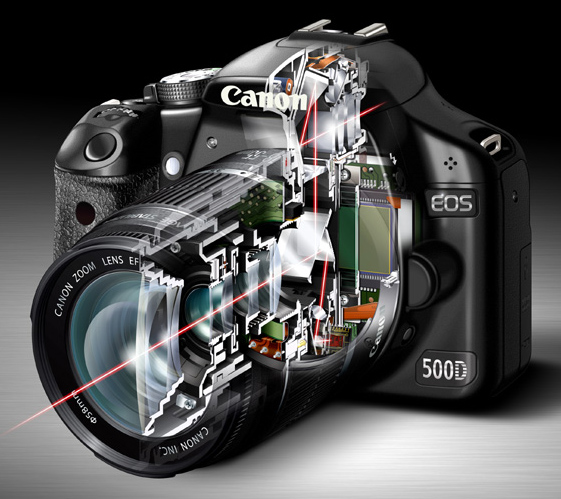
    In a digital SLR most of the light coming through the lens is reflected up by the mirror, into the pentaprism and through the viewfinder. A small part is deflected downwards to a dedicated autofocus sensor. It uses a system called phase detection autofocus to calculate the camera to subject distance, and tell the lens where to focus.
    Mirrorless cameras and focusing

    The red lines in this diagram show the path that light takes through an SLR camera with the mirror in the down position. Most of the light is reflected into the pentaprism and the viewfinder. Part of it is reflected downwards towards the autofocus sensor.

    The advantage of phase detection autofocus is that it’s fast (generally speaking – but it also depends on which camera you have) and very good at tracking moving subjects. It’s the best system anyone has managed to come up with for an SLR camera.

    However, phase detection autofocus has a significant weakness – lack of accuracy.

    There are two main reasons for this. The first is that most digital SLRs have a combination of cross-type and single line autofocus points. Cross-type autofocus points are the most accurate, and should always be used when focus is critical (for example, when using a prime lens at its widest aperture), otherwise the camera may not focus where it is supposed to. Your camera’s manual will tell you which of its AF points are cross-type.

    Whenever you use a non cross-type autofocus point, you cannot rely on the camera to focus accurately. This is fine when using small apertures, which give you plenty of margin for error, but not when focus and accuracy is critical.

    The second reason is to do with camera and lens calibration. Even when you use a cross-type autofocus point your camera may not focus exactly where it is supposed to. For accurate focus, every part of your camera setup – from the autofocus sensor, to lens and autofocus motors that tell the lens where to focus – must be working in perfect harmony. It only takes a small degree of misalignment to throw the accuracy of the system out.

    Most of the time you won’t notice, because there is sufficient depth-of-field to make the focusing inaccuracies irrelevant. But if you use a wide aperture, especially with a telephoto lens, then depth-of-field is measured in millimetres, and accurate focus is essential.

    For example, if you are taking a portrait then it is conventional to focus on the model’s eyes. If you miss focus, and her eyes are soft, then people will notice and the portrait will lose its impact.

    Mirrorless cameras and focusing

    I made this portrait with an EOS 5D Mark II and 85mm lens set to f1.8. With this camera it is necessary to measure and calibrate the autofocus system to ensure accurate focus at wide apertures.

    Most mid-range and high-end digital SLRs have a feature that allows you to measure and compensate for inaccurate focusing. Manufacturers have different names for this – Canon and Sony use the term Autofocus micro-adjustment, Nikon calls it Autofocus fine tune, Pentax uses the term Autofocus adjustment and Olympus Autofocus focus adjust. It’s bit of a long winded process – you have to test your lenses by focusing on a ruler, or a purpose made scale, to see if the focus is accurate, and make adjustments if it isn’t.

    You can also get your camera and lenses calibrated at a service centre. This is the only way to calibrate an SLR camera that doesn’t have the above feature built-in.

    That was bit of a long explanation, but crucial if you are to understand why phase detection autofocus is not as accurate as it should be.

    How are mirrorless cameras different?

    So, how do mirrorless cameras differ? As they don’t have a mirror, there is no way of deflecting light to a dedicated autofocus sensor. The solution is to take a reading from the sensor. The camera looks at the point on the sensor which is meant to be in focus, and adjusts the lens until maximum contrast is achieved. This is called contrast detect autofocus.

    This system is slower, because the camera has to move the lens first one way, then the other, to find the sharpest point. But, it is much more accurate (for still subjects).

    With a mirrorless camera autofocus micro-adjustment is redundant. You don’t need it, and you will never have to measure or calibrate the camera’s autofocus system. It also doesn’t matter which autofocus point you use, as they all work equally well. That is why, for still subjects, autofocus in mirrorless cameras is superior to that of digital SLRs.

    Mirrorless cameras and focusing

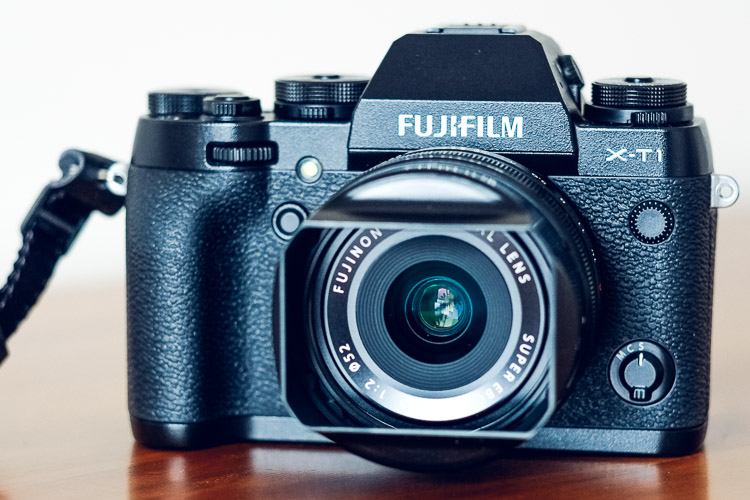
    I made this portrait with a 56mm lens at f/1.2 with my Fujifilm X-T1 mirrorless camera. With this camera it is easy to focus on the model’s eye. There is no need to calibrate the camera’s autofocus system.

    2. Manual focusing

    Mirrorless cameras are also a better tool for utilizing manual focus lenses.

    Modern digital SLRs are not designed to be helpful with manual focus lenses. The split prism focusing screens of the past are gone, and assistance is limited to a light that comes in the viewfinder when the subject underneath the selected AF point comes into focus.

    Mirrorless cameras are different. They have a tool called focus peaking, which is specifically designed to help you manually focus a lens. The camera highlights the parts of the scene that are in focus, so that you can see which areas are sharp. You can also magnify the image at the touch of the button, making it even easier to see whether the subject is sharply focused.

    This feature works best when using lenses at wide apertures. Both tools take advantage of the camera’s electronic viewfinder, a feature that most digital SLRs don’t have.

    Mirrorless cameras and focusing

    This mock up shows how focus peaking works. I made the portrait with a Helios 58mm manual focus lens at its widest aperture setting of f/2. The red lines indicate how focus peaking shows you what is in focus.

    3. Hyperfocal distance

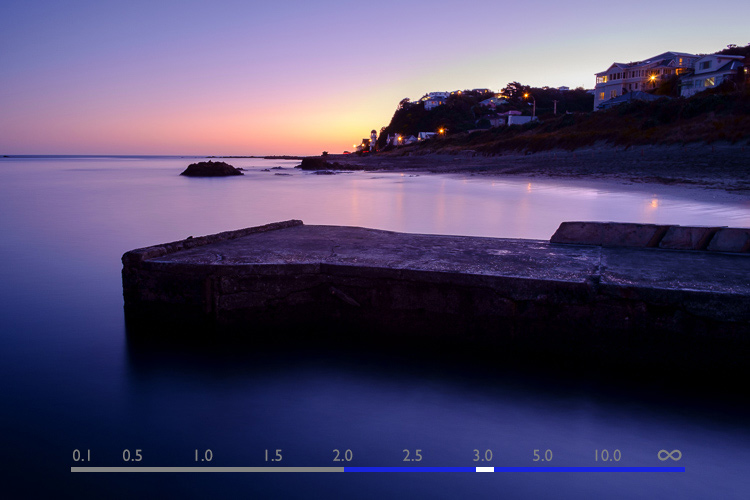
    Fujifilm cameras have another tool that will be of interest to landscape photographers as it helps you instantly find the hyperfocal distance without referring to tables or smartphone apps.

    The viewfinder has a depth-of-field scale that shows you the point you are focused on and the area in focus on either side, according to the selected aperture. If you move the focusing ring until the depth-of-field scale touches the infinity mark at one end, you have found the hyperfocal distance point. It’s quick and easy.

    To be honest, I don’t know if this feature is available in any brand of mirrorless camera other than Fujifilm. I’d be grateful if Sony/Olympus/Panasonic, etc., owners would let us know.
    Mirrorless cameras and focusing

    This diagram shows how the depth-of-field scale works. The bar shows the point the lens is focused on (white), and how much of the scene is in focus (blue). The lens is focused on the hyperfocal point in this made-up example.

    Since buying my first Fujifilm camera a little over 18 months ago, I’ve been pleasantly surprised by what a great tool mirrorless cameras are for photography. They are much better than my old digital SLR for focusing on still subjects, or for using manual focus lenses.

    The difference is so great that I predict that one day most photographers will use mirrorless cameras, and digital SLRs will be a niche item built for photographing sports and wildlife.

    But what do you think? Please share your thoughts, or ask any questions about focusing, in the comments below.


    Mastering Lenses

    If you want to know more about lenses and autofocus check out my ebook Mastering Lenses: A Photographer’s Guide to Creating Beautiful Photos With Any Lens.

    googletag.cmd.push(function() {
    tablet_slots.push( googletag.defineSlot( “/1005424/_dPSv4_tab-all-article-bottom_(300×250)”, [300, 250], “pb-ad-78623” ).addService( googletag.pubads() ) ); } );

    googletag.cmd.push(function() {
    mobile_slots.push( googletag.defineSlot( “/1005424/_dPSv4_mob-all-article-bottom_(300×250)”, [300, 250], “pb-ad-78158” ).addService( googletag.pubads() ) ); } );

    The post 3 Reasons Why Mirrorless Cameras are Better than Digital SLRs for Focusing by Andrew S. Gibson appeared first on Digital Photography School.


    Digital Photography School

  • Hands-on with the Sony RX10 III

    Hands-on with Sony Cyber-shot RX10 III

    The Sony Cyber-shot RX10 III boasts a 24-600mm equivalent zoom lens, 14fps continuous stills shooting and 4K video capture. We’ve had the chance to get hands-on with Sony’s newest flagship compact camera today for a few hours, and we’ve put together some first impressions. Click through this slideshow for a closer look at the new Cyber-shot RX10 III.

    Hands-on with Sony Cyber-shot RX10 III

    Cosmetically and ergonomically, the RX10 III is a near twin of its predecessor the RX10 II. It feels the same, looks pretty much the same and the key controls are laid out in the same way. The grip has been slightly redesigned (our impression is that it’s slightly more comfortable when the lens is zoomed fully, but there’s not much in it) but if you’ve used an RX10 II, the RX10 III will feel immediately familiar.

    At just over a kilo (~2.3 pounds) in weight the RX10 III is not not quite as heavy as it looks, and in use (like the RX10 II) it feels solid and well-made. 

    Hands-on with Sony Cyber-shot RX10 III

    The RX10 III isn’t a particularly ‘compact’ camera when it’s turned off, but once it’s turned on and the lens extends, it gets even larger. Here, the camera is shown with its lens zoomed out to 24mm…

    Hands-on with Sony Cyber-shot RX10 III

    …and here’s what the camera looks like when zoomed in all the way to 600mm. This is a big lens and it takes around 4 seconds to go from 24mm to 600mm. 

    Hands-on with Sony Cyber-shot RX10 III

    To help frame your shot with such a long zoom, Sony has provided a ‘Zoom Assist’ feature that lets you jump back to wider framing so that you can re-find your subject, before releasing the button to jump back to your chosen zoom level.

    Hands-on with Sony Cyber-shot RX10 III

    The RX10 III boasts a powerful video feature set, based around 4K capture which samples a 17MP chunk of the sensor then down-scales to 4K, . In theory, this should mean that video quality is pretty darned good, and we’ll be posting some samples as soon as we can. 

    As we’d expect from a camera with such solid video credentials the RX10 III offers headphone and microphone sockets, as well as HDMI out and USB (2.0). This view also shows the articulating rear screen, folded out. As usual (sadly) for Sony, the screen is a magnet for finger prints and general crud, and isn’t touch-sensitive.

    Hands-on with Sony Cyber-shot RX10 III

    The RX10 III’s built-in flash is (as usual for cameras like this) pretty weedy, but its pop-up mechanism raises it unusually high above the lens axis, which should reduce the risk of red-eye in portraits, and minimize shadowing caused by the massive lens. 

    Hands-on with Sony Cyber-shot RX10 III

    The rear control layout of the RX10 III is exactly the same as the RX10 II. Twin control dials (one to the right of the movie button and one around the 4-way controller) allow control over exposure parameters, and a generous rubber thumb grip helps to get a firm hold on the camera. 

    The RX10 III’s electronic viewfinder is very nice indeed, boasting 2.35 million dots (giving 1024 x 768 pixel resolution).

    Hands-on with Sony Cyber-shot RX10 III

    The RX10 III is rated for 420 shots from its supplied NP-FW50 lithium-ion battery, which is a modest increase from the 400 shot rating of the RX10 II (as per CIPA ratings in both cases). For maximum battery life, deactivate the built-in Wi-Fi and NFC when not in use.  

    Hands-on with Sony Cyber-shot RX10 III

    One of the things we liked about the RX10 and RX10 II is the physical aperture ring. The RX10 III also boasts two additional rings for focus and zoom – the latter function doubled by a conventional compact camera-style ‘W-T’ rocker around the shutter release. And note that the shutter button is threaded for a mechanical cable release – a nice touch, and a subtle indication of the RX10 III’s high-end positioning. 

    Hands-on with Sony Cyber-shot RX10 III

    We’ll be posting images and video samples from the RX10 III as soon as we can – keep an eye on our homepage!

    Articles: Digital Photography Review (dpreview.com)

  • Lightroom Quick Post-Processing Tips for Landscape Photography

    Processing a good landscape image is a lot like getting a good haircut…it should look good, but people shouldn’t really be able to tell you’ve had anything done. Now while that may be a slightly funny (hopefully) analogy, it really is a good way to approach the editing of your landscape photos. Ideally, the image should be developed to its full potential in accordance to your vision, while stopping well short of over-processing. The key to pulling off a strong landscape image can sometimes be understanding when to stop.

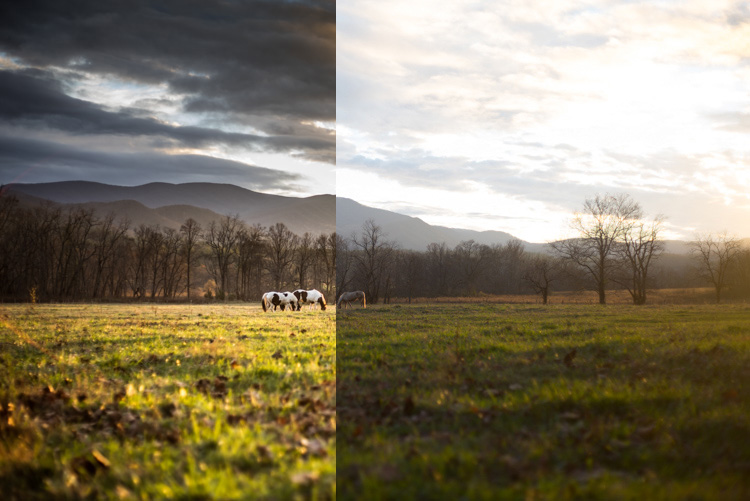
    Before and After Split

    In this article, we will go from a straight out of the camera RAW file to a fully processed photograph using Adobe Lightroom CC. We will look at each step, and I will explain why each edit was made. By the end, you will see just how easy it is for you to take full control of your landscape photography with a few simple edits.

    Shoot in RAW

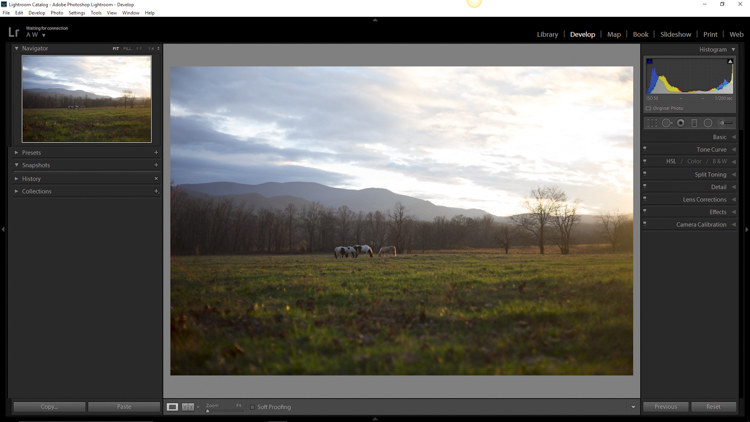
    Here we have the RAW file as it looked after importing into Lightroom.

    RAW Screenshot

    As always, the better the ingredients you have to begin with, the better the finished product will be. This means to always strive to make for best exposure, crop, and composition you can, before any processing is applied. Shooting in RAW format helps you immensely when working with landscapes. The greater dynamic range (exposure latitude) will allow you to bring up shadows, and manage highlights, much better than with smaller JPEG files. I know, I know – you’ve heard all of this before – but it doesn’t hurt to hear it again! RAW truly is the best friend of the landscape photographer.

    Crop first

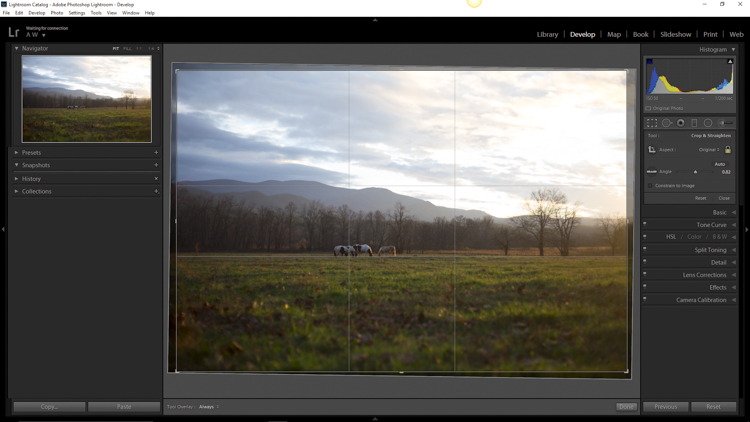
    The image above is virtually level, but not perfectly so. The first thing we will do is open the crop panel and tweak the alignment before we begin any development. Having a grid overlay will really help you to get the lines of the image just right (with the crop tool activated, press the O key to cycle through all the grids available until you find the one you want). If you wanted to crop the image further, this would be done here as well.

    Crop

    Add Graduated Filters to adjust sky and foreground

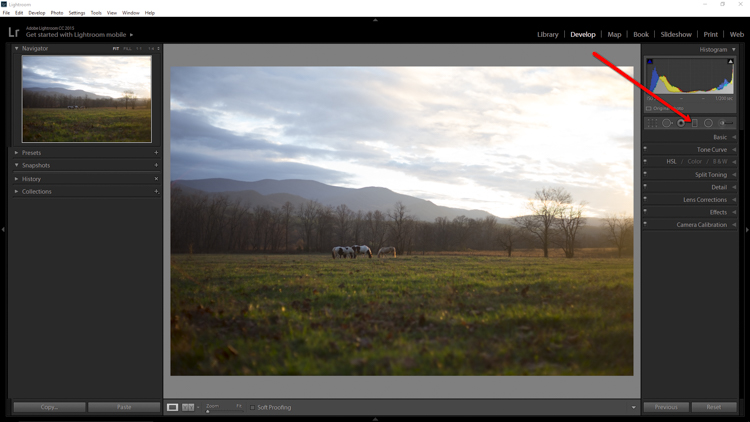
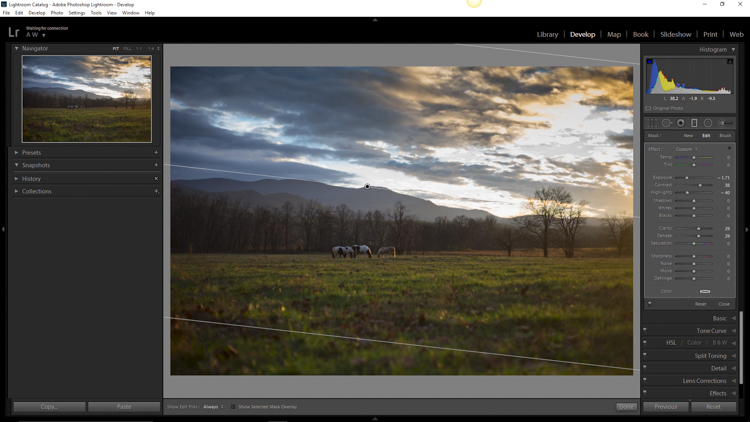
    Now that the image has been straightened, it’s time for the real fun to begin. The first thing to do is take control of the sky so that it isn’t quite so bright. To do this, we will use the Graduated filter tool. It’s located just above the Basic Panel in the develop module, in the same row as the crop tool.

    GND Indicator

    The filter simulates the effect of a graduated neutral density filter. It is an indispensable tool for adjusting landscape photos. Using the Graduated filter, you can decrease the exposure, add a little contrast, and then increase the clarity just to make the clouds more pronounced, which adds a little drama in the sky. In this example I also took town the highlights, and dehazed ever so slightly. The dehaze feature is a relatively new addition to the Lightroom tool box, is available in Lightroom 6 and Lightroom CC, and really helps when clearing skies.

    GND Sky

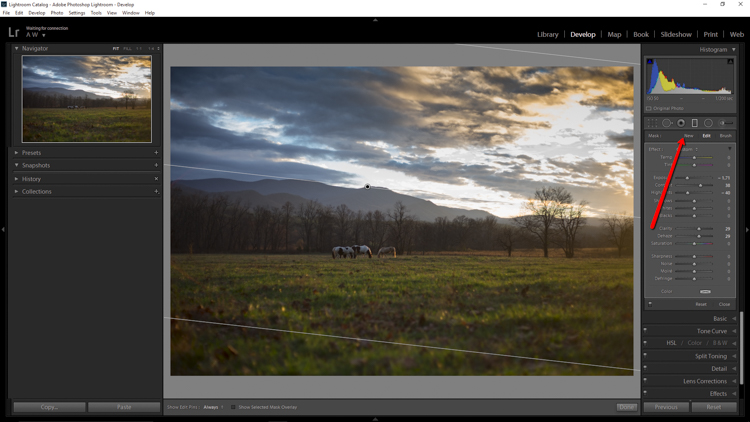
    Next, you want to process the foreground but not disturb the edits you’ve just made to the sky. To do this, click new to make a new Graduated filter.

    New GND Indicator

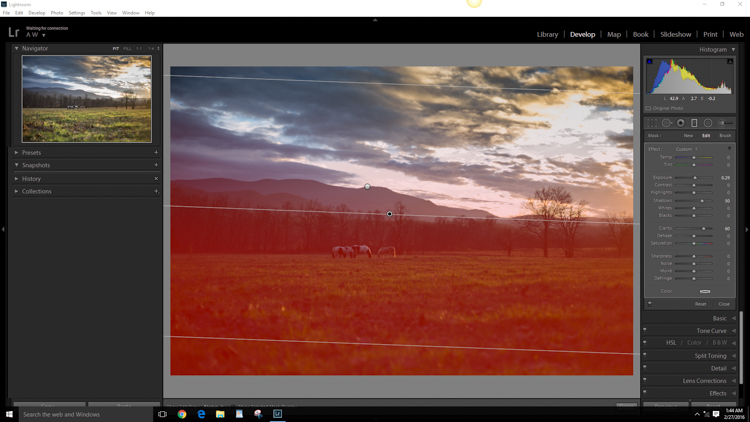
    To better understand where your edits will be applied with the ND filter, simply hover the pointer over the indicator dot for a second. Everything in red indicates where the filter is working (you can also just press the o key and it will show the mask overlay – it may also show in another color on your screen, press Shift+o to cycle through all the various colors).

    GND Red

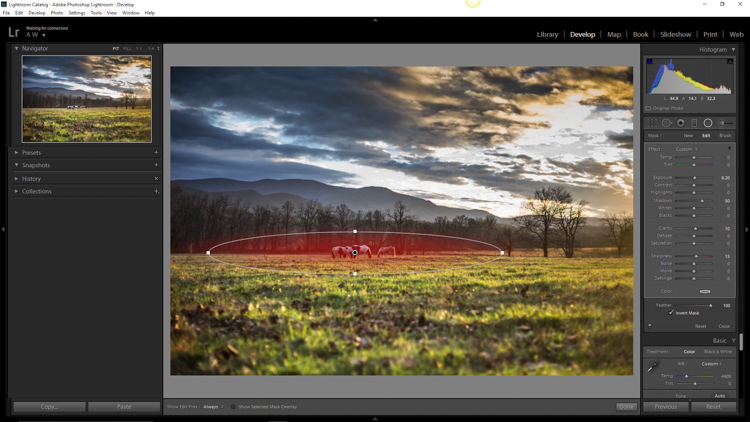
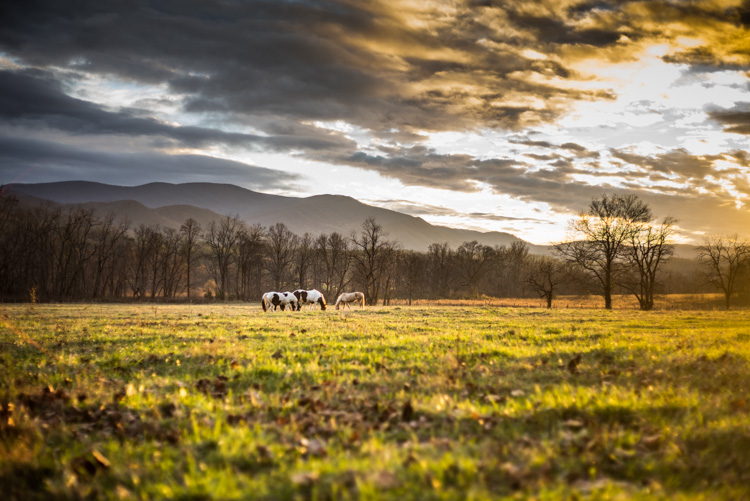
    Using the Graduated filter, I increased the clarity of the foreground grass, as well as illuminated the shadows. This will help to draw the viewer’s eye into the image. I’m careful not to overdo the exposure here. The main subjects of the image are the horses, and the mountains in the background, so I want to keep those emphasized. Speaking of horses…

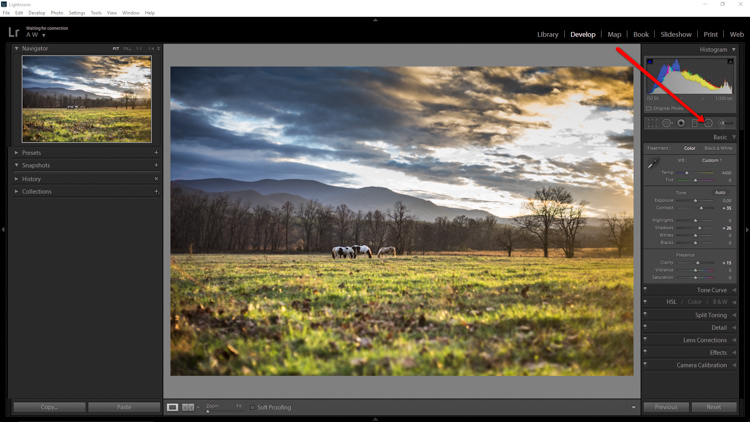
    Do local edits using a Radial Filter

    I wanted to really make the horses standout within the photo so let’s make use of another powerful tool in the Lightroom arsenal – the Radial filter. It works virtually the same way as the Graduated filter, except that it is applied in the form of a circle (fully adjustable). It can be set to apply edits either inside or outside of the circular outline.

    Circular GND Indicator

    With the Radial filter, I raised the shadows around the horses and increased clarify slightly. I also threw in a little extra sharpening there as well. When using the Radial filter, it’s important to remember that the border between what is, and what is not edited, is very controllable. Make use of the feathering slider in order to control the density of your adjustments as they radiate outward or inwards of the circle. Effective feathering will make make your adjustments with the Radial filter seamlessly blend in with the rest of the image. Here you can see exactly where the edits will be applied.

    Circular GND Red

    Makes global adjustments

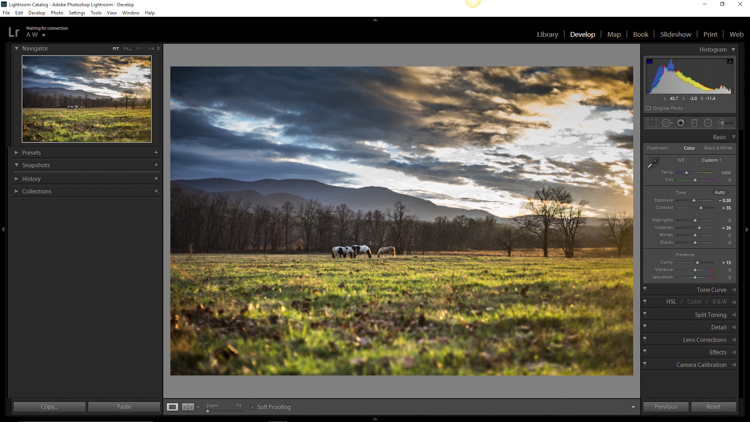
    So far, the image has been processed using only the Graduated and Radial filter tools for local adjustments (specific areas). Now we will make some final global (whole image) adjustments in the Basic Panel.

    I brought up the overall contrast and shadows, and added in a little bit more clarity. Doing this made the highlights a little too harsh so I reduced the exposure by -10. This photograph was made in the waning golden hours of sunset, so I increased the total temperature (white balance) from 4400 to 5200, so that the tone better matched what I was feeling at the time of the exposure.

    Global Adjustment

    Add an edge vignette

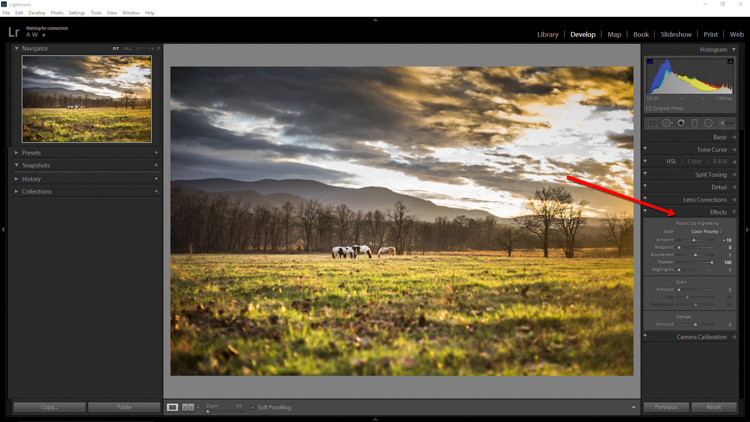
    As a final touch, I add in a small amount of vignetting.

    Vignette

    Vignetting is great because it serves to draw the viewer’s attention into the image. In the case of this photo it works well, but that is not always the case. Just as with any other effect used in post-processing, discretion is the name of the game. When using a vignette, make sure it fits the overall mood of the image. Experiment with the feathering slider (and others) until you achieve the desired effect. As a general guideline, very subtle vignetting usually works best.

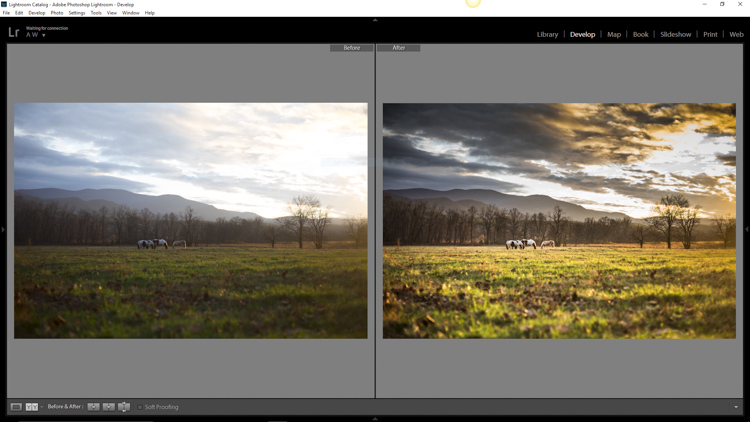
    See, that wasn’t difficult at all! We have went from a completely unprocessed RAW file to a fully developed image using relatively few edits in Adobe Lightroom.

    Before and After

    Processing a landscape image doesn’t have to be a massive undertaking. Everything you do to a landscape photograph should compliment the scene and add harmony. You have some incredible processing tools available today which can help you to achieve your creative vision. Be careful that you don’t go too far, though. Every photograph is as unique as a fingerprint, and should be approached individually. Use the techniques in this article as a guide to your processing, and have fun helping your photos reach their full potential.

    Finished

    If you have any additional landscape post-processing tips that work for you, please share in the comments below.

    googletag.cmd.push(function() {
    tablet_slots.push( googletag.defineSlot( “/1005424/_dPSv4_tab-all-article-bottom_(300×250)”, [300, 250], “pb-ad-78623” ).addService( googletag.pubads() ) ); } );

    googletag.cmd.push(function() {
    mobile_slots.push( googletag.defineSlot( “/1005424/_dPSv4_mob-all-article-bottom_(300×250)”, [300, 250], “pb-ad-78158” ).addService( googletag.pubads() ) ); } );

    The post Lightroom Quick Post-Processing Tips for Landscape Photography by Adam Welch appeared first on Digital Photography School.


    Digital Photography School

  • Famous Figures: How 21 Different Architects Draw Scale Humans

    [ By WebUrbanist in Art & Drawing & Digital. ]

    norman foster figure

    Many contemporary architects cut and paste scale figures into their renderings to show depth and dimension, but in cases where they draw their own, aspects of their style and personality become apparent in the radical differences between their approaches.

    frank gehry figure

    walter gropius figure

    steven holl figure

    Frank Gehry’s figure, perhaps predictably, is a mess of forms and shapes. Walter Gropius’ betrays a Bauhaus bent, all angles and boxes. Steven Holl, of course, is a lovely little watercolor, expressive and reflective of his well-known habit for creating daily water-colored sketches.

    renzo piano figure

    alvaro siza figure

    New York architectural designer Noor Makkiya has collected twenty-one such examples for a series dubbed simply Figures, isolating them on neutral backgrounds to allow for easy side-by-side comparisons.

    sanaa figure

    mies van der rohe figure

    The variations are dramatic, between highly-stylized forms to simplified human figures or completely abstract sets of shapes forming nearly-illegible avatars, all showing something about the architect behind them and how they choose to represent their work.

    santiago calatrava figure

    lenoardo de vinci figur

    From the collector: “Human figures are typically used in an architecture rendering to provide a clear scale for the common eye. Thanks to new technologies like Photoshop we have lost our “ontological dimension”, and the copy paste method we use makes it easier for us to fill architecture renderings with a desultory crowd of figures.”

    peter cook figure

    oscar neymeier figure

    le corbusier figure

    “True architects since the early centuries used human figures not only to describe the quantity and the quality of the environment but also for deeper purposes of study and expression. Some used it as means of architecture inspiration, demonstrating the divine power of the human order. Other architects use human figures to emphasize on the activity within the space, sometimes it is important to depict the spatial properties of a design. Architects project themselves into the human figure. So if we compare drawings from different architects, we frequently find differences in body shape and body activity, for practicing architects often represent their own ideologies as a reference for understanding the human physical condition.”

    Share on Facebook


    [ By WebUrbanist in Art & Drawing & Digital. ]

    [ WebUrbanist | Archives | Galleries | Privacy | TOS ]


    WebUrbanist

  • Sony Cyber-shot DSC-RX10 III puts emphasis on lens reach and video capabilities

    $ (document).ready(function() { SampleGalleryV2({“containerId”:”embeddedSampleGallery_4452101136″,”galleryId”:”4452101136″,”isEmbeddedWidget”:true,”standalone”:false,”selectedImageIndex”:0,”startInCommentsView”:false,”isMobile”:false}) });

    Sony has unveiled the Cyber-shot DSC-RX10 III, surpassing the zoom range of its predecessor with a 24-600mm equiv. F2.4-4 lens. The camera uses the same 1″-type stacked CMOS sensor which produces 20MP stills as well as 4K/UHD video, and does not replace the RX10 II, which continues in Sony’s lineup.

    The RX10 III’s sizable lens makes room for aperture, focus and zoom rings, as well as a focus hold button. The camera offers an XGA OLED EVF with 2.36 million dots, as well as a tilting LCD. The body is dust and moisture resistant. Sony claims that its SteadyShot stabilization system offers up to 4.5 stops of benefit.  

    The Cyber-shot RX10 III’s lens features eight ED glass elements, including two ED aspherical and one Super ED glass elements. A SteadyShot stabilization system provides up to 4.5 stops of benefit, according to Sony.

    An updated shutter provides a fast read-out ‘anti-distortion’ electronic shutter up to 1/32,000sec as well as a silent shooting mode. Wi-Fi and NFC have also come along for the ride.

    Movie capabilities

    Like the RX10 II, the RX10 III features a solid video specification; offering 4K video from 1.7X oversampled, full pixel readout (without binning). The camera alsio offers the video-centric Picture Profile modes that give fine-grained control over the camera’s tonal and color responses, and include the very flat S-Log2 and S-Log3 gamma curves. Like the RX10 II, the III includes both a mic input socket for using an external mic and a headphone jack for monitoring that recorded audio. 

    It also offers the high frame rate ‘HFR’ videos modes that capture footage at up to 960 fps (albeit at reduced resolutions) and then play it back as 1080p/24.

    The Sony Cyber-shot DSC-RX10 III will sell for around $ 1500, a $ 200 premium over the existing RX10 II.


    Press Release:

    Sony’s New Cyber-shot RX10 III Camera Brings Extended Zoom Capability to Acclaimed RX Line

    SAN FRANCISCO, Mar. 29, 2016 – Sony – a worldwide leader in digital imaging and the world’s largest image sensor manufacturer – has today announced an exciting new addition to its acclaimed Cyber-shot RX lineup, the high-zoom RX10 III camera.

    Featuring a newly-developed 25x super-telephoto zoom lens with an extensive focal range of 24-600mm1, the new RX10 III camera is able to produce high-quality content at a variety of focal lengths and camera settings that would require three or more large, heavy and expensive lenses for an interchangeable lens camera user. It’s an outstanding choice for a shooting anything from landscapes to distant wildlife and everything in between.

    The RX10 III high zoom camera is equipped with a 1.0 type stacked 20.1 MP Exmor RS™ CMOS sensor with DRAM chip and advanced signal processing, along with a powerful BIONZ X™ image processor. These components work together to ensure the highest possible image quality throughout the entire zoom range of the 24-600mm lens. Additionally, they are responsible for a variety of standout professional-caliber features including 40x super slow motion video capture at up to 960 fps, an ultra-fast Anti-Distortion Shutter with a maximum speed of 1/32000 second, high resolution 4K movie shooting and more.

    “By pairing the convenience of an ultra-telephoto lens with our innovative stacked CMOS image sensor design, we’ve created a whole new image experience unlike anything else in market today,” said Neal Manowitz, Vice President of Digital Imaging at Sony Electronics. “The new RX10 III offers a true ‘all in one’ package that will appeal to a wide range of amateur, hobbyist and professional photographers and videographers.”

    New ZEISS® Vario-Sonnar T* 24-600mm F2.4 – F4 Lens

    The impressive 24-600mm ZEISS® Vario-Sonnar T* lens on the Cyber-shot RX10 III camera features a large maximum aperture of F2.4 – F4.0, helping it achieve outstanding image quality throughout the entire zoom range, all the way up to ultra-telephoto. This differentiates it from many other high-zoom lenses that often struggle with light-gathering at longer focal lengths. The aperture unit itself has nine blades that are designed to create a near perfect circle in the F2.4 – F11 range, enabling shooters to create content with beautiful bokeh, where the subject stands out against a softly defocused background.

    In total, the extended zoom lens features eight ED glass elements including one super ED glass element, five ED glass elements and two ED aspherical lenses, which all work together to minimize chromatic aberration and deliver high-contrast, ultra-sharp image quality. It also has ZEISS® T* Coating for minimizing flare and ghosting and delivering accurate, faithful color reproduction.

    The new lens has built-in Optical SteadyShot™ image stabilization that helps to reduce camera shake and image blur, in particular when shooting at longer focal lengths. When active, the OSS is equivalent to shooting at a shutter speed approximately 4.5 stops3 faster than the current setting of the camera.

    Additionally, with a minimum focusing distance of 72 cm (2.36 ft) and 0.49x maximum magnification at a fully extended 600mm, the new lens is capable of producing amazingly detailed tele-macro images.

    High Quality Image Detail

    The RX10 III features a back-illuminated 20.1 MP 1.0-type stacked CMOS sensor and BIONZ X image processing engine that allow the camera to achieves a wide sensitivity range of ISO 644 – ISO 12800 and produce images with exceptionally low noise, even at higher sensitivity settings.

    Additionally, the rear of the sensor has a DRAM chip that allows it to read and process large volumes of data exceptionally fast, enabling the camera to shoot super slow motion video at up to 960 fps. The powerful DRAM chip also allows the RX10 III to shoot continuously at up to 14fps with minimal blackout.

    With shutter speeds as fast as 1/32000 second, the electronic shutter on the RX10 III minimizes image distortion at faster shutter speeds. It also offers silent shooting at all settings and speeds, ensuring all content can be captured quietly without disrupting the subject, a powerful feature when combined with the wide-ranging zoom lens.

    High Quality 4K Movie Recording

    The new RX10III model becomes the latest and most versatile Cyber-shot RX camera to offer the advantages of 4K (QFHD 3840×2160) movie recording thanks to its far-reaching 24-600mm lens, which gives videographers the luxury of shooting high quality 4K video from extreme distances.

    In 4K video mode, the RX10 III camera utilizes full pixel readout without pixel binning, capturing approximately 1.7x more information than is required for 4K movie output to enhance image detail and minimize moiré and jaggies. It achieves these high-quality results through use of the XAVC S codec, which records video at a high data rate of up to 100 Mbps during 4K recording and up to 50 Mbps during full HD recording5.

    The new camera also has a variety of other professional caliber video features including Picture Profile, S-Log2/S-Gamut, Gamma Display Assist, Time Code and more, as well as input for external microphone and output for headphone monitoring.

    Super Slow Motion Video Recording

    The new RX10 III also possesses the ability to record super slow-motion video at up to 40x slower than the standard rate, allowing users to capture and replay fleeting moments of action with incredible detail, resolution and clarity.

    In “HFR” (high frame rate) setting, it offers the option to choose among 960fps, 480fps and 240 fps frame rates and among 60p, 30p and 24p playback formats6,7 with the option to use the movie record button as a ‘start trigger’ to begin recording once button is pressed or ‘end trigger’ to record footage up until the button is pressed.

    High Speed Autofocus

    The new RX10III camera is equipped with an impressive autofocus system with spatial object detection, allowing the camera to detect and predict motion of a subject before the shutter button is pressed, This helps the camera achieve an incredibly fast and efficient AF response when the shutter is halfway pressed, enabling it to lock on to a subject in as little as 0.09 seconds8. This is a yet another compelling technology, especially when paired with a versatile, highly capable 25x zoom lens with a range up to 600mm.

    Ergonomics and Design

    Aesthetically, the new RX10 III features a number of upgrades compared to existing RX10 models including triple lens rings for focus, zoom and aperture for direct, precise control. The hand grip shape has also been optimized for the new high-magnification, large-aperture lens to enhance stability when holding the camera at eye level. There is a new focus hold button on the lens barrel as well, allowing the focus to be easily locked on a subject while the shooter reframes the image.

    The new model features a high-contrast XGA OLED Tru-Finder™ with approximately 2.35 million dots of resolution, ensuring true-to-life image preview and playback functionality. The camera is also dust and moisture resistant and both Wi-Fi® and NFC™ compatible, with the ability and can access Sony’s growing range of PlayMemories Camera Applications. Learn more at www.sony.net/pmca. A dedicated LCJ-RXJ soft carrying case will also be available for the new camera.

    Pricing and Availability

    The new Sony Cyber-shot RX10 III extended zoom camera will be available this May for about $ 1,500 US and $ 2,000 CA, respectively. The new cameras and all compatible accessories will be sold at a variety of Sony authorized dealers throughout North America. 

    Notes to Editors:

    1. 35mm equivalent focal length
    2. Approx. effective megapixels
    3. CIPA standard, pitch/yaw directions, at 600mm (35mm equivalent,Telephoto)
    4. Both ISO 64 and ISO 80 are expandable ISO range
    5. A class 10 or higher SDXC/SDHC memory card is required for movie recording in XAVC S format. UHS-I (U3) SDHC/SDXC card is required for 100Mbps recording
    6. Sound cannot be recorded when shooting slow motion. An SDXC memory card of Class 10 or higher is required.
    7. In NTSC
    8. CIPA standard, internal measurement, at 24mm (35mm equivalent, Wide), EV8.2, Program Auto, AF area: Centre, with NTSC mode

    Sony Cyber-shot RX10 III specifications

    Price
    MSRP $ 1499
    Body type
    Body type SLR-like (bridge)
    Body material Magnesium alloy, composite
    Sensor
    Max resolution 5472 x 3648
    Other resolutions 4864 x 3648, 5472 x 3080, 3648 x 3648, 3648 x 2736, 3648 x 2592, 3648 x 2056, 2544 x 2544, 2736 x 1824, 2592 x 1944, 2720 x 1528, 1920 x 1920, 640 x 480
    Image ratio w:h 1:1, 4:3, 3:2, 16:9
    Effective pixels 20 megapixels
    Sensor photo detectors 21 megapixels
    Sensor size 1″ (13.2 x 8.8 mm)
    Sensor size notes Stacked CMOS sensor
    Sensor type BSI-CMOS
    Processor Bionz X
    Color space sRGB, AdobeRGB
    Color filter array Primary color filter
    Image
    ISO Auto, 125 – 12800 (expands to 64-25600)
    Boosted ISO (minimum) 64
    Boosted ISO (maximum) 25600
    White balance presets 9
    Custom white balance Yes
    Image stabilization Optical
    Uncompressed format RAW
    JPEG quality levels Extra fine, standard, fine
    File format
    • JPEG (DCF 2.0, EXIF 2.3)
    • Raw (Sony ARW 2.3)
    Optics & Focus
    Focal length (equiv.) 24–600 mm
    Optical zoom 25×
    Maximum aperture F2.4 – F4.0
    Autofocus
    • Contrast Detect (sensor)
    • Multi-area
    • Center
    • Selective single-point
    • Tracking
    • Single
    • Continuous
    • Face Detection
    • Live View
    Autofocus assist lamp Yes
    Digital zoom Yes (4X)
    Manual focus Yes
    Normal focus range 3 cm (1.18″)
    Macro focus range 3 cm (1.18″)
    Number of focus points 25
    Screen / viewfinder
    Articulated LCD Tilting
    Screen size 3″
    Screen dots 1,228,800
    Touch screen No
    Screen type TFT LCD
    Live view Yes
    Viewfinder type Electronic
    Viewfinder coverage 100%
    Viewfinder magnification 0.7×
    Viewfinder resolution 2,359,296
    Photography features
    Minimum shutter speed 30 sec
    Maximum shutter speed 1/2000 sec
    Maximum shutter speed (electronic) 1/32000 sec
    Exposure modes
    • Auto
    • Program auto
    • Aperture priority
    • Shutter priority
    • Manual
    Scene modes
    • Portrait
    • Sports Action
    • Macro
    • Landscape
    • Sunset
    • Night Scene
    • Handheld Twilight
    • Night Portrait
    • Anti Motion Blur
    Built-in flash Yes
    Flash range 10.80 m (at Auto ISO)
    External flash Yes (Multi-interface shoe)
    Flash modes Auto, fill-flash, slow sync, rear sync, off
    Drive modes
    • Single-shot
    • Continuous
    • Speed priority continuous
    • Self-timer
    • AE/WB/DRO Bracketing (single, continuous)
    Continuous drive 14.0 fps
    Self-timer Yes (2 or 10 sec, continuous)
    Metering modes
    • Multi
    • Center-weighted
    • Spot
    Exposure compensation ±3 (at 1/3 EV steps)
    WB Bracketing Yes
    Videography features
    Resolutions 3840 x 2160 (30p, 25p, 24p), 1920 x 1080 (60p, 60i, 24p) ,1440 x 1080 (30p), 640 x 480 (30p)
    Format MPEG-4, AVCHD, XAVC S
    Videography notes High speed modes at 240, 480, 960 fps
    Microphone Stereo
    Speaker Mono
    Storage
    Storage types SD/SDHC/SDXC, Memory Stick Duo/Pro Duo/Pro-HG Duo
    Connectivity
    USB USB 2.0 (480 Mbit/sec)
    HDMI Yes (micro-HDMI with 4K still and uncompressed HDMI output)
    Microphone port Yes
    Headphone port Yes
    Wireless Built-In
    Wireless notes 802.11b/g/n with NFC
    Remote control Yes (via smartphone)
    Physical
    Environmentally sealed Yes
    Battery Battery Pack
    Battery description NP-FW50 lithium-ion battery and charger
    Battery Life (CIPA) 420
    Weight (inc. batteries) 1051 g (2.32 lb / 37.07 oz)
    Dimensions 133 x 94 x 127 mm (5.24 x 3.7 x 5″)
    Other features
    Orientation sensor Yes
    Timelapse recording No
    GPS None

    Articles: Digital Photography Review (dpreview.com)

  • Sony announces 50mm F1.8 and 70-300mm F4.5-5.6 full-frame lenses

    Sony today announced a pair of FE-mount full-frame lenses for its Alpha and NEX mirrorless cameras. The first is an FE 50mm F1.8 prime lens, giving photographers a considerably less expensive option compared to the Zeiss 55mm F1.8 currently on the market. This compact and lightweight lens is priced at $ 249 and will ship in May.

    The other lens is the 70-300mm F4.5-5.6 G OSS, which is the longest FE-mount tele-zoom available. It features four aspherical and two ED elements, optical image stabilization, and a Nano AR coating to reduce flare and ghosting. The lens offers a minimum focus distance of 0.9m/3ft, and uses a linear actuator for smooth and silent autofocus. The 70-300 will also be available in May at a price of $ 1199.


    Press release:

    Sony Bolsters Full-Frame FE Lens Lineup with New 70-300mm High-Resolution Zoom and 50mm F1.8 Prime Lenses

    New FE 70-300mm F4.5-5.6 G OSS Telephoto Zoom and 50mm F1.8 Prime Lens Extend Sony ? Shooting Possibilities

    SAN FRANCISCO, Mar. 29, 2016 – Sony Electronics, a worldwide leader in digital imaging and the world’s largest image sensor manufacturer, has today introduced two new full-frame lenses for their E-mount camera system, the FE 70-300mm F4.5-5.6 G OSS telephoto zoom and 50mm F1.8 prime lens. 

    The new FE 70-300mm F4.5-F5.6 G OSS zoom lens represents the first Sony ? E-mount lens to reach a 300mm focal length, featuring high resolution and excellent overall optical performance throughout the entirety of its range.  The new 50mm F1.8 prime lens is extremely compact, lightweight and affordably priced, making it an ideal choice for those looking to explore the benefits of a large aperture prime lens at a reasonable cost. 

                “We’re continuing to build out our FE lens lineup, offering more variety than ever for today’s imaging enthusiasts,” said Neal Manowitz, Vice President of Digital Imaging at Sony Electronics.  “Representing two of the most requested focal lengths by our customers, the new 70-300mm zoom and 50 F1.8mm prime become ideal choices for those looking to expand and enhance their Sony ? kits.

    New FE 70-300mm F4.5 – 5.6 G OSS Telephoto Zoom Lens

    Sony’s longest reaching E-mount lens to date, the new FE 70-300mm F4.5 – 5.6 G OSS telephoto zoom lens (model SEL70300G) features a state-of-the-art optical design including four aspherical glass elements, two ED (Extra-low Dispersion) glass elements and Sony’s Nano AR coating, which all work together to effectively suppress spherical aberration, distortion, and chromatic aberration.  This ensures beautiful high-resolution results for both still and video shooting.

    The new telephoto zoom lens also features class-leading close-up performance, with a minimum focusing distance of less than 3 feet (0.9m) and a maximum magnification of 0.31x, making it an ideal choice for tele-macro photography.  This outstanding close-up performance also factors into the lens’ excellent corner-to-corner sharpness.

    The versatile zoom lens includes built-in Optical SteadyShot image stabilization that helps to reduce camera shake, making it easier to capture clear images when shooting handheld.  Additionally, the new SEL70300G model has a linear actuator that allows it to achieve fast, smooth and quiet autofocus and is also dust and moisture resistant1 to ensure reliable operation in harsh outdoor conditions.

    New FE 50mm F1.8 Prime Lens

    Weighing in at less than 7 oz (192 g), the new lightweight FE 50mm F1.8 “normal” prime lens (model SEL50F18F) delivers an outstanding blend of performance, compactness and value, making it a perfect choice for hobbyist photographers and videographers looking to experience the benefits of a wide aperture prime lens at an attainable cost.

    The lens features a new optical design with an aspherical element that effectively compensates for all forms of aberration, resulting in beautiful, crisp imagery.   Additionally, it has a circular aperture with a maximum of F1.8, producing beautiful ‘bokeh’ in images that allows the subject to stand out against a smoothly defocused background.  For extended durability, the new prime lens is built with a solid metal mount.

    Pricing and Availability

    The new FE 70-300mm F4.5 – 5.6 G OSS telephoto zoom lens will be available in May for about $ 1,200 US and $ 1,700 CA, respectively. 

    The new FE 50mm F1.8 prime lens will also be available in May for about $ 250 US and $ 350 CA, respectively. 

    Both of the new FE interchangeable lenses will be sold at a variety of Sony authorized dealers throughout North America.   

    A variety of exclusive stories and exciting new content shot with the new lenses and other Sony ? products can be found atwww.alphauniverse.com , Sony’s new community site built to educate, inspire and showcase all fans and customers of the Sony ? brand. 

    Content is also available for viewing at the sony.com product pages for the FE 70-300mm F4.5 – 5.6 G OSS telephoto zoom lens and the FE 50mm F1.8 prime lens.

    Articles: Digital Photography Review (dpreview.com)

  • 9 Things You Need to Know to Become a Nature Photographer

    Nature photography is a very popular field to be involved in. That’s no surprise though, as it gets you outdoors and seeing our planet in a way that others may miss. When I first started as a nature photographer, I began to see things differently. It sounds cliché, but I paid more attention to my surroundings and saw things from different angles.

    Will Nicholls 3This tutorial will look at some of the most important things to keep in mind if you are looking to become a nature photographer.

    #1 You’ve got to love it

    Luckily this isn’t a very hard thing to adhere to, but you must love nature to excel at capturing it on camera. Nature photographers spend a lot of time outdoors. If you’re a landscape photographer, you’ll spend lots of your time hiking through scenic areas for just a few clicks of the shutter. Wildlife photographers often spend hours and hours sitting in one place, waiting for an animal to appear. Without the passion and drive behind you, this can be mind-numbing.

    So it’s not for everyone, but if you’re reading this article, then chances are you have that interest programmed within you already!

    #2 Be different

    While it’s great that nature photography is so popular, this brings with it one big challenge – everybody is doing it. This means you need to figure out how you can be different (assuming you want your photos to be noticed).

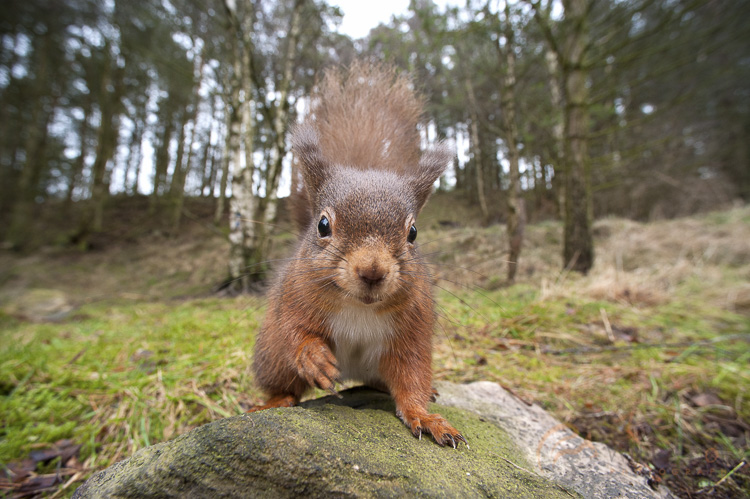
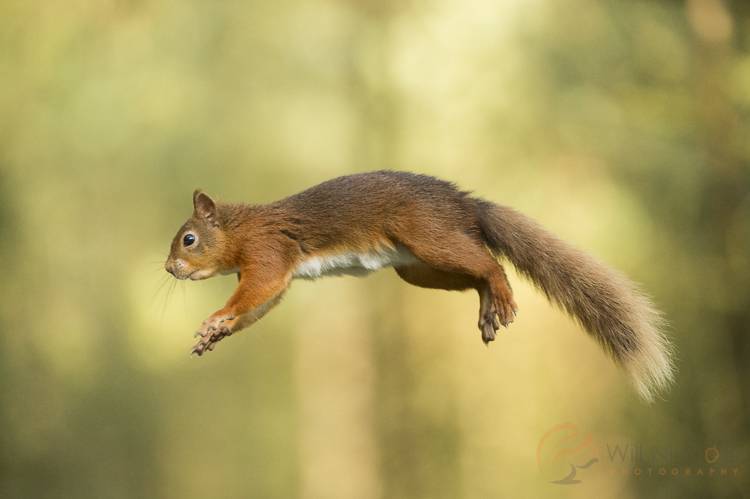
    This could be anything from focusing, and specializing on a single family or species of animal, to developing an artistic quirk and style in your photography. Personally, I spend a lot of my time photographing red squirrels – thousands of hours actually, to give you some idea. All this time has allowed me to learn about the animal, and capture behaviour that others have not managed.

    Will Nicholls 5

    #3 Take risks

    By taking risks I mean with your time, not necessarily something dangerous to your wellbeing. As the saying, “Nothing ventured, nothing gained.” suggests, if you don’t take risks then you are unlikely to capture those truly mesmerizing images.

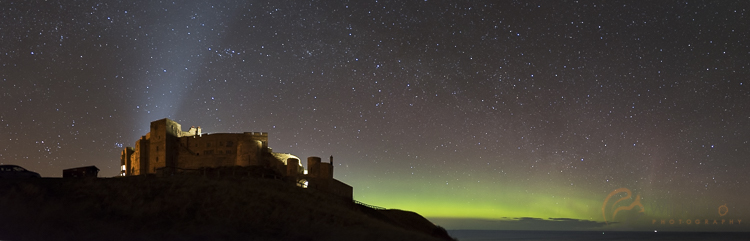
    Recently in the North of England, there was a display of the aurora borealis. Typically, it is hard to predict this phenomenon, and the available forecasts only look an hour ahead. It can finish as quickly as it starts, so planning for such an event is not really possible. I decided that I wanted to capture the Northern Lights with a particular castle in the foreground, but it was over two hours away. Nevertheless, at 2 a.m. I dropped everything, and raced off to the coast. When I arrived the display was weakening, but I waited a further two hours and the lights erupted in front of me. I got home at 8 a.m., but it was well worth it.

    I’m particularly pleased with this result as photographing the Aurora Borealis can be especially challenging because we are positioned only just north enough to see them.

    Will Nicholls 8

    #4 Be respectful of nature

    Unfortunately, this is one thing that is not adhered to by everyone who calls themselves a nature photographer. Having an ethical approach to your photography, especially when it involves animals, is of the upmost importance. Those who don’t are shamed within the industry, and immediately lose the respect of the majority of photographers who really care about their subjects.

    No photo should come before the welfare of an animal or place. It’s just that simple, and remembering this rule will help to improve your photos in the long run. The best photographers don’t cut corners, and you’ll find they have a great affinity with the environment.

    Will Nicholls 4

    #5 Think about what you’re photographing

    It’s easy to press the shutter when you finally find what you’re looking for, whether that be an animal or a scene, but clicking the shutter without thought will often result in unimpressive photos. Think about what you’re trying to convey to the viewer. You want the person looking at the picture to feel like they are in your shoes, looking at the scene themselves.

    For landscape photography, this often comes with effective composition, thinking about both your foreground and background to properly document a scene, and avoiding a flat appearance.

    With wildlife photography, this comes from capturing the character and behaviour of an animal. Impactful photos can be achieved by establishing eye contact between the viewer and the subject.

    Will Nicholls 7

    #6 Introduce scale

    Sometimes we are just bowled over by the scale of something in nature. Documenting this with a camera can be tricky as you’re recording a three dimensional scene with a two dimensional medium. Think about using objects to show scale in your photos.

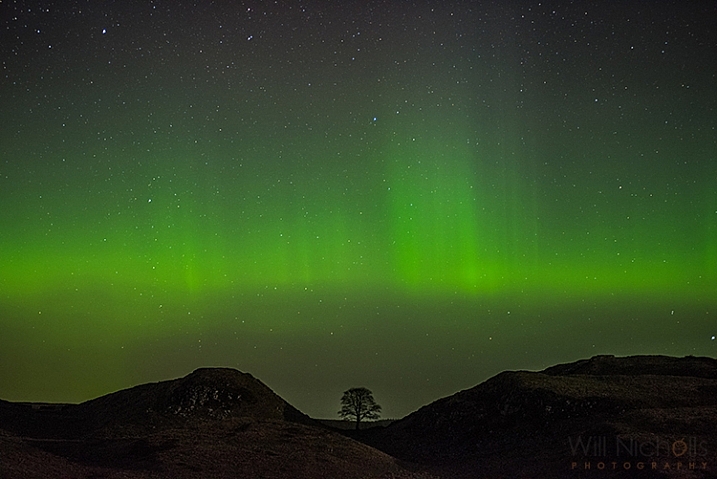
    For this photo of the Northern Lights, I photographed it above a tree. This tree is particularly famous, resting in a gap on Hadrian’s Wall in England – and it’s actually rather large itself! This helps to convey the expanse of the sky and display above.

    nature photography


    #7 Try a different lens

    This is another way of experimenting with your photos, and it works for both landscape and wildlife photography. If you usually shoot with a wide-angle lens, then put it down and pick up a telephoto. If you use a telephoto, then try something shorter. This forces you to play with perspective, and capture something new.

    Photographing wildlife with a wide-angle lens is great fun, and can result in some fun shots that incorporate the surroundings into the image.

    Will Nicholls 2

    #8 Plan your shoots

    Just because nature is relatively unpredictable, that doesn’t mean you shouldn’t plan your shoots. Have an idea of a photo you want to capture, and keep at it. Maintaining a long-term study of an area, or animal, will allow you to capture something extra special. It may be that particular shot you’ve been chasing, or something completely different.

    #9 Don’t give up

    If it was easy then everyone would do it. Nature photography requires a huge amount of time, but it should also be something that you can relax and enjoy – it definitely shouldn’t be a burden on you.

    Will Nicholls 6

    Results don’t come instantly, and like anything, it takes practice to achieve great images. Since you can’t direct nature and tell it what to do, taking good photos can be a longer process than in the other disciplines, but the challenge is what keeps it interesting.

    Please share any other things you’ve noticed about being a nature photographer, and your nature images in the comments below.

    amzn_assoc_placement = “adunit0”;
    amzn_assoc_enable_interest_ads = “true”;
    amzn_assoc_tracking_id = “dpsgeneral-20”;
    amzn_assoc_ad_mode = “auto”;
    amzn_assoc_ad_type = “smart”;
    amzn_assoc_marketplace = “amazon”;
    amzn_assoc_region = “US”;
    amzn_assoc_linkid = “6710d26f550e9793f41475ee806fee9e”;
    amzn_assoc_emphasize_categories = “13900861”;
    amzn_assoc_fallback_mode = {“type”:”search”,”value”:”digital cameras”};
    amzn_assoc_default_category = “Photo”;

    googletag.cmd.push(function() {
    tablet_slots.push( googletag.defineSlot( “/1005424/_dPSv4_tab-all-article-bottom_(300×250)”, [300, 250], “pb-ad-78623” ).addService( googletag.pubads() ) ); } );

    googletag.cmd.push(function() {
    mobile_slots.push( googletag.defineSlot( “/1005424/_dPSv4_mob-all-article-bottom_(300×250)”, [300, 250], “pb-ad-78158” ).addService( googletag.pubads() ) ); } );

    The post 9 Things You Need to Know to Become a Nature Photographer by Will Nicholls appeared first on Digital Photography School.


    Digital Photography School

  • Photo Pranks To Trick Your Pals

    It’s April Fools’ Day!*

    *APRIL FOOLS. It’s really not till Friday.

    You still have time to plan the perfect photo prank.

    So, we’ve rounded up our favorite ways to trick our buddies. Oh, and there’s a spider on your shoulder.

    (…)
    Read the rest of Photo Pranks To Trick Your Pals (0 words)


    © laurel for Photojojo, 2016. |
    Permalink |
    No comment |
    Add to
    del.icio.us

    Post tags:


    Photojojo