Blog

  • Tips for Shooting the Milky Way

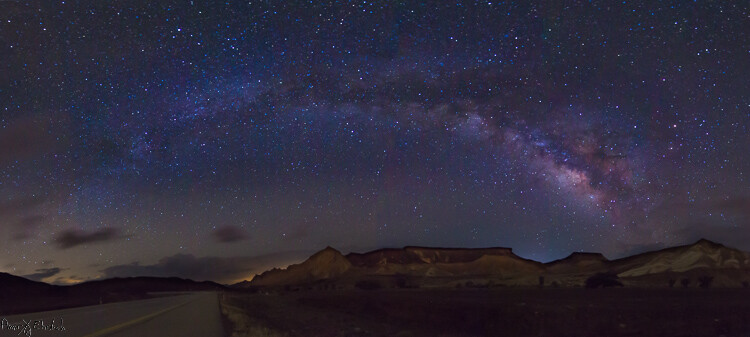
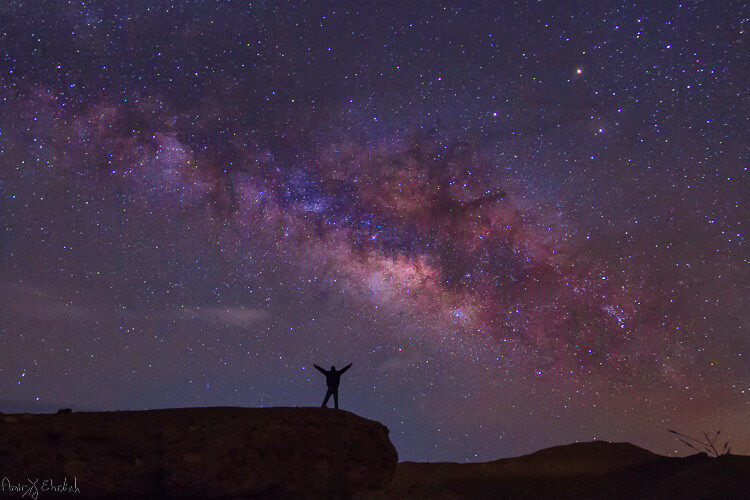
    Seeing the Milky Way with your own eyes is what you may call a jaw dropping experience, but one that can be truly achieved only in complete darkness. While stars are visible even in light polluted areas, the Milky Way’s beauty, which is actually caused by concentrations of stars, gas and dust, fades away in the light polluted areas and cannot be seen.
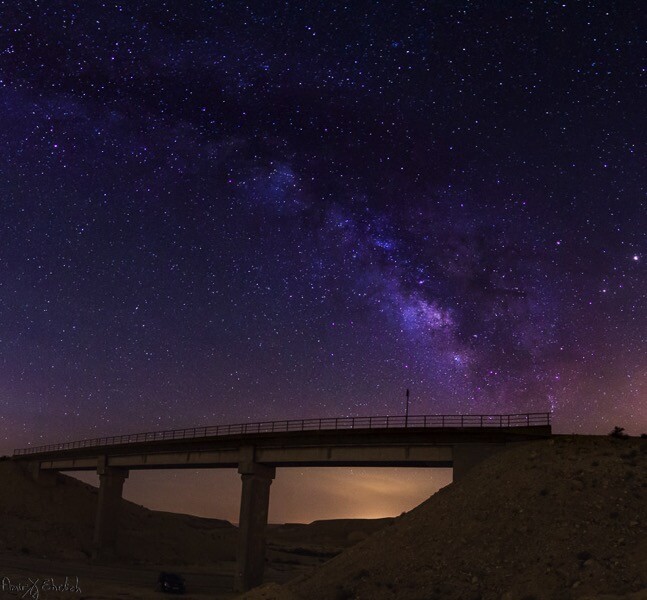
    2 frames portrait

    Before going in to practice, you need to understand few things about the appearance of the Milky Way:

    • The part that you want to shoot is the center of the galaxy, and it is not visible all year long. In the northern hemisphere the Milky Way is best observed between April and September. During April and May it is almost parallel to the horizon (the best time for Milky Way panoramas) while in June to September it gets more vertical.
    • Unlike star trail photography, when shooting the Milky Way your goal is to achieve a sharp image, where the stars are seen as points and do not smudge.
    • At the beginning of the Milky Way season, it rises above the horizon late at night – and as the months pass, it rises earlier and earlier.
    • Getting a good photograph requires quite a lot of editing, in order to emphasis the Mily Way’s colors and shapes.

    Planning ahead

    Before going out to shoot the Milky Way, there is some planning that needs to be done.

    • Choose your location carefully (there is no place for spontaneity). There are several things to consider, but most importantly you need a dark location, as far as possible from light polluted areas. Consider that city halos are visible at night for a very long distance, so get as far as possible from light sources. The darker the area you’re in, the clearer the Milky Way will be seen.
    • Consider an interesting item to be used as your anchor in the photo. It is not enough to shoot the Milky Way, you want to have a nice foreground to make your photo interesting and unique. Find yourself a big tree, an interesting rock formation, a pier on a lake, or any other item to be used as your anchor. Try to make your foreground correspond the the Milky Way’s view.
    • Learn about the weather and lunar (moon) phases – to get a good, clean shot you need a good, clear and dark sky. Choose that period of the month when the moon is not visible in the night sky, and make sure the forecast does not predict too many clouds. High humidity is also not good, as it may accumulate on your lens and result in blurry frames.
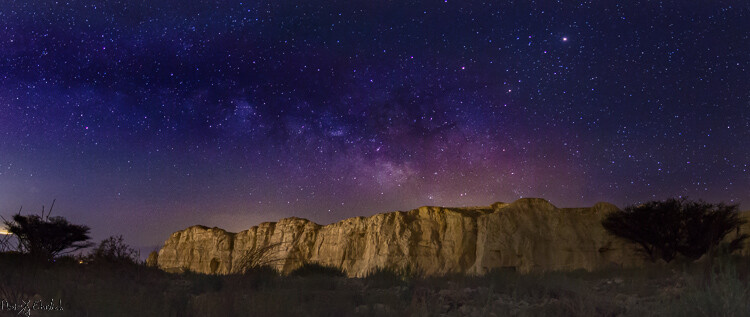
    2 frame landscape

    Prepare your gear

    Before you head out make sure you are prepared with:

    • A DSLR camera with a fully charged battery. Unfortunately – not any DSLR (or mirrorless) camera will work for you. You need to be able to go to a minimum of ISO 2,000 and preferably even higher.
    • Plenty of room on your memory card. Shooting in RAW is crucial for post-processing.
    • A wide angle lens. Anything between 10-20 mm will give you good results. You can shoot also with narrower lens but results will be less impressive. A wide aperture is also essential to allow lower ISO.
    • A strong, steady, tripod. When placing it, make sure nothing will cause it to shiver from a passing wind.
    • A remote control can help but it is not mandatory – you can program your camera to shoot in delay mode or self-timer.
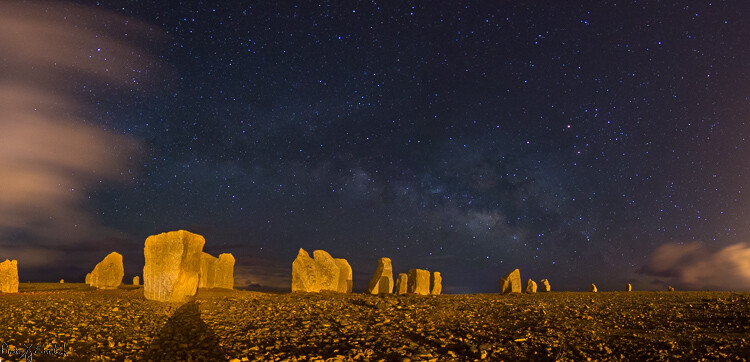
    3 frames

    Getting started

    Single frame option:

    Although you may want to show as much of the Milky Way as possible, it cannot stand alone. Your photo must rely on a strong anchor, or foreground, if you want your viewers to be really impressed. You also need to consider that it is impossible to have all of the Milky Way in your frame, and shooting a panorama may be a good solution.

    In most cases, it will be quite difficult, to the verge of impossible, to build your composition at night, in total darkness. So, it is better to arrive before night falls and it gets too dark to see. The last minutes of the day are your best time to plan and build your composition. But, remember to consider the expected location of the Milky Way in the sky. Use one of the many sky apps available to help you plan.
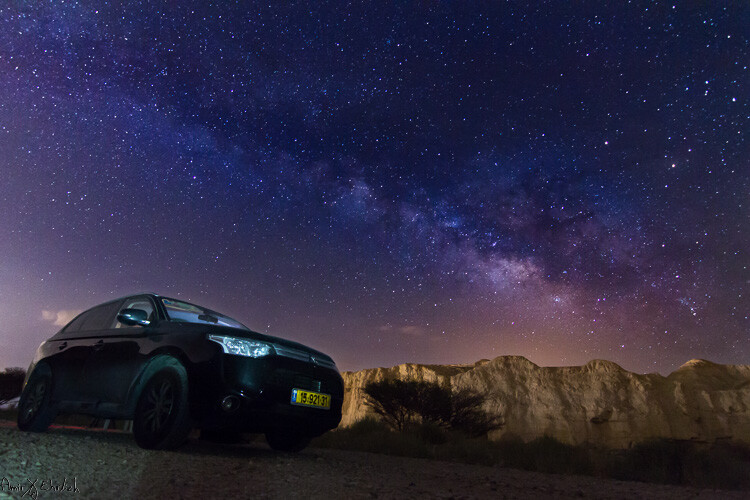
    1 frame

    Single frame shot.

    Take the first shot which will be used as the foreground of the frame. If you want your foreground to be a silhouette then all is good but, if you want details to be shown, you will need to have at least one frame lit. This can be achieved in a few ways:

    • Shooting one frame during twilight (to be blended in during post-processing later).
    • Using a high ISO and longer exposure.
    • Using an outside light source such as flash (with a flash it is better to use a CTO gel for the right temperature).
      Your goal here is to get one frame that has good appearance of your chosen foreground. It is better to take a few options; using different ISO level, exposure time, lightning options, to be able to choose the best rest afterward. When satisfied, you can move on.

    Set your camera to the widest aperture you have on your lens, the highest ISO bearable, manual focus to infinity, and longest possible shutter speed, considering the rotation of earth (see below).

    Choosing the correct shutter speed:

    • If your exposure is too long, the rotation of earth will start to have impact, and the stars will start to arch in your frame.
    • Calculate the longest possible shutter speed while keeping the stars clear and sharp using the 500 Rule. This rule considers your focal length to determine when star movement will start to be seen in your image. The calculation is 500 divided to the focal length equals time in seconds. This calculation is for full frame cameras and in crop sensors you need to add the crop factor to the calculation (1.6 for Canon / 1.5 for Nikon). Here are couple of samples:
      • Using a 10mm focal length on a full frame sensor: 500 / 10 = 50. You can use up to 50 seconds as your shutter speed with this lens/camera combination.
      • Using a 10mm focal length on a Canon crop sensor: 500 / (1.6*10) = 31.25. You can use up to 31 seconds as your shutter speed with this combination.
      • Using a 10mm focal length on a Nikon crop sensor – 500 / (1.5*10) = 33.33. You can use up to 33 seconds as your shutter speed with this gear.

    Panoramic option:
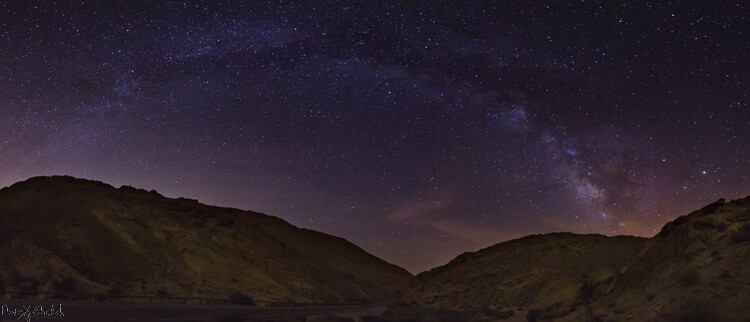
    9 frames

    9 frame panoramic shot.

    There is no change in the settings for your camera when shooting a panorama.

    You may want to consider the appearance of the Milky Way though. If it is relatively horizontal it is a good idea to aim for a wide panorama, showing it from side to side. If it is vertical, you may want to build your panorama upwards.

    In a panorama it is recommended that you have a 30% overlap, but when shooting at night it is more difficult to see – so it is even better to have a larger overlap between the frames. Better to be on the safe side, than discover later that you have gaps in your final result.

    When shooting a Milky Way panorama you may want to position your camera in portrait orientation (vertical). Although you will need more frames from one side to the other, you will have more sky, and a chance of catching the entire Milky Way. If shooting in landscape position, you may need to shoot two “floors”, in order to catch the entire Milky Way together with the ground.
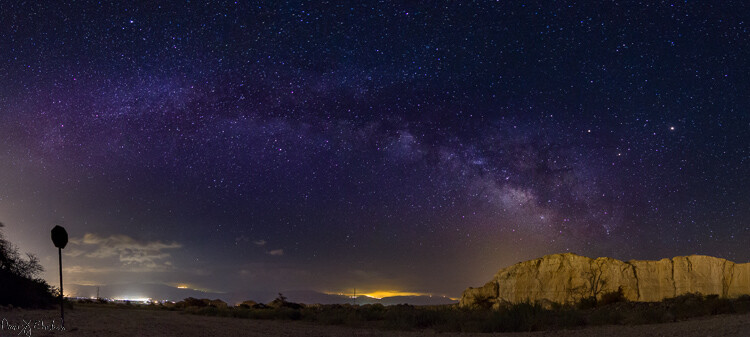
    10 frames

    10 frame pano shot.

    18 frames

    18 frame pano shot.

    Post-processing your Mikly Way photos

    Milky Way frames require a lot of post-processing work, which deserves its own article. There are also many ways to approach post-processing of the Milky Way, and it depends on the software you are using and your personal taste.

    I’m working with Lightroom and Photoshop. Starting with Lightroom, I use the Dehaze and clarity sliders, tone adjustments, saturation and noise reduction. After reaching the best possible outcome, I move to Photoshop for some additional adjustments by playing with curve layers.
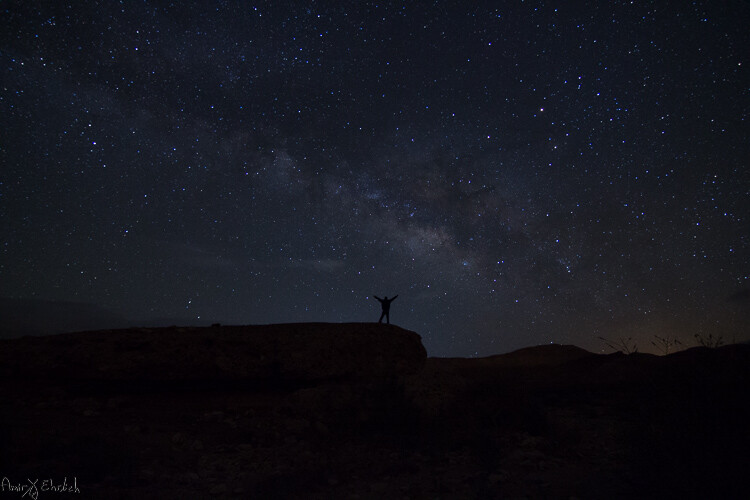
    1 frame original

    Before post-processing.

    1 frame edited

    Final processed image.

    Your turn

    Have you tried to capture the Milky Way before? Please share your experiences, questions, and your images in the comments below.

    googletag.cmd.push(function() {
    tablet_slots.push( googletag.defineSlot( “/1005424/_dPSv4_tab-all-article-bottom_(300×250)”, [300, 250], “pb-ad-78623” ).addService( googletag.pubads() ) ); } );

    googletag.cmd.push(function() {
    mobile_slots.push( googletag.defineSlot( “/1005424/_dPSv4_mob-all-article-bottom_(300×250)”, [300, 250], “pb-ad-78158” ).addService( googletag.pubads() ) ); } );

    The post Tips for Shooting the Milky Way by Amir Ehrlich appeared first on Digital Photography School.


    Digital Photography School

  • Pentax K-70 firmware 1.10 now available

    Ricoh has released firmware version 1.10 for the Pentax K-70 camera. The update is a small one, bringing general stability improvements alongside a couple of minor changes. The download for Windows and Mac, as well as the installation instructions, are available here. The changelog lists the following updates:

    • Enabled ISO sensitivity to change during multiple exposures.
    • Optimized performance when attaching new lens HD PENTAX-DA 55-300mmF4.5-6.3ED PLM WR RE.
    • Improved stability for general performance

    Pentax K-70 owners can check their camera’s current firmware version by pressing the menu button, followed by [Set-up 5], then [Firmware Info/Options]. In the Firmware Info menu, press the camera’s four-way controller to the right. 

    Articles: Digital Photography Review (dpreview.com)

  • ThinkTank updates Shape Shifter camera bags and offers ‘naked’ option

    $ (document).ready(function() { SampleGalleryV2({“containerId”:”embeddedSampleGallery_3303476890″,”galleryId”:”3303476890″,”isEmbeddedWidget”:true,”standalone”:false,”selectedImageIndex”:0,”startInCommentsView”:false,”isMobile”:false}) });

    Thanks to their use of individual pouches for camera bodies and lenses and the ability to expand their size, ThinkTank’s Shape Shifter camera bags are known to be among the most versatile in the business. Now ThinkTank has funneled years of feedback from photographers into an update and released a new generation Shape Shifter line.

    The series consists of three models: the Shape Shifter 15, the Shape Shifter 17, and the Naked Shape Shifter 17. Like their predecessors all new bags compress down to only three inches when empty and can be expanded in line with the amount of gear you carry on a shoot. They also come with a detachable water pouch, YKK RC-Fuse zippers, a removable waist belt, a tripod attachment and a rain cover. 

    The Shape Shifter 15 holds a 15″ laptop, a DSLR, three lenses and a 12-inch tablet plus accessories. The larger Shape Shifter 17 is good for a 17-inch laptop, up to two DSLRs, four lenses, tablet and all the cables, lens caps and other accessories you need. The Naked Shape Shifter 17 is even more versatile, as you can configure the bag in exactly the way you prefer by inserting ThinkTank’s Skin Pouches and Lens Changers. The Shape Shifter 15 is available now for $ 250, the 17-inch model is $ 280 and the Naked version will set you back $ 220.

    Articles: Digital Photography Review (dpreview.com)

  • Canon EOS-1D X Mark II: What you need to know

    Introduction

    The Canon EOS-1D X Mark II is Canon’s flagship DSLR aimed at pro photographers, with a lineage dating all the way back to 2001’s EOS-1D. As usual, this iteration of the line is full of new and updated technologies designed to make it one of the top performing cameras in the world.

    A quick glance through the headline features will tell you that this is a pretty amazing camera, and unsurprisingly that’s pretty much what our review uncovered. But let’s take a look at what impressed us most, what surprised us, and maybe even what disappointed us a little bit.

    Touch screen innovation – conservative UI

    The EOS-1D X II gains a touchscreen, which we’ve seen work well in conjunction with the excellent live view focus that Canon’s Dual Pixel AF can bring. Sadly, and presumably in the name of backwards compatibility, its use is extremely limited.

    Thus, you can customize the arrangement of the Q.Menu but can’t operate it by touch. You can use the touchscreen to specify the AF position in live view mode, but the camera can’t then track the subject and, unlike its Nikon counterpart, you can’t double-tap to zoom nor swipe to switch images.

    In fairness, the 1D X II is designed as the zenith of what the conventional DSLR can do. It’s a traditional, sports-shooting super camera that will be immediately familiar to existing users of the series. But is that a reason to limit the utility of a feature that its new owners are having to pay for?

    Autofocus needs careful configuration

    The EOS-1D X II’s autofocus is excellent, as you’d expect for a camera whose first major outing was to cover the multitude different sporting challenges of the Rio Olympics.

    Configuration is easier than on the likes of the EOS-1D IV: you now need only choose from six preset use cases, then adjust them if they’re not giving you the results you want, rather than just being confronted with the 75 different combinations that the settings allow.

    However, in our testing, we found that it needed a bit more of a hand than Nikon’s D5 for it to anticipate the type of movement it needed to shoot. And that, once suitably configured, it was less adaptable to other shooting situations. Which isn’t to suggest it’s not up to the job, just that it requires a little more user input.

    We were also hoping the higher resolution metering sensor would increase the accuracy, of the camera’s iTR focus tracking system. Sadly, the system still felt imprecise and tended to jump off the subject entirely. It works, but it’s not as effective as the 3D autofocus on the Nikon D5, which may leave many users shooting their 1D X II the same way they always have.

    Quick, easy video

    The 1DX II can shoot DCI 4K video at 60 frames per second. It’s the first stills camera we’ve seen that can do this and we were very impressed with the quality, detail and how little rolling shutter it exhibits. So, while we don’t expect many people to buy this camera for video shooting, it does put very good quality video into the hands of photojournalists and sideline shooters (so long as TV rights deals don’t prohibit it, of course).

    And, beyond thinking of it as video, this means the 1D X II can shoot 8MP JPEGs at 60 frames per second with the camera refocusing as you shoot. Suddenly, rather than just using the touchscreen to rack focus between subjects, you can ask it to track subjects as you record and have a great chance of capturing your decisive moment.

    Huge files, dual formats

    High frame rate 4K isn’t an unalloyed benefit, though. The 1D X II doesn’t (or can’t) compress video into a compact video format, instead taking the unusual route of using the huge, inefficient Motion JPEG format.

    It’s true that Motion JPEG gives slightly higher quality individual frame grabs even than All-I H.264 (where each frame is recorded individually), but the size cost for that gain is tremendous.

    And this draws attention to the 1D X II’s decision to use two different memory card formats. You’ll need to use a CFast card to capture video at the camera’s highest rate, just as you will to maximize the camera’s buffer when 14 fps shooting. In which case, what do you use the second slot for? Even choosing to record JPEGs to the physically similar Compact Flash format while shooting Raw to a CFast risks slowing the camera down. Perhaps Canon should have been brave and made a dual CFast camera, even if that meant also offering a slower dual CompactFlash version.

    Image Quality

    The area we had least concern about was image quality (though the JPEGs seemed a little muted, by default.) Despite splitting every pixel in two and increasing the amount of circuitry, the 1D X II outperforms its predecessor in low light. That’s not enough to quite match the best sensors we’ve seen but hey, you also gain that simple autofocus in video.

    The other area in which the Mark II gains an edge over the original model is dynamic range. A move to on-sensor analog-to-digital conversion means that you get Raw files will more processing latitude at low ISOs. You can push, pull and manipulate your Raw files more than before without having to worry about noise becoming visible. Which is especially useful in unexpected or challenging light the X is likely to encounter.

    Take Home Message

    The EOS-1D X II exceeds its predecessor in just about every way, though not without a few compromises along the way.

    We love the additional dynamic range we get out of the Raw files on this camera; it makes it a much more flexible tool in challenging lighting. We also love the CFast card slot, though we kind of wish Canon had gone all the way and just put in two of them. Also, while AF is blazing fast, there are enough customization options to make you dizzy at times; practice and familiarity will pay off.

    Our biggest surprise was how much we liked the 1D X II as a video camera. Thanks to Dual Pixel autofocus, it’s really easy to capture beautiful footage, even for someone who’s not a video pro. This could be a real game changer for photographers who need to capture both stills and video from the same event.

    What’s your experience? Have a favorite feature or surprise from this camera? Tell us in the comments below?

    Articles: Digital Photography Review (dpreview.com)

  • Street Eats: Free Urban Refrigerators for Sharing Spare Food

    [ By WebUrbanist in Culture & History & Travel. ]

    A few years back, one man in Saudi Arabia was hailed as a hero for putting leftover food from his restaurant in a refrigerator along the street for anyone to take; since then, an ongoing effort in Europe has been scaling up the same approach to serve whole communities of people in need.

    In Germany, urban refrigerators have spread thanks to help from online food-sharing apps and thousands of volunteers. A digital platform that connects those in need with stores and restaurants that have excess food boasts 10,000,000 pounds of shared edibles to date. Still, they have a long way to go: the European Commission estimates that over 100,000,000 tons of usable food is discarded annually across the EU. Globally, a whopping 40% of edible leftovers are thrown away.

    food fridge germany

    Currently, over 100 shared food spots have been developed across Germany, 20 of which are located in Berlin. Large chain supermarkets are playing a significant part, making a coordinated effort to donate food they cannot sell but that is still safe and edible. Passers by also fuel the efforts, however, depositing whatever they can spare at these sites.

    grocery store

    Germany is leading the charge on multiple food-related fronts these days, home to the world’s first packaging-free grocery store and first in-store vertical micro-farms. As a landlocked country without much space to grow (in terms of population or produce), Germany is bent on innovation and looks likely to remain a leader in this department for years to come.

    Share on Facebook


    [ By WebUrbanist in Culture & History & Travel. ]

    [ WebUrbanist | Archives | Galleries | Privacy | TOS ]


    WebUrbanist

  • Circular Polarizers Versus Graduated Neutral Density Filters for Landscape Photography

    Whether you’re a professional or hobby photographer, odds are you’ve come across a beautiful, scenic landscape, that you absolutely had to photograph. Unless you’re an experienced landscape photographer, there’s a good chance the color in that photo wasn’t as saturated, or balanced as you were expecting. That’s because there’s generally a wide disparity in the dynamic range between the foreground and background of landscapes, as well as between the upper (sky) and lower (earth) halves of the frame. Thanks to a couple of lens filters, this hurdle can easily be overcome without having to spend hours of post-processing in Photoshop.

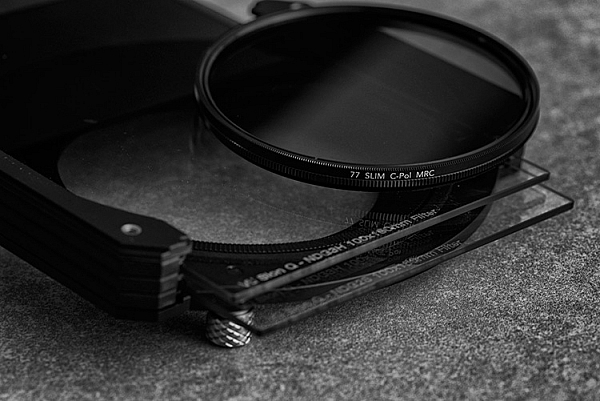
    Drop-in and screw-in filters

    What are lens filters?

    Lens filters are lightweight pieces of glass that screw onto the front of most camera lenses (or drop-in using a holder system) in order to offer additional protection of your lens while also improving image quality. There are a variety of filter sizes that must match up to the size of the thread on your camera lens, so it is very important to make sure you get the correct size for the lens you plan to use it on (tip look on the back of your lens cap).

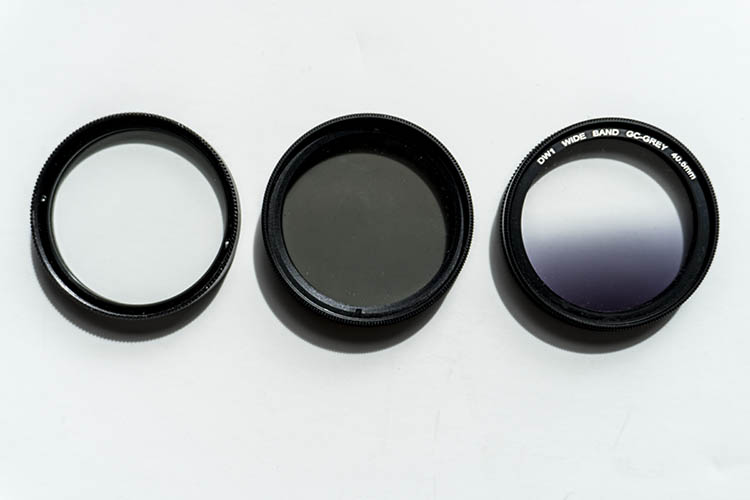
    In addition to varying sizes, lens filters can also serve several different purposes. Most basic lens filters are ultra-violet (UV) reducing filters (also known as haze filters) that come with an anti-reflective coating to cut through the effects of atmospheric haze, thereby improving overall image quality. Besides UV/haze filters, there are two others that are particularly useful for landscape and outdoor photography – polarizers and graduated neutral density filters.

    From left to right: A clear UV filter, a polarizing filter, and a Graduated Neutral Density filter.

    From left to right: A clear UV filter, a polarizing filter, and a Graduated Neutral Density filter.

    What is a polarizing filter?

    The next filter we’ll discuss is the polarizing (usually circular) filter, which attaches to the front of a lens and can be spun around to produce varying degrees of saturation throughout an image. This quality of the polarizing filter is important to pay attention to, because it’s easy to produce uneven shades of saturation if the polarizer is even slightly off, such as in the example below.

    Circular polarizer versus ND grad filter

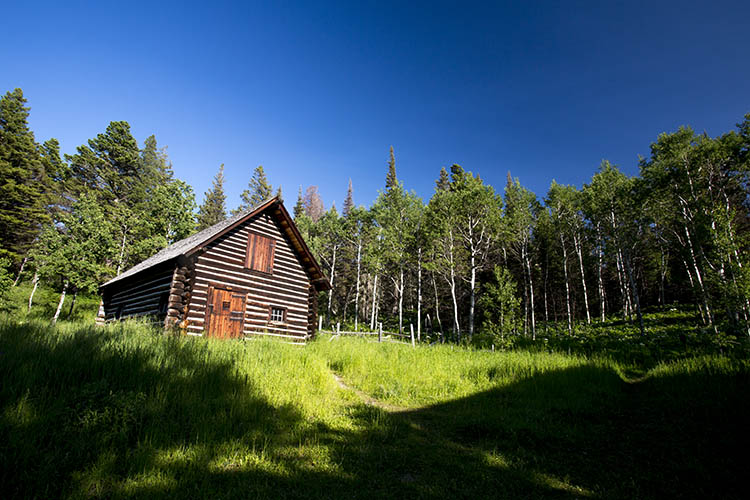
    Landscape photo with uneven polarization. Notice how the sky is very uneven in color.

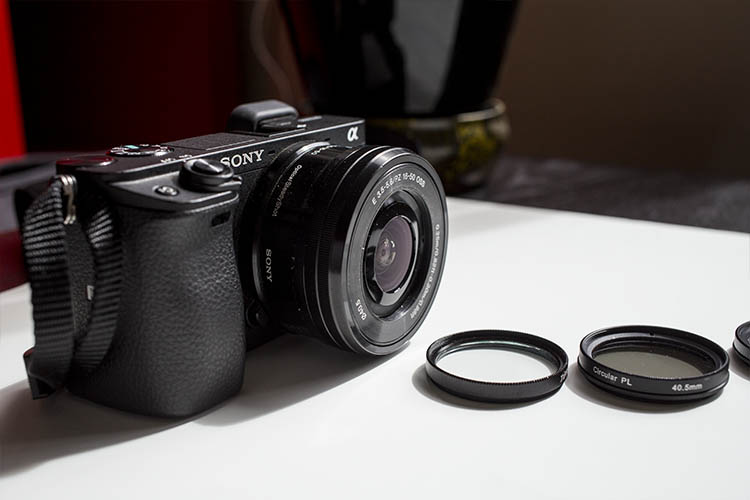
    Sony a6300 camera with bare kit lens - no filter applied. UV and Polarizing filters on the table.

    Sony a6300 camera with bare kit lens – no filter applied. UV and Polarizing filters on the table.

    Polarizing filters do two things: first, they help reduce glare or reflections cast by non-metallic reflective surfaces such as glass or water. Second, they saturates colors and enhances image clarity by reducing the overall exposure of an image. The benefits of the polarizing filters are best seen when you are shooting at a 90-degree angle to the sun.

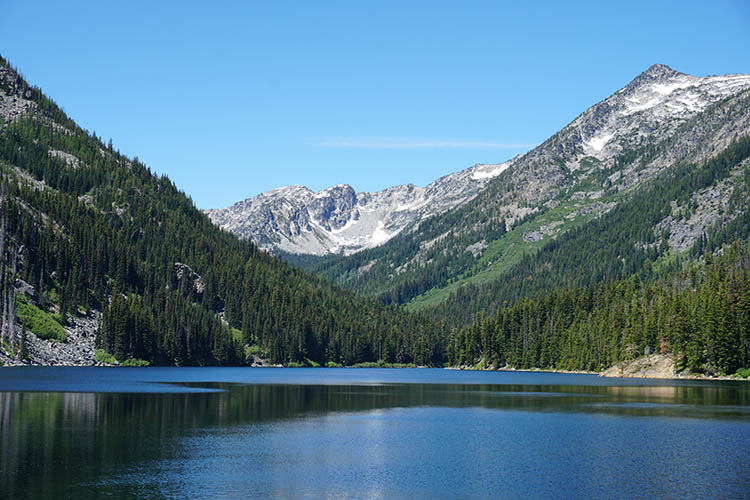
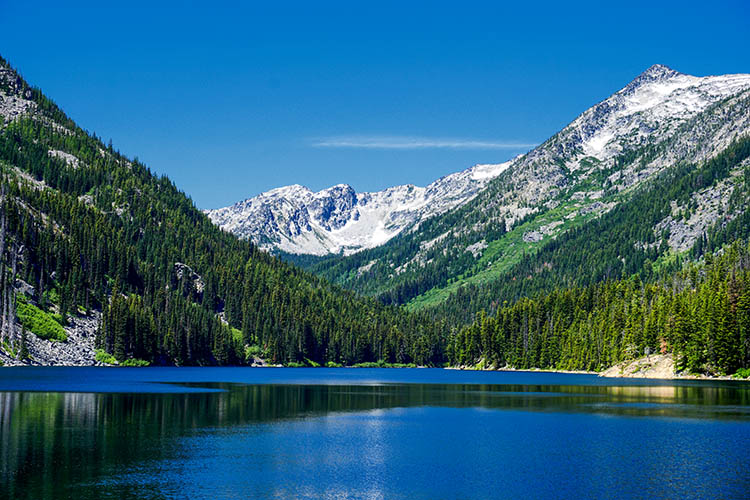
    Take a look at the landscape photo below that was taken with no filter, the colors are muted and not very exciting. However, once the polarizing filter is added, you can see a huge boost in overall color saturation. It’s a pretty dramatic difference without even post-processing the photo.

    Circular polarizer versus ND grad filter

    Landscape photo with no filter.

    Circular polarizer versus ND grad filter

    Landscape photo with a circular polarizing filter. Notice how overall the colors are intensified.

    What is a neutral density filter?

    Another effective filter for landscape photography is a neutral density (ND) filter, which reduces the overall exposure of an image. ND filters are uniformly dark in color and they come in different strengths depending on density.

    The best use of ND filters is in situations where you wish to use a long exposure or wide aperture to capture an image, without risking overexposure. Some example scenarios when a ND filter would be effective include:

    • Producing a smooth, blurred movement of water in a waterfall, lake, or the sea.
    • Blurring moving subjects to convey movement or motion (such as panning).
    • Reducing diffraction by using a large aperture.
    • Shooting with a shallow depth of field in bright lighting.

    What is a graduated neutral density filter?

    ND filters also come in a graduated form, also known as a split ND filter. The top half of the filter appears dark, while the bottom half is clear. Similar to the circular polarizer, the graduated ND filter can also be spun around to produce varying degrees of saturation, so it’s important to be careful when using it to avoid unevenly saturating your image.

    The best scenarios for a graduated ND filter to shine are when you wish to reduce light, or darken just part of your image. Think landscape photos where the earth is balanced, but the sky is blown out. This would be an ideal time to use a graduated ND filter to darken the sky.

    Circular polarizer versus ND grad filter

    The above landscape photo with a soft edge ND grad filter. Notice how the sky is darker and more saturated, while the water hasn’t changed.

    There are two types of ND grad filters: hard edge, and soft edge. You’ll want to use a hard edge filter when the light and dark sections are very clearly separated, while a soft edge filter is best used when the light and dark sections are not distinctly separated.

    Circular polarizer versus ND grad filter

    Landscape photo with no filter.

    Circular polarizer versus ND grad filter

    Landscape photo with a circular polarizer.

    Circular polarizer versus ND grad filter

    Landscape photo with a graduated ND filter.

    Over to you

    Do you use polarizers or neutral density filters with frequency in your photography? Please share your thoughts and images in the comments below.

    googletag.cmd.push(function() {
    tablet_slots.push( googletag.defineSlot( “/1005424/_dPSv4_tab-all-article-bottom_(300×250)”, [300, 250], “pb-ad-78623” ).addService( googletag.pubads() ) ); } );

    googletag.cmd.push(function() {
    mobile_slots.push( googletag.defineSlot( “/1005424/_dPSv4_mob-all-article-bottom_(300×250)”, [300, 250], “pb-ad-78158” ).addService( googletag.pubads() ) ); } );

    The post Circular Polarizers Versus Graduated Neutral Density Filters for Landscape Photography by Suzi Pratt appeared first on Digital Photography School.


    Digital Photography School

  • Unfree Wheeling: Amusingly Surreal Vintage Soviet Auto Ads

    [ By Steve in Culture & History & Travel. ]

    soviet-auto-ad-zaz968-2

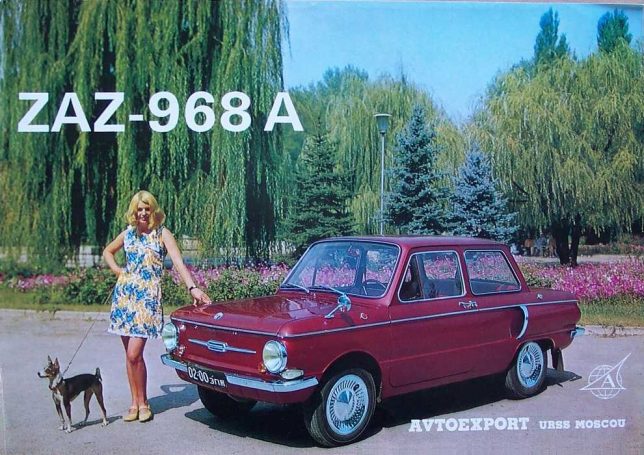
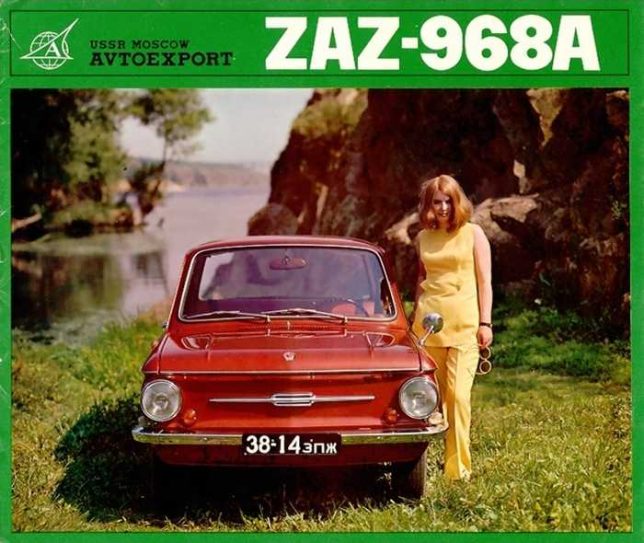
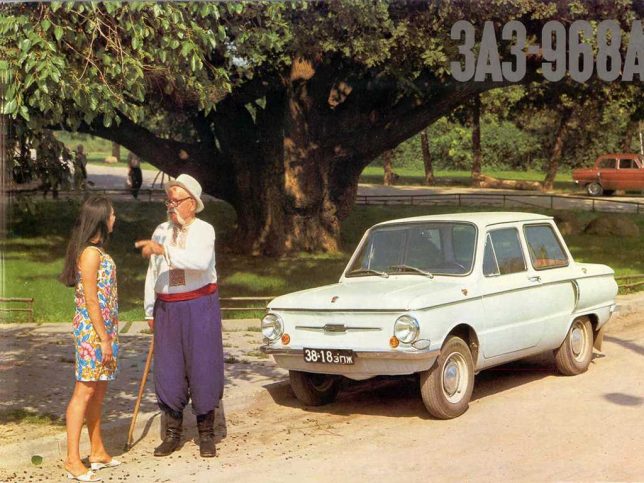
    The Soviet Union not only manufactured cars, they exported them to buyers charmed (or duped) by some amusingly and bemusingly photographed advertisements.

    soviet-auto-ad-zaz968-4

    soviet-auto-ad-zaz968-1

    Putin the pedal to the metal lately? Don’t let the jet-fighter-like rear fender air intakes fool you, the ZAZ-968 “Zaporozhets” wasn’t exactly a muscle car even by Soviet standards. Built at the Zaporizhian Automobile Factory in Melitopol, Ukrainian SSR from 1971 through 1980, the ZAZ-968 was propelled by a 40hp air-cooled V4 engine mounted in the rear. Export versions were upgraded with international-spec headlights, a safety glass windscreen and an anti-theft steering lock which was rarely, if ever, tested.

    soviet-auto-ad-zaz968-3

    soviet-auto-ad-zaz968-putin

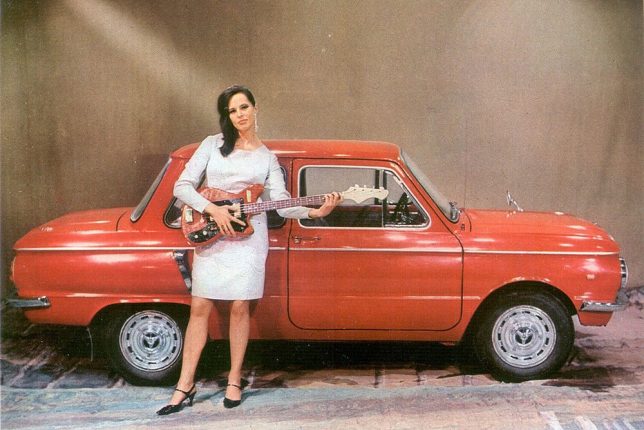
    Wonder if that guitar-playing model knows “Back In The USSR”. Designed to be a “people’s car” that was sturdy yet affordable, the Zaporozhets is fondly recalled by Russians of a certain age… including some guy named Vladimir Putin. According to the Russian President’s official website, Putin’s mother won a ZAZ-968 in a lottery when young Vlad was a third year university student. His parents then gave the car to Putin – no word if he frequently drove it shirtless.

    Whole LADA Love

    soviet-auto-ad-lada-2

    soviet-auto-ad-lada-1

    soviet-auto-ad-lada-3

    soviet-auto-ad-lada-4

    soviet-auto-ad-lada-5

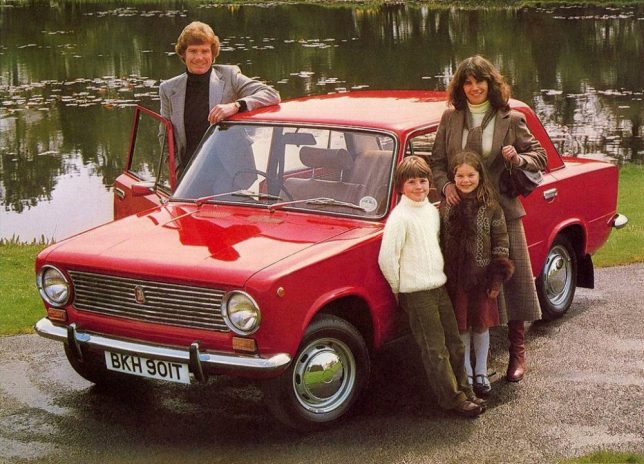
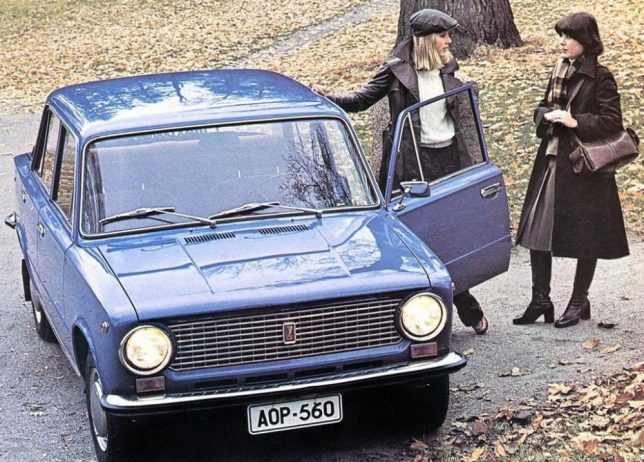
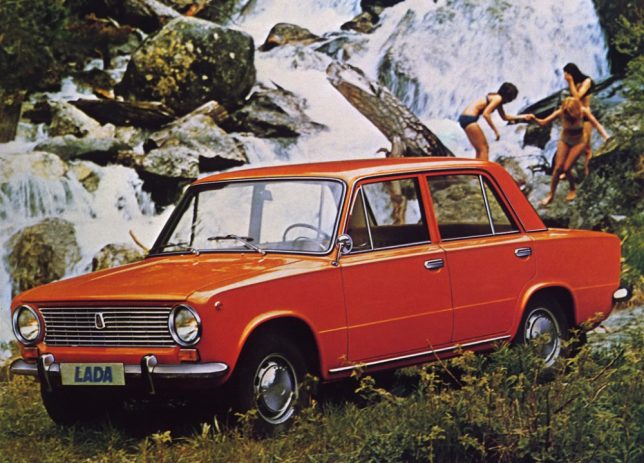
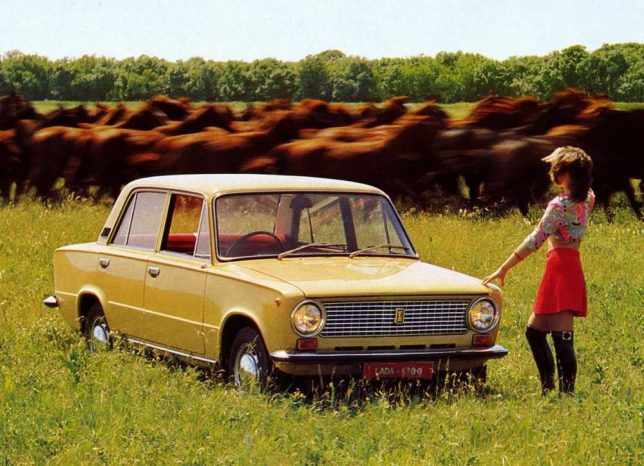
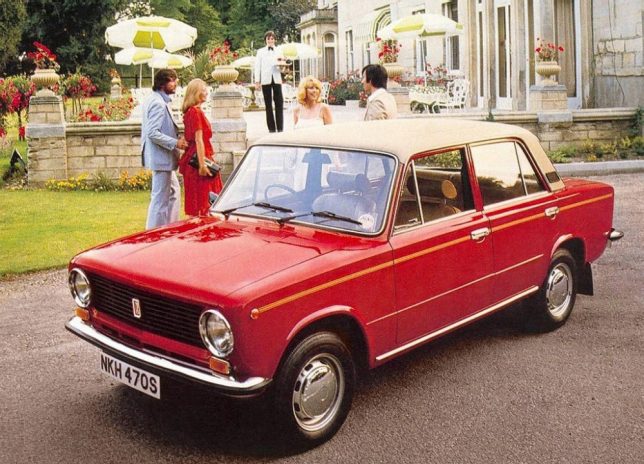
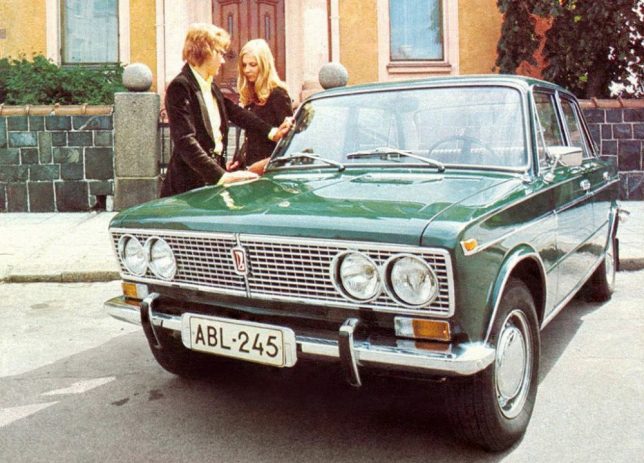
    Russian car manufacturer AvtoVAZ, based in Tolyatti, Samara Oblast based their boxy Lada Classic on the mid-sixties Fiat 124 sedan. Between 1966 and 2012, over 20 million Classic sedans and station wagons had been sold without the vehicle undergoing a major design change. Dig that groovy vinyl roof on the last ad above; it kinda breaks up the Red Square look.

    soviet-auto-ad-lada-4headlights-1

    soviet-auto-ad-lada-4headlights-2

    soviet-auto-ad-lada-4headlights-3

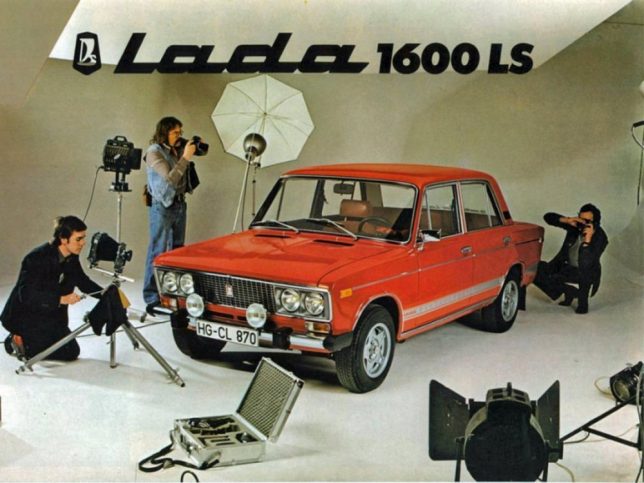
    About 60% of all Lada Classics were exported to both East Bloc and West Bloc nations – the USA being a notable exception; Americans had to wait for the Yugo to “enjoy” owning a workers-paradise-made copy of a Fiat. Note what appears to be (at first glance) a Soviet laptop computer in the faux photoshoot ad above.

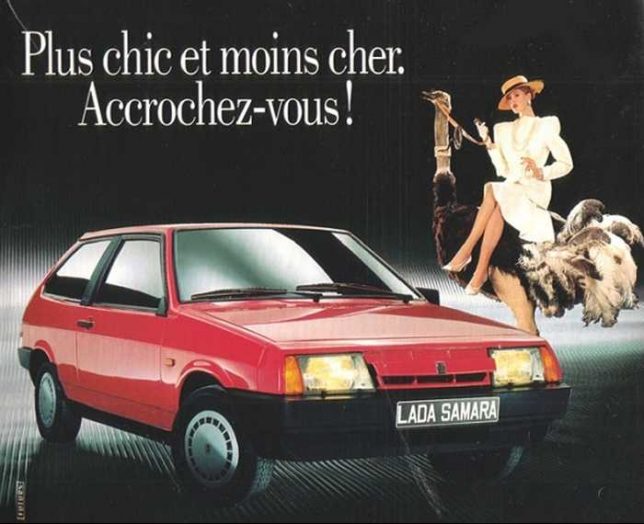
    soviet-auto-ad-lada-samara

    AvtoVAZ introduced the VAZ-2108 in 1984 with export versions named Samara and domestic market cars labeled Sputnik – hey, Plymouth had a Satellite so why not? The French copy on the ad above translates to “More stylish and less expensive. Hold on! Yeah, hold on to your wallet.

    Next Page – Click Below to Read More:
    Unfree Wheeling Amusingly Surreal Vintage Soviet Auto Ads

    Share on Facebook


    [ By Steve in Culture & History & Travel. ]

    [ WebUrbanist | Archives | Galleries | Privacy | TOS ]


    WebUrbanist

  • How to Tell a Story with Portraits by Using Creative Composition

    In this article, we will explore new ways of using composition and creative framing to tell a story in your portraits. We’ll do so by understanding the marvellous ways our brain (as viewers) construct a sense of story.

    The common principle of the techniques I will describe here, is that they are all based on our mind’s ability to fill in missing gaps of information. A skill that helps us survive in a world of uncertainty.

    F11A2018

    Two things to note about creativity before we start

    Skill, is not just a talent: Just like working on the flexibility of a muscle, I believe we can work on our creativity, with the “muscle” being our vision.

    Being creative for the purpose of being creative: Creative compositions should be a vehicle for a purpose – an emotion or a story you want to evoke in the image. If you choose to add creativity to your images, just to be more creative, it will be an empty gimmick.

    Half close up portrait – a full story

    By showing only half of a close-up portrait, you stimulate the viewer’s mind and almost force it to delve into the image. We do so by activating their mind’s need to fill in gaps of missing information. This ability is rooted in us since ancient times, from which we evolved to understand that the two blurry spots between the trees, could be the hidden face of a tiger.

    F11A6628

    Good to know:

    For best results, you can practice framing this kind of composition by using the crop tool in your editing software. Once you become comfortable with this technique (and framing); it will be easier to achieve a “half close-up portrait” in the field, without the need to crop it in the post-processing stage.

    This kind of framing is like an exclamation mark, which one cannot ignore. Therefore, use it only on the most interesting faces, and not on every portrait.

    F11A8534

    Environmental portrait – a person in context

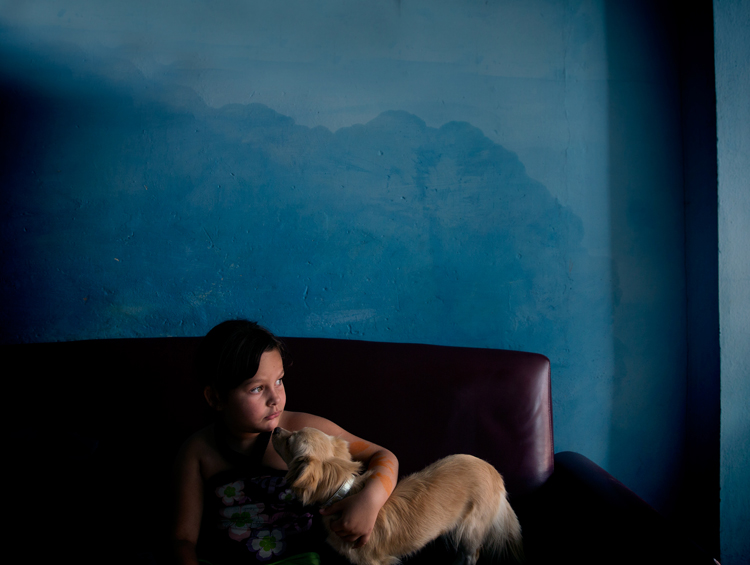
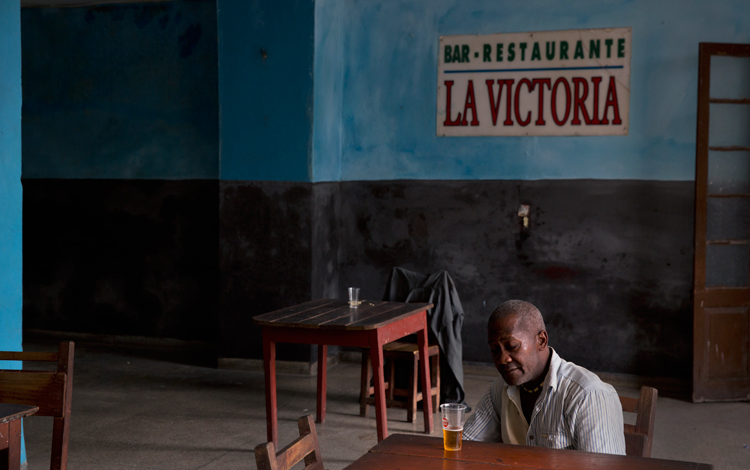
    For me, this the most challenging and rewarding portrait framing style, the environmental portrait. This shows not only the person, which is the hero of your image, but also his or her environment: home, work place, country, etc. By doing so, you use the mind’s ability to conclude and understand a situation by connecting pieces of information.

    14 the sleep

    Good to know:

    The biggest challenge in this type of composition is the balance between the main figure (hero) and environment. Keep in mind that the main figure must be dominant, and not overtaken by the background. Use light, color, and sharpness to make your subject significant.

    Using a wide lens (below 50mm) is recommended for the environmental portrait framing, as it will allow you to capture the environment of your hero, even in small spaces.

    F11A4931

    Detail portrait – telling the story with small details

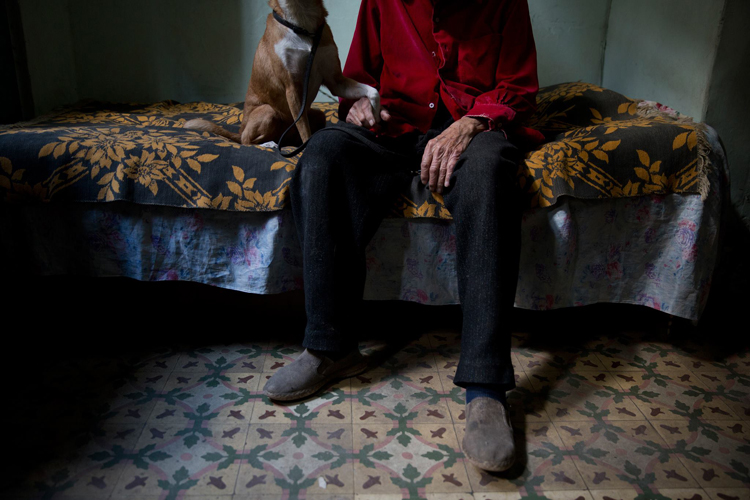
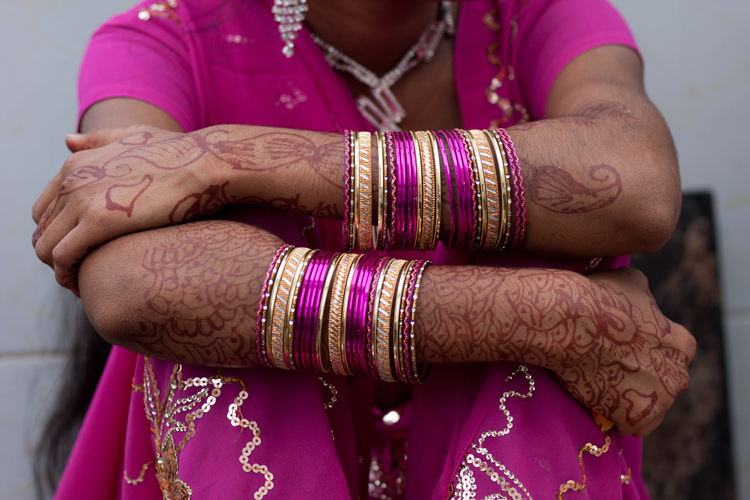
    Like with the half portrait technique, in the detail framing we use the brain’s ability to fill in the gaps, by showing only a small fraction of the entire story. For a good detail shot, choose some with a connection to your subject. It can be a connection of similarity or difference. For example: take a close-up shot of his or her hands, shoes, the reading books on the shelf, the subject’s regular chair or smoking pipe, you name it! As long as this object, represent something which is bigger than the object itself.

    12970960 1147522381976706 3379301587067512747 o

    Good to know:

    A good place to start is by examining your subject from head To toe. Looking for anything that other people might miss in that person. Did you spot anything special? Like a unique piece jewelry, a tattoo, or just a hole in their shoe.

    Some of my best ideas came from my subjects. Ask your subject to show you an object to which he or she feel a strong connection. You do not even need to have any human presence in the detail shot, as long as the object represents or tell us something about its owner.

    IMG 4005

    Kuleshov effect – creating a meaning by interaction

    In this technique, based on the groundbreaking experiment by the Soviet filmmaker Lev Kuleshov, we will use the brain’s ability to derive meaning from the interaction. Kuleshov demonstrated that the audience constructs the story not only by the content, but also by the order in which the images appear, and the connection between them.

    In the experiment, Kuleshov used two different shots, which he put in sequence one after the other. The first shot, a close-up shot of the face of silent film actor Ivan Ilyich Mozzhukhin, remained the same throughout the experiment, while the second shot was replaced with every round of projection; a plate of soup, a dead young girl, a woman on a divan (sofa).

    The audience praised the actor’s ability to express different feelings such as sadness and even hunger, using only his facial expressions, without knowing that they watched the same shot over and over, and the only thing that was changed was the second image.

    Page 18

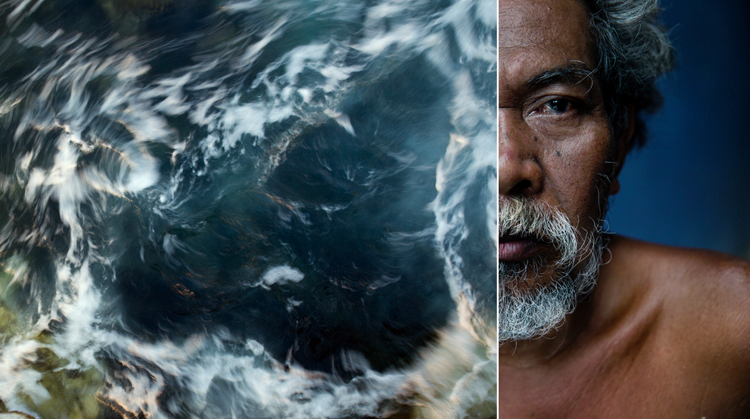
    To use this effect in your work, just place two images side by side and try to evoke a connection between them. In the example, I combined between the portrait of Net, which I did with the half close-up composition, with an image of a swirling sea. Where does it take you?

    Good to know:

    You will be amazed by the power of creative composition. Challenge your audience. Don’t be afraid to create a connection which is too complicated to understand.

    A good creative exercise which you can do is by collaborating with a different photographer. You will provide the first image, he or she will provide the second. In there you will have a connection, not only between the two side-by-side images but by two different points of view.

    The author would like to thank Nicholas Orloff for his assistant in writing this article.

    googletag.cmd.push(function() {
    tablet_slots.push( googletag.defineSlot( “/1005424/_dPSv4_tab-all-article-bottom_(300×250)”, [300, 250], “pb-ad-78623” ).addService( googletag.pubads() ) ); } );

    googletag.cmd.push(function() {
    mobile_slots.push( googletag.defineSlot( “/1005424/_dPSv4_mob-all-article-bottom_(300×250)”, [300, 250], “pb-ad-78158” ).addService( googletag.pubads() ) ); } );

    The post How to Tell a Story with Portraits by Using Creative Composition by Oded Wagenstein appeared first on Digital Photography School.


    Digital Photography School

  • Tips for Abstract Macro Photography – Using Texture and Light

    Macro photography opens up a whole new world to those who are willing to get up close. There is no shortage of subject matter to photograph, but in this article we’ll look at the abstract world of texture and light.

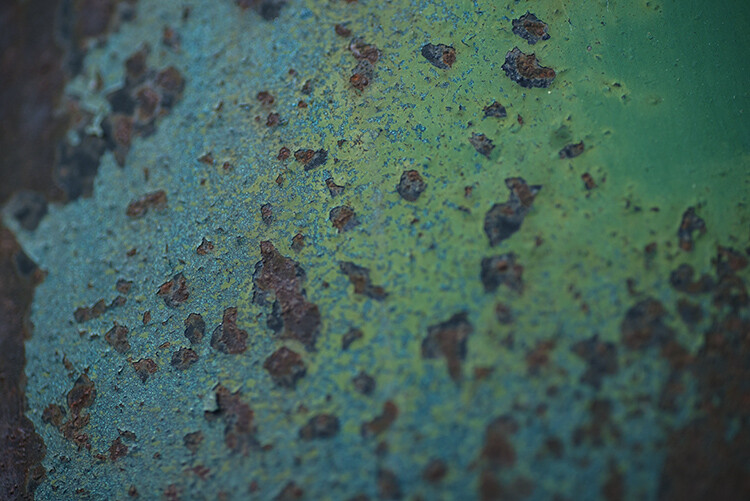
    Rusted paintwork of a Dodge Campervan

    Rusted paintwork of a Dodge Campervan

    The beauty about these subjects is that they can be shot anywhere; in your backyard, on your street, or in any part of your city. Textures are everywhere. They are really easy to find, and working with the light properly will help you to highlight the grittiness and tactile effect of textures. Ideally, a macro lens would be perfect to use for this type of photography, but a good 50mm or 85mm can work too. A macro lens gives you the bonus of being able to focus really close, normal lenses may not be able to get as close as you want.

    My view is that even if you don’t have a macro lens, give this a try anyway, a new tiny world of wonder awaits you!

    What is Abstract Macro Photography?

    Abstract photography, in general, is about representing a subject in a non-literal way. The focus of abstract photography is more about colour, shape, and texture, as opposed to the literal representation of the subject. Abstract macro photography, takes this to the next level by enabling you to get even closer to your subject, and therefore also able to be more abstract in a sense. In this article, we are concerned with texture and showing that in our images.

    The same guidelines around composition apply, you can use the rule of thirds, curves, and lines, to draw the viewer into your image. The difference is that the subject may not be immediately recognizable, your centre of interest might be a colour, or the curve of a flower. So for abstract macro photography, you will need to think a little differently.

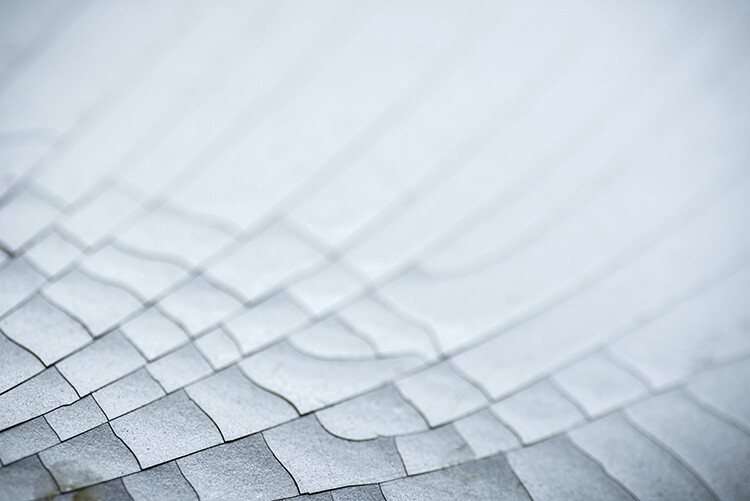
    Cracked paint on a car bumper

    Cracked paint on a car bumper

    What will I need to do abstract macro photography?

    A macro lens will work best. A 50mm or 85mm lens will work pretty well too, you may not be able to get as close to your subject though, so be aware of that (or you can try close-up filters). You will need a tripod too, or some sort of support for your camera, as shooting macro images handheld is really difficult and can be frustrating.

    What can I photograph?

    Textures are all around you. Think of the rusted lamppost at the corner of your street, the peeling paint on the wall of the shed, or even the cracked paint on the bumper of a car. They are everywhere.

    You need to spend time looking at all the surfaces around you, then take some test shots to see if they work. The key thing to be aware of when shooting textures is how the light is affecting the scene. Macro photography is like a micro landscape image. It has a foreground, middle-ground and background. There are colours, shapes, and of course textures in the image.

    When you look at the texture, take some time to study where the light is coming from, and how it is affecting the image. Try a few different angles to see what works best in the scene. Using side light (i.e. light some from the left or the right) will accentuate the texture in your image. Side light will give your image a three dimensional quality, so try and get some directional light on your scene if possible.

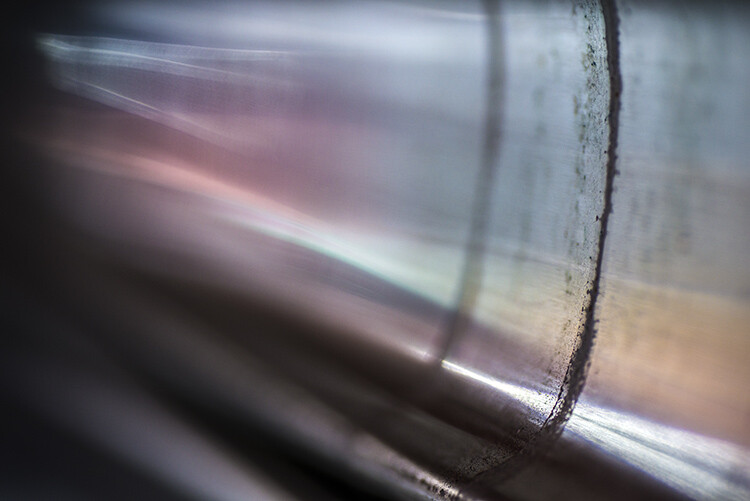
    Reflections from a security gate

    Reflections from a security gate

    Find your texture, and use this as a workflow

    • Work on building your composition – is there a particular part of the texture you want to emphasize, try and get some side light if possible?
    • Use manual focus to bring even a small part of your image into sharp focus, this sharp area will be the natural focal point for your viewer.
    • As an abstract image, you don’t need a subject as such, but the texture and the colours will be the reason for the image, so make sure the subject matter is interesting.
    • Check the histogram to make sure that you are exposing your scene correctly.
    • Capture the shot.
    • Try shooting the same subject from different angles, and maybe even with a different centre of interest.
    • Take as many images as possible, from different angles, with different focal points.

    The beauty about this type of photography is that you have an infinite number of subjects. It is really easy to get going once you start looking around you, at what there is to photograph.

    The beauty of cracked window putty

    The beauty of cracked window putty

    Have you tried abstract macro photography before? If not give it a go and share some of your images in the comments below. See if we can guess what you photographed.

    googletag.cmd.push(function() {
    tablet_slots.push( googletag.defineSlot( “/1005424/_dPSv4_tab-all-article-bottom_(300×250)”, [300, 250], “pb-ad-78623” ).addService( googletag.pubads() ) ); } );

    googletag.cmd.push(function() {
    mobile_slots.push( googletag.defineSlot( “/1005424/_dPSv4_mob-all-article-bottom_(300×250)”, [300, 250], “pb-ad-78158” ).addService( googletag.pubads() ) ); } );

    The post Tips for Abstract Macro Photography – Using Texture and Light by Barry J Brady appeared first on Digital Photography School.


    Digital Photography School

  • How to Add a Soft Focus Look to Your Images for a Unique Style

    Soft focus photographs present themselves with a tranquil and almost dream-like effect. They have become quite popular, and can be found to some extent in many genres of photography, from portraits to landscapes.

    In reality, what many of us think of as soft focus photos, aren’t actually soft focus at all. The more accurate term is soft contrast. Soft focus is essentially the blurring of an image, which is not exactly the same as soft contrast. The softening effect can be achieved a number of ways using softening filters mounted in front of your lens, or in post-processing. With the powerful digital editing tools we have today, a soft contrast effect is both easily achieved, and infinitely adjustable.

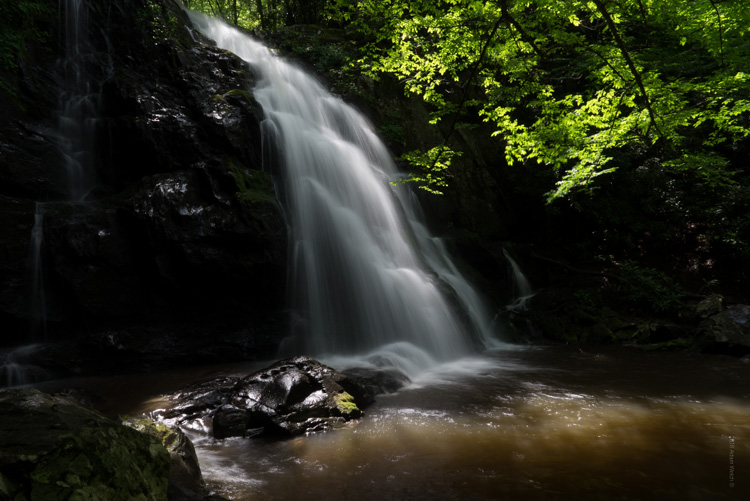
    Before and After

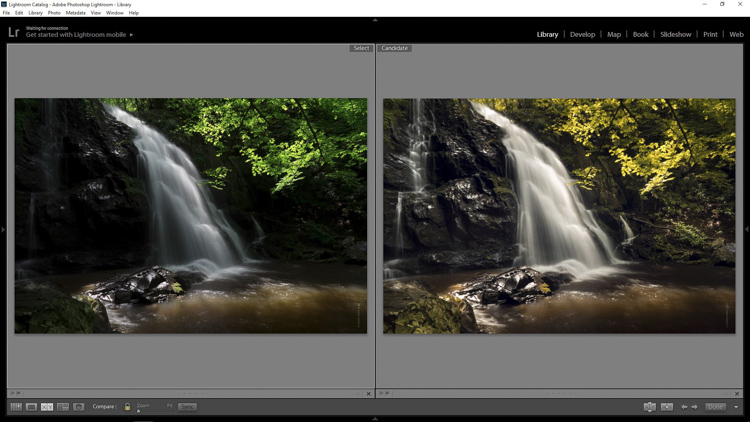
    In this example, you will see at a step-by-step workflow for applying a soft focus, or soft contrast, look to a photograph in Photoshop using our old friend the High Pass Filter. You might be familiar with using the High Pass for sharpening, but in this case it will be used on the opposite end of the spectrum. We will begin with a RAW image file and work our way to a finished product ready for publishing.

    Don’t worry. All these edits are incredibly easy, fast, and will give your images a little creative boost if used correctly. Let’s get started!

    Here have the RAW file or as I affectionately call it the “Genesis Image”.

    Raw

    Make basic edits first

    We will begin with some basic edits in Adobe Lightroom, then transfer the image to Photoshop to apply the soft contrast magic. It’s best to perform your core processing first, before beginning the soft contrast process. I like using Lightroom because it makes for a super simple transfer, for working in tandem with Photoshop.

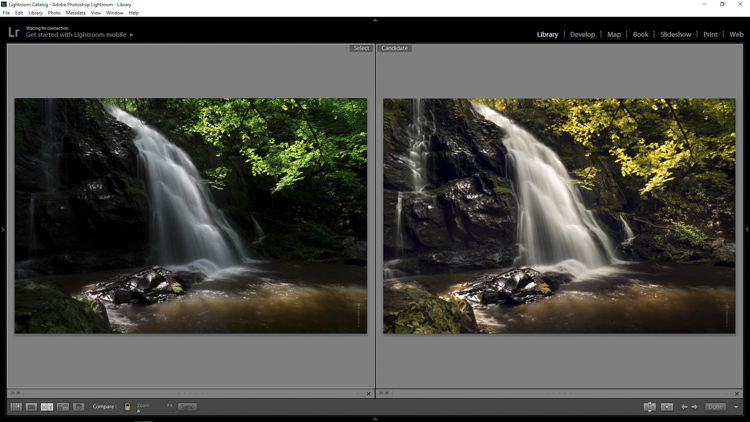
    For this photo I performed some global exposure adjustments, as well as made some selective adjustments. I also made use of the HSL panel to bring the color saturation and luminance closer to my visualization.

    LR Adjustments

    Open in Photoshop and duplicate the background layer

    Once you’ve finished the foundational processing it’s time to bring your image into Photoshop. Right click it in Lightroom and choose “Edit in Photoshop”.

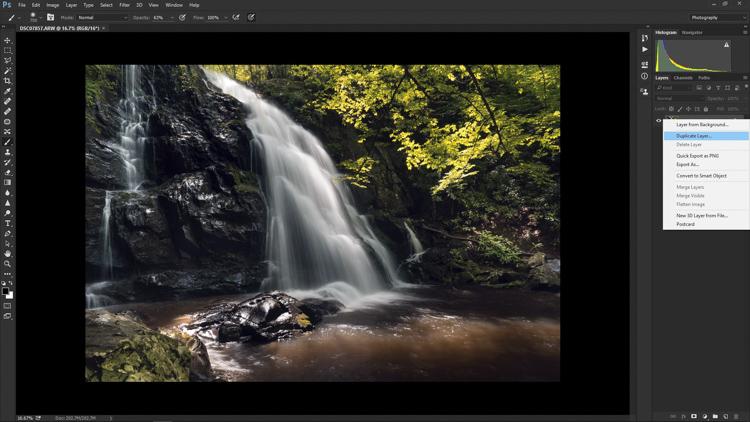
    Now that you have your file open in Photoshop, you can begin the easy process of applying the soft contrast effect. To begin, you need to duplicate the base layer. Do this by right clicking the base layer and selecting Duplicate Layer, or by pressing control+J (command+J for Mac).

    Duplicate Layer

    Apply the High Pass Filter

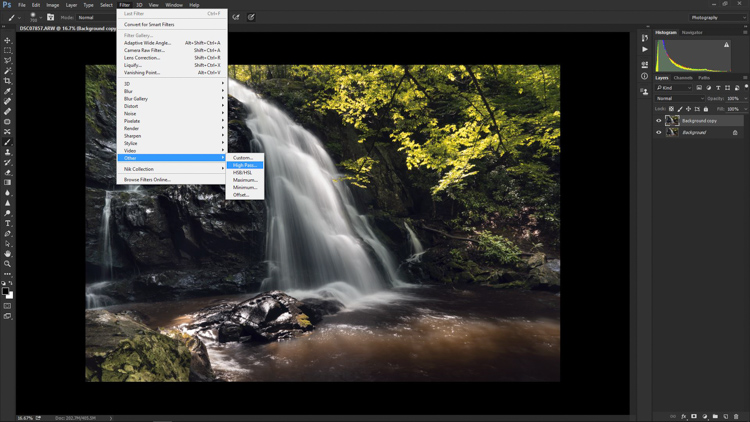
    Next, select the High Pass Filter. To do this, select from the top menu: Filter > Other > High Pass. The image before you will transform into a garbled mass of gray muck.

    High Pass Filter Select

    You will be given the option of adjusting the radius of the High Pass. I have found that for most images, a radius of 10-20 pixels is appropriate, but in the end it will be up to you and your creativity to decide. After you’ve selected the radius, click OK.

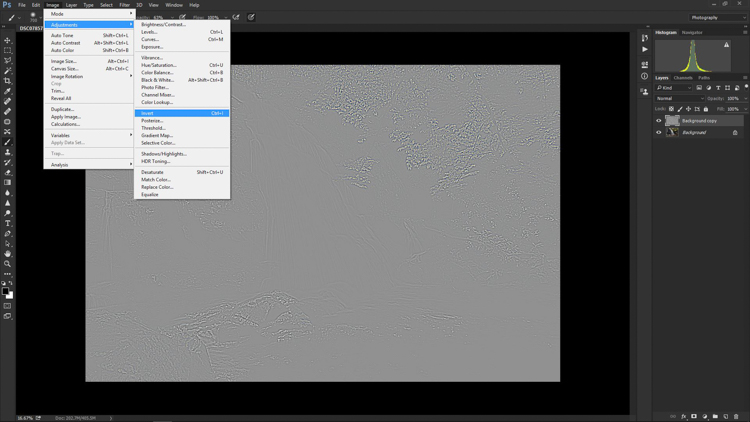
    Next, go to: Image > Adjustments > Invert. You can save some some time by using the keyboard shortcut Ctrl+I (Command+I for Mac).

    High Pass Invert

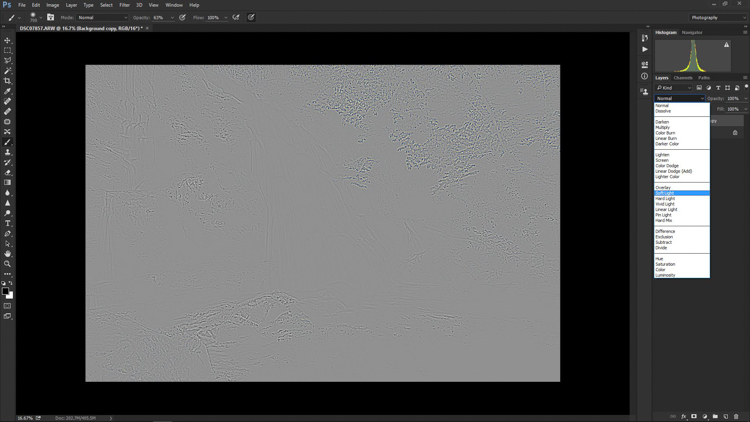
    Change the layer blend mode

    And vola! Wait…the photo still looks like a moldy piece of bread. Everything is okay, though! The next step is one of the most important, and it will make all the difference. In your layers panel, change the blending mode to Softlight.

    High Pass Softlight

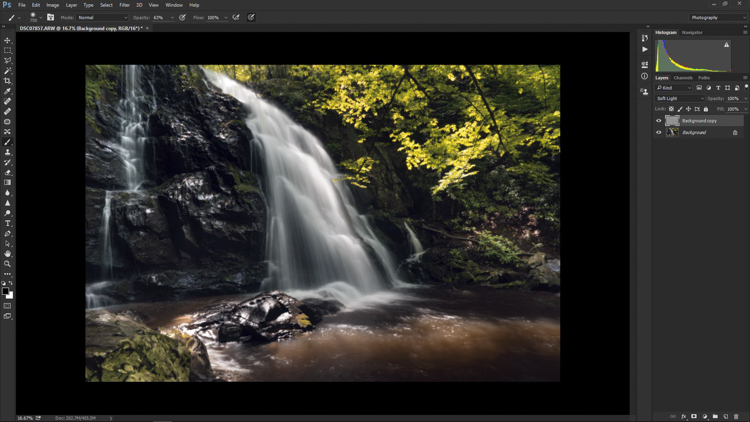
    Boom!

    High Pass Softlight Effect

    The image looks like a photo again. The soft contrast effect has now been applied to every part of the image. If you like how everything looks, great, you’re completely finished and can go on your way. Most often though, additional fine tuning will be needed to bring out the best of your photograph. This is the real power of Photoshop, because you can now selectively choose what areas will benefit most from the softening. To do this you need to add another layer mask, but don’t let this intimidate you.

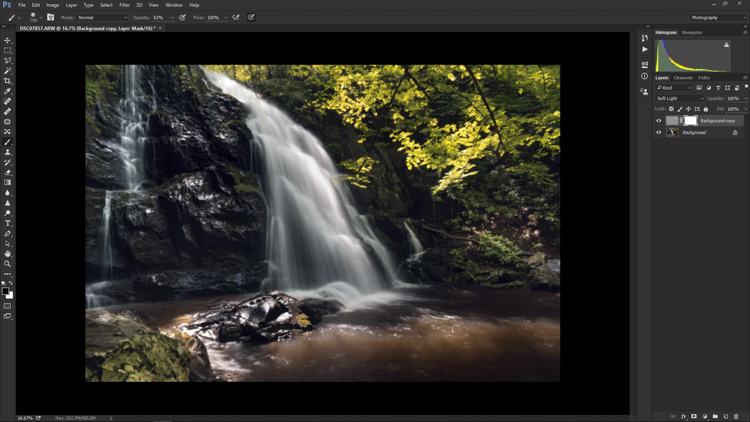
    Add a layer mask to refine the effect

    At the very bottom of the layers panel you will see a small row of icons. The layer mask icon is the white rectangular box with the gray dot inside, click that. A layer mask will be added to your adjustment layer. This way, you can choose exactly where you want your effect to be applied using the brush tool.

    Add Mask

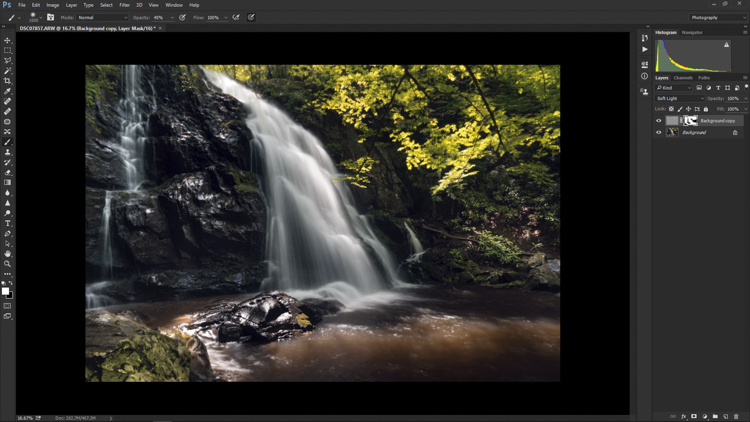
    Now I can really get creative. I want to leave the softening effect on some areas, but remove it from some of the key points of the composition; namely the rock face and the ground surrounding the waterfall. Use the brush tool (paint brush icon) and a layer mask to show or hide your edit. Be sure the two black and white squares at the far left bottom of the tool panel show the black square above the white one (hit D on your keyboard to set them to default and X to swap the colors). This means you are hiding the effect from the image by masking it.

    If you click the two sided arrows above the squares (switch to put white on top – or click X on your keyboard to do this) you will be able to paint back in the effect, in the case you remove too much (using a mask is non-destructive editing, you are not removing pixels just hiding or showing parts of one layer). Also, remember the the brush tool is completely customizable as far as size, flow, and opacity are concerned.

    Layer Mask Adjustments

    Final edits back in Lightroom

    In the case of this photo, I save and close it in Photoshop, and it will automatically import back into Lightroom where I will finish up some minute details. The final edits include mainly selective sharpening and a slight vignette.

    Final Adjustments

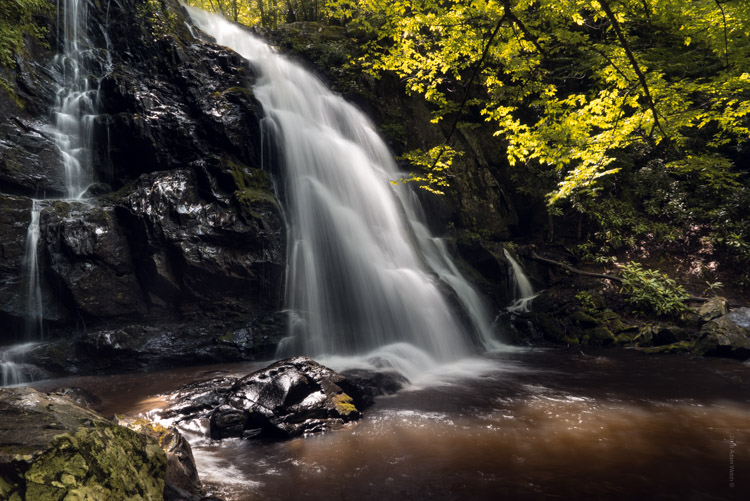
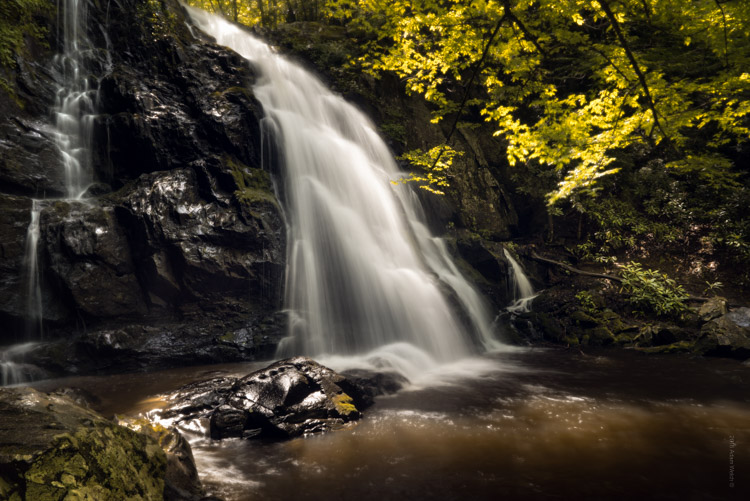
    And it’s done! In what amounts to a few short minutes, I have gone from a RAW file, to an image that artistically captures what I saw when I clicked the shutter.

    Before and After

    As with any type of post-processing, it’s important to remember that less is often more. Be judicious with your edits and only go as far as you need, in order to reach the image you want to make.

    Have a soft contrast or soft focus image you’ve edited in Photoshop? Feel free to share them in the comments below.

    googletag.cmd.push(function() {
    tablet_slots.push( googletag.defineSlot( “/1005424/_dPSv4_tab-all-article-bottom_(300×250)”, [300, 250], “pb-ad-78623” ).addService( googletag.pubads() ) ); } );

    googletag.cmd.push(function() {
    mobile_slots.push( googletag.defineSlot( “/1005424/_dPSv4_mob-all-article-bottom_(300×250)”, [300, 250], “pb-ad-78158” ).addService( googletag.pubads() ) ); } );

    The post How to Add a Soft Focus Look to Your Images for a Unique Style by Adam Welch appeared first on Digital Photography School.


    Digital Photography School