Blog

  • Zeiss adds super-wide and tele- options to Milvus line

    Zeiss has announced it’s adding 15mm F2.8, 18mm F2.8 and 135mm F2 options to its manual focus Milvus line. Counting these three, there are now nine lenses in the Milvus range. Zeiss puts an emphasis on robust construction with their full metal barrels, video-friendly features and optical designs that minimize chromatic aberration and distortion. 

    The new lenses will be available in October. The 15mm F2.8 will cost $ 2699/€2699, the 18mm F2.8 will cost $ 2299/€2299 and the 135mm F2 will cost $ 2199/€2199.

    Press release

    Three new lenses for the ZEISS Milvus family

    The lens family with manual focusing for DSLR cameras is now also available with focal lengths of 15, 18 and 135 millimeters

    Oberkochen, September 8, 2016

    Two super-wide angle lenses, the ZEISS Milvus 2.8/15 and ZEISS Milvus 2.8/18, and the telephoto lens ZEISS Milvus 2/135 have expanded this family of manual focus lenses for DSLR cameras, bringing the total number of ZEISS Milvus focal lengths to nine. “The ZEISS Milvus family of lenses is an invaluable investment for the future due to its excellent imaging quality and its large range, which now covers 15 to 135 millimeters,” says Christophe Casenave, product manager at ZEISS Camera Lenses. Delivery of the new ZEISS Milvus lenses begins at the end of October 2016.

    For high-end DSLR cameras

    “The ZEISS Milvus lenses have been designed in particular to fulfill the requirements of today’s powerful digital cameras and those of the future thanks to their high imaging performance, even in difficult lighting situations,” says Casenave. The new lenses are characterized by a harmonious bokeh and very high degree of flare control due to the T*® anti-reflective coating from ZEISS. Further optimization of the lens coating has also ensured less likelihood than ever of ghosting, flare or shading effects, even in critical lighting situations. And all ZEISS Milvus lenses come with a floating elements design, which compensates imaging errors at different distance settings.

    ZEISS Milvus for video

    The new ZEISS Milvus lenses also allow the user to create high-quality film shoots with a pleasing cinematic bokeh. “Due to their extremely high contrast rendition, the lenses fulfill the most modern video standards of 6K and higher, and have uniform color characteristics,” said Casenave. All ZEISS Milvus lenses have a focus ring with a very large rotation angle to enable precise focusing, and are made of comfortable rubber to ensure a good grip while focusing. The De-Click function on lenses with a ZF.2 mount lets cinematographers set the aperture in a soft and infinitely variable way so they can work professionally in changing lighting conditions. The ZEISS Milvus lenses’ robust full-metal barrel ensures long and reliable usage. In addition, the lenses are protected against dust and spray water. The robust metal lens shade is an integral part of the overall product design and included with all ZEISS Milvus lenses.

    The new focal lengths of the ZEISS Milvus family are also compatible with the ZEISS Lens Gears, providing filmmakers with additional value-add. The ZEISS Lens Gears, which are made of high-quality aluminum with a hardened surface coating, slide into the respective lens and are attached to the focus ring by turning two counter-rotating rings through a simple mounting procedure.

    The new ZEISS Milvus lenses in summary:

    ZEISS Milvus 2.8/15:

    This super wide-angle lens with a field of view of 110 degrees allows every photographer to consciously compose using extreme perspectives. The lens has excellent imaging performance – even with an open aperture – thanks to the correction of color errors. Color fringing and distortion are minimal. This is all thanks to a ZEISS Distagon® lens design with 15 lens elements in 12 groups, including two aspheric lenses, special glass with anomalous partial dispersion, and the floating elements design. A removable lens shade and the 95-millimeter filter thread also make this lens the ideal companion for special applications with additional slide-in filter holders.

    ZEISS Milvus 2.8/18:

    This compact super-wide angle lens with a newly calculated ZEISS Distagon optical design has 14 lens elements in 12 groups, including two aspheric elements. The ZEISS Milvus 2.8/18 has a short close-up distance of 0.25 meters and internal focusing. With an angular field of 99.9 degrees, this lens is the ideal companion for landscape and architectural photography, as it allows creative shots to be taken using unusual perspectives. The filter thread has a diameter of 77 millimeters. The ZEISS Milvus 2.8/18 delivers outstanding imaging performance and very good distortion correction.

    ZEISS Milvus 2/135:

    This fast telephoto lens delivers excellent correction of all color errors. Thanks to a large aperture and pleasing bokeh, it is the perfect lens for portrait photography from a medium distance. The angular field is 18.7 degrees. The short minimum object distance of 0.80 meters makes this lens even more versatile. It has an optical design with 11 lens elements in eight groups and, like the ZEISS Milvus 2.8/18, a filter diameter of 77 millimeters.

    Price and availability

    The delivery worldwide of the three new lenses will begin at the end of October 2016. The lens shade is included with the corresponding lens. Sales prices are EUR 2,699 (including 19% German VAT) or 2.699US$ for the ZEISS Milvus 2.8/15; EUR 2,299 (including 19% VAT ) or 2.299US$ for the ZEISS Milvus 2.8/18; and EUR 2,199 Euro (including 19% German VAT) or 2.199US$ for the ZEISS Milvus 2/135. For ambitious cinematographers and photographers, a set solution is also available for up to six ZEISS Milvus lenses. A discount of 8% is available with the purchase of three to four lenses. Purchasing more than five lenses gives the user a 10% discount.

    Articles: Digital Photography Review (dpreview.com)

  • Instagram is working on iPhone 7-specific features

    Yesterday Apple announced its iPhone 7 models and app developers are already working hard at making use of the devices’ new features, especially the dual-camera in the iPhone 7 Plus. Instagram actually had a slot during the Apple presentation and Ian Spalter, head of design at Instagram, had the opportunity to explain how the app would make use of the camera’s new features and capabilities. 

    In one of the next versions of the app, the zoom of the iPhone 7 Plus dual-camera will be controllable from the Instagram camera. In addition, the new taptic engine will indicate how much the photographer has zoomed into the scene in both video and stills mode. Instagram says it is also looking at adapting its image filters to the iPhone 7 display’s wider color gamut, which lets viewers see a wider range of color.

    Other, not strictly iPhone 7-related improvements, include the addition of a 3D Touch action for the Instagram app icon, which will let you add an image to an Instagram story in a quick and easy fashion. There will also be a function to convert Live Photos into Instagram Boomerang GIFs, which repeatedly play back and forth. This function will be based on the new Live Photo API in iOS 10.  The new Instagram version is expected to launch sometime after shipping of the new iPhone models has started on September 16. 

    Articles: Digital Photography Review (dpreview.com)

  • Flickr’s New Home Page is Fantastic!

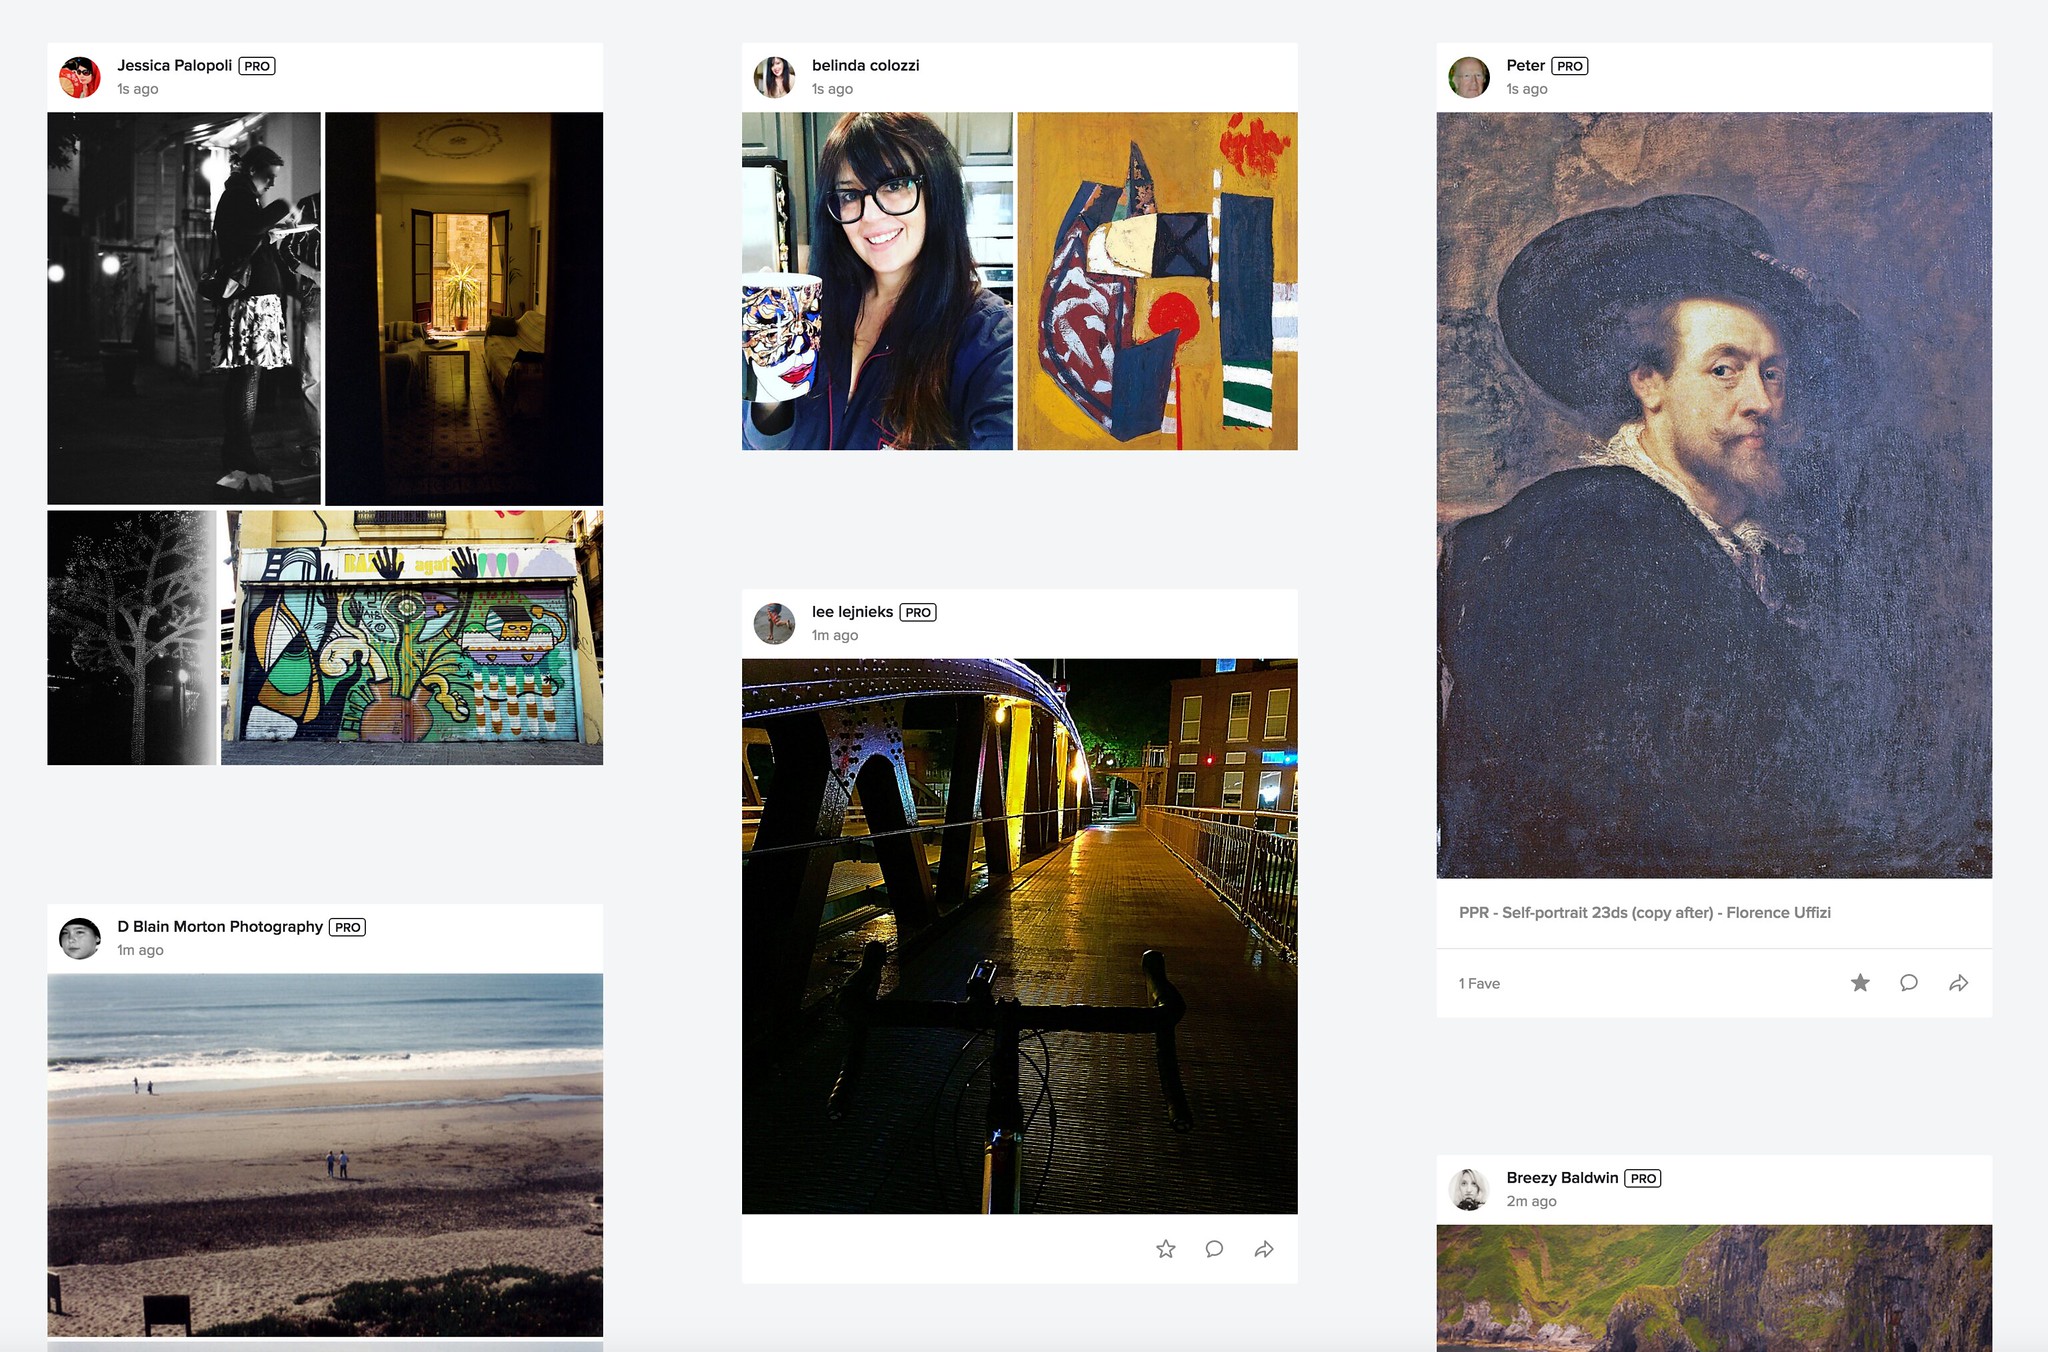
    New Flickr Feed on the Flickr Home Page

    Even in the new Instagram, Facebook, Snapchatty world, Flickr still remains my favorite place to share photos. I have now posted over 120,000 photos to Flickr and it remains my primary online archive for my body of work. Even though you don’t hear about Flickr as much in the headlines these days, there is still a very robust community there who shares great work every single day. I usually post two batches of photos each day to Flickr, once in the morning and once in the evening.

    The value proposition for Flickr is compelling. Both free and $ 49/year Pro accounts offer 1 terabyte of storage for your photos. One terabyte should be enough for almost every photographer out there today. Fortunately for me, I’ve been grandfathered into the old Flickr Pro account structure, which allows *unlimited* photo storage. I have already passed 1 terabyte at Flickr, but I am a very rare outlier. 99.9% of the photographers using Flickr today are nowhere close to this limit.

    In addition to generous storage, Flickr also gives both Pro and free accounts a terrific iPhone/Android app and a beautiful web experience. Where Facebook and Instagram downsize and degrade your photos, Flickr allows you to host your full high resolution original JPGs. This also makes Flickr a great place as an additional layer of backup for published JPG images. Pro accounts also get ad free browsing and sharing (that’s why even free accounts don’t see advertisements on my photo pages) which makes the account worth the $ 49 a year alone. There are also some nice additional benefits to going Pro.

    Recently Flickr made a very significant change to the web version of the site. Flickr.com, the main home page has been completely redesigned and in my opinion is 1000% better.

    You may or may not have the new home page yet, but they are slowly rolling it out to everybody over time. If you haven’t been to flickr.com in a while I’d encourage you to check the new feed page out. You have to be logged in to see the new changes, but they make following your Flickr friend’s photos such a better experience.

    Several new design elements have been brought into the new feed page.

    1. There is now a three column layout. Photos are easy to browse and you can just scroll down the page looking at photos from your contacts.

    Previews in the New Flickr Feed Look Awesome!

    2. Preview. This is my favorite feature of the new feed. If you see a photo on a page that you want to see larger you just click on it. The photo instantly blows up big and beautiful in a very clean version on your screen. Even better, Flickr has incorporated keyboard commands to the large view of these previews, so if I like a photo and want to favorite it or comment on it I can just press the F or C key on my keyboard. If someone has uploaded multiple photos in a batch (like I usually do) I can also easily use the forward and backward arrow keys to go through a batch of photos, easily interacting with each image with my keyboard commands.

    Once you are done looking and interacting with a batch of photos using preview, you can just hit the escape key and it takes you right back where you were to your place in feed. Very slick!

    Previously if I wanted to go through my contacts’ photos I would have to go to the “People” menu item which was a very glitchy page that bounced around too much on page reloads. I still use the People tab because it allows me to filter between friends/contacts photos and sometimes I just have time to look at my friend’s images, but I’m finding that I’m spending the majority of my time following my contacts’ images through the new feed page. I also like that it includes entire batches of photos that I can click through if I want whereas the old People page only would show the last 1 or 5 images depending on how I set it.

    In addition to providing a great new way to look at your contacts’ photos huge, the new page is very fluid and very fast. It feels like a big tech breakthrough vs. the old People page.

    Please, Please, Please Make this Load More Button Go Away

    My only complaint about the new page is that like other pages on Flickr it still makes you hit the dreaded “load more” button when you get to the bottom of the page. I wish that Flickr used true infinite scroll like Facebook does. It is such a better experience.

    At first I did not like that you cannot fave/comment on batches of photos directly from the page, but after playing around with preview and seeing how well it worked and how fast it was, combined with awesome keyboard shortcut commands, I became a convert and now flickr.com has earned a coveted spot on my bookmarks bar. Hats off to the Flickr design and engineering team for such an awesome improvement to the site. ?

    There is a help forum thread on the new Flickr feed where you can read more about the new Flickr feed and see what others think of it here.

    You can follow my work on Flickr here. ?


    Thomas Hawk Digital Connection

  • GivePhotos gifts instant portraits to impoverished families

    $ (document).ready(function() { SampleGalleryV2({“containerId”:”embeddedSampleGallery_7887944249″,”galleryId”:”7887944249″,”isEmbeddedWidget”:true,”standalone”:false,”selectedImageIndex”:0,”startInCommentsView”:false,”isMobile”:false}) });

    For many of us, the phrase ‘family photo’ can stir up memories of long, uncomfortable sessions, being made to wear clothes we didn’t like, sitting with siblings we liked even less. But despite the reputation they’ve gotten for being awkward and sometimes weird, we still kind of love them. And when you think about the fact that a lot of people fleeing a house fire will likely grab their family photos on the way out, it’s fair to say that we count them among our most prized possessions. 

    So you can imagine the impact it might have if you’d gone your whole life never having a family photo or portait taken, and suddenly a stranger hands you one. That’s what GivePhotos is all about. Born in Kolkata, Hollywood film editor Bipasha Shom grew up in New Jersey but made many trips back to India to visit family. On these trips she encountered many people living in poverty, and discovered that they often didn’t have photos of themselves or their families. It was a seemingly small thing, but something she had the power to change, and she vowed to do so.

    Three Fujifilm Instax wide cameras and 1,000 prints later, she’s met countless strangers, learned their stories and given them a priceless gift. The reaction? Well, a photo’s worth a thousand words, and the smiles in the images above say it all.

    Shom’s mission continues and you can help keep it going – check out her page on Generosity.

    Learn more at Resource Travel 

    Articles: Digital Photography Review (dpreview.com)

  • How to Create an Infrared Effect in Photoshop

    Note: For this tutorial I am using Photoshop CS6, however every version from CS2 up will work for this technique.

    What is Infrared Photography?

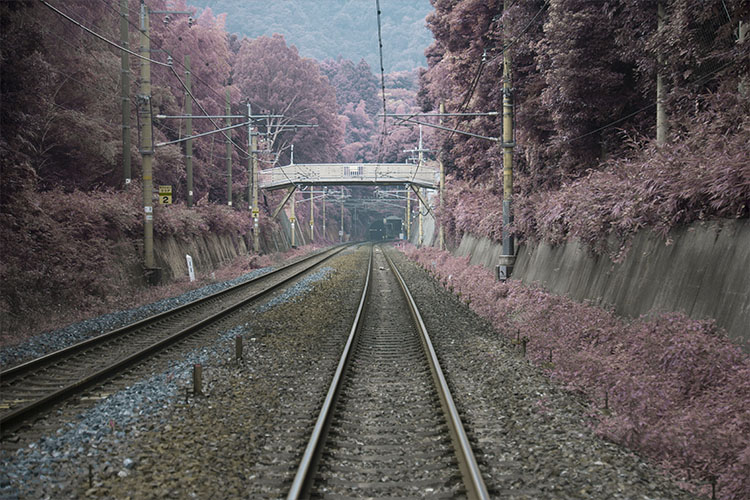
    Infrared (IR) light lies just beyond the visible spectrum, so we can’t actually see it with the naked eye. However, IR photography allows us to view this spectrum with a camera, to capture a whole new world of invisible light.

    13Done

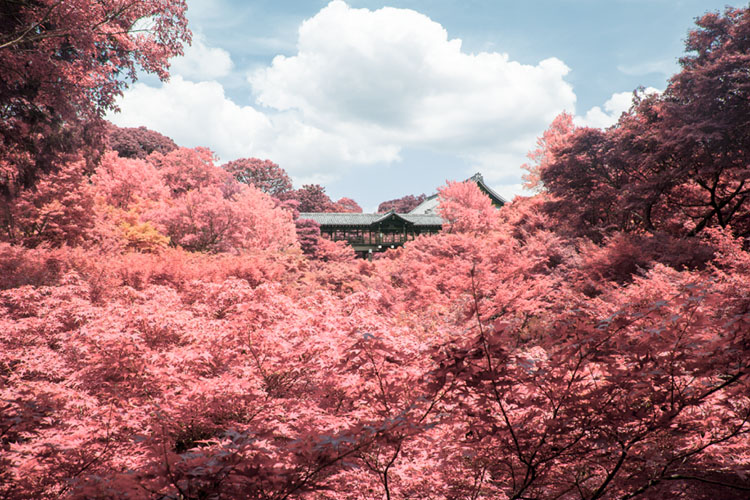
    In basic terms, anything that reflects a lot of infrared light, will appear red in IR photography. As healthy vegetation absorbs blue and red-light energy to fuel photosynthesis and create chlorophyll, organic matter is the most popular subject for IR photography. The surrealistic effects that are created when IR comes into contact with plants and grass makes the method very popular for with landscape photographers, and is a great way to diversify your portfolio.

    There are a few ways to capture IR photos in-camera

    As most digital cameras are somewhat sensitive to IR waves already, screw-in filters are a reasonably straightforward way to make IR photographs. They are, however, fairly expensive and significantly reduce the amount of light that reaches the sensor of your camera, thus also increasing exposure times. Infrared light also focuses at a slightly different point than visible light. Once the filter is on, you won’t be able to see much at all, a combination that makes for a difficult time focusing. Autofocus is also rendered useless.

    You can also use a film camera with special infrared film. This type of film is quite expensive and requires special handling, but shooting IR photos with it requires no modification to your camera.

    Your third option is to pay for your digital camera to be altered to capture infrared light exclusively. But the procedure is expensive, and involves altering the internal layout of the camera, meaning it will never photograph light in the visible spectrum again.

    This simple tutorial will show you how to mimic the distinct, surrealistic effect of in-camera IR photography, without the hassle or expense of buying an IR filter, IR film, or doing a camera-overhaul.

    1Originalimage

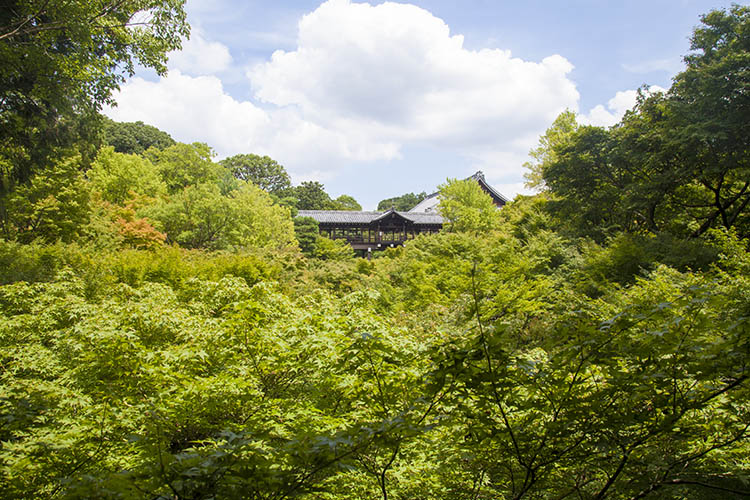
    Step 1 – Open our image in Photoshop

    Open up your image with Adobe Photoshop. The image I’ve chosen for this tutorial has plenty of organic material in it, so the finished result will be pretty intense. However, if a subtler effect is what you are after, simply pick an image with less dense greenery. As demonstrated in the conclusion, sometimes less can be more with this effect.

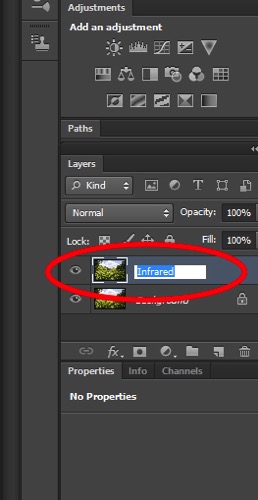
    Now, duplicate the image layer via Image > Duplicate Layer or by using the shortcut CMD/CTRL + J. Rename this layer “Infrared” via the command box or by double-clicking on the layer name.

    2Rename

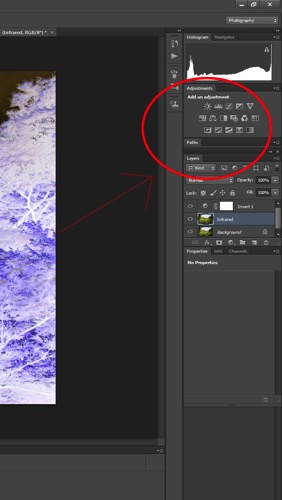
    Next, invert the colors of the layer you just named “Infrared” by using the Invert option in the Adjustments Layer Panel. We will be using a few tools in the Adjustment Layer Panel. This method adds layers over the original image rather than directly editing it, which reduces the overall image quality and its ability to be altered again later if you change your mind. This is called non-destructive editing.

    3Adjustmentlayers

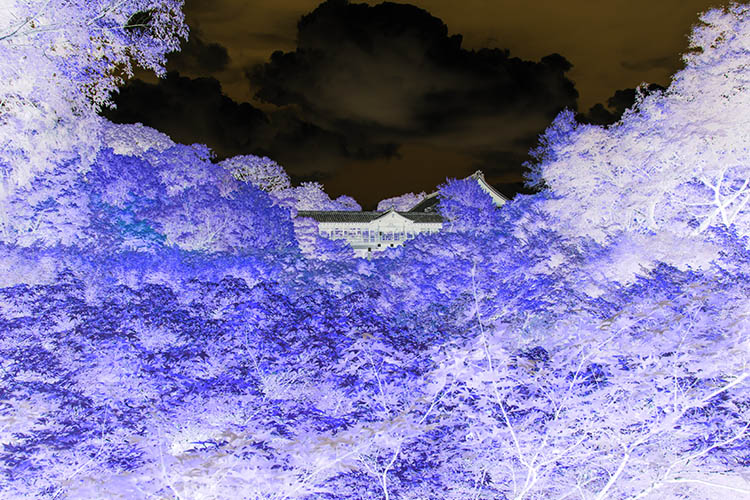
    Once the layer is inverted it will look like a color negative.

    4Inverted

    Step 2 – Blending Modes

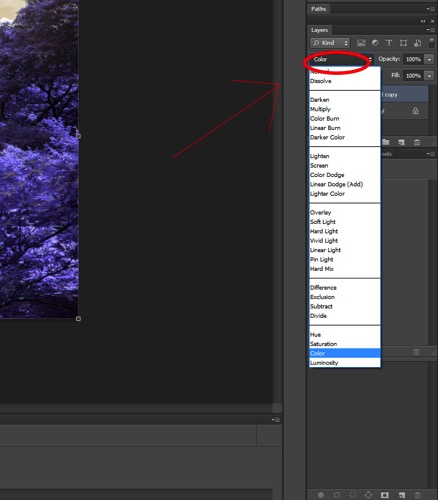
    With the Invert Adjustment Layer selected, change the Blending Mode to Color, from the dropdown menu in the layers panel.

    5Blendingmodesdropdown

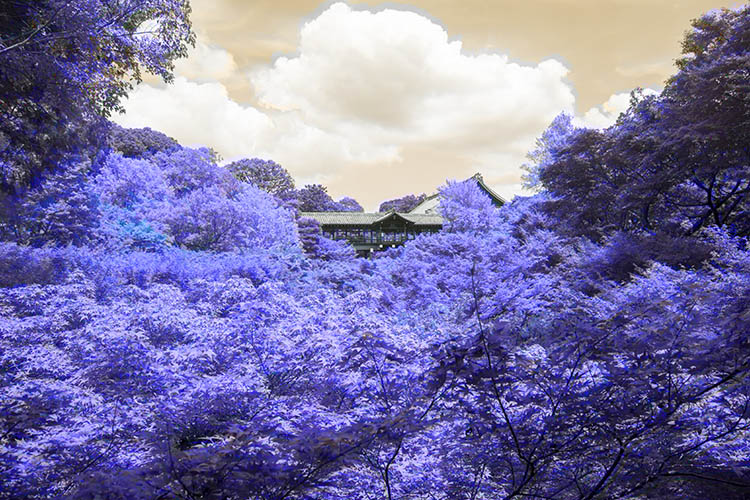
    The image should now have a nice orange and blue tone.

    6Color

    Step 3 – Channel Mixer

    Select Layer > New Adjustment Layer > Channel Mixer, or select the Channel Mixer icon in the adjustment layers panel.
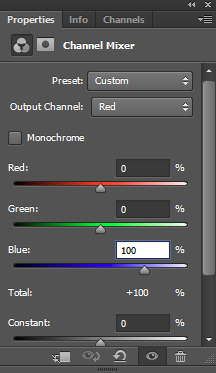
    Now, in the Channel Mixer, first set the output channel to red, and move the red slider to 0. Move the blue slider to +100.

    7colorbalance1panel

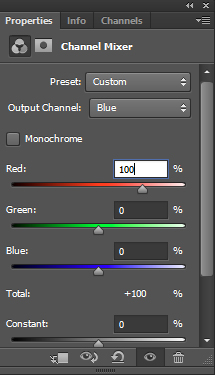
    Then set the output channel to blue. Increase the red to +100 and move the blue slider to 0.

    8colorbalance2

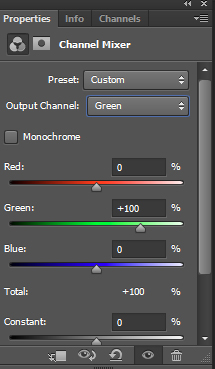
    Leave the green output channel as it is, making sure that the green slider it is set to +100.

    9colorbalance3

    The image will now look a lot more saturated, color wise.

    10Channelmixer

    Step 4 – Hue and Saturation

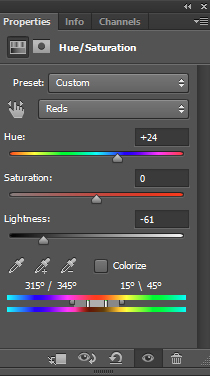
    This step is going to vary depending on what photo you have selected, but the overall goal is the same: isolating the pink/red colors and converting them to whitish/yellow color.

    Make a Hue and Saturation adjustment layer via the Adjustment Layer Panel. Select the red channel. Reduce the saturation down so the result is almost grey.

    Following this, adjust the hue slider until you get a hint of yellow. Feel free to play around with the other channels slightly to get the best results.

    11HueSaturation

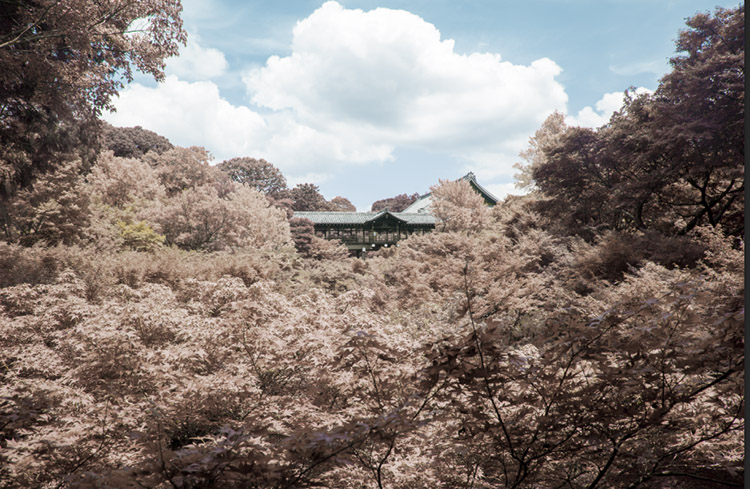
    My image now looks more faded and subtle:
    12Afterhuesaturation

    Step 5 – Finishing Touches

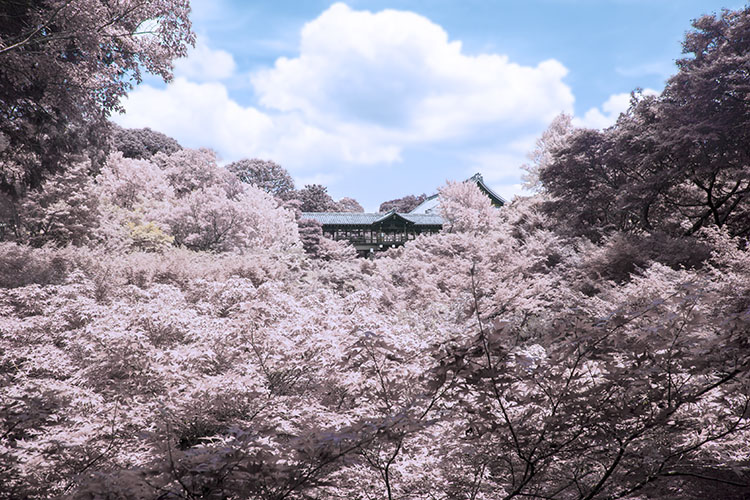
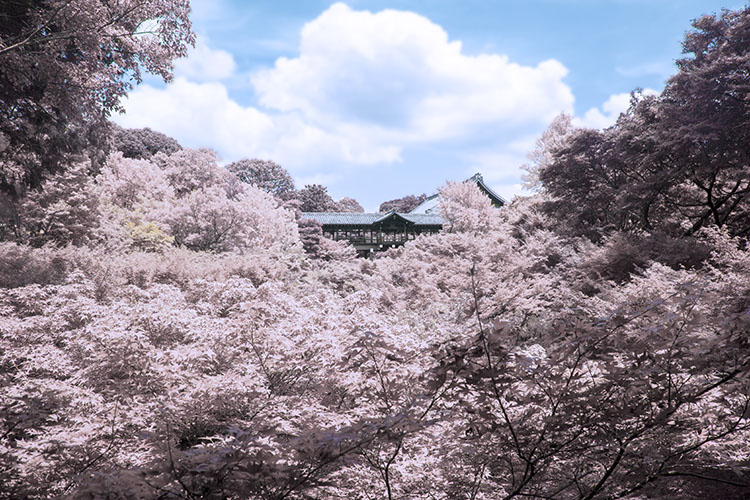
    To finish up, I adjusted the contrast of the image using the Curves Adjustment Layer on the Adjustment Layer Panel.

    13Done

    Other Examples

    Here are some examples of other landscapes I’ve used this technique on:

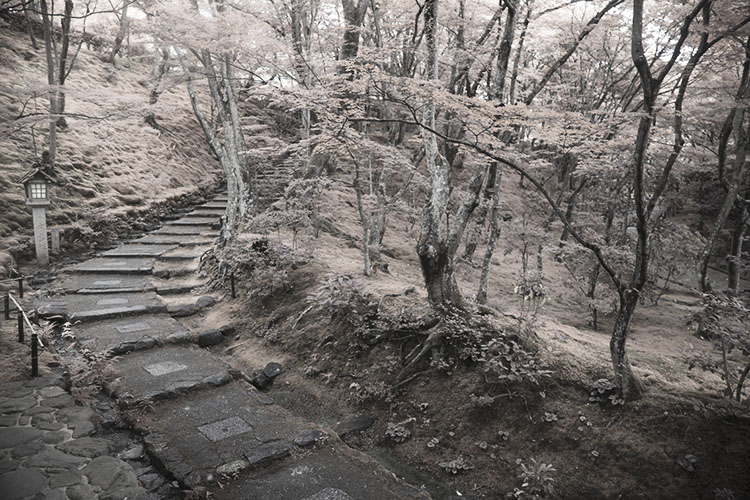
    The image below started with little or no blue tones. The final image takes on the appearance of a black and white, hand painted with a slight yellow tone.

    14Example1

    Inorganic material isn’t really affected by the IR treatment, so only the grass and plants in this image take on a surreal hue.

    15Example2

    I hope this tutorial was useful as a quick trick to diversify your landscape work.

    Enjoy playing around with this technique, because the results are often unpredictable and can lend a completely different perspective to an image. Please share your questions and IR image results in the comments section below.

    googletag.cmd.push(function() {
    tablet_slots.push( googletag.defineSlot( “/1005424/_dPSv4_tab-all-article-bottom_(300×250)”, [300, 250], “pb-ad-78623” ).addService( googletag.pubads() ) ); } );

    googletag.cmd.push(function() {
    mobile_slots.push( googletag.defineSlot( “/1005424/_dPSv4_mob-all-article-bottom_(300×250)”, [300, 250], “pb-ad-78158” ).addService( googletag.pubads() ) ); } );

    The post How to Create an Infrared Effect in Photoshop by Megan Kennedy appeared first on Digital Photography School.


    Digital Photography School

  • Pre-Visualization: Ansel’s views on what made his images so special

    Marc Silber from Advancing Your Photography continues his interview series with Ansel Adam’s son Michael in this video. Marc visits Ansel’s home and discusses the concept of pre-visualization in photography and Ansel’s writing, workshops and techniques with Michael. 

    In the interview, Michael also details what made Ansel’s work so special – my favorite quote from the video comes from Michael as he paraphrases Ansel’s thoughts on his work. Ansel would always say ‘It’s not what you see, it’s what I want you to see.’ That mindset is really what made Ansel’s photos so dramatic and memorable. He processed them in a way that fulfilled his vision and conveyed the story that he wanted to tell.

    This interview also offers an inside look at a few of Ansel’s favorite cameras, and even some of his color work that he completed through a partnership with Kodak. It really is a fascinating look back at some Ansel’s most profound thoughts, teachings and photographs.

    Articles: Digital Photography Review (dpreview.com)

  • Google Photos for iOS improves Live Photos management

    An update to the Google Photos app for iOS brings some of the features of the Motion Stills stand-alone app to Google’s main photo application. New functions allow for easier editing, sharing and stabilization of Apple’s animated Live Photos. Thanks to intelligent electronic stabilization algorithms Google Photos now lets you create animated images with moving subjects but frozen backgrounds, and sweeping pan shots. 

    After editing Live Photos can now be converted into movie files and saved to the iPhone’s camera roll. This means with the update the files are shareable with Android phones and other devices which are not capable of processing Apples Live Photo format. Additionally, the improved version of the app includes some new photo organization functions. Images in albums can now be sorted chronologically and you can choose thumbnails for your friends’ faces in the People module. 

    The update can now be downloaded and installed from the Apple App Store and should be available for the Android and Web versions of Google Photos soon. 

    Articles: Digital Photography Review (dpreview.com)

  • Meyer Optik brings back the Primoplan 58 F1.9 on Kickstarter

    Meyer Optik, a German lens manufacturer that has already brought some of its historic lens designs back to life via crowdfunding campaigns, has launched another Kickstarter project. This time the company is looking for funding to relaunch the Primoplan 58/F1.9 lens, designed 80 years ago by engineer Paul Schaefter.

    The lens comprises five elements and offers different styles of bokeh, depending on subject distance and aperture. The 58/F1.9 uses some of the same components, including the housing, as the Trioplan 50. This means Meyer Optiks can generate economies of scale and offer the lens at a more affordable price than otherwise possible. 

    The new Primoplan 58/F1.9 will be available worldwide and shipping is slated for February or March 2017. To minimize the cost of delivery the lens will be shipped, depending on the buyer’s location, from either the US or Germany. The campaign has already surpassed its funding goal but you can still secure a Primoplan 58/F1.9 by pledging $ 599. More information, sample images and a video are available on the project’s Kickstarter page. 

     Copyright: Firat Bagdu
     Copyright: Tamara Skudies
    Copyright: Firat Bagdu

    Articles: Digital Photography Review (dpreview.com)

  • Harder than it looks: LensRentals gets inside the Canon EOS 5D IV

    LensRentals gets inside the Canon EOS 5D IV

    Canon’s new EOS 5D IV is a formidable bit of hardware, boasting a 30MP full-frame sensor and 4K video. Our friend Roger Cicala over at LensRentals.com has taken one apart to see how it works. His verdict? It’s harder to disassemble than you might expect…

    LensRentals gets inside the Canon EOS 5D IV

    Lensrentals.com, 2016

    We love it when LensRentals takes cameras to bits for two reasons. First, we’ve always wanted to see what these things look like on the inside, and second, it’s not the kind of thing that our friends at the major camera manufacturers would ever let us do. 

    The screwdrive-happy nerds at LensRentals enjoy opening up Canon cameras particularly, it seems, because in Roger’s words ‘the engineering is always nicely laid out and usually pretty’. Ok then. 

    LensRentals gets inside the Canon EOS 5D IV

    Lensrentals.com, 2016

    The 5D IV, however, seems not to be a typical Canon camera in that it proved very difficult to get into. According to the crew at LensRentals, ‘Until now Canon cameras have all been pretty straightforward in their disassembly: you take out screws, that part of the case comes off, repeat for another part of the case’. 

    With the 5D IV, on the other hand… ‘to take off any part of the shell, other than the back assembly, you have to take off most of the shell because Canon has added lots of plastic pegs and latches to the various parts of the shell, making it much more interlocking than in previous cameras’. 

    LensRentals gets inside the Canon EOS 5D IV

    Lensrentals.com, 2016

    Part of the reason for the additional latches could be to improve the durability and weather-sealing of the camera, which as you’d hope features ‘lots of foamed seals along doors and joints’

    This view shows the inside of the 5D IV’s rear shell. According to Roger, ‘Inside it looks very much like other Canon back covers. There are aluminum shields over the button panel and LCD. The flexes running to and fro over the LCD are more complex than other Canons because of the extra processing for the touch screen.’

    LensRentals gets inside the Canon EOS 5D IV

    Lensrentals.com, 2016

    This is the main LCD flex, which is unusually large. In Roger’s words ‘almost a circuit board’. 

    LensRentals gets inside the Canon EOS 5D IV

    Lensrentals.com, 2016

    From the back, Roger found a couple of interesting things, looking at the EOS 5D IV: ‘First, there are more flexes connecting to the main PCB than most other models. Second, we were very pleased to see a thick, stiff, sheet of rubber covering the back of the PCB’.

    LensRentals gets inside the Canon EOS 5D IV

    Lensrentals.com, 2016

    The EOS 5D IV benefits from the redesigned mirror assembly we first saw in the EOS 5DS/R, and here’s the mirror motor, tucked away to the left of the lensmount.

    LensRentals gets inside the Canon EOS 5D IV

    Lensrentals.com, 2016

    Here’s the EOS 5D IV’s top assembly. And this is as far as Roger is prepared to go, because ‘we’ve learned from long, painful experience not to take these apart unless we absolutely need to. In general, if something is wrong with the top assembly, you just replace the top assembly’. 

    LensRentals gets inside the Canon EOS 5D IV

    Lensrentals.com, 2016

    This is the EOS 5D IV’s main PCB. Unusual, because ‘there are a lot, a whole lot, of flexes connected to the board from every direction. They are thicker and more complex than previous cameras and a lot end up in thick ‘press in’ connectors instead of simple flex cables.’

    LensRentals gets inside the Canon EOS 5D IV

    Lensrentals.com, 2016

    ‘Underneath where the PCB was we now see the circuit board of the image sensor, and to the right of that the CF card assembly’.

    LensRentals gets inside the Canon EOS 5D IV

    Lensrentals.com, 2016

    What did Roger and his team learn from taking the EOS 5D IV apart? 

    • ‘The weather sealing on the Canon 5d Mark IV appears pretty robust’
    • The multiple pins, clips and screws that hold the camera together might improve weather-resistance but make it ‘kind of a pain to get into’.
    • The extra technology inside the EOS 5D IV mean that ‘there are more chips, and more and heavier connectors moving electrons from board to board than even the Canon 5Ds cameras have’.
    • ‘there’s more air inside this camera than we’re used to seeing. […] In other words, this camera probably could have been a bit smaller but Canon wanted to keep the form factor the same.’
    • ‘Construction is at least as robust as the recent 5 series releases and better than the Canon 5D III’.

    You can read the full tear-down, with Roger’s usual detailed analysis and plenty of additional images at LensRentals.com.

    Articles: Digital Photography Review (dpreview.com)

  • So, you don’t care about the iPhone 7? Here’s 10 reasons why you should

    The iPhone 7 has a newly designed 12MP camera with a six-element, optically stabilized lens. As well as stills it can shoot 4K video at up to 30p, and the iPhone 7 Plus offers a twin-lens camera providing 28mm and 56mm focal lengths. 

    Another year, another iPhone, the usual chorus of Internet commenters going to great lengths to tell the world how little they care. But we’d be foolish to ignore the world’s most popular camera – and so would you.

    Here’s why.

    $ (document).ready(function() { SampleGalleryV2({“containerId”:”embeddedSampleGallery_5515118563″,”galleryId”:”5515118563″,”isEmbeddedWidget”:true,”standalone”:false,”selectedImageIndex”:0,”startInCommentsView”:false,”isMobile”:false}) });

    Official iPhone 7 sample photos, courtesy Apple

    1: 12MP is good enough

    Ok, most DSLRs and high-end compacts offer 20MP+ but if we’re being honest, 2MP is good enough for Facebook, 3MP is good enough for a magazine cover, 6-8MP is good enough for a large-ish wall print and anything more than that is a bonus, most of the time. In short, the chances are that 12MP is good enough for you. 

    2: It shoots Raw

    It was only a matter of time before Apple added a Raw capture option to its iPhone series, and the day has come. As such, the iPhone 7 and 7S are arguably more enthusiast-friendly than the majority of low-end zoom compact cameras, and almost all tough cameras.

    Adding Raw capture to the iPhone gives photographers a lot more creative freedom, and should allow them to mitigate – if not entirely overcome – some of the limitations of shooting with a control-limited device and a small sensor format. Raw shooting is coming to older iPhones soon too, with the upcoming release of iOS 10.

    3: The iPhone 7 Plus has a proper zoom. Kind of.

    The iPhone 7 and 7 Plus feature 12MP imaging sensors – most likely a 4.9 x 3.7mm BSI-CMOS which gives an equivalent crop factor of around 7X. The 7 Plus has two of them, which form twin cameras shooting at 28mm and 56mm equivalent. Their F1.8 and F2.8 apertures are equivalent in depth of field terms to ~F12 and ~F22 respectively.

    The iPhone 7 Plus features a twin-camera design, which comprises 28mm F1.8 and 56mm F2.8 equivalent prime lenses. A forthcoming update will enable a computationally-derived bokeh simulation effect.

    A 28-56mm two-step zoom might not set your heart ‘a flutter, but for the average beginner, or keen smartphone photographer, the added versatility of a proper choice of optical focal lengths is a serious selling point of the iPhone 7 Plus over every other phone on the market. A true optical zoom would be hugely complicated, but Apple’s approach makes sense. One lens for landscapes, one for portraits.

    5: The iPhone 7 Plus can do bokeh. Kind of. 

    We’ve seen attempts to blur out backgrounds using software before, but they don’t tend to end well. Typically, in the devices which offer some kind of algorithmic background blur feature, the effect is inconsistent. Even when it works, it doesn’t hold up well to critical examination.

    We won’t be able to properly test the iPhone 7 Plus’s bokeh simulation effect for a while, but early samples look very encouraging indeed. 

    Apple seems to be doing two things a little differently. The first is that the feature only works in ‘Portrait’ mode (when the iPhone 7 Plus’s 56mm equivalent lens is employed), and the longer focal length probably gives it a bit of a head-start in terms of baseline background blur for portraits compared to a bog-standard wideangle cellphone lens.

    The second is that rather than just identifying your subject, making a mask, then blurring everything which looks like it probably isn’t your subject, the iPhone 7 Plus’s software makes a very complex depth map of the scene, and selectively applies blur based on the calculated distance of the background from your intended subject. For now, we only have Apple’s sample images to go by, but it seems to work impressively well.

    6: It’s optically stabilized

    Here’s an exploded view of the iPhone 7’s camera, showing its six-element construction.

    This is old news in the mainstream camera market, but optical stabilization still isn’t included in some fixed-lens cameras. Optical I.S. will make the iPhone 7 and 7 Plus cameras more useful in poor light, extending the potential of the products for social and environmental photography.

    7: It’s quick, and powerful

    Modern smartphones incorporate an incredible amount of processing power, and compared to most cameras they’re capable of churning through much more data. With the cameras activated, the iPhone 7 and 7 Plus are constantly sampling a scene in preparation for exposure. So effectively, when you tap the shutter button, they’ve already taken the picture. On-sensor phase-detection autofocus using dedicated pixels means there’s virtually no hunting for focus, either.

    Apple claims that the iPhone 7/Plus’s imaging processor manages more than 100 billion operations every time a picture is taken. Think about that the next time you take a photo of your cat.

    8: It shoots 4K

    Maybe you think you don’t care, but trust us – even if you’re not a filmmaker, the ability to capture 8MP frames at up to 30fps can be pretty handy.

    9: It’s water-resistant

    You can take the iPhone 7 and 7 Plus out in the rain, or drop them in the bath without worrying. How many photographers can say the same thing about their ‘proper’ cameras?

    Supposedly, the iPhone 6S was almost water-sealed, but not quite. With the removal of the headphone jack, the iPhone 7 and 7 Plus have been made fully water resistant, and are both capable – apparently – of being submersed for up to 30 minutes without damage. 

    10: Good iPhone cameras lead to better ‘proper’ cameras.

    Even if you’re one of those people who has an almost religiously-held indifference to cellphones (and I know you exist because I get emails from you), consider this:

    The greater the public’s expectations of the cameras in their cellphones, the more they expect of ‘proper’ cameras, if and when they buy one. There is certainly an argument to be made that the only reason we have things like beautiful high-resolution touch-screens, wireless connectivity, GPS and 4K video in cameras now is the iPhone. That ten years ago, Apple kicked off a smartphone revolution with the original iPhone which lead to the inclusion of these features in cameras becoming an expectation on the part of smartphone upgraders.

    Habitual iPhone photographers won’t put up with laggy low-resolution touch-screens on DSLRs, or the omission of features like 4K video and wireless connectivity that they’re used to from their phones. This drives camera manufacturers to add more features to their products, and we all benefit. Right?

    10.5: It’s an iPhone camera.

    This is an obvious point, but bear with me. Remember what I just wrote about this being the ‘world’s most popular camera?’ Apple has been phenomenally successful when it comes to putting its devices in people’s pockets. More people are taking photographs now than ever before, and the iPhone, in its various versions, is the most popular picture taking device (or strictly speaking, series of devices) in the world.

    What that means is that like it or not, when Apple does something, even if it didn’t do it first, it tends to have a certain significance. It’s safe to assume that there are a lot of people talking about the words ‘Bokeh’ and ‘Raw’ today who had never heard the terms before Apple’s launch event this week. Maybe I’m just a misty-eyed optimist, but I think that’s kind of cool. 

    Articles: Digital Photography Review (dpreview.com)