Blog

  • Food photographers rejoice: Camera-enabled Samsung Family Hub 2.0 fridge quick review

    Introduction

     Source: Samsung

    All of Samsung’s new Family Hub 2.0 line of camera fridges come in three or four door configurations, have 21.5” 1080p LED screens, and of course, internet connectivity and cameras with enough resolution to allow you the freedom to count your yogurt cups from anywhere in the world.

    Electronics giant Samsung has been largely absent from consumer digital imaging lately, save for its ongoing lineups of smartphones and tablets (please, don’t say ‘phablets’ within earshot of anyone, anywhere). That all changed at CES 2017, where the company has shown a renewed vigor in the digital imaging space with an update to its Family Hub refrigerator-based camera technology.

    At the heart of this system is the large LED screen on the front of the units, which will allow you to load web pages, place food orders, leave notes for your family, and of course, frame your photographs of the food that is being cared for by the very device doing the photographing. The 21st century sure is grand.

    Key Specs

    • Camera type: Fridge
    • Price as tested: $ 3499
    • Resolution: Good enough
    • ISO: Good enough
    • Image stabilization: Weight-based (334 lb. shipping weight)
    • AF Point Selection: Dunno
    • Battery life: AC power only
    • Fingerprint resistance: Standard

    So who, then, is the Samsung Family Hub 2.0 camera fridge for? For the budding food photographer, it doesn’t get much easier. If you’re a landscape shooter though, you may run into some limitations.

    In practice

    The Family Hub 2.0 line of camera refrigerators makes basic food photography as easy as can be. The camera fridge acts essentially as a large softbox or cove, with ample space to style your food with ease.

    Your photos with your camera fridge will look nothing like this, because this is a camera in a fridge, not a camera built into a fridge door. Important distinction.

    A full internal LED lighting setup provides bright, constant illumination to allow you to capture your stylized creations or past-due eggs with a flattering (or maybe just flat) look, and internet connectivity lets you share these works with literally anyone in the world, even if no one wants to see them. In other words, this could be the perfect food-focused Instagrammer’s main camera.

    There’s also an argument to be made for the eccentric product photographer who prefers to shoot primarily on bright reflective white, or the accomplished portraitist who wants some variety for his or her ‘Trapped Businessman’ portfolio (note, the ‘similar images’ listings on that page show a similar theme, ‘Trapped,’ but for some reason, the businessman is nude – fair warning).

    But as an enthusiasts’ all-rounder, the Family Hub 2.0 camera fridge leaves something to be desired. First of all, to photograph anything besides what’s actually in the fridge, you will have to literally saw the back of the fridge off (DPReview in no way endorses this activity). And though the immense weight will be a boon to those photographing landscapes in windy conditions, the lack of any sort of control over image capture settings makes long exposures of waterfalls, grassy knolls and the like exceedingly difficult to capture with any sense of motion or grandeur.

    There goes a brave man.*

    For wildlife, you’re going to need a very long extension cord to keep the generator noise far enough away to keep from frightening your subjects, to say nothing of the rustling you’d make wheeling the camera up to a confused and soon-to-be angry Grizzly. And as for sports, the lack of a zoom will be limiting for anything besides a slot-car track built inside the fridge itself; wheeling a fridge up and down the sidelines of your local football match is likely to cause health problems.

    Lastly, there’s no Auto ISO or Raw support (besides supporting the chilling of various raw meats), and these are both features that are present on many competing camera models in this price range. Of course, none of those competing models comes with a fridge built-in. So you just can’t have it all, it seems.

    The wrap

    Overall, we’re pleased to see Samsung’s continued commitment this new (ice) age of digital imaging. Their Family Hub 2.0 line of camera fridges offer easy-to-use Wi-Fi connectivity in solid, well-built packages. But we can’t help but feel that the camera fridge phenomenon as a whole will be given the cold shoulder by the broader photography community.

    After all, the price of entry for a camera that primarily appeals to food photographers is fairly steep. And even if you can appreciate the stabilizing heft, there will be those for whom a hand truck is just one photography accessory too many. Perhaps most importantly, if you need to photograph anything besides what you place in the fridge, it’ll require a couple of warranty-breaching hours with a hacksaw.

    In the end, the Family Hub 2.0 line of camera fridges is going to appeal to a very select niche, and if it’s the right camera for you, who are we to judge? But if you need a more well-rounded solution for your photography, we have to recommend that you hold off and put that pre-order on ice.

    *In accordance with Creative Commons 2.0 and 3.0 licensing, image is a composite with credits to Rob Bixby for the photographer, Samsung for the fridge and someone whose alias is Traveler100 for the bears.

    If you hadn’t caught on yet, we’re having a little April Fool’s Day fun her. We in no way endorse taking a hacksaw to a refrigerator, or really using a refrigerator for anything aside from refrigeration.

    Articles: Digital Photography Review (dpreview.com)

  • Circular Logic: “Endless Runways” Rounded to Save Energy, Time & Space

    [ By WebUrbanist in Architecture & Public & Institutional. ]

    circular takeoff

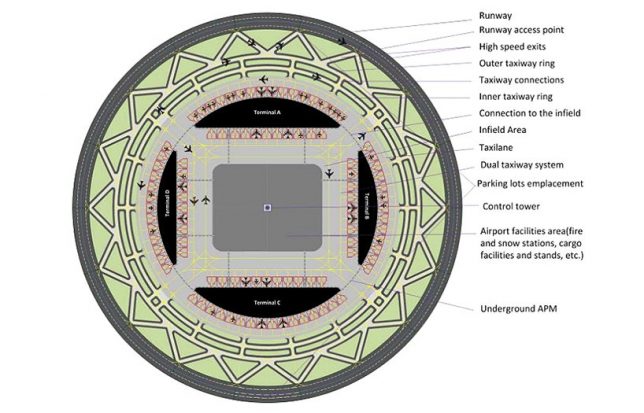
    Designed to reduce real estate needs for runways in ever-more-crowded cities, this “endless runway” system encircles a central terminal building and lets multiple planes take off and land at the same time.

    Developed by Dutch scientist Henk Hesselink, the two-mile-circumference shape also lets planes land or take off in alignment with the wind (rather than fighting crosswinds) since they can line up with any point on the strip.

    round runway solution

    In theory, the system would improve the flying experience for both passengers and pilots, making for smoother departures and arrivals. They would also save energy and space, increasingly an issue for once-suburban (or rural) airports now encroached upon by growing cities.

    circular runway

    Critics have expressed skepticism regarding the difficulty of landings and take-offs in such a setup, but big backers seem to believe in the potential. Also, even if not immediately feasible, increased automation could make it increasingly viable over time, since computer systems can coordinate ideal landing and arrival trajectories for optimal safety and comfort and across multiple planes.

    runway system

    Each such setup provides the length of three airstrips and could be deployed or at least tested at scale in Europe soon — participating backers include the Netherlands Aerospace Centre (NLR), along with DLR Germany and ONERA in France.

    round runway backers

    From the designers research report: “The results of the literature survey in this document are promising and suggest that a circular runway can be developed with current and expected technology. Today’s aircraft characteristics allow to take off and land with speeds and low altitude bank angles compatible with the operation on a circular track. The Endless Runway fits in future concepts that specify improved planning of operations, new navigation equipment, and intermodal transport.”

    Share on Facebook


    [ By WebUrbanist in Architecture & Public & Institutional. ]

    [ WebUrbanist | Archives | Galleries | Privacy | TOS ]


    WebUrbanist

  • We try out the new HassleVlad X1D

    We try out the new HassleVlad X1D

    This is Vladimir. He’s a developer. More importantly to us, he’s the newest member of the DPReview team. We’re always excited when we get new things in the office.

    We try out the new HassleVlad X1D

    This is another new thing in the office.* What a happy coincidence that we get the perfect camera at the same time we welcome our new teammate.

    *Not really. That’s not a real camera. That’s an edited image of a Hasselblad X1D**.

    **Which, incidentally, is the camera we used to take all of the photos for this slideshow.

    We try out the new HassleVlad X1D

    Vlad wears noise-canceling headphones to block the sound of the demolition of the building next door. Unfortunately, the headphones do not cancel out the sound of the HassleVlad’s shutter.

    We try out the new HassleVlad X1D

    Vlad is an avid photographer as well as a developer. This means he has quickly adopted the habit of taking photos out of our office windows. We hope that he will be as quick to accept being the subject of many of our photos.

    We try out the new HassleVlad X1D

    The HassleVlad’s leisurely startup time and satisfying yet conspicuously loud shutter mean we cannot sneak up on Vlad.

    We try out the new HassleVlad X1D

    Here, Vlad knows that as long as he keeps walking, it is unlikely that I will be able to turn on the HassleVlad, set the AF point, and capture focus before he gets to me. He’s mostly right; the image is a bit soft. I am not deterred.

    We try out the new HassleVlad X1D

    Vlad seems happy about our team trip to photograph the University of Washington cherry blossoms even as he tries to ignore me.

    We try out the new HassleVlad X1D

    The cherry blossoms are beautiful and the HassleVlad does a fine job retaining the highlights of Vlad’s trip.

    We try out the new HassleVlad X1D

    Although Vlad does not take any selfies, the HassleVlad ensures his morning is well-documented.

    We try out the new HassleVlad X1D

    Medium format has a reputation for not performing well in low light, but we find the HassleVlad is quite competent in low Vlad situations.

    We try out the new HassleVlad X1D

    Yes, Vlad is sharp in the corners too.

    We try out the new HassleVlad X1D

    Vlad continues to try to avoid me, but I’m nothing if I’m not persistent. And I am determined to get the most out of the HassleVlad while I can.

    We try out the new HassleVlad X1D

    With a minimum focus distance of 27″ (70 cm) on the XCD 90mm F3.2, this is as close as I can get to Vlad. He is happy a macro lens has not been released for the HassleVlad.

    We try out the new HassleVlad X1D

    Vlad has proven to be a patient subject; he simply ignores me as I follow him and take photos. I have been Mildly Inconveniencing Vlad, so it is time for bolder measures: I am now standing directly in his line of sight.

    We try out the new HassleVlad X1D

    Success! The HassleVlad works. We definitely recommend this camera for the Vlad in your life. (And welcome to the team to the Vlad in our life!)

    Articles: Digital Photography Review (dpreview.com)

  • STC adds 6-stop neutral density to its clip-on sensor filter range

    Specialist filter manufacturer STC Optical Ltd has expanded its range of Clip filters to include a ND64 with infrared-cut properties. The new filter, which clips directly in front of the camera’s sensor instead of over the front of the lens, provides 6 stops of light reduction while maintaining accurate colors by preventing infrared light from passing freely during the exposure.

    The benefit of using filters over the sensor is that the same filter can be used whichever lens is fitted, so users don’t have to buy a separate size for each lens diameter, or a different adapter ring. These kinds of filters are especially useful when used with ultra-wide lenses as they present no danger of vignetting and they fit behind lenses that can’t accept conventional front-element screw-in filters.

    With wide, as well as normal, lenses having the filter behind the lens avoids the problems of flare that adding glass in front of the lens can create. It also side-steps the problem of  reflections on the back-side of the filter that can be a danger during long exposures when using filter holders that don’t hold the filter flat against the front of the lens.

    Using this sort of ND filter will potentially be of benefit not only for creating long-exposure still images but also for video work. And of course with the filter remaining in place in the camera, changing lenses will take less time as there’s no need to screw off and reattached the filter.

    Since the filter prevents DSLR mirrors returning to their normal position, it must be attached in live view mode. STC claims that it is perfectly safe to leave the filter in place even with the camera powered off, since the filter is designed to support the mirror, and prevent it from dropping.

    A full list of compatible Nikon, Canon and Sony full frame and Canon APS-C  bodies is available on the STC Optical website. The filters cost $ 90.

    Articles: Digital Photography Review (dpreview.com)

  • Just added: New product overview videos and getting started guides

    Are you shopping for a new camera? Or just looking for some advice about how to use your current favorite model? We’ve been working on a series of product overview videos for a couple of years, and we’ve just added a new series of informational videos to our YouTube channel.

    Called ‘Getting Started Guides’, these videos are intended to give you a quick breakdown of the key features of several recent releases, and some quick tips on how to get the most out of them. You can find all of our recent overview and getting started guide videos from the links below, and subscribe to our YouTube channel to ensure you never miss a new video!

    Watch our series of product overview videos

    Watch our new ‘Getting Started Guides’

    Articles: Digital Photography Review (dpreview.com)

  • Visiting the ‘Niagara of the West’: Idaho’s Shoshone Falls

    $ (document).ready(function() { SampleGalleryV2({“containerId”:”embeddedSampleGallery_3016072904″,”galleryId”:”3016072904″,”isEmbeddedWidget”:true,”standalone”:false,”selectedImageIndex”:0,”startInCommentsView”:false,”isMobile”:false}) });

    After visiting Idaho on a road trip, Resource Travel’s Michael Bonocore fell in love with the state, and moved there just three months later. One spot he hadn’t yet visited was beautiful Shoshone Falls, which is 45 feet taller than world-famous Niagara Falls and arguably as spectacular. 

    After a two hours in the car wondering if the light from the setting sun would still be there when he arrived, Michael struck gold:

    ‘I didn’t take into account the fact that the sun would stop hitting the wall of water straight on well before the actual sunset time. But, as the diffused light cascading across the roaring waterfall, I was able to start getting some nice, evenly lit photos.

    ‘And then, it happened.’

    Find out what ensued and see even more photos from Michael’s trip at Resource Travel. He’s also provided some tips on shooting the falls should you end up visiting.

    Articles: Digital Photography Review (dpreview.com)

  • Complete Step By Step Wedding Photography Workflow

    You may have spent months planning a wedding with your client. After countless emails, meetings, and the actual wedding day itself; it’s time for the lengthiest part of your work to begin, the post-processing. Your wedding photography workflow is the part of the job that clients never see (and most never think about) after the event is over. Post-processing for digital photography starts from the moment you return to your home or office up until the clients receive their final images.

    Wedding photography workflow

    Every photographer has their own speed and style to post-processing and most will have their own aesthetic or editing programs they prefer to use. However, after owning a busy wedding photography studio for the past five years, I have created an efficient workflow that works well, while giving images a personal aesthetic. In this article you’ll find what to do after the wedding day is over, to delivering the final product to your clients using an efficient workflow.

    Complete Step By Step Wedding Photography Workflow

    Step 1: Back Up

    You may have been shooting for eight or more hours, but when you get home, don’t crawl in that sweet, comfy bed just yet – your night isn’t over. It’s imperative that you back your client’s images up in several places as soon as possible. Not only did your client pay a lot of money for your time and expertise, but for the safety of their images as well. Until their images are backed up safely in several locations, no naps allowed! Don’t learn the hard way, back those things up.

    Part one – download

    On your computer, create a folder with the client’s name, and a sub-folder called “RAWS” (assuming you shoot in RAW, which you should. More on that later). You will need to copy the images from all of your memory cards into the new “RAWS” folder on your computer.

    Note: RAW files are huge, s,o you will probably need to upgrade the amount of storage space on your computer, and get some more RAM while you’re at it to run your computer programs efficiently. If you’re using a Mac, make sure your computer is scheduled to back up using Time Machine as well.

    Step1 BackingUp

    Part two – make a copy

    After all the files are on your computer, back them up again to a client folder on an external hard drive. When not in use, the external hard drive should be kept securely in a place like a fireproof safe. Some photographers back up on more than one external hard drive.

    Part three – backup online

    Lastly, when you don’t think you can stay awake another second, you need to start your RAW file back up to an online or cloud location. I use Zenfolio for my RAW storage, although there are other storage sites available. The good news? You can go to sleep while the files upload overnight (and maybe the next few days if you have a slower internet connection).

    Step1 BackingUp1

    Step 2: Importing and Culling

    The most exciting part of your job – not!

    I’m going to be honest here, culling, or going through every image you took of a wedding, rating them, and deciding which to keep and which to trash, is the most tedious, eye-bleeding part of your job. This is why it’s not a good idea to “spray and pray” throughout a wedding day with your cameras. The more selective you are with the photos you take, the faster your post-wedding workflow will be. Alternatively, there are companies you can use to cull your images for you if that is within your budget.

    In Lightroom, create a new Lightroom catalog for your client in their client folder: File>New Catalog. Then import your RAW files from the client folder you created while in the Library module.

    Step1 5 Importing

    Once all the images are imported, make sure all cameras are set to the correct time, and do a “sort by capture time” so everything from the wedding day on all cameras is in chronological order.

    Culling

    Next, start to cull your photos by lens. I have found this is the quickest way to make a decision on which images to keep. You can do this in the Library Module, going to Metadata (or hitting the / key), and selecting the lens you want to cull (see below). Rate your images on what to keep (hit P for picks or keepers) and what to toss (hit X for rejects). Repeat your rating process with each lens, and after they are finished filter by “all lenses” in the Library module to see the images all together. From there, do a second (or third) round of culling in the Library module until you have your final number.

    Step2 Culling

    For the step above, you’ll need to choose a rating system that works well for you. My rating system is 1 stars are rejects, 2 stars are keepers, and 3 stars are keepers that need Photoshop retouching. I often find that if I took a series of photos at once (like I do for the family formals to ensure no eye blinks) the last ones in the set are usually the best, so I will look at those images first for my 2-star keepers.

    For more on rating and flags in Lightroom read: How to Organize Your Photos in Lightroom OR Organizing Images in Lightroom.

    Step 3: Basic Edits

    This is where the magic happens!

    You have your final number of culled images, and can now begin your basic Lightroom edits. This is where your cropping, straightening, and adjustments for exposure, contrast, shadow, highlights, etc., come into play. This part is very personal to each photographer and this is where your style begins to emerge. This is also why shooting in RAW is so important, as you will have greater flexibility in editing as compared to a JPG. Many photographers may stop after this step, and that’s A-Okay if you’re happy with your result! However, if you want to push your images further – there are a few more steps involved.

    Quick tip! If you have a series of photos in the same lighting situation taken with the same camera, edit the first photo in the set, select the rest of the photos that match, then hit the “Sync” button to apply your edit to all of the photos in that set at once.

    Step3 Basicedits

    Step 4: Polishing

    Making your images sparkle using Alien Skin or Presets.

    Many photographers may polish their images (a.k.a. color tone) with a chosen preset after the basic edits are done. You can buy Lightroom presets from a plethora of sources online or create your own. I found the Alien Skin program years ago and fell in love. For me, Alien Skin gives me the pop, sharpness, and great skin tones that I absolutely adore. It also has beautiful lens flares and light leaks that I use for enhancing natural sunlight. If you choose to try Alien Skin, see the steps below, otherwise skip to Step 5.

    1. Choose your favorite images (or all of them) to put through Alien Skin by selecting them in Lightroom, right-clicking and choosing “Edit in Alien Skin” (once the program is installed, this will be an option).
      Step4 Polishing
    2. You can create your own presets in Alien Skin for a faster workflow and a likely favorite will emerge. Select your most used preset and apply to all. Then deselect all.
    3. Go through each photo individually, and make sure that’s the Alien Skin preset you want to use and see what tweaks are needed for each image.
      Step4 3 Polishing
    4. When you’re finished, click save and your images will automatically import back into Lightroom (as copies) with the filters applied. Hit the 1 key, to discard the originals that you’re not going to use. (Occasionally, I end up liking my Lightroom edit better than my Alien Skin edit, so it’s nice to compare them side-by-side).

    Step4 5 Polishing

    Step 5: Photoshop – Retouching Your Images

    Now that your images have all your basic edits and color toning, select the images that need to be retouched with Photoshop by filtering for the 3-star rated images. Retouching can include editing out acne, stray hairs, doing head swaps or editing out any distracting objects in the image. On a Mac, you can hit command+E (Window is Control+E) in Lightroom to open your image in Photoshop. After retouching is complete, you can select CMD/CTRL+S (or File>Save) to return your retouched image to Lightroom.

    Step5 Retouching

    Step5 5 Retouching

    Step 6: Black and White Images

    This is the quickest part of my post-production and one my favorites, as well, because I love black and white images so much. Many wedding photographers provide a mix of color and black and white photos, with the color versions of each black and white as well. This where Alien Skin comes into play again. Not only are the black and white filters so dreamy, but they automatically make a copy for you, making your job really easy.

    1. In Lightroom, select the images you want to be in black and white by using CMD/CTRL+click to individually select them.
    2. Right-click and select “Edit in Alien Skin”. From there, all the selected images are uploaded to Alien Skin.
    3. It’s easiest if you already have a black and white preset that you love saved, and apply that to all images, then deselect all. Go through each image individually using the color sliders (especially the reds and yellows) to edit and ensure each black and white image is perfect.
    4. Save all black and white images back to Lightroom where the edited color version and the edited black and white version will be side by side.

    Step6 BlackandWhite

    Step6 5 BlackandWhite

    Black and white images can also be made in Lightroom by creating a virtual copy, Photo>Create Virtual Copy (or CMD/CTRL+’). Then select “Black and White’ in your Basic Edits box, and adjust the color sliders until they’re perfect.

    Step 7: Exporting. The Home Stretch!

    Hooray! All of your images have been backed-up, culled, edited, polished, retouched, and you have your black and white copies. Now you just need to export the final versions to your client’s folder on your computer (I create a folder called “Edited:).

    Step7 Exporting

    Select all of your completed images in Lightroom, go to File>Export. Choose your file location, file name (I have mine set to custom name and sequence), file settings (Mine is set to jpeg, sRGB, quality 100), and then select export when you are finished.

    Step 8: Importing to an Online Client Gallery

    Once all of your high-resolution JPGs are exported to the Edited client folder on your computer, you can then upload to the online gallery of your choice. Some online galleries allow you to upload your high-res JPGs directly from Lightroom using a plug-in, letting you skip a step in the process. I use Pixieset for my galleries, as I like the modern look, ease of use, and their customer service.

    Step8 Uploading

    Step 9: At Long Last…

    After you upload your images to an online gallery, copy your final edits to your external hard drive in their client folder. Once your edited files are safely online and on an external hard drive, you can delete the RAW files from your computer, because they take up a lot of space and you already have them safely backed up online and to an external hard drive (or two). If you ever want to use that Lightroom catalog again, it’s easy to sync the RAW files on your external hard drive with the Lightroom catalog that’s stored on your computer. I like to leave the edited JPGs on my computer for easy access.

    Conclusion

    This entire workflow process time will vary for every photographer. For me, I need 4-5 full days of nearly uninterrupted work. As you know, photographers are humans too. With life and other weddings/shoots in between – delivery time can take weeks or months after the event, depending on how busy your season is, how many photos you have, and how much retouching is required. You may need to mail prints, albums, USB drives, etc., as well, so keep that in mind for your total post-production time.

    With a lot of practice and knowing your style, you’ll see your post-processing time get shorter and shorter. If you’re lucky enough to find a post-processing company that fits your style and budget, you’ll have extra time in life for the things you love, like photography. Until then, get to work!

    The post Complete Step By Step Wedding Photography Workflow by Misti Marquette appeared first on Digital Photography School.


    Digital Photography School

  • Samsung Galaxy S8 comes with two different camera sensors

    It appears that as with previous Samsung flagship smartphones, the brand new Galaxy S8 and S8+ will, depending on region, come with different camera sensors. Since the launch users have spotted versions with Sony IMX333 and S5K2L2 ISOCELL image sensors. The latter is made by System LSI, which is a subsidiary of Samsung.

    The situation is the same for the front camera. One version features a Sony IMX320 imager, the other comes with an ISOCELL S5K3H1 sensor. That said, there is no difference between the two versions in terms of camera specifications. In both main cameras the sensor is a 1/2.55″ 12.2MP variant with Dual-Pixel AF. With an F1.7 aperture and optical image stabilization the lens specification is identical as well. Sensor size in the front camera is not known at this point but all models come with an F1.7 aperture and face-detection AF.
    Considering camera specifications are identical on all models and presumably so will be image processing, we should not expect any noticeable differences between the two versions, but if we get the chance, we’ll try and find out if there is any variation in image quality.

    Articles: Digital Photography Review (dpreview.com)

  • Learning Zeppelin: Wooden Airship Docked on Museum Roof as a Reading Room

    [ By SA Rogers in Architecture & Public & Institutional. ]

    airship 1

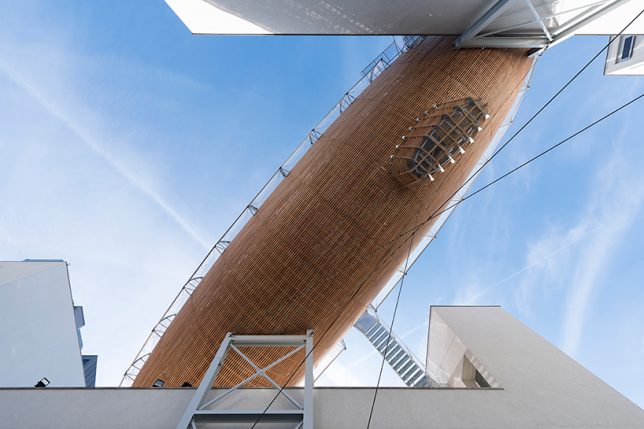
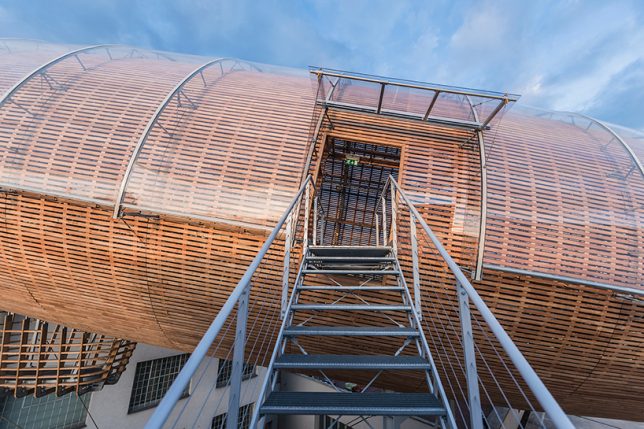
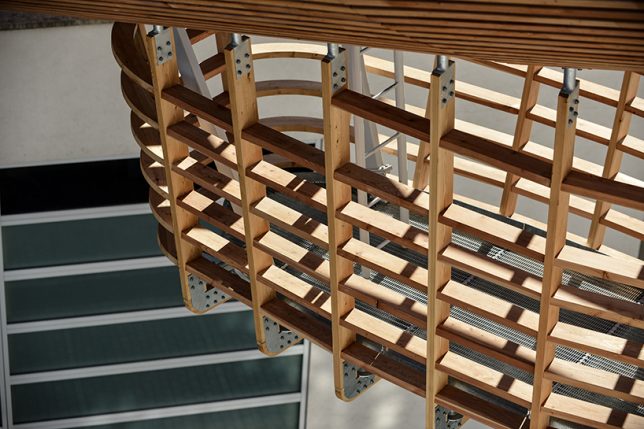
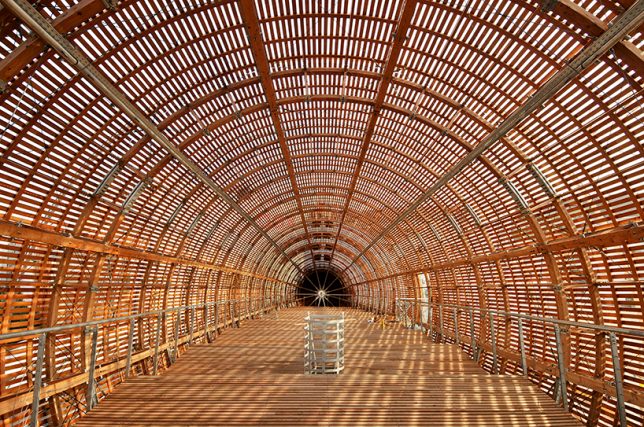
    A wooden airship has seemingly crash-landed onto the roof of the DOX Centre for Contemporary Art in Prague, wedged between two white museum buildings for dramatic effect to serve as a new space for literature and reading. Conceived by Leos Valka, director of DOX, and completed by Hut Architektury, the Gulliver Airship measures nearly 138 feet long and features a basketweave-like construction open to the air, protected from the rain by a transparent roof.

    airship 2

    airship 3

    Taking inspiration from the zeppelins of the early 20th century, the airship aims to reflect the optimism, technological advancements and futurism of the era, inciting a sense of wonder when you gaze up at it from the ground level. Valka says he dreamed of “an absurdly fascinating organic shape” that would have a parasitic appearance, alien to the concrete and glass of the museum itself.

    airship 4

    airship 5

    The ‘ship’ is accessible from the museum’s roof, and takes advantage of plentiful natural light for a pleasant reading environment. Adding such an unconventional structure is in line with the museum’s hope to encourage innovative thinking and take risks.

    airship 6

    airship 7

    The DOX facility is a reclaimed factory, its renovation nominated for the prestigious Mies van der Role Award, and its purpose is “to create a space for research, presentation and debate on important social issues, where arts in dialogue with other disciplines encourage a critical view of the so-called reality of today’s world.”

    airship 9

    airship 10

    “The shape of the zeppelin is symbolic,” reads a statement on the DOX website. “The early zeppelins represented the optimistic ideals of a new era of unprecedented technological advancements. With their remarkable monumentality and hypnotic dignity that would continue to fascinate generations to come long after they had vanished from the skies, they have always embodied the eternal human desire to fly, and have represented a certain utopian ideal.”

    Share on Facebook


    [ By SA Rogers in Architecture & Public & Institutional. ]

    [ WebUrbanist | Archives | Galleries | Privacy | TOS ]


    WebUrbanist

  • The Library of Congress has acquired photographer Bob Adelman’s archives

    Prints and Photographs Division, Library of Congress (004.00.00) © Bob Adelman

    On March 20, the Library of Congress announced that it has acquired photographer Bob Adelman’s archives, a massive collection containing 575,000 images. An anonymous donor gifted the collection, which now resides with the Library’s Prints and Photographs Division. According to the Library’s announcement, the collection contains 50,000 printed photos, while the rest of the archives are composed of slides and film negatives.

    Adelman, who was born in 1930 and passed away last March, was an award-winning American photographer well known for his iconic photos of the Civil Rights Movement. Adelman’s work spans approximately forty years, documenting topics including racial issues, poverty, immigrant experiences, mental illnesses, addictions, and more. Perhaps best known from Adelman’s work are his photos of the March on Washington and Martin Luther King.

    Via: Library of Congress

    Articles: Digital Photography Review (dpreview.com)