Tag: WARP

  • How to Use Puppet Warp in Photoshop

    One of the most powerful distortion tools in Photoshop is the Puppet Warp command. First Introduced in Photoshop CS5, Puppet Warp is a handy command that allows you to easily bend and shape parts of your image as if it were a puppet. You can use this distortion tool on almost any photo, but in this tutorial, I am going to give you a crash-course on how to make the most out of Puppet Warp command when distorting people in your photos.

    Puppet Warp provides a visual mesh that lets you drastically distort specific image areas while leaving other areas intact. Applications range from subtle adjustments to severe limb distortions. In most cases, you will keep your distortions subtle to keep them realistic.

    How to Use Puppet Warp in Photoshop

    However, in this tutorial, we will push the Puppet Warp Tool to the max and make drastic adjustments to completely reposition the arms and legs of the man in this composite.

    Isolating Your Subject

    The first step to using the Puppet Warp command is to isolate the person (or object) that you would like to distort. This often involves making a selection of the individual and masking-out the background.

    In this example, the man jumping was extracted from his background via a Layer Mask and placed into a Smart Object. Smart Objects allow you to apply filters, commands, and distortions nondestructively; which means that you can always come back and adjust any changes that you’ve made.

    02 isolate - How to Use Puppet Warp in Photoshop

    Puppet Warp works even if you don’t extract the subject from the background, but the tool becomes less efficient and less intuitive.

    Apply The Distortion Pins

    The Puppet Warp command allows you to distort an image by clicking-and-dragging pins which distort the pixels to which they are attached.

    After you isolate the person in your scene, you will need to add the distortion pins so that you can start manipulating the pixel in your image. Start by selecting the layer that contains your foreground element, in this case, the layer of the man jumping, and Go to Edit > Puppet Warp.

    03 mesh How to Use Puppet Warp in Photoshop

    By Default, you will see a mesh around your layer. This mesh can be distracting; I encourage you to disable it by unchecking the “Show Mesh” checkbox from the Options Bar.

    04 disable mesh

    You can now click anywhere on your subject to create the pins that will allow you to move (or pin down) the pixels in the image. When working with people, create the pins near the joints such as the wrist, shoulders, knees, ankles, and in any other area where the body would normally bend. You can also create pins in areas that you want to keep pinned down.

    05 add pins How to Use Puppet Warp in Photoshop

    Adjusting Pins and Distorting the Image

    With your pins in place, click on a single pin to activate it, and drag it to a new location. You will see that the image will be distorted as you drag the pin. The distortions will become more extreme the further you drag it from its original location.

    06 move pins How to Use Puppet Warp in Photoshop

    Rotating Pins

    After making a distortion, you may find that the image does not look realistic because of how the pins bend the surrounding pixels. To help fix this issue, you can use the Rotate control in the Options Bar to rotate a single point and help correct some of the unrealistic distortions.

    07 rotate options

    You can also select a pin and hover over it while holding Option/Alt to reveal a Rotate UI element that you can click-and-drag on to rotate the mesh.

    08 rotate

    This method is much more intuitive, and it allows you to rotate the pin much easier. But for more subtle and precise rotations, the Rotate control in the Options Bar will be the better option.

    Pin Depth

    In this example, you’ll notice that the model’s leg has been placed over his right leg. But if you would like for his right leg to be in front, then you can adjust the Pin Depth.

    Select the pin that controls his right leg, and in the Options Bar, under Pin Depth, Click the Move Forward icon to push that pin forward.

    09 pin depth

    After changing the Pin Depth, the model’s right leg will appear in front of his left leg.

    09 leg behind

    You can do the same with any of the other pins in your image to change the depth of the corresponding body part.

    Options Bar Settings

    The Options bar also give you a few extra options that will determine how the mesh will behave and it will, of course, affect how the pixels are distorted.

    • The Mode option lets you decide how stretchable the mesh should be.
    • Density controls the spacing of the mesh’s points. Adding more points makes your edits a lot more accurate, but the processing time takes longer to complete.
    • Expansion allows you to expand or contract the outer edges of the mesh.

    Conclusion

    If you prefer to watch me do this and follow along by video, see below:

    Remember that when using the Puppet Warp command, or any other distortion tool in Photoshop, you should do so with restraint. Small changes can have a significant impact and go unnoticed. However, extreme adjustments could quickly become unrealistic and distracting to the whole image.

    The post How to Use Puppet Warp in Photoshop by Jesus Ramirez appeared first on Digital Photography School.
    Digital Photography School

  • Drone Distortions: Manipulated Landscapes Warp and Bend Upon Themselves

    [ By SA Rogers in Art & Drawing & Digital. ]

    american drone landscapes 1

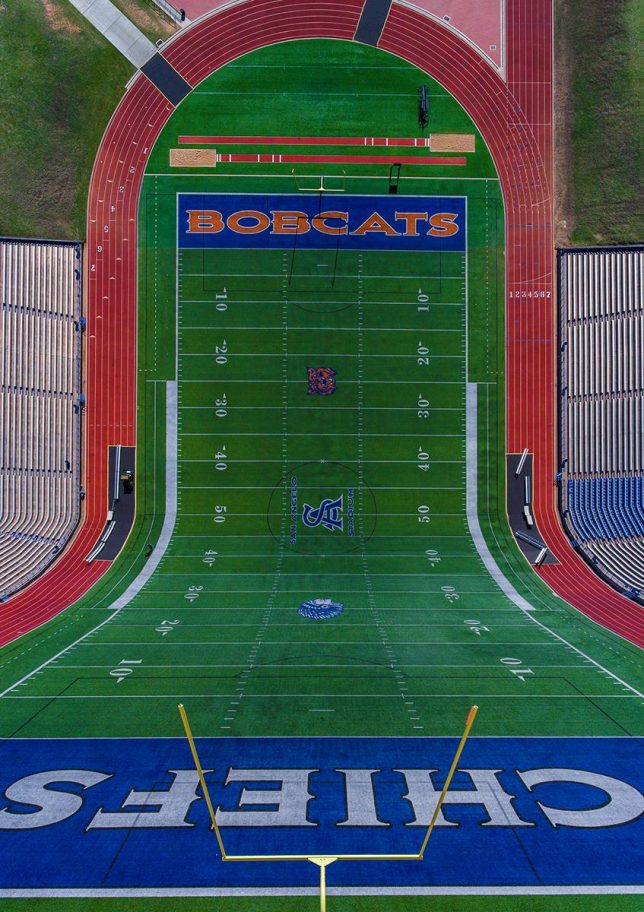
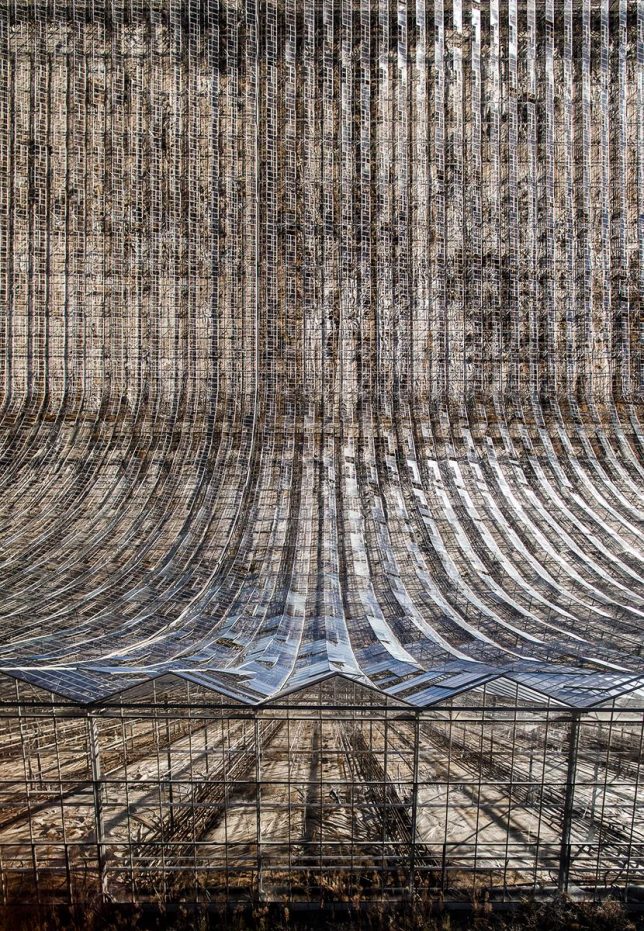
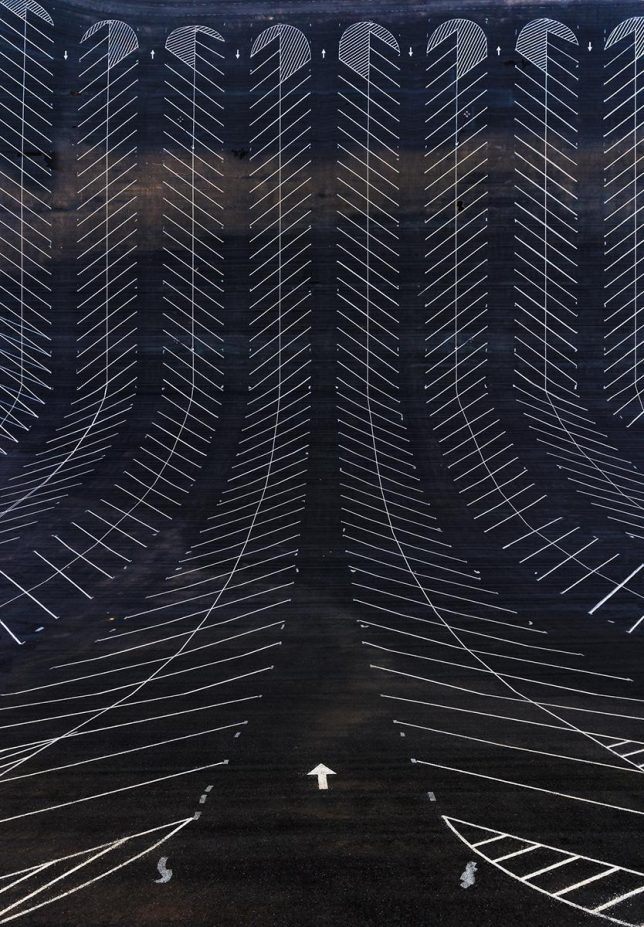
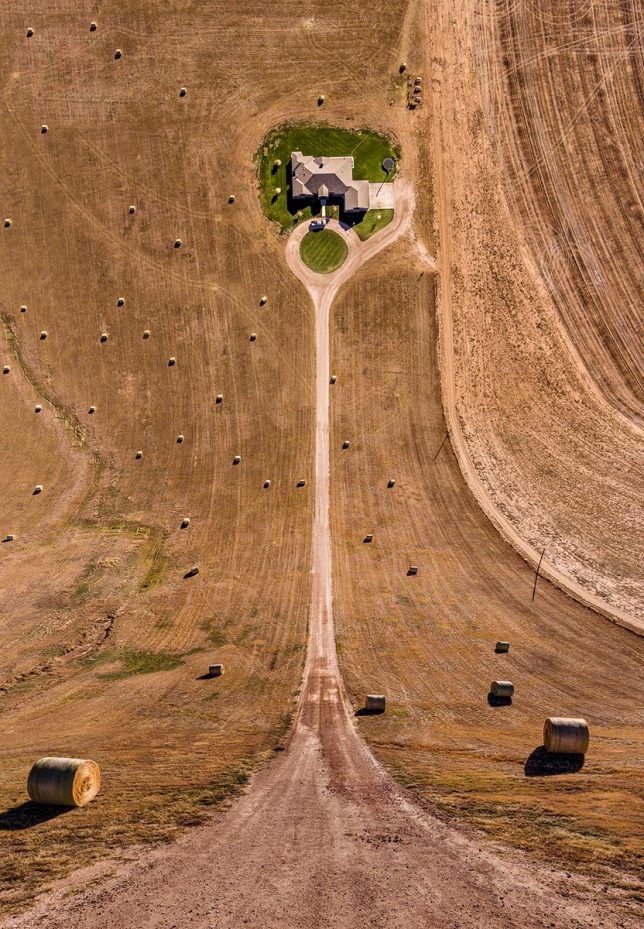
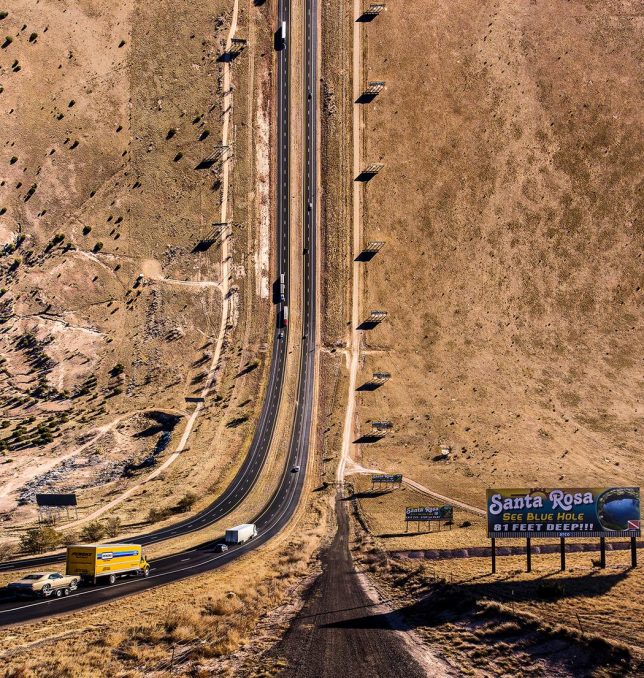
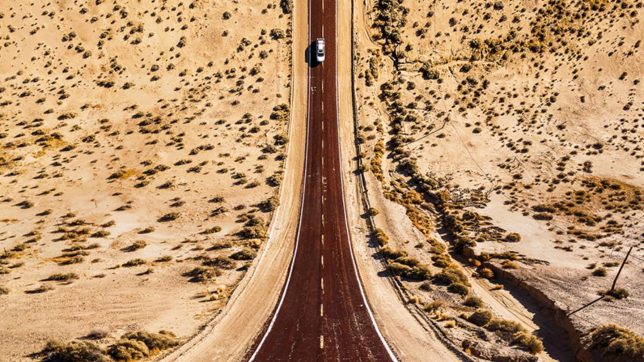
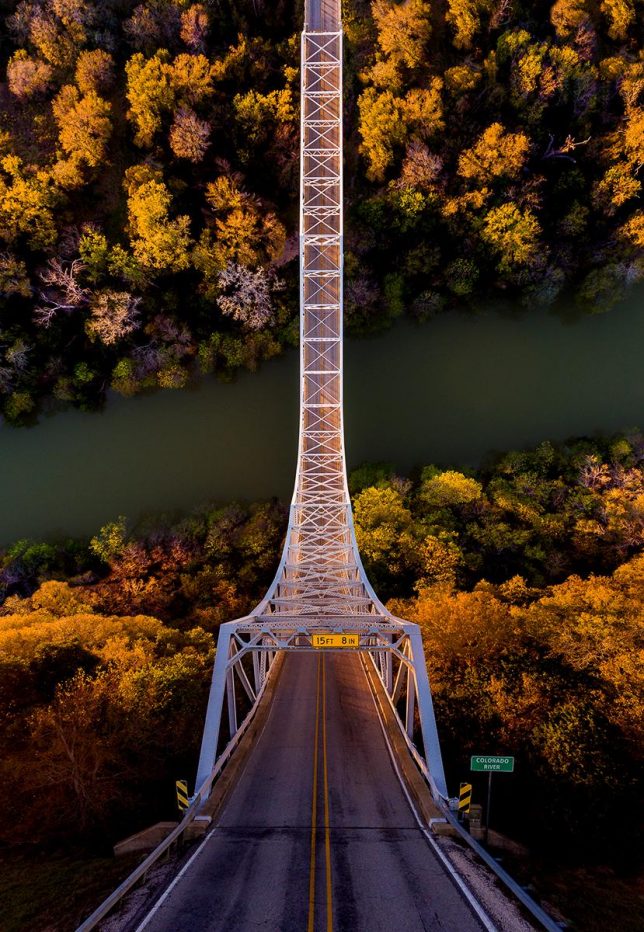
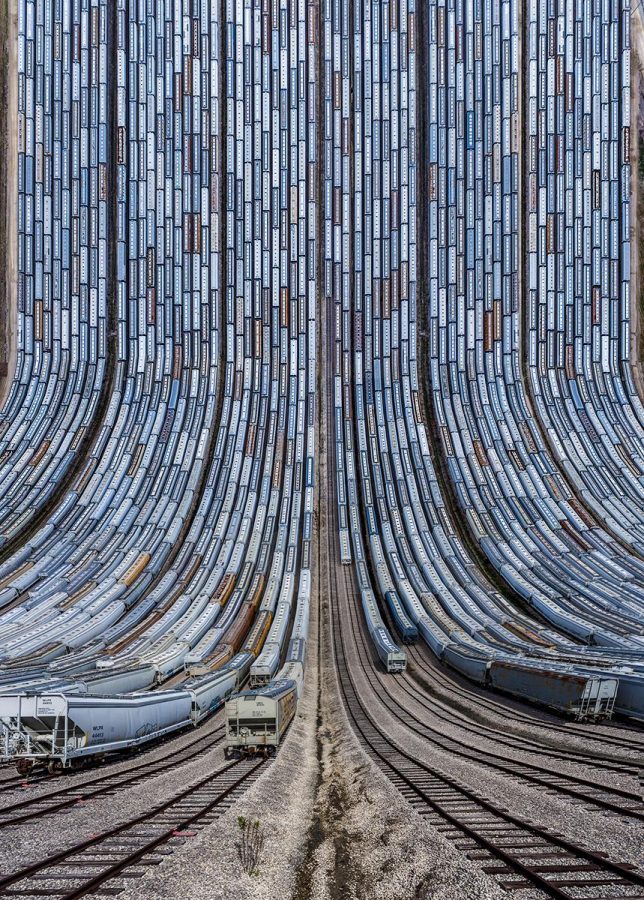
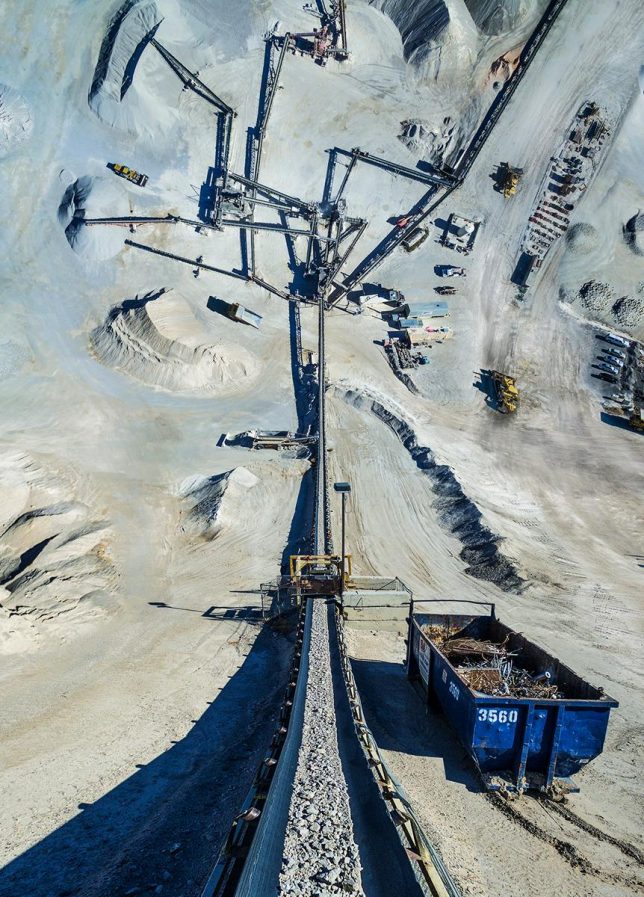
    Gazing at any one of these stretched-out, gravity-defying landscape photos, you feel like you’re at the pinnacle of a rollercoaster, about to zoom down to ground level. Except instead of being elevated on an artificial track, you’re on flat ground, positioned at the high end of a nearly 90-degree angle with no care for gravity. Turkish artist Aydin Büyüktas warps American landscapes, nearly doubling them in half to show multiple perspectives at once.

    american drone landscapes 5

    american drone landsacpes 4

    american drone landscapes 10

    A continuation of the ‘Flatlands’ series, which previously saw similar manipulations of urban Turkey, the images draw on a satirical sci-fi novella by Edwin Abbot entitled ‘Flatland: A Romance of Many Dimensions.’ To create the images, Büyüktas flies drones over his chosen setting to capture aerial images and then uses 3D software to stitch the images together.

    american drone landscapes 3

    american drone landscapes 2

    american drone landscapes 9

    The scenes chosen for Flatlands II include the pits of mines, desolate desert roads, junkyards, train yards, farms, bridges and empty parking lots. Büyüktas flew his camera-equipped quadcopter total of about 10,000 miles to capture thousands of photos. The finished series required about two months of planning, a month of photography and many more months of digital composition.

    american drone landscapes 6

    american drone landscapes 7

    american drone landscapes 8

    “We live in places that most of the time don’t draw our attention, places that transform our memories, places that the artist gives another dimension; where the perceptions that generally crosses our minds will be demolished and new ones will arise,” says the artist. “These works aim to leave the viewer alone with a surprising visuality ironic as well, multidimensional romantic point of view.”

    Share on Facebook


    [ By SA Rogers in Art & Drawing & Digital. ]

    [ WebUrbanist | Archives | Galleries | Privacy | TOS ]


    WebUrbanist

  • 4 Ways to Use the Warp Command in Photoshop

    Custom-mode-warp-command

    Warp command in Photoshop, showing the grid over a selection and the presets

    What is Warp?

    The Warp command was introduced in Photoshop CS2 along with Vanishing point feature. This meant an image, or part of one, could now be distorted or transformed into a new shape. You may have seen popular online tutorials where the warp command was used to create a realistic page curl in Photoshop?

    How useful is the Warp Command as a photographer?

    Honestly, to answer this question it will depend on the type of photography you specialize in, and to what degree you post-process your images. For a lot of photographers, the less time in front of the computer editing the better. I include myself in this group. That said, I rarely get that perfect in-camera shot that requires minimal processing after the fact. If you composite images together, do a lot of retouching, or you just simply want to know what this command does in Photoshop, then read on. I’ve put together five tips that you may find useful.

    How do you access the Warp Command?

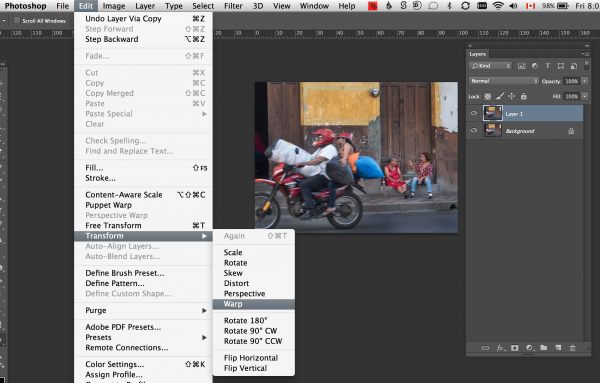
    To access the Warp Command, you need to first have a selection or a layer selected (you cannot use your background layer, you must duplicate it first). Go up to Edit>Transform>Warp.

    Screen Shot 2015-01-09 at 8.02.21 PM

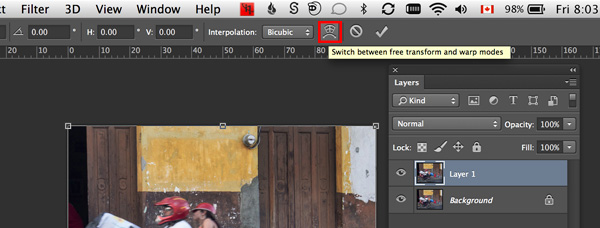
    Alternatively, CMD+T on a Mac or CTRL+T on a PC. This brings up the Free Transform command. Click on the Warp mode button in the tool Options bar or right click within the Free Transform bounding box.

    warp-mode-toggle

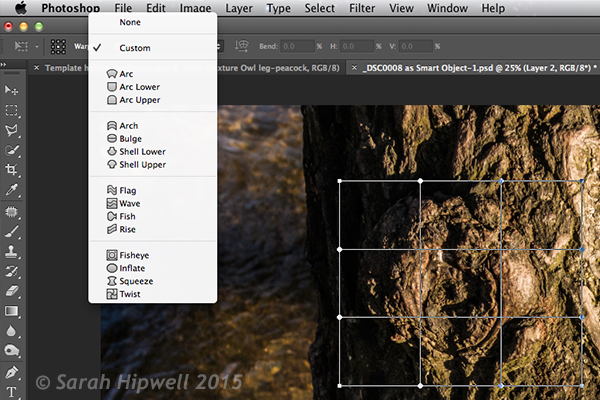
    A grid with nine boxes appears with control points on the perimeter. The four corner square control points are similar to the bezier handles when using the pen tool. As you drag on those points, the handles appear. You can drag on the other points, and within the boxes to change the shape of the selection in any direction. There are also a number of built-in presets (see below).

    Custom-mode-warp-command


    Are the Puppet Tool or Liquify Filter alternatives to the Warp Command?

    Well not exactly. Both have their merits when it comes to distortion but each have their own characteristics and differ again to the Warp Command. The Puppet Warp tool allows you to place points or pins systematically around a displayed mesh (polygons) which will create bending or warping points. The object or subject selected must be isolated from the background first. Puppet Warp can also be applied to a Smart Object.

    The Liquify Filter will work on ordinary layers but If you convert your layer to a Smart Object, then the Liquify Filter won’t work in Photoshop versions up to CS6. However, Liquify does work with Smart Objects in Photoshop CC. The Liquify filter takes a bit of getting used to. When you open it, a separate dialog box appears, like a plug-in of sorts with its own set of warp tools. It works on pushing and pulling the pixels around, similar to a smear effect.

    4 Ways of using the Warp Command

    1. Wrapping

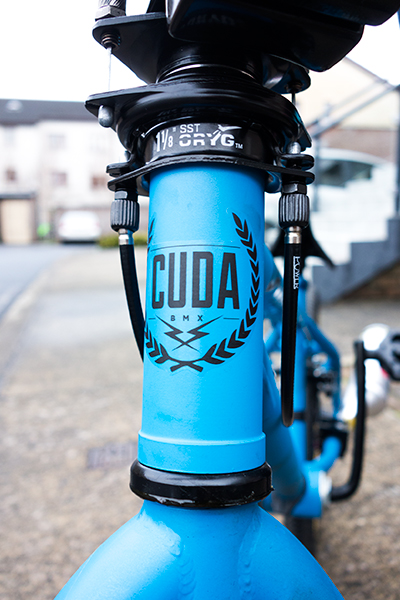
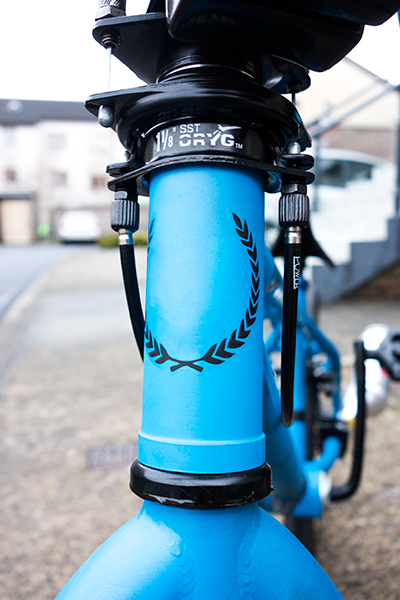
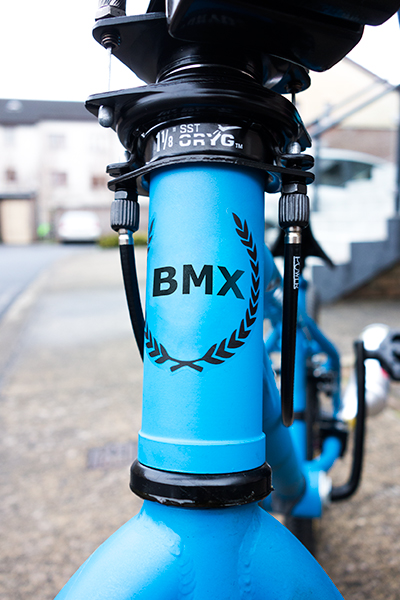
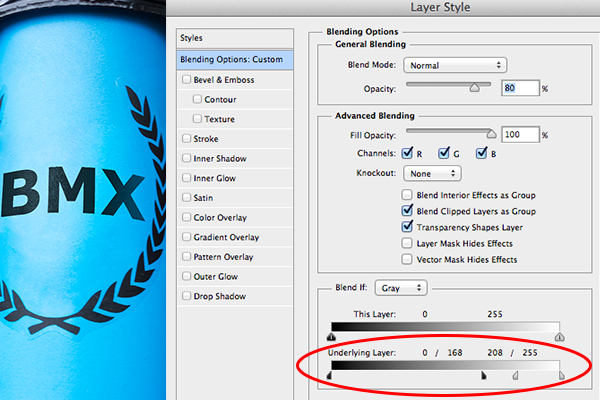
    The Warp Command is great for wrapping text, logos, or even textures around cylindrical objects such as bottles to give it that 3-D look. For example, a bike has a lot of cylindrical shapes on it, the front forks, frame, etc. So any logos on a bike will look bendy to fit the shape it sits on. In the photo of the BMX bike which I deliberately shot wide(focal length-10mm) to emphasize the cylindrical shape of the tube. I removed part of the existing logo to illustrate how I wrapped some text around the front tube. Type ‘BMX’ on a separate later and convert this to a smart object. You will need to do this to access the custom mode of the Warp Command. By using the existing Logo as a guide, I was able to warp ‘BMX’ in place. I then applied the Blend-if layer style to the underlying layer to give it a more authentic look.

    bmx-bike

    A wide angle shot of a BMX type bike

    bmx-logo-removed

    I removed the centre part of the logo on the bike

    text-wrapped-bmx-bike

    I wrapped the letters ‘BMX’ around the front tube area of the bike using the Warp Command

    Blend-if-mode-applied-to-BMX

    Holding down the ALT key on Mac, Option key on a PC, will split the slider arrows to get a finer adjustment.

    The Warp Command can also be used to wrap texture around an object.

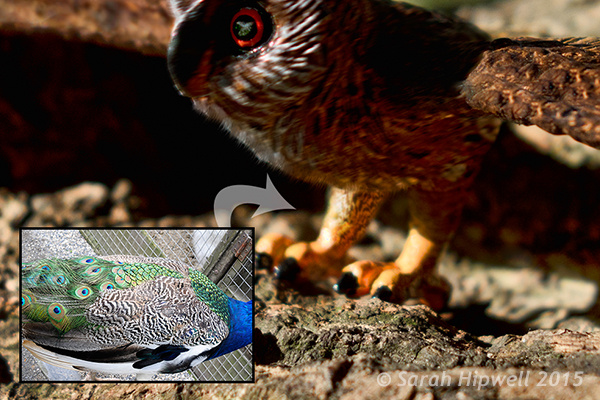
    Owl-peacock-texture-wrapped-around-leg

    I used an image of a Peacock to add texture and realism to the owl’s leg

    2. Duplicating a similar element in an image and distorting it to make it look different

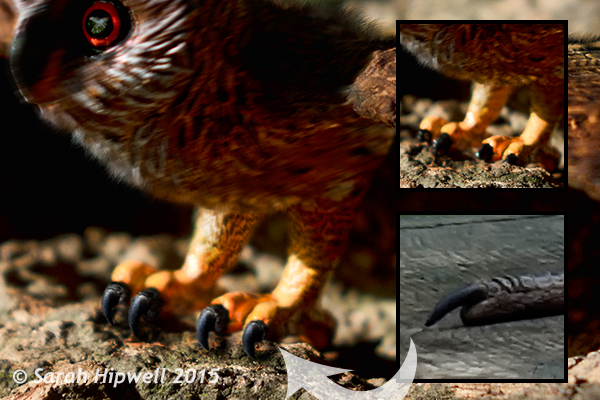
    When you use the Clone Tool to replicate a similar object or element in an image, it does a fantastic job. However, if you don’t want the cloned look, this is where the Warp Command is great for changing the shape of a duplicated element in an image, to give the appearance of a completely different one. I found this particularly useful when I used the same heron claw to replicate four Owl’s talons.

    Owl-with-Heron-talons

    I used the same heron claw to manipulate four owl talons

    3. Retouching – adding elements

    Retouching an image can mean many things. Usually, it means removing or taking away parts of a photo so that the final image looks better. This includes removing imperfections and blemishes from a model or subject’s skin. It could also mean removing distracting elements from a photo, and the list goes on.

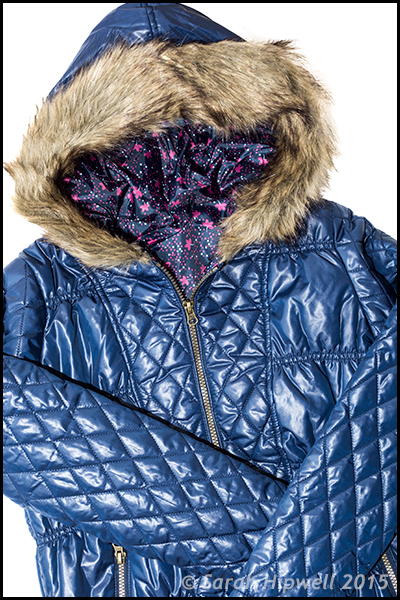
    But what about adding to an image to enhance it? For example, you have a shot of a subject but you want to add volume to his or her hair. You can do this using the Warp Command by selecting part of their existing hair. Put the selection on a separate layer, make sure you convert that layer to a Smart Object (working non-destructively). You will then need to apply a layer mask to hide hard seams or obvious cloned areas.

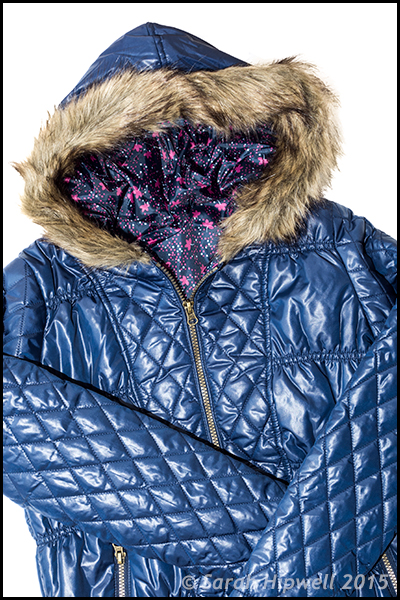
    Jacket-original

    Photo of a jacket with a fur hood

    Jacket-hood-fuller

    This is the same jacket but I’ve added more volume of fur to the hood by using the Warp Command

    4. Retouching – removing things

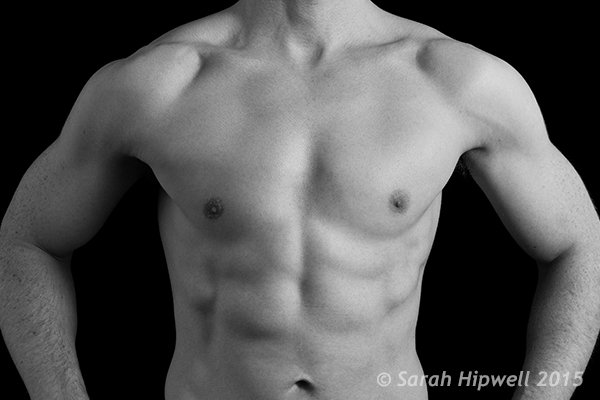
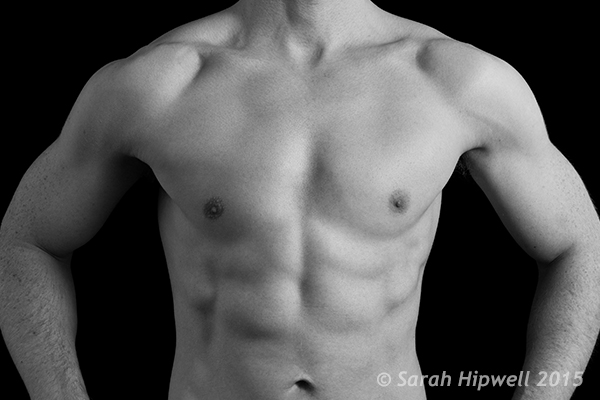
    The Liquify Filter is a choice for many retouchers. It is very powerful, but as I mentioned before, it does take a bit of mastering and Smart Objects cannot be applied to this filter, unless of course you use Photoshop CC. I find the Warp Command quick and easy to use. It does a great job of slimming areas on the body. Sometimes due to the angle of how a model or subject was photographed, it might require that you raise or lower a shoulder, for example to give symmetry or balance to the shot.

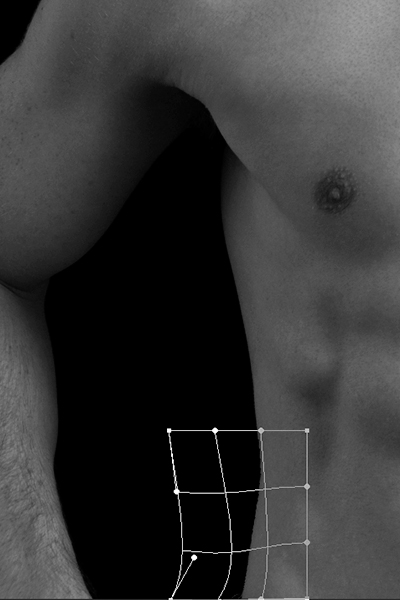
    Take the Love Handles for example in the photo below. Make a quick selection using the Marquee Tool. Use CMD+J on a Mac or CTRL+J on a PC. This puts the selection on its own layer. Right click on the layer and convert it to a Smart Object. Hit CMD+T/CTRL+T, to bring up the Free Transform Tool, then click on the Warp mode button in the Options bar. Distort just enough to keep it real. Add a layer mask to hide any hard seams.

    Love-handles

    Even sport models can have slight ‘Love Handles’

    Love-handles-removed

    Love Handles removed using Warp

    Warp-grid-love-handles

    Careful nudging of the Warp Command to get rid of Love Handles

    When using any of the distortion tools or commands in Photoshop, do so with restraint. A slight adjustment is often all that is required. It is this small change that can sometimes add a big difference to your image.

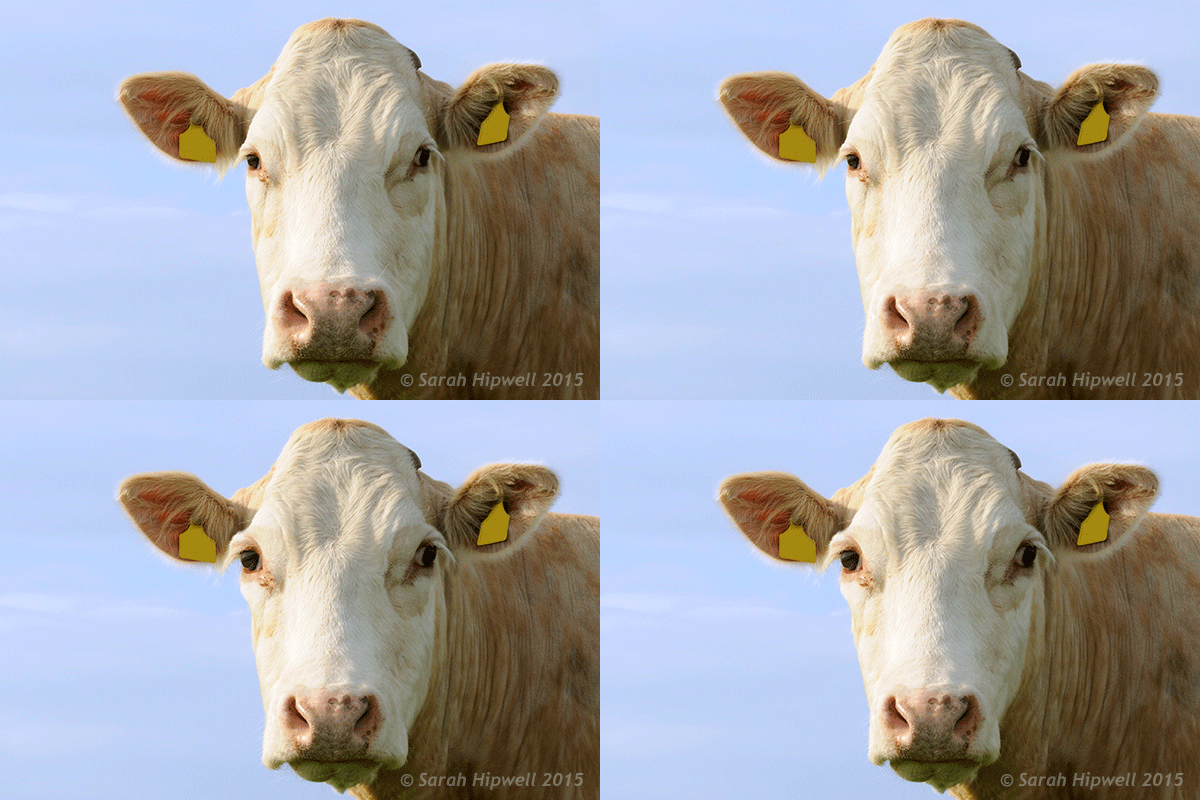
    Just for a bit of fun, I produced the animated cow.gif to illustrate a slight adjustment where I made the nose smaller. I then went on to show no restraint by enlarging the eyes and making the jowls slimmer!

    cow

    googletag.cmd.push(function() {
    tablet_slots.push( googletag.defineSlot( “/1005424/_dPSv4_tab-all-article-bottom_(300×250)”, [300, 250], “pb-ad-78623” ).addService( googletag.pubads() ) ); } );

    googletag.cmd.push(function() {
    mobile_slots.push( googletag.defineSlot( “/1005424/_dPSv4_mob-all-article-bottom_(300×250)”, [300, 250], “pb-ad-78158” ).addService( googletag.pubads() ) ); } );

    The post 4 Ways to Use the Warp Command in Photoshop by Sarah Hipwell appeared first on Digital Photography School.

    Digital Photography School

  • Adobe adds Perspective Warp and 3D printing to Photoshop CC

    shared:AdobeLogo.png

    Adobe has released a major update to Photoshop for Creative Cloud subscribers. The most notable new features are Perspective Warp, Linked Smart Objects and 3D printing capability. Other improvements include enhancements to Scripted Patterns and fills, performance boosts for Smart Sharpen, Adobe Generator improvements for rescaling Smart Objects and adding padding, and font transformations and shape selections. Learn more

    News: Digital Photography Review (dpreview.com)

  • Introduction to Puppet Warp in Photoshop

    By Frank Wang

    One of the most retouching powerful tools in Photoshop is a relatively new feature called Puppet Warp. Introduced in Photoshop CS5, it can be extremely useful when you want to bend and shape parts of your image as if it were silly putty (or, as the name implies, like a puppet). I am going to give you a quick crash-course into how to make the most out of Puppet Warp.

    The first step to puppet-mastery is to isolate the object you want to warp. This often involves making a selection of the object and deleting the background.

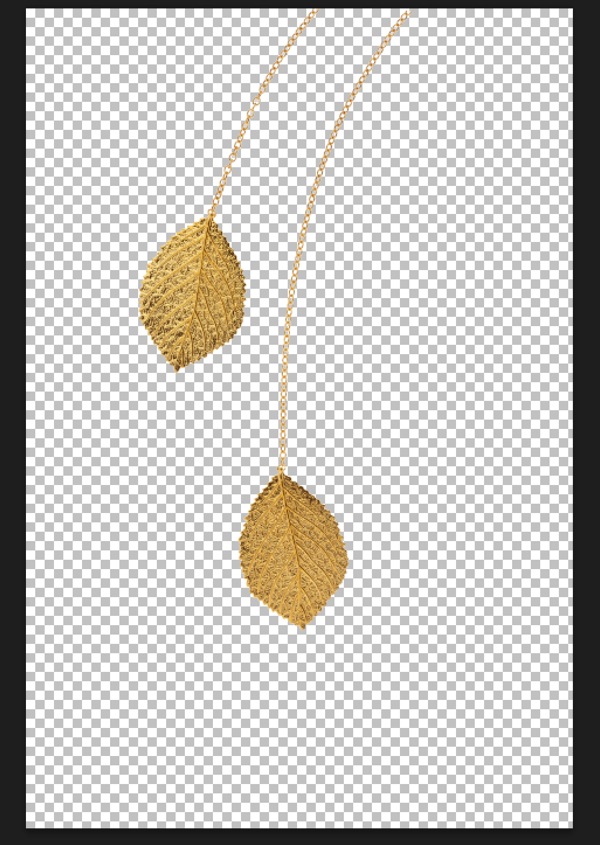
    Assuming you are familiar with selection tools, I am going to start with an isolated image below. I would suggest making the object you want to edit into it’s own later after you’ve selected it (control+J or command+J). Puppet Warp works even if you don’t isolate the object from the background, but I find it less effective as you’ll end up moving background elements unintentionally. Not isolating the object will also slow things down, as you’ll be moving more pixels than necessary.

    Puppet warp 01

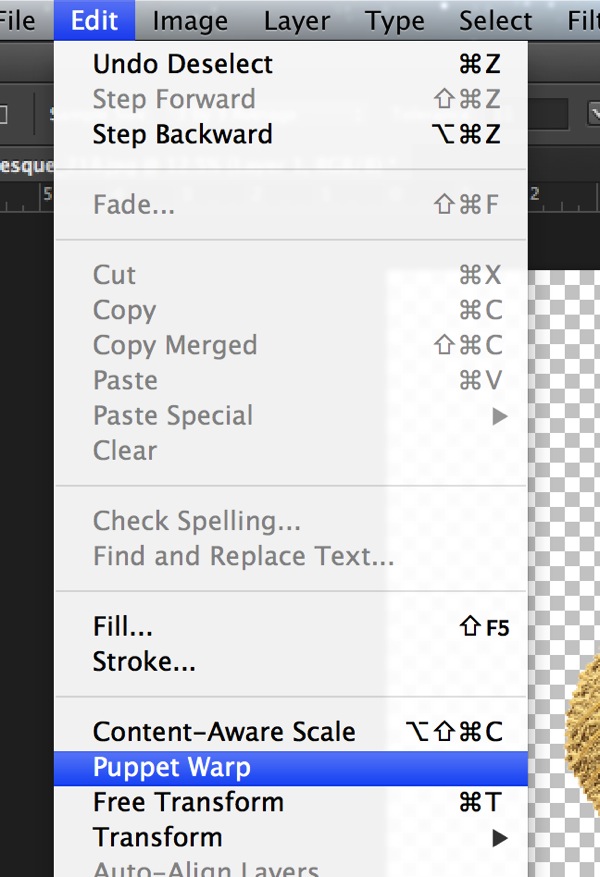
    With the layer you want to edit selected, go to the Puppet Warp tool, which is found under the “Edit” menu.

    Puppet warp 02

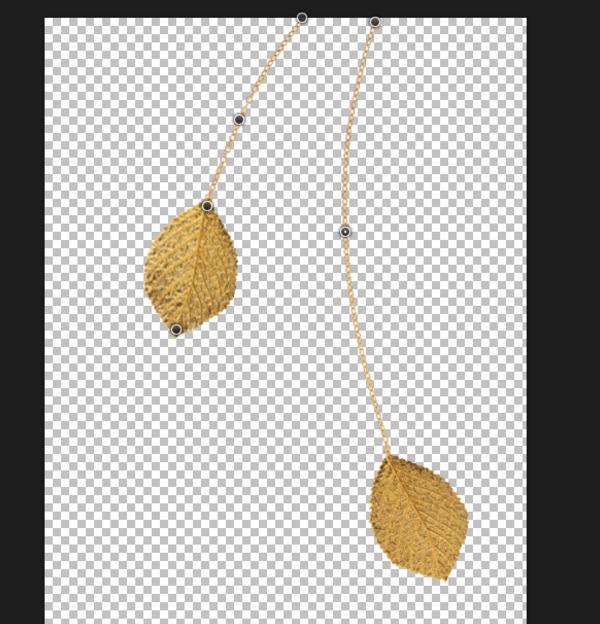
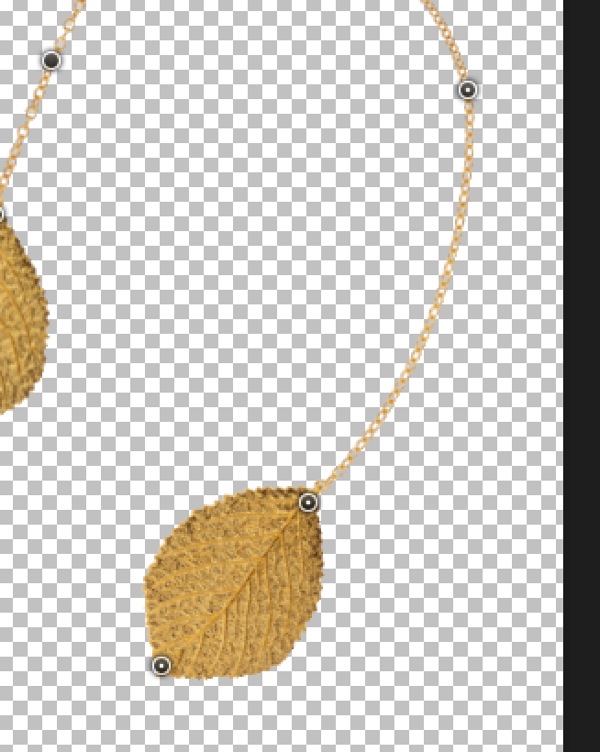
    Once you’ve entered the Puppet Warp mode, you can start adding anchor points or “joints” that function both as anchors and points where you can click and drag. I’ve added some anchor points to my jewelry pieces below.

    Puppet warp 03

    Next, select an anchor point and start dragging. Puppet Warp is a fairly intuitive tool once you’ve added some anchor points and started to move them around. The anchor points you are not dragging will stay put, while the ones you’ve selected (hold shift to select multiple points) bend to your will. Cool, right?

    Puppet warp 05

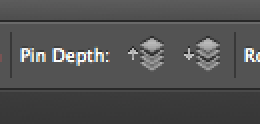
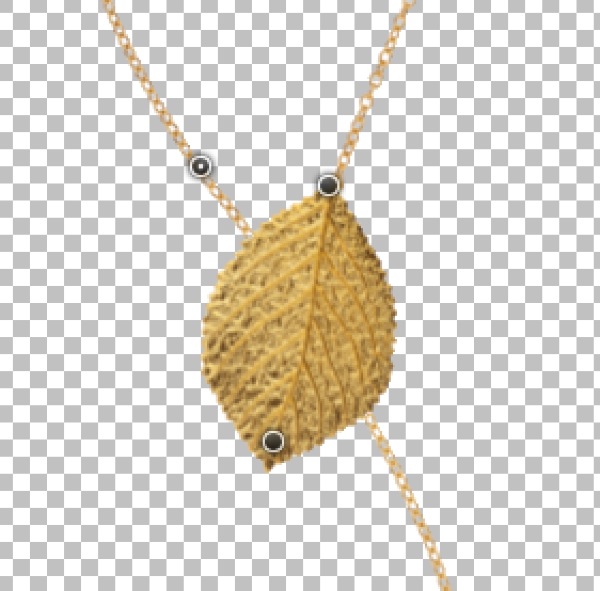
    Another useful feature of Puppet Warp is the Pin Depth option. As you add anchor points and move them, you may discover you want to move one part of the object behind another. This is where Pin Depth comes into play. If I want a part of this chain to move behind the left leaf, all I have to do is to select the anchor point on the chain, click on the Pin Depth button with the “down” arrow, and voila, I can drag that part of the image behind another.

    Puppet warp 06

    Puppet warp 07

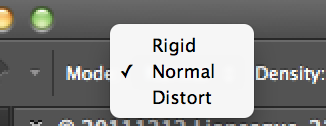
    The “mode” option of Puppet Warp allows you to control how dramatic the changes to your image are when you move an anchor point. The default is Normal, which should suffice for most situations. For more dramatic changes, you can select the “Distort” option.

    Puppet warp 08

    To delete anchor points simply select the point in question and hit the DELETE or key on your keyboard. Alternatively, you can hold down the ALT key and click an anchor point to delete it.

    Puppet Warp is fairly intuitive but it takes a bit of experimenting to get a sense of how best to use it. I suggest alternating between the “Rigid”, “Normal”, and “Distort” modes to get an idea of how the tool works. Once you’ve gotten the hang of it, Puppet Warp is a VERY powerful tool.
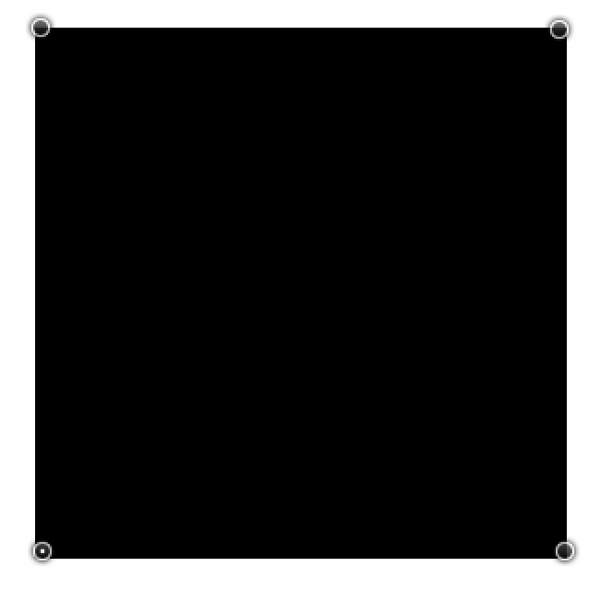
    As an additional example, I am going to warp the following black square. I’ve added four anchor points at the corners.

    Puppet warp 09

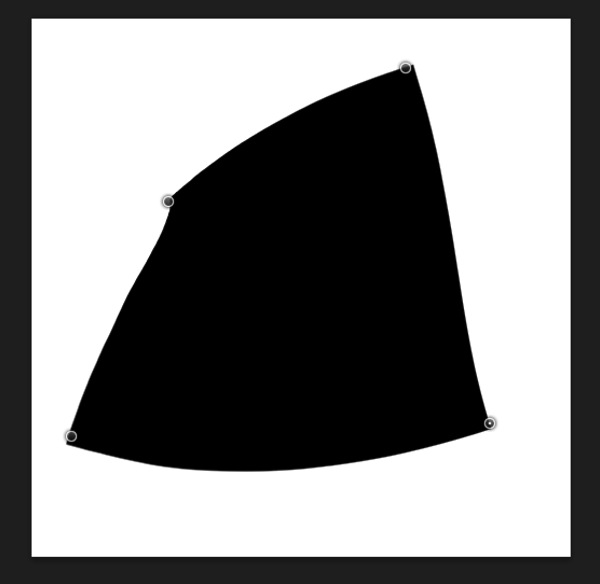
    Once I’ve added the anchor points I can bend and stretch the rectangle to something else entirely.

    Puppet warp 10

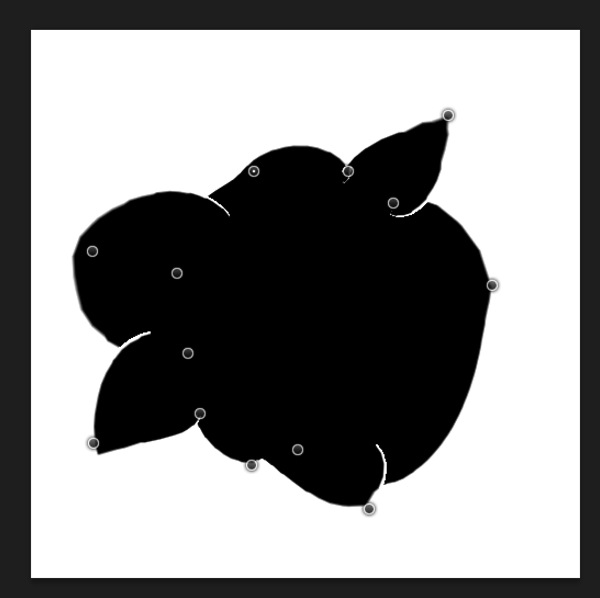
    If you want to edit it further, you can add even more anchor points until you’ve warped the square to something akin to a Rorschach inkblot test. What do you see? A moth? A bird? Hm…

    Puppet warp 11

    Frank Wang is a NYC photographer specializing in portrait and architectural photography. You can find him online at www.frankwangphotography.com and www.framephotographics.com. Connect with him via Twitter / Instagram: @frankwangphoto

    Post originally from: Digital Photography Tips.

    Check out our more Photography Tips at Photography Tips for Beginners, Portrait Photography Tips and Wedding Photography Tips.

    Introduction to Puppet Warp in Photoshop


    Digital Photography School

  • Flexible Paper Sculptures Bend Reality + Warp Perceptions

    [ By Delana in Art & Sculpture & Craft. ]

    girl ii paper accordion-like sculpture

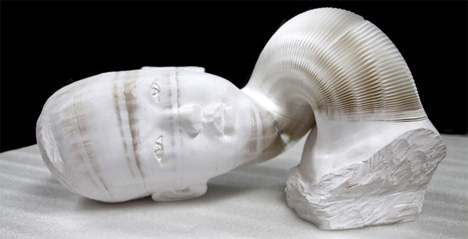
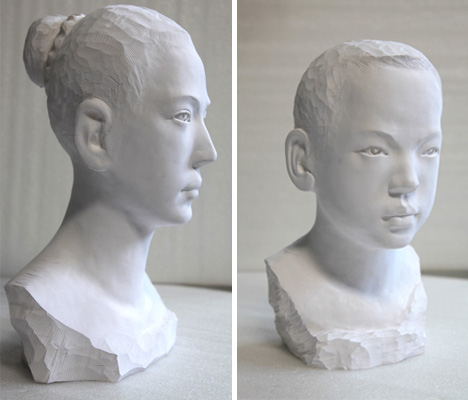
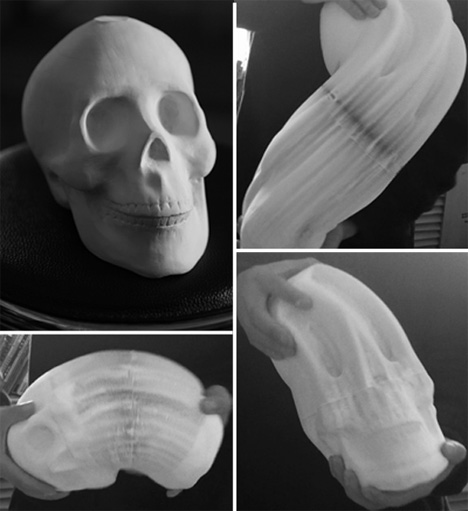
    At first glance, these sculptures look just like delicate porcelain or ceramic – but they hide a surprising secret. Beijing artist Li Hongbo‘s sculptures are actually made of thousands of layers of plain white paper, glued together into heavy accordion-like shapes that only appear totally solid when they are still.
    girl and boy paper sculptures

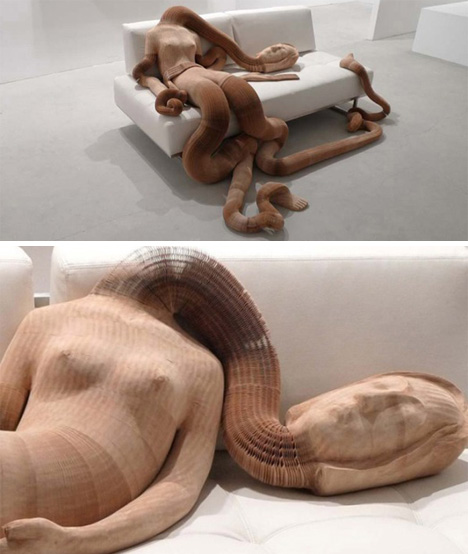
    woman on sofa paper sculpture

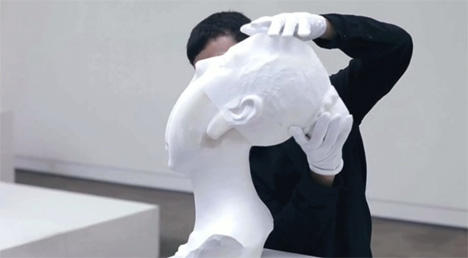
    When grabbed and manipulated, their true nature is revealed. They are flexible and complex, capable of stretching long distances and looking altogether otherworldly, particularly the human figures.
    paper sculpture bust

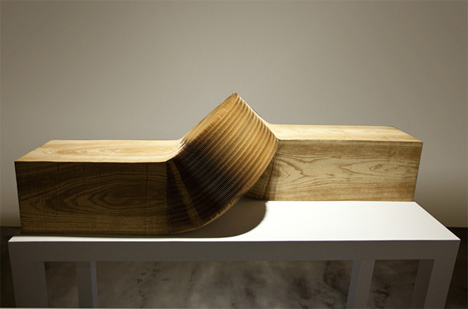
    wooden cube paper sculpture illusion

    Li Hongbo was inspired by traditional Chinese toys made from intricately folded and glued pieces of thin paper. The toys are stored flat but open up to reveal fun, playful shapes.

    skull li hongbo paper sculpture

    Likewise, Li Hongbo’s sculptures exist in two different states. Their static shape is stable, solid and beautiful – but when they are moved, their true nature is revealed. They are ephemeral, not stable; airy, not solid – but the beauty of these flexible sculptures remains.

    Share on Facebook


    [ By Delana in Art & Sculpture & Craft. ]

    [ WebUrbanist | Archives | Galleries | Privacy | TOS ]


    WebUrbanist

  • WARP Stereoscopic 3D Pilot Video for a Sci-fi Movie Project

    3dvision-blog.com
    Video Rating: 5 / 5

    Nvidia 3D Vision Test Application VIDEO red – blue stereoscopic version nvision 3d vision drivers windows 7
    Video Rating: 5 / 5