Tag: Photoshop

  • Create an Image Watermark in Photoshop

    Create an Image Watermark in Photoshop

    In a recent post I talked about using an image watermark in Lightroom to apply to your images. This post I’ll show you how to create the watermark image to use.

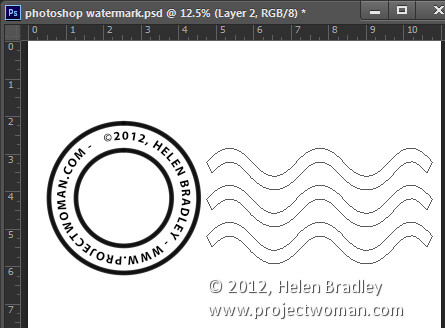
    This watermark has two concentric circles with text between them and a set of wavy lines making it reminiscent of a post office stamp cancellation. The watermark also has a slightly grunge look.

    To make it, start in Photoshop with a letter size image. I set mine to landscape orientation with a white background. This will make it easy to create a black watermark and I will be able to see it as I work.

    Add a new layer by choosing Layer > New > Layer. This is a transparent layer on which you’ll place the circles.
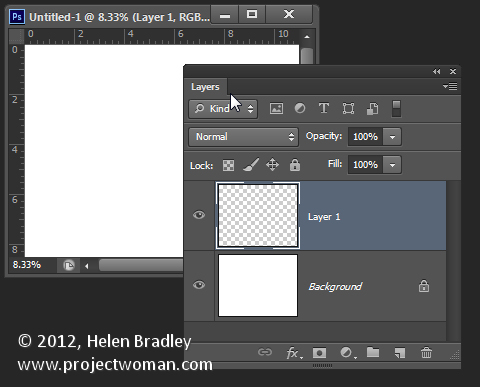
    Make a watermark image in photoshop step1

    Start with the Ellipsis Tool which shares a position in the Tools with the Rectangle tool – it is a shape tool – don’t use the Elliptical Marquee Tool.

    Make sure that the option on the Tool Option bar is set to Path and hold Shift as you drag a circle on the screen.
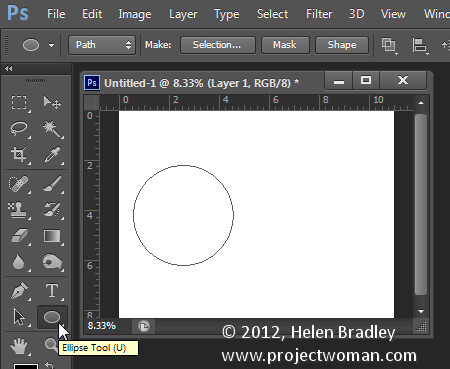
    Make a watermark image in photoshop step2

    When the circle is in position choose Window > Paths to view the Paths palette.

    Select the Brush tool and select a brush. I used a Hard Round brush sized down to around 40 pixels.

    Set the foreground color to black, click the Work Path in the Paths palette to select it and then click the Stroke Path with Brush icon at the foot of the Paths palette. This strokes the path with the current brush.
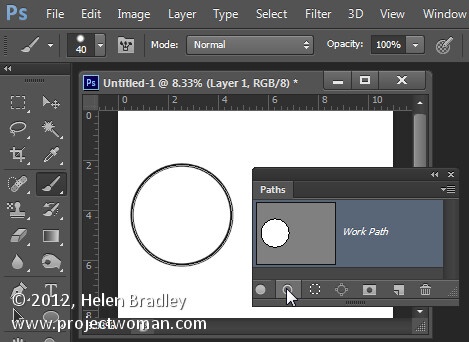
    Make a watermark image in photoshop step3

    Click the Path Selection Tool which shares a position in the Tools palette with the Direct Selection Tool. Click on the path and it will select the entire path.

    If the transformation handles do not appear press Ctrl + T (Command + T on the Mac). Hold Shift and Alt (Shift and Option on the Mac) and drag inwards to create a circle which is concentric with the previous circle.
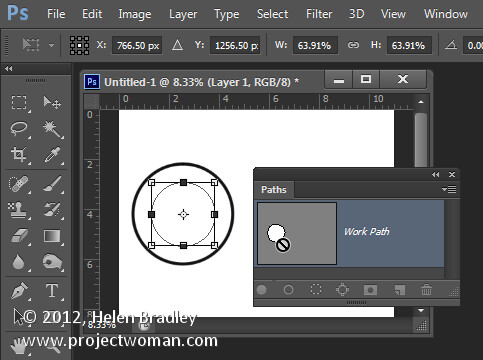
    Make a watermark image in photoshop step4

    Repeat the process of selecting the Brush, click on the path so it is selected and click to Stroke Path with Brush.
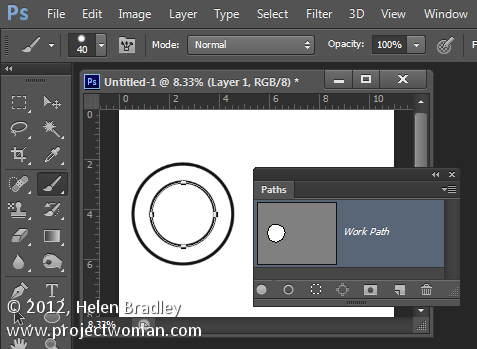
    Make a watermark image in photoshop step5

    Click the Path Selection Tool and, with this smaller circle selected, press Ctrl + T (Command + T on the Mac). Hold Shift and Alt (Shift and Option on the Mac) and drag a little outwards to create a circle path for typing the text along.
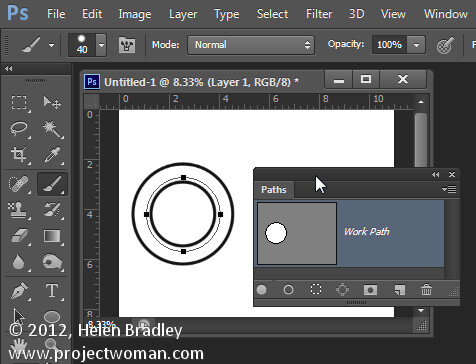
    Make a watermark image in photoshop step6

    Select the Text tool and hold the mouse over this third path.

    Look for the text tool to show as an I-beam pointer with a bent line through it – this tells you Photoshop will align the text along the path.

    Click once to anchor the Text tool to the path. Select the text color – in my case I chose black – and select the font and font size – I used Myriad Pro – 24 points. Type the text to use – I typed:

    © 2012, Helen Bradley – projectwoman.com –

    To enter © hold Alt and type 0169.
    ?Make a watermark image in photoshop step7
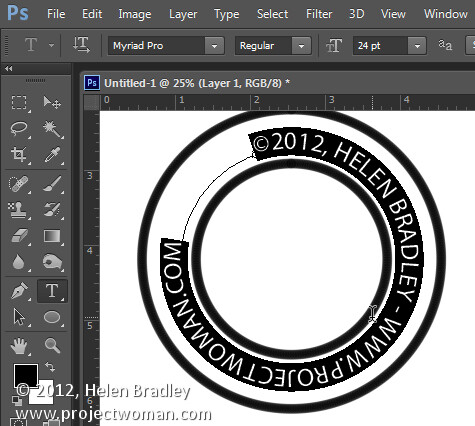
    With the text selected display the Character palette by choosing Window > Character and adjust the tracking to expand the text so it wraps all the way around the shape.
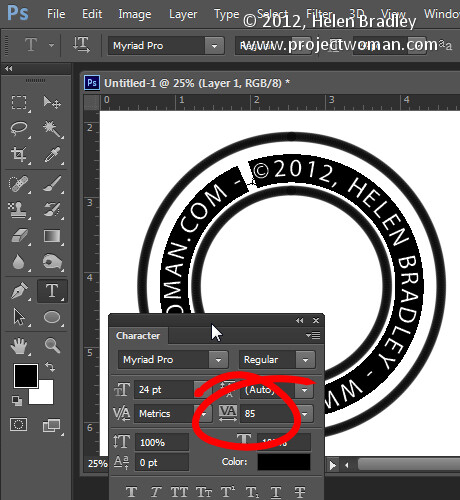
    Make a watermark image in photoshop step8

    You can draw your own lines for the cancellation lines using the Custom Shape Tool. First create a new layer then select the Wave shape and on the Tool Options bar make sure that it is set to Path.
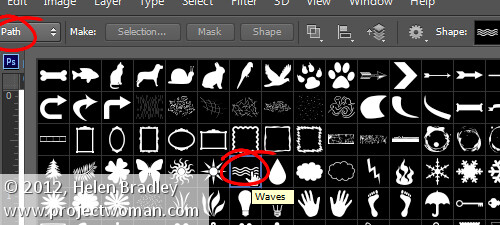
    Make a watermark image in photoshop step9

    Drag to make your curved lines.

    Make a watermark image in photoshop step10

    Select the Add Anchor Point Tool (it shares a position with the Pen tool) and click once in the middle of each end of the path to add a point.
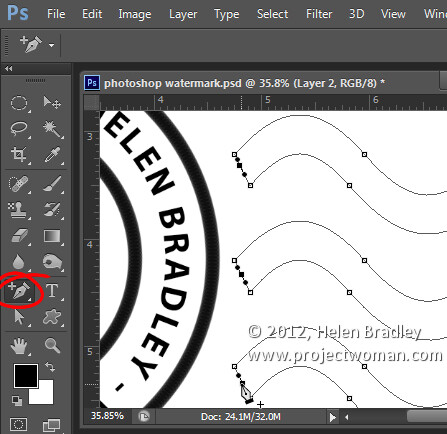
    Make a watermark image in photoshop step11

    Target the Direct Selection Tool, click one at a time on the Anchor points you just added and press Delete – this breaks the 3 paths in half to make 6 paths. When the Anchor is selected it will show as a dark filled square.
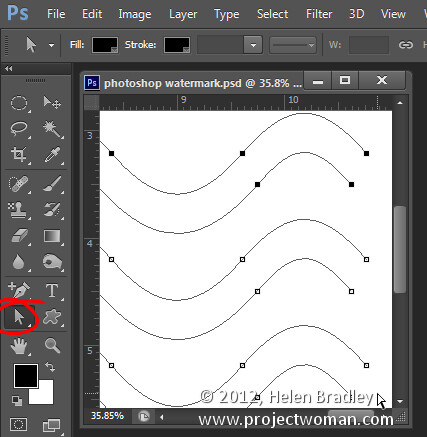
    Make a watermark image in photoshop step12

    Select your Brush and black paint and select the path in the Paths palette and click the Stroke Path with Brush icon.
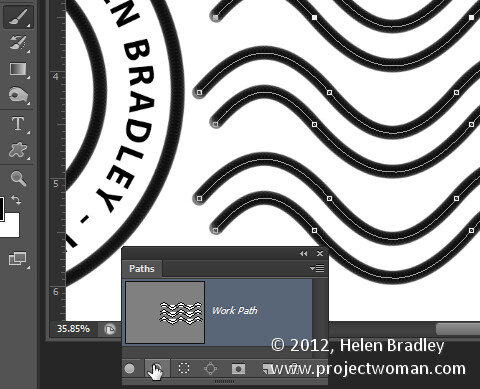
    Make a watermark image in photoshop step13

    Once you’ve done this you can add a grunge effect.

    Start by hiding the background layer, target the top layer and press Control + Alt + Shift + E to create a flattened layer with transparency. Hide all layers but this top one.

    If the lines aren’t dark enough duplicate this layer a few times and they will darken. Then merge all these duplicated layers

    To add the grunge effect click Add a Layer Mask icon at the foot of the layers palette to add a mask to the layer. Locate an interesting texture image to use such as this one from www.mayang.com/textures.
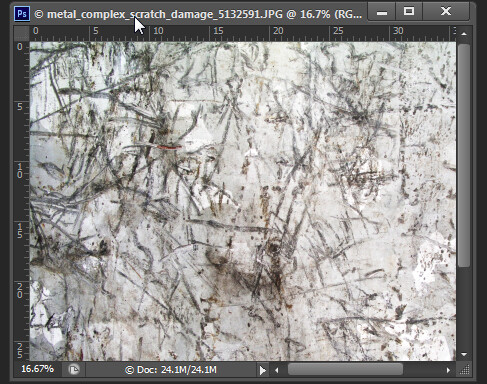
    Make a watermark image in photoshop step14

    Make it the same size as your image by choosing Image > Resize, deselect the Constrain Proportions checkbox and click Window and click your copyright image file to use its dimensions. Click Ok.

    Now return to your Copyright image, click the mask to target it and choose Image > Apply Image. From the Source box select the texture image (it won’t appear in the list if it isn’t the right size), and then set the other options to suit so you get a distressed look to your copyright symbol. Click Ok.
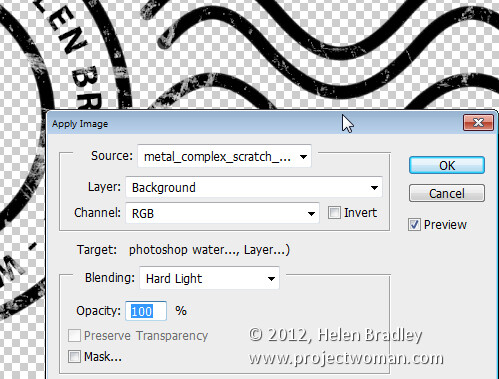
    Make a watermark image in photoshop step15

    Add a new layer and press Control + Alt + Shift + E to create a flattened version of the image on this layer but maintaining its transparency. Make all other layers invisible and crop the image close around your shape.

    Then choose File > Save As and save it as a .PNG image to use in Photoshop or Lightroom as a copyright overlay.

    If you select the top layer and press Control + I you’ll invert it to make a white version of the copyright image that you can then save as a second .png file.
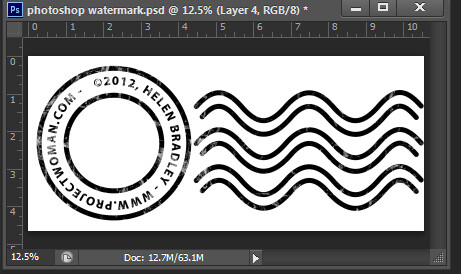
    Make a watermark image in photoshop step16

    Make sure to also save your file as a .psd file if you think you might need to make changes to it – for example, to change the date – a .png file is flattened so it won’t be easy to edit – a .psd file will be much easier to update.

    Post originally from: Digital Photography Tips.

    Check out our more Photography Tips at Photography Tips for Beginners, Portrait Photography Tips and Wedding Photography Tips.

    Create an Image Watermark in Photoshop


    Digital Photography School

  • Photoshop CS5 Top 5 NEW Features (plus bonus)

    Narrowing Photoshop CS5’s features down to my top five was almost impossible, but here you go… Follow me: www.gavtrain.com http twitter.com
    Video Rating: 4 / 5

    SUBSCRIBE! Here’s how this video came about: I have never done this with my kids. I usually avoid this kind of stuff but i thought it would a great opportunity for both of them to hang out together as the sisters they are. This Alexa and Eliana getting pampered at Pigtails and Crewcuts. Alexa confesses about her boyfriend. (noooooooo aghhhhhhh!). And of course Eli’s awesomeness. One of many moments with my little ones. Enloy a step in our journey.- Jorge ( HERE ARE SOME PICS FROM MY FANPAGE www.facebook.com Who are we? Please read: ENGLISH manofthehouse.com Who are we? Please read: SPANISH telemundoatlanta.com For amazing photography albums, bios and awesome weekly family moments, add us on facebook! www.facebook.com Finally!! Have an opportunity to purchase a T-shirt that will help pay my student loans! Go to: www.gonnawhistle.com OR www.jorgeandalexa.com Would you like to reach out? Donations? Support? Use: 3910 University Ave #300-RC San Diego CA 92105 or use e-mails below I’M JUST A FATHER OF TWO WORKING MY WAY THROUGH COLLEGE CHECK OUT THE REST OF OUR CHANNEL!! SUBSCRIBE!! BECOME PART OF OUR EXPERIENCE!! CONTACT US AT GONNAWHISTLE@GMAIL.COM
    Video Rating: 4 / 5

  • DxO Labs FilmPack 3.2.3 now compatible with Photoshop Elements 11

    logo.png

    DxO Labs has updated its FilmPack film simulation software to v3.2.3, adding Windows 8 support and Adobe Photoshop Elements 11 compatibility. Both Mac and PC versions are available, with a free 30-day trail downloadable from the company’s website. The company has also announced v1.1.1 of its ViewPoint distortion correction software that fixes minor bugs.

    News: Digital Photography Review (dpreview.com)

  • 18 January, 2013 – Briot’s Favourite New Photoshop CS6 Features

    Though it’s been out for quite a while, many photographers are still making the transition to Photoshop CS6.

    Last fall Alain Briot write a piece titled Alain’s Favourite CS6 Features. Things were a bit hectic for me at the time, and I neglected to publish it then. Sorry Alain. Here it is now though.


    "Yes I downloaded the videos. THEY ARE AWESOME!!! I learned so much I think my brain is going to explode.


    Now I need to get the LR4 video to see how much of Lightroom 4 I don’t know". 


    The Luminous Landscape – What’s New

  • Using Polar Coordinates In Photoshop

    Make a square selection

    1. Open an image in Photoshop (screenshots are from Photoshop CS2 on Mac). Higher resolution and size will give better results. I used a picture I found online on Freedom Wallpaper.

    2. You need to make a selection that is squared. Use the selection tool, and set the aspect ratio to fixed:

    fixed-ratio

    3. Enter the same number in both fields. 1 and 1 works.
    1-by-1

    4. Make a selection.
    make-a-selection

    Apply The Filter

    5. Apply the filter Polar Coordinates:
    apply-filter

    6. In this step, use the bottom radio button, marked “Polar to Rectangular”:
    rectangle

    7. Now your image will turn into something that may look interesting at best, but we’re not yet there:
    after

    Rotate And Apply Filter Again

    8. Rotate the selection 180 degrees. There are a few different ways to do this. One of them is to use the Edit menu, then Transform and Rotate 180 degrees.
    rotate

    9. Now apply the same filter we did in point 5. But do NOT just choose it from the top of the Filter menu. We are going to change one of the parameters so you have to choose it from Filters > Distort > Polar Coordinates… again.

    This time, choose the upper radio button, labeled “Rectangular to Polar”:
    switch

    Crop And Save

    10. Crop your picture to get rid of the stuff surrounding your new circle:
    final

    Any suggestions, ideas? Feel free to comment on this article!

    Back to Top

    BlogPhoto

  • What’s New In Photoshop CS6

    Adobe® Photoshop® CS6 software delivers even more image editing power, new creative options, and the Adobe Mercury Graphics Engine for blazingly fast performance. Retouch with new Content-Aware features, and create superior designs as well as movies using new and reimagined tools and workflows.*

    Upgrade to Photoshop CS6 for greater speed, power, and productivity. A fresh, elegant interface features groundbreaking design tools like Content-Aware Patch, a new Blur Gallery, a faster and more precise Crop tool, and intuitive video creation. Or become an Adobe Creative Cloud™† member to also get over a dozen new features, including new Smart Object support for Blur Gallery and Liquify, export of text and shape styling as CSS, and other new features exclusively in Creative Cloud.

    Any suggestions, ideas? Feel free to comment on this article!

    Back to Top

    BlogPhoto

  • Photoshop Getting Started Tutorials

    Learn Photoshop CS6 video tutorials

    Adobe TV (Jul. 11, 2012)

    video-tutorial

  • Layers 101

    Infinite Skills (Aug. 9, 2012)

    video-tutorial

    Introduction to layers and the Layers panel

    What is Photoshop?

    Lynda.com (May. 7, 2012)

    video-tutorial

    An introduction to the essential digital imaging application.

    Adobe Photoshop CS5/CS6 tutorials

    article (Dec. 19, 2012)

    Enhancing Raw images

    video2brain (May. 7, 2012)

    video-tutorial

    Draw upon the full range of image data.

    Selecting areas of a photo

    video2brain (May. 7, 2012)

    video-tutorial

    Discover the basic building block of image editing.

    Straightening a crooked image

    video2brain (May. 7, 2012)

    video-tutorial

    Define the horizon line.

    Any suggestions, ideas? Feel free to comment on this article!

    Back to Top

    BlogPhoto

  • Megan Fox – Transformers 2 – Digital Painting – Adobe Photoshop

    My Music on ITUNES : itunes.apple.com My Music on AMAZON : www.amazon.com My Music on AMAZON France : www.amazon.fr Print on canvas in limited editions : www.stval.fr I’m Stephanie Valentin (website : www.stval.fr), afrench artist violinist, singer, composer, painter and sculptor I often put new artwork and free downloads on my website www.stval.fr – How to draw videos – Free brushes for Adobe Photoshop (CS2, CS3, CS4) and Gimp – Painting tutorials (french and english text and pictures) – Free celebrity wallpaper – Digital art gallery and print – Free songs to download (mp3), lyrics and sheet music – Free online dress up games – Oil painting (musicians, artistic nude, animal…) – Photo retouching tutorials and pics – 2D and 3D animation – Sculpture Subscribe to my channel : youtube.com Thank you for viewing ! Time : 6 hours
    Video Rating: 4 / 5

  • Camera Raw In Photoshop CS6

    The camera raw converter functionality in Adobe® Photoshop® software provides fast and easy access to the raw image formats produced by many leading professional and mid range digital cameras. By working with these “digital negatives,” you can achieve the results you want with greater artistic control and flexibility while still maintaining the original raw files.

    The Adobe Camera Raw plug-in became the latest must-have tool for professional photographers when it was released in February 2003. This powerful plug-in has been frequently updated to support more cameras and include more features and is available as part of Adobe Photoshop CS6. Adobe Photoshop Lightroom® software is built upon the same powerful raw processing technology that is available in the Camera Raw plug-in.

    The Camera Raw plug-in (2.3 or later) now also supports raw files in Digital Negative (DNG) format. Find out more about the benefits of DNG, a raw file format made available to the public by Adobe.

    Any suggestions, ideas? Feel free to comment on this article!

    Back to Top

    BlogPhoto

  • How to Make Instagram Filters in Photoshop: Earlybird

    Cell phone cameras and apps like Instagram have made it possible for anyone to practice and enjoy the art of Photography. The filters that come with Instagram do a great job of altering the mood or tone of photographs. They also add a flare of drama to otherwise boring images. However, because Instagram filters lack the ability to customize exactly Continue Reading

    The post How to Make Instagram Filters in Photoshop: Earlybird appeared first on Photodoto.


    Photodoto