Tag: Photoshop

  • Is ‘Leonardo’ a Photoshop alternative for mobile?

    TS250x0~cms_posts-2880506722-histogram_photo.PNG

    The recently-launched Leonardo is a full-featured image-editing app for iOS that offers tools you won’t find on too many other comparable apps. Containing options familiar from high-end PC applications like Photoshop, Leonardo allows you to make selections using lasso and ‘magic wand’ tools, and create layer masks, gradients and much more. For more details head over to our sister site connect.dpreview.com. 

    News: Digital Photography Review (dpreview.com)

  • DxO Viewpoint 1.2.1 now compatible with Photoshop CC and Lightroom 5

    shared:DxOLogo.png

    DxO Labs has updated its distortion-correction software Viewpoint to version 1.2.1, meaning it’s now compatible with Adobe Photoshop CC and Lightroom 5. Viewpoint works both as standalone software and as a plug-in, and is designed to correct for perspective distortions such as converging verticals, and to restore more natural proportions to objects at the edge of the frame when shooting with wideangle lenses. The company has also announced that all of its software is on sale at reduced prices until 31st July. Click through for more info and download links.

    News: Digital Photography Review (dpreview.com)

  • Introduction to Puppet Warp in Photoshop

    By Frank Wang

    One of the most retouching powerful tools in Photoshop is a relatively new feature called Puppet Warp. Introduced in Photoshop CS5, it can be extremely useful when you want to bend and shape parts of your image as if it were silly putty (or, as the name implies, like a puppet). I am going to give you a quick crash-course into how to make the most out of Puppet Warp.

    The first step to puppet-mastery is to isolate the object you want to warp. This often involves making a selection of the object and deleting the background.

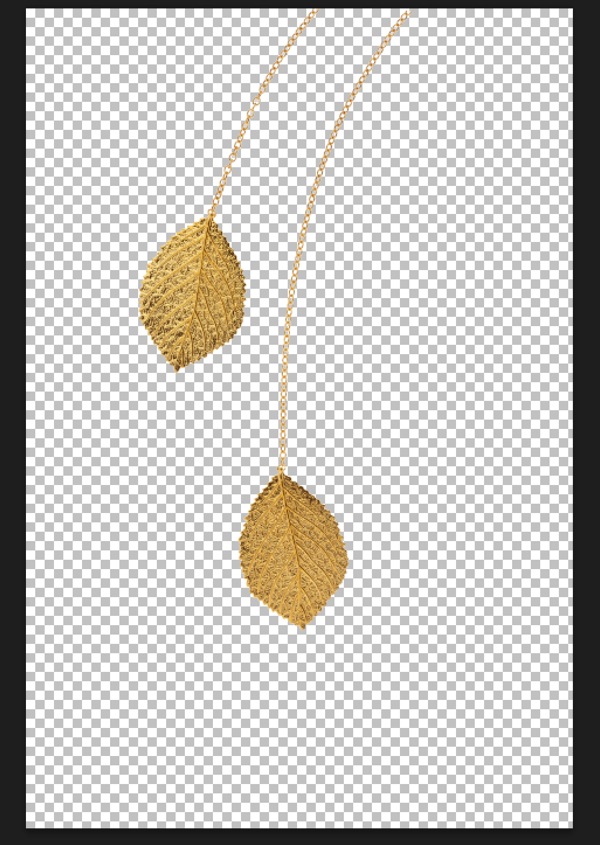
    Assuming you are familiar with selection tools, I am going to start with an isolated image below. I would suggest making the object you want to edit into it’s own later after you’ve selected it (control+J or command+J). Puppet Warp works even if you don’t isolate the object from the background, but I find it less effective as you’ll end up moving background elements unintentionally. Not isolating the object will also slow things down, as you’ll be moving more pixels than necessary.
    Puppet warp 01

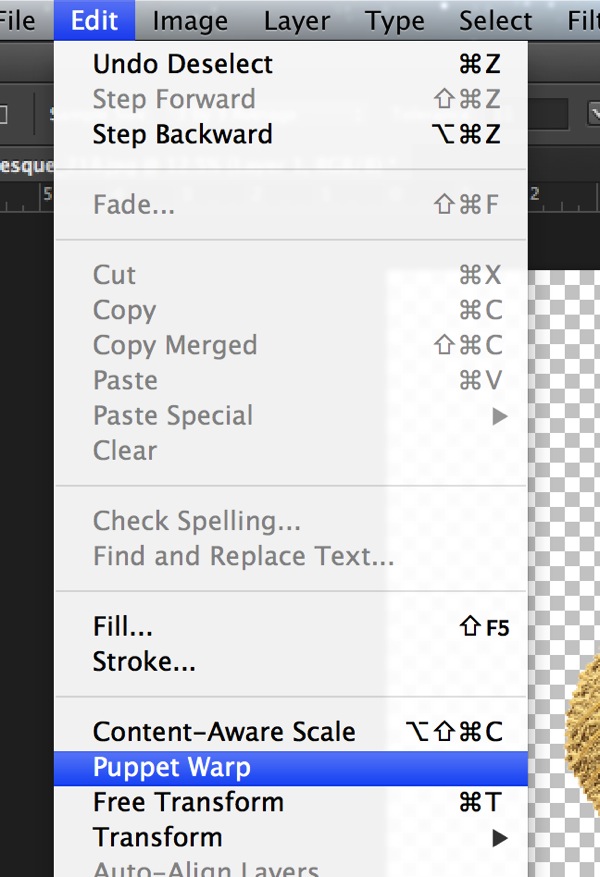
    With the layer you want to edit selected, go to the Puppet Warp tool, which is found under the “Edit” menu.
    Puppet warp 02

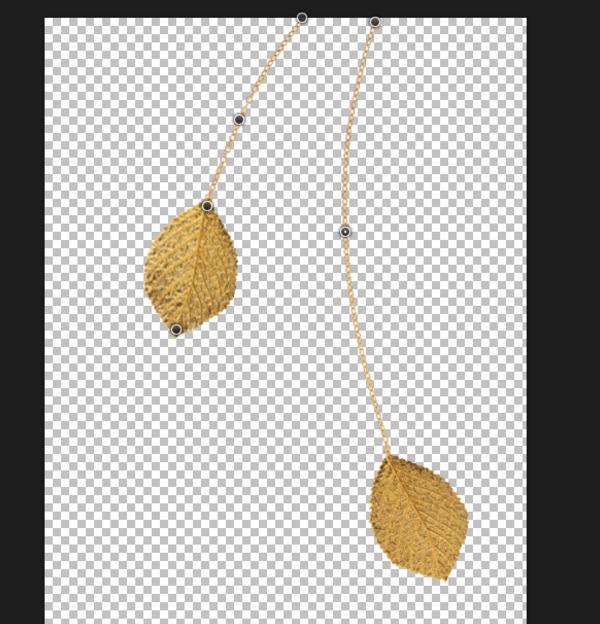
    Once you’ve entered the Puppet Warp mode, you can start adding anchor points or “joints” that function both as anchors and points where you can click and drag. I’ve added some anchor points to my jewelry pieces below.
    Puppet warp 03

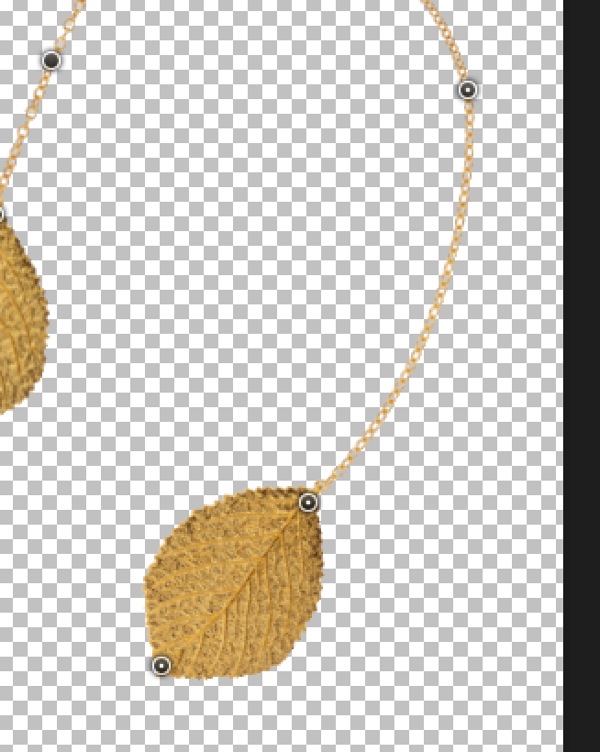
    Next, select an anchor point and start dragging. Puppet Warp is a fairly intuitive tool once you’ve added some anchor points and started to move them around. The anchor points you are not dragging will stay put, while the ones you’ve selected (hold shift to select multiple points) bend to your will. Cool, right?
    Puppet warp 05

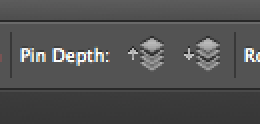
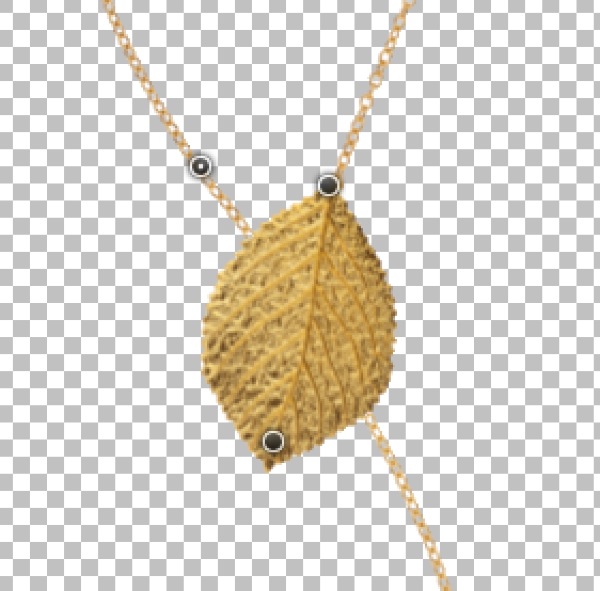
    Another useful feature of Puppet Warp is the Pin Depth option. As you add anchor points and move them, you may discover you want to move one part of the object behind another. This is where Pin Depth comes into play. If I want a part of this chain to move behind the left leaf, all I have to do is to select the anchor point on the chain, click on the Pin Depth button with the “down” arrow, and voila, I can drag that part of the image behind another.
    Puppet warp 06

    Puppet warp 07

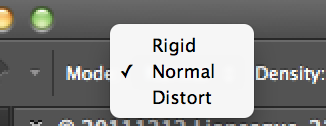
    The “mode” option of Puppet Warp allows you to control how dramatic the changes to your image are when you move an anchor point. The default is Normal, which should suffice for most situations. For more dramatic changes, you can select the “Distort” option.
    Puppet warp 08

    To delete anchor points simply select the point in question and hit the DELETE or key on your keyboard. Alternatively, you can hold down the ALT key and click an anchor point to delete it.

    Puppet Warp is fairly intuitive but it takes a bit of experimenting to get a sense of how best to use it. I suggest alternating between the “Rigid”, “Normal”, and “Distort” modes to get an idea of how the tool works. Once you’ve gotten the hang of it, Puppet Warp is a VERY powerful tool.

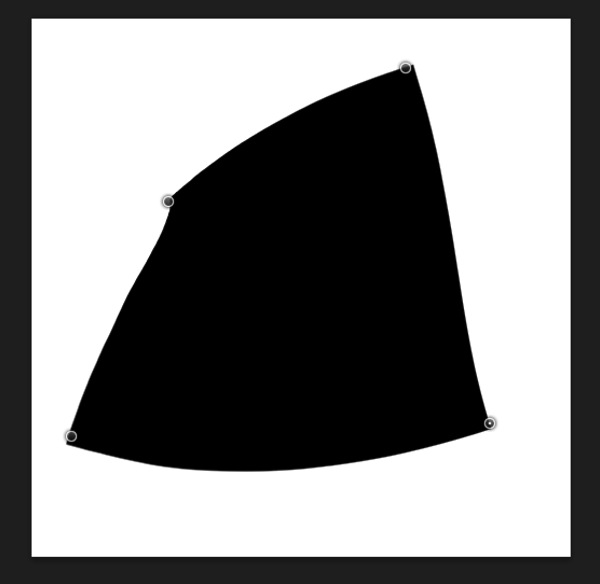
    As an additional example, I am going to warp the following black square. I’ve added four anchor points at the corners.

    Puppet warp 09

    Once I’ve added the anchor points I can bend and stretch the rectangle to something else entirely.
    Puppet warp 10

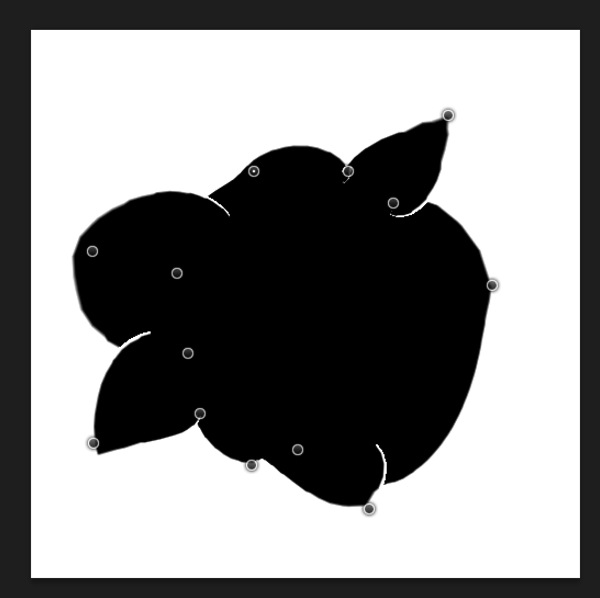
    If you want to edit it further, you can add even more anchor points until you’ve warped the square to something akin to a Rorschach inkblot test. What do you see? A moth? A bird? Hm…
    Puppet warp 11

    Frank Wang is a NYC photographer specializing in portrait and architectural photography. You can find him online at www.frankwangphotography.com and www.framephotographics.com. Connect with him via Twitter / Instagram: @frankwangphoto

    Post originally from: Digital Photography Tips.

    Check out our more Photography Tips at Photography Tips for Beginners, Portrait Photography Tips and Wedding Photography Tips.

    Introduction to Puppet Warp in Photoshop


    Digital Photography School

  • How To Improve an Image with 2 Steps in Photoshop Using Screen Mode

    A Guest Post by Sergey Sus/

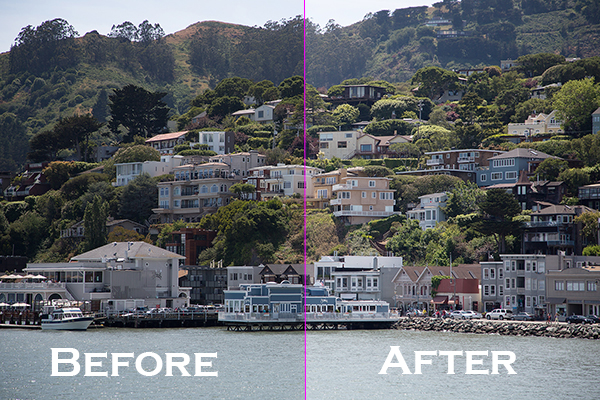
    Before after

    Wanted to share a very simple way for improving a photo without having to change the exposure. I use this method quite often and sometimes even after adjusting exposure.

    The image is of a small hillside town in North California called Sausalito taken while on vacation.

    Here the SOOC (straight out of the camera) image before any adjustments are applied or any cropping. It is just a bit under exposed and very flat looking.

    Img sooc

    Certainly there are many ways to brighten a photo in Photoshop like using Curves, Levels or Shadow layers. For this tutorial, we will be using a duplicate layer and then change the overlay to Screen mode to brighten up and give it a bit of a punch. I’ve seen many professional photo retouchers use this technique on both landscape and portrait photography as a starting point for retouching. This method works really well on jpgs as well!

    1. Open image in Photoshop. Then duplicate layer by pressing Ctrl+J (Win) / Command+J (Mac)

    Img dup layer

    2. Change blend mode to Screen and and then set Opacity to 50%.

    Img screen

    Starting out with Opacity set to 50% and adjusting the slider for more or less brightness. For this image the opacity is about right at 50% for my eyes. See how this new layer in Screen mode added a subtle contrast and brightness.

    Img ps screen

    Give this technique a try even if the image is not under exposed as it will brighten up overall highlights and will slightly increase perceived contrast. Make sure to experiment with different opacity values for different looks. Here is the final image cropped and with a bit more processing – how I remember Sausalito looking that day.

    Img final

    Let me know in the comments how this has worked for you or if you have questions.

    Sergey Sus is a Los Angeles based photographer telling telling real stories, individual, professional and family. Problem solver, artist and teacher. His work can be found on http://www.sergeys.us/.

    Post originally from: Digital Photography Tips.

    Check out our more Photography Tips at Photography Tips for Beginners, Portrait Photography Tips and Wedding Photography Tips.

    How To Improve an Image with 2 Steps in Photoshop Using Screen Mode


    Digital Photography School
  • How to Create a Beam of Light in a Photo using Photoshop [Video Tutorial]

    Have you ever wanted to create a beam of light in a photo using Photoshop? Me neither – but after watching this tutorial I think I’ve found a little project to try – check it out!

    Post originally from: Digital Photography Tips.

    Check out our more Photography Tips at Photography Tips for Beginners, Portrait Photography Tips and Wedding Photography Tips.

    How to Create a Beam of Light in a Photo using Photoshop [Video Tutorial]


    Digital Photography School

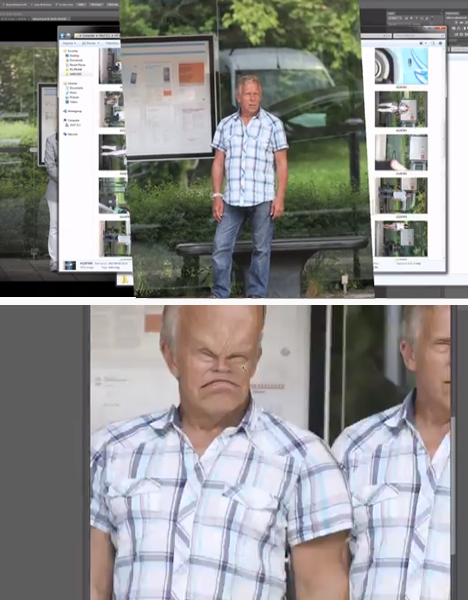
  • Street Retouch: Bus Riders Get Live Photoshop Treatment

    [ By Steph in Art & Photography & Video. ]

    Street Retouch Live Photoshop 1

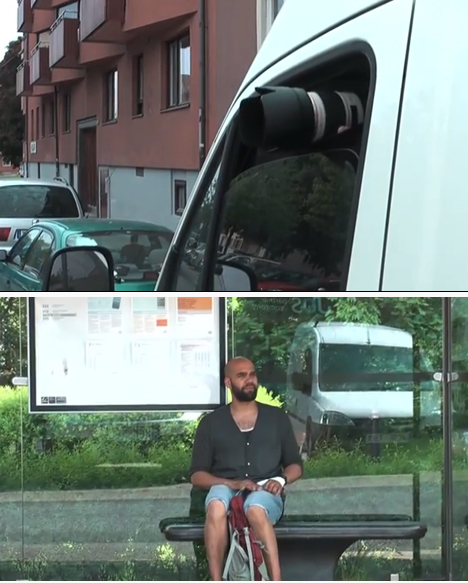
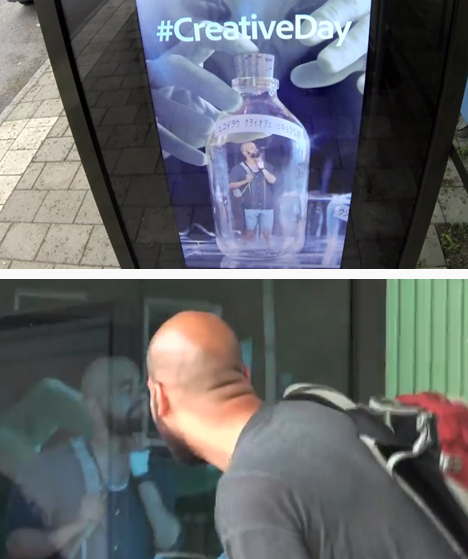
    Unsuspecting travelers waiting to catch a ride were shocked to see their own photos integrated into humorous advertisements on the walls of the bus stop shelter. Berlin-based Photoshop artist Erik Johansson took surreptitious photos from a van across the street, altered them in Photoshop, and projected the edited images onto the ad space on the shelter.

    Street Retouch Live Photoshop 2

    Johansson had to work fast, getting only a few minutes to take the photo, make his changes, insert it into a funny pre-made background and transmit it to the bus shelter. He also filmed the reactions of the surprised subjects, who suddenly found themselves integrated into ads for fictional films and products.

    Street Retouch Live Photoshop 3

    Street Retouch Live Photoshop 4

    Street Retouch Prank was developed for Adobe Creative Days, an annual event that showcases creativity and innovation using Adobe products. It may be a prank, but it’s also an interesting look at how interactive the future of advertising is likely to be.

    Share on Facebook


    [ By Steph in Art & Photography & Video. ]

    [ WebUrbanist | Archives | Galleries | Privacy | TOS ]


    WebUrbanist

  • Adobe releases subscription-only Photoshop CC

    PS-CC.jpg

    Adobe has released the latest version of Photoshop: CC for ‘Creative Cloud’. It’s the first to be made available solely though the company’s controversial subscription-only model, that requires users to pay an ongoing monthly charge of £17.58 /$ 19.99 for access to the software. New features include a revised ‘Smart Sharpen’ function, a ‘Camera Shake Reduction’ filter, and the ability to apply Camera Raw edits as layers. The latest versions of other Creative Cloud apps such the video editor Premier Pro are also now available to download.

    News: Digital Photography Review (dpreview.com)

  • MetaRaw plugin offers Photoshop and Elements users broader Raw support

    metaraw.png

    The Plugin Site has created the MetaRaw plugin for Photoshop and Photoshop Elements that allows the conversion of Raw files not supported by the associated version of Adobe Camera Raw. The MetaRaw plugin offers access to three Raw conversion methods – ACR, DNG Converter or its own, dcraw-based converter. It also allows Elements 10 and 11 users to access ACR’s lens correction and chromatic aberration tools.

    News: Digital Photography Review (dpreview.com)

  • Adobe releases Photoshop Lightroom 5

    shared:lr5box.png

    Adobe has released Photoshop Lightroom 5, the latest version of its workflow and image editing software. Available as either an individual license or as part of a Creative Cloud subscription, Lightroom 5 adds a more advanced healing/cloning tool, automatic image leveling and perspective correction, a new selective editing tool and the ability to edit files that are offline. US pricing is $ 149 for new customers and $ 79 for the upgrade. Click here for more information, including our features preview and download links.

    News: Digital Photography Review (dpreview.com)

  • Mastering Photoshop Textures to Create Powerful Imagery

    Photoshop has done for photography what the road did for the wheel! That’s quite a bit in case you’re wondering… This union has made photography the worlds 2nd most popular past time… Because let’s face it; creating exciting images is indeed thrilling, and most of all, highly addictive! One such addiction is a single technique: Simple to grasp,hard to master! Continue Reading

    The post Mastering Photoshop Textures to Create Powerful Imagery appeared first on Photodoto.


    Photodoto