Tag: correcting

  • Leica T lenses: Correcting some distortions

    leica-front.jpg

    During pre-launch briefings for the T, Leica was very keen to stress the optical quality of the new lenses. Most interestingly, we were told they relied on optical corrections, rather than software to project the best possible image onto the sensor. So with this in mind, when processing some images from the Leica T, we were surprised by a notification that Adobe Camera Raw gave us. See our results

    News: Digital Photography Review (dpreview.com)

  • Fujifilm releases X100S firmware 1.02, correcting OVF brightness bug

    fujifilm_x100s.png

    Fujifilm has announced the availability of new firmware for its X100S fixed-lens compact camera. Firmware version 1.02 corrects an issue where the framelines in the camera’s viewfinder did not automatically adjust brightness at ISO 1600 and higher. Fujifilm has also issued firmware updates for its ZS2000EXR, HS50EXR, F820EXR and F900EXR compacts. Click through for more details and links. 

    News: Digital Photography Review (dpreview.com)

  • Correcting For Under Exposure and Boosting Dynamic Range with an Environmental Portrait in Lightroom 4

    Introduction

    This tutorial is a demonstration of the SLR Lounge Lightroom 4 Preset System. With over 200 presets, the LR4 Preset System has been critically acclaimed as the most powerful and intuitive preset system available for Lightroom 4. DPS users can get 10% off by using the DPS10 coupon code upon checkout. Click the link above to learn more/purchase.

    Overview

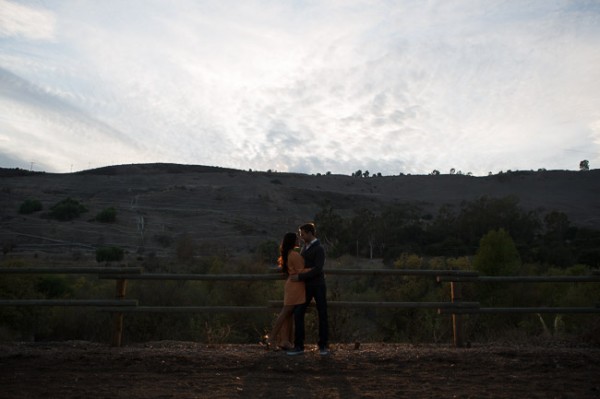
    Often times when shooting environmental portraits we “expose to the right”, meaning we are pushing our highlights to the right of the histogram without blowing out too much of our highlights, or clipping too much of our shadows. Depending on the type of scene, this can lead to what looks like an underexposed image directly out of the camera since we are trying to preserve the majority of our highlight detail. However, since most of the range in the highlights and shadows are still retained, we can bring it out through post production. In this step-by-step tutorial, we will demonstrate how to not only correct the exposure in this type of portrait, but also how to increase its dynamic range.

    Lightroom 4 Preset System Mixology

    This effect can be achieved quickly in under a minute with the SLR Lounge Lightroom 4 Preset System, If you don’t own the preset system, please skip to Step 1 to learn how to do it manually.

    1. MY MIXOLOGY > 25 HDR Strong
    2. BASE ADJUSTMENTS > 23 Light Soften Skin (Detail)
    3. BASE ADJUSTMENTS > 34 Medium Boost (Contrast)
    4. BASE ADJUSTMENTS > 62 Light Noise Reduction (Noise Reduction)
    5. Add +.30 Exposure
    6. 13 Nature | Color Adjustment Brush
    7. 12 Sky | Cloud | Ocean Adjustment Brush

    The Original Image
    Step 1. Applying our Basic Adjustments

    What we usually recommend when working in Lightroom is to work your way down the Develop Module Panels starting from the Basic Adjustment Panel.

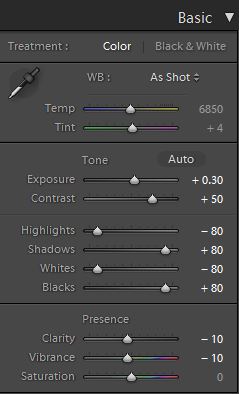
    Because the image is underexposed, one of the first steps that we need to do is to correct the exposure by adding +0.30 stop to Exposure. In order to increase the dynamic range, we are also going to bring down the Highlights and Whites by -80 and lift up the Shadows and Blacks by +80. When applying this technique to your own photos, you may be better off dialing in your Highlights, Whites, Shadows and Blacks and then adjusting the Exposure as necessary.

    At the same time, when we increase the dynamic range, the contrast flattens out, so we do need to add Contrast to compensate.

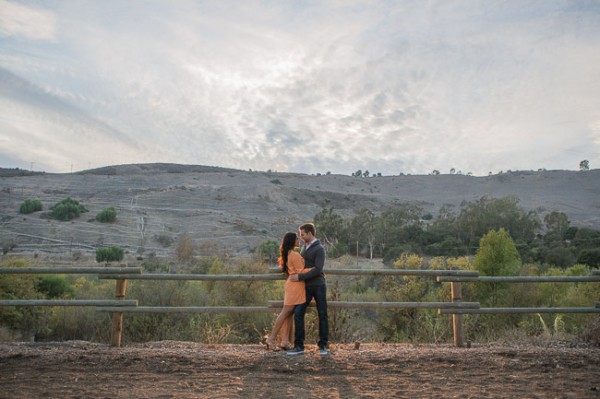
    Because we are working with a portrait, we want to have nice, smooth skin tone that is not overly saturated, so let’s decrease Clarity and Vibrance by -10. Your Basic Panel adjustment and image should look like the following:
    02 Basic Adjustments

    Step 2. Adding Additional Contrast via Curves

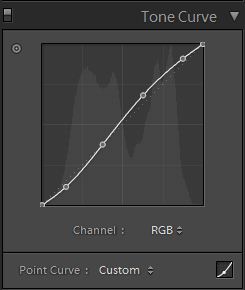
    The image can still use some more contrast, so let’s add a subtle contrast-boosting “S” curve.
    03 Tone Curve

    Step 3. Sharpening and Noise Reduction

    With the SLR Lounge Preset System, we typically apply the following Sharpening setting to our image:
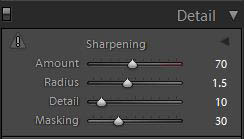
    Detail

    We are also going to add Noise Reduction because we to smooth out any noise that is introduced from the dynamic range boost. We use this setting for Noise Reduction:
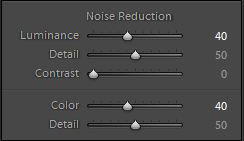
    Noise-Reduction

    Here is how your image should look like after applying all of these adjustments.
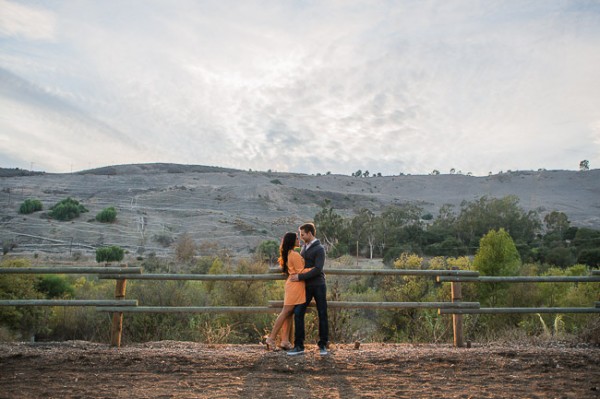
    04 Detail

    Step 4. Using Adjustment Brushes for Sky and Landscape

    Even though we boosted the dynamic range of this image, the sky is still overblown. The LR4 Preset brush we use for the sky is called “Sky | Cloud | Ocean.” This brush lowers the exposure, highlights, and shadows, and increases contrast, clarity, and saturation in the sky. Here is our settings for this brush.
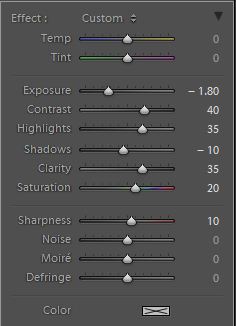
    Sky Cloud Ocean Brush

    Finally, we want to add more midtone contrast and saturation to the foliage in order to make them pop. Here is how the settings look like for the “Nature | Color” LR4 Preset Brush that we applied to the landscape. This also increases contrast, clarity, and saturation.
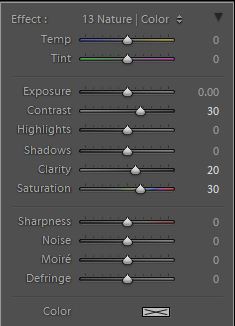
    Nature Color Brush

    Now that all our adjustments have been applied, let’s take a look at the before and after images to compare the original underexposed image against the final image.

    ORIGINAL

    HIGH DYNAMIC RANGE PORTRAIT
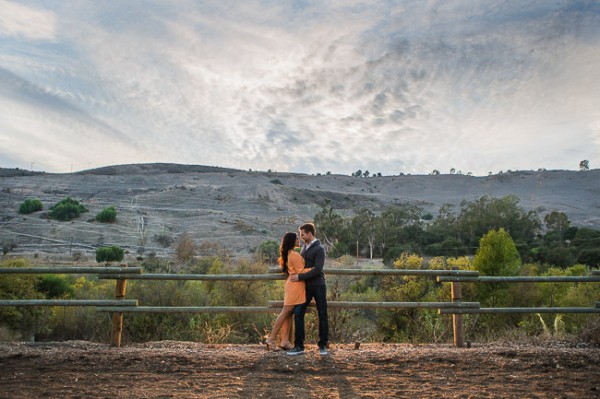
    05 Finished

    The Lightroom 4 Preset System

    The SLR Lounge Lightroom 4 Preset System is designed to enable users to achieve virtually any look and effect within 3-5 simple clicks. From basic color correction, vintage fades, black & white effects, tilt-shift effects, faux HDR, retouching, detail enhancing, and so much more. The sky is the limit with what has been dubbed the most powerful and intuitive preset system available. Click the link above to learn more/purchase.

    Post originally from: Digital Photography Tips.

    Check out our more Photography Tips at Photography Tips for Beginners, Portrait Photography Tips and Wedding Photography Tips.

    Correcting For Under Exposure and Boosting Dynamic Range with an Environmental Portrait in Lightroom 4


    Digital Photography School

  • Correcting Perspective in Photoshop and Photoshop Elements

    Photoshop perspective correction opener

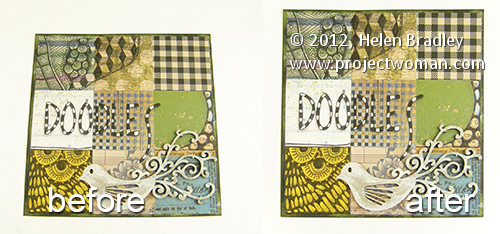
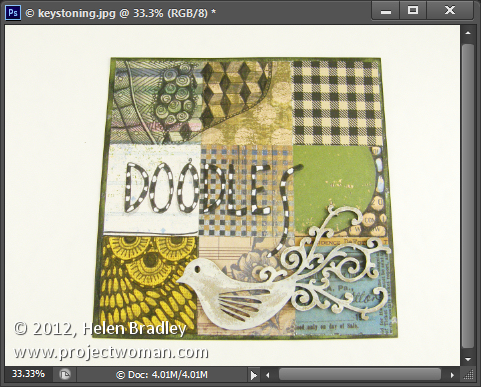
    Sometimes you’ll capture an image that should be rectangular but is anything but. In this example I shot an image of a 6 x 6 inch sheet of paper for a project. The aim at the time was to have a reference image before the project was shipped.

    Photoshop perspective correction step1

    Later I found I need to do more with the image and because it had been shot so casually the proportions were all wrong and the image does not look like a square sheet of paper. I also no longer have the project so reshooting is out of the question.

    Luckily Photoshop and Photoshop Elements both share a similar tool for adjusting perspective which will go a long way towards fixing an image like this.

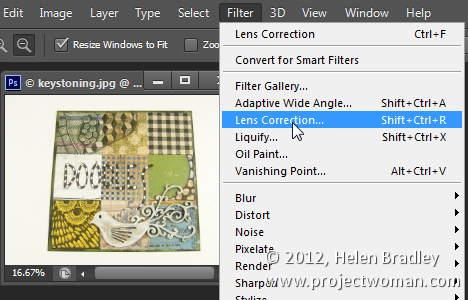
    To do this choose Filter > Lens Correction in Photoshop and then click the Custom tab to access the custom tools. In Photoshop Elements choose Filter > Correct Camera Distortion.

    Photoshop perspective correction step2

    Make sure the Show Grid option is checked and you may want to adjust the grid size so it is useful for determining the straightness of the edges in the image.

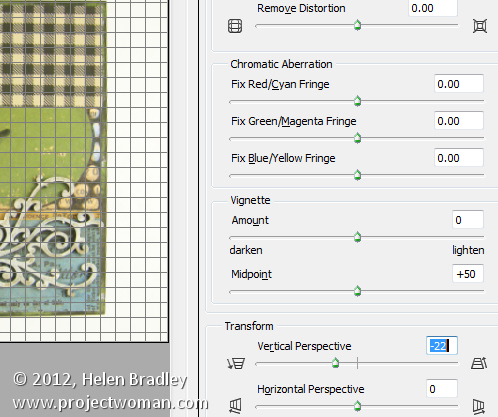
    The Vertical Perspective adjustment will fix this image’s perspective problems so drag it to the left to increase the width at the top of the image to adjust for the incorrect perspective.

    Photoshop perspective correction step3

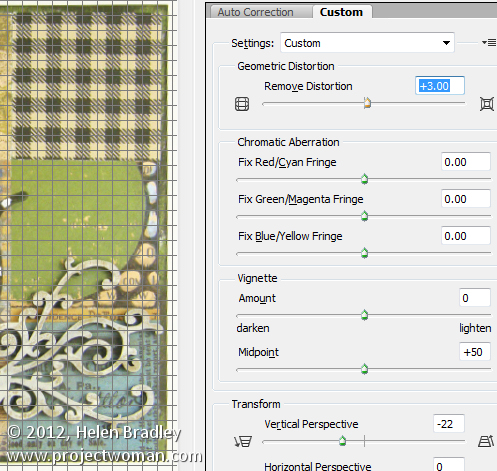
    When you do this you may notice that the image has some geometric distortion. In this case it’s barrel distortion and the edges of the subject are billowed out.

    To remove this adjust the Remove Distortion slider to counteract the distortion. It won’t be possible to get it perfect but it will be possible to reduce it to acceptable levels.

    Photoshop perspective correction step4

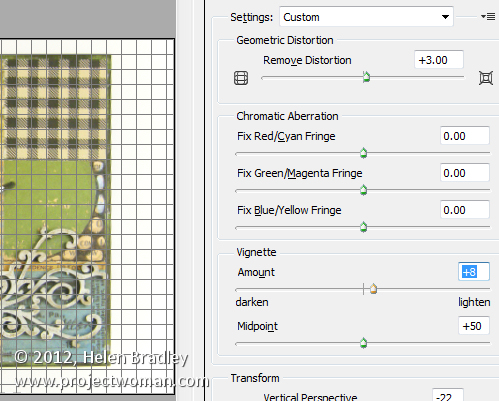
    In this same dialog you may occasionally want to adjust the Vignetting slider if your lens causes dark vignettes in the corners of the image. In most cases you will drag to the right to slightly lighten the edges of the image.

    Photoshop perspective correction step5

    Once you’re done click Ok to return to Photoshop.

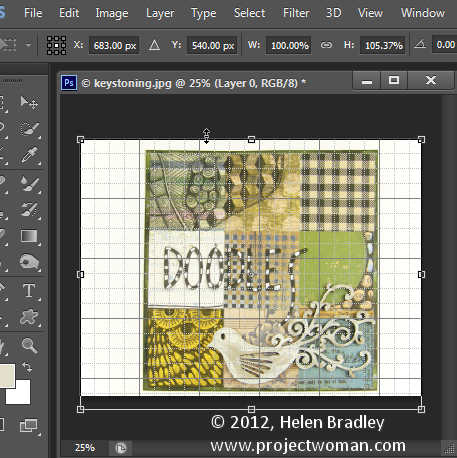
    The only problem that cannot be fixed in the lens correction filter is the one that would stretch the image so the subject looks closer to its original proportions which are of a 6 x 6 inch page.

    For this you’ll need to click the Move tool and drag up or down on the image to stretch it.

    If you need to stretch the image beyond the current image canvas dimensions, do so and confirm the change. Then choose Image > Reveal All to reveal the area of the image off the side of the canvas. While the final image isn’t perfect it looks a lot better than the original.

    Photoshop perspective correction step6

    This same tool can be used to adjust perspective on buildings which show a keystoning effect where the building appears to be narrower at the top than at its base.

    Post originally from: Digital Photography Tips.

    Check out our more Photography Tips at Photography Tips for Beginners, Portrait Photography Tips and Wedding Photography Tips.

    Correcting Perspective in Photoshop and Photoshop Elements


    Digital Photography School

  • #6 – Correcting and Enhancing Colour

    Color correcting & enhancing, selective colour, lab colour mode, and tips/tricks!
    Video Rating: 0 / 5

  • Color Correcting Photos: Photoshop CS3!

    Check this video out at Hi-Res here: www.tutvid.com We will discuss the basics of RGB and CMYK colors and how you need to use them to color correct everything from everyday snapshots to portrait photographs. We will be using the eyedropper and the info palette to read the colors in the photos we color correct and based on the CMYK read out of the color sample targets we will adjust the color channels using a curves adjustment for spectacular colors that are perfect. Also learn about the perfect color formula for getting color correct skin! Guide available as a PDF download at tutvid.com. Please check out www.tutvid.com for more free video tutorials and downloads!

  • Color correcting skin by the numbers – Photoshop CS5: Portrait Retouching from lynda.com

    Watch the entire course at www.lynda.com InPhotoshop CS5: Portrait Retouching, professional photographer and instructor Chris Orwig uses his extensive experience with Photoshop to focus on the specific tools every photographer needs to adjust images and keep them looking genuine. This course explores this program’s deep resources for portrait retouching and inspires photographers to do their creative best with everything from blemishes to backdrops.
    Video Rating: 5 / 5