Hannah Trigwell and Pete McDonald of Rho performing Love Song [Sara Bareilles] Leeds City Centre, Lands Lane. 14/12/2008 www.myspace.com/hannahtrigwell
Video Rating: 4 / 5
Hannah Trigwell and Pete McDonald of Rho performing Love Song [Sara Bareilles] Leeds City Centre, Lands Lane. 14/12/2008 www.myspace.com/hannahtrigwell
Video Rating: 4 / 5

For the last few weeks I’ve been thinking a lot about online conversations. It feels like I’m constantly in one somewhere on some site.
More and more for me these are happening on Google+. I used to spend almost all of my social time online in Flickr group discussion threads. I stopped visiting Flickr groups for a while due to personal harassment — but you know what, it wasn’t just me who left, the velocity of quality conversations in Flickr groups have gone wayyyy down more broadly speaking in the past year.
This is not just a subjective thing — it’s easily measured ojbectively as well. Flickr Central is one of the oldest/largest/most active groups on Flickr. Over there years (as counted by threads) 11,503 conversations that have gone on there. Some are very successful, some are not.
If you look at Flickr Central today you’ll see that the time stamp for discussions on the first page goes back two weeks. This was not always the case. It used to be that the entire first page of discussions in Flickr Central were from the past 48 hours. Clearly the velocity of conversations in this Flickr group has gone way down. I suspect the same goes for other groups as well. Many of the groups recommended to me as “groups that Flickr has noticed” on the groups page haven’t had conversations in months, in some cases even years.
Meanwhile, over at Google+, in the past year I’ve been involved in some of the best conversations that I ever remember happening anywhere on the web. Interesting conversations about photography and art and meetups and hangouts and all kinds of fun things. it seems like there is always some great conversation somewhere on Google+ to jump into.
Over the course of the past few weeks I’ve jumped back into a few Flickr conversations to see what it feels like. What I’ve noticed is that the tone of conversations on Google+ feels so much more positive than it does at Flickr. There’s so much less snark and bitterness and negativity overall. I hadn’t seen the difference so dramatically before, but after having been gone awhile it felt more evident.
This made me think about what Google+ was doing right for community that Flickr is not.
When I first joined Google+ one of the things that I noticed is that some of the more hostile individuals from many of the old Flickr groups showed up. Some personal attacks took place, they aired their gripes about different things, typical BS hater stuff — but you know what? These people were quickly marginalized and moved out of the way to create a more positive environment. I blocked many of these people and so did so many other photographers on G+.
A few weeks went by and these people were just as hostile and negative but they were basically shouting to an empty room. The majority of positive forward thinking photographers on G+ had tuned them out with the tools that we were given. What we were left with was a more positive filtered G+ experience. I went back a few days ago to look at a few of the accounts of people that I blocked and you know what — they are gone. They quit G+. By empowering a mostly positive oriented community these people found no audience to bitch at and they left. Meanwhile, more constructive social photographers on G+ carry on.
Now, one worry with filtering out criticism is that it hurts meaningful conversation because all conversation is not always puppy dogs and roses, but that also hasn’t happened on Google+. Lots of criticism has gone on in tons of threads. The difference is though that the criticism feels much more respectful than some of what I’ve experienced in Flickr groups. People disagree on Google+ they just do it respectfully.
By giving users more powerful blocking tools on G+ Google has built a nicer community. A nicer community feels so much more enjoyable.
Every so often I’ll find someone new who comes along and leaves some sort of assholish comment in a thread on Google+. It’s almost delightful at how easy it is to block them and make them invisible.
In poking around Flickr Groups over the past week I did find what felt like some high quality conversations to me, I read them, I lurked — but I didn’t participate. The reason why I didn’t participate was that I noticed some of the toxic types that I’d run into previously on Flickr or G+. I’m sure I would have jumped into these conversations if I hadn’t seen them there, but what’s the point of jumping into a conversation about fine art photography when you know someone is just going to be a jerk?
When it comes to fixing images in Photoshop or Photoshop Elements the ability to use masks to do your edits is invaluable. By using a mask instead of, for example, the Eraser you get an edit which can be changed or even removed any time in the future.
However masks aren’t easy to use or even understand when you first get started. In fact they can be downright scary. To help you get started here is a quick and easy technique that can be achieved using masks. Doing it will show you a situation in which a mask is a good editing choice. You will see how to add a mask to a layer and how to use it to edit the image. By the end of the process you will be on your way to understanding how to use masks in your photo editing workflow.
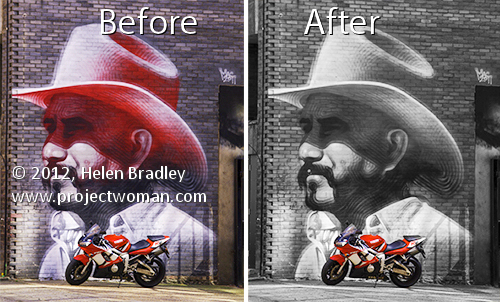
The effect that I’ll be creating is one that you see in a lot of wedding albums and advertisements. It is an element of color in an otherwise black and white image. It can be achieved using masks and that’s what we’ll do here.
Start by opening an image that has some colorful element of interest that you can show in color while you turn the remainder of the image into black and white. Here I’ll turn this graffiti image black and white and leave the bike in color.

Make sure your Layers palette is visible. If not, choose Window > Layers to display it.

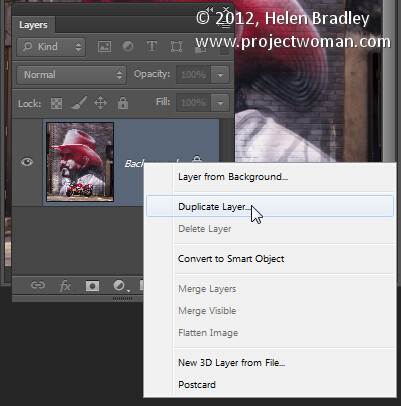
Right click the Background layer in the Layers palette and choose Duplicate Layer and click Ok. This makes a duplicate of the image layer.
With this layer selected, choose Image > Adjustments > Desaturate to turn the image into black and white.

Notice that the Layer palette contains a black and white layer and a color layer. The black and white layer is at the top of the stack which is why you are seeing a black and white image.
At this point we’ll add the mask so we can use it to bring back the color in a specific are of the image. To do this with the Background Copy layer still selected choose Layer > Layer Mask > Reveal All.

This adds a white filled layer mask to the layer – notice the white box which appears in the layer palette next to the image thumbnail – that’s the mask.

Right now all you need to know about masks is that you can paint on them with black, white or shades of gray.
When you paint with white on a mask you reveal any content on the current layer – in our case that is the black and white layer.
If you paint with black you’ll reveal the content on the layer below the current layer – in this case the color layer. You might like to think of it as poking a hole in the top layer so that you can see part of the layer below.
If you paint with a shade of gray you’ll be seeing part of the layer below and part of the current layer. The hole that you’re punching through the top layer will be semitransparent.
To work on this image, select the brush tool and select a small brush with a hardness of around 75%. Make sure black is set as the foreground color and click on the white mask thumbnail in the Layers palette to target the mask. It should have a border around it as in this image:

Now paint on the photo over the areas that you want to bring back color in. Instead of seeing black paint on your image as you might expect to see, you will see the color coming back.

Look at the mask thumbnail in the Layers palette and notice it has some black markings in it where you painted on the image.
If you make a mistake and paint back too much color, switch the paint color so that you are painting with white and paint out the areas that you want to return to black and white.
If you are working with a mask and find that the brush is painting black or white paint on your image it is because the image thumbnail is selected in the Layers palette and not the mask thumbnail. When you select the mask thumbnail it will have a small white border around it so you can tell it is active and selected.
The benefit of using a mask for this type of effect is that you can paint the effect on or off the image as desired. This gives you a lot more flexibility in editing your image. While this is a very simple example it does give you a starting point for learning to use masks in your photo editing.
When you save this photo, save it as a psd format file if you want to be able to come back later and adjust the mask – the psd format saves layers and layer masks.
If you are familiar with using Adjustment Layers in Photoshop you could apply this effect using an adjustment layer to desaturate the image and paint on the Adjustment Layer’s mask to bring the detail back. If you are not familiar with using Adjustment Layers then the process that I have outlined will give you the same results but just a different way of achieving it.
Post originally from: Digital Photography Tips.
Check out our more Photography Tips at Photography Tips for Beginners, Portrait Photography Tips and Wedding Photography Tips.
Photoshop Masks 101
Mark Pesce on Byteside discusses one of the possibly dangerous side effects of watching 3D television and playing 3D games. To learn more visit www.3dSideEffects.com . Research and form your own opinion before you buy. What are your thoughts? Should the TV manufacturers conduct further testing?
The 3D Film Factory’s stereoscopic 3D production demo – “The Platt Brothers in 3D”. For more information on 3D production services and 3D camera systems visit www.3DFilmFactory.com To view in 3D use anaglyph (red glasses. Produced by the 3D Film Factory and filmed on location at the California Center for the Arts.
Video Rating: 5 / 5

One of the greatest challenges of being a backpacking photographer/videographer is how to haul around your DSLR in a way that’s relatively comfortable and accessible. I hiked over 1200 miles in Glacier National Park with my DSLR Camera setup (which I blogged about at www.hike734.com using a couple of great pieces from ThinkTank Photo. The case and the camera connection kit are listed below. If you use these links, you’ll get a choice of a free gift of gear depending upon how much you spend! www.hike734.com I would love to hear what solutions you’ve come up with! Please post them in the comments below. Here are links to the products: ThinkTank Photo Digital Holster 30 V2.0 www.thinktankphoto.com ThinkTank Photo Lens Changer 25 V2.0 www.thinktankphoto.com ThinkTank Photo Backpack Connection Kit www.thinktankphoto.com
Video Rating: 0 / 5

www.snapchick.com Leigh talks about her unexpected dental work.
Video Rating: 1 / 5
A short video of a few of my favorite hunting knives. Buck, Schrade Old Timer, Grohmann, and a couple others. Shot with my Nikon D90.
Video Rating: 4 / 5

After watching my good friend Stazima’s Halo 4 Beta Discussion video the other day it got me thinking about as and when we were likely to see the Beta and when it would be announced. Stazima’s VIdeo www.youtube.com This is not fact this is simply my opinions on how I’d like to see the Beta and Halo 4 be revealed at E3 2012 Follow me on Twitter www.twitter.com
Growth is a direct result of being outside your comfort zone. But being outside your comfort zone can be wonderful thing and it can also be your worst nightmare. The trick is in striking the perfect balance between doing what you know how to do well and doing what you have no idea about. Let’s say someone asks you to Continue Reading
The post How To Experience Rapid Growth As A Photographer appeared first on Photodoto.
Ad showcasing the features of the Nikon D5100 HDSLR — 2011’s new upper entry-level DSLR from Nikon.

Questions? Go here: www.youtube.com Hands-on review on Nikon 135mm ƒ/2.0D AF DC. See below for compatibility. AUTOFOCUS UNAVAILABLE D40 D40X D60 D3000 D3100 D3200 D5000 D5100 AUTOFOCUS AVAILABLE D50 D70-Series D80 D90 D7000 D100 D200 D300-Series D600 D700 D800-Series D1-Series D2-Series D3-Series D4-Series
Video Rating: 0 / 5

We’ve reviewed the multi-platform mobile app Photo Editor by Aviary. Even if you’re not familiar with this app, you’ve likely seen Aviary in effect in other mobile applications as the photo editor is available to other app developers as a software development kit (SDK) for Android, iOS and Windows Phone 7, and there’s a Web Widget too. We take a look at Aviary’s version, optimized for both phone and tablet screens, on Connect.
