Month: November 2012

  • Camera Buying Guide!

    Digital Camera information: dpreview.com CAMERA BUYING SUGGESTIONS: ** Updated November 5, 2011 ** ** Under 0 ** Canon SD1400 IS – amzn.com (Recommended for beginners) Canon SX-210 IS – amzn.to (Riley’s camera) Canon Elura100 – amzn.to (My older camera) Canon SX120 – amzn.to Canon ELPH 300 HS – amzn.com Sony DCR-SX85 – amzn.com GoPro HD Hero – (Sport/stunt camera) Kodak ZX5 Playsport – bit.ly (Shock/waterproof) ** Under 00 ** Panasonic DMC-FZ150 – amzn.com (My vlogging camera) Canon SX-20 IS – amzn.to (My old blogging camera) Canon G12 – amzn.com Panasonic Lumix FZ100 – amzn.com Nikon D90 – bit.ly Nikon D5100 – amzn.com Sony HDR-XR550v – bit.ly Sanyo Xacti – bit.ly Canon VIXIA HV30 – amzn.to ** Under 00 ** Panasonic DVX-100b – bit.ly (My old primary camera) Panasonic Lumix-GH2 – bit.ly (Newer model of Jory’s camera) Canon 60D – amzn.to Canon EOS Rebel T2i – amzn.to Canon GL2 – bit.ly Sony HDR-XR550V – bit.ly ** Above 00 ** Panasonic HMC-150 – amzn.to (My main camera) Canon XL H1A – bit.ly Sony HDR-AX2000 – bit.ly It goes without saying that if any of these cameras become outdated (because their successor has since be released) it’s probably not a bad idea to check out the newest version of each camera listed. Again, these are just recommendations based on what I’ve personally used, or researched. As you can see, I’m also very partial to Canon, Panasonic and Sony – which for my money, produce the best video equipment available. But visit some of the above
    Video Rating: 4 / 5

  • Canon Powershot SX50 HS Review

    Canon Powershot SX50 HS.jpg

    Camera companies love ‘world’s best’ labels, no matter whether they truly are ‘world’s best’ or merely biggest, smallest, longest, widest, quickest, smartest … or whackiest!

    However, it’s hard to ignore Canon and its description of the PowerShot SX50 HS as possessing the ‘world’s largest optical zoom range in a compact camera.’ Simply because, at time of writing, it is!

    Think of it this way: if you owned a 35mm SLR film camera, wouldn’t you simply love to clip on a zoom lens that ranged from an enjoyably wide 24mm to a fearfully long 1200mm? I know I would!

    But, get real, and theorise about the physical practicality of such a 35mm film lens! It would weigh a ton, stick far out from the camera and probably constitute a wind hazard! And forget handholding it.

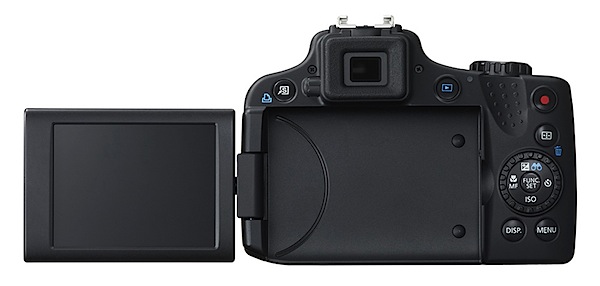
    Canon Powershot SX50 Review SX50 HS back.jpg

    In reality, the new Canon Powershot SX50 HS compact weighs just a little over half a kilo and is no larger than most compacts. Not pocketable but easy to carry, this new maxi zoom camera looks no larger than Canon’s first long zoom compact, the SX30 of two years ago.

    How do they do it? Don’t ask me!

    Canon Powershot SX50 HS Features

    Aside from the 12.1 megapixels packed into the CMOS the maximum image size is 4000×3000 pixels, or 34x25cm as a print. True, the 12.1 figure is lower than many other digicams out there but you stand a better chance of avoiding noise in the Canon’s slightly larger pixels.

    Movies? 1920×1080 Full HD.

    First up, you notice that the tiltable LCD screen is a little larger than many recent cameras, at 7.1cm and has lower resolution. However, there is the turret viewfinder which is ideal for bright light shooting. I found it useful, to a certain degree, quite low in resolution but helpful in pointing the camera!

    Many will be grateful that the array of external controls is limited.

    Bark 2.JPG

    The camera feels good in the hand and is well-balanced; you could operate it solely with the right hand with the lens at full wide …if you had to!

    Top deck: at left is the button to release the flash; to the right are the shutter button and zoom lever sited on top of the prominent speed grip; back a bit is the on/off button and mode dial where can be found positions for auto, Program AE, aperture and shutter priority, scene modes, custom settings etc.

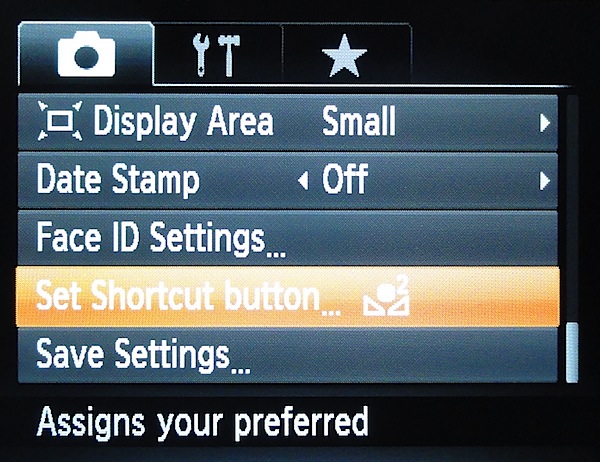
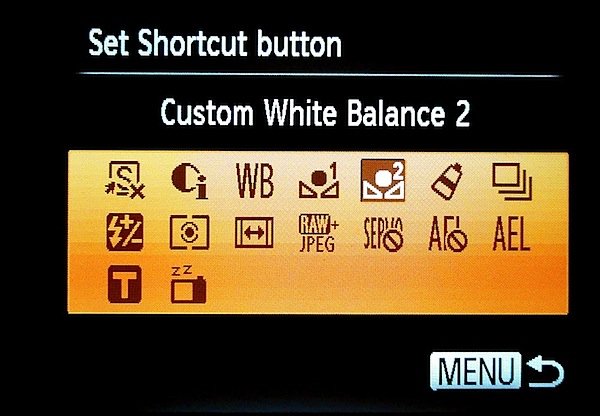
    At rear: a shortcut button is at far left … this gives two avenues to assign a function; to the right is replay, the four way rocker to access macro, timer, ISO setting and exposure compensation; lower is a button for the display options, including access to the turret finder and then the menu button.

    Framing Assist 2.jpg

    The viewfinder menu layout is less complex than many seen in recent months, a factor I suspect will be appreciated by many.

    Framing Assist 1.jpg

    There are two front mounted framing assist buttons which will considerably assist the use of the long zoom: if you’re zoomed in at any distance, the button temporarily whizzes the zoom back to full wide to let you know where you are, with a white outline indicating where you were (in tele)!

    Canon Powershot SX50 Distortion

    Slight barrel distortion was evident at the wide end of the zoom, along with slight pincushion distortion at the tele end.

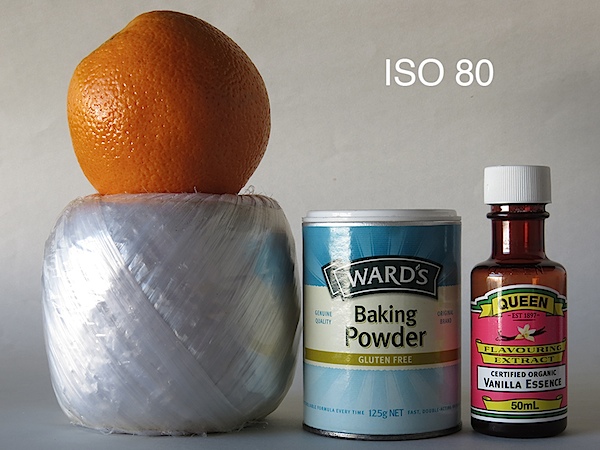
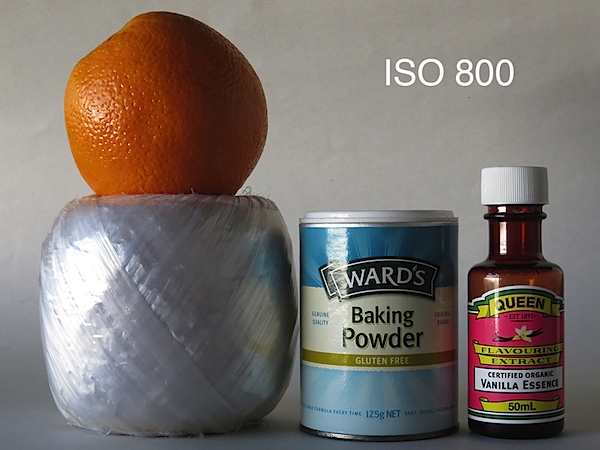
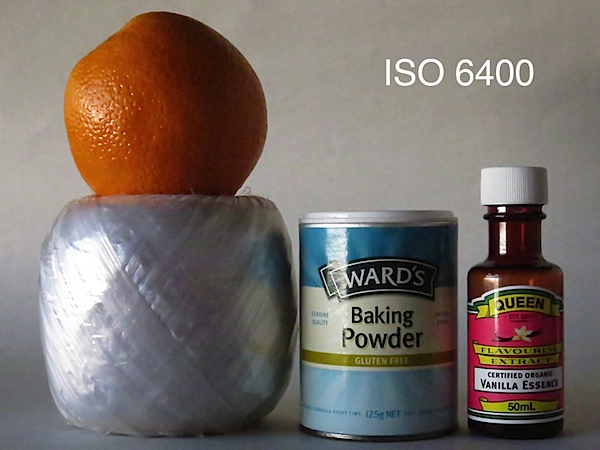
    Canon Powershot SX50 HS ISO Tests

    Canon SX50 HS ISO 80.JPG

    Canon SX50 HS ISO 400.JPG

    Canon SX50 HS ISO 800.JPG

    Canon SX50 HS ISO 1600.JPG

    Canon SX50 HS ISO 3200.JPG

    Canon SX50 HS ISO 6400.JPG

    A good performance right up to ISO 1600; at ISO 3200 sharpness began to drop off; by ISO 6400 sharpness was well gone but surprisingly noise was not objectionable.

    Narrabeen lagoon wide 1.JPG

    Narrabeen lagoon tele 1.JPG

    Canon Powershot SX50 HS Review Verdict

    Quality: above average. Bear in mind, using the tele end of the zoom will see you face off atmospheric haze. In this shot the bridge capture by the tele end was actually 1.8km or just over a mile away.

    Why you’d buy the Canon Powershot SX50: the 50x zoom!

    Why you wouldn’t buy the Canon Powershot SX50: the 50x zoom! Too hard to deal with, you need some patience, a decent tripod and suitable subject matter to use it satisfactorily.

    Take note: if you plan to do any amount of long lens shooting, go get yourself a decent tripod; try out the camera in the store before you buy and avoid wobbly legs!

    Canon Powershot SX50 Specifications

    Image Sensor: 12.1 million effective pixels.
    Sensor: 11mm CMOS.
    Metering: Evaluative, centre-weighted, spot.
    Lens: f3.4-6.5/4.3-215mm (24-1200mm as 35 SLR equivalent)
    Exposure Modes: Auto, Program AE, shutter and aperture priority, manual.
    Shutter Speed: 15-1/2000 second.
    Memory: SD/SDHC/SDXC.
    Image Sizes (pixels): Stills: 4000×3000 to 640×480.
    Movies: 1920×1080, 1280×720, 640×480.
    Viewfinder: Turret and 7.1cm LCD screen (461,000).
    File Formats: JPEG, MPEG4.
    Colour Space: sRGB.
    ISO Sensitivity: Auto, 80 to 6400.
    Interface: USB 2.0, HDMI mini, DC input.
    Power: Rechargeable lithium ion battery.
    Dimensions: 112.5×87.5×105.5 WHDmm.
    Weight: 551 g (body only).
    Price: get a price on the Canon PowerShot SX50 HS at Amazon.

    Post originally from: Digital Photography Tips.

    Check out our more Photography Tips at Photography Tips for Beginners, Portrait Photography Tips and Wedding Photography Tips.

    Canon Powershot SX50 HS Review


    Digital Photography School

  • Lightmirror – video designed by dreamscene.org

    Download: www.dreamscene.org – free dreamscenes, video loops and windows 7 themes. Copyright © dreamscene.org
    Video Rating: 4 / 5

    More 3D goo.gl A 3D video of me use a saw. It looks like its poping out. Watch in 720p it will be worth the wait for the video to load. Use red and blue 3D Glasses or use a 3D tv or 3D smart phone. Choose your viewing method by clicking on 3D icon next to the HD button. FREE 3D Glasses: www.3dn3d.com 3D Facebook: www.facebook.com View cool 3D Photos: www.3dn3d.com LIKE ME: www.facebook.com Follow ME: twitter.com BEST 3D EVER: www.youtube.com

  • Moufy – Miss Newton (Short Film)

    DOWNLOAD MOUFY’S NEW FREE ALBUM: hulkshare.com Barstool Sports ‘Back to Stool’ Tour: bit.ly CollegeFest 2011 Boston: bit.ly Get Connected to Moufy’s Movement at www.facebook.com Download this song at hulkshare.com Management: Cam Woodsum Cam@WoodsumMusicGroup.com Video by Filmatic Executive Produced by Cam Woodsum Directed by Austin Steele Produced and Edited by Jason Jenkins Director of Photography Mike Quill Steadicam Operator Alex Stinson Assistant Camera Zack McGeehan Production Assistant/Photographer Scott Largay Starring Danielle Mayer Also featuring: Ryan Boudreau (www.RyanBoudreauActor.com), Mary Vincunas, Michael Yebba, and Deme Lane. Shot on the Arri Alexa

    A bit more information… These are beauty shots intended to focus on our natural hair and faces, not so much fashion shots. The pictures are for promo purposes… In case anyone wanted to know 🙂 So basically, just stay tuned-in if you want to learn more about our projects outside of YouTube lol (Also, these images are unedited as well. We’re showing them to you fresh from the camera) Click here to read Meechy’s blog post coverage!: meechymonroe.com Click here for MeechyMonroe’s YouTube channel!: www.youtube.com To contact the talented gentlemen mentioned in this video, click their links: Tony Smith – Experienced Photographer, Chicago www.facebook.com designsmith2001@aol.com Dame-O – Recording Artist, Music Producer, Composer, Songwriter www.reverbnation.com Please check these guys out. They are my FAVs! I love my team! Love, Vaughn
    Video Rating: 4 / 5

  • High fashion photoshoot at home…setup + makeup :]

    This is me showing my setup for a photoshoot I did with my sister. I did her makeup, and layed her out on an affordable setup. The final results were edited in CS5 :] If you have ?s let me know! Feed me feedback 😀

    I have still shots from this show here: www.flickr.com They came out better than the video. The Bangles at Busch Gardens in Williamsburg, Virginia on Sunday July 25th. Shot with my Nikon D90.
    Video Rating: 4 / 5

  • Nikon AF-S 24-85 VR Review

    I take a look at the Nikon AF-S 24-85 VR, this is a variable aperture (F/3.5-F/4.5) lens designed for the FX (full-frame) format. It has a USD price of 9.99 which places it beyond most kit lenses but not quite as high as pro level lenses. It is compact and features a 72mm filter thread, internal focus, Super Integrated Coating, and 3 ED glass elements. Sample Images: www.flickr.com Follow me on Twitter @photogjthegreat or find me on Facebook: www.facebook.com www.flickr.com
    Video Rating: 5 / 5

  • 5 Tips for a Faster Lightroom Workflow

    At a recent workshop I joined, several of the attending photographers expressed frustration with the slowness of Lightroom, and were surprised to see how quickly I am able to process my photos in Lightroom. So I thought I’d share some of the workflow tricks that I’ve picked up over the last few years that have helped me get faster in Lightroom.

    In addition to specific workflow practices, there are also some important configuration changes you can make to optimize Lightroom performance. However, in this post I will focus on workflow technique, not application configuration. Check out this post for more information on configuring Lightroom for optimal performance.

    Note: The tips and screenshots in this article are from Lightroom 4.2, but most of these ideas are also applicable to older versions of Lightroom.

    Let’s get on to the tips.

    1. Start with Spot Removal, and use the 2003 process

    As you begin to stack up edits in Lightroom, some of the tools get slower and slower. This is the nature of nondestructive editing. None of your edits have changed the underlying image data, so the more you do with an image, the more work your computer has to do to update the preview of your image in real time as you move sliders or work with other controls.

    I’ve found this phenomenon to be the most annoying when using the Spot Removal tool to retouch portions of an image. Using the Spot Removal tool at the end of your workflow can be painfully slow. To address this, I’ve formed the habit of always doing spot removal first, before applying any other edits to an image. This is much faster, and there is also a creative advantage to removing the small distractions, before you go on to more serious editing work.

    To further improve the performance of the Spot Removal tool, you can change to the “2003 Process.” This is especially helpful if you have an older computer. The process version is the algorithm that Lightroom uses to decode your Raw image file and display it in the Develop Module. Different process versions give you different options in the Development Module, with significant improvements in the later versions. The 2003 Process is the most basic, and therefore the fastest. The 2012 Process gives you much more flexibility, but is more resource intensive and forces your computer to work harder.

    Check out this post for more information on process versions.

    The process version setting is in the Camera Calibration section of the Develop Module:
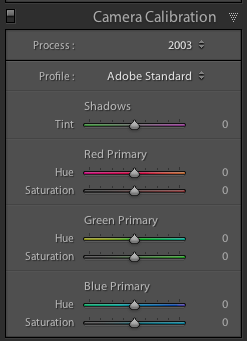
    screenshot showing Lightroom Camera Calibration Settings

    In my own workflow, especially for portrait retouching were I use the Spot Removal tool extensively, I start by changing to the 2003 process, doing only spot removal, and then changing back to the 2012 process for the rest of my edits.

    CAUTION: since the process versions are very different, some controls get zeroed out when you move between process versions. Avoid making adjustments like contrast, tone curve, noise reduction, sharpening, etc while you’re in the 2003 process as you might lose some of those settings when you return to the 2012 process. Just do your spot removal in the 2003 process, and then go back to 2012 process for the rest of your editing work. Doing this at the very beginning of your workflow saves time and makes for a happier, snappier, spot removal experience.

    2. Learn (and use) keyboard shortcuts

    There’s a lot going on in the Lightroom interface. Using just your mouse or trackpad to get from place to place can really slow you down. Use keyboard shortcuts to jump straight to the tool you need.

    Lightroom has a help screen that will show you the keyboard shortcuts for the module you’re currently in. Look under Help > Lightroom Module Shortcuts, or use this keyboard shortcut:

    Mac: CMD /
    Windows: CTRL /
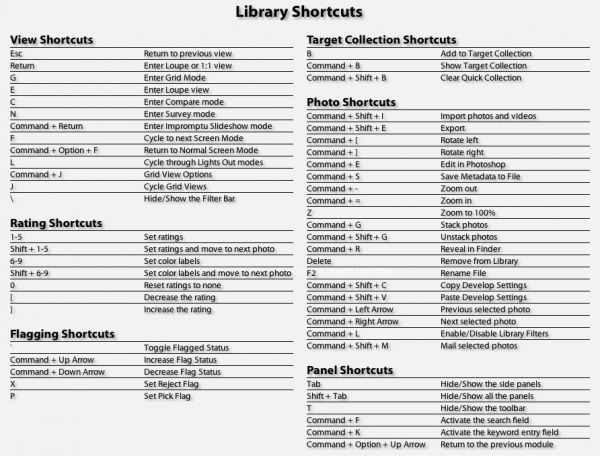
    screenshot of the Lightroom Keyboard Shortcut help screen

    In additional to consulting this screen, I also recommend learning the shortcuts as you go. As you navigate a menu for a certain control, take note of the keyboard shortcut and try to use it next time:
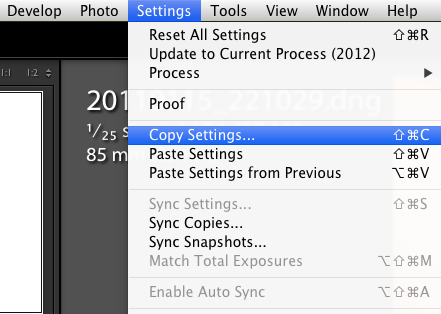
    screenshot showing one of the menus in Lightroom

    “Note to self, press SHIFT CMD C next time!”

    Or when you reach for your mouse to access a tool in the interface, like the crop tool for example, hover over the tool and take note of the keyboard shortcut, then try to remember it for next time.
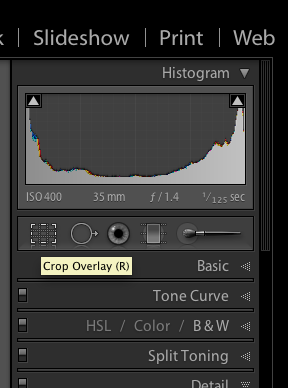
    Screenshot showing a tooltip in Lightroom

    “Note to self, press R next time!”

    This is a good way to teach yourself the keyboard shortcuts that are most useful for you in your own workflow. You’ll be learning them in the order that is most useful for you personally.

    There are lots of keyboard shortcuts in Lightroom, but here are the ones I use the most:

    Changing Modules and Views

    E – Enter Loupe View
    D – Enter Develop Module
    G – Enter Grid View

    Develop Module Shortcuts:

    \ – Toggle before / after view
    Q – Enter Spot Removal Mode
    M – Enter Graduated Filter Mode
    K – Enter Adjustment Brush Mode
    V – Toggle between Black and White and Color
    W – White Balance Selector
    R – Enter Crop Mode
    Shift CMD C (Shift CTRL C on Windows) – copy develop settings
    Shift CMD V (Shift CTRL V on Windows) – past develop settings

    3. Enable Lens Correction at the end of your processing workflow

    Lightroom includes lens profiles for many common lenses. Lens Correction works well to remove distortion and vignetting, especially from wide angle lenses. Sometimes this improves the image, sometimes it doesn’t.

    If you choose to enable lens correction for a particular photo, enable it near the end of your workflow after you’ve made your other adjustments. Many of the controls in Lightroom, especially the Spot Removal tool and the Adjustment Brush, run more slowly with Lens Correction turned on.
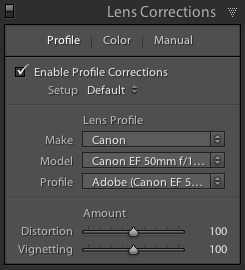
    screenshot showing Lightroom Lens Corrections Settings

    4. Create Develop Presets for commonly used settings

    In addition to using develop presets to quickly apply a desired visual effect, I also use them to reduce the number of mouse clicks required to access certain controls in the GUI, for which there is no keyboard shortcut. This is particularly useful for changing process versions quickly, as mentioned in #1 above, or for toggling lens corrections on or off.
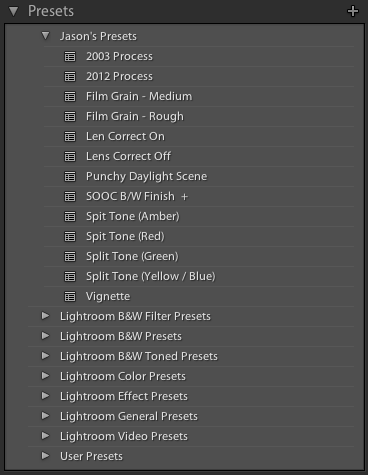
    screenshot showing Lightroom Develop Presets

    I’m basically using develop presets to pull some commonly used controls to the top of the GUI. It’s like creating a custom button.

    To create a Develop Preset:
    1. Apply some settings to a photo in the develop module.
    2. Navigate to the Develop menu and select “New Preset…”
    3. Check the box next to the settings you want captured in the new Develop Preset
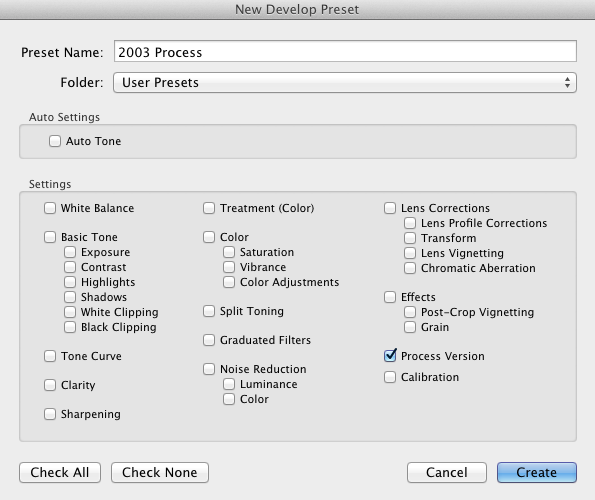
    screenshot showing how to create a Lightroom Develop Preset

    5. Shoot smaller files

    This is not for everyone, and not for every situation, but there are times when you don’t need that full 18, or 22, or 36 megapixel Raw file. Depending on the project at hand, a 10mp file may be more than enough, and shooting smaller files are much faster to work with on the computer. Personally, I have a hard time letting go – when I shoot smaller files I always worry that I’m missing something. But it’s worth considering a smaller file size from time to time. What are you going to do with the photo? If you have a specific usage in mind and you know that you don’t need the full resolution your camera can capture, try shooting a smaller size.

    I hope this article has been helpful, and that you’ve found at least one trick that you can use to get a little faster in Lightroom. Studying and processing your photos improves your creative vision, which over time impacts your shooting decisions. So a solid post-processing workflow is essential to developing yourself as a photographer.

    Post originally from: Digital Photography Tips.

    Check out our more Photography Tips at Photography Tips for Beginners, Portrait Photography Tips and Wedding Photography Tips.

    5 Tips for a Faster Lightroom Workflow


    Digital Photography School
  • Knitting in Reverse: Un-Knitting Machine Unravels Sweaters

    [ By Delana in Gadgets & Geekery & Technology. ]

    For any knitter who has ever looked at an ugly sweater and thought wistfully of all of the projects they could complete with that wasted yarn, the Un-Knitting Machine is a gift from the crafting gods. It was developed by Kingston University design student Imogen Hedges and is meant to salvage miles and miles of perfectly usable yarn.

    According to the designer, her inspiration for the project was twofold. As a child, her grandmother knitted sweaters for her; when she had outgrown them, her mother simply threw them away because she didn’t believe anyone would want a secondhand hand-made sweater. More recently, Imogen discovered that many charity shops spend hours and hours unraveling old sweaters to reclaim the yarn. With this revelation, the designer conceived of a machine to make the process of recycling yarn far simpler.

    The rather minimal machine utilizes an old bicycle frame to spin old yarn out of its previous incarnation and into a re-sellable, reusable heap of material. The user sits on a chair and pedals, spinning the bike wheel and causing the yarn to spool on the side of said wheel. As the yarn is pulled from the old project, it passes through the steam of a kettle which helps to straighten out the kinks and get it ready for a brand new life as something else entirely.


    Want More? Click for Great Related Content on WebUrbanist:

    Mini Rube Goldberg Machine Makes Cool Travel Companion

    A Dutch design studio packs an amazingly complex Rube Goldberg machine into two suitcases, two years after producing the world’s largest room-sized machine.
    1 Comment – Click Here to Read More
    »»


    Don’t Call it Knitting: Olek’s Crazy Crocheted World

    If you see a man in a crocheted ski mask running down the street, don’t worry: it’s not a bank robber, it’s just one of Olek’s performance artists.
    7 Comments – Click Here to Read More »»


    Share on Facebook


    [ By Delana in Gadgets & Geekery & Technology. ]

    [ WebUrbanist | Archives | Galleries | Privacy | TOS ]


    WebUrbanist

  • Timo Maas – Help Me (feat. Kelis) // HD Music Video

    Video conceived and directed by ROJO (François Roland & Josef Baar) for Timo Maas. timomaas.com ? http The end of the world, as seen through the 3D glasses of a lustful teenage comic book geek. LABEL: Perfecto PRODUCTION: Battlecruiser/Harry Nash CINEMATOGRAPHY: David Ungaro SET DESIGN: Marco Bardochan SCULPTURE/MURAL: Mist COMIC BOOK ART: Pascal Valdes FILM EDITING: Frédéric Baudet GRAPHIC DESIGN: Rojo HEAD FLAME ARTIST: Renaud Philipps VFX: Snarx-FX

    Morgan Page In Your Soul with art by RIONX RIONX.DEVIANTART.COM 2006-2010
    Video Rating: 4 / 5

  • Jamie Woon – Blue Truth

    Backstage photosession director of photography Ivan Kvasha model: Alyona Kozlovets
    Video Rating: 4 / 5