Category: Photography

  • What is a Flash Bracket and Why Do You Need One?

    A flash bracket is a device that attaches to your camera and allows you to keep your flash at a greater distance than your built-in or shoe-mounted flash. The result is lighting that is more attractive and consistent. But it comes at the expense of adding quite of a bit of extra bulk to your camera.

    In this day and age of MagMod and other portable lighting modifiers, are flash brackets still relevant for photography? Perhaps. Let’s dig into when and why you might need a flash bracket (or not).

    Camera flash bracket

    Parts of a flash bracket

    Flash brackets typically consist of a metal frame that attaches to the tripod screw on the base of your camera. The top portion of the flash bracket will also have a cold shoe mount for attaching an external lighting source such as a speedlight flash.

    Camera flash bracket

    As a result of your flash no longer being connected to your camera’s hot shoe mount, you’ll have to add an extra accessory to complete your flash bracket setup. You’ll need a flash trigger, which can take the form of a dedicated TTL cord, sync cable, or a wireless radio transmitter.

    Once you put it all together, you’ll have a beast of a camera rig.

    Why use a flash bracket?

    The reasons for needing a flash bracket depend entirely on what kind of photography you do, and the gear that you have. Generally speaking, flash brackets are useful for the following reasons.

    Predictable, consistent lighting

    Flash brackets allow you to have predictable, consistent lighting. This is especially key for event photographers who may need to roam between rooms with differing ambient lighting conditions. A flash bracket can help you achieve consistent lighting no matter the ambient light.

    Among the most common applications for a flash bracket is at a red carpet event. If you look a the photographers working the event, almost all will have a flash bracket of some sort. That’s because they have no control over the ambient lighting at the event and must quickly take horizontal and vertical images of a fast-moving subject.

    Camera flash bracket on a Canon camera

    No need for an assistant

    It holds your flash slightly off camera without the need to physically hold your flash off-camera or use an assistant. Again, this is most useful for event or wedding photographers who may not have an extra set of hands.

    Helps you shoot in a vertical orientation

    If you shoot a vertical image with direct flash attached to your camera’s hot shoe mount,  you might notice that your photo subject has a sideways shadow. You’ll have a similar challenge even when trying to use your flash’s built-in bounce card or a lighting modifier such as the MagMod MagBounce.

    Most speedlights don’t rotate 90 degrees, with the exception of select Sony flashes with the Quick Shift Bounce feature. In order to keep your flash position consistent when shooting horizontal and vertical photos, you need a pivoting flash bracket to help you swivel the flash to always keep it above the camera.

    Camera flash bracket

    Shooting a vertical photo with the flash mounted to your camera’s hot shoe means your flash is at a sideways angle.

    Camera flash bracket

    Resulting image when shooting vertically without a flash bracket. Note the heavy shadow to the subject’s side.

    Camera flash bracket

    Shooting a vertical photo with a flash bracket keeps the flash on top of your lens, allowing for more consistent lighting.

    Camera flash bracket

    Resulting image when using a flash bracket. The side shadow is almost totally eliminated.

    What about bounce flash?

    Bouncing your flash off the ceiling or using the built-in bounce card is a great way to achieve nice lighting. But depending on the type of photography you do, you can’t always guarantee there will be a good surface to bounce your flash. When you need consistent lighting in unpredictable photography environments, a flash bracket could help you out.

    Camera flash bracket

    Shooting a vertical image with a bounce card results in awkward angles when shooting without a flash bracket.

    Camera flash bracket

    Resulting image when shooting without a flash bracket.

    Camera flash bracket

    Shooting a vertical image with a bounce card and a flash bracket results in an image with more balanced lighting.

    Camera flash bracket

    Resulting photo when shooting with a flash bracket.

    Recommended flash brackets

    Flash brackets can range from very simple and inexpensive, to more complex and thus more costly. A straight flash bracket such as this one by Vello will be pretty cheap, costing $ 20 or less. It’s much harder to find a rotating or swiveling flash bracket that will do so smoothly and without adding too much bulk. After much research, I ended up purchasing the model below, used mainly for my red carpet photography shoots.

    Custom Brackets RF-PRO Rapid Fire Flash Bracket

    This flash bracket (Custom Brackets RF-PRO Rapid Fire Flash Bracket) stands out for several reasons. First, it is somewhat thin and compact, especially when folded down. This makes it easy to store and carry with me on location. The layout of the flash bracket is also such that it keeps my speedlight relatively close to my camera body and lens, making for an overall low-profile rig.

    Many other flash brackets such as this option from LimoStudio end up being extremely bulky as they elevate the flash way above the camera. This might be helpful if you need to move your flash around a lot, but it makes for a much bigger footprint.

    Constructed of sturdy aluminum, the Custom Brackets unit is very solid, yet relatively lightweight considering the load that it is meant to carry. And finally, it is one of few flash brackets out there that easily and quickly rotates the flash.

    Camera flash bracket

    So do you need a flash bracket?

    If you have the luxury of setting up lighting and controlling your photography environment, you probably don’t need a flash bracket. However, if you do a lot of on-location photography and don’t always have control over your lighting factors, a flash bracket could help you out, and be a handy addition to your bag.

    Do you use a flash bracket for photography? If so, tell us what brand you use and in what photography scenarios below in the comments areas.

    The post What is a Flash Bracket and Why Do You Need One? appeared first on Digital Photography School.


    Digital Photography School

  • How to Easily Watermark Your Images Using Lightroom

    In this article, I’m going to show you just how easy it is to watermark your images using Lightroom.

    With photography, it’s the simple things which often become the most important. Simple moments like the sun shining through that perfect wisp of cloud and plain objects shot with elementary techniques. Perhaps one of the simplest, and yet at the same time most important, additions you can make to your work is helping to protect it from unwanted uses while at the same time making sure people know who made your wonderful image.

    How to Add Watermarks to Your Images Using Lightroom

    Watermarks and logos (we’ll just use the term “watermark” for this article) help to keep your images from being used without your permission. Of course, nothing is bulletproof in the digital age but adding a watermark to your photos is one of the easiest ways you can impart a little security to your images before you send them out into the world.

    Watermarks in Lightroom

    Watermarks can be added to your images during the exportation process, but the watermarks you make and store in Lightroom are available anytime.

    To access the watermark creation section dialog at any time in Lightroom, from your top menu bar go to Edit > Edit Watermarks (note: on Mac you need to go to Lightroom > Edit Watermarks).

    How to Add Watermarks to Your Images Using Lightroom

    Once in the watermark creation dialog, you have quite a few options for constructing your watermarks. The two main choices will be whether to create a text watermark or to import a graphic from somewhere else on our computer.

    I’ll begin by showing you how to make a simple text watermark (which I use) and then move onto importing a graphic.

    How to Create a Text Watermark

    Making a text-based watermark right in Lightroom is extraordinarily easy. Essentially, all you need to do is type in the box provided and place the watermark where you want it to appear on your image.

    For our example, let’s type in a simple watermark. Make sure the “Text” option is selected as the Watermark Style at the top right of the window.

    How to Add Watermarks to Your Images Using Lightroom

    Next, choose what font, color, style, and orientation you would like to use for the text. The orientation is less of an issue because you will be moving the watermark yourself later.

    How to Add Watermarks to Your Images Using Lightroom

    To shadow or not to shadow? This is just a drop-shadow to make the text appear more three-dimensional and I usually leave this option unchecked. If you choose to add a shadow, there will be some basic positioning and opacity options for you to adjust to suit your tastes.

    How to Add Watermarks to Your Images Using Lightroom

    Add a drop-shadow here.

    Set the size

    Now you will need to decide what size to make the watermark relative to your photo. Generally, keeping the watermark sized proportionately is best but you can also choose to “Fit” or “Fill” the text to the photo. Usually, the “Fill” option will be seldom used as it obnoxiously enlarges the watermark.

    How to Add Watermarks to Your Images Using Lightroom

    The Fill option is a bit too in your face.

    Position the watermark

    The “Inset” sliders control how far inside the frame the watermark will be positioned. I’ve found this is best left until the end so we’ll adjust this later.

    How to Add Watermarks to Your Images Using Lightroom

    The final set of options in the watermark dialog is the anchor point selection.

    set the anchor points - How to Add Watermarks to Your Images Using Lightroom

    Picture that center dot as being the middle of your photo. You can choose whichever location you prefer but I like to position my watermarks in the bottom right corner and also vertically orient them. Use the arrows to rotate your watermark.

    How to Add Watermarks to Your Images Using Lightroom

    Watermark rotated and placed in the lower right corner.

    Before you save your new watermark, I want you to adjust the inset just a tad vertically to move it back from the edge of the image. This is where those inset sliders from earlier come into play.

    Now is the time to make some final tweaks to the size and opacity of the watermark once it is fully positioned.

    How to Add Watermarks to Your Images Using Lightroom

    To save this for use later (more on this shortly) simply click “Save” and give your freshly-minted watermark a name.

    How to Add Watermarks to Your Images Using Lightroom

    How to Create a Graphic Watermark

    You might not believe it, but using your own graphical watermark is just as easy as making its textual counterpart. To start, simply select the “Graphic” option at the top of the watermark dialog box.

    How to Add Watermarks to Your Images Using Lightroom

    Next, click “Choose…” and find the graphic you want to use on your computer. Keep in mind it will need to be either in a JPG or PNG file format.

    For this tutorial, I made a quick 3D watermark in Photoshop. Once you’ve selected the file you want to use, Lightroom will do the rest. This is my graphic before it was nested into the image.

    How to Add Watermarks to Your Images Using Lightroom - 3d graphic

    And here it is after it has been placed and positioned. The text left in the box will have no effect since the Graphic Watermark option is selected.

    How to Add Watermarks to Your Images Using Lightroom

    From here you have many of the same options for opacity, positioning, and sizing as you did for the text watermark. Saving the graphic watermark is done exactly the same way as you saved the text watermark as well.

    How to Apply Your Watermark During Export

    Now that you know how to create and save your watermarks in Lightroom, it’s time to stick them onto your images during export which is also super easy.

    Open the Export dialog box by choosing File > Export. Near the very bottom of the dialog box in the right-hand box, you’ll see the Watermarking drop-down menu.

    Select the watermark you would like to apply. In this case, add the graphical watermark you saved earlier.

    How to Add Watermarks to Your Images Using Lightroom

    Click export and your image will be exported with your watermark lovingly placed!

    Final Thoughts on Making Watermarks in Lightroom

    Watermarks are a great way to sign and protect your photographs. While there are no real rules for applying your watermarks, I would urge you to adhere to the “less is more” mentality. Do not plaster your watermark obtrusively over your images like most of the samples in this tutorial, which were done for demonstration purposes only.

    Make your photo the center of attention with your watermark as more of an afterthought. That being said, feel free to experiment with your own creative watermarks. As you’ve just seen, they are incredibly easy to apply in Lightroom.

    The post How to Easily Watermark Your Images Using Lightroom appeared first on Digital Photography School.


    Digital Photography School

  • Tips for Photographing Real Estate Interiors

    In this article, we’ll address the challenges you may face when photographing real estate interiors and a few ways to combat the issues. Shooting bracketed images is the most common and effective way to handle high contrast interiors. Read on below for tips on how to shoot and process interiors.

    The problem

    Most real estate photographers have entered a room at some stage in their career and thought, “Ah… a dark room with a bright window. Just what I do NOT need!”

    Using straightforward post-production techniques to fix either over or underexposed parts of a photograph is practically impossible. So walking into this kind of scene can make your heart sink. The good news is that it’s not so hard to get around the problem posed by these scenes once you are equipped with the right techniques.

    Achieving a well-exposed photograph of a dark room with a bright window initially seems impossible. Expose for the interior and the windows are blown out. Expose for the windows and the darker parts of the room are plunged into shadow.

    Photo exposed for the interior (1/4 second at f/8), notice the windows are overly bright.

    The difference between the brightest and darkest areas, known as dynamic range, is just too great. This is a High Dynamic Range scene, or HDR for short.

    Photo exposed for the windows (1/125th at f/8), now you can see the inside is almost completely black.

    Our eyes cope with HDR scenes by adjusting the size of our pupils, letting in more or less light as we encounter darker or brighter areas. The brain balances it all out and everything seems well lit.

    Unfortunately, when it comes to a dark interior with a bright view, even the best DSLR cameras can’t capture the entire brightness range with a single exposure.

    Photo at normal exposure (1/30th at f/8), here you can see some areas are too dark, and the windows are too bright. The camera cannot hold detail in the entire scene, the contrast is too great.

    There are two ways you can resolve this issue

    1. You can add light to brighten the room and reduce the dynamic range.
    2. You can take multiple exposures and combine them using software to emulate what our eyes and brain do.

    Adding light

    To brighten the room, you’ll generally need to supply extra lighting. Just turning on all the available lights is unlikely to solve the problem.

    One option is to bring along portable lighting. However, this is another skill to master, another thing to carry, and even though the cost of lighting is falling it’s still another expense. You may also need to bring an extension cable, and hope that the property has power.

    You could also use professional flash units, mounted off-camera and triggered remotely. The term professional is important here because less powerful flash units rarely deliver enough light to solve this particular problem.

    Effective use of flash units also requires skill. You’ll probably need several flashguns, and the knowledge of which units to use and where to put them. Again, it’s more expense and a lot more kit to carry, especially when you include stands for the units too.

    Taking multiple exposures

    So what about multiple exposure approaches? One method is the Photoshop approach where you take only two photographs, one correctly exposed for the room and one for the windows, and open them in separate layers in Photoshop.

    Once you have manually aligned the two layers (using the Difference blending mode to guide you, zooming in may help as well), with the darker image on the bottom, you then select the blown-out windows on the top layer (the image exposed for the inside of the room). Using a layer mask, make the window areas transparent, and the properly exposed windows in the second shot will show through from underneath.

    Unfortunately, this approach rarely results in a convincing and realistic looking image, as two exposures are not enough to cover the entire range of brightness that our eyes perceive. Additionally, the photo exposed for the window will underexpose the window frame and any ornaments on the windowsill, making them look darker than they should be.

    A more effective approach involves taking multiple exposures to capture different lighting levels (bracketed photographs) and using HDR software to merge them into an image that’s well-exposed throughout. Shadows are corrected without additional lighting, and bright areas are pulled back without appearing artificial.

    Bracketing is very popular with real estate photographers because it overcomes the problems associated with the alternative approaches. All without the cost and inconvenience of more equipment on location – except for one good quality tripod!

    Bracketing exposures

    Correctly capturing the exposures is key to obtaining the best results with this approach. So let’s look more closely at how professionals do this when photographing real estate interiors so that you can master it yourself.

    Essentially, you take a series of identical shots at the same aperture – but using different shutter speeds. A constant aperture keeps the depth of field the same while changing the exposure allows you to capture well-exposed images for all the different lighting levels in the scene.

    It is called exposure bracketing because the varying exposure settings are “bracketed” between the slowest and fastest shutter speeds needed.

    The Automatic Exposure Bracketing (AEB) function, built into most DSLR and mirrorless cameras, greatly simplifies the process, allowing you to take three or more bracketed exposures with just one shutter release.

    In many situations, especially outdoors, it will also save you having to use a tripod. Any camera movements during shooting (inevitable in hand-held shots) are small enough that software with robust alignment features can automatically correct them.

    Camera settings

    You start the AEB setup by selecting Aperture Priority (Av) mode.

    The rest varies between camera models, but typically involves three steps: selecting AEB and continuous shooting mode, choosing the number of bracketed frames, and choosing the number of EV steps between each shot.

    Your camera’s user manual will cover the steps needed for your model.


    Exposure bracketing techniques for interiors

    Lighting differences in an interior scene with views through the windows are so great, that taking bracketed exposures may involve more than just setting up AEB and taking the shots, especially when you want the highest quality results.

    The main problem comes from the camera’s choice of shutter speed for the baseline or “normal” exposure (0 EV). Bright light through a window can influence a camera’s automatic exposure, resulting in a photo set that is skewed towards underexposure.

    Another problem is that capturing the scene could demand more exposures than your camera’s AEB provides. Also, since a low ISO is best to minimize noise in the shadows, you may need quite long exposures. Without a tripod, that will result in blurred images that could ruin the shot.

    Quick technique

    Even though exposure bracketing is more involved when photographing interiors with window views, you can use a relatively quick technique when the lighting differences aren’t too great and your camera offers a broad AEB exposure range. This is how it works.

    After selecting Aperture Priority (Av) mode, point the camera at an area of the room that is neither too dark nor too bright, just ‘average’, and well away from the windows.

    Note that the shutter speed when the camera is pointed at the sofa is 1/10th.

    Take note of the shutter speed your camera displays for that area. Then switch to Manual mode, make sure the shutter speed is the one you noted, activate the AEB function and take the photos.

    While this will certainly be better than a single exposure, you lack control with this technique and you can’t always select the right number of photographs to be taken.

    Advanced bracketing technique

    When you want to maximize output quality, use this advanced bracketing exposure technique to ensure that you take all the exposures needed to cover the entire lighting range. This gives you far more control, although it takes a little longer and the process is slightly more complex.

    This video steps you through the technique, from camera setup to determining what exposures to use, through to taking the photos themselves.

    One of the main advantages of this technique is that it establishes precise shutter speeds that match the maximum levels of darkness and brightness in the room. It does this by determining the shutter speeds for both extremes of the lighting range.

    This is important because misjudging the correct exposure for the darkest areas can result in an image where the interior isn’t bright enough. While failing to capture the brightest areas results in washed-out looking windows.

    How to find the shutter speed for both extremes

    You can choose between two methods to find the shutter speeds for the darkest and brightest parts of the scene:

    • Spot Metering method.
    • Histogram check method.

    Spot metering method

    This is the quickest way to find your needed shutter speeds. Start by selecting Aperture priority, or Av mode, then choose the Spot Metering option from the camera menu.

    Spot Metering mode.

    Find the longest shutter speed by focusing on the darkest part of the room. While watching the exposure meter in the camera’s viewfinder, adjust the shutter speed until the camera shows it to be the best exposure for that part of the room. Make a note of the recommended shutter speed.

    Find the shortest shutter speed by focusing on the brightest part of the room, and repeat the process to find the best shutter speed. Again, note the recommended speed.

    Histogram method

    The second method to determine the two shutter speeds is more precise and works like this:

    • Set the camera’s LCD screen or image preview to display the brightness histogram.
    • Take a test shot of the darkest area of the room, then examine the histogram.
    • If the left side of the histogram shows a vertical line at the start of the graph, then there are dark areas you’ve not yet captured.
    • Take another shot with a longer shutter speed and repeat the process until the histogram trails off to a flat line on the left. When you see that, you’ve identified the slowest shutter speed needed.

    • Now take a test shot of the brightest part of the room, and again examine the histogram.
    • This time look for a vertical line on the right of the histogram. If you see one, then you’ve not yet captured the brightest parts of the scene.
    • Keep taking shorter exposures, checking the histogram after each one until it shows a flat line to the right of the graph. When you see that, you know the shortest shutter needed.

    Many DSLR cameras have a feature that shows overexposed parts of an image. When activated, the highlight warning system makes overexposed areas blink or flash when viewed on the LCD screen. If you see this, increase the shutter speed until the blinking areas stop flashing.

    How to bracket your exposures

    Once you know these two shutter speeds you can use them in two different ways – one that uses the camera’s built-in Auto Exposure Bracketing (AEB) option, and one that does not.

    The full manual method

    • Switch the camera to Manual mode
    • Set the shutter speed to the shortest of your measured shutter speeds and take a photograph.
    • Decrease the shutter speed by one stop (EV) and take the next photograph.
    • Keep reducing the shutter speed by one (EV) stop for each photograph until you reach the longest of the two shutter speeds you measured.

    The semi-automated method

    • Open the HDR Exposures Calculator app from HDRsoft.
    • Enter the shortest and longest shutter speeds into the app.
    • Select the maximum number of bracketed frame your camera supports.
    • Select an EV Spacing of 2 if your camera supports it, otherwise go with the highest EV spacing it offers, then click “Get Exposures”.
    • Follow the instructions given by the HDR Exposures Calculator, making sure you have set the camera to AEB mode and selected Continuous Shooting mode before taking a bracketed set.

    Additional tips to take the photos

    You now know how to measure the longest and shortest exposures you will need, and how to set up your camera to take all exposures between them. Correct technique is important too, so here are some steps to follow to make sure you get good results.

    1. Securely mount the camera on a tripod, and ensure the camera is level.
    2. If the camera is mounted on a tripod, switch off Auto Image Stabilization.
    3. Set the built-in flash to Off if your camera has one.
    4. Attach a remote shutter release to reduce the risk of blur.
    5. Select Manual mode and set an aperture suitable for the lighting and depth of field required.
    6. Set the ISO value, 100 is ideal. Digital noise (the electronic equivalent of grain) increases as the ISO value increases, so keep it as low as possible. Try not to go beyond ISO 400.
    7. Determine the shutter speed required to best expose the darkest part of the room and the shutter speed to best expose the brightest part. See the section above on finding the shutter speeds for both extremes.
    8. Take the exposure bracketed photos as detailed in the previous section.

    Once you’ve returned from the shoot, process the images in HDR software. There are various photo applications that can merge multiple exposures to HDR. Photomatix Pro is the first choice among many real estate photographers because it offers presets optimized for interiors, achieving the natural look they strive for.

    Using Photomatix Pro with real estate interiors

    Photomatix Pro is designed to be easy to use, so you should get comfortable using it pretty quickly.  Here are a few tips to help you get the best out of it for your interior photographs.

    Check the Align Source Images option with On Tripod selected (even when you use a tripod, there can be some small camera movement between shots).

    Don’t activate the option to remove ghosts. This is important in real estate images as adjusting for ghosting when there isn’t any reduces image quality. If you absolutely must use de-ghosting, for example, because something moved outside a window, be sure to use the selective de-ghosting option, so it can be applied to just the affected window.

    When you adjust the merged HDR image, use the drop-down list above the preset thumbnails to show just those related to the Architecture style (or “Real-estate” depending on your Photomatix version).

    Lastly, you can use the Finishing Touch panel’s straightening tool to correct sloping floors or walls that aren’t upright. Finally, use the cropping tool to remove edge areas of the photo affected by wide-angle lens distortion or chromatic aberration.

    Conclusion

    Although getting good photographs of real estate interiors can seem daunting, particularly when bright windows are involved, the right techniques and software make it is achievable without bulky, expensive equipment.

    The main points to remember are:

    • Exposure bracketing is the key technique.
    • For simple scenarios, you can bracket based on an average exposure.
    • For other situations, work out the brightest and darkest exposure along with the shots in between.
    • Spot metering or the histogram can help you determine these exposures.
    • You can take the exposures manually, or using AEB and the HDR Exposures Calculator app.

    Do you have any questions you’d like to ask about the tips in the article and taking bracketed exposures of interiors? If you do, please let us know in the comments below. If you have any tips of your own, you’re welcome to share them too.

    Disclaimer: HDRsoft is a paid partner of dPS

    The post Tips for Photographing Real Estate Interiors appeared first on Digital Photography School.


    Digital Photography School

  • 5 Ways to Challenge Yourself as a Wildlife Photographer

    As a wildlife photographer, often it can seem challenging enough just to find your subjects out in the field, let alone get close enough to take that perfect image. However, to develop as a photographer, constantly challenging yourself is a key ingredient to learning and growing, helping you to tell stories in a more meaningful and creative way through your images.

    In this article, I will give you a few ideas to explore when you next head out on a nature photography shoot, to keep you challenged and growing as a photographer.

    1 – Take one lens

    One lens - wildlife photographer

    Restricting yourself is often a great way to encourage creativity. Working with constraints can help you to think outside the box and explore ideas or ways of working that you might have missed in other cases. As photographers, having a boatload of lenses at our disposal means we have options to capture the world in a multitude of ways. Yet still, within this, we often become restricted within our view, choosing to consistently work with convention rather than explore creative options.

    For example, if you are going to work with birds you will likely select your long telephoto, whereas, for insects or flowers, the obvious choice is a macro lens. However, if you decide to restrict yourself to a certain lens or focal length you have to use that in order to explore and create a photograph. That means that sometimes you’ll have to work in a new way, choose a different composition, or go for a different type of image than you would normally attempt.

    For example, taking a macro lens out for a full day of shooting you might feel restricted. But the 100mm focal length (common for most macro lenses) is actually highly adaptable for working with a variety of subjects from landscapes to tiny insects, or even people and street images. Prime lenses further enhance this restriction, forcing you to zoom with your feet.

    However, after a number of days solely focused on each lens in your bag, you’ll have a much greater appreciation for the wide variety of subjects and images it can produce. Thus helping you to be more creative with your choices in the future.

    2 – Work wide

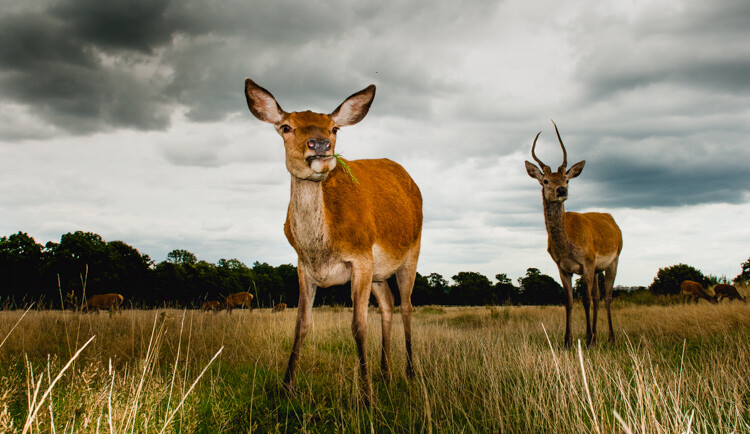
    Shooting wide two deer in a field - wildlife photographer

    For most wildlife photographers, the long telephoto is our safe haven. We know that when using a 300mm, 500mm or 600mm lens we can frame up our subjects and get wonderful clean portrait images. Allowing us to concentrate on our subjects and not necessarily needing to worry about the other elements in the landscape.

    The thing is that, although telephotos are fantastic for filling the frame and showing close details of distant creatures, they don’t give an impression of scale. Images show with a long lens almost seem less immersive than shots taken with shorter focal lengths.

    Of course, one of the biggest problems is that shooting wildlife with a wide lens is often a lot harder, (depending on the subject) than your traditional long lens wildlife photography. But this is a great learning curve. Yes, the complexities of predicting animal behavior, working out positioning for remote cameras and triggering them at the perfect time without always being able to look through the viewfinder is difficult. But the struggles will certainly push you to be a better wildlife photographer in the long run.

    Try working with a wireless remote in the garden to get started. A simple bird feeder or setup for urban mammals is a great way to hone your skills, to add another string to your photographic bow.

    Remote camera triggers - wildlife photographer

    Remote camera setup

    Remote triggered wideangle

    Remote-triggered wide-angle shot.

    3 – Add movement

    Often, I hear wildlife photographers talking about always getting the image tack sharp. But in reality, how much in nature ever freezes dead still? Adding motion to your images is a great way to explore and develop your shooting style, adding drama to images and also helping the wildlife you’re recording to come alive in your frames.

    When working in the field it can be tempting to always have that 1/1000 of a second shutter speed dialed in. Learning how and when to slow your shutter to display movement is a great skill, but it takes practice to get it right.

    Often I find that for large moving creatures, such as deer, a shutter speed of 1/15th of a second allows enough movement into the frame to make great panning shots. In contrast, birds with their fast-moving nature mean that often 1/100th or 1/60th easily provides enough movement within the frame for lovely streaking effects.

    a deer running - wildlife photographer

    Birds in flight - wildlife photographer

    Of course, in addition to panning with slow shutter speeds, keeping your camera dead steady and allowing the creatures to move is another effective technique for creating unique and captivating images of nature’s patterns and movements.

    4 – Pick a theme and stick to it

    Another way to challenge yourself as a nature photographer is to set yourself a theme to work on. This could be a practical theme like birds in flight, animal portraits, or in the landscape images. Another option is exploring a certain location or place with a geographical theme or even delving a little deeper to explore emotions or feelings as a base for a set of images.

    The reason for shooting around a theme is to train yourself how to showcase and express your ideas through images more effectively. As a photographer, you are a visual storyteller. So being able to draw from inspirations, ideas, and emotions and express them photographically helps you to tell better and more powerful stories through your images.

    Aim to develop a couple of small bodies of work, maybe three sets of three images, each with a different focus as a training exercise. It’s a great way to focus on areas where you’re less confident and give yourself a mini-assignment to develop and shoot to keep you focused on improving your work.

    Shooting a set of images (3 images of deer)

    5 – Shoot like you have one roll of film

    A final way to challenge yourself is to go out on a shoot and pretend that you only have 36 images or a single roll of film. This is to force yourself to be more critical and picky with your images, choosing the perfect moment to get a shot rather than just taking a number to be sure one will be okay.

    Shooting with a limit slows you down and makes you consider things more intently, thinking through your exposure, composition, and technique before shooting. The idea is that you only shoot one frame per subject, aiming to get it perfect on every image.

    You can do this even more strictly by getting hold of an old school 1gb or 2GB memory card, the modern equivalent of a single roll of film. You can pick them up cheap on eBay and they are great training aids.

    Small SD and film

    Of course, if you want even more of a challenge why not try shooting an actual roll of film. With each frame literally costing you money, you will soon focus your shooting in order to make sure you nail it out on location. It’s good fun and a really great learning tool!

    Conclusion

    So there you have it, a quick rundown of five ways to challenge yourself as a nature or wildlife photographer to help develop your photography.

    By focusing on specific challenges and setting yourself goals and tasks, you’ll certainly see your photography improve. As well, you will have more confidence going for those creative images when you’re on your next shoot.

    The post 5 Ways to Challenge Yourself as a Wildlife Photographer appeared first on Digital Photography School.


    Digital Photography School

  • How to Simulate Venetian Blinds Lighting Using Photoshop

    When you’re having a romantic dinner you light it with candles and not a bright reflector, right? That’s because light contributes to forming an atmosphere. When you’re making a photograph, measuring the right exposure is not the only thing that matters. Wouldn’t you agree that manipulating that light is what makes it or break it?

    In this tutorial, I’ll show you how to simulate light coming in through a window, so that your photo has a warmer ambiance.

    Venetian Blinds Lighting Effect Photoshop Tutorial Intro

    Getting started

    In this case, we’re going to make the effect of sunlight passing through a window with Venetian blinds. This is why the first thing you need to do is delineate the spacing in between the blinds. To make this task easier you can turn on the rulers, just go to Menu > View > Rulers so you can make the spaces more evenly.

    Make a new empty layer by going to Menu > Layer > New Layer. Then select the Rectangle Marquee Tool and start tracing. They don’t have to be perfect just try to keep more or less the same width and the same spacing in between. The amount is up to you, for this example, I’ll do 8.

    NOTE: Hold the Shift key down to add multiple rectangular selections.

    Marquee Selection Venetian Blinds Through Window Light Photoshop Tutorial

    Adding the light

    Next, you need to fill the selections with white. You can either select the Paint Bucket Tool and click inside each of the rectangles, or you can go to Menu > Edit > Fill which will bring out a pop-up window. Just make sure the content is set to white and all the selected areas get colored at once when you click OK.

    Edit Fill Venetian Blinds Through Window Light Photoshop Tutorial jpg

    This doesn’t look very realistic yet, but don’t worry, we’ll make it better. To start, you need to give it some perspective to make it fit your image. For this, you can go to Menu > Edit > Transform > Perspective. Find the real light source and make the light (the white bars) smaller on that side. Then turn it and drag it until it feels as if the strips are coming out from that source.

    Free Transform Venetian Blinds Through Window Light Photoshop Tutorial jpg

    Tweak the light beams

    Once it fits you need to make the white bars look more like light beams by smoothing them using a blur filter. Go to Menu > Filter > Blur > Gaussian Blur.

    A pop-up window appears and you can set how blurred you want it by dragging the Radius slider. Make sure the preview option is checked so that you can see how your adjustment looks before you apply it. I’m leaving it at around 50 pixels but this is up to you. When you’re happy just click OK.

    Gaussian Blur Venetian Blinds Through Window Light Photoshop Tutorial jpg

    Then change the blending mode of the layer where your stripes are so that it integrates better with the background image. You can do this in the drop-down menu on top of the layers panel. Open it and select Soft Light blend mode.

    SoftLigh Blend Mode Venetian Blinds Through Window Light Photoshop Tutorial

    Apply a gradient

    It’s already looking much better, there’s just one final touch that needs to be done. Because the light will obviously be stronger closer to the source and slowly fade away; you need to apply a gradient to achieve this effect.

    Add a Layer Mask by clicking on the button that looks like a rectangle with a circle in the middle, located at the bottom of the layers panel. While the mask is selected, go to the Gradient Tool that is hidden behind the Paint Bucket Tool. Then from the top sub-menu, choose the one that goes from black to transparent.

    Apply the gradient by dragging your mouse across your image. Follow the lines and make sure the white part of the gradient is at the end of the image where you want the light the brightest. If it’s not, you can just invert the layer mask, or undo it and try again.

    Graded Layer Mask Venetian Blinds Through Window Light Photoshop Tutorial jpg

    Finishing up

    There you go, light passing through Venetian blinds from the window onto your subject without even needing a window!

    Venetian Blinds Lighting Effect Photoshop Tutorial After

    Applying the effect to the background only

    This, of course, works if your subject is lit by the same source as the background, but what happens if you have two different light sources? Let’s do an example where we want only the background to receive the light from the window and the subject will be lit by a different light source.

    Venetian Blinds Lighting Effect Photoshop Tutorial Before2

    Start by doing exactly the same as you did in the previous example. When you’re done with that you have to add one more step. Duplicate the subject that you want to be in front of the Venetian blinds lighting effect.

    You do this by selecting the object. It doesn’t matter which tool you use. In this case, I used a combination of the Quick Selection tool refined later in the Quick Mask. Once you have your selection go to Menu > Layer > New > Layer via Copy. A new layer will be created duplicating the subject that you selected onto an empty background; drag this layer to the top.

    Venetian Blinds Lighting Effect Photoshop Tutorial Duplicate Layer

    That’s it, your subject will be in front of the lighting effect and therefore won’t be affected by it. Give it a try and show us your results in the comment section below.

    Venetian Blinds Lighting Effect Photoshop Tutorial After2

    The post How to Simulate Venetian Blinds Lighting Using Photoshop appeared first on Digital Photography School.


    Digital Photography School

  • Five Simple Exercises to Improve your Photography

    In this article, you will get five simple exercises to help you improve your photography.

    How to grow as a photographer

    Everyone, from beginners to professionals, seeks to improve their photography. Yet we often struggle to do just that, repeatedly asking the question, “How do I actively move my photography forward?

    macro photography flower - Five Simple Exercises to Improve your Photography

    Learning to take top-notch photographs isn’t like learning a musical instrument, where you can practice fingerings and scales while slowly gaining skills. When it comes to improving photography, the path often seems nebulous, difficult to grasp.

    It doesn’t have to be this way. There are more focused ways of improving your photography. Below, I discuss five of these exercises, which, if done consistently, will help you improve your photography by leaps and bounds.

    Exercise #1: Photograph every day for a month

    The first exercise is simple; photograph every day. This may sound easy, but it often isn’t. With a job and family and life, it’s surprisingly difficult to get out and do photography.

    But I’d like to emphasize this, if you’re serious about improving your photography, start here. Make sure that you use your camera each day, even if you only take one image. Carve out a particular time of the day that works. Or, if it’s easier for you, carry a camera around in your purse/backpack/briefcase, and bring it out during your lunch break.

    macro photography flower abstract - Five Simple Exercises to Improve your Photography

    I’ve found that there’s a sort of magic that comes from photographing—not just consistently—but daily. Your camera becomes a familiar tool in your hands. You start to see compositions everywhere. The photographic medium starts to make sense.

    Trust me, if you do this your work will improve fast.

    Exercise #2: Make 10 unique images of one subject

    One of the main barriers to photographic improvement is not the technique so much as it is the ability to see.

    A great photographer often views a subject and starts to visualize the many possibilities, quickly rejecting those which won’t work, and selecting that which does.

    macro photography flower abstract aster - Five Simple Exercises to Improve your Photography

    Hence, choose a subject and start by taking the obvious photographs.

    Then, rather than moving on, force yourself to look for more. Get in close and take some more abstract or detail shots. Move back and look for more environmental images. Alter the background, the angle, and/or the lighting. If you normally use a tripod, try working handheld, or vice versa.

    macro photography flower aster abstract - Five Simple Exercises to Improve your Photography

    This exercise is meant to improve your ability to see. It is meant to take you out of your comfort zone so that you go beyond the obvious, and start looking deeper at your subject. Once that is ingrained, the photographic possibilities begin to open up, and your images will become unique and more satisfying.

    macro photography flower abstract aster - Five Simple Exercises to Improve your Photography

    Exercise #3: Share only one image per week

    Let me explain this one. Part of improving one’s photography involves becoming a better self-critic. If you cannot recognize where you need to improve, then it’s very difficult to improve at all. But if you can pinpoint your strengths and your weaknesses, then you can improve upon the weaknesses—and harness your strengths.

    To this end, I recommend joining a photo sharing site, one that is geared towards photography. Flickr, 500PX, and Tumblr would work well (or the dPS Facebook group). Then post one, and only one, image per week. Make sure that you’ve looked through your recent work, and that the image that you’re sharing is your best.

    Before posting, think to yourself, “What is it that makes this a strong image? What would make it better? And what was it that made me reject the other images in favor of this one?” Take note of your responses, and remember them the next time you’re out in the field.

    macro photography flower coneflower - Five Simple Exercises to Improve your Photography

    So why can’t you just do this privately, rather than posting to a photo sharing site?

    I find that there’s a bit of pressure that comes from posting your pictures publicly. This forces you to work slightly harder in identifying your best images. However, if you would strongly prefer not to post your images publicly, you could adjust the settings on your chosen sharing site so that only you can view the images—but imagine that you’re assembling them for a gallery showing.

    Exercise #4: Critique at least 10 images per week

    Similar to Exercise #3, but with a slightly different focus. Learning to critique your own work is great, but it’s also important to look at a broad array of photography with a critical eye. Hence, join a photo critique forum, and critique at least 10 images per week.

    There are a number of forums out there that I recommend for nature photographers like myself: Naturescapes, Nature Photographers Network, and Birdphotographers.net are all good ones. They should allow you to make a free account in order to comment on other images.

    macro photography flower abstract pink - Five Simple Exercises to Improve your Photography

    This will help you in a few ways. First, constantly looking at images will help you to internalize compositions and get a sense of what works and what doesn’t. It’s difficult to improve your own photography if you don’t have a sense of what good photography looks like.

    Second, it may give you ideas for your own photography. By this, I don’t mean that you copy other people’s photographs directly. But you can take note of interesting techniques, camera settings, and compositions, and incorporate them into your own work.

    Third, being forced to articulate, in writing, what you find pleasing about an image will go a long way toward being able to understand how to make your own images more pleasing.

    Notice that I’m not telling you to post your images on the critique forum—but if you feel confident enough to do so, then that is an excellent way to improve as well.

    Exercise #5: Work in another genre of photography

    This exercise is for those who would self-identify as intermediate or advanced photographers. Early on in your photographic journey, I would recommend focusing on a single genre and improving within that genre.

    street photography ann arbor nickels arcade - Five Simple Exercises to Improve your Photography

    I took a break from macro photography to work on my street photography skills.

    However, once you have a decent amount of experience, I find that it is really beneficial to get out of your comfort zone by working on another photographic genre (the more different, the better!). Stick with this genre for an entire month.

    street photography ann arbor - Five Simple Exercises to Improve your Photography

    This forces you to expand your photographic eye and think in new ways. It can often generate unique ideas that you can apply to your primary area of photography. And when the month is up and you switch back to your favored type of photography, you’ll likely find that you’ll be seeing the world in a whole new light.

    ann arbor street photography - Five Simple Exercises to Improve your Photography

    In conclusion…

    If you’re seeking to improve your photography, follow the exercises discussed above.

    If you photograph every day, focus on expanding your photographic eye, look at numerous images and learn to critique your own, and expand your photographic horizons—you will soon be on your way to a higher level of photography. I wish you the best of luck!

    macro photography flower abstract tulip - Five Simple Exercises to Improve your Photography

    Have any exercises that you’ve found useful for photographic improvement? Share them in the comments!

    The post Five Simple Exercises to Improve your Photography appeared first on Digital Photography School.


    Digital Photography School

  • Review of the Lensbaby Burnside 35 Special Effects Lens

    Review of the Lensbaby Burnside 35 Special Effects Lens

    A Lensbaby lens is a dream come true for artistic, creative, and ground-breaking photographers. A company made famous by their innovative effect lenses and optics, Lensbaby has captivated the industry for nearly 14 years. This company’s newest pride and joy is the Lensbaby Burnside 35, an f/2.8 lens that is unlike any other in their arsenal.

    Swirly Bokeh

    The Burnside 35 features the iconic “swirly bokeh” that Lensbaby is famous for. This effect is seemingly influenced by the Petzval objective which causes a swirly bokeh and vignette, and it is created by pairing two doublet lenses with an aperture stop in between.

    The first lens corrects spherical aberrations and the second lens corrects for astigmatism. However, the pairing creates the swirly distortion that we all love.

    You can adjust the intensity of the swirly bokeh by changing the aperture: f/2.8 will be most intense, while something like an f/16 won’t have any swirl at all. The thing that I find most compelling about Lensbaby is the fact that all of the effects are in-camera/in-lens, hence saving you a lot of time on the editing front.

    Review of the Lensbaby Burnside 35 Special Effects Lens

    Built-in vignetting

    I was very intrigued to stumble upon this lens, as it has a feature I have never before seen in any other – a built-in vignette slider. Instead of needing to darken the edges of your photograph in post-processing, you can do an in-camera effect and save yourself the editing trouble.

    Review of the Lensbaby Burnside 35 Special Effects Lens

    Review of the Lensbaby Burnside 35 Special Effects Lens

    It’s a manual lens

    That being said, much like other lenses in the Lensbaby collection, this one is fully manual. The aperture is adjusted by rotating the aperture cuff at the very back of the lens rather than in the camera as is common for other lenses. The vignette slider is located near the cuff on the opposite side of the lens.

    When rotating either the vignette slider or the aperture ring, you can feel each stop as there feels to be a minor indent that pops into place – a welcome feeling when wanting to make quick adjustments without looking up from the lens.

    Review of the Lensbaby Burnside 35 Special Effects Lens

    The focus is also manual, which may cause a bit of a learning curve for photographers that rely heavily on autofocus. However, I found that it was rather easy to see when the focus was captured or not and I was able to become proficient in a matter of a half hour.

    Keeping the fully manual aspect of the lens in mind, this may not be the right piece of equipment for fast-paced action shooting. That being said, the artistic look of Lensbaby Burnside 35 can even make out of focus images look intentionally fuzzy (although any stylistic choice should look intentional, not as a mistake).

    Review of the Lensbaby Burnside 35 Special Effects Lens

    Build

    The lens’s build feels incredibly sturdy (it’s made of metal) and it is visually striking. Though I’d consider the lens fairly light in comparison to other 35mm lenses, it is still a significant weight that adds to the impression of a very sturdy build.

    The lens does not come with a case, and I’d highly recommend one. Despite a sturdy build, a good bump could crack something, and that’s not a risk worth taking.

    The metal front lens cap is easy to slide on and off but holds very tight when it’s on; exactly how you’d want it to be. The rear mounting cap is equivalent to all the ones I’ve seen from other lenses. The box comes with a user guide with tips and tricks on how to get the most out of your lens, a welcome addition to any lens purchase.

    Review of the Lensbaby Burnside 35 Special Effects Lens

    The vignette slider in action

    The vignette slider makes a significant, visual difference in the image. It’s great to be able to see right-off-the-bat how the image will look at the various vignette stops. As well, from a purely aesthetic perspective, it can be rather fun to watch the vignette open and close on the glass itself – it’s a bit like a reptilian creature blinking.

    Do keep in mind that the frame will darken significantly when the vignette slider is set at its most closed point. As such, I actually found myself using the vignette slider almost like a neutral density filter to bring out the colors of a very bright sky.

    The versatility of this lens is also notable enough to bring up. You are certainly not obligated to photograph at a low aperture number and a shallow depth of field, when bumping the aperture up to f/16, architectural photographs are exceptional at the 35mm focal length. Add the vignette slider and you have a dramatic image worthy of any gallery.

    Review of the Lensbaby Burnside 35 Special Effects Lens

    The vignette slider at the dark end of the scale.

    Review of the Lensbaby Burnside 35 Special Effects Lens

    Review of the Lensbaby Burnside 35 Special Effects Lens

    Review of the Lensbaby Burnside 35 Special Effects Lens

    The vignette slider at the light end of the scale.

    Overall

    This 35mm lens is nice and wide and can focus up to 6 inches away from the glass itself, excellent for macro photography. There isn’t much distortion on the subject that is in focus in the center, which is much appreciated.

    Compatible with both full-frame cameras and crop sensors, I tested the Burnside 35 on my Canon 5D Mark IV (full-frame) and Canon 7D Mark II (crop sensor) to see how well it performed. I was brilliantly satisfied with its abilities for both, though it was clear to see that the full-frame yielded even more fantastic results than the crop sensor.

    It’s worth mentioning that I was exceptionally pleased with how fluid the manual focus was as well as the vignette slider, both moved with ease and can be adjusted with just one or two fingers! This lens is exceptionally sharp when the focus is right, making sure that whatever you want to be the subject is very clear.

    The equipment is small and easy to carry, another welcome sight in lenses.

    Review of the Lensbaby Burnside 35 Special Effects Lens

    At a retail price of $ 499.99 (available now), the Lensbaby Burnside 35 is worth every penny if I do say so myself. The Burnside 35 is available in the following mounts: Canon EF, Nikon F, Sony E, Sony Alpha A, Fuji X, Micro 4/3, Pentax K, and Samsung NX.

    The post Review of the Lensbaby Burnside 35 Special Effects Lens appeared first on Digital Photography School.


    Digital Photography School

  • Photographing Toddlers – 5 Tips for Keeping Your Sanity

    “Having a two-year-old is like having a blender that you don’t have the top for.” – Jerry Seinfeld

    No doubt, you’ve experienced the frustration of photographing your own toddler or a family with toddlers. Frustration and anxiety come from not knowing how to relate to toddlers and get them to cooperate for photos. But there is a way to have a great experience photographing toddlers even if they are grumpy, unruly, shy or scared.

    I’ve developed five strategies based on my own career as a portrait photographer and insights from childhood psychology.

    If you struggle when photographing toddlers, these five tips will transform your experience and theirs too!

    Photographing toddlers 1

    This is often how a sibling photo with toddlers goes! There are times when you need to forget about the perfect photo and go for comical instead.

    1. Meet the toddler where they are

    “The fundamental job of a toddler is to rule the universe.” – Lawrence Kutner

    Most toddlers are not interested in sitting for a picture. For them, life is all about exploration. They don’t understand the picture taking process. Photography is about cherishing their childhood and marveling at their growth.

    Photographing toddlers 2 rec

    Toddlers love to explore. They were born for picking up sticks and wandering off.

    Begin by realizing that a toddler does not know what a photography session is about. They may even be confused or scared during this new experience.

    I was photographing a family and the mom and dad told me that their little guy was terrified of the camera. When he saw my camera he burst into tears and ran away. It seemed like an impossible situation.

    Photographing toddlers 3

    Never fear when a toddler runs away from a photo. Turn it into a fun game of chase.

    2. Promise to be patient

    “You can learn many things from children. How much patience you have, for instance.” – Franklin P. Jones

    If you’re planning to photograph your own toddler or another family, you must begin by promising to be patient.

    This should happen long before you pick up your camera. Patience must be built into your photo session. Make the decision in advance that nothing will cause you to become upset.

    Photographers only feel impatient with toddlers because they’ve lost control and don’t know what to do. When you promise to be patient, your mind will be clear to think of solutions.

    Photographing toddlers 4

    Embrace a variety of emotions. Sometimes a grumpy look adds an interesting mood to the photo, especially in black and white.

    When that little boy ran away from the camera, I had to be clear in my thinking and figure out what to do next.

    Promise to be patient no matter what happens and then begin to create an environment in which toddlers will thrive.

    Photographing toddlers 5

    3. Develop a friendship

    “My best friend is the one who brings out the best in me.”– Henry Ford

    Kids love to make new friends. During photo sessions with toddlers (or older kids), you must make time to befriend them. A fun grown-up is like a superhero leading them into adventures.

    When a toddler is shy, give them time to warm up. They’ll let you know when they’re ready to be friends.

    Photographing toddlers 6

    Go ahead and provoke a great expression by being a comedian, toddlers will love it.

    You can even make friends with misbehaving toddlers. Give them time to run free and pretty soon they’ll pull you by the hand to go play. This will give you great opportunities for candid photos.

    The terrified little boy took about 20 minutes to calm down. In a few more minutes we were friends and my camera was no longer a threat to him.

    Photographing toddlers 15

    This was actually a grumpy moment, but nobody can resist a funny photographer!

    4. Give the child high fives

    “Our chief want is someone who will inspire us to be what we know we could be.” – Ralph Waldo Emerson

    Toddlers love to show off and make you laugh, and they love to receive praise from grown-ups.

    When they do something well, give them a pat on the head or a high five. Simple gestures like this bring them to life.

    Note: Be aware of cultural differences. Touching an Asian (or more specifically, Buddhist) person on the head is an insult.

    If they give you rocks, leaves, or sticks as gifts, receive them with excitement!

    Photographing toddlers 7

    Allow time for true joy to emerge.

    Now that you’ve established an encouraging friendship, you can ask them to sit or pose. Get your pictures quickly, give the child a high five, and move on.

    I didn’t force the terrified little guy to sit and smile properly. There was nothing but friendship, encouragement, and high fives. He would gladly sit for a moment or two. I was quick with my camera and captured many candid photos too.

    When you focus less on telling the toddler what to do, and more on drawing out genuine happiness and laughter, you’ll get the photos you want without the stress.

    You won’t even need patience if you create a toddler-friendly experience.

    5. Don’t force the moment

    “The quickest way for a parent to get a child’s attention is to sit down and look comfortable.” – Lane Olinghouse

    One of the toughest problems you’ll face is toddlers not wanting to be in group photos. The more you try to force the toddler to sit for a photo, the harder it often becomes.

    Photographing toddlers 8

    All sorts of fun can happen between the poses. Look around your environment to see what fun elements can be used in your photos.

    Photographing toddlers 9

    Just moments later came a perfect pose and a smile.

    Allow for a contrast of sitting for a photo and then time to explore.


    When toddlers refuse to join in the family photo, I don’t force them. Every parent knows that toddlers love to interrupt what adults are doing. As soon as I start photographing Mom and Dad together, the toddler wants to be picked up. It’s a perfect moment for group cuddles, bringing out beautiful smiles from everyone.

    That terrified little boy did not want to be in photos, but he did want to be comforted by mom and dad.

    As he sat with them, I did things that would make him smile and laugh. I made a teddy bear dance on my camera. He smiled at Teddy which was as good as smiling at the camera.

    Photographing toddlers 12 rec

    Photographing toddlers 13

    Photographing toddlers 14 rec

    Bring in the background as part of the photo. Let the little one wander off and then call their name when you’re ready with the camera.

    Bonus: Dealing with the toddler’s parents

    We spend the first 12 months of our children’s lives teaching them to walk and talk and the next 12 months teaching them to sit down and shut up.” – Phyllis Diller

    Sometimes the hard part is dealing with a toddler’s parents. Some parents will be easy-going and let you run the photo session the way it seems best to you. Other parents will not. They have a deep need for things to be orderly and go as they planned.

    During the session, keep reassuring parents that everything is going well, even if it doesn’t feel like it to them. Assure and show them that you know how to handle toddlers and that you will make beautiful photos.

    Photographing toddlers 16 rec

    This moment took a lot of work. It was a tiny moment of stillness in the midst of chaos.

    Remind them how much their child has accomplished in these early years of life. Inspire parents to see the fun of the moment. Remember, you promised to have patience with the toddler, and his/her parents!

    Let them be toddlers

    “There was never a child so lovely but his mother was glad to get him to sleep.” – Ralph Waldo Emerson

    Photographing toddlers 17

    Remember what it’s like to be a two-year-old. They don’t care about pictures like we do (but they will one day).

    Promise to be patient and then create an environment for toddlers to thrive. Even when they start out cranky, angry, shy or scared, you’ll let them be themselves and experience friendship and encouragement. This is what leads to wonderful photos of toddlers.

    I’d love to hear about your experiences photographing toddlers in the comments below. Please share your thoughts and images of toddlers.

    The post Photographing Toddlers – 5 Tips for Keeping Your Sanity appeared first on Digital Photography School.


    Digital Photography School

  • Weekly Photography Challenge – Architecture

    Earlier I shared a few videos with images and tips for doing architecture photography, here.

    Hassan II Mosque in Casablanca, Morocco.

    If you need some additional help with this one, check out these dPS articles:

    • 6 Helpful Tips for Doing Interior Architecture Photography
    • 4 Beginner Tips for Doing Architecture Photography
    • How to Create Stunning Architecture Photography by Painting with Light
    • Tips for Different Approaches to Architecture Photography
    • 6 Tips to Take Your Architecture Photography to the Next Level
    • How to Use a Tilt-Shift Lens Creatively and for Perspective Control

    Look for details and interesting lines and shapes in the architecture.

    Look for lighting that highlights the features or textures of the building.

    Weekly Photography Challenge – Architecture

    Simply upload your shot into the comment field (look for the little camera icon in the Disqus comments section) and they’ll get embedded for us all to see or if you’d prefer, upload them to your favorite photo-sharing site and leave the link to them. Show me your best images in this week’s challenge. Sometimes it takes a while for an image to appear so be patient and try not to post the same image twice.

    Share in the dPS Facebook Group

    You can also share your images in the dPS Facebook group as the challenge is posted there each week as well.

    Try a different camera angle by looking up!

    Look for interesting lighting and textures.

    Wait for all the elements to come together.

    The post Weekly Photography Challenge – Architecture appeared first on Digital Photography School.


    Digital Photography School

  • Video: Tips for Doing Architecture Photography

    When you’re out and about walking around and shooting in the city, one of the most common things you can do is some architecture photography. The buildings don’t mind having their photo taken, they don’t move, and are interesting subjects to work with.

    Here are a few videos showcasing some architecture photography and tips for doing it.

    10 architecture images from COOPH

    In this video, we’ll get you inspired by looking at 10 stunning architecture shots from the COOPH community.

    Did you enjoy those images? Let’s dig into some tips now.

    Quick tips for architecture photography

    In this video, photographer Peter McKinnon puts two minutes on the clock. Then he gives you as many tips as he can get out in that time frame on shooting architecture.

    Lastly tips from Adorama TV

    Finally, here are some tips from Doug McKinlay to help you do better architectural photography. He talks about composition, what lenses to use, using a tripod, getting sharp images, and more in this video.

    ?

    Now it’s your turn. Do you have any additional tips for doing architecture photography to share with others? Please tell us in the comments area below.

    The post Video: Tips for Doing Architecture Photography appeared first on Digital Photography School.


    Digital Photography School