Category: Photography

  • Canon Unveils a Dual Fisheye Virtual Reality Lens, the RF 5.2mm f/2.8L

    The post Canon Unveils a Dual Fisheye Virtual Reality Lens, the RF 5.2mm f/2.8L appeared first on Digital Photography School. It was authored by Jaymes Dempsey.

    Canon unveils a dual fisheye VR lens

    Canon has announced a one-of-a-kind lens for EOS R cameras: the RF 5.2mm f/2.8L Dual Fisheye lens, which looks exactly as strange as it sounds:

    RF 5.2mm Dual Fisheye lens side view

    And check out the lens again, this time mounted to the Canon EOS R5:

    virtual reality lens mounted to a Canon EOS R5

    So what is this bizarre new lens? What’s it’s purpose? 

    The RF 5.2mm f/2.8L is designed for virtual reality (VR) recording; it’s “the world’s first digital interchangeable dual fisheye lens capable of shooting stereoscopic 3D 180° VR imagery to a single image sensor.” In other words, the twin fisheye lenses offer two frames covering a huge field of view in total; when processed, this footage turns into a single, 180-degree image, and with the proper equipment (the press release mentions the Oculus Quest 2), viewers can feel truly present in the scene.

    It seems that, when the RF 5.2mm f/2.8L debuts, it will be available solely for EOS R5 cameras, though this could change once the lens hits the market. Such a unique lens is bound to turn heads, and Canon has certainly been hard at work, offering a product with an outstanding form factor – for filmmakers who record on the go or who simply prefer to minimize kit size – along with weather resistance, a very nice f/2.8 maximum aperture, and most importantly, Canon’s in-built filter system. The latter allows you to use neutral density (ND) filters when recording, essential for serious videographers.

    Unfortunately, processing dual fisheye images isn’t done with standard editing software. Instead, Canon is developing several (paid) programs capable of handling VR footage: a Premiere Pro plugin, and a “VR Utility.” The company explains, “With the EOS VR Plug-In for Adobe Premiere Pro, creators will be able to automatically convert footage to equirectangular, and cut, color, and add new dimension to stories with Adobe Creative Cloud apps, including Premiere Pro,” while “Canon’s EOS VR Utility will offer the ability to convert clips from dual fisheye image to equirectangular and make quick edits.”

    So who should think about purchasing this new lens? It’s a good question, and one without an easy answer. Canon’s decision to bring out a dedicated VR lens suggests a growing interest in creating VR content. But the day when most video is viewed through VR technology seems a long way off, at least from where I’m sitting. 

    That said, if VR recording sounds interesting, you should at least check out this nifty new lens. Canon suggests a December release date with a $ 1999 USD price tag, and you can expect Canon’s VR post-processing software around the same time.

    Now over to you:

    Are you interested in this new lens? Do you do (or hope to do) any VR recording? Share your thoughts in the comments below!

    The post Canon Unveils a Dual Fisheye Virtual Reality Lens, the RF 5.2mm f/2.8L appeared first on Digital Photography School. It was authored by Jaymes Dempsey.


    Digital Photography School

  • Shallow Depth of Field: How to Get It in Your Photos (5 Easy Ways)

    The post Shallow Depth of Field: How to Get It in Your Photos (5 Easy Ways) appeared first on Digital Photography School. It was authored by Darren Rowse.

    shallow depth of field: how to get it in your photos

    What is shallow depth of field photography? And how can you create it for beautiful, pro-level effects?

    In this article, I’ll share everything you need to know about shallow depth of field, including:

    • What shallow depth of field actually is
    • Why shallow depth of field is useful in photography
    • Five easy ways to create that gorgeous shallow depth of field effect

    In fact, here’s my guarantee: By the time you leave, you’ll be a shallow DOF expert.

    Sound good? Let’s dive right in, starting with a simple definition:

    What is a shallow depth of field in photography?

    A shallow depth of field refers to an effect where very little of the image is in focus.

    For instance, an image might include an in-focus subject, but have a blurred-out background. This is common in portrait photography (and if you look through this article, you’ll notice that my shallow depth of field examples are all portraits for this very reason!).

    A shallow depth of field contrasts with a deep depth of field, where the entire shot, from foreground to background, remains in focus. Deep depth of field effects are common in landscape photography, where detail is a key compositional element.

    Why is a shallow depth of field effect important?

    Plenty of photographers love shallow depth of field effects – for two big reasons:

    1. A shallow depth of field separates the subject from the background, helping the subject stand out.
    2. A shallow depth of field generally blurs the background, which looks really gorgeous (when done right, that is!).

    Often, a shallow depth of field is a stylistic choice, one that certain photographers tend to prefer and other photographers like to avoid.

    Here’s a list of genres that gravitate toward shallow DOF effects:

    • Portrait photography
    • Wildlife photography
    • Street photography (sometimes)
    • Fashion photography
    • Product photography (sometimes)

    Of course, this list isn’t exhaustive, and regardless, don’t feel hemmed in. If you prefer shallow depth of field but you shoot landscapes, that’s okay – do what you like!

    How to get a shallow depth of field effect: 5 techniques

    Now let’s take a look at how you can create shallow depth of field effects in your photos:

    1. Increase the subject-background distance

    It’s one of the easiest ways to achieve a shallow depth of field effect:

    Position your subject as far away from any background objects as possible.

    If your subject is standing right in front of a wall, it’ll be in focus no matter what you do. But if they’re standing 100 meters in front of that same wall, it’s going to be a lot more blurry. Think of it as giving your background more room to blur.

    Quick note: Technically, increasing the distance between the subject and the background doesn’t make the depth of field more shallow. The depth of field remains the same regardless (it depends on other factors that I discuss below).

    But bringing your subject forward increases the appearance of a shallow depth of field and gives you a near-equivalent effect.

    shallow depth of field photography woman smiling

    2. Use your camera’s Portrait mode

    These days, most beginner cameras include a little wheel on top with lots of little icons on it – the Mode dial.

    And on certain beginner models, the Mode dial will feature Scene modes, such as Landscape, Night, Sports, etc.

    Generally, one of these modes is Portrait. And if you’re uncomfortable using more advanced modes (such as Aperture Priority or Manual mode), Portrait mode is a good way to decrease the depth of field; it sets a large aperture (discussed in the next section!), which will make the depth of field smaller.

    Now, Portrait mode doesn’t offer any control over your depth of field effect, so I only recommend you use it if you feel completely lost or have no intention of learning basic camera settings.

    And if you do want to gain more control, check out the next method of creating shallow depth of field:

    3. Widen your lens’s aperture

    Every lens includes an aperture – essentially a hole – that widens or narrows depending on your camera’s aperture setting.

    And the wider the aperture, the shallower the depth of field.

    Portrait mode will automatically widen your aperture. But if you want a greater level of control, I’d recommend using either Aperture Priority mode or Manual mode, which allow you to dial in your preferred aperture (then watch as the background is blurred).

    If you’ve never set the aperture before, know that small numbers, such as f/1.8 and f/2.8, correspond to a wide aperture (and hence a shallow depth of field). Large numbers, such as f/16 and f/22, correspond to a narrow aperture (and a deep depth of field).

    For ultra-shallow depth of field effects, stick to f/2.8 and wider if possible, though your aperture capabilities will depend on your lens (because all lenses have an aperture maximum).

    shallow depth of field photography man with camera

    In fact, if you like the idea of adjusting the aperture to achieve the perfect depth of field effect, I highly recommend you put your camera on Aperture Priority mode, find a subject, and test out a handful of different apertures. Then review each photo carefully, paying attention to how the aperture setting affects the depth of field.

    4. Use a long lens (and get close to your subject)

    The closer you get to your subject, both optically – by using a long lens – and physically – by moving toward your subject – the shallower the depth of field and the better the background blur.

    That’s why the best shallow depth of field portraits tend to be taken on an 85mm lens or a 70-200mm lens, not a 50mm or 35mm lens. The longer focal length makes it easier to get close, which in turn decreases the depth of field. Make sense?

    However, if you only own a 35mm lens, don’t worry; you can still create a shallow DOF. You simply need to get close to your subject. Yes, it might be a bit uncomfortable if you’re photographing people – you’ll be shooting from right in front of their face! – but the results will be worth it.

    By the way, longer lenses have another advantage over shorter lenses:

    They compress the background. The actual effect is difficult to explain, but it leads to a smoother background blur and the appearance of a shallow depth of field.

    So if possible, shoot your images from up close – and use a long lens, too. (Don’t get crazy with your focal length, though, especially if you’re photographing people; if you go over 200mm or so, you’ll be forced to back up ridiculously far, which can become unmanageable, plus you’ll lose a level of photographer-subject intimacy.)

    5. Get a wide-aperture lens

    Previously, I explained that a wide aperture leads to outstanding shallow depth of field effects. I also mentioned that some lenses feature a maximum aperture.

    So if you’re serious about achieving a shallow depth of field, a lens with a wide aperture (known as a fast lens) is your friend.

    Unfortunately, fast lenses tend to be expensive, but they can also be worth the investment. Plus, there are a few fast primes – such as a 50mm f/1.8 – that are optically impressive, capable of beautiful background blur, and are also quite cheap.

    (Fast lenses also let you shoot in low light, which is a major bonus.)

    By the way, some lenses offer better background blur than others. So before purchasing, I recommend reading reviews of possible lenses (or at least viewing sample images). Good reviewers will discuss background blur (also known as bokeh), and you can determine whether the lens is right for you.

    woman on a subway platform portrait shallow DOF

    Shallow depth of field: final words

    Now that you’ve finished this article, you know all about shallow depth of field and how to create it.

    So head out with your camera. See if you can get some beautiful depth of field effects. Try out the methods I’ve suggested.

    And have fun!

    Now over to you:

    Which of these methods is your favorite? Do you have any tips that I missed? Share your thoughts in the comments below!

    The post Shallow Depth of Field: How to Get It in Your Photos (5 Easy Ways) appeared first on Digital Photography School. It was authored by Darren Rowse.


    Digital Photography School

  • App för handel med kryptovaluta Erfarenheter

    Att välja App för handel med kryptovaluta de bästa kryptosystem som finns på marknaden är en mycket viktig aspekt av handeln. Om du inte är medveten om detta kan det sluta med att du förlorar mycket pengar i det långa loppet. Om du vill göra mest vinst på kortast möjliga tid måste du göra din hemläxa väl. Här är några av de grunder som du bör känna till innan du väljer de bästa mynten att handla på marknaden med.

    App för handel med kryptovaluta

    En av de första sakerna du måste titta efter i de bästa valutorna som finns på marknaden är deras inflationsgrad. För att förstå detta måste du först förstå vad inflation är. Inflation är helt enkelt en ökning av priserna utan att varor och tjänster minskar. Till exempel är en enårig dollar värd mycket mer om några månader, eller hur? Så om du väljer att investera i de bästa råvarorna för det här århundradet vore det klokt att hålla utkik efter de valutor som enligt prognoserna kommer att uppleva den högsta inflationen under de kommande tio åren.

    Ett annat grundläggande övervägande när det gäller att investera i de bästa valutorna är deras historik när det gäller handel och gruvdrift. Man kan inte bara välja vilket gammalt system som helst att investera i idag. Det finns hundratusentals valutor som handlas på marknaden och endast ett fåtal utvalda är lönsamma. Därför är det nödvändigt att du forskar väl om de olika systemen som finns tillgängliga för att veta vilket av de tillgängliga kryptosystemen som är det bästa att investera i.

    Ett av de enklaste sätten att avgöra vilken av de bästa valutorna att investera i är genom att titta på den underliggande tillgångens egenskaper. Detta kallas tillgångens egenskaper och de är kända som Ripples. Låt oss ta en titt på två exempel på de bästa valutorna att investera i under det kommande decenniet. Den första typen av tillgång är aktier. Ett index som följer värdet av olika typer av företag kallas aktier. Så om vi tittar på de tio främsta valutorna som kommer att styra aktiemarknadens värde i framtiden är det troligt att dollarn kommer att fortsätta sin uppgång eftersom värdet på aktier i USA och Europa förväntas stiga.

    Den andra typen av tillgångar är guld. Det finns en stor sannolikhet för att guldpriset kommer att stiga under det kommande decenniet. Om du håller på med handel och inte har teknisk kunskap om vilken av de bästa valutorna du ska investera i bör du prova de bästa kryptovalutorna som sannolikt kommer att öka i värde under detta årtionde. Bland de möjliga valutorna att investera i App för handel med kryptovaluta finns euron, den japanska yenen, den australiska dollarn, schweiziska francen, den kanadensiska dollarn och det brittiska pundet. Var och en av dessa valutor har sina egna för- och nackdelar och du bör noggrant studera dem innan du investerar i dem.

    Även om det är lätt att bli lockad av de dåliga nyheterna om att investera i kryptovalutor finns det ingen dålig investering när det gäller mynt. Anledningen till detta är att de flesta investerare som är nya i den här branschen slutar med att förlora sina pengar eftersom de inte har rätt kunskap om vilka av de bästa valutorna de ska investera i. Så när du letar efter de bästa valutorna att investera i är det viktigt att du blir bekant med alla dessa. Detta beror på att endast genom att bli en registrerad användare av en onlinehandelsplats kan du få tillgång till alla de bästa kryptovalutorna som finns tillgängliga i världen idag.

    Det finns många fördelar som är förknippade med att investera i de bästa kryptokurvorna, bland annat det faktum att de handlas på den globala marknaden. Därför är det lätt att handla med de bästa valutorna och du kan också förvänta dig god avkastning. Att investera i de bästa valutorna kräver dock att du lär dig hur systemet fungerar, grunderna i ekonomi och företagsledning. Om du till exempel är en investerare som är ny på att investera på altcoin-marknaden, är det bättre om du får hjälp av professionella personer som experter och handlare.

    Det finns många fördelar som du kan njuta av när du investerar i de bästa valutorna i världen. En av dessa är att när du väljer de bästa kryptosurferna kan du vara säker på att värdet på din investering alltid kommer att vara stabilt. Eftersom värdet på varje mynt varierar beroende på utbud och efterfrågan är det viktigt att du investerar i de bästa valutorna och sedan handlar med dem enligt dina behov. När värdet på en valuta fluktuerar kan du alltså enkelt sälja dina tillgångar och investera i de nya.

    Det bästa sättet att investera i de bästa kryptosurfarna är att se till att du är välinformerad om de olika faktorer som påverkar värdet på ett visst mynt och du har också en expert som kan lära dig hur du väljer de bästa valutorna att investera i. När du vill göra vinster från handeln med den bästa kryptosurf bör du alltså se till att du utbildar dig om marknadens ekonomi och affärsmodeller. Här är nästa intressanta blogginlägg: Den bästa online-börsen för kryptovaluta.

    The post App för handel med kryptovaluta Erfarenheter first appeared on Hur man använder kryptovalutor på rätt sätt.


    Hur man använder kryptovalutor på rätt sätt

  • Cryptocurrency Trading Kander Erfarenheter

    Att välja Cryptocurrency Trading Kander de bästa kryptosystem som finns på marknaden är en mycket viktig aspekt av handeln. Om du inte är medveten om detta kan det sluta med att du förlorar mycket pengar i det långa loppet. Om du vill göra mest vinst på kortast möjliga tid måste du göra din hemläxa väl. Här är några av de grunder som du bör känna till innan du väljer de bästa mynten att handla på marknaden med.

    Cryptocurrency Trading Kander

    En av de första sakerna du måste titta efter i de bästa valutorna som finns på marknaden är deras inflationsgrad. För att förstå detta måste du först förstå vad inflation är. Inflation är helt enkelt en ökning av priserna utan att varor och tjänster minskar. Till exempel är en enårig dollar värd mycket mer om några månader, eller hur? Så om du väljer att investera i de bästa råvarorna för det här århundradet vore det klokt att hålla utkik efter de valutor som enligt prognoserna kommer att uppleva den högsta inflationen under de kommande tio åren.

    Ett annat grundläggande övervägande när det gäller att investera i de bästa valutorna är deras historik när det gäller handel och gruvdrift. Man kan inte bara välja vilket gammalt system som helst att investera i idag. Det finns hundratusentals valutor som handlas på marknaden och endast ett fåtal utvalda är lönsamma. Därför är det nödvändigt att du forskar väl om de olika systemen som finns tillgängliga för att veta vilket av de tillgängliga kryptosystemen som är det bästa att investera i.

    Ett av de enklaste sätten att avgöra vilken av de bästa valutorna att investera i är genom att titta på den underliggande tillgångens egenskaper. Detta kallas tillgångens egenskaper och de är kända som Ripples. Låt oss ta en titt på två exempel på de bästa valutorna att investera i under det kommande decenniet. Den första typen av tillgång är aktier. Ett index som följer värdet av olika typer av företag kallas aktier. Så om vi tittar på de tio främsta valutorna som kommer att styra aktiemarknadens värde i framtiden är det troligt att dollarn kommer att fortsätta sin uppgång eftersom värdet på aktier i USA och Europa förväntas stiga.

    Den andra typen av tillgångar är guld. Det finns en stor sannolikhet för att guldpriset kommer att stiga under det kommande decenniet. Om du håller på med handel och inte har teknisk kunskap om vilken av de bästa valutorna du ska investera i bör du prova de bästa kryptovalutorna som sannolikt kommer att öka i värde under detta årtionde. Bland de möjliga valutorna att investera i Cryptocurrency Trading Kander finns euron, den japanska yenen, den australiska dollarn, schweiziska francen, den kanadensiska dollarn och det brittiska pundet. Var och en av dessa valutor har sina egna för- och nackdelar och du bör noggrant studera dem innan du investerar i dem.

    Även om det är lätt att bli lockad av de dåliga nyheterna om att investera i kryptovalutor finns det ingen dålig investering när det gäller mynt. Anledningen till detta är att de flesta investerare som är nya i den här branschen slutar med att förlora sina pengar eftersom de inte har rätt kunskap om vilka av de bästa valutorna de ska investera i. Så när du letar efter de bästa valutorna att investera i är det viktigt att du blir bekant med alla dessa. Detta beror på att endast genom att bli en registrerad användare av en onlinehandelsplats kan du få tillgång till alla de bästa kryptovalutorna som finns tillgängliga i världen idag.

    Det finns många fördelar som är förknippade med att investera i de bästa kryptokurvorna, bland annat det faktum att de handlas på den globala marknaden. Därför är det lätt att handla med de bästa valutorna och du kan också förvänta dig god avkastning. Att investera i de bästa valutorna kräver dock att du lär dig hur systemet fungerar, grunderna i ekonomi och företagsledning. Om du till exempel är en investerare som är ny på att investera på altcoin-marknaden, är det bättre om du får hjälp av professionella personer som experter och handlare.

    Det finns många fördelar som du kan njuta av när du investerar i de bästa valutorna i världen. En av dessa är att när du väljer de bästa kryptosurferna kan du vara säker på att värdet på din investering alltid kommer att vara stabilt. Eftersom värdet på varje mynt varierar beroende på utbud och efterfrågan är det viktigt att du investerar i de bästa valutorna och sedan handlar med dem enligt dina behov. När värdet på en valuta fluktuerar kan du alltså enkelt sälja dina tillgångar och investera i de nya.

    Det bästa sättet att investera i de bästa kryptosurfarna är att se till att du är välinformerad om de olika faktorer som påverkar värdet på ett visst mynt och du har också en expert som kan lära dig hur du väljer de bästa valutorna att investera i. När du vill göra vinster från handeln med den bästa kryptosurf bör du alltså se till att du utbildar dig om marknadens ekonomi och affärsmodeller. Här är nästa intressanta blogginlägg: Rippel köper Kraken på allvar.

    The post Cryptocurrency Trading Kander Erfarenheter first appeared on Hur man använder kryptovalutor på rätt sätt.


    Hur man använder kryptovalutor på rätt sätt

  • Var kan man köpa de billigaste Itcoins Erfarenheter

    Att välja Var kan man köpa de billigaste Itcoins de bästa kryptosystem som finns på marknaden är en mycket viktig aspekt av handeln. Om du inte är medveten om detta kan det sluta med att du förlorar mycket pengar i det långa loppet. Om du vill göra mest vinst på kortast möjliga tid måste du göra din hemläxa väl. Här är några av de grunder som du bör känna till innan du väljer de bästa mynten att handla på marknaden med.

    Var kan man köpa de billigaste Itcoins

    En av de första sakerna du måste titta efter i de bästa valutorna som finns på marknaden är deras inflationsgrad. För att förstå detta måste du först förstå vad inflation är. Inflation är helt enkelt en ökning av priserna utan att varor och tjänster minskar. Till exempel är en enårig dollar värd mycket mer om några månader, eller hur? Så om du väljer att investera i de bästa råvarorna för det här århundradet vore det klokt att hålla utkik efter de valutor som enligt prognoserna kommer att uppleva den högsta inflationen under de kommande tio åren.

    Ett annat grundläggande övervägande när det gäller att investera i de bästa valutorna är deras historik när det gäller handel och gruvdrift. Man kan inte bara välja vilket gammalt system som helst att investera i idag. Det finns hundratusentals valutor som handlas på marknaden och endast ett fåtal utvalda är lönsamma. Därför är det nödvändigt att du forskar väl om de olika systemen som finns tillgängliga för att veta vilket av de tillgängliga kryptosystemen som är det bästa att investera i.

    Ett av de enklaste sätten att avgöra vilken av de bästa valutorna att investera i är genom att titta på den underliggande tillgångens egenskaper. Detta kallas tillgångens egenskaper och de är kända som Ripples. Låt oss ta en titt på två exempel på de bästa valutorna att investera i under det kommande decenniet. Den första typen av tillgång är aktier. Ett index som följer värdet av olika typer av företag kallas aktier. Så om vi tittar på de tio främsta valutorna som kommer att styra aktiemarknadens värde i framtiden är det troligt att dollarn kommer att fortsätta sin uppgång eftersom värdet på aktier i USA och Europa förväntas stiga.

    Den andra typen av tillgångar är guld. Det finns en stor sannolikhet för att guldpriset kommer att stiga under det kommande decenniet. Om du håller på med handel och inte har teknisk kunskap om vilken av de bästa valutorna du ska investera i bör du prova de bästa kryptovalutorna som sannolikt kommer att öka i värde under detta årtionde. Bland de möjliga valutorna att investera i Var kan man köpa de billigaste Itcoins finns euron, den japanska yenen, den australiska dollarn, schweiziska francen, den kanadensiska dollarn och det brittiska pundet. Var och en av dessa valutor har sina egna för- och nackdelar och du bör noggrant studera dem innan du investerar i dem.

    Även om det är lätt att bli lockad av de dåliga nyheterna om att investera i kryptovalutor finns det ingen dålig investering när det gäller mynt. Anledningen till detta är att de flesta investerare som är nya i den här branschen slutar med att förlora sina pengar eftersom de inte har rätt kunskap om vilka av de bästa valutorna de ska investera i. Så när du letar efter de bästa valutorna att investera i är det viktigt att du blir bekant med alla dessa. Detta beror på att endast genom att bli en registrerad användare av en onlinehandelsplats kan du få tillgång till alla de bästa kryptovalutorna som finns tillgängliga i världen idag.

    Det finns många fördelar som är förknippade med att investera i de bästa kryptokurvorna, bland annat det faktum att de handlas på den globala marknaden. Därför är det lätt att handla med de bästa valutorna och du kan också förvänta dig god avkastning. Att investera i de bästa valutorna kräver dock att du lär dig hur systemet fungerar, grunderna i ekonomi och företagsledning. Om du till exempel är en investerare som är ny på att investera på altcoin-marknaden, är det bättre om du får hjälp av professionella personer som experter och handlare.

    Det finns många fördelar som du kan njuta av när du investerar i de bästa valutorna i världen. En av dessa är att när du väljer de bästa kryptosurferna kan du vara säker på att värdet på din investering alltid kommer att vara stabilt. Eftersom värdet på varje mynt varierar beroende på utbud och efterfrågan är det viktigt att du investerar i de bästa valutorna och sedan handlar med dem enligt dina behov. När värdet på en valuta fluktuerar kan du alltså enkelt sälja dina tillgångar och investera i de nya.

    Det bästa sättet att investera i de bästa kryptosurfarna är att se till att du är välinformerad om de olika faktorer som påverkar värdet på ett visst mynt och du har också en expert som kan lära dig hur du väljer de bästa valutorna att investera i. När du vill göra vinster från handeln med den bästa kryptosurf bör du alltså se till att du utbildar dig om marknadens ekonomi och affärsmodeller. Här är nästa intressanta blogginlägg: Bitcoin-värde i slutet av 2021 .

    The post Var kan man köpa de billigaste Itcoins Erfarenheter first appeared on Hur man använder kryptovalutor på rätt sätt.


    Hur man använder kryptovalutor på rätt sätt

  • Photoshop Elements vs Photoshop: Which Editor Is Right for You? (2021)

    The post Photoshop Elements vs Photoshop: Which Editor Is Right for You? (2021) appeared first on Digital Photography School. It was authored by Megan Kennedy.

    Photoshop vs Photoshop Elements

    Which editor should you pick, Photoshop Elements vs Photoshop?

    It’s a tough question, and the answer will depend on your post-processing preferences. In this article, I’ll break it all down for you; I’ll compare and contrast Photoshop Elements and Photoshop and see where they both fit in the grand scheme of image editing.

    By the time you’re finished, you’ll know which program is the better buy!

    Let’s get started.

    Photoshop Elements vs Photoshop: overview

    Photoshop has become the industry standard for editing on Windows and MacOS systems – so much so, in fact, that the phrase Photoshop is now used as a verb. Photoshop gives users the ability to create and enhance photographs, illustrations, and other digital media. As a critical utility for graphic artists, photographers, designers, web developers, etc., Photoshop has become an integral part of many creators’ processes.

    The Photoshop layout
    Layout of Photoshop 2021

    So where does Elements come in? Photoshop Elements is a simplified version of Photoshop, designed primarily for photographers who want a quick and easy way to edit and organize images. The program came out in 2001 (long after Photoshop first debuted), and is also great for consumers who are just getting started with photo editing.

    The Photoshop Elements layout
    Layout of Photoshop Elements 2021

    While there are numerous incarnations in the Adobe Photoshop and Photoshop Elements lines, for this article, I’ll compare the most recent versions: Photoshop Elements 2021 vs Photoshop version 22.3.0.

    Photoshop Elements vs Photoshop: key features

    Now that you’re familiar with the purposes of both Photoshop Elements and Photoshop, let’s take a detailed look at what these two programs offer, starting with:

    Price

    While both Photoshop Elements and Photoshop are owned by Adobe, the sales models couldn’t be more different.

    Adobe Photoshop Elements is sold as a one-off program, and the 2021 version will set you back about $ 100 USD. Photoshop Elements can be bundled with Premiere Elements 2021, a simplified video editing software (see the screenshot below). Upgrade pricing for existing Elements customers in the United States is also available.

    Photoshop Elements pricing

    Adobe Photoshop, on the other hand, is offered only as a (monthly or yearly) subscription. At present, the best value is the Creative Cloud Photography Plan, which includes Photoshop, Lightroom, Lightroom Classic, plus 20 GB of cloud storage, and costs $ 9.99 USD per month.

    Creative Cloud pricing for Photoshop

    Note that Adobe offers a 30-day trial of both Elements and Photoshop if you’d prefer to try before you buy.

    Ease of use

    Although Elements and Photoshop offer many overlapping features, Elements is geared toward an audience looking for a newcomer-friendly editing application.

    Photoshop is the industry standard, but this can make it harder to approach for first-time users. Enter Photoshop Elements, which is designed to enable simple, streamlined editing processes while maintaining an accessible interface. This simplified application can help ease a budding creative into the world of digital editing without plunging them headfirst into a sea of pixels.

    Bottom line: Photoshop is designed for in-depth, manual editing operations. Elements is a photo processor, better suited to quick and easy refinements that don’t require intensive editing.

    Workspaces

    Photoshop offers six pre-made workspaces for different creative requirements: 3D, Essentials, Graphic and Web, Motion, Painting, and Photography.

    Photoshop Elements divides the editing process into three workspaces: Quick, Guided, and Expert:

    Quick

    In Photoshop Elements, Quick view is a simplified interface with basic adjustments. This layout lets you quickly perform common editing tasks and includes basic photo editing tools neatly distributed across the workspace.

    Quick mode enables users to access the Healing brush, fix exposure, sharpness, color, and lighting, and even provides the option to apply effects, filters, enhancements, textures, and frames.

    Elements Quick interface
    The Quick interface of Adobe Photoshop Elements.

    Guided

    The Guided workspace offers step-by-step instructions for Photoshop Elements users. With over 50 tutorials and counting, this workspace will help you apply a range of effects to a photograph.

    Elements Guided interface
    The Guided interface with editing functions to select.

    With the option to introduce Tilt-Shift, Black and White, Orton, and Lomo effects (and many more) to an image, Guided provides a user-friendly interface for applying relatively customizable effects.

    To access these tutorials, switch over to the Guided interface in Photoshop Elements, pick an effect, and go from there.

    Black and White effect Elements
    The Guided interface with the Black and White effect in action.

    Expert

    Expert mode is designed for users who are more experienced with image editing. The Expert view unpacks all of the editing tools available in Photoshop Elements and neatly organizes them around the user interface:

    The Expert view in Elements.
    Photoshop Elements interface in Expert view.

    Expert mode has an expanded range of tools compared to Quick mode, enabling you to apply complex editing effects. Draw and Enhance tools, Graphics, Layers and Styles, Histograms, additional Filters, History, and more are all available in the Expert workspace.

    Other tools and functions

    While Photoshop Elements packs a considerable amount of power, some tools are still reserved for Photoshop. For instance, chromatic aberration correction, which fixes unwanted fringing, is a Photoshop exclusive.

    Elements doesn’t support vector formats, either – so the Pen tool, which creates advanced paths and shapes, is not an Elements feature. (Because Photoshop supports vector and raster files, users can add vector-based Smart Objects into a Photoshop file.)

    In addition, Elements doesn’t offer the Content-Aware Patch tool (which sources nearby content to blend a region with the surrounding image area) or the Channel Mixer (which is often used for advanced black and white conversions).

    Other significant differences include the lack of 16-bit and 32-bit image support in Elements. Lens geometry profiles aren’t included in Elements or in the accompanying (and also pared-back) Camera Raw utility.

    Sample moving photo

    A new feature in the 2021 version of Elements is the AI-powered Moving Photos function (used to turn static pictures into moving GIFs, as displayed above). While GIFs can be created in Photoshop, the process is a little less streamlined, though Photoshop does offer more flexibility in making these GIFs.

    Printing

    An additional point of difference in the Photoshop Elements vs Photoshop comparison is printing. Unfortunately, Elements is missing a few key features for professional print production. Unlike Photoshop, Photoshop Elements can’t export files in CMYK, and the program also excludes in-depth soft-proofing.

    Plus, Elements supports a simplified color management system compared to Photoshop; while Elements has RGB, Grayscale, Bitmap, and Indexed Color, Photoshop features all of the aforementioned color options, but also Duotone, CMYK, Lab, and Multi-Channel, which allows for greater control when printing.

    Elements vs Photoshop: the two programs compared
    A game of image modes! Photoshop on the left, Photoshop Elements on the right.

    Time management

    Photoshop can be more labor-intensive than Photoshop Elements, though the number of guided edits available in Photoshop Elements do streamline the process.

    However, although Elements includes quick, automated processes and adjustments, it sometimes sacrifices the manual customizability and creative precision achieved through editing in Photoshop. Put simply, the hands-on approach of Photoshop can pay off, depending on the level of tweaking you require to create an effective image.

    Photoshop Elements vs Photoshop: final words

    Photoshop can create stunning photographic work, but that doesn’t rule out the capabilities of Photoshop Elements. While Photoshop Elements offers to do the heavy lifting with a few clicks of the mouse button, Photoshop proper offers a larger range of detailed editing features.

    Ultimately, if you’re looking for a simple editing program, Elements works well. However, creative professionals in need of precision editing software should jump for Photoshop instead.

    Photoshop Elements vs Photoshop FAQs

    What is the difference between Photoshop Elements and Photoshop?

    Put simply, Photoshop Elements is a simpler version of Photoshop. Elements is easier to use but lacks the full-fledged creative control that Photoshop delivers.

    Who uses Photoshop Elements?

    Photoshop Elements is primarily aimed at beginner or intermediate users looking to edit photographs. Professional photographers and designers generally invest in Photoshop for more in-depth editing capabilities.

    What are some features in Photoshop that aren’t in Photoshop Elements?

    There are a good amount of utilities available in Photoshop Elements, but some tools are still reserved for Photoshop. Chromatic aberration correction, the Content-Aware Patch tool, and the Channel Mixer don’t feature in Elements. Elements doesn’t provide vector format or 16-bit and 32-bit image support. Lens geometry profiles aren’t included in Elements or in the accompanying Camera Raw utility. Photoshop Elements can’t export files in CMYK, Lab, Duotone, or Multi-Channel color modes.

    How much does Photoshop and Photoshop Elements cost?

    Adobe Photoshop Elements 2021 costs around $ 100 USD for a full license. Photoshop is only available as a subscription, which costs $ 9.99 USD per month (at minimum).

    The post Photoshop Elements vs Photoshop: Which Editor Is Right for You? (2021) appeared first on Digital Photography School. It was authored by Megan Kennedy.


    Digital Photography School

  • Rule of Thirds in Video: The Essential Guide

    The post Rule of Thirds in Video: The Essential Guide appeared first on Digital Photography School. It was authored by Jaymes Dempsey.

    rule of thirds in video: the essential guide

    The rule of thirds is a simple composition technique that can instantly enhance your videography, but how does it work? And how can you use it to improve your videos in post-production?

    In this article, I’ll explain everything you need to know about the rule of thirds, from the basics – what it is and how to follow it – to more advanced techniques, such as how to apply the rule to real estate footage, landscape footage, wedding footage, and more. 

    I’ll also explain how to adjust your compositions in VideoProc Vlogger, the just-launched, beginner-friendly video editing software from the company behind the popular VideoProc program. (Bonus: It’s completely free!)

    So if you’d like to improve your videos in the field and in the editing room, then let’s dive right in, starting with the essentials:

    What is the rule of thirds in videography?

    The rule of thirds is a compositional guideline designed to make your visuals more balanced and dynamic.

    Specifically, the rule states that the best compositions position key elements a third of the way into the frame. It comes with helpful gridlines:

    rule of thirds gridlines

    The idea is simple, at least in theory. When faced with a scene, you – the videographer – should position key elements somewhere along the gridlines, and when possible, at the intersection of two gridlines.

    (These intersections are known as power points, because they improve your compositions even further.)

    So if you’re shooting a mountain at sunset, you might position the horizon line along the lower horizontal gridline, then make sure that the camera pans until the main mountain peak falls across a power point. Make sense?

    The rule of thirds isn’t really a rule – just a guideline. But it is a great way to make your videos look professionally composed, and it’s a technique used all the time in movies, TV, commercials, and more.

    In other words: You don’t need to follow the rule of thirds religiously. But if you can learn to incorporate it into your shooting – if you can learn to think in terms of the rule of thirds gridlines as needed – then your footage will improve dramatically.

    Now, you can apply the rule in two basic ways:

    1. You can plan out your shots using the rule of thirds, then keep your subjects aligned with the gridlines while recording.
    2. You can record, then crop to satisfy the rule of thirds (when editing).

    If possible, it’s best to nail the composition in camera; that way, you don’t lose resolution during post-production. However, if you’re shooting at high resolutions and exporting at low resolutions, or you aren’t too obsessed with pixel-perfect quality, you can always adjust your footage to use the rule of thirds after your shoot is over, as I discuss in the next section:

    Applying the rule of thirds in VideoProc Vlogger: step by step

    VideoProc Vlogger is a powerful new program designed to make video post-production quick, easy, and intuitive, plus it costs nothing. You can download the software here.

    And in VideoProc Vlogger, literally anyone can use the rule of thirds to enhance their photos; all it takes is a few simple clicks. Here’s how it works:

    Step 1: Prepare your footage for editing

    Once you’ve launched VideoProc Vlogger and started a new project, you’ll need to bring your clips into the Media Library. 

    Simply drag and drop the relevant files onto the Library panel:

    uploading your videos for editing

    Or tap Add Video and browse through your files for the relevant footage:

    adding videos to VideoProc

    Then drag the clips down to the Timeline:

    the VideoProc timeline

    And you’re ready to go.

    Step 2: Add horizontal and vertical guides to approximate the rule of thirds

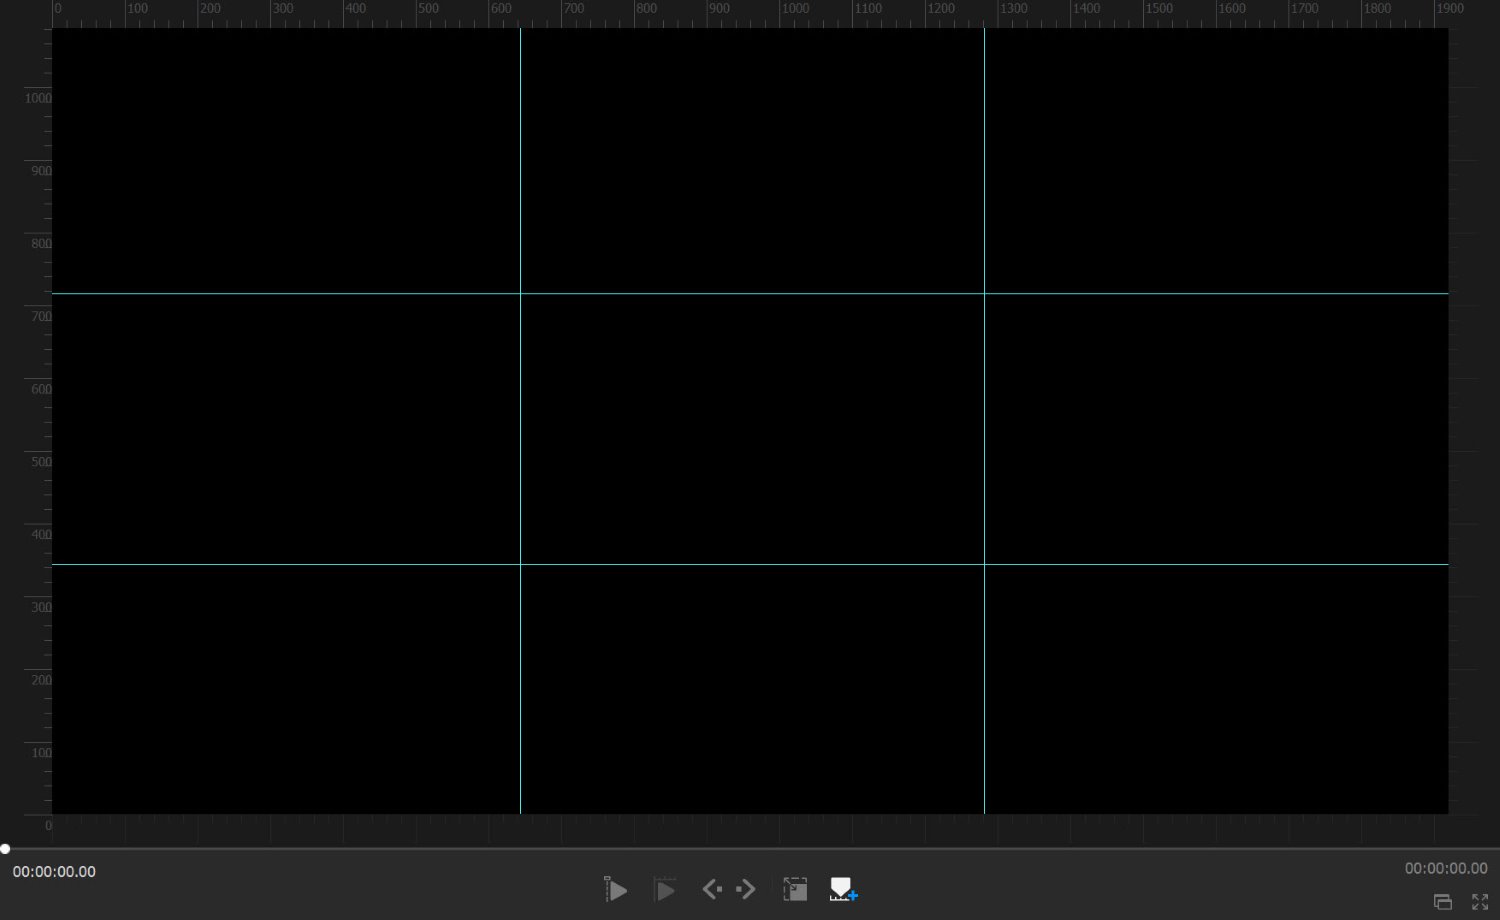
    VideoProc Vlogger allows you to easily create guides on your preview screen. Our goal is to recreate the rule of thirds gridlines, like this:

    rule of thirds gridlines

    First, you’ll need to identify the dimensions of your frame. For this example, I’m working with a 1920 x 1080 (HD) video. (If you’re not sure, you can always check the desktop file, or you can click the little i Info button on the clip thumbnail in VideoProc.)

    Second, take the width and divide it by 3. Do the same for the height.

    To use my example, 1920 divided by 3 equals 640, and 1080 divided by 3 equals 360.

    Next, make sure the Show Rulers button is selected:

    activating the ruler

    Tap the Horizontal Guide button:

    horizontal guides

    Then place two horizontal guides: one at around 640 pixels, and the other at around 640 x 2 (1280) pixels. 

    Finally, tap the Vertical Guide button and place two vertical guides: one at around 360 pixels and the other at around 360 x 2 (720) pixels.

    adding vertical guides

    And there you have it: a rule of thirds grid, right in your Preview panel.

    If you’re worried about accidentally adjusting your guides, you can always hit the Lock Guide button:

    locking the guides

    Step 3: Use the rule of thirds to evaluate (and crop) your footage

    Once you have your rule of thirds gridlines in place, I recommend playing through your footage, paying careful attention to key elements, including:

    • Horizon lines
    • People
    • Bright, eye-catching objects
    • Any other main subjects

    Ask yourself: Are these key elements frequently aligned with the rule of thirds gridlines? If the answer is “Yes,” then you’re doing great – but if you come across a clip where the answer is “No,” you can simply select the Crop tool:

    cropping the video

    Then adjust your footage until it’s rule-of-thirds compliant. 

    Pro tip: If possible, ensure the aspect ratio of the crop matches the original aspect ratio of the footage; otherwise, you’ll need to scale the footage (and you’ll lose parts of the frame in the process).

    When should you apply the rule of thirds in VideoProc Vlogger?

    While you can technically use the rule of thirds at any stage in your editing process, I highly recommend you add the gridlines and evaluate your composition at the very beginning of your workflow. 

    Compositional arrangement tends to affect everything about a recording, from its mood to its ideal color grade to its ideal speed, so it pays to determine exactly how your composition will look before proceeding with any other edits.

    Case studies: how to apply the rule of thirds in real-life situations

    Up until this point, I’ve explained how to use the rule of thirds, but I haven’t talked much about common situations you’ll run into when filming and how you can use the rule of thirds to enhance your footage.

    Let’s take a look at a few likely scenarios:

    Real estate videography

    In real estate filming, you’ll want to pay careful attention to a few features, including major appliances, eye-catching furniture, wall lines (i.e., the point where one wall ends or intersects with another), and floor lines (i.e., the point where the floor intersects with the wall).

    Aim to position wall lines along vertical gridlines and floor lines along horizontal gridlines:

    real estate videography with rule of thirds

    You can also position appliance and furniture edges along the gridlines and (ideally) at power points, like the kitchen island in the example above.

    By the way, it’s generally better to pan than to capture static shots, but make sure you move into the final composition. In other words, pan until the scene meets the rule of thirds, then cut.

    Night videography

    Shooting at night can go many different ways, but I do recommend you think about the horizon line; as I discuss in the next section, you’ll want to position it along the top or bottom horizontal gridline.

    This clip could use a bit of rule-of-thirds adjusting:

    city scene at night video

    For instance, I might crop at the top to emphasize the foreground (and get rid of the boring sky).

    cropped city scene at night

    I can also align interesting subjects with the horizontal gridlines, like the busy road on the left-hand side.

    city scene at night second crop

    Landscape videography

    When filming landscapes, always check the horizon line. In rare cases, it can work to place this dead-center – but in general, I recommend positioning it along the top or bottom horizontal gridline. 

    Which option is better? That depends on the scene. If your footage includes a lot of foreground interest, such as a river, rocks, or even a rustic cabin, then you’ll want to minimize focus on the sky by positioning the horizon along the top gridline:

    mountain landscape scene with rule of thirds

    But if your footage contains very little foreground interest and/or a beautiful sky, the reverse is the way to go.

    Food videography

    In general, your food compositions should feature a main dish or main food item, often surrounded by other supporting dishes, food items, or utensils.

    You’ll want to position your main subject along a gridline or at an intersection point. You’ll also want to pay attention to the table edge; if it’s present in your composition, it may sit most naturally along a horizontal gridline.

    Here, you can see the pitcher of syrup, which sits along the top gridline, positioned above the dessert, which sits along the bottom gridline:

    rule of thirds food scene

    Wedding videography

    While wedding scenes include a lot of variation and can be somewhat unpredictable, you might aim to put the happy couple along the two vertical gridlines. Check out this clip, where the bride and groom start in the center of the screen…

    wedding scene

    …but eventually align perfectly with the rule of thirds gridlines:

    rule of thirds cropped wedding scene

    Starry sky videography

    As with landscape videography, you’ll need to check your horizon lines. You’ll likely want to position the horizon along the lower horizontal gridline; that way, you can emphasize the beautiful sky:

    starry sky scene

    However, in situations with especially interesting foreground elements, you might position the horizon along the upper horizontal gridline instead.

    Rule of thirds in video: final words

    Now that you’ve finished this article, you are well equipped to use the rule of thirds in your own videography. 

    Just remember my tips on composition, and be sure to download VideoProc Vlogger so you can evaluate (and adjust) your compositions after shooting!

    Digiarty, the creator of VideoProc, is a paid partner of dPS.

    The post Rule of Thirds in Video: The Essential Guide appeared first on Digital Photography School. It was authored by Jaymes Dempsey.


    Digital Photography School

  • Btc till Dollar Erfarenheter

    Att välja Btc till Dollar de bästa kryptosystem som finns på marknaden är en mycket viktig aspekt av handeln. Om du inte är medveten om detta kan det sluta med att du förlorar mycket pengar i det långa loppet. Om du vill göra mest vinst på kortast möjliga tid måste du göra din hemläxa väl. Här är några av de grunder som du bör känna till innan du väljer de bästa mynten att handla på marknaden med.

    Btc till Dollar

    En av de första sakerna du måste titta efter i de bästa valutorna som finns på marknaden är deras inflationsgrad. För att förstå detta måste du först förstå vad inflation är. Inflation är helt enkelt en ökning av priserna utan att varor och tjänster minskar. Till exempel är en enårig dollar värd mycket mer om några månader, eller hur? Så om du väljer att investera i de bästa råvarorna för det här århundradet vore det klokt att hålla utkik efter de valutor som enligt prognoserna kommer att uppleva den högsta inflationen under de kommande tio åren.

    Ett annat grundläggande övervägande när det gäller att investera i de bästa valutorna är deras historik när det gäller handel och gruvdrift. Man kan inte bara välja vilket gammalt system som helst att investera i idag. Det finns hundratusentals valutor som handlas på marknaden och endast ett fåtal utvalda är lönsamma. Därför är det nödvändigt att du forskar väl om de olika systemen som finns tillgängliga för att veta vilket av de tillgängliga kryptosystemen som är det bästa att investera i.

    Ett av de enklaste sätten att avgöra vilken av de bästa valutorna att investera i är genom att titta på den underliggande tillgångens egenskaper. Detta kallas tillgångens egenskaper och de är kända som Ripples. Låt oss ta en titt på två exempel på de bästa valutorna att investera i under det kommande decenniet. Den första typen av tillgång är aktier. Ett index som följer värdet av olika typer av företag kallas aktier. Så om vi tittar på de tio främsta valutorna som kommer att styra aktiemarknadens värde i framtiden är det troligt att dollarn kommer att fortsätta sin uppgång eftersom värdet på aktier i USA och Europa förväntas stiga.

    Den andra typen av tillgångar är guld. Det finns en stor sannolikhet för att guldpriset kommer att stiga under det kommande decenniet. Om du håller på med handel och inte har teknisk kunskap om vilken av de bästa valutorna du ska investera i bör du prova de bästa kryptovalutorna som sannolikt kommer att öka i värde under detta årtionde. Bland de möjliga valutorna att investera i Btc till Dollar finns euron, den japanska yenen, den australiska dollarn, schweiziska francen, den kanadensiska dollarn och det brittiska pundet. Var och en av dessa valutor har sina egna för- och nackdelar och du bör noggrant studera dem innan du investerar i dem.

    Även om det är lätt att bli lockad av de dåliga nyheterna om att investera i kryptovalutor finns det ingen dålig investering när det gäller mynt. Anledningen till detta är att de flesta investerare som är nya i den här branschen slutar med att förlora sina pengar eftersom de inte har rätt kunskap om vilka av de bästa valutorna de ska investera i. Så när du letar efter de bästa valutorna att investera i är det viktigt att du blir bekant med alla dessa. Detta beror på att endast genom att bli en registrerad användare av en onlinehandelsplats kan du få tillgång till alla de bästa kryptovalutorna som finns tillgängliga i världen idag.

    Det finns många fördelar som är förknippade med att investera i de bästa kryptokurvorna, bland annat det faktum att de handlas på den globala marknaden. Därför är det lätt att handla med de bästa valutorna och du kan också förvänta dig god avkastning. Att investera i de bästa valutorna kräver dock att du lär dig hur systemet fungerar, grunderna i ekonomi och företagsledning. Om du till exempel är en investerare som är ny på att investera på altcoin-marknaden, är det bättre om du får hjälp av professionella personer som experter och handlare.

    Det finns många fördelar som du kan njuta av när du investerar i de bästa valutorna i världen. En av dessa är att när du väljer de bästa kryptosurferna kan du vara säker på att värdet på din investering alltid kommer att vara stabilt. Eftersom värdet på varje mynt varierar beroende på utbud och efterfrågan är det viktigt att du investerar i de bästa valutorna och sedan handlar med dem enligt dina behov. När värdet på en valuta fluktuerar kan du alltså enkelt sälja dina tillgångar och investera i de nya.

    Det bästa sättet att investera i de bästa kryptosurfarna är att se till att du är välinformerad om de olika faktorer som påverkar värdet på ett visst mynt och du har också en expert som kan lära dig hur du väljer de bästa valutorna att investera i. När du vill göra vinster från handeln med den bästa kryptosurf bör du alltså se till att du utbildar dig om marknadens ekonomi och affärsmodeller. Här är nästa intressanta blogginlägg: Kryptovaluta Hur man handlar.

    The post Btc till Dollar Erfarenheter first appeared on Hur man använder kryptovalutor på rätt sätt.


    Hur man använder kryptovalutor på rätt sätt

  • Kan du köpa Ether direkt via Coinbase? Erfarenheter

    Att välja Kan du köpa Ether direkt via Coinbase? de bästa kryptosystem som finns på marknaden är en mycket viktig aspekt av handeln. Om du inte är medveten om detta kan det sluta med att du förlorar mycket pengar i det långa loppet. Om du vill göra mest vinst på kortast möjliga tid måste du göra din hemläxa väl. Här är några av de grunder som du bör känna till innan du väljer de bästa mynten att handla på marknaden med.

    Kan du köpa Ether direkt via Coinbase?

    En av de första sakerna du måste titta efter i de bästa valutorna som finns på marknaden är deras inflationsgrad. För att förstå detta måste du först förstå vad inflation är. Inflation är helt enkelt en ökning av priserna utan att varor och tjänster minskar. Till exempel är en enårig dollar värd mycket mer om några månader, eller hur? Så om du väljer att investera i de bästa råvarorna för det här århundradet vore det klokt att hålla utkik efter de valutor som enligt prognoserna kommer att uppleva den högsta inflationen under de kommande tio åren.

    Ett annat grundläggande övervägande när det gäller att investera i de bästa valutorna är deras historik när det gäller handel och gruvdrift. Man kan inte bara välja vilket gammalt system som helst att investera i idag. Det finns hundratusentals valutor som handlas på marknaden och endast ett fåtal utvalda är lönsamma. Därför är det nödvändigt att du forskar väl om de olika systemen som finns tillgängliga för att veta vilket av de tillgängliga kryptosystemen som är det bästa att investera i.

    Ett av de enklaste sätten att avgöra vilken av de bästa valutorna att investera i är genom att titta på den underliggande tillgångens egenskaper. Detta kallas tillgångens egenskaper och de är kända som Ripples. Låt oss ta en titt på två exempel på de bästa valutorna att investera i under det kommande decenniet. Den första typen av tillgång är aktier. Ett index som följer värdet av olika typer av företag kallas aktier. Så om vi tittar på de tio främsta valutorna som kommer att styra aktiemarknadens värde i framtiden är det troligt att dollarn kommer att fortsätta sin uppgång eftersom värdet på aktier i USA och Europa förväntas stiga.

    Den andra typen av tillgångar är guld. Det finns en stor sannolikhet för att guldpriset kommer att stiga under det kommande decenniet. Om du håller på med handel och inte har teknisk kunskap om vilken av de bästa valutorna du ska investera i bör du prova de bästa kryptovalutorna som sannolikt kommer att öka i värde under detta årtionde. Bland de möjliga valutorna att investera i Kan du köpa Ether direkt via Coinbase? finns euron, den japanska yenen, den australiska dollarn, schweiziska francen, den kanadensiska dollarn och det brittiska pundet. Var och en av dessa valutor har sina egna för- och nackdelar och du bör noggrant studera dem innan du investerar i dem.

    Även om det är lätt att bli lockad av de dåliga nyheterna om att investera i kryptovalutor finns det ingen dålig investering när det gäller mynt. Anledningen till detta är att de flesta investerare som är nya i den här branschen slutar med att förlora sina pengar eftersom de inte har rätt kunskap om vilka av de bästa valutorna de ska investera i. Så när du letar efter de bästa valutorna att investera i är det viktigt att du blir bekant med alla dessa. Detta beror på att endast genom att bli en registrerad användare av en onlinehandelsplats kan du få tillgång till alla de bästa kryptovalutorna som finns tillgängliga i världen idag.

    Det finns många fördelar som är förknippade med att investera i de bästa kryptokurvorna, bland annat det faktum att de handlas på den globala marknaden. Därför är det lätt att handla med de bästa valutorna och du kan också förvänta dig god avkastning. Att investera i de bästa valutorna kräver dock att du lär dig hur systemet fungerar, grunderna i ekonomi och företagsledning. Om du till exempel är en investerare som är ny på att investera på altcoin-marknaden, är det bättre om du får hjälp av professionella personer som experter och handlare.

    Det finns många fördelar som du kan njuta av när du investerar i de bästa valutorna i världen. En av dessa är att när du väljer de bästa kryptosurferna kan du vara säker på att värdet på din investering alltid kommer att vara stabilt. Eftersom värdet på varje mynt varierar beroende på utbud och efterfrågan är det viktigt att du investerar i de bästa valutorna och sedan handlar med dem enligt dina behov. När värdet på en valuta fluktuerar kan du alltså enkelt sälja dina tillgångar och investera i de nya.

    Det bästa sättet att investera i de bästa kryptosurfarna är att se till att du är välinformerad om de olika faktorer som påverkar värdet på ett visst mynt och du har också en expert som kan lära dig hur du väljer de bästa valutorna att investera i. När du vill göra vinster från handeln med den bästa kryptosurf bör du alltså se till att du utbildar dig om marknadens ekonomi och affärsmodeller. Här är nästa intressanta blogginlägg: Betalning med Bitcoins på Sparda Bank.

    The post Kan du köpa Ether direkt via Coinbase? Erfarenheter first appeared on Hur man använder kryptovalutor på rätt sätt.


    Hur man använder kryptovalutor på rätt sätt

  • Is it Legal to Fly a Drone over Private Property? Laws Explained

    Drone photography and videography are becoming big business, from real estate to special effects such as simulating views from aircraft or a bird’s eye.  Aerial photography can be simply stunning and even abstract which makes for great photos. With money out there and more and more people getting into using drones for photography, legal questions arise over what you can Continue Reading
    Photodoto