RSS
 

Posts Tagged ‘Copies’

How to Use the Lightroom Editing Trifecta: History, Snapshots, and Virtual Copies

05 Aug

I often find myself knee-deep into editing a photo when an idea hits me to try something totally different. Maybe it’s exploring different cropping options, creating a black-and-white version, or getting crazy with the adjustment brush. One useful feature of a Lightroom editing workshop is that it gives you the flexibility to explore as many different paths as you want for a picture. While always giving you the freedom to jump back to different editing points or start over entirely.

Three of the best ways to do that are with the History, Snapshot, and Virtual Copy options. Let’s dig deeper into each one separately.

butterfly on a red flower - How to Use the Lightroom Editing Trifecta: History, Snapshot, and Virtual Copies

Lightroom History

Decades ago in the early days of personal computers, you were lucky if you could click undo more than once. Even the first version of Photoshop did not allow more than one undo!

This meant that you had to be extraordinarily careful when creating or editing digital images because any changes were basically permanent. Whereas today most programs allow virtually limitless error-correction when it comes to undoing your work. Lightroom is no different and if you want to fix a mistake just choose Edit > Undo and any errors or changes will be immediately wiped away.

Better than undo

History in Lightroom is sort of like undo but it is infinitely more flexible. It’s a veritable time machine that gives you the freedom to revert back to any aspect of your editing even if you have made dozens and dozens of changes to an image.

Whereas Undo lets you go back to earlier versions of your image one step at a time, the History panel actually lists all the changes made since you imported an image into your Catalog including the numerical values of each edit. If you make a change that involves a numerical value those will show up in the History panel as well, including the amount of the change and the resulting value.

For example, if you adjust the Exposure by +0.5, the History panel will show you Exposure +0.50 and then the resulting exposure value of +0.50. If you make another exposure adjustment of 0.2, you will see that in the History panel along with a final value of +0.70. This helps you see a written description of all the edits you have made to an image as they were applied.

lightroom history - How to Use the Lightroom Editing Trifecta: History, Snapshot, and Virtual Copies

The complete history of all my edits to the butterfly image at the top of this article. Clicking on any of the edits listed will instantly let me jump back in time to that particular step of the editing process.

History is saved within your catalog

Every image’s complete editing history is saved in your Lightroom Catalog so you can revisit changes you made to photos years ago just as you can with photos you take today.

Using the History panel is fairly straightforward. Click on any edit and your image will instantly revert back to when that change was made.

However, if you then make any subsequent edits at that point, the changes will be reflected at the top of the History panel and therefore will not take into account all the additional edits you already made. This is where the Snapshot tool comes in handy.

Lightroom Snapshots

You can use Snapshots in combination with the History panel or all by themselves. Either way, it opens up a great deal of editing flexibility that is light years beyond what the Undo/Redo commands have to offer.

As you work through your edits on a photo you might find yourself wanting to save the current state of your image so you can make additional changes but still have the option of reverting back to a specific point in time or a specific set of edits later.

Snapshots let you do that easily with one click. They are extremely useful for trying new things or even just saving various versions of a single image.

countryside weather vane - How to Use the Lightroom Editing Trifecta: History, Snapshot, and Virtual Copies

The above image was taken on a recent trip through the state of Kansas. I got it printed as a canvas for my wife to hang on the wall.

Creating and naming a snapshot

After creating this version of the picture I wanted to make some additional changes and even try a black and white version. But I did not want to lose the original image in case I ever want to get it re-printed. Lightroom makes this a simple one-click step. All I had to do was click the + button under the Snapshot panel. Lightroom then created a version of the image frozen in time at that exact point in the editing process.

name your Snapshot in LR - How to Use the Lightroom Editing Trifecta: History, Snapshot, and Virtual Copies

After creating the Canvas Print Snapshot I did a black-and-white conversion, changed the Blue color slider to adjust the brightness of the sky, and re-cropped it to be a 3:2 aspect ratio.

black and white version - How to Use the Lightroom Editing Trifecta: History, Snapshot, and Virtual Copies

I was happy with the result, so I saved a new Snapshot which I titled according to the edits made.

black and white snapshot named - How to Use the Lightroom Editing Trifecta: History, Snapshot, and Virtual Copies

Benefits

This process lets me switch between two versions of the same image with the click of my mouse. I can also create as many Snapshots as I want while also re-naming or deleting them by right-clicking on any given Snapshot name. In addition, I can use the History panel to create Snapshots by hovering over any of the edits listed in the History, right-clicking, and choosing the “Create Snapshot” option.

Finally, one nice but an often-unnoticed benefit of Snapshots is that you can move the mouse over your list of Snapshots and see a preview of each one in the small window in the top-left corner of Lightroom. It’s a handy way to see what each snapshot looks like without clicking and loading them one by one.

snapshot version of windmill - How to Use the Lightroom Editing Trifecta: History, Snapshot, and Virtual Copies

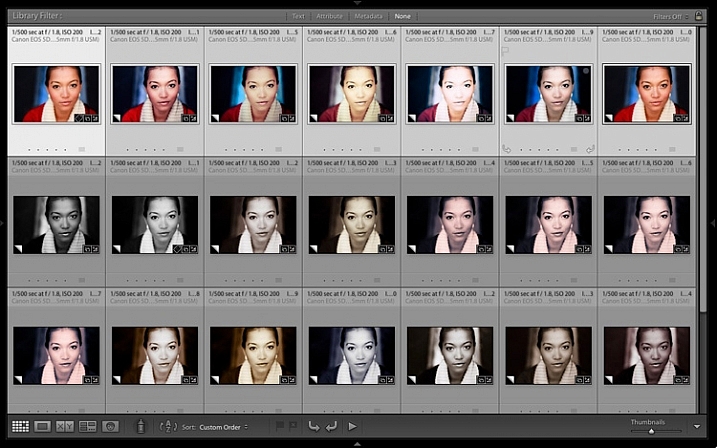
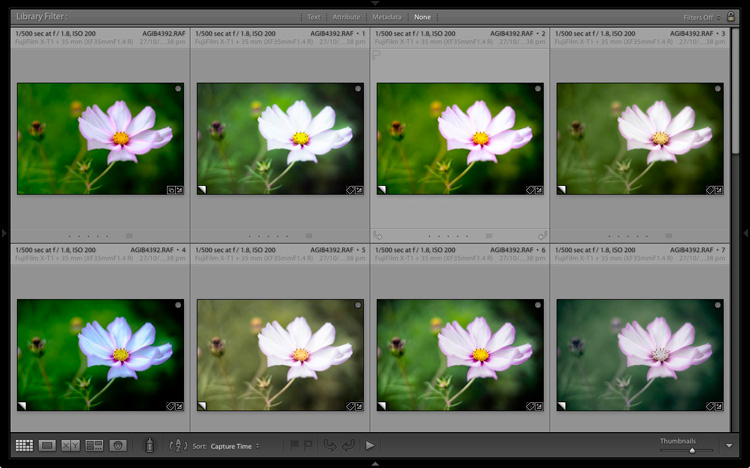
Three renditions of the windmill photo now exist, each with its own Snapshot that I can click on at any time to load that particular version.

Virtual Copies

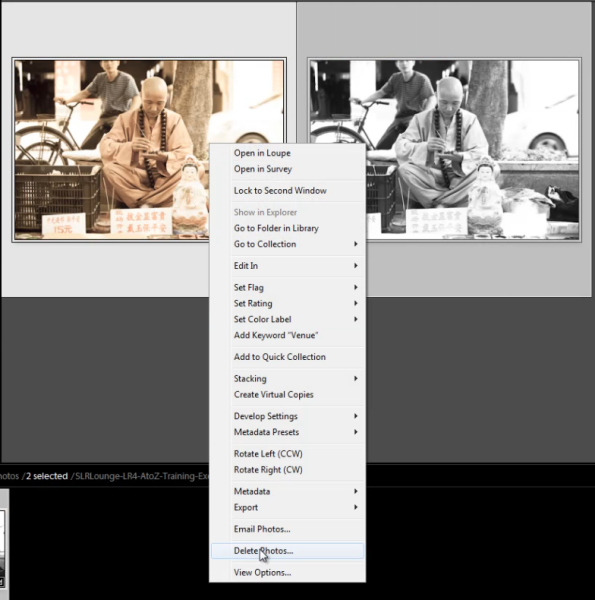
One limitation of the Snapshots is that you have to manually click through your Snapshots one by one by one if you want to export them as individual photos. This is fine if you have one or two snapshots of a single image, but if you need to export multiple snapshots from multiple photos the process can become cumbersome right away.

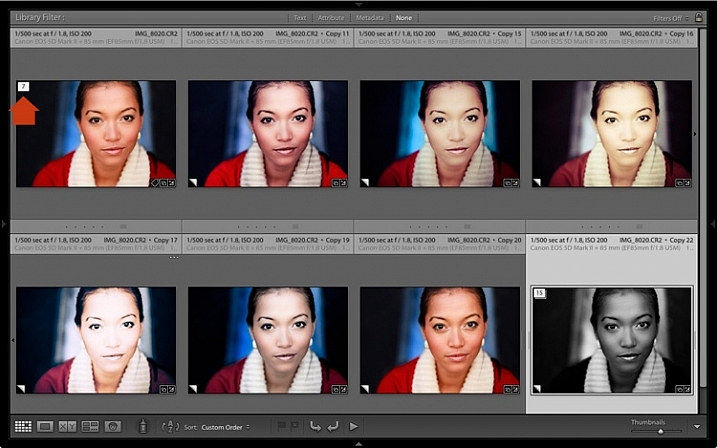
This is where Virtual Copies really shine. While they are similar to Snapshots there are some key differences that make them highly useful in certain situations.

maternity portrait - How to Use the Lightroom Editing Trifecta: History, Snapshot, and Virtual Copies

I cropped this image into a square and while the client loved it, she asked if I could send her a vertical version. I used Lightroom to make a Virtual Copy and re-cropped that so I would always have my original crop.

How they work

Virtual Copies function in a manner almost identical to Snapshots in that you can create what is basically a saved state of your edits at any point in the editing process. After that, you can add more changes to each saved state without impacting the other Virtual Copies.

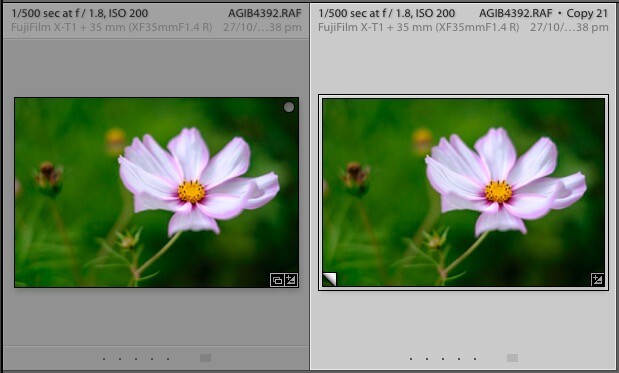
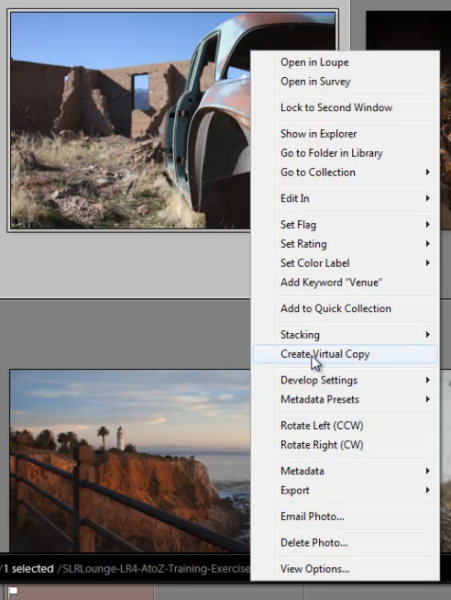
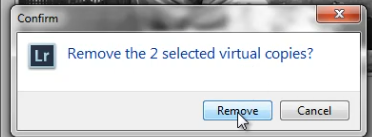
To create one, right-click on any image in the Library or Develop module and choose “Create Virtual Copy” or choose “Create Virtual Copy” from the Photo menu (or use the keyboard shortcut Cmd/Ctrl+’). This essentially duplicates the photo in your library (as a new thumbnail) but does not actually create a copy of the original file.

Virtual Copies are duplicate versions of images that can be edited like any other photo in your library, and function almost identically. A Virtual Copy has its own unique editing history, can be cropped and adjusted like any other image, and can utilize editing presets as well.

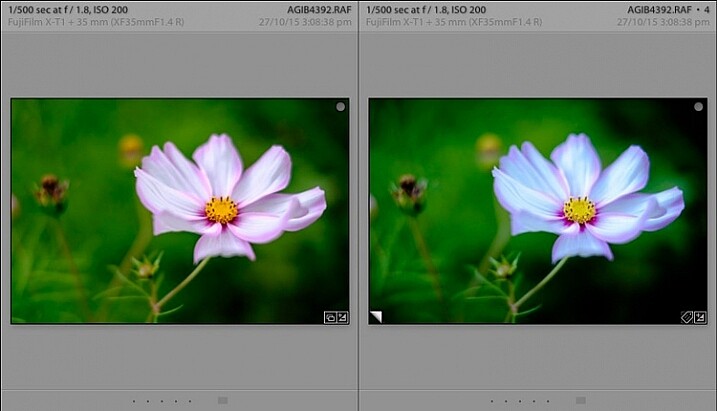
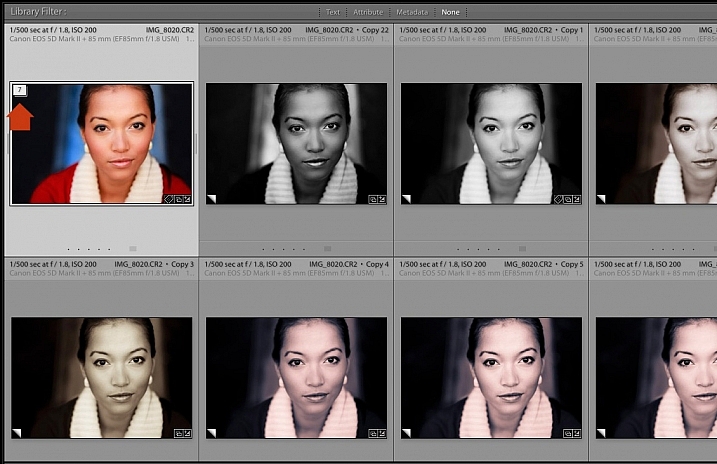
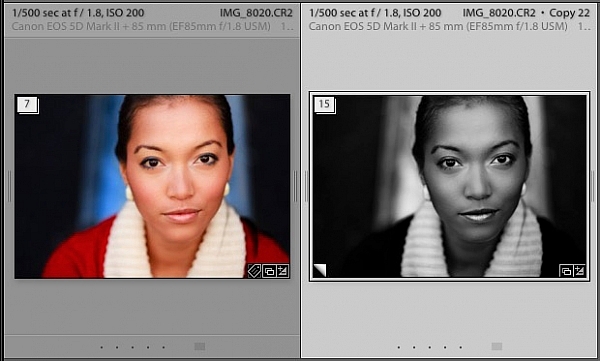
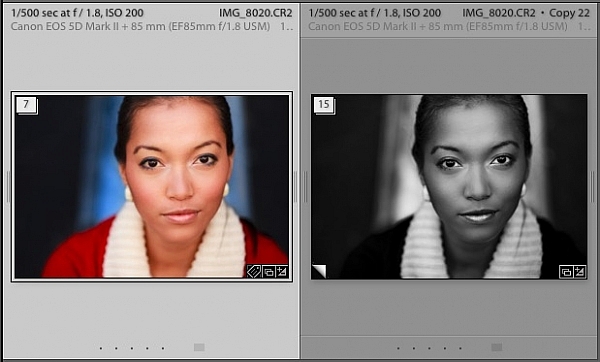
The only way to distinguish Virtual Copies from other photos is that they have a small triangle icon (like a page turning) in the lower left corner of their thumbnail.

How to Use the Lightroom Editing Trifecta: History, Snapshot, and Virtual Copies - virtual copy in thumbnail strip

The small triangle icon in the lower left corner of an image thumbnail indicates that it is a Virtual Copy.

Snapshot or Virtual Copy?

Snapshots are fine when I’m experimenting with different editing techniques, but I prefer Virtual Copies on client work, particularly when I want to give them multiple versions of a single image.

For example, when processing a recent session I was able to edit an image for white balance, sharpness, tonality, etc., and then create a virtual copy with those same edits that I cropped much closer. When I exported my images from Lightroom both versions got rendered and saved to my computer, which is not the case when working with Snapshots.

How to Use the Lightroom Editing Trifecta: History, Snapshot, and Virtual Copies

I had two different crops of this image that I wanted to send to the clients. I used Virtual Copies instead of Snapshots so both would be exported when I created the final batch of images to send to them.

Conclusion

Lightroom has a host of small but powerful features like this that, once learned, can greatly streamline and enhance your workflow.

Do you use History, Snapshots, or Virtual Copies? If so what are some of your favorite tips and tricks that help you get your work done more efficiently? Leave your thoughts in the comments below.

The post How to Use the Lightroom Editing Trifecta: History, Snapshots, and Virtual Copies appeared first on Digital Photography School.


Digital Photography School

 
Comments Off on How to Use the Lightroom Editing Trifecta: History, Snapshots, and Virtual Copies

Posted in Photography


This NVIDIA algorithm copies the artistic style of one photo onto another

26 Mar

Struggling with stylistic consistency, or wanting to transpose the style of your best picture onto the rest of your Instagram feed? Thanks to a group of scientists at Cornell University, you can now do just that with surprisingly accurate and realistic results.

The team created an algorithm for graphics card company NVIDIA that lifts the stylistic characteristics of one picture and drops them onto a completely different image with startling precision. The algorithm is called FastPhotoStyle, and it’s capable of transferring the coloration, drama and atmosphere of one picture and making an entirely different frame look as though it was taken at the same time even if the subject matter is totally unrelated.

According to the developers, the goal of photorealistic image style transfer is:

…to change the style of a photo to resemble that of another one. For a faithful stylization, the content in the output photo should remain the same, while the style of the output photo should resemble the one of the reference photo. Furthermore, the output photo should look like a real photo captured by a camera.

There are programs already invented to do this, but the inventors of this algorithm claim that what already exists is slow, and doesn’t produce realistic results anyhow.

FastPhotoStyle is different, they say, because it uses a smoothing process after the initial whitening and Coloring Transfer step—or PhotoWCT step. This smoothing step tries to ensure that neighboring pixels receive similar styling and, by using what they call Matting Affinity, individual areas of the image can be subjected to slightly different treatment. This is what helps the algorithm produce such realistic looking results.

Another major difference is that this program reportedly operates as much as 60x faster than existing algorithms.

The code can be downloaded from NVIDIA’s GitHub for anyone to use under Creative Commons license (BY-NC-SA 4.0), and a user manual download is included on the page. If you’re brave, you can read the full technical paper as well.

Technical Paper Abstract:

A Closed-Form Solution to Photorealistic Image Stylization

Photorealistic image style transfer algorithms aim at stylizing a content photo using the style of a reference photo with the constraint that the stylized photo should remains photorealistic.

While several methods exist for this task, they tend to generate spatially inconsistent stylizations with noticeable artifacts. In addition, these methods are computationally expensive, requiring several minutes to stylize a VGA photo. In this paper, we present a novel algorithm to address the limitations.

The proposed algorithm consists of a stylization step and a smoothing step. While the stylization step transfers the style of the reference photo to the content photo, the smoothing step encourages spatially consistent stylizations. Unlike existing algorithms that require iterative optimization, both steps in our algorithm have closed-form solutions.

Experimental results show that the stylized photos generated by our algorithm are twice more preferred by human subjects in average. Moreover, our method runs 60 times faster than the state-of-the-art approach.

Articles: Digital Photography Review (dpreview.com)

 
Comments Off on This NVIDIA algorithm copies the artistic style of one photo onto another

Posted in Uncategorized


Enter to Win one of 10 Copies of Corel’s AfterShot Pro 3 Photo Editor

27 Jun

Win one of 10 Copies of AfterShot™ Pro 3 Photo Editor from Corel!

Enter the After Photography Contest Today!

After dark, after thought, after noon, after work, after school, after life, after all…

You pick your after theme and have fun with it.

ASP 3 workspace

Over the last few years here at dPS, we’ve run very some very popular contests with our partners, to give away some of their great photographic products to lucky dPS readers. We are lucky enough to be able to do it again now.

For this competition, Corel is giving away TEN copies of AfterShot™ Pro 3 Photo Editor!

These prizes are designed to help every level of photographer create BETTER pictures. Since 1989, with the introduction of CorelDRAW, Corel boasts a range of award-winning products that includes graphics, painting, photo, video, and office software with a community of over 100 million strong. Each copy of AfterShot Pro 3 will be won by a different dPS reader.

ASP3 box front

Our 10 prize winners will receive the full version of Corel’s leading RAW Photo Editor – A $ 79.99 Value

Corel® AfterShot™ Pro 3 is up to four times faster than Adobe® Lightroom (claim based on a batch export workflow, using Lightroom CC 2015.5.). It’s the photo editor that helps you reveal your true creative potential. With AfterShot™ Pro 3 there are no subscriptions, and no longer a need to spend hours editing at your computer. You can import, process, output faster, and get back to taking photographs. Take a look at a few of the new, improved and classic features:

  • Faster workflow
  • Simple photo management
  • New comprehensive watermarking
  • Enhanced highlight recovery
  • New blemish remover tools
  • New image preset library
  • Powerful batch processing

Adobe®, Lightroom® and Photoshop® are either registered trademarks or trademarks of Adobe Systems Incorporated in the United States and/or other countries.

ASP 3 Highlight Recovery

New Blemish Remover

Learn a little more about AfterShot Pro 3 HERE:

ASP3 Logo

How to win

To win this contest you’ll need to:

  • Edit your favorite ‘After’ photo. To make it even better, download a free trial of AfterShot Pro 3 HERE
  • Post your After photo, along with a few words on how you feel AfterShot Pro 3 would help your photography in the comments section below, and of course, your After themed image. It’s as easy as that!
  • Do this in the next 21 days and on August 5, 2016, the team at Corel will choose the 10 best photos and comments, and we will announce the winners in the following days.
  • Deadline Is July 19, 2016, at 11:59pm PDT. Photos and comments left after deadline will not be considered.

By best – we’re looking for people who have an understanding of photography post-processing, and how AfterShot Pro 3 may best suit your needs. So you’ll need to check out the product page to put yourself in the best position to win. Don’t forget to grab a free trial download.

There’s no need to write essay length comments to win – but we’re looking to hear what you like about the software, and how it would help your development as a photographer. Don’t forget to include your favorite After themed photo. We encourage you to have fun and be creative!

This competition is open to everyone, no matter where you live – but there is only one entry per person. To enter – simply leave your photo and comment below.

ASP3 Logo

Disclaimer: Corel is a paid partner of dPS.

By entering the After photo contest, the Entrant is providing permission to Corel to publish their photo, if it is chosen as a winner, to be utilized within media post(s) by Corel announcing the winners and promoting. Entrants will be provided a full photo credit if photo is used, and will retain their copyright – Please click HERE or full contest rules, terms and conditions.

googletag.cmd.push(function() {
tablet_slots.push( googletag.defineSlot( “/1005424/_dPSv4_tab-all-article-bottom_(300×250)”, [300, 250], “pb-ad-78623” ).addService( googletag.pubads() ) ); } );

googletag.cmd.push(function() {
mobile_slots.push( googletag.defineSlot( “/1005424/_dPSv4_mob-all-article-bottom_(300×250)”, [300, 250], “pb-ad-78158” ).addService( googletag.pubads() ) ); } );

The post Enter to Win one of 10 Copies of Corel’s AfterShot Pro 3 Photo Editor by Darlene Hildebrandt appeared first on Digital Photography School.


Digital Photography School

 
Comments Off on Enter to Win one of 10 Copies of Corel’s AfterShot Pro 3 Photo Editor

Posted in Photography


Long Term Angle Parking: 12 Cool Cadillac Ranch Copies

01 Feb

[ By Steve in Art & Installation & Sound. ]

cadillac_ranch_5a
The legendary Cadillac Ranch can’t be beat but it CAN be copied! These 12 tinny tributes to Amarillo’s angled auto art shift flattery into high gear.

cadillac_ranch_5b

cadillac_ranch_5c

Cadillacs may be iconic symbols of those Fabulous Fifties but by the time the Space Age was in full flight, pop culture had ditched finned land barges in favor of “lowly” but well-loved VW Beetles. A half-century later, classic Bugs are a rare sight on America’s roads though you’ll find plenty at the Slug Bug Ranch in Conway, Texas! Kudos to Flickr users Jenny McG (thedefiningmoment), Kent Kanouse (Snap Man) and The Atomic Kid 1959 for bringing out the best in the Bug Ranch’s buried but be-dazzled Beetles!

Truckhenge, Boathenge, Bushenge…

cadillac_ranch_6c

cadillac_ranch_6a

Lumping Ron Lessman’s varied automotive artworks into a “truckhenge” is rather all-inclusive – the Shawnee County, Kansas denizen has deployed a host of land and water craft in several distinct henges.

cadillac_ranch_6b

cadillac_ranch_6d

According to The Vagabond Glovers’ Meanderings, “Shawnee County health and zoning officials got after him to clean up his yard, and when they told him to pick up his trucks, he decided to take their orders literally, and pick them up, then plant them back down in the ground the way he saw it done in Texas at Cadillac Ranch.” That’s tellin’ ’em, Ron!

Small Wonders

cadillac_ranches_1a

Old and busted: car smashups. New hotness: Toy Mashups, which just happens to be where photographers Josh Cornish and Kyle Hillery snapped the above installation and its inspiration in May of 2012. Unlike the original Cadillac Ranch created by art collective Ant Farm (Chip Lord, Hudson Marquez and Doug Michels) and eclectic landowner Stanley Marsh 3 back in 1974, no backhoes were required to set the miniatures in place. Well, maybe a teeny tiny toy backhoe.

cadillac_ranch_1b

cadillac_ranch_1c

Nice that both Miniatur Wunderland (c/o Knitrageous) in Hamburg, Germany and Un Petit Monde saw fit to apply graffiti to their scaled-down Cadillac Ranch tributes. It’s doubtful visitors to these installations will be allowed to personalize them, though.

Lying Solo

cadillac_ranch_3

Wow, Christine has really let herself go! Actually this is/was a 1960 Plymouth Fury while King’s krazed killer kar was a ’58 model. We’re not certain whether the vehicle’s owner had Cadillac Ranch in mind when he tilted this seemingly sharp Oldie But Goodie into its diagonal semi-grave but the finned beauty sure could use some company.

Next Page – Click Below to Read More:
Long Term Angle Parking 12 Cool Cadillac Ranch Copies

Share on Facebook


[ By Steve in Art & Installation & Sound. ]

[ WebUrbanist | Archives | Galleries | Privacy | TOS ]


WebUrbanist

 
Comments Off on Long Term Angle Parking: 12 Cool Cadillac Ranch Copies

Posted in Creativity


5 Ways to Use Lightroom Virtual Copies Better

20 Nov
Virtual Copies in Lightroom

Virtual Copies in Lightroom

Imagine that you have just processed a colour image and you are happy with the result, but you’d also like to experiment with it a little. Perhaps you’re curious to see how it will look if you convert it to black and white. Maybe you’d like to apply a Develop Preset or two, or crop to the square format, or even all three.

It’s easy in Lightroom. All you have to do is make a Virtual Copy and experiment.

A Virtual Copy is an exact replica of the original photo, including all edits made in Lightroom. Once you have made a Virtual Copy you can process it any way you like without affecting the original.

Virtual Copies are a fantastic tool because they let you make multiple copies of a single image, while using very little hard drive space (it only makes a new thumbnail it doesn’t duplicate your image file). You can try out different techniques, and keep all the results. Each Virtual Copy exists as a set of text commands in the Lightroom Catalog, an addition measured in kilobytes rather than megabytes.

You can review this by reading A Brief Introduction to Lightroom if you are unsure how it works.

Are you making the most of Virtual Copies? Here are five ways to use them better in Lightroom.

Creating Virtual Copies

There are four ways to create a Virtual Copy.

Start in Grid View in the Library module (press the G key to go there from any part of Lightroom). Select the image (or images) that you want to make Virtual Copies of:

1. Go to Photo > Create Virtual Copy. Lightroom creates the Virtual Copies and places them in the same Collection as the original images.

2. Alternatively, use the keyboard shortcut. If you’re using Windows press Ctrl plus apostrophe (Ctrl + ‘), on a Mac press Command plus apostrophe (Cmd + ‘).

3. Alternatively, right click on one of the selected photos and choose Create Virtual Copy.

Virtual Copies in Lightroom

When you create a Virtual Copy it appears alongside the original in Grid View, and is identical in every way. You can make as many changes to the Virtual Copy as you lik,e without affecting the original.

4. The fourth way is to go to Library > New Collection. The Create Collection window opens. Under Options, tick the Include Selected Photos and Make New Virtual Copies boxes. Lightroom creates a new Collection (with the name you give it), and adds Virtual Copies of the selected images.

Virtual Copies in Lightroom

Using Virtual Copies Better

Now you know how to create Virtual Copies, let’s look at some ways you can use them better in Lightroom.

1. To create multiple versions of the same photo

This is the main reason that you would want to create Virtual Copies – so you can process the same photo, a number of different ways. The photo shown below is a great example. I created a colour version first, then made a Virtual Copy and converted it to black and white. Then I made some more Virtual Copies and experimented with different Develop Presets and split tones. I ended up with 22 different versions in a mixture of colour and black and white.

Virtual Copies in Lightroom

2. Stacking Virtual Copies

You can use Stacks to simplify the thumbnails displayed in Grid View. In this example I’m going to create two Stacks – one containing colour photos, and the other black and white.

  • Select the photos you want to place in the same stack. Click and drag thumbnails to rearrange them in Grid View if you need to. Here, I grouped all the colour photos together.

Virtual Copies in Lightroom

  • Go to Photo > Stacking > Group into Stack. You can also find this option by right-clicking a thumbnail. Or use the keyboard shortcuts, Ctrl+G (Windows) or Cmd+G (Mac).

Lightroom places the photos into a Stack. The first photo in the selection is used as the cover image. The Stack icon is displayed in the top left corner of the thumbnail (marked below). The number inside tells you how many photos are in the Stack.

Virtual Copies in Lightroom

Repeat if you want to group other Virtual Copies into another stack. Below, you can see that I did the same with the black and white versions.

Virtual Copies in Lightroom

To view the photos in a Stack, click on the Stack icon in the thumbnail. Click it again to hide the stacked photos.

Virtual Copies in Lightroom

3. For working with plug-ins and Photoshop

If you want to send a photo to a plug-in or Photoshop, the recommended approach is to process it in Lightroom first (applying at least basic settings such as Camera Calibration, Lens Corrections and tonal adjustments in the Basic panel).

Before the export, make a Virtual Copy and send the Virtual Copy to the plug-in or Photoshop. Then, when you return to Lightroom, you can compare the two. You can also make more Virtual Copies from the original to send to other plug-ins, or to work on in Lightroom.

4. Set up View Options to show which images are Virtual Copies

In the screen shot below, you can see that the image on the right is a Virtual Copy as it is labelled Copy 22. The image on the left is the original and just has the file name.

Virtual Copies in Lightroom

You can set this up in View Options (View > View Options or Ctrl+J/Cmd+J). Tick the Show Grid Extras and Top Label boxes (marked below). Set Show Grid Extras to Expanded Cells and set Top Label to File Base Name and Copy Name (the other options in the same section do a similar thing).

Virtual Copies in Lightroom

5. Use the Excessor plug-in to create a Collection of photos processed with different Develop Presets

The Excessor plug-in creates Virtual Copies and applies a different Develop Preset to each one. This is how to use it:

  • Go to the Capture Monkey website and download the Excessor plug-in. It is available on a shareware model – you can download and use it, and if you find it useful, you are encouraged to pay a one time registration fee of $ 10. Add it via the plug-ins manager (my article Useful Lightroom Plug-ins explains how – scroll to the bottom for instructions).
  • Select the photo you want to work with. Go to Library > Plug-in Extras > Excessor.
  • The Excessor window opens. Use the top menu to select a Develop Presets folder. Select Preset name from the bottom menu to give each Virtual Copy the name of the Develop Preset used to process it. Press OK.

Virtual Copies in Lightroom

  • Lightroom creates a Virtual Copy for each Develop Preset in the selected folder.

Virtual Copies in Lightroom

Tip: Create Preset folders containing your favourite Develop Presets. You can create different folders for different subjects: e.g., a folder for portraits, another for landscapes, another for black and white, another for vintage presets, and so on. Then you can use the Excessor plug-in as a shortcut to applying your favourite presets to a photo.

Your turn

These are my five suggestions for using Virtual Copies better in Lightroom, but how do you use them? Have you come up with anything that I haven’t thought of? Let me know in the comments.


The Mastering Lightroom CollectionMastering Lightroom ebook bundle

My Mastering Lightroom ebooks are a complete guide to using Lightroom’s Library and Develop modules. Written for Lightroom 4, 5, 6 and CC  they  show you how to import and organise your images, use Collections, creatively edit your photos and how to work in black and white.

googletag.cmd.push(function() {
tablet_slots.push( googletag.defineSlot( “/1005424/_dPSv4_tab-all-article-bottom_(300×250)”, [300, 250], “pb-ad-78623” ).addService( googletag.pubads() ) ); } );

googletag.cmd.push(function() {
mobile_slots.push( googletag.defineSlot( “/1005424/_dPSv4_mob-all-article-bottom_(300×250)”, [300, 250], “pb-ad-78158” ).addService( googletag.pubads() ) ); } );

The post 5 Ways to Use Lightroom Virtual Copies Better by Andrew S. Gibson appeared first on Digital Photography School.


Digital Photography School

 
Comments Off on 5 Ways to Use Lightroom Virtual Copies Better

Posted in Photography


Lightroom 4 Virtual Copies 101

25 Mar

Introduction

This tutorial has been transcribed from the SLR Lounge Lightroom 4 Workshop on DVD, a 14 hour Lightroom 4 A – Z guide with over 130 tutorials for mastering Lightroom from start to finish. The Digital download can be purchased from SLR Lounge while the physical copy is available through Amazon Prime.

Overview

The way an image is post-produced can drastically change the mood and feel of that image. We often take pictures that would look great in color, black and white or even with vintage effects. Virtual Copies are great for creating duplicates of an image with different develop settings applied to them. In this tutorial, we will go over the basics of Virtual Copies in Lightroom 4 and how they differ from Snapshots.

What is a Virtual Copy?

Virtual Copies are not copies of the original RAW file (that’s actually what makes them so awesome to begin with). Instead, a virtual copy is only a copy of the develop settings, represented as a new image within the Lightroom catalog. When you export the image, Lightroom will create outputted images based on each virtual copy of a particular image. Virtual Copies are great because they do not take up much space on the hard drive since only the settings of the photo are saved within the catalog. However, once you export these images out from Lightroom, they will take up more space because Lightroom is creating different versions of the original image.

Creating Virtual Copies

There are several ways to create a virtual copy of an image. We can right-click on an image and hit “Create Virtual Copy.”

01_right-click-create-virtual-copy

But, my favorite method is simply to use the shortcut. To create a Virtual Copy at any point hit (Ctrl + ’) on the desired image.

Filtering and Deleting Virtual Copies

At times, it might be beneficial to view all the Virtual Copies within our Lightroom catalog. To aid us, we can actually filter by Virtual Copies in Lightroom. First, you need to bring up your Filter Menu. To do this, you need to be in the Library Module. Once there, hit “\” to bring up the Filter Menu. Click on “Attribute” and on the far right of the panel there are 3 little box icons. To select Virtual Copies, click on the middle box, as shown below. Once you turn this filter on, you can see all the Virtual Copies in your catalog.

02_virtual-copies-filter

Filtering by Virtual Copies is very handy if say you wish to clear out all of your Virtual Copies in your catalog. Often times I also like to filter by Virtual Copies when I want to create a “universal look” with the develop settings for all of my Virtual Copies.

Remember, if you delete a Virtual Copy, the original file with the original settings will still be in your catalog. Deleting a Virtual Copy has no effect over the original image. Delete Virtual Copies the same way you would a regular image, simply right-click on the images, and hit “Delete Photos.”

03_delete-virtual-copies

A dialogue box will then appear, asking if you want to remove the Virtual Copies. Once again, this will not remove your original image from your catalog (so long as the original image isn’t selected for deletion).

04_confirm-remove-virtual-copies

Virtual Copies vs. Snapshots

We are often asked what the difference is between a Snapshot versus a Virtual Copy. Given that both functions are used to create different looks for an image, it can seem similar. However, in reality, these two functions are very different, particularly when it comes to exporting.

When you create different looks via Snapshots, only the “active” or selected Snapshot develop settings will be exported to the final image. Let’s illustrate with an example.

Let’s say we have an image with 3 different looks created with Snapshots, and another image with 3 different looks created with Virtual Copies.

When we export the image with the 3 different Snapshots, Lightroom will create one exported image with the develop settings from the “active” snapshot.

When we export the image with the 3 different Virtual Copies, Lightroom will actually create 3 separate exported images using the develop settings from each Virtual Copy.

To keep it simple. Virtual Copies will create additional exported images while Snapshots will not.

Learn More with the Lightroom 4 Workshop Collection!

This was a sample tutorial from the Lightroom 4 A to Z DVD which is one of the DVDs in the Lightroom 4 Workshop Collection. A collection of nearly 30 hours of video education teaching everything from Lightroom basics to advanced raw processing techniques.

The LR4 Workshop Collection also includes the critically acclaimed Lightroom 4 Preset System which is designed to enable users to achieve virtually any look and effect within 3-5 simple clicks. From basic color correction, vintage fades, black & white effects, tilt-shift effects, faux HDR, retouching, detail enhancing, and so much more. Click the links above to learn more.

Post originally from: Digital Photography Tips.

Check out our more Photography Tips at Photography Tips for Beginners, Portrait Photography Tips and Wedding Photography Tips.

Lightroom 4 Virtual Copies 101


Digital Photography School

 
Comments Off on Lightroom 4 Virtual Copies 101

Posted in Photography


Pirated Architecture: Chinese Copies of Famous Buildings

17 Jan

[ By WebUrbanist in Architecture & Offices & Commercial. ]

china france copycat buildings

Consider what Le Corbusier would think if he were alive to see his famous church in France duplicated as a Chinese barbecue restaurant. Or imagine what an Austrian village  must feel about its entire township being copied to a lake in China. But more on that later – first: Zaha Hadid now is experiencing it all in real time, as she races to complete her original before its copycat takes shape.

copycat china architecture

Copycats exist in all disciplines, but reputation-sensitive architects are often self-policing, as they want their work to stand out as original – but there are exceptions. Hadid’s new project is the victim of the bold copiers (above) are not only building an identical complex to her Wangjing SOHO (below). And while the developers of the legitimate project may well be able to sue, it would only be for damages – not to stop (or undo) construction.

copycat zaha hadid

copycat zaha original complex

From Der Spiegel: “Satoshi Ohashi, project director at Zaha Hadid Architects for the SOHO complex that is now being cloned, said: ‘It is possible that the Chongqing pirates got hold of some digital files or renderings of the project.’ From these, he added, ‘you could work out a similar building if you are technically very capable, but this would only be a rough simulation of the architecture.’”

chinese duplicate village

As for the aforementioned village: Der Spiegel covered this strange phenomena a while back as well. Pictured above is the Chinese copy (top) of the Austrian original (bottom). Architects from China, passing as tourists, simply documented the entire town of 800, and, without permission, planned to replicate it back home as part of a large development. This may, of course, turn into a mixed blessing in the end – after all, it will almost certainly boost tourism as people experience the copy and seek out the original.

Share on Facebook


[ By WebUrbanist in Architecture & Offices & Commercial. ]

[ WebUrbanist | Archives | Galleries | Privacy | TOS ]


WebUrbanist

 
Comments Off on Pirated Architecture: Chinese Copies of Famous Buildings

Posted in Creativity


Windows Live Photo Gallery 2011 – Move Original Copies of Edited Photos to Recycle Bin after Awhile

30 Oct

If hard drive space is at a premium, place original copies of photos edited in Windows Live Photo Gallery 2011 into the Recycle Bin for later emptying.

It is always recommended to make backup copies of photos before editing them. To help automate this process, as you edit photos in Windows Live Photo Gallery 2011, the software makes its own backup copies of originals. This way you can later revert the changes if you do not find the edits to your liking.

If you edit many photos using Photo Gallery 2011 and hard drive space is at a premium, you may decide that once you edit a photo and leave it edited for awhile without reverting to the original, you mean for the edit to stick. Or, you may make backup copies of photos before importing them into Photo Gallery 2011 and not need the tool to make its own copies. Thus you can automatically move original photos to the Recycle Bin after a given period of time by doing the following:…

Read more at MalekTips.
New Computer and Technology Help and Tips – MalekTips.Com

 
Comments Off on Windows Live Photo Gallery 2011 – Move Original Copies of Edited Photos to Recycle Bin after Awhile

Posted in Technology