RSS
 

Archive for July, 2018

Tips for Photographing Artwork for Marketing Purposes

29 Jul

You have come a long way as a photographer and people are constantly telling you, “Your photos look great! You should start to sell some!”. As you are excited at the prospect, take their advice, and begin to post photos of printed products on your social media or perhaps you even develop a website.

However, you notice something. When you take an image of your images the color is off, there is a reflection of the lights in the room, and you are generally unhappy with how it looks. Not only that, but you realize your print products do not look that desirable to purchase based on the photo you took.

The reality is taking photos of your print products or artwork (paintings for example) for marketing can be difficult. But for a few dollars and a little bit of work you can increase the marketability (and hopefully sales) of your hard-earned images (and photograph other artist’s work for them too).

Tips for Photographing Artwork for Marketing Purposes - photo of an owl in a rustic wood frame

I create a lot of my own artwork from my images and depend on quality images of my artwork to help market them.

I hope you will learn a few key things while reviewing this article.

You will learn how to make an inexpensive lightbox, how to change lighting direction and source, and how to set up a camera for shooting photos of your photos. With those skills in your arsenal, I hope you will begin to market your own work!

Tips for Photographing Artwork for Marketing Purposes - photo in a frame on a small stand

Pre-matted prints are a common way to sell your work. But in my opinion are difficult to photograph because of the gloss from the cover and reflections is causes. A properly lit lightbox can help you create marketable images of your artwork.

Make a Lightbox for Less Than $ 20

The first thing you will need to do is create (or buy) a lightbox. A lightbox is a simply a structure that provides a neutral background for making images.

This is beneficial because it helps your camera control the color of your image and as well as removing distracting background elements. The construction of the lightbox will allow you to creatively light your artwork and ensure it is evenly lit as well.

Let’s look at how you can build a lightbox for under $ 20. I like this design because it comes apart for easy storage or transportation.

DIY Do It Yourself lightbox - Tips for Photographing Artwork for Marketing Purposes

In the steps below I will show you how to build this simple lightbox.

What you will need:

  • 5 sheets of 3/32” foam core board. These can be any dimension and should be large enough to fit your artwork into once the box is completed.
  • A utility blade
  • And a yard (meter) stick.

Steps to make the lightbox

Use the meter stick to measure in 2 inches from the edge of the foam-core board and then draw a line from the top that is half the length of the board.

Now measure in from the same edge 2 3/32” inches and draw another line paralleling the first. You should now have two lines that are 3/32” apart that span half the board

Using the utility blade, cut out the 3/32” space down half the board.

Tips for Photographing Artwork for Marketing Purposes - diy lightbox cutout

Repeat on the other side of the board so that you have parallel cuts in the board (see below).

Tips for Photographing Artwork for Marketing Purposes

Put that board aside and repeat on two more of the boards. Once you are done should have 3 boards with 3/32” grooves cut into them.

Assemble the walls of the lightbox by sliding the grooves of the boards into each other.

Tips for Photographing Artwork for Marketing Purposes

Place one, uncut board underneath the walls for a bottom and place the other on top. You now have a lightbox!

Display in the Lightbox

You will now use your newly built lightbox for displaying, lighting, and photographing artwork. You will want an easel-style stand that fits the feel of your artwork. If you have any extra foam-core board laying around, consider using that to build a neutral easel that will not detract from your artwork.

Tips for Photographing Artwork for Marketing Purposes - DIY lightbox in use

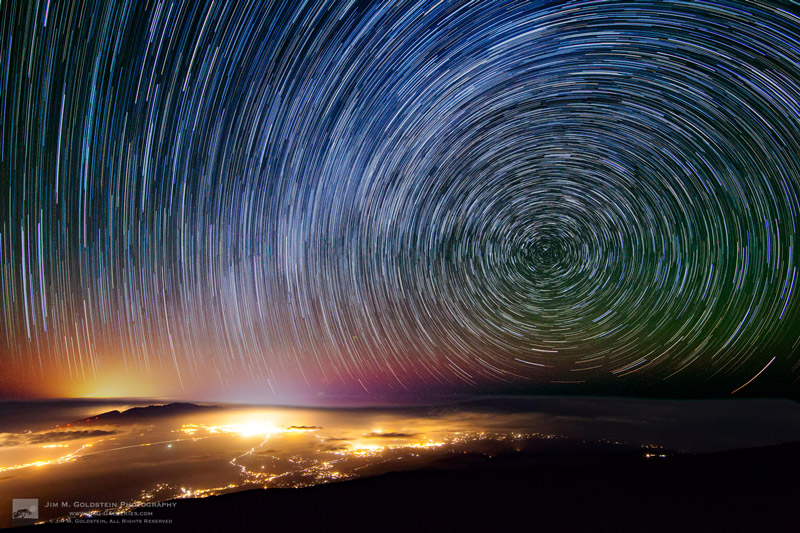
Once completed with an easel, your lightbox will help you create beautiful images of your artwork such as this metal print of the Aurora Borealis.

Lighting

Getting the lighting in the box set correctly is the most important thing you can do. Correctly lighting your image will remove reflections from the artwork, evenly light it, and ensure the color of the light allows your camera to capture the white-balance of the image correctly.

You may consider backlighting, lighting angle, and lighting intensity to help address these things. For each of these things, you should adjust and modify accordingly until you are happy with the shot.

Tips for Photographing Artwork for Marketing Purposes

I use this light panel to light my products, but a cell phone or other light source will suffice, too!

Lighting Angle

Lighting angle is the most important thing you can do to create a quality shot. Try lighting your artwork from the top and the side and see what you like better.

If your artwork is tilted backward in an easel, lighting it from the top and then shooting the image straight on with your camera will remove the reflection of the light in your final image. Lighting from the top and the sides simultaneously will evenly distribute the light over your print to accurately portray your product.

Tips for Photographing Artwork for Marketing Purposes - canvas print on a stand

This image of a canvas print is lit from the top.

Tips for Photographing Artwork for Marketing Purposes

In this image, it was lit from the bottom.

Tips for Photographing Artwork for Marketing Purposes

This image of a canvas print was lit from the side and creates the best finished product to my eye.

Back Lighting

Backlighting the image is another way to evenly distribute light. To backlight, place a lighting source behind your artwork so that it cannot be seen by the camera. Reflect the light off the roof of the lightbox or the side of it to light your image. A properly used backlight will give your image the appearance of floating in mid-air.

Tips for Photographing Artwork for Marketing Purposes

This image of a metal print was lit from behind with a cell phone and from the top with a light panel.

Lighting Intensity

You will need to control the lighting intensity inside the lightbox. There are several ways to do this.

First, be sure to take advantage of those white walls by bouncing light off them. Second, you may want to cover your light source with something to soften the light. This could be a tissue over the light of a cell phone, or a professional cover on a light panel.

As you progress with your skills you may consider purchasing a professional lighting source that allows you to adjust the intensity of the light.

Tips for Photographing Artwork for Marketing Purposes

I needed to reduce the intensity of the light and adjust my camera’s exposure compensation settings to keep this image from blowing out.

Tips for Photographing Artwork for Marketing Purposes

I changed my lighting intensity to get the proper exposure on this metal print.

Camera Settings and Setup

The next thing you need to do is get your camera set up. I like to use a 50mm lens because it is sharp to the corners and will not distort the final image. If you have a tripod, it is best to use it and set it up in front of your artwork.

Try starting your camera in aperture priority mode, your aperture at a couple of stops past wide open (e.g, if you have a f/2.8 lens stop it down to f/5.6), the white balance on auto and your ISO at 200.

You can alter these settings, but use I like to use a shallow depth of field to emphasize the surface of your artwork. Since a picture is two dimensional you will not have to worry about it being out of focus!

With your camera on a tripod, step down the aperture and shoot at a low ISO to reduce noise in the final image. A slow shutter speed should not be an issue with the camera on a tripod.

Practice Makes Perfect

Each of the things discussed in this article is just a starting point. Be sure to experiment with lighting angles, light sources, intensity, and camera settings to get the most stunning image of your product possible.

Remember, “pixels are cheap”, so make lots of them as you go out marketing your art!

The post Tips for Photographing Artwork for Marketing Purposes appeared first on Digital Photography School.


Digital Photography School

 
Comments Off on Tips for Photographing Artwork for Marketing Purposes

Posted in Photography


DPReview TV: Entry-level APS-C shootout

29 Jul

In this week’s episode of DPReview TV we take a look at three entry-level APS-C mirrorless models: the Canon EOS M50, Sony a6000 and Fujifilm X-T100. Which one rises to the top of the class? Chris and Jordan walk us through each camera’s strengths and weaknesses in terms of key factors like autofocus, usability and JPEG image quality.

Be sure to subscribe to our YouTube channel to get new episodes of DPReview TV every week.

Read our Fujifilm X-T100 Review

Read our Sony a6000 Review

Read our Canon EOS M50 Review

Articles: Digital Photography Review (dpreview.com)

 
Comments Off on DPReview TV: Entry-level APS-C shootout

Posted in Uncategorized


What to Do When Your Camera Won’t Work and You Wanna Scream

29 Jul

You love your camera and care for it with due diligence. You (hopefully) clean the sensor and wipe down your lenses, being careful to keep them dry and avoiding high humidity. But what happens when no matter how careful you’ve been, your camera won’t work and starts to act funny? What if that dear, dear equipment of yours stops working the way you try and expect? Then what?

Easy Fixes

There are some fairly common problems that you can fix yourself. They involve a little bit of fiddling with your camera, but you don’t always need to run to your local camera store for repairs. So before you go running to the experts consider these options if your experience the following issues with your camera.

1) The lens won’t focus

  • Check that the autofocus is turned on – This is a fairly easy fix most of the time. The first thing you should always do is check to make sure you have the lens’s autofocus turned on. There have been a few times when I didn’t realize that I had pushed the switch to manual focus and I can’t understand why the lens won’t work. Always, always check this button first.
  • Try removing the lens and reattaching it. Sometimes when changing lenses you may not quite connect the camera and lens properly. In this case, the camera and lens can’t communicate and the camera can’t send a message to the lens to start the autofocus adjustments. Make sure you hear a click and the lens is attached tightly to the camera body (if not it can also fall off!).
  • Try using compressed air or a blower. It may be that there is some dust that is interrupting the proper workings of your camera use a blower to clean out the attachment area for both lens (metal contacts) and the area on the camera.
What to Do When Your Camera Won't Work and You Wanna Scream

Try using a blower to clean the attachment area for your lens. Just remember don’t ever touch the little gold squares with your fingers. They can corrode and then your camera cannot communicate with the lens. I will apologize for the camera shake on this image. It’s not easy holding a camera while shooting using a blower tool.

  • Take out your trusty user manual and see if the there’s a troubleshooting section. Most camera user manuals will have a section where you can find solutions to common problems.
  • You’re too close – Every lens has a minimum focusing distance. If you get too close to your subject, the lens will not be able to focus. For example, if the minimum focusing distance for your lens is 18″ and you try to do a macro shot of a flower and get right into about 8″ away from it – you lens physically cannot do that job. Try adding a close-up filter or using extension tubes to solve this issue.

2) Memory Card Errors

  • Check it’s not locked – If your camera won’t allow you to take or to delete photos it may be because you’ve not removed the write protect on your card or you’ve locked it. If the memory card is locked you can move the switch to unlock it. Sometimes the switch will break off. This is an easy repair. Place a piece of tape over the space where the switch should be and the card will once again be unlocked.
  • Format – If nothing is working, it may be time to consider formatting the card. You will lose all pictures currently on the card (download them first) but this may be the only way to get the card working again.
What to Do When Your Camera Won't Work and You Wanna Scream

Here you can see the little switch on the SD card. If you can’t write to the card check here.

3) Weird Exposures

It can happen sometimes, you read the exposure correctly, and somehow everything comes out way too bright or too dark. The first thing to check is your exposure settings.

  • Perhaps you’ve got exposure compensation turned on. This means that the camera will alter the value selected when the camera is set in various automatic modes (with some models it even applies in Manual Mode, like most Nikons). Check to make sure you haven’t accidentally turned on exposure compensation.
What to Do When Your Camera Won't Work and You Wanna Scream

Oops, yep definitely did not look at camera settings when I shot this. Always check those when you consistently get a weird exposure.

  • Also, check what metering mode the camera is set to use. Often, issues can be caused by using Spot Metering mode if you are not careful and understand how to use it. If in doubt, use Average or Evaluative Metering Mode as a safe fall-back.
  • Check you haven’t activated Auto Exposure Bracketing (AEB) by mistake. This is a common accident and you may not even realize it’s happened, but auto bracketing will take a series of images both under and overexposed that could be throwing off your exposures. If one shot is dark and the next is too bright this could be the culprit, check your bracketing settings.

Know when it’s time to put your camera to rest

There are times when there’s nothing you can do. Your camera is just like other tools and eventually, it will wear out. So let’s talk about the signs that you may have a camera on its last legs.

  • The ISO grain on your camera has become way more sensitive. In this case, it’s time to consider a new camera. If your camera’s ISO 400 is starting to look grainy in good lighting then you may need to go shopping.
  • The shutter is very slow. A camera usually has a lifespan of maximum shutter actuations. Once your camera reaches its limits, there’s nothing you can do. You will know if you’re reaching the end when the shutter on your camera starts to become very slow and there is often a delay after you press the shutter button before it takes the photo.

The dark band at the top is a sign that your camera shutter isn’t functioning properly.

  • You’ve surpassed your camera’s limits – There’s another factor that has nothing to do with the proper workings of the camera. Sometimes you may outgrow the capabilities of your equipment. I used a Canon 50D for years. But then when I became much more serious about my photography, and I needed something with a higher megapixel count I knew it was time to put my lovely camera to rest. Sometimes we need better equipment. It’s okay to accept this fact and move on. I know this sounds like you’re breaking up a relationship of sorts. Well, the truth is you are. Do what’s best for you and the goals you have for your photography.

Conclusion

So go ahead and tell us more about your camera. Give us some nice anecdotes about your frustrations with your gear. Tell us about the quick fixes you’ve found and tell us about your love-hate relationships with your older gear and why you moved on.

The post What to Do When Your Camera Won’t Work and You Wanna Scream appeared first on Digital Photography School.


Digital Photography School

 
Comments Off on What to Do When Your Camera Won’t Work and You Wanna Scream

Posted in Photography


Review: The Wandrd Prvke Backpack is one of the best multi-use camera bags you can buy

28 Jul

Wandrd Prvke 21L Backpack with Camera Cube
$ 264 | www.wandrd.com

The quest to find the perfect camera bag is never-ending. It’s not unusual for a photographer have a closet jammed full of various packs that work pretty well for most situations, but are not ideal for others. The classy looking packs often don’t hold enough gear while the ones with ample space often end up being too bulky for travel.

For my typical shooting needs the Prvke has proven to be nearly perfect, which is an incredible feat for a camera bag.

At first glance, I liked the design of the Prvke bag (pronounced Provoke) from Wandrd, but was concerned that it would be yet another backpack with understated urban looks that simply isn’t functional as a camera bag. But I can happily say that Wandrd won me over – for my typical shooting needs the Prvke has proven to be nearly perfect, which is an incredible feat for a camera bag.

Specifications

  • Exterior: 17 x 11 x 6.5in / 43 x 30 x 16.5cm
  • Interior Volume: 25L with roll-top expanded
  • Camera Cube Insert: 9 x 11 x 5in / 23 x 30 x 13cm
  • Laptop Sleeve: 14.5 x 9.5 x 1in / 37 x 24 x 2.5cm
  • Tablet Sleeve: 13 x 9 x 5 / 33 x 23 x 13cm
  • Weight: 2.8lbs / 1.3kg

Design & Construction

A look inside the Wandrd Prvke from the back entrance: The area where the camera gear is (called the Camera Cube) can be completely removed.

The Wandrd Prvke bag is designed to be multi-functional for carrying both camera gear and personal items – something lots of packs try to do, but ultimately fail. The design was conceived by three photography-minded brothers and their attention to detail makes me think they too were tired of the ‘almost there, but not quite right’ camera backpacks.

The Prvke has an understated roll-top design with a fairly slim profile – it’s constructed from water-resistant tarpaulin and woven nylon and has a rain-fly with a dedicated pocket at the bottom of the bag. The roll-top opens and closes with high quality Velcro and is secured with a large metal hook. The removable Camera Cube comes with the Photography Bundle for $ 264 (or can be purchased individually for $ 39) and fits nicely into the bag’s back compartment. Velcro is used to secure it into place.

You can access the Camera Cube from a zipped entryway on the side of the pack. The roll-top is secured closed with Velcro and a big metal hook.

The Prvke has three points of entry: the roll-top, a left side pocket for camera access into the Cube while on the go (shown above) and a back entrance to completely open the pack. Above the Camera Cube there is a mesh zipper compartment that allows you to access anything that may have been stashed through the roll-top. On the left side of the bag you will find a small zipper pocket for memory cards and a separate Velcro pocket for other small camera accessories.

An internal laptop/tablet compartment keeps these devices flush against your back when wearing the pack. Two straps ensure the compartment doesn’t fly completely open when unzipped.

Once the bag is unzipped there are dedicated sleeves for both a laptop and a tablet (see above). And on the back of the Prvke there is a dedicated passport sleeve with a small mesh pocket (see below).

I was able to fit a 5D Mark IV body, a 70-200mm lens and a 24-70 lens in the cube without issue.

Although the removable Camera Cube was designed with a mirrorless system in mind (a body, plus a large and medium sized lens) the molded dividers make it possible to carry a full frame DSLR with lenses as well. I was able to fit a 5D Mark IV body, a 70-200mm F2.8 lens and a 24-70 F2.8 lens in the cube without any issues.

A small compartment on the back has space for a passport and other items, a nice touch for photographers on the fly. Magnetically-connecting carrying straps (located on top) are just one of many handy features of this pack.

Behind the roll-top there is a fleece lined pocket for a phone and on the side of the bag a small pocket with a clip for your keys. A large flat pocket runs the length of the bag’s front side – a great place for a notebook, magazine or other paperwork. On the right side of the bag there is an expandable pocket for a water bottle or a small tripod.

The Prvke has lots of pockets and areas to store both personal items and camera gear. The side pocket can be used to carry a water bottle or small tripod. And a zippered area on front is perfect for storing magazines, notebooks or a book. The other side of the pack offers a small storage pocket with a connector for keys. Camera gear can be accessed through the zippered area lower right.

The Prvke features a number of optional add ons too: a removable chest strap, a removable waist belt and an accessory strap system that can attach to six different points on the bag for carrying a larger tripod, lighting accessories, a jacket or even minimal camping gear.

The bag comes in three colors (classic black, wasatch green and aegean blue) and two sizes (21L and 31L). Our review bag is the 21L in wasatch green.

A removal waist belt adds another place to store small items. And accessory straps allow one to easily connect even bulky items, like camping gear, to the bottom of the pack.

In Use

I’ve used this bag in a variety of different situations and I’ve yet to notice anything major that I didn’t like about it. While it may not be the ideal bag for traveling with multiple camera bodies (although it isn’t impossible), for a one body, two lens shoot that requires me to bring a laptop along, it’s the closest to a perfect bag that I’ve found.

The lay-flat design of the bag makes it ideal for traveling through airport security – the Camera Cube and the laptop sleeve are both checkpoint friendly, so in theory, you won’t need to unpack your gear bag when flying.

For a one body, two lens shoot that requires me to bring a laptop along, it’s the closest to a perfect bag that I’ve found.

And the three different access points make this bag particularly user friendly. You can grab a camera body from the left side without removing the bag fully from your back, lenses and accessories are quickly accessed by unzipping the back panel and you can even access items in the roll-top through the back. The expandable roll-top on the bag is great for stashing any odds and ends that you might pick up.

The zippers were easy to manipulate and none of the dedicated sleeves or pockets suffer from the stiffness that new camera bags sometimes have. Everything fits where it’s supposed to and does so with ease.

The straps are a comfortable amount of thickness and the bag distributes weight nicely – even when fully loaded with gear it didn’t hurt my shoulders. The waist belt and chest strap are nice touches, and might be appreciated if you were taking the Prvke on a long outdoor adventure.

The Prvke is the best camera bag I’ve used in a long time.

I found the various small pockets within the Prvk very useful: the fleece lined top pocket was a great place for storing my shades and that side key pocket gave me peace of mind as I traveled away from New York City with the bag.

We’re big fans of the removal Camera Cube.

My complaints about this bag are minor. The zippers around the Camera Cube can occasionally get tangled with the zippers within the back compartment that cover the cube – a minor annoyance, considering sometimes it just took a few additional seconds to zip everything together. Some might say that the second zippered flap might be unnecessary, but the additional layer of protection of my lenses gave me peace of mind while using the bag.

The bag was also a little snug when traveling with two bodies and two small lenses – although it should be noted that I was testing out the 21L version and I’m guessing these issues would be resolved if I’d been using the 31L model.

What’s the Bottom Line

The Prvke is the best camera bag I’ve used in a long time. It has a durable build, it is functional as both a camera backpack and an everyday backpack and it looks nice. It hits the trifecta of sought-after qualities in a camera bag. Also important, it feels like it will hold up over time. And for the quality that you are getting, the $ 264 price tag (which includes the Camera Cube, waist strap, accessory straps and rain-fly) it doesn’t feel excessive. We also like that the Camera Cube can be removed and used in a different bag allowing you to use The Prvke as a place to store clothing and personal items while you are on the road.

What We Like:

  • Durable build
  • Functional as a multi-use bag and a dedicated camera bag
  • Removable Camera Cube
  • Utilitarian design
  • Small organizational pockets
  • Back mesh pocket with entry to roll-top
  • Nice weight distribution, comfortable to carry
  • Holds the gear necessary for an average shoot

What We Don’t Like:

  • Zippers around the Camera Cube and the zippers within the back of the bag getting tangled together
  • The, at first glace, difficult to pronounce name of the bag

Articles: Digital Photography Review (dpreview.com)

 
Comments Off on Review: The Wandrd Prvke Backpack is one of the best multi-use camera bags you can buy

Posted in Uncategorized


5 Lightroom Tips and Tricks for Beginners

28 Jul

If you have recently started using the Adobe Lightroom software and are looking for some exciting tips and hacks, this article is the perfect read for you. Lightroom is one such software which allows us to visually improve your photos with easy controls.

But there are some hidden or less explored features of this software of which you might not be fully aware. This is why made this list of five such Lightroom tips and tricks which you can use to maximize your editing skills and save time while editing pictures.

1. Change Colors using the HSL Tool

The HSL tool is one of my favorite tools in Lightroom as it allows you to adjust the Hue, Saturation, and Luminance of a particular color in your image. Yes, you can selectively choose one of the eight primary colors (as shown in the image below) and adjust its tint (hue), intensity (saturation), and brightness (luminance).

If you wish to play around with the colors in your photo, you can use the Hue tool and adjust the tones as per the range of colors available for the respective color.

For example, if you look at the images below, you can simply change a particular color in a photo by adjusting the Hue scale. When I took the purple color hue slider all the way towards +100, the color shifted towards pink. Whereas, when I took the scale towards -100 the color changed to somewhat blue.

5 Lightroom Tips and Tricks for Beginners

It is simply magical how you can use the hue scale and change the color (within the range of hue of colors) and enhance the visual appearance of your photo.

2. Automatic Slider Adjustment (shift + double click)

In situations when you are not sure which slider to adjust and by how much, Lightroom has an automated solution to this. The “Automatic Slider Adjustment” feature enables the software to automatically adjust the primary sliders which are Exposure, Contrast, Highlights, Shadows, Whites, and Blacks.

All you have to do is hover the mouse pointer on a particular slider title (on the word, NOT the actual slider – for example, “Exposure”). Then press and hold the Shift key and along with that double-click the mouse button on the title.

In this example, the software automatically detected the properties of the photo and adjusted the exposure as +0.45. Similarly, you can do this for rest of the primary sliders and let the software decide the best settings for your photos. It’s a good starting point, you can then tweak them as necessary.

NOTE: When you press the Shift key, the “Reset” button at the bottom right corner will change to Reset.

5 Lightroom Tips and Tricks for Beginners

3. Clipping Mask

One of that toughest parts of editing is getting the shadows and highlights accurate and within the range so that there is no clipping or loss of detail. One way of keeping a watch on the shadows, highlights, blacks, and whites is by reading the histogram. But histogram can sometimes be difficult to read and you can end up losing details in certain areas of the image.

Inside Lightroom, there is a quick and easy way of finding out if the shadows, highlights, whites or blacks are going out of range or leading to any clipping.

Press and hold the Alt key and then move one of the four sliders. When you are adjusting the highlights or whites in this way, you will see any areas which are clipped appearing as white. Similarly, when you adjust shadows or blacks, the spots appearing in black (or a color) indicate clipping in those areas (as shown in the samples below).

5 Lightroom Tips and Tricks for Beginners

Left – highlight areas being clipped appear in white. Right – shadow areas being clipped appear in black or a color (partial clipping).

4. Copy Paste Effects

If you are a wedding or event photographer, you might find this tip really helpful. Adobe Lightroom allows you to copy and paste effects from one photo to another with just a click. This comes handy when you are editing photos which are shot in similar lighting conditions and you want the similar effects on multiple photos.

Once you are done editing the first photo from the lot, click on the “Copy” button located at the bottom left corner (or press Cmd/Ctrl+C). Now you can see multiple adjustments (as shown in the screenshot below). Check off the ones you wish to copy or simply select Check All if you want everything similar in other photos.

Now navigate to the next photo and simply press Paste (or press Cmd/Ctrl+V) and all of the same settings will be applied to that particular image.

5 Lightroom Tips and Tricks for Beginners

5. Radial Filter Auto Selection

The Radial Filter in Lightroom is a life saver for photographers, don’t you agree? You may have used this tool to create vignetting effect or to make adjustments in the selected area of your photo.

But did you know that rather than wasting your time manually selecting the shape of the selection as per your subject you can use the Auto Selection trick?

Simply draw a small selection over your subject, press and hold Ctrl/Cmd and double-click on the small dot at the center of the selection. The software will automatically make a selection based on the shape and size of your subject. It is accurate most of the time, but there are always exceptions especially when the photo has multiple elements in the frame.

5 Lightroom Tips and Tricks for Beginners

Conclusion

Lightroom is a great program, but image procesing can be tricky and time consuming. Try out these five Lightroom tips and tricks and let us know how you make out. If you have any others please share your Lightroom tips for beginners in the comments area below.

The post 5 Lightroom Tips and Tricks for Beginners appeared first on Digital Photography School.


Digital Photography School

 
Comments Off on 5 Lightroom Tips and Tricks for Beginners

Posted in Photography


Nikon counts down to new mirrorless

28 Jul

Following an earlier leak, Nikon has officially started the clock on a countdown to its upcoming ‘special event’, widely assumed to be the launch of a new mirrorless system. The timer is counting down to 1pm, on the 23rd of August (Tokyo time). That’s midnight in New York, 5pm in London and 9pm on the previous day for the DPReview office here in Seattle.

What are you hoping to see announced? Let us know in the comments, and don’t forget to vote in our ongoing poll.

Visit Nikon’s ‘special event’ site

Vote in our poll

Articles: Digital Photography Review (dpreview.com)

 
Comments Off on Nikon counts down to new mirrorless

Posted in Uncategorized


Weekly Photography Challenge – Creative Black and White

28 Jul

This week it’s time to get creative and work on your black and white photography.

Bland and white photography of a Kayaw girl

Image by dPS author Kevin Landwer-Johan

Get some help here:

  • 9 Quick Tips for Better Black and White Photos
  • A Guide to Black and White Conversion in Photoshop
  • A Guide to Black and White Conversion in Lightroom
  • Rekindling the Romance of Black and White Photography
  • 5 Reasons Why You Might Want to Try Black and White Photography
  • How to Make Brilliant Black and White Photos with Dramatic Composition

And have a look at our dPS ebook: THE ESSENTIAL GUIDE TO BLACK AND WHITE PHOTOGRAPHY

Weekly Photography Challenge – creative black and white

Creative use of shadows

Look for light and shapes – black and white photography is better with a play of light and shadow!

Simply upload your shot into the comment field (look for the little camera icon in the Disqus comments section) and they’ll get embedded for us all to see or if you’d prefer, upload them to your favorite photo-sharing site and leave the link to them. Show me your best images in this week’s challenge. Sometimes it takes a while for an image to appear so be patient and try not to post the same image twice.

Share in the dPS Facebook Group

You can also share your images in the dPS Facebook group as the challenge is posted there each week as well.

The post Weekly Photography Challenge – Creative Black and White appeared first on Digital Photography School.


Digital Photography School

 
Comments Off on Weekly Photography Challenge – Creative Black and White

Posted in Photography


9 Quick Tips for Better Black and White Photos

28 Jul

Here’s an 11-minute video from Jamie Windsor that is filled with 9 quick tips that you can use to improve your black and white photos in an instant.

?

“For most of us these days, black and white is an after-thought,” says Windsor. “It’s a creative filter that we have on Instagram.”

But Windsor points out that black and white photography is “much more than an editing technique” – and he would be right!

To make strong, powerful monochromatic images, it is important to approach the shot knowing that it will be the final result. It allows you to think differently, adapt your creative techniques, and see the scene in front of you in a different light.

Once you’ve finished watching the video, make sure to check out dPS’s own black and white photography eBook for further tips and tricks!

Summary of the 9 tips for better black and white photos:

  1. Plan to shoot in black and white
  2. Look for the abstract shots
  3. Shoot in RAW or use Color Filters
  4. Use long exposures
  5. Utilize the Dodge and Burn Tool
  6. Understand how light is affected
  7. Try Using HDR (High Dynamic Range)
  8. Emphasize the mood
  9. Shoot black and white photos that should be in color

Have you shot any black and white images lately? Show us in the comments below!

The post 9 Quick Tips for Better Black and White Photos appeared first on Digital Photography School.


Digital Photography School

 
Comments Off on 9 Quick Tips for Better Black and White Photos

Posted in Photography


Stars Above Maui

27 Jul
Stars Above Maui
Stars Above Maui

Circumpolar star trails high above Haleakala National Park in Maui, Hawaii

It’s an interesting feeling to be atop Haleakala, high above the South Pacific, with the feeling of being on top of the world. Atop Haleakala National Park you can see out for 50 miles in every direction when its cloud-free and you tower above the rest of Maui.  Yet when you take a star trail photo such as this you quickly realize that you were really on the side of our spinning globe. Star trail photos are always fun, but I’m particularly fond of this one because Polaris is so much closer to the horizon than I’m used to. One day it would be equally fun to head closer to the Arctic to see Polaris directly overhead.

Happy Shooting!

Photo Details
Canon 5D Mark II + Canon 14mm f/2.8L II USM
f/7.1, ISO 6400 at 90 min

The post Stars Above Maui appeared first on JMG-Galleries – Landscape, Nature & Travel Photography.


JMG-Galleries – Landscape, Nature & Travel Photography

 
Comments Off on Stars Above Maui

Posted in Equipment


Blog Project: Your Best Photos From 2016

27 Jul

It’s that time of year again and if you’re a regular JMG-Galleries reader that means one thing…
it is time to kick off the 10th annual best photos of the year blog project. This is by far my most popular blog project with hundreds of photographers taking part last year (see Best Photos of 2015, 2014, 2013,  2012, 2011, 2010, 2009, 2008 and 2007). Around this time of year people start to ask if I’d be running this project again. The answer clearly is always YES!
1. I love this project and I love that so many people get excited about it.
2. It’s a great way exercise to improve your photography (10 Ways to Top Your Best 20xx Photographs).
So with out any further delay here is how you take part to submit your best photos of 2016.

How to Participate (Read Carefully)

  1. Review & select your best photos from 2016.
    Note: Photo edit carefully narrowing down your results to your best 10 or 5 photos. Reference Pro Tips: Photo Editing with Gary Crabbe for pointers.
  2. Create a blog post on your web site or a Flickr/500px set containing your best photos from 2016.
  3. Complete the form below by Tuesday JANUARY 3rd at 11:59PM PST to take part. The following Tuesday, or there about, I’ll post a link to all submitted sites and photos on my blog. Through out the week I’ll also share the results across all my social media accounts.

Spread the Word!
Feel free to spread the word of this project on Twitter, Facebook, Google+, photo forums you frequent and/or your blogs. All who are interested in taking part are invited.


Loading…

The post Blog Project: Your Best Photos From 2016 appeared first on JMG-Galleries – Landscape, Nature & Travel Photography.


JMG-Galleries – Landscape, Nature & Travel Photography

 
Comments Off on Blog Project: Your Best Photos From 2016

Posted in Equipment