RSS
 

Archive for January, 2017

Valentine Gift Guide for Photo Lovers

30 Jan

Give a Valentine from the heart or rather … from your camera roll. Or, BOTH.

Our print shop, Parabo Press, makes it easy to whip up the perfect Valentine’s gift from your photos!

Print up just the thing to win over a handsome stranger or let the ol’ ball-and-chain know you couldn’t be happier to have them around.
(…)
Read the rest of Valentine Gift Guide for Photo Lovers (0 words)


© laurel for Photojojo, 2017. |
Permalink |
No comment |
Add to
del.icio.us

Post tags:


Photojojo

 
Comments Off on Valentine Gift Guide for Photo Lovers

Posted in Equipment


Fujifilm X100F vs X100T, what’s new, what’s changed and is it enough?

30 Jan

Apparent similarities

Glance too fleetingly at the X100F and you might think nothing had changed, compared with the X100T. Or the X100S, the original X100 or the film rangefinders their styling harks back to. But, in keeping with continuous improvement approach (‘Kaizen’ if you must) Fujifilm appears to be adhering to, just about every aspect of the camera has been updated in some small way.

But is the sum of those changes enough to make it worth upgrading or to attract new customers?

New Sensor

The single biggest change to the X100F is the use of the latest 24MP sensor. As we’ve seen the the X-Pro2 and X-T2, it’s capable of some excellent results and is a bigger step forward from its 16MP cousins than the 22% increase in linear resolution would suggest.

Arguments still rage about the merits of X-Trans, especially now that Bayer sensors are reaching high enough pixel counts that manufacturers can cut out the costly AA filter without too many downsides/complaints. Clearly X-Trans strikes a different balance of luminance/chroma resolution than the Bayer design and isn’t as universally well supported, when it comes to Raw processing, however, we’ve seen the 24MP version and Fujifilm’s latest processing give some great results, so we find it hard to get that worked-up about it.

What hasn’t changed?

The X100 series’ core features are, broadly speaking, unchanged. The OLED panel in the hybrid optical/electronic viewfinder is being run at a faster refresh rate, but it’s still essentially the same spec as on the previous model.

Likewise, the lens is unchanged from the X100F’s predecessors. This means that it’s still a increasingly soft when shot close-up and wide-open but also that it’s not exactly fast to focus (though this is the snappiest X100 yet). The good news, though, is that the the lens seems to me more than sharp enough to resolve the higher-res sensor at all but the closest working distances, and remains as impressively small as ever.

Handling differences: Joystick

Many of the differences between the X100T and F come down to small changes in the cameras’ handling. The first thing to note is the addition of the AF joystick that first cropped up on the X-Pro2.

In its own way, it’s as big an upgrade as the 24MP sensor. It speeds up AF point selection immensely (which is needed, since the X100F can offer up to 325 individually selectable points). Or, at least, it does once you’ve got out of the habit of trying to use the four-way controller to do so.

The other thing the joystick does is resolve the tension between using the four-way controller as Fn buttons or to directly access AF points. This means that, while the X100F still offers the same number of customizable buttons as its predecessor, it’s more likely that you’ll be able to use them all.

Handling differences: Buttons

There’s been a considerable re-shuffling of buttons between the X100T and the F though, as already mentioned, the net result is still that there are still seven customizable control points.

The buttons to the left of the rear screen, which date back to the original X100, have been eliminated, with most of them being pushed across to the right. There’s also an extra function button at the center of the viewfinder mode switch on the front panel, to make up from the one lost on the rear plate. The ‘Drive’ mode function is now irrevocably assigned to the four-way controller, while the function of the rear dial’s push-in button can now be re-configured.

For most users we think it’s likely to be a case of swings and roundabouts, unless there’s some very specific but vital combination of buttons that we’ve not been able to envisage. Generally it seems likely that the certainty of being able to use the four-way controller (or, at least, three of its buttons) as Fn keys will be enough to keep most users happy.

Handling differences: Extra dial

The bigger change to the camera’s handling is the addition of a clickable dial set into the camera’s front plate. By default, this does nothing while shooting, and is primarily used for jumping between images in playback mode. However, there is a menu option that allows its use to control ISO if the top plate ISO dial is set to ‘A.’

While this makes it possible to use the rear dial to set shutter speed (by setting the shutter speed dial to ‘T’), and the front dial for ISO, there’s no way to use anything other than the aperture ring to control aperture value. We’re not sure why you’d want to, but if that’s something you were hoping for, you’re out of luck.

The final big change is the use of the focus ring as a control ring. There are four settings for this: Standard, White Balance, Film Simulation and (if you’re shooting JPEG-only), Digital Teleconverter, all of which are overridden if you switch to manual focus mode. Personally I found that assigning anything to the focus ring just meant that I’d inadvertently make a change, every time I changed the aperture, so I just left it on ‘Standard’, which leaves the ring inactive in most drive modes.

Handling differences: ISO Dial

The final two changes in the X100F’s dial behavior are modifications that were introduced with the X-Pro2. Note that I say ‘modifications,’ rather than ‘improvements.’

The first, which I’m all for, is the addition of a ‘C’ position on the Exposure Comp dial. Set to this position, the newly added front command dial takes charge of Exposure Comp and extends the controllable range from ±3EV to ±5EV.

The other modification is the arrival of the pretty-but-pretty-impractical ISO control set within the shutter speed dial. I don’t hate it, but, given that I change ISO more frequently than once every 36 frames, I just don’t think that lifting, turning and dropping a dial is the most sensible way of controlling sensitivity. Thankfully there are two effective workarounds: pushing ISO control to the camera’s front dial or, better still, setting a couple of Auto ISO presets and switching between them.

Finer control

The X100F has the latest ‘X Processor Pro,’ which not only sees the addition of the more-detailed black-and-white ‘Acros’ film simulation, but also the option to control the JPEG output with a higher degree of precision.

Whether it’s for straight-out-of-camera JPEGs or for subsequent in-camera Raw conversions, the highlight and shadow portions of the tone curve can now be adjusted between +4 and -2, while most other parameters, including sharpening, noise reduction and color (saturation) can be adjusted on a ±4 scale.

Latest UI

As you might expect (assuming you’ve been reading our recent X-series reviews, start-to-finish), the X100F gets Fujifilm’s improved menus.

The latest version of the menu system breaks the options down into sensible categories with icons to distinguish between them, as opposed to the numbered tabs in the older scheme.

On top of this, there’s a ‘My Menu’ tab that can be populated with your most-accessed menu options. Add to this a wider range of flash control options, for use with external flashguns and the X100F manages that rare trick of being both more powerful and easier to operate.

In the moment:

The thing that’s most noticeable when you pick up the X100F is that it’s quicker than the T or any of the previous models. It’s the little things: start-up time, especially from sleep mode, or a focus re-acquisition if there’s been very little change of depth, they all add up.

Continuous focus still isn’t going to help you win any sports photo competitions but it too is noticeably improved. Overall, then, the camera just feels responsive to an extent that the series hasn’t really done, previously. Hell, even the Wi-Fi connects faster, making it that bit more likely that you’ll use it.

This newfound responsiveness is something that will be almost immediately apparent to existing X100 series owners and, perhaps just as importantly: unnoticed by new users whose expectations have been set by contemporary cameras.

Overall

Fujifilm’s approach to the its X-series cameras has been one of constant improvement, which has meant that each generation of camera is better than the last (bickering about X-Trans notwithstanding). However, while this has made it easy to recommend which model a new customer should buy, it’s meant it’s not always been clear-cut whether the sum of the differences is sufficient to prompt existing owners to upgrade.

Obviously the specific decision will depend on the needs, expectations and level of satisfaction of individual users but, even in pre-production form, this feels like more of a step forwards than the bare specs led me to expect. We’ll revisit this question as part of the full review, once we’ve spent more time with the camera, but our initial impressions are pretty positive. Well, except for my bank account.

Articles: Digital Photography Review (dpreview.com)

 
Comments Off on Fujifilm X100F vs X100T, what’s new, what’s changed and is it enough?

Posted in Uncategorized


Makeup Not War: Soviet Army Monument’s Many Makeovers

29 Jan

[ By Steve in Art & Street Art & Graffiti. ]

soviet-army-monument-1a

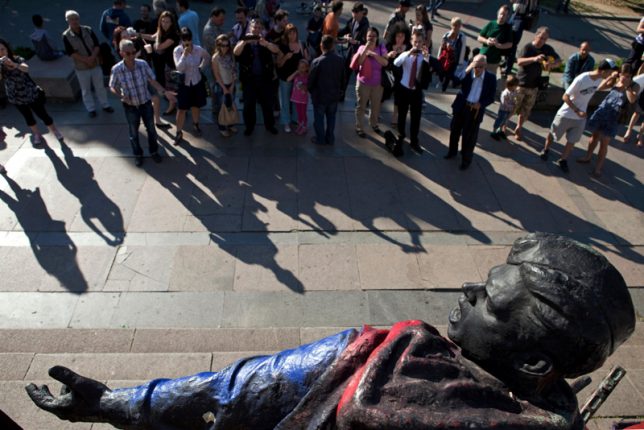
In recent years the Monument to the Soviet Army in Sofia, Bulgaria has become a colorful canvas for protesters, much to the chagrin of Russian politicians.

soviet-army-monument-1d

soviet-army-monument-1b

soviet-army-monument-1q

The Monument to the Soviet Army is quite large as military memorials go. Built in 1954, the monument is centered by a 120-ft-tall stone plinth supporting a statue of a Soviet soldier surrounded by admiring Bulgarian women. The monument also features large bronze sculptural compositions on all four sides at ground level. One of these secondary compositions was “artistically vandalized” on June 17th of 2011 by Destructive Creation, a group of street artists who for a variety of reasons have chosen to remain anonymous.

soviet-army-monument-original

soviet-army-monument-1o

soviet-army-monument-1p

Destructive Creation descended on the monument at night and were able to paint every figure in the pantheon of attacking soldiers without interruption. The result was breathtaking no matter what one’s political bent, as the onrushing platoon of Soviet troops was transformed into a bizarre version of the Justice League: from left to right there’s The Mask, The Joker, Wolverine, Santa Claus, Superman, Ronald McDonald, Captain America, Robin, and Wonder Woman.

soviet-army-monument-1k

soviet-army-monument-1g

soviet-army-monument-1h

soviet-army-monument-1n

Spray-painted black text below the figures translates to “In Step With The Times”. Activists embellished the monument the next day, during the Fourth Annual Sofia Pride Parade, before city workers power-washed the monument.

Mask Communications

soviet-army-monument-2a

The initial vandalizing of the Monument to the Soviet Army resulted in an explosion of international publicity, mainly due to the skill and content of the artwork. In general the reaction was one of bemused admiration, especially from the global geek community, but Russia’s Foreign Ministry was of a different mind. Not only did Russia vocally condemn the vandalism, they pressed the Bulgarian government to find, arrest and punish the artists. This only served to embolden a host of copycat graffiti artists and make the monument the focus of repeated street art protests.

soviet-army-monument-2b

The next such incident occurred on February 10th, 2012 when the monument’s soldiers were fitted with Anonymous masks of Guy Fawkes in conjunction with anti-ACTA (Anti-Counterfeiting Trade Agreement) protests being held all over Europe. Not certain if the perpetrators were anonymous or Anonymous.

Pussy Riot Act

soviet-army-monument-3c

soviet-army-monument-3a

On August 17th of 2012, three previously arrested members of Russian feminist protest punk rock band Pussy Riot were convicted by a Russian court of “hooliganism motivated by religious hatred” and were sentenced to two years’ imprisonment each.

soviet-army-monument-3f

soviet-army-monument-3b

The sentencing was widely criticized outside Russia and on the same day of the conviction, activists placed colorful knit balaclavas (Pussy Riot members’ trademark costume) over the heads of figures at the Monument to the Soviet Army in Sofia.

soviet-army-monument-3d

soviet-army-monument-3e

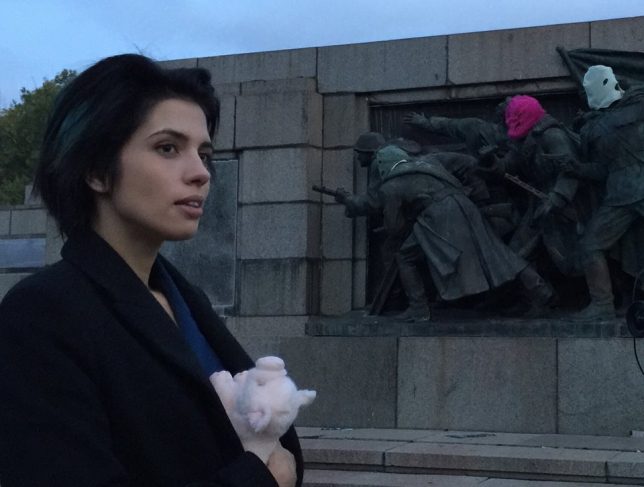
On October 15th of 2015, Pussy Riot member Nadezhda Tolokonnikova visited the monument and participated in a reenactment of the original masking event.

Bulgar Not Vulgar

soviet-army-monument-4c

soviet-army-monument-4d

Observed initially in 2010, the first day of February is officially the Day of Remembrance and Respect to Victims of the Communist Regime in Bulgaria. Approximately 20,000 to 30,000 Bulgarians lost their lives due to state-ordered repression between 1946 and 1990.

soviet-army-monument-4e

soviet-army-monument-4a

On February 1st of 2013, areas on several sides of the Monument to the Soviet Army were daubed with red, green and white paint – the colors of the Bulgarian flag.

Next Page – Click Below to Read More:
Makeup Not War Soviet Army Monuments Many Makeovers

Share on Facebook


[ By Steve in Art & Street Art & Graffiti. ]

[ WebUrbanist | Archives | Galleries | Privacy | TOS ]


WebUrbanist

 
Comments Off on Makeup Not War: Soviet Army Monument’s Many Makeovers

Posted in Creativity


Four Advantages of Using Lightroom Collections

29 Jan

In this article, I will explain Lightroom Collections, a very powerful cataloging feature. We’ll focus on how using Lightroom Collections and Collection Sets can help you build a significant portfolio of your best work. Then we’ll move on to the difference between Standard and Smart Previews and how combining Smart Previews with Collections makes it even easier to review and process your best work. Next, we’ll learn how Lightroom Mobile dovetails with Collections and finish up with a few tips on using both of them to share your images. It’s a lot of info (it’s a long one) so buckle up.

Four Advantages Lightroom Collections

A little background first

A year ago at a photography conference run by a consortium of local camera clubs, I had the pleasure of introducing Lightroom expert Tim Grey to the audience. After I introduced him, I sat in on his seminar. He asked everyone to raise their hands if they organize their image files chronologically by date. Knowing that most experts agree this is a terrible way to organize your files, very few attendees admitted to organizing this way. I raised my hand because of course, I do. It just makes my brain happy to be chronological. Mr. Gray asked me how I could ever keep track of or find images by date, so I explained how I also used Lightroom Collection Sets and Collections. He laughed at me and told me to put my hand down. He felt I didn’t really organize things chronologically at all.

Use Lightroom Collections to Build Your Portfolios

The main goal of Lightroom Collections is to create cohesive groupings of your best images. Naming and how you sort and organize your images is up to you, based on how and what you shoot. The key to building a portfolio using Collections is to include only your absolute best images. If you shoot 10,000 images on a two-week photo trip, the images you put in your Collections are the top 1%, the best-of-the-best. These are the ones you share online, upload to sell as stock images, prepare an exhibit or your work, or make some prints for your own walls.

How to Create Collections and Collection Sets

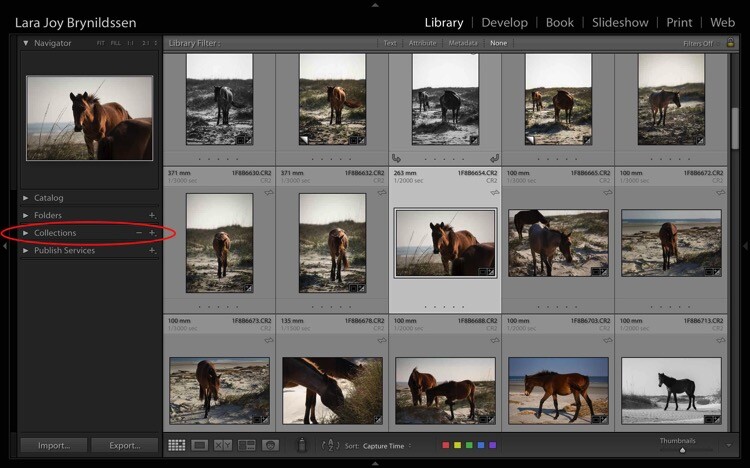
You can find Collections in the Develop Module, on the left-hand panel between Folders and Publish Services. To create a new Collection or Collection Set, click the + (plus sign).
Four Advantages Lightroom Collections 1

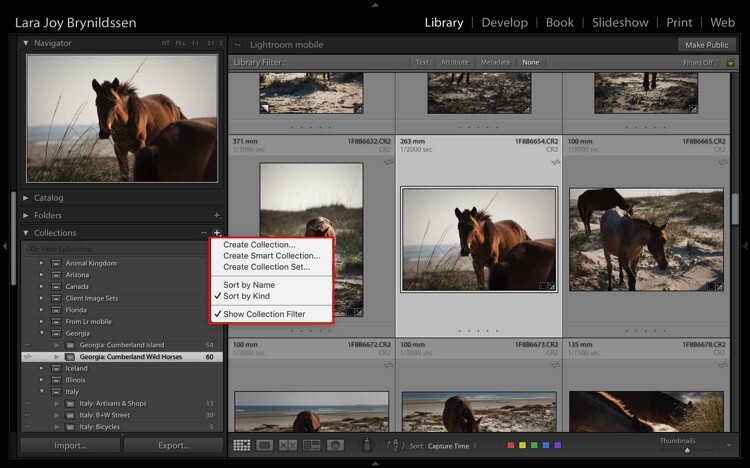
Once you click the + (plus sign), a dialog box pops up. Click Collection Sets to create a container that will hold multiple, related Collections. Or, if you just have one group of images that isn’t related to anything else, click Collections.
Four Advantages Lightroom Collections

NOTE: In this article, we’re focusing on Collections, not Smart Collections, which work a bit differently. Read this for more on that topic: How to Create and Use Smart Collections in Lightroom.

Collections Versus Collection Sets
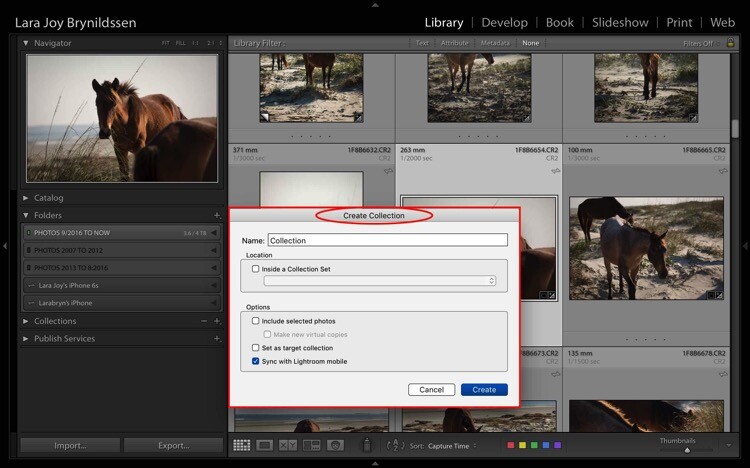
Four Advantages Lightroom Collections 1 2

This is the dialog box for creating a Collection.
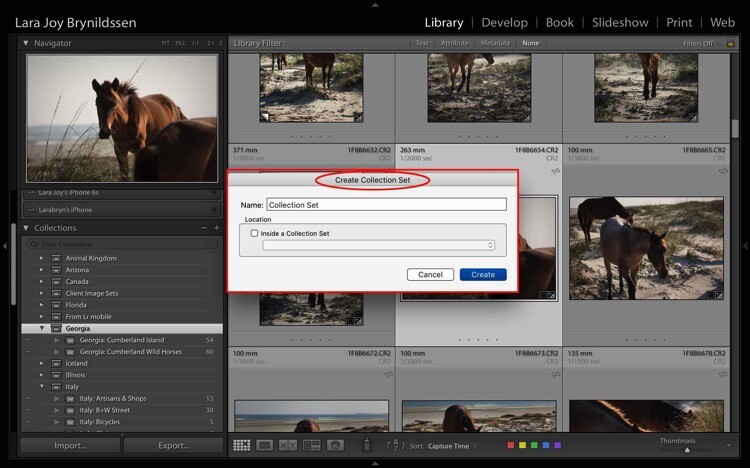
Four Advantages Lightroom Collections 1 3

This is the dialog box for creating a Collection Set.
Four Advantages Lightroom Collections 1 4

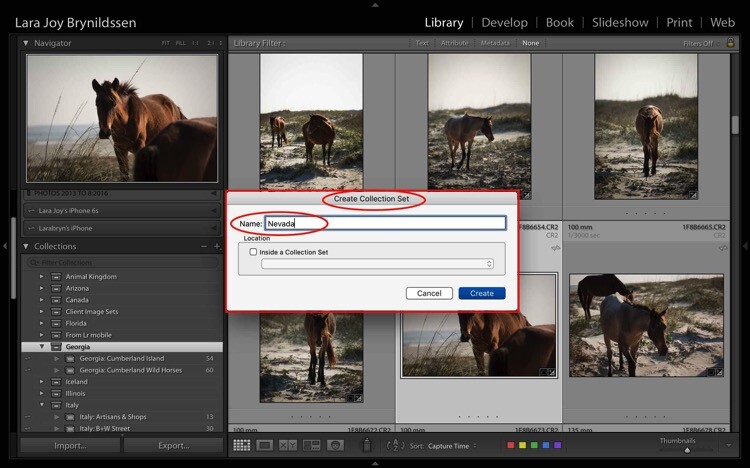
I’m headed to Nevada soon so I created a new Collection Set for Nevada. To do this, type the title of your Collection Set in the 1st box and click Create.
Four Advantages Lightroom Collections 1 5

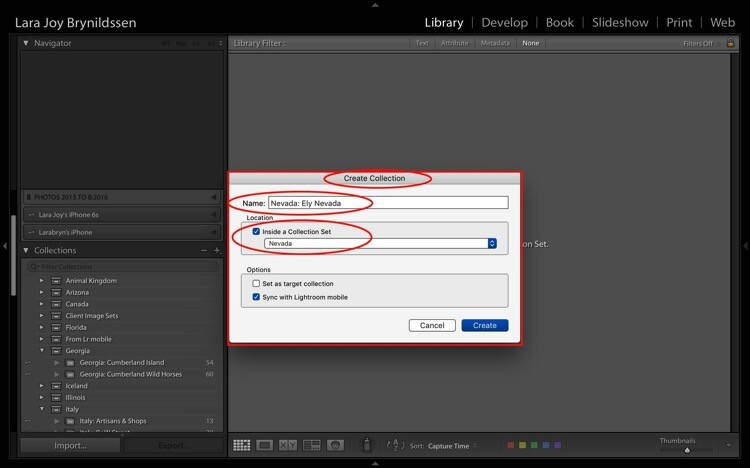
When I’m in Nevada, I’ll be staying in Ely so I created a Collection within my Nevada Collection Set for Ely.

To do this, first, check the box indicating that this Collection sits inside the Nevada Collection Set. When titling Collections, repeat the title of your Collection Set (e.g. Nevada: Ely Nevada). This is important because it helps maintain the file structure in Lightroom Mobile. (More details on that in a few paragraphs.) Make sure you also check the box to Sync with Lightroom Mobile.
Four Advantages Lightroom Collections 1 6

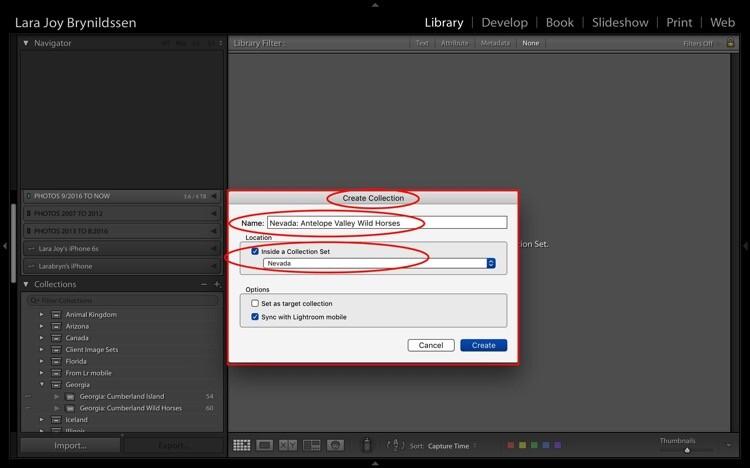
Second Collection for wild horse images.

I’ll also be photographing the wild horses in the Antelope Valley HMA, so I created a second Collection within my Nevada Collection Set for that called – Nevada: Antelope Valley Wild Horses (as shown above).

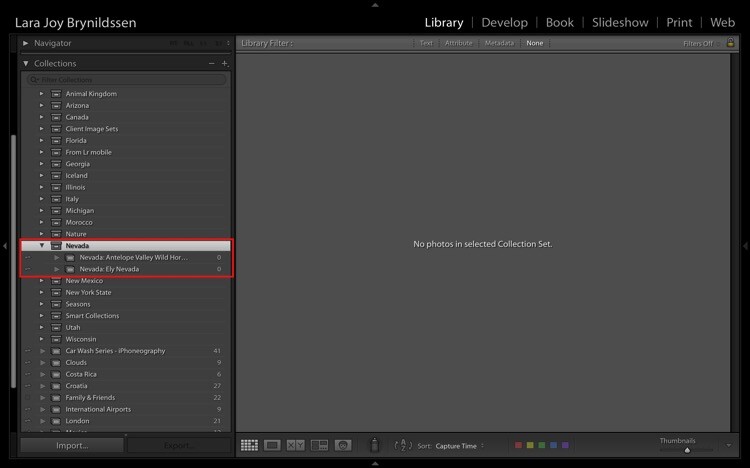
Now you can see the new Nevada Collection Set within the Collections tab on the left panel (below). Note that the icon for the Collection Set is like a large file box. The icons for the two collections inside of it are smaller, like file folders. Both say that they contain zero images because I haven’t added anything to them yet.
Four Advantages Lightroom Collections 1 7

How to Name Your Collections Sets and Collections

As you can see, I most frequently organize based on location. My Collection Sets are often names of countries or American states. That works for me since I travel a lot to make my images and I often go back to the same places over and over again. When I create a collection of my best images of Italy, I’m not interested in whether I made the image in 2013, 2014, 2015 or 2016. I’m interested in whether it’s the best image I’ve ever made in that region of that subject.

If you’re a macro flower photographer, it might make more sense for you to name your images by flower type and color. E.g., your Collection Set could be called Peonies, and your Collection names would be Peonies: Pink, Peonies: White, Peonies: Purple.

You would be able to continue that naming structure across all flower types that you photograph: Zinnias, Dahlias, Daisies, etc. By naming this way, if you get a request for an image of a pink peony, you know exactly where to find it. Click your Peonies Collection Set and scroll down to the Collection called Peonies: Pink.

If you want to have more comprehensive portfolio-like collections, you can have a Collection Set called “Best of”. Your Collections can be called Best of: Peonies, Best of: Zinnias, etc. You can even have a Collection called Best of: All Flowers, which would be the most superlative macro flower images you have ever made.

Collections Add a Second Level of Organization to Your Files

Basically, Collections are a secondary organization structure for your images. The first (for me) is chronological organization. Think of those folders as archives. All images live there. Collections are a second tool to harness the best of those images and make them easier to find. How you name them doesn’t matter as much as consistency. By consistently naming your Collections, you’ll be able to take the most advantage of their features and quickly locate your portfolio-worthy images.

Think of a Collection like a bookmark. Each time you create a Collection, you’re basically bookmarking the images inside of it so that you can quickly and easily find them by clicking on that Collection. You can bookmark each image as many different ways as you want by adding them to multiple Collections. A flower image could be in your Collection called Peony: Pink. It can also be in Best of: Peonies and Best of: All Flowers.

The main purpose is always to include your best work. You never want to scramble to find that great image you think you took two years ago in in Italy but you’re not sure exactly when? Or what town? By using Collections, you’ll always know exactly how to find that awesome image which is worth its weight in gold.

Adding Images to Collections

Four Advantages Lightroom Collections 1 7 3

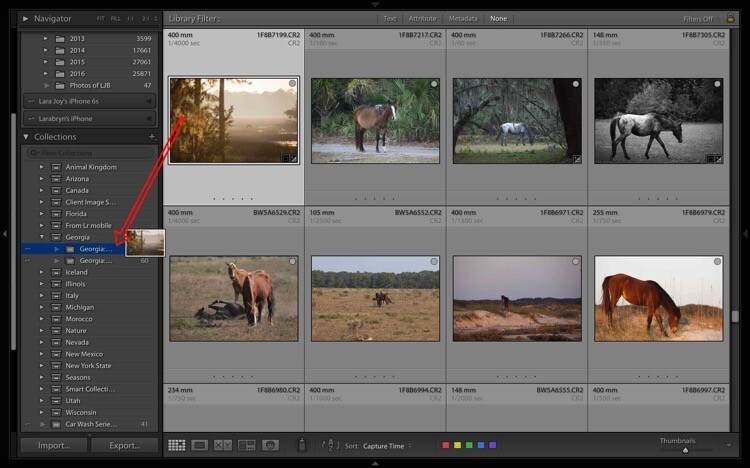
Now that you know how to create and name Collections, and why they’re useful, YOU need to add some images to them. First, select an image. The one above is from a group of images I made on a recent trip to Georgia (USA). I like it and have processed it, so now I select and drag the thumbnail to the Georgia: Cumberland Island Wild Horses Collection. Once the Collection name is highlighted, just release the image and it will drop into the Collection.
Four Advantages Lightroom Collections 1 7 1

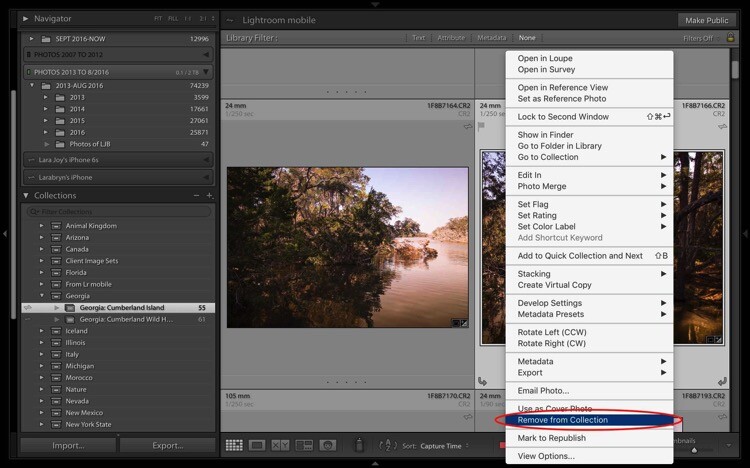
To remove an image from a Collection, first select it. You can see it’s highlighted in pale gray, which means it’s been selected. Right-click and when the menu pops up, scroll to the bottom and select Remove from Collection. Voila! The image will be removed from the Lightroom Mobile Collection too.
Four Advantages Lightroom Collections 1 7 2

Bonus Feature That Makes Collections Even More Useful

If you are looking through your Collections and find the perfect image, but wish it was shot in vertical rather than landscape format, you need to be able to find the original folder where your image file lives. Luckily, Lightroom builds in a neat little trick to help you to quickly jump to that folder.
Four Advantages Lightroom Collections 1 8

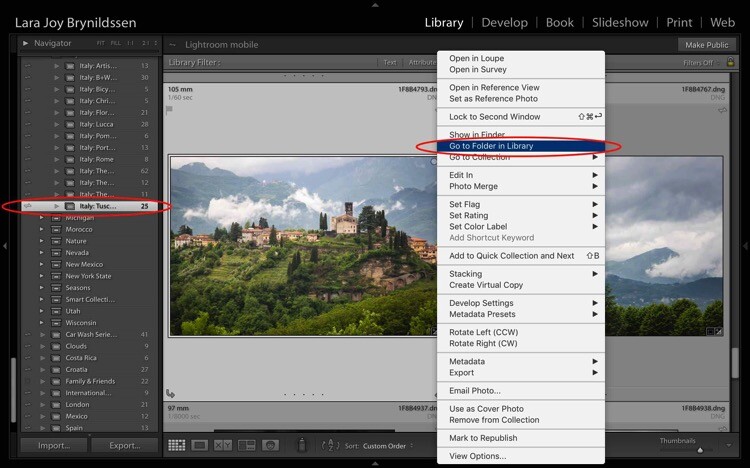
For example, in the Italy: Tuscany Collection, there is a beautiful landscape looking over Barga with lush green grass and heavy clouds sitting on the mountains above the village. To check whether this image is available in a vertical orientation, select the image and right-click to bring up a menu. Scroll to the top of the menu and click; Go to Folder in Library.
Four Advantages Lightroom Collections 1 9

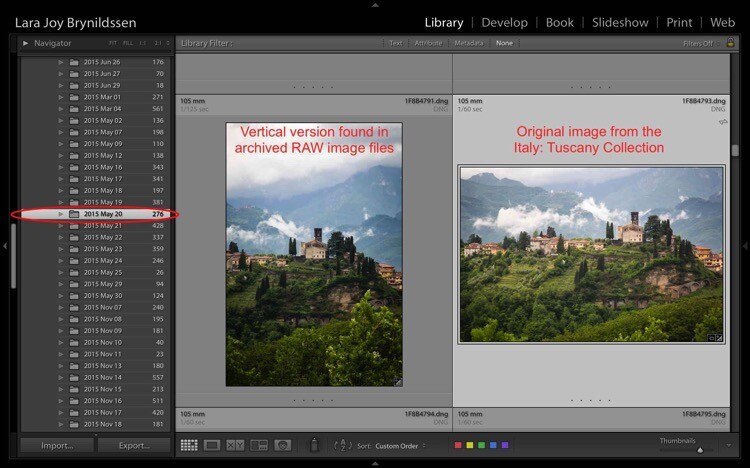
Lightroom takes us from the Italy: Tuscany Collection to the main folder where all of the RAW images taken that same day actually live on the hard drive. You can see in the left side panel we’re now in the 2015 May 20 folder. I think of these folders as archives. They contain all the RAW images I shoot, even the so-so ones or the ones that are near duplicates of other, better images. And – good news – there is a very similar image in a vertical orientation.

Standard Previews Versus Smart Previews

Whenever you upload images using Lightroom, Lightroom creates a small Standard Preview. This preview is like a tiny little jpeg allowing the program to quickly show you your image. If you want to edit that image, Lightroom usually needs to be able to access the original image file.

If you have just a few images, you can keep the files on your computer’s hard drive but since you’re an avid photographer, you probably have your images saved on external drives. The more images you take, the more external hard drives you probably have containing all of your images. If you’re looking for your best Italy images from the last 10 years, you might have to look through images on four hard drives. That can get a little unwieldy. To solve this problem, create Smart Previews for all of the images that you have organized in your Collections.

Creating a Smart Preview

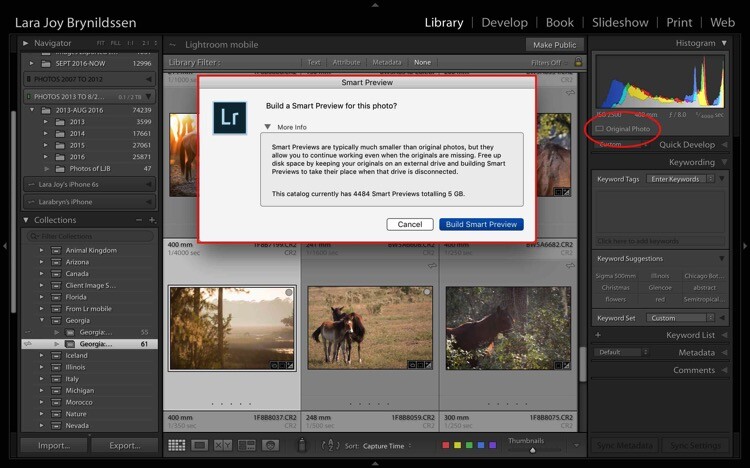
To create a Smart Preview, click on the icon next to where it says Original Photo in the right side panel. A dialog box will pop up. Click Build Smart Preview.
Four Advantages Lightroom Collections 1 10

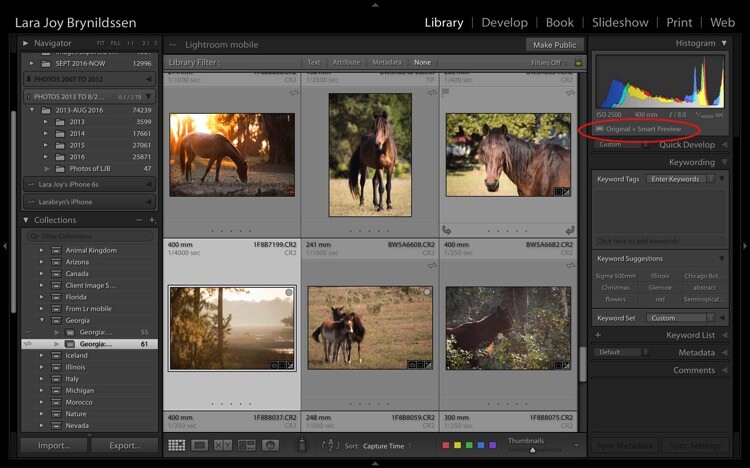
Now in the right side panel, you can see that the icon has changed and the text now reads Original + Smart Preview.
Four Advantages Lightroom Collections 2

A Smart Preview is a larger jpeg than the Standard Preview. The advantage is that it lives on your computer with your Lightroom Catalog files. A Smart Preview takes up far less space than an actual image file but it still contains plenty of information available in it for you to increase the size of the image on your screen, to magnify the details, and even to process it within the Lightroom Develop Module. Any changes you make to the Smart Preview will carry over to your original image once you connect your hard drive too.
Four Advantages Lightroom Collections 2 1

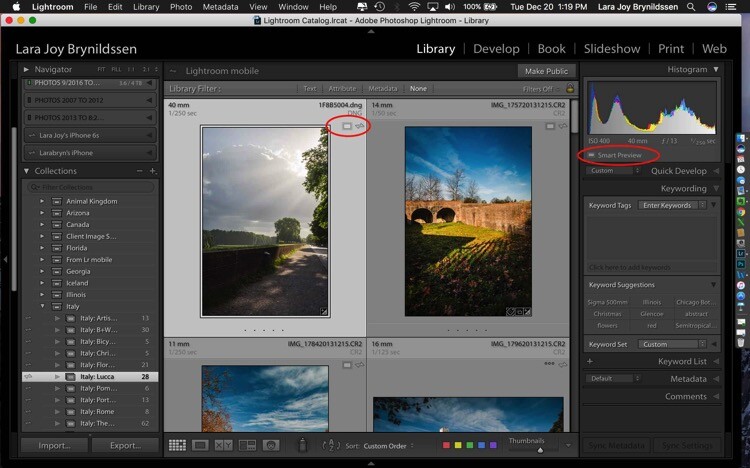
This file is a Smart Preview. You can see the icon on the image and also in the side panel on the right.

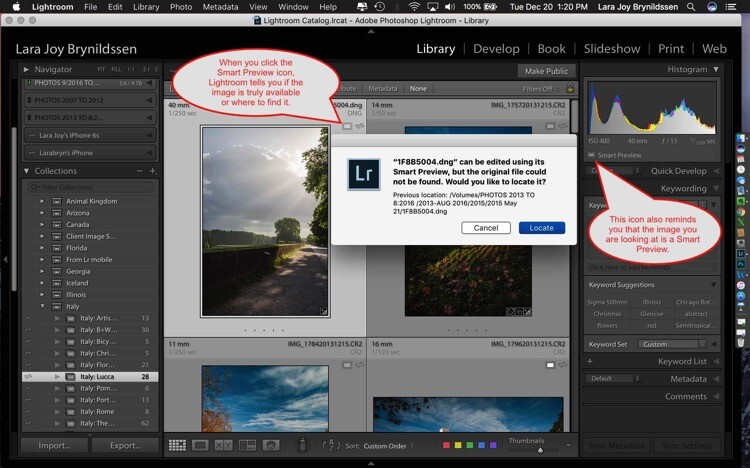
If you click on that icon, Lightroom shows a dialog box letting you know the image isn’t available but that Lightroom knows where it should be. In this case, if I attach the external hard drive and click Locate, Lightroom will find the image for me. Note that LR is also telling me that I can process the image without the original which is exactly what I want.
Four Advantages Lightroom Collections 2 2

NOTE: You cannot export an image if you are only working from a Smart Preview. You also cannot edit it outside of Lightroom (e.g., like Edit in Photoshop).

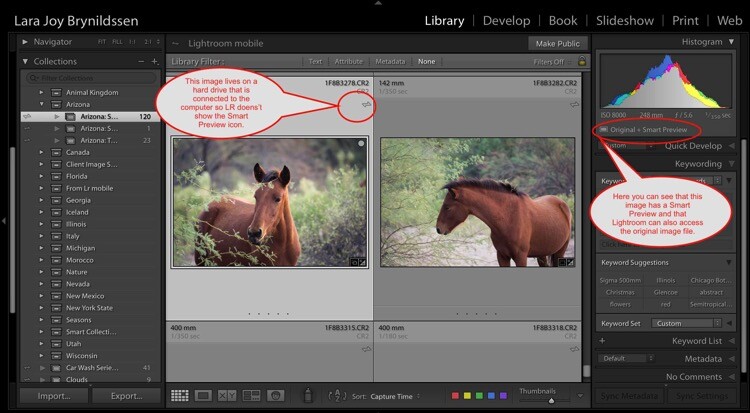
Here you can see that since the external hard drive for this image is attached to the computer, the full image file is available. Lightroom doesn’t show the Smart Preview icon in the Grid View since you’re working with the actual file. In the side panel on the right, LR does show you that this image has a Smart Preview available.
Four Advantages Lightroom Collections 2 3

How are Smart Previews Helpful?

Let’s say you’re printing images for a solo exhibition, and want to showcase your images of Italy. There’s no need for you to slog through the 25,000 images on your miscellaneous external hard drives. All you need to do is open Lightroom, click on Collections, and scroll down to your Italy Collection Set.

Because you’ve made Smart Previews for all your images, you don’t even need to have the hard drives which contain the actual images connected to your computer. This is the key to pairing Smart Previews with Collections. Even if your external hard drives are at home and you only have five minutes before you head back to work, you can begin selecting exhibition images on your laptop. Once you get home and can connect to your external hard drives, you can finish the selection and start printing.

How Lightroom Mobile Dovetails with the Collections Feature

If you are an Adobe Creative Cloud member you are getting so many more features than constant updates to Photoshop and Lightroom. One of those features is Lightroom Mobile. The mobile app doesn’t have the processing power of the full version but I don’t typically use it to edit images so that’s not an issue for me. I use it mainly to have my best images at my fingertips all the time.

Sync with Lightroom Mobile

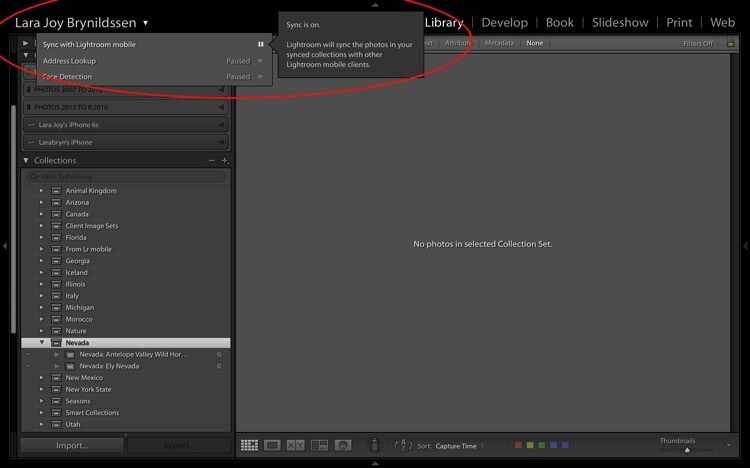
To Sync with Lightroom Mobile, you need to be logged in to your Adobe CC (Creative Cloud) account and you have Sync turned on. Click your nameplate in the upper left corner to ensure you are logged in and Sync is on. My nameplate has been customized, yours might simply say Lightroom. Here you can see that Face Detection and Address Lookup are off but that Sync is on. If you’re ever confused about the on and off positions, just hover your cursor over the box or triangle. A dialog box will pop up letting you know if that feature is on or off.
Four Advantages Lightroom Collections 3

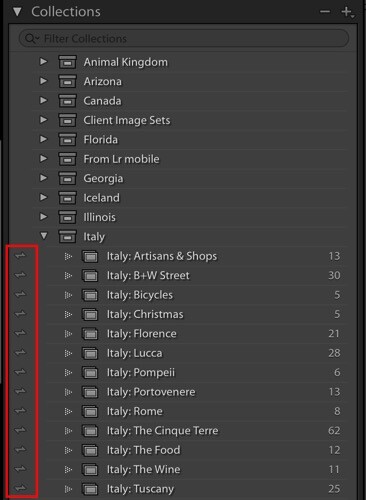
On the left of each collection is a double-sided arrow (see below). This indicates that these Collections are being synced with Lightroom Mobile.
Four Advantages Lightroom Collections 3 1

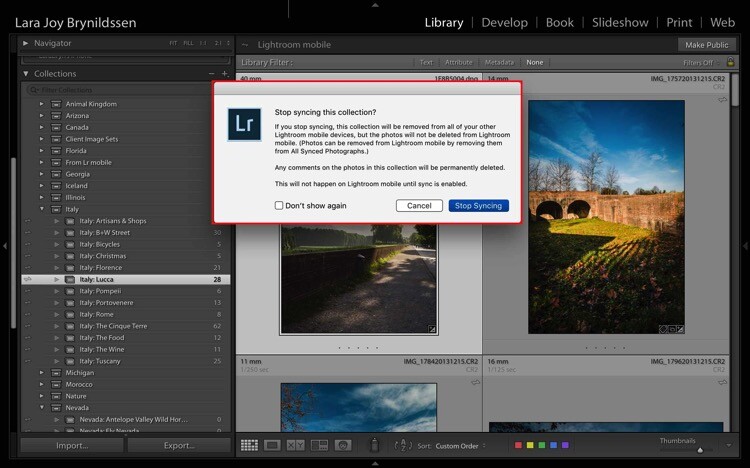
You can toggle Sync with Lightroom Mobile on and off by clicking this arrow. When you turn syncing off, Lightroom will double check with you and let you know that it will remove these images from Lightroom Mobile too.
Four Advantages Lightroom Collections 3 2

If you leave Sync with Lightroom Mobile on, Lightroom will sync the images in your Collections to the mobile app. This is a good time to install the app on your phone and tablet if you haven’t already. Now that you’ve installed the mobile app and logged in, your phone or tablet will be busy grabbing copies of those collections.

While Lightroom Mobile is working, you’ll see the cloud icon in the upper left-hand corner will have three moving dots. When the dots stop moving, the mobile app should be synced with your desktop or PC.

Four Advantages Lightroom Collections 3 3

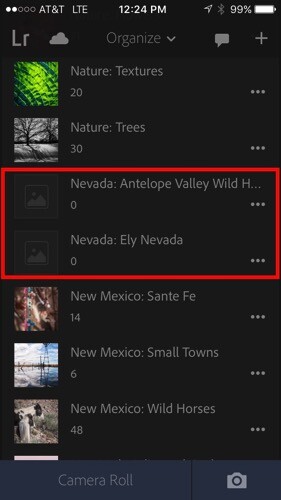
Remember earlier when we created a Nevada Collection Set? And then created a Nevada: Ely Nevada Collection and a Nevada: Antelope Valley Wild Horses Collection? Here they are in Lightroom Mobile.
Four Advantages Lightroom Collections 3 4

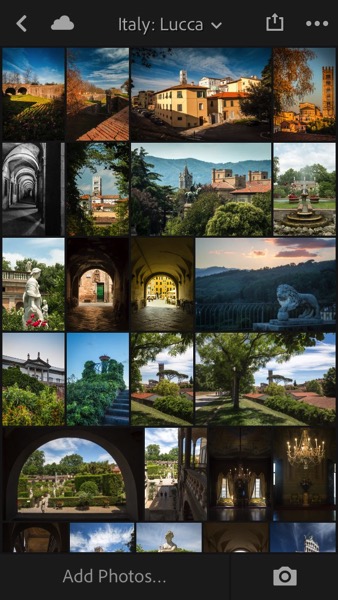
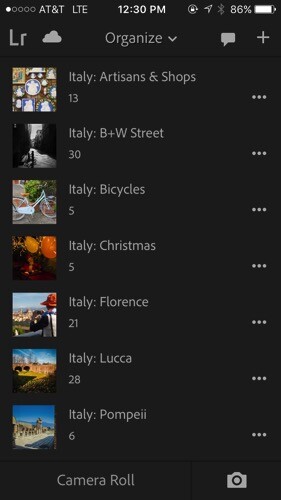
We’ve been working a lot with the Italy Collection Set too and you can see all of those folders here on the mobile app.
Four Advantages Lightroom Collections 3 5

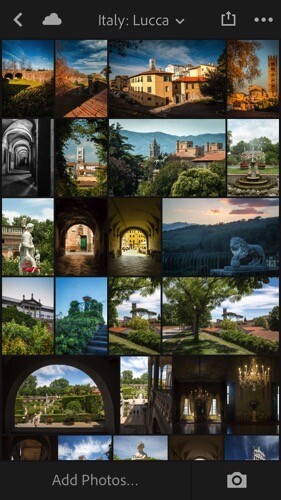
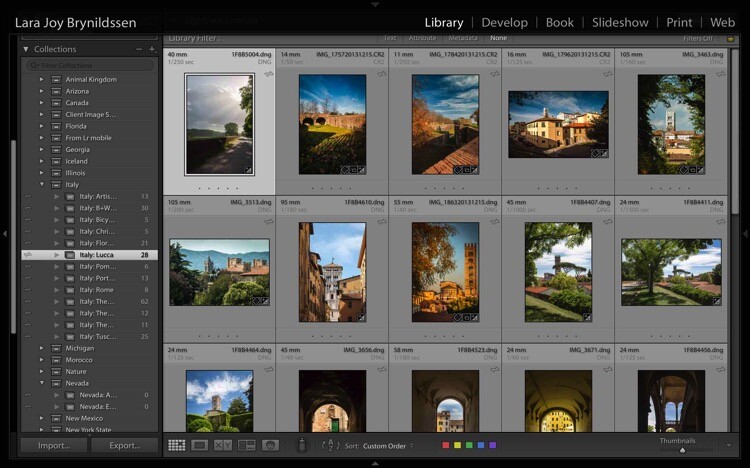
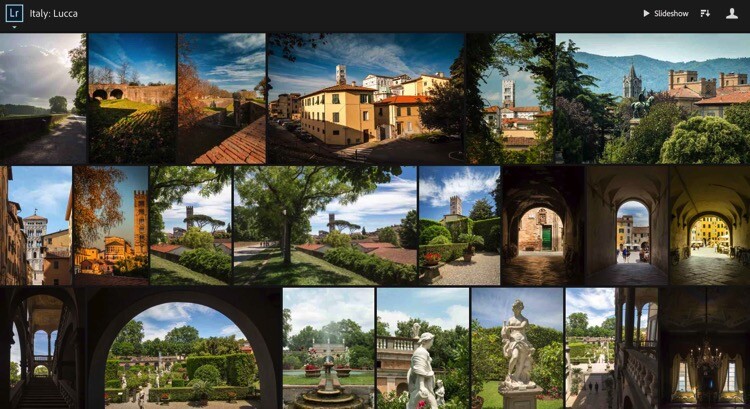
When you click on one of the folders – for example, Italy: Lucca – you’ll see that the images are exactly the same as they are on the desktop version.
Four Advantages Lightroom Collections 3 6

Four Advantages Lightroom Collections 3 7

Why Collection Names are Important in Lightroom Mobile

Remember back when we were setting up our Collection Sets and Collections on the desktop version? We repeated the name of the Collection Set in each Collection. It seems a little clunky to do it that way but hopefully now that we’re in Lightroom Mobile, you can see why we’ve chosen to name things that way. Lightroom Mobile doesn’t have Collection Sets. Instead, the mobile app organizes everything alphabetically by title.

If we hadn’t repeated the name of the Collection Set when we named our Collections, the names wouldn’t be specific enough. For example, I might not know what images are in a file called Artisan Shops if I don’t know those shops are in Italy. Now, by adhering to this slightly clunky naming structure, if someone (i.e. a publisher, client, gallery owner, friend or fellow photographer) wants to see your Italy images, you can open the app on your phone, scroll down the alphabet to Italy and show them the most important group of images.

NOTE: You can actually change the organization method in Lightroom Mobile by clicking the Organize menu. For our purpose of building portfolios of your best work, it’s best to stick with the default, Alphabetize by Title.

Using Collections to Share Images from the Desktop Version of LR

For many of us, sharing our images is the very heart of why we do what we do. Lightroom has built some handy features right into Collections to make it as easy as possible to share our portfolios.

Let’s start with the desktop or full version of Lightroom. The first way we can share a Collection or portfolio of images is by right-clicking on a Collection. Let’s click on Italy: Lucca. A dialog box pops up. Click on Lightroom Mobile Links. Then, in the second dialog box, under Private Link, click on View on Web.
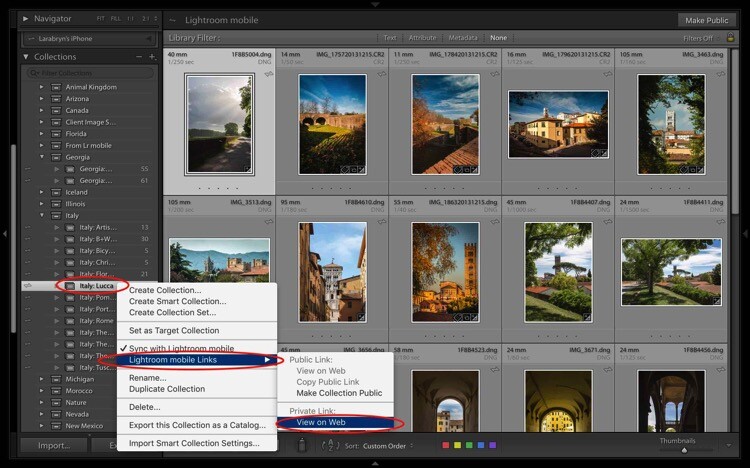
Four Advantages Lightroom Collections 4

That takes us online to Adobe.com. If you’re not signed in, you’ll need to sign in now. You can see that once again, we’re in the same collection where we started. It’s titled the same and the images are in the same order. You can easily share by clicking on the Shared icon that is a box with an arrow sticking out of it.
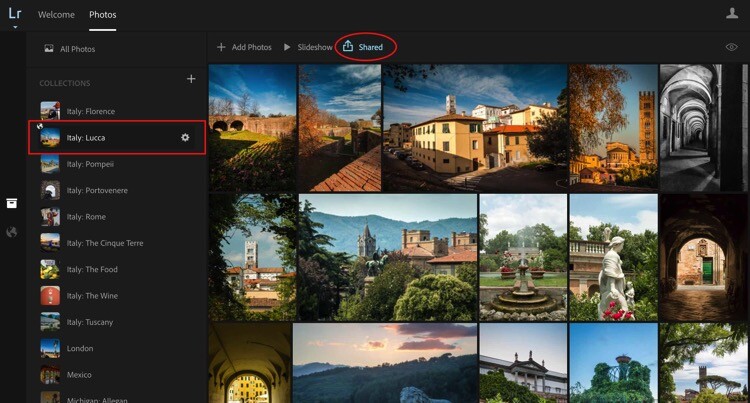
Four Advantages Lightroom Collections 4 1

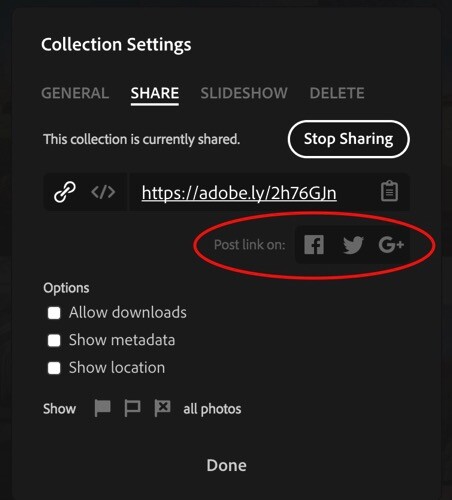
Once you click that icon, another dialog pops up. This dialog gives you a link to share. Here’s the link to my Italy: Lucca Collection. https://adobe.ly/2h76GJn. There are also a few options you can choose to specify how much about your images you want to share.
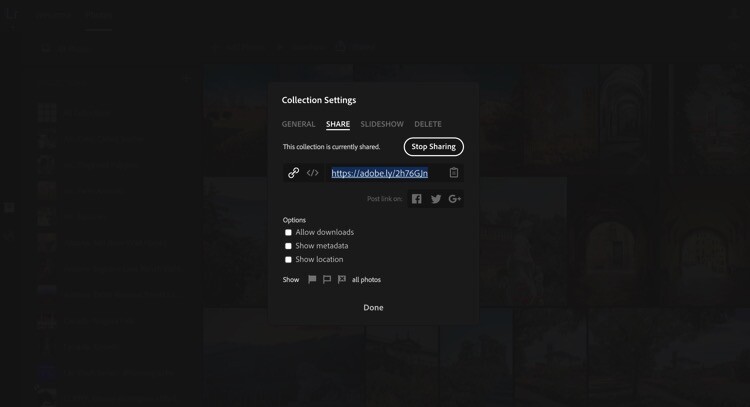
Four Advantages Lightroom Collections 4 2

Depending on where you’re sharing your Collection and why the only box I would suggest you almost never check is Allow Downloads. If you prefer to be credited for your work and to be paid, do NOT check this box or allow anyone to download your images.
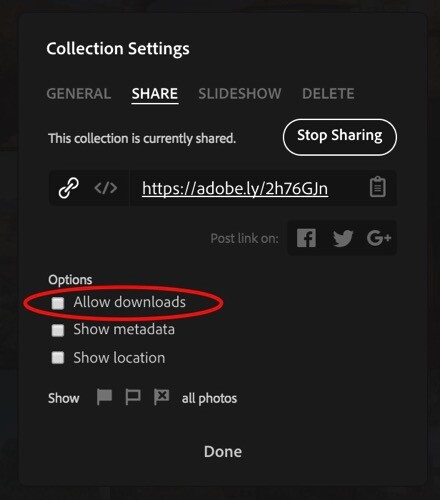
Four Advantages Lightroom Collections 4 2 1

You can share your entire Collection on Facebook, Google+, or Twitter too. Tap the icon for your favorite social media site and follow the prompts. Lightroom will post the link to your entire Collection.
Four Advantages Lightroom Collections 4 2 2

Four Advantages Lightroom Collections 4 3

Four Advantages Lightroom Collections 4 4

Four Advantages Lightroom Collections 4 5

Another way you can share your images from the desktop or full version of Lightroom is to click the Make Public button in the top right corner.

Four Advantages Lightroom Collections 4 6

Once you click that link, Lightroom will generate a public link.

Four Advantages Lightroom Collections 4 7

When you click a public link, Lightroom again takes you to Adobe.com only this time, you’re not the only one who can see it. Anyone online can see your public Collection as a web gallery. To make the Collection private again, just click the button that says Make Private.
Four Advantages Lightroom Collections 4 8

Using Collections to Share Images from Lightroom Mobile

You can also share from the Lightroom Mobile in almost exactly the same way, with the same options.

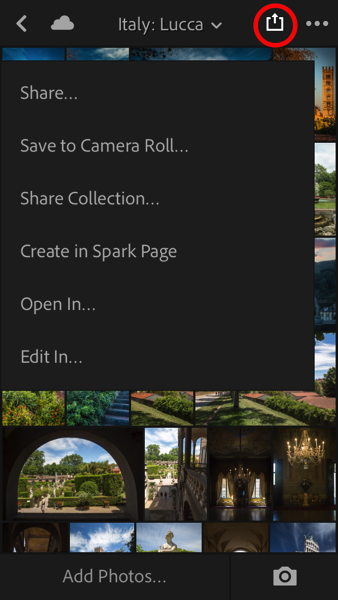
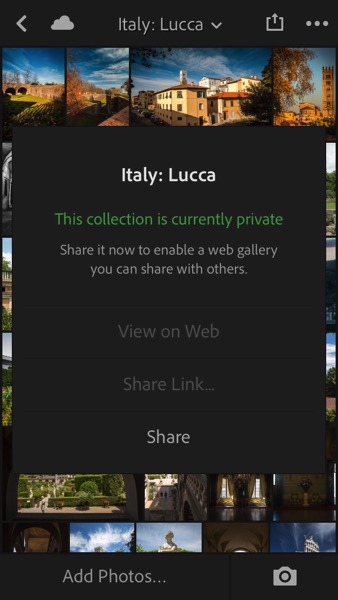
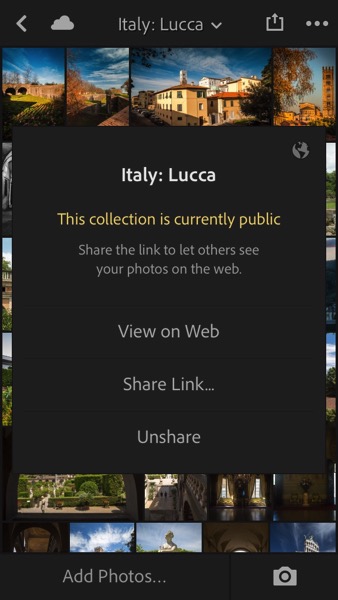
Here we have the Italy: Lucca Collection. When you tap the Share button (the box with the arrow sticking out of it), you pull up a dialog. Tap Share Collection. Another dialog box pops up giving you the option to make the Collection Public by tapping Share at the bottom of the dialog. If you change your mind, tap Unshare.

Four Advantages Lightroom Collections 4 9 Four Advantages Lightroom Collections 4 10
Four Advantages Lightroom Collections 4 11 Four Advantages Lightroom Collections 4 12

Why do you even need these links?

You might be thinking at this point that while it’s pretty cool to have shareable links to your Collections, you don’t really need them. That brings us back to the idea of building a portfolio. Regardless of whether you are an amateur photographer hoping to go pro someday, or whether you are a very serious enthusiast, building a portfolio is going to help you improve your photography.

More than that, sharing your portfolio enables you to get feedback on what you think are your best images. If you have a trusted mentor, you can share a link to one of your Collections with her, she can view the images, comment, and you can use her feedback to improve.

These links can also be used to share the image files from your shoot if you are a pro and work with clients. If you’re looking to sell your travel images, you can share a link with a local tourism bureau or to a travel magazine when you pitch a story. Or, if you were in Italy with friends and want them to see why exactly you always carry 30 pounds of camera gear with you when you travel, send them a link to one of your Italy Collections. They’ll re-live the trip as they scroll through your images and maybe even offer to carry some of your gear the next time you travel together.

Sharing to Instagram from Lightroom Mobile

Your sharing options from Lightroom Mobile are similar to the sharing options from the full desktop version and also include Facebook, Twitter, and email. One of the best ways to use the Lightroom Mobile app is to share to Instagram. Since uploads to Instagram can only be done from your phone, if you want to share images from your DSLR, it’s always a bit of a trick getting them over to your phone in a quick, easy way. Lightroom Mobile is the perfect solution.

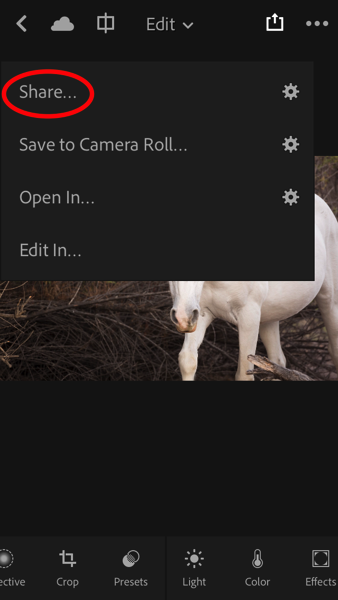
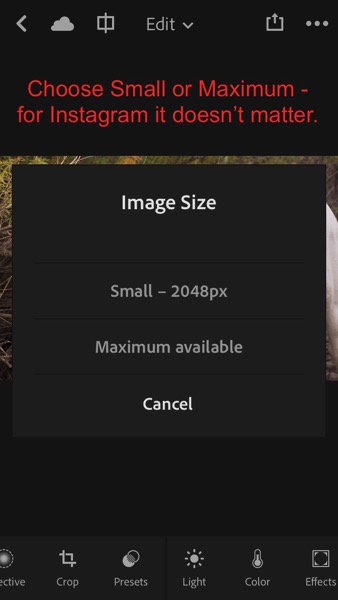
My Instagram feed is only images of horses so let’s jump to Arizona: Salt River Wild Horses Collection. Click on the image you want to share. Tap the Share button (the box with the arrow sticking out of it). In the dialog box that opens, tap Share…. Then, in the Image Size dialog box that opens, tap either one (it doesn’t matter so much for Instagram). Finally, in the next box that opens, click the icon that says Import with Instagram.

Four Advantages Lightroom Collections 5

Four Advantages Lightroom Collections 5 1 Four Advantages Lightroom Collections 5 2
Four Advantages Lightroom Collections 5 3 Four Advantages Lightroom Collections 5 4
Four Advantages Lightroom Collections 5 5 Four Advantages Lightroom Collections 5 6

You might also see an icon that just says Instagram. I don’t use that one because it gives fewer options. The Import with Instagram button takes you right into the app with all the native options to Instagram. Now you’re all set. Caption and hashtag as you normally would and go on your merry way.

NOTE: I’ve really just posted that image to Instagram. Go find it and give it some love so I can give you bonus points for reading all the way through this very long article.

Four Advantages Lightroom Collections 5 7

As long as you consistently sync to Lightroom Mobile, you can easily share your images to Instagram on a daily basis and eventually, your feed will be a living portfolio of your best images.

How do you use Lightroom Collections Sets and Collections?

The goal with this article was to show you how to set up and use Lightroom Collections to build your portfolio, to demonstrate the utility of Smart Previews, to clarify how to sync with Lightroom Mobile, plus a few tips on using Collections to share your images.

Do you use Lightroom Collections? Do these ideas work for you?

Share with me in the Comments below. I’d love to know how you build and share your portfolios.

googletag.cmd.push(function() {
tablet_slots.push( googletag.defineSlot( “/1005424/_dPSv4_tab-all-article-bottom_(300×250)”, [300, 250], “pb-ad-78623” ).addService( googletag.pubads() ) ); } );

googletag.cmd.push(function() {
mobile_slots.push( googletag.defineSlot( “/1005424/_dPSv4_mob-all-article-bottom_(300×250)”, [300, 250], “pb-ad-78158” ).addService( googletag.pubads() ) ); } );

The post Four Advantages of Using Lightroom Collections by Lara Joy Brynildssen appeared first on Digital Photography School.


Digital Photography School

 
Comments Off on Four Advantages of Using Lightroom Collections

Posted in Photography


How to Make Abstract Glitch Art Photographs

29 Jan

Have you ever watched a television system receiving a corrupted signal – misplaced squares, static, jagged frames, freezing, misplaced or inverted colors – and thought “hey, that actually looks pretty neat?” Being eager to get your favorite show going again, the answer might well be no. Yet, these corruptions or glitches can be exploited to add a unique dimension to your photography.

What is glitch art?

Glitch art is a fairly recent phenomenon that has developed from the fast-paced evolution of digital technology. Technically, a glitch is the temporary and slight malfunctioning of a system. Due to the limitations of current technology, time, funding, and human error, glitches run the whole gamut of the digital landscape and can be difficult to pinpoint due to their transient nature. From software and games to sound files, automated systems and phones, there is an endless number of glitches that we encounter, often unknowingly, during day to day life.

Glitch art is an art form that harnesses the visual effects of data corruption. By applying certain encoding or actions to an image, a photograph can become visually corrupted while retaining a usable file. Glitch art is generally an experimental process, with glitch artists walking the fine line between a usable file and a completely broken one.

glitch-art-photography-01

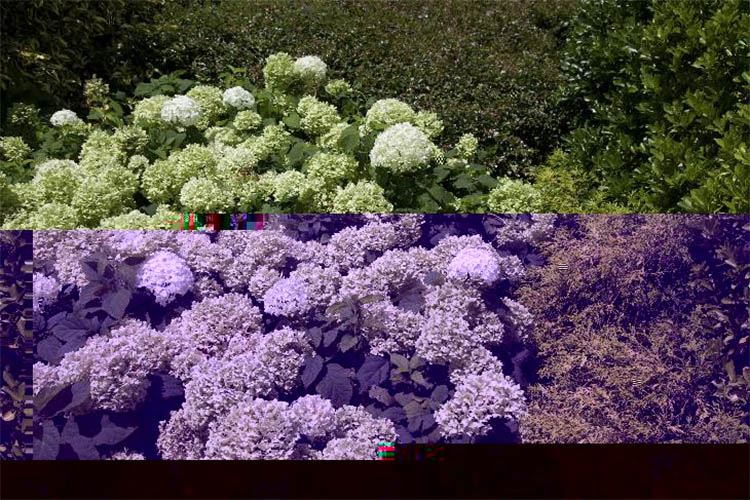
Even the dreaded CF card malfunction can produce intriguing results

Controlled glitching

In analogue photography, glitches came in the form of negative scratches, light leaks, dust, finger prints, and chemical residue. Some problems were solved with a trip back to the enlarger or a re-inspection of chemicals. Other incidences, like exposed negatives and light leaks could be an unmitigated disaster. Nowadays, it’s the defective memory card that could spell certain doom – so the very notion of intentionally breaking an image may well send chills up a photographer’s spine. This is where glitch art comes in, to explore the flaws of our temperamental digital landscape, under controlled circumstances with carefully backed up files.

Glitching with the internet

There are many complex methods of glitching photography, including short-circuiting cameras, applying code, and creating automated programs. Fortunately, there are some less complicated methods too. If you google “glitch art maker” you will see numerous hits for various automated glitching programs. These programs allow you to upload an image and the program will apply a glitch art effect to the file in real time.

Some programs are more in-depth than others, allowing you to adjust the parameters of the effect or emulate several glitch aesthetics at once. Programs that can apply glitch effects to photographs are also available as apps for smartphones, making for easy uploading to social media sites. While quick and easy, the downside of using an online program is that it can produce some generic or bland results, but they are great for an initial induction into the world of glitch art.

glitch-art-photography-17

glitch-art-photography-21

Image file vs text editor

One of the methods of glitching digital image files is called databending. This involves manipulating an image file by opening it in a program designed for another purpose. Be sure to make duplicates of the images you decide to use, as you will not be able to undo the databend later.

For Windows users

If you use Windows – select a BMP, TIF, or RAW image file. Open the image using WordPad (which comes with almost all versions of Microsoft Windows from Windows 95 onward). After loading, you will be met with a wall of seemingly random text. Click File > Save and then close WordPad. Open the saved file in Paint or Photo Viewer to see the result. You can also experiment with entering text from the middle of the document, but doing so can increase the likelihood of an unreadable file.

For Mac users

If you use Mac, select any image. Mac users can use any file type. Open the image in Text Edit (a default program with Mac operating systems). After loading, a document with a wealth of text will appear. The first few lines of text are important and contain information that tells the image how to open. Scroll down to about midway through the text file and select and copy a few lines of text. Paste the copied text into other areas around the middle of the file. Click File > Save and open the glitched image in Preview to view the result.

glitch-art-photography-02

glitch-art-photography-03

This is the result of a .bmp file having been opened in WordPad and saved.

glitch-art-photography-04

This glitched flower image was saved as a .tif file is slightly different in appearance

If the image you’ve saved won’t open, the glitch may have rendered the file unusable. Persevere with a new image or a different file type and make conservative interventions while you get used to the process.

Databending with an audio editor

Audacity is a free audio editing software available for both PC and Mac platforms. Databending with Audacity is a technical process, with a high degree of trial and error involved. As with any databend, files can become corrupt, so make numerous copies of any image you choose to databend. I’m using a PC for this tutorial, but the process is similar on a Mac.

Prepare your file

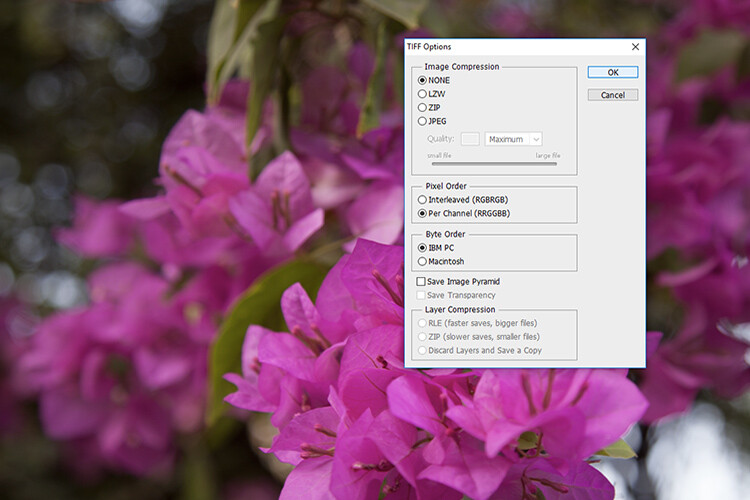
First, you will need to prepare a file for databending. Open an image in Photoshop and save it as a TIF. Select “per channel” as the pixel order in the TIFF Options prompt. Be sure that “none” is selected for image compression.

glitch-art-photo-08

glitch-art-photo-07

TIF saving settings

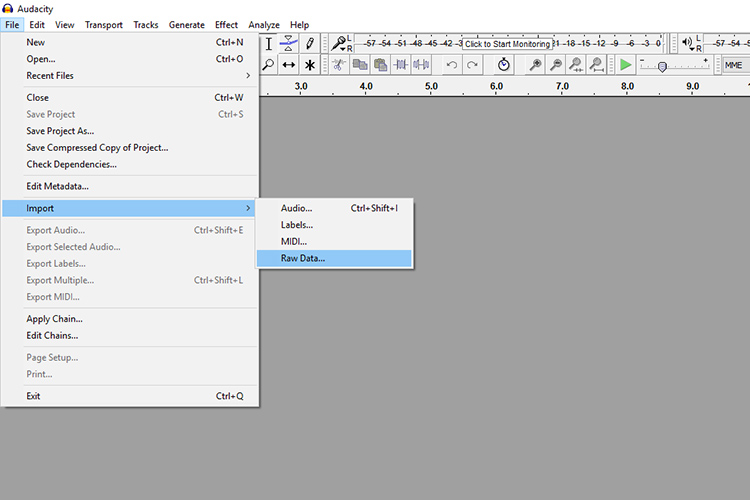
Open Audacity and select File > Import > Raw Data and select your file.
glitch-art-photo-09

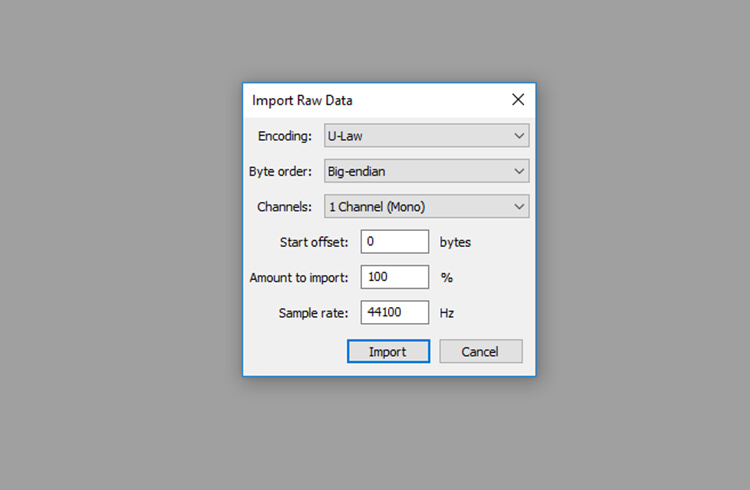
You will need to input some parameters so that Audacity reads the image as a sound file. Copy the settings in the image below.

glitch-art-photography-10

Drag your mouse over the middle portion of the timeline. Leave the first 5 seconds un-selected as it contains important file data.

glitch-art-photography-11

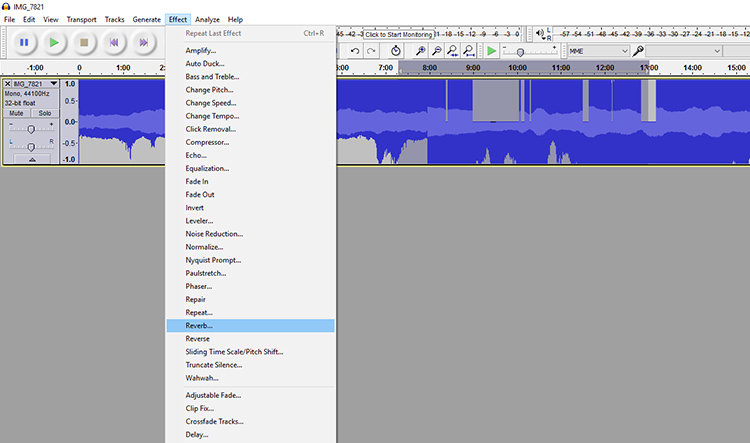
With the middle portion of the timeline selected, click Effect and choose an effect. Reverb is a good starting point.

glitch-art-photography-12

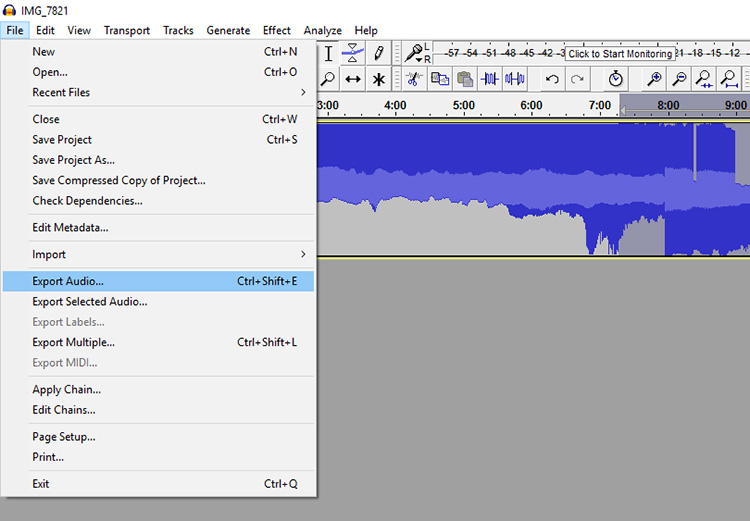
A window with options to fine-tune the effect will appear, click ok. Once you have applied the effect, click on File > Export Audio.

glitch-art-photography-19

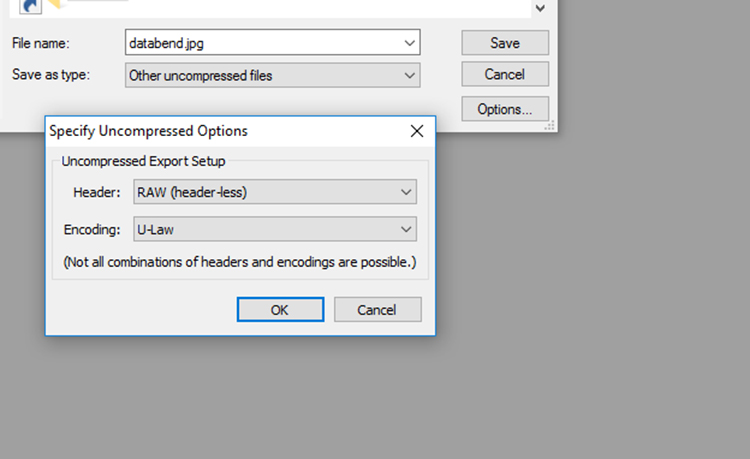
Name the image and enter a .jpg extension at the end. In the “Save as type” menu, select “Other uncompressed files”. Select “Options…”  and copy the specifications in the image below. Click Save. Select OK for the various prompts.

glitch-art-photography-13

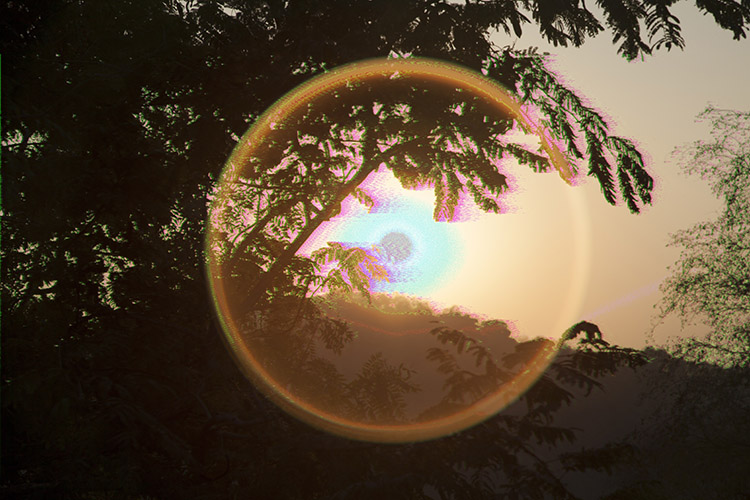
Open the file in Paint, Preview, or Camera Raw to view the results of the databend. Save the file as a JPG under a new name if you want to open the file in Photoshop. If you discover that the file has been rendered completely unreadable, try a different image or file formats.

glitch-art-photography-14

Conclusion

The experimental nature of glitch art makes it an intriguing undertaking. As photographers, glitch art allows us the freedom to create visually engaging imagery by deferring to the idiosyncrasies of technology. Databending explores themes of creativity and destruction, control, and unpredictability by exploiting the digital systems with which we surround ourselves.

Visually, glitch art creates unusual, surrealistic, and even abstract imagery via a set of interventions that may likely never be repeated again. Whether you experiment with an automated program or try your hand at data bending – when you leave your images to the whims of digital devices, the results will always surprise you.

glitch-art-photography-16

The repeated effect of the rabbit’s face was achieved with the “Echo” effect

glitch-art-photography-20

I used the “Fade in” and the “reverb” effect for this photograph of a Lion Fish.

glitch-art-photography-23

glitch-art-photography-15

glitch-art-photography-24

googletag.cmd.push(function() {
tablet_slots.push( googletag.defineSlot( “/1005424/_dPSv4_tab-all-article-bottom_(300×250)”, [300, 250], “pb-ad-78623” ).addService( googletag.pubads() ) ); } );

googletag.cmd.push(function() {
mobile_slots.push( googletag.defineSlot( “/1005424/_dPSv4_mob-all-article-bottom_(300×250)”, [300, 250], “pb-ad-78158” ).addService( googletag.pubads() ) ); } );

The post How to Make Abstract Glitch Art Photographs by Megan Kennedy appeared first on Digital Photography School.


Digital Photography School

 
Comments Off on How to Make Abstract Glitch Art Photographs

Posted in Photography


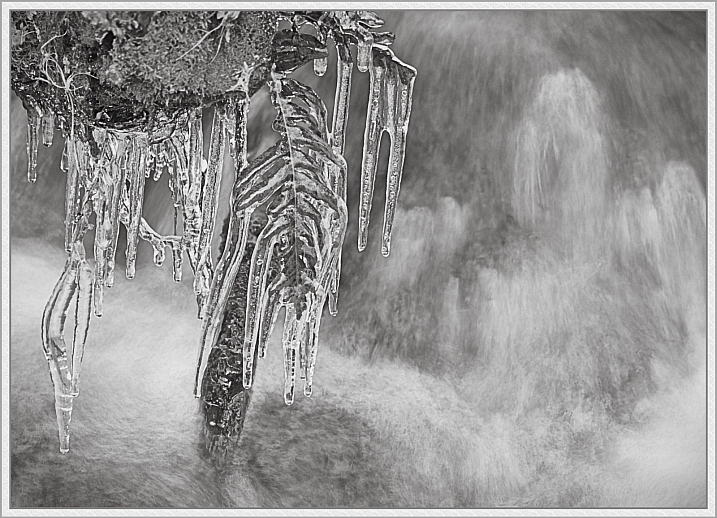
24 Frozen Images of Some Cold Winter Weather

29 Jan

Here in the northern hemisphere part of the world, it is winter. That means two things – cold and snow. But that doesn’t stop some people (nor should it stop you) from doing photography.

Let’s have a look at some frozen images of some cold winter scenes.

By Howard Ignatius

By Neil Howard

By Dan (catching up)

By smilla4

By Ken Mattison

By Sigurd Rage

By Roger S. Hart

By Barbara Friedman

By Julie Falk

By chuddlesworth

By USFWS Mountain-Prairie

By Jack Skipworth

By ShinyPhotoScotland

By B Gilmour.

By Tupulak

By Kamil Dziedzina

By MJI Photos (Mary J. I.)

By Brian Hawkins

By Melinda Shelton

By Simon Doggett

By Nicolas Raymond

By ellenm1

By Gonzalo Baeza

By ravas51

googletag.cmd.push(function() {
tablet_slots.push( googletag.defineSlot( “/1005424/_dPSv4_tab-all-article-bottom_(300×250)”, [300, 250], “pb-ad-78623” ).addService( googletag.pubads() ) ); } );

googletag.cmd.push(function() {
mobile_slots.push( googletag.defineSlot( “/1005424/_dPSv4_mob-all-article-bottom_(300×250)”, [300, 250], “pb-ad-78158” ).addService( googletag.pubads() ) ); } );

The post 24 Frozen Images of Some Cold Winter Weather by Darlene Hildebrandt appeared first on Digital Photography School.


Digital Photography School

 
Comments Off on 24 Frozen Images of Some Cold Winter Weather

Posted in Photography


Pulitzer-prize winning photographer Jack Dykinga reflects on his career

29 Jan
A collection of Jack Dykinga’s Press Passes from his years in Photojournalism.
Photo by Jack Dykinga

Jack Dykinga’s career started in photojournalism during the Civil Rights Movement in the US during the 1960’s and 70’s. Despite winning a Pulitzer Prize during his tenure at the Chicago Sun-Times, he’s never allowed himself to get too comfortable with one style. He later shifted his focus to fine art and landscape photography, a career move that’s not too common among photojournalists.

Arizona State Trust land near Redrock, AZ with summer monsoon storm, flashes of lightning and a partial rainbow over the saguaro cacti in the Sonoran Desert Arizona. Photo by Jack Dykinga

He’s now offering a retrospective on his unique career in his book ‘A Photographer’s Life’. His recent interview with Resource Travel also reveals some interesting insights. He has this to say about finding success in any field of photography:

‘I’m a tried and true pro and I know exactly what buttons to push and what I need to do to capture the story, but it still boils down to your impression, your curiosity, what it is that piques your interest. That varies from photographer to photographer. From that, you apply your set of skills and your style artistically — so you’re doing both journalism and art at the same time. That’s the most successful type of photography.’

Yosemite National Park, CAL/Bridalveil Falls pours into Yosemite Valley’s coniferous forest under shroud of fog. California, 1987 Photo by Jack Dykinga

The full interview over at Resource Travel is well worth your time. Do Dykinga’s words ring true for you? Let us know in the comments.

Articles: Digital Photography Review (dpreview.com)

 
Comments Off on Pulitzer-prize winning photographer Jack Dykinga reflects on his career

Posted in Uncategorized


Weekly Photography Challenge – Frozen

29 Jan

The first thing I want you to do to get ready this week is to have a look at these 24 Frozen Images to get you ready for a spine-chilling challenge!

Weekly Photography Challenge – Frozen

If you live in a northern part of the globe this should be easy for you. Find something frozen, just look around for:

  • Icicles
  • Snow
  • Frost
  • Snowflakes if you want to go ultra macro!

By wiredforlego

By LASZLO ILYES

By Susanne Nilsson

Even if you do not live in the northern parts of the world you can participate in this challenge. Think outside the box what else is frozen? How about:

  • Ice cubes
  • Popsicles
  • Ice skating rink
  • Ice cream!

You could even freeze something inside an ice cube and photograph that! How about a flower or slice of cucumber? Get inventive.

By Barta IV

By Derek Key

By m01229

Share your images below:

Simply upload your shot into the comment field (look for the little camera icon in the Disqus comments section) and they’ll get embedded for us all to see or if you’d prefer, upload them to your favorite photo-sharing site and leave the link to them. Show me your best images in this week’s challenge. Sometimes it takes a while for an image to appear so be patient and try not to post the same image twice.

Share in the dPS Facebook Group

You can also share your images on the dPS Facebook group as the challenge is posted there each week as well.

googletag.cmd.push(function() {
tablet_slots.push( googletag.defineSlot( “/1005424/_dPSv4_tab-all-article-bottom_(300×250)”, [300, 250], “pb-ad-78623” ).addService( googletag.pubads() ) ); } );

googletag.cmd.push(function() {
mobile_slots.push( googletag.defineSlot( “/1005424/_dPSv4_mob-all-article-bottom_(300×250)”, [300, 250], “pb-ad-78158” ).addService( googletag.pubads() ) ); } );

The post Weekly Photography Challenge – Frozen by Darlene Hildebrandt appeared first on Digital Photography School.


Digital Photography School

 
Comments Off on Weekly Photography Challenge – Frozen

Posted in Photography


How to Photograph Close-Up Details of Newborns and Infants

29 Jan

Newborn portraits warm hearts and bring tons of joy to those who view them, especially if they are the new parents or extended family of the newborn. Often, we focus on capturing the new baby among their surroundings with various props and scenes setup. One area we might overlook in our quest to photograph their fresh new life is the tiniest of parts in comparison to the larger world around them. Parents love these special details of newborns just as much, and you’ll enjoy taking them, too.

newborns

The Gear

Using a macro lens or a close-up filter will help you get in tight without the need for cropping in post-processing which may degrade the image quality later. Ideally, you want to use a macro lens as they stay sharp while allowing you to get in closer than ever before.

Close-up details of newborns macro lens

If you don’t have a macro lens or close-up filter in your lineup, a zoom lens works well, too. You can be a short distance away and still get close-up without needing to crop. Post-processing may help with sharpness if you’re using a zoom lens.

Non-macro fixed lenses may be a little more challenging to use for getting close up, depending on their minimum focusing distance (how close you can be to the subject while still keeping it in focus). Investing in a fixed macro lens or close-up filters would be more suitable for this application.

The Hands

Everyone remarks on the small hands of a baby and how soft they are when they’re holding them. There are two ways to photograph close-up details of newborn hands to make an impact.

The first way to photograph new hands is up close. Hands resting near their body or close to their face shows the small details on their hands and provides a glimpse into how soft they are.

Close-up details of newborns hands

The second way to photograph their hands is against another person’s hand, finger, or an object that shows the actual size of their hand. By capturing hands near or holding an object, the viewer easily can gauge how small the baby’s hands are in comparison to the world around them.

Place their hand around a parent’s finger, or a special family heirloom like wedding rings to show their true size.

Close-up details of newborns hands

As the newborn grows, hands become an integral part to how they begin to use their body or hold themselves steady. Make sure to give some focus to their hands in the coming months as they grow and start to grasp objects, use them for balance, or while they are relaxing in a seated position.

Close-up details of newborns hands

The Face

A newborn’s face is priceless to their parents. Photographing details of their face at various angles will give you more than just a straight-on standard image. Their tiny nostrils or eyelashes can have a tremendous impact on the viewer. Ears, lips, and hair are just as valuable to capture in an image when focusing close-up and on details.

Close-up details of newborns face

As the child grows, his or her face will change tremendously from those first few weeks. Photographing their face over the course of infancy will be a proud addition to their baby album as they morph features from one parent to another over a short time.

Close-up details of newborns face

The Feet

The feet are extra soft and cuddly, minus the wrinkles of age or use. They might be pricked and prodded before they get home, but photographing them alone is worth the additional editing time it may take to remove small pricks from hospital needles. Getting in close to shoot details of newborn feet makes the viewer almost want to touch them and feel how smooth and gentle they are.

Close-up details of newborns feet

Try capturing their feet while they are lying on their back and while also snuggled up on their stomach. Both angles will give you options to again add-in family heirlooms in addition to showing just how tiny they are in comparison to their parents’ fingers. Parents love these types of images that embody the love they have for their new addition.

Close-up details of newborns feet

Also, as growing infants become more aware of their feet, you’ll be able to capture them against a backdrop of their face while sucking on their toes, or pulling back from touching the green grass outdoors for the first time.

Close-up details of newborns feet

Wrap-up

Getting close-up with newborns is essential to telling the entire story of their fresh new life.

Photographing these little parts makes for beautiful wall decor, while also capturing the same features one might ordinarily try to get set in ink for their baby book. To cherish their growth over time, getting in close with macro or zoom lenses offers the best option when focusing on these tiniest of parts and parents will absolutely love these details shots.

Please share your newborn details photos in the comment below, or post any questions you have.

googletag.cmd.push(function() {
tablet_slots.push( googletag.defineSlot( “/1005424/_dPSv4_tab-all-article-bottom_(300×250)”, [300, 250], “pb-ad-78623” ).addService( googletag.pubads() ) ); } );

googletag.cmd.push(function() {
mobile_slots.push( googletag.defineSlot( “/1005424/_dPSv4_mob-all-article-bottom_(300×250)”, [300, 250], “pb-ad-78158” ).addService( googletag.pubads() ) ); } );

The post How to Photograph Close-Up Details of Newborns and Infants by Kate Nesi appeared first on Digital Photography School.


Digital Photography School

 
Comments Off on How to Photograph Close-Up Details of Newborns and Infants

Posted in Photography