RSS
 

Posts Tagged ‘Trails’

How to do Long Exposure Photography and Light Trails at Night

16 Aug

The post How to do Long Exposure Photography and Light Trails at Night appeared first on Digital Photography School. It was authored by Barry J Brady.

Gastown Light Trails

Gastown light trails, Vancouver, Canada

Before I understood how photography worked, I was always intrigued by light trails in images. I never understood how that happened. When I began to study photography, one of the first assignments I did was an advanced course on night photography. I decided I would try and capture some light trails.

I set up my camera, made sure the settings were correct and waited. A few cars went past, but my timing was off and the shots were not great. I continued to wait. After about an hour of trying and experimenting, I got the shot I was looking for. It was like magic to me.

The car was not in the shot but the lights seemed to float in mid-air. I was hooked. This was something that had mystified me for a long time, yet I had managed to get it right. What was so mesmerizing for me was that the image I saw on my LCD screen was not what I saw in real life. The camera had managed to capture a scene that my eyes could not capture in the same way. This seemed amazing to me.

I soon realized that the camera was able to “see” things differently compared to the way my eyes saw them. I spent many nights trying to capture light trails in various locations. I was also doing lots of reading and research and came across a technique called long exposure.

This too was amazing. It had the ability to alter a scene in such a way that it looked totally different to the way our eyes normally see it. Again I was hooked; to this day, long exposures and light trails are some of my favorite techniques in photography.

Long exposure photography and light trails have similar techniques; it is the subject matter that differs. So I will discuss each technique separately, and tell you how to get the best results in both.

How to do long exposure photography

Shooting long exposures effectively requires that you should be shooting in Manual mode as much as possible. If you are not sure how to shoot in Manual, take a look at “Getting Off Auto – Manual, Aperture and Shutter Priority Modes Explained to learn more about these modes. To be able to get sharp and effective long exposure images, here is a checklist of items you will need.

1. What equipment is needed to shoot long exposures?

  • A tripod – this is a good piece of equipment to have in most instances, but is a critical piece of equipment for shooting long exposures. Make sure your camera is properly mounted onto the tripod before you start shooting.
  • A camera – obviously you will need a camera, but many people assume you can only do this type of photography with an SLR. Some advanced point-and-shoot cameras can also do long exposures if they have a Shutter Priority function. Take a look in your camera’s manual to see if it has this function; you may be surprised.
  • Cable release – your camera will be on a tripod, so it should be very still. However, sometimes the action of pressing the shutter release button can cause the camera to move slightly and this movement can cause your image to blur very slightly. You may not notice this on the LCD screen, but when you open the image on your computer, it will be evident. I recommend getting a cable release (also called a remote trigger). It is simply a cable that attaches to your camera and acts as a shutter release button. Using a cable release means you can set up your camera, step away from the tripod, and press the button without touching the camera. Cable releases can be wireless too. If you don’t have a cable release or don’t want to buy one, you could use your camera’s self-timer function to trigger the shutter.
  • Warm clothes and comfortable shoes – depending on where you live, and depending on the time of year you plan to be shooting, you may need to dress warmly. Long exposures work well after dark and it may get cold, so be sure to wear warm clothes. Be sure that you have comfortable footwear, too, as you may be standing for a few hours.

2. What subjects are best for long exposure photography?

Long exposures work well for certain types of subjects like seascapes, landscapes, and cityscapes. The key to getting a successful long exposure image is to have something in your image that is perfectly still and something that is moving. Water, clouds, and trees blowing in the wind all work well if the rest of the scene is stationary. This difference between the elements in the scene will create drama, and will add significant value to your image. The viewer will be seeing something that cannot be seen with the naked eye.

The reason why long exposure images are so compelling is that they warp time. Water looks like a soft mist, trees look like a dull blur, and clouds become long and streaky. This is what makes a familiar scene more compelling.

Long Exposure scene in Vancouver BC

Long exposure scene in Vancouver, Canada

3. What camera settings should be used?

Long exposures are ideally shot in Manual mode. If you are not sure how to shoot in Manual mode, you can use one of the other semi-manual modes such as Aperture priority or Shutter priority. Here are some quick pointers on the settings:

  • Shutter speed – depending on the light in your scene, your shutter time will need to be at least 10 to 15 seconds, or longer if necessary. If you are doing a seascape and the water is moving quickly, then a few seconds may be long enough to make the water look misty.
  • Aperture – you will want to have your aperture set at anywhere between f/8 and f/16. This will be determined by how much light is in the scene and how long you want to expose for.
  • ISO – keep your ISO settings as low as possible. ISO 100 is what I use for long exposures.

4. When is the best time of day to shoot long exposures?

It’s normally a good idea to shoot long exposures as the sun is setting, or just after sunset. My suggestion is to be on the scene an hour before sunset. That way you can test some shots, make sure your composition is good, and be sure all your settings are correct. Then wait.

I will sometimes simply sit there and enjoy the scene; other times I may listen to some music. But I like to be relaxed and ready for when the light starts to work. Normally you will want to start shooting about 15 minutes before the sun has completely set and up to an hour after it is below the horizon. The important part is to be willing to experiment.

Each time you decide to shoot long exposures will be a little different. The light may be brighter than you think, the sunset may not be as dramatic as you hoped, or the shot may not be just as you imagined. Be patient and experiment. I will sometimes go back to a location two or three times to try and get the shot I am looking for. Once I have it, though, the sense of reward is fantastic, and the patience and effort are paid off!

Long Exposure of Science World in Vancouver

Long exposure of Science World in Vancouver

How to shoot light trails

Much of the advice for shooting light trails is very similar to the tips above. The key difference is in the timing and location of your shoot.

1. What equipment is needed to shoot light trails?

  • Same as above 

2. What subjects are best for light trails?

For light trails to work, you need to have something with lights moving through your scene. A car, a bus, a train, and even an aircraft can work. Be sure to be out of the direction of the vehicle you are photographing. Please do not stand in the middle of the road, or on train tracks. Position yourself in a safe place to make this work. Always be aware of your surroundings. It is easy to become immersed in what you are shooting and lose sight of where you are standing. Be safe, first and foremost!

A moving bus in the scene made this shot more dynamic

A moving bus in the scene made this shot more dynamic

3. What camera settings should be used?

Light trails, like long exposures, are ideally shot in Manual mode.

  • Shutter speed – depending on the light in your scene, your shutter time will need to be at least 10 to 15 seconds, or longer if necessary. Make sure that your shutter speed is long enough to capture longish light trails. You don’t want to cut them off too soon as you will have some short trails in your image that may look strange.
  • Aperture – you will want to have your aperture set at anywhere between f/5 and f/11. This will be determined by how much light is in the scene and how long you want the exposure.
  • ISO – keep your ISO settings as low as possible; ISO 100 is what I use for light trails. If your ISO is set to 500 or higher, your exposure will be shorter and you run the risk of overexposing the highlights, especially when shooting car headlights.

4. When is the best time of day to shoot light trails?

Light trails can be shot in the early evening, or after the sun has set. Each scene will be different, but sometimes it is too light to get effective light trails just after sunset. You may need to wait until 30 minutes after the sun has set to get longer light trails.

The important part, once again, is to be willing to experiment. Try different times after sunset and see what works for you. Spend time behind your camera perfecting your timing. Scout locations during the day that you will think will work for light trails and then go and try it out.

Steam Clock in Gastown, light trails on the road

Steam Clock in Gastown, light trails on the road

Photographing after dark can be very rewarding. It is worth the effort to learn how to use these techniques to bring new images into your portfolio, and to have new skills which will enable you to shoot under any lighting conditions. Experiment and enjoy it! Happy shooting.

The post How to do Long Exposure Photography and Light Trails at Night appeared first on Digital Photography School. It was authored by Barry J Brady.


Digital Photography School

 
Comments Off on How to do Long Exposure Photography and Light Trails at Night

Posted in Photography


6 Tips for Photographing Amazing Light Trails at Blue Hour

21 Feb

The post 6 Tips for Photographing Amazing Light Trails at Blue Hour appeared first on Digital Photography School. It was authored by Joey J.

amazing-light-trails-at-blue-hour-photography

Have you seen cityscape photos with light streaks of moving cars? That’s called light trail photography. I see it as a part of the long exposure photography family. However, the exposure doesn’t have to be very long (typically under 30 seconds) to capture light trails. While my absolute favorite long exposure photography style is waterfront cityscapes with a silky smooth water effect, I also enjoy light trail photography – and it’s something I’ve done a lot of over the years. So I’d like to share some tips I’ve learned so far so that you’ll achieve better light trails at blue hour shots much sooner.

6 Tips for Photographing Amazing Light Trails at Blue Hour

1. Find a location with a great city view with plenty of traffic going by

This is a prerequisite for any great light trail photography. It might sound plain obvious, but it’s not always easy to find a perfect location, as there is more to it than meets the eye. I’ll describe more down the road.
amazing-light-trails-at-blue-hour-photography

18mm, f/10, 25 seconds (based shutter speed of 3 seconds, with 3 stop ND filter attached), ISO 100, shot 7 minutes before dusk. © Joey J

2. Shoot from slightly higher than ground level (e.g. a footbridge)

Rather than staying on the same level as moving cars, getting up above allows you to shoot more dynamic images.

Image: Shooting from a footbridge is an easy way to get up above the moving cars. This is how I shot...

Shooting from a footbridge is an easy way to get up above the moving cars. This is how I shot the photo above, clamping Manfrotto Super Clamp onto a footbridge railing. © Joey J

3. Curvy roads give a more pleasing result

Compared to light trails shot on straight roads (such as the first photo above), those shot on curvy roads look more pleasing (to me, at least), as seen in the photo below shot at Connaught Rd Central (Hong Kong).

amazing-light-trails-at-blue-hour-photography

18mm, f/8, 25 seconds (based shutter speed of 3 seconds, with 3 stop ND filter attached), ISO 100, shot 5 minutes before dusk.

4. Headlights, taillights or both?

Depending on the road you’re photographing (one-way street or two-way street), there may be only headlights or tail lights available. Or both of them may be available.

Personally, I prefer headlights, as they are more visually striking. As seen below, one-way traffic with tail lights (only) lacks some impact.

Image: 18mm, f/13, 10 seconds (based shutter speed of 1.3 seconds, with 3 stop ND filter attached),...

18mm, f/13, 10 seconds (based shutter speed of 1.3 seconds, with 3 stop ND filter attached), ISO 100, shot 8 minutes before dusk. © Joey J

5. Capture light trails of tall vehicles

The majority of light trails are created by low-height vehicles such as private cars and taxis. However, when tall vehicles (e.g. buses, trucks) move through the frame, light trails record at a much higher point, adding more interest to your photos.

I shot the photos below from a sideway of a busy street in Seoul, Korea. Seeing public buses frequently passing through, I timed my exposure to capture their lights. I love how they came out!

Image: 24mm, f/8, 30 seconds (based shutter speed of 4 seconds, with 3 stop ND filter attached), ISO...

24mm, f/8, 30 seconds (based shutter speed of 4 seconds, with 3 stop ND filter attached), ISO 100, shot 1 minute after dusk. © Joey J

amazing-light-trails-at-blue-hour-photography

22mm, f/13, 8 seconds (based shutter speed of 1 second, with 3 stop ND filter attached), ISO 100, shot 10 minutes before dusk. © Joey J

By the way, I have one funny story to share.

When I shot the photos above, I spent a full hour shooting at minus 10 degrees Celsius in Seoul’s winter. Since I didn’t have gloves, my hands went completely numb with cold. By the end of the photoshoot, I couldn’t even hold my lens cap properly. Trying to put it back on the lens with trembling hands, I dropped it so many times. It sounds like a joke, but this simple task took me so long to complete!

6. Use mild-strength neutral density (ND) filter

You can shoot light trail photography at blue hour without using any neutral density (ND) filter, but the exposure time will probably be a little too short (a few to several seconds) to capture enough light trails.

If you don’t own an ND filter, try shooting with a small aperture (e.g. f/13) to make the shutter speed longer (ideally 10+ seconds).

An ideal strength ND filter for light trail photography is around a 2 or 3 stop ND. For example, a base shutter speed of 2, 2.5, and 3 seconds (i.e., when no filter is attached) will extend to 15, 20 and 25 seconds, respectively, with a 3-stop ND filter attached. That is long enough to capture plenty of light trails on busy roads. FYI, I shot almost all the photos in this post with a B+W 3 Stop ND Filter (77mm) attached.

Image: Neutral density (ND) filters help reduce light coming through the lens and allow you to slow...

Neutral density (ND) filters help reduce light coming through the lens and allow you to slow down the shutter speed by a certain number of f-stops (e.g. 3 stops). © Joey J

One advantage of using a 3-stop ND filter is that you can attempt shooting light trails many times, as each exposure time isn’t too long.

When using a more dense filter like a 6-stop ND filter, a base shutter speed of 2 -3 seconds turns into a 2-3 minute exposure. This severely limits the number of photos you can take during the blue hour.

Besides, when the exposure goes so long, you won’t be able to time your exposure to target certain lights (such as those of tall vehicles).

Image: 18mm, f/13, 161 seconds (based shutter speed of 2.5 seconds, with 6 stop ND filter attached),...

18mm, f/13, 161 seconds (based shutter speed of 2.5 seconds, with 6 stop ND filter attached), ISO 100, shot 7 minutes before dusk. With B+W 6 Stop ND Filter (77mm) attached, I exposed for 161 seconds, capturing a ton of light trails in a single shot. © Joey J

Conclusion

I hope these tips will help you capture stunning light trails at blue hour. In fact, writing this post has made me want to try more light trail photography!

As always, if you have any questions or info to share about shooting light trails at blue hour, feel free to do so in the comments below. Happy shooting!

The post 6 Tips for Photographing Amazing Light Trails at Blue Hour appeared first on Digital Photography School. It was authored by Joey J.


Digital Photography School

 
Comments Off on 6 Tips for Photographing Amazing Light Trails at Blue Hour

Posted in Photography


Weekly Photography Challenge – Light Trails

12 Jan

The post Weekly Photography Challenge – Light Trails appeared first on Digital Photography School. It was authored by Caz Nowaczyk.

This week’s photography challenge topic is light trails!

Tree Top Circus © Caz Nowaczyk

Your photos can include light trails from vehicles, light painting, or any other moving light source. Have fun, and I look forward to seeing what you come up with!

Some Inst-piration from some Instagrammers:


View this post on Instagram


A post shared by Johan Weesie (@jowie_pictures) on


View this post on Instagram


A post shared by Carlos Bolivar (@photo_charles) on


View this post on Instagram


A post shared by Om Prakash Sethia (@om_prakash_sethia) on


View this post on Instagram


A post shared by RECYCLED PHOTOS (@recycleartz) on


View this post on Instagram


A post shared by Phutter Blog (@phutterblog) on


Check out some of the articles below that give you tips on this week’s challenge.

Tips for Shooting Light Trails

How to do Long Exposure Photography and Light Trails at Night

Stacking Light Trails for Night Photography Special Effects

How to Create Dynamic Photos of Car Light Trails

How to Photograph Light Trails from the Back Seat of a Car

7 Tips for Shooting and Processing Star Trails

How to do Light Painting and Illuminate Your Photography

Long Exposure Photography 101 – How to Create the Shot


Weekly Photography Challenge – Light Trails

Simply upload your shot into the comment field (look for the little camera icon in the Disqus comments section) and they’ll get embedded for us all to see or if you’d prefer, upload them to your favorite photo-sharing site and leave the link to them. Show me your best images in this week’s challenge.


Share in the dPS Facebook Group

You can also share your images in the dPS Facebook group as the challenge is posted there each week as well.

If you tag your photos on Flickr, Instagram, Twitter or other sites – tag them as #DPSLighttrails to help others find them. Linking back to this page might also help others know what you’re doing so that they can share in the fun.


Feature Photo by Alen Rojnic on Unsplash

The post Weekly Photography Challenge – Light Trails appeared first on Digital Photography School. It was authored by Caz Nowaczyk.


Digital Photography School

 
Comments Off on Weekly Photography Challenge – Light Trails

Posted in Photography


7 Tips for Shooting and Processing Star Trails

08 May

Have you ever looked at an image of the night sky where the stars leave long, arching trails? These images, called “star trails”, record the movement of the stars as the earth spins around its axis. This is a compelling way for you to capture a phenomenon not observable to the human eye.

As with many creative photography techniques, there are can be a steep learning curve for shooting star trails. A basic understanding of the night sky, knowing the impact of focal length, and composition can help you maximize a night out with the goal of shooting star trails.

Star Trails, Alaska, Tutorial, Starlapse - 7 Tips for Shooting and Processing Star Trails

This star trails shot adds to the native art of the Hoonah Tlingit.

Some fairly simple post-processing techniques can help you perfect your shot once home. I will walk you through the basic technique of photographing star trails, help you think about how your gear affects the outcome, and highlight two post-processing techniques that I find useful.

1 – Basic Technique for Shooting Star Trails

The concept of the shooting star trails is actually pretty simple. Set up your camera on a tripod and then compose the shot. I recommend disabling autofocus at this time. Once you have your composure right, set the exposure on your camera. In general, you will want to expose the shot for as long as possible without over-exposure. You can check the histogram of your image to decide if it has been overexposed or not.

On dark nights without a moon or light pollution, you can start in Manual Mode, ISO 800, f/2.8 (or lower/wider), and 15-seconds. Modify these settings to best capture your scene. Once you are happy with the exposure, you will need to set your camera to take pictures at a steady interval. You can do this by setting your camera’s internal interval meter or by attaching an external intervalometer.

Each camera model has different intervalometer connections or internal settings (or may not have this feature), so consult your camera’s manual to get this set up correctly. As you set up your camera, think about the number of shots you want to take. The more shots you take the more the stars will move – with many lenses you will start to capture significant movement in about 8 minutes.

Below I will go through a couple scenarios where fewer or more shots may be better. As a rule of thumb, I shoot for a minimum of 45 minutes and as long as several hours. Let your camera shoot and enjoy the night sky!

Processing or Stacking the Star Trails

Once I am done with the shoot, I import the photos to Lightroom and Photoshop (using Adobe Bridge). There are other star-stacking programs that you can experiment with, but I like Photoshop for this task. To import the photos from Adobe Bridge open the program and then navigate to where the photos are stored. Highlight the photos you want to include in the star trail and then go to Tools –> Photoshop –> Load Layers into Photoshop As Layers.

Once the layers have loaded into Photoshop you may want to use the Auto-align feature (disregard this if you are certain your tripod did not shift) by highlighting the layers in the right panel and then going to Edit –> Auto-Align Layers –> Auto. The final step is the use the “lighten” blend mode in the Layers panel and apply it to all the layers.

The lighten function examines all of the overlapping layers and then keeps only the lightest pixel. Keep that in mind as you can use it to your advantage (examples of that below). To complete the image export it to a lossless format (I like TIFF). You may then continue to edit the new TIFF in Lightroom or Photoshop.

2 – Shooting Tips

Know the North Star

Having a basic understanding of astronomy will aid you as you compose your shot. The North Star is often the focus of star trails because it does not move in the sky as the earth spins on its axis. To find it, locate Ursa Major (e.g., The Big Dipper) and then follow the line created by the stars at the end of the dipper to locate the North Star.

Star apps on your phone are also a great way to locate the dipper or the North Star. Once you know where it is, you can use it in your shot. I often like to bury the North Star behind a piece of a foreground element giving the final image a pinwheel effect.

Polaris, North Star - 7 Tips for Shooting and Processing Star Trails

Knowing the north star will help you with your star trails! In this image of Ursa Major, I have circled the stars of the constellation in red and the north star in green.

Star Trails, Alaska, Tutorial, Starlapse - 7 Tips for Shooting and Processing Star Trails

I buried the north star behind this black spruce and shot for nearly three hours to make this shot. The resulting image has a pin-wheel effect.

Star Trails, Alaska, Tutorial, Starlapse - 7 Tips for Shooting and Processing Star Trails

I put the north star behind a Sitka Spruce and shot this image at 14mm providing many stars in the shots and a pinwheel effect.

3 – Find Some Foreground Elements

Foreground elements are always important for landscape photography. When shooting star trails, think about foreground elements that capture the essence of the scene or that you can place prominently and by themselves.

By this, I mean objects that stand away from the background of the image. You may also want to choose elements that can be lit by the light of the moon or by using light painting. I like to think of star trails as telling the story of the night and the objects that you include in that frame will aid you in that storytelling.

Star Trails old barn, Minnesota, Tutorial, Starlapse - 7 Tips for Shooting and Processing Star Trails

I chose this old barn because the moonlight helped light up its character and I felt it captured the essence the Minnesota field in which it stands.

4 – Use Light Painting

Using Adobe Photoshop’s Lighten blend mode provides a lot of options for creativity when shooting star trails! Remember, that Lighten only keeps the lightest pixels in the whole stack of images. So by using light painting, you can selectively lighten objects in the frame.

Illuminate the foreground with your phone, headlamp, or another light source. You can light up the whole thing or selectively light elements of it. Experiment with lighting angles, intensities, and colors. If you don’t like the lighting of a certain exposure simply remove it from the layers that you import into Photoshop. I usually spend the first 10-20 frames lighting the foreground to make sure that I capture the lighting that I want and then let the camera take the rest of the shots.

Star Trails, Alaska, with american flag - 7 Tips for Shooting and Processing Star Trails

Here I used light painting to illuminate this flag that I placed in the foreground. I lit the flag in several different ways and then chose the best frame to include in the final shot.

Star Trails, Alaska, evergreen trees - 7 Tips for Shooting and Processing Star Trails

In this image, I used light painting the softly illuminate the snow-covered trees in the foreground of this shot.

5 – Pick Your Lens Focal Length Wisely

Focal length will strongly impact the amount of time it takes for the stars to move in your shot. Shorter focal lengths (e.g, 14mm) will take longer for the stars to have trails than longer focal lengths (e.g., 50mm). Knowing this will help you plan your shot. The three images below emphasize this effect.

MThe wide-angle of my 14mm wide-angle lens allowed me to capture the North Star and a distant mountain landscape, but I stood there for three hours to get the amount of movement in the stars that I wanted. The second shot was taken at 50mm and only 45-minutes elapsed before significant movement in the stars occurred. The third shot is an extreme example, shot at 300mm. The green streak is Comet Lovejoy and shows only a couple minutes of movement.

Star Trails North Star - 7 Tips for Shooting and Processing Star Trails

This image was shot at 14 mm, full frame and captures about three hours of star movement.

Star Trails landscape night - 7 Tips for Shooting and Processing Star Trails

Shot at 50mm, this image took 45 minutes to capture the star movement.

Star Trails 300mm lens - 7 Tips for Shooting and Processing Star Trails

This image was captured at 300mm on a crop sensor (effective 600 mm) and shows only a couple minutes of movement. The green streak is Comet Lovejoy.

6 – Play with Exposure Times

The length of your exposure will strongly influence the final image that you create. There are no guidelines to what is the right length, instead, you should be guided by what looks good to your eye. As a tip – you can always choose to use fewer shots than you captured so by default I would take as many images as you think you’ll need and then modify the amount once you import them into Photoshop.

Which of the images below do you like better? The longer exposure or the shorter one?

Star Trails, Alaska, - 7 Tips for Shooting and Processing Star Trails

This image captures about 45 minutes of star trails at 50mm and I like how the falling arc of the stars lead my eye to the subtle mountains in the background.

Star Trails, Alaska dock - 7 Tips for Shooting and Processing Star Trails

This image captures 30 minutes of star trails at 24mm. I felt that including any more stars would take away from the dock in the foreground.

7 – Compositing Tips

Photoshop gives you a lot of flexibility to mask and preserve or remove elements of the shot. Since star trail shots are composite images and thus art, I do not worry about these alterations from an ethical standpoint. The two techniques below may help you improve the final shot. They assume you are familiar with masking and healing in Adobe Photoshop. If not you will find the linked articles helpful!

Masking a Foreground

Once you compile the images you may find elements that draw your eye away from the phenomenon you are trying to capture. Since the horizon and foreground are the same for all of the images you can choose which foreground looks best to you. Use that foreground to create a selection and convert the selection to a mask.

You can use that mask and exported TIFF file to maintain the foreground you like. In the images below, I wanted to remove the hikers that walked up to the lava flows in Volcanoes National Park and the bright highlights of the lava which became overexposed as the lava moved. I used a mask to preserve the foreground elements I liked.

Star Trails, Hawaii, Tutorial, Starlapse

Editing out Planes and Satellites

Almost all dark nights will have a plane or a satellite come through your frame. Fortunately, these are very easy to remove! Use the Healing Brush tool and set the tool to replace and content aware. You can draw a linear line with the tool over the track of the satellite or plane. Voila! The offending track will disappear.

Star Trails, Alaska, Tutorial, Starlapse

Star Trails, Alaska, Tutorial, Starlapse

I used the healing brush to remove the satellites and planes from the final image above. Can you tell the difference?

Summary

So there you go! I hope this article can help you get out there on your first night of shooting star trails. Remember, knowing your stars, picking a foreground and playing with exposure length will help bring the shot you imagine to reality.

Once you process the stacked images you have lots of flexibility in Photoshop to fix parts you do not like. As I always say, pixels are cheap. So make lots of them as you learn to shoot and process star trails.

The post 7 Tips for Shooting and Processing Star Trails appeared first on Digital Photography School.


Digital Photography School

 
Comments Off on 7 Tips for Shooting and Processing Star Trails

Posted in Photography


How to Photograph Light Trails from the Back Seat of a Car

21 Jan

Photographic light trails are a beautiful effect. You’ve no doubt encountered them before. Photographers perch over a vantage point and trace the trajectory of cars navigating an urban landscape using a slow shutter speed. The result renders a fluid trail tracing around the environment in a variety of shapes and colors.

Think of this project as a new take car light trails. We’ll still be recording passing light sources – but we’ll be capturing them from inside of the car instead. The result is just as striking inside as it is outside. You might have an old car or a fresh new one – it doesn’t matter! You get an impressive effect regardless.

How to Photograph Light Trails from the Back Seat of a Car

Safety

First, a little caveat. Safety is the priority here. As we are going to shoot from the back seat of the car, you will need a pal as the driver. Do not try and take photos while driving – it can only end badly. Having a buddy as a driver will allow you to concentrate on what you are doing while the driver can focus on driving. It’s strictly a team effort.

Another safety point, try not to obscure the rear-view mirror. Hunch down a little to save the obstructing the driver’s view. For the best effect, photographing at night is ideal – so be extra aware of the limited visibility.

Equipment

What you need to do this:

  • Camera
  • Sturdy Tripod
  • A friend
  • A car

Setting up

It can be a rough ride trying to get everything set up in a moving car, so set up before hitting the road. First, clean the glass. Give your windshield and windows a good clean to avoid spending countless hours cloning out unfortunate bugs in post-production. Next, set up your tripod in the car. You’ll have to do some adjusting to get the camera level with the windshield.

Just keep in mind, the tripod just adds extra stability. It’s impossible to take a sharp slow shutter speed image while driving along in a fast car. But the tripod is far more stable than photographing by hand. I use a Manfrotto tripod because it’s nice and heavy to keep things a little steadier.

Sit the tripod so two legs rest against the front seats, with your camera peeking through the gap between the headrests. Be sure your camera is securely attached before heading out. You don’t want a camera bouncing around in a moving car.

Method

Once you are packed and ready,  it’s time to set off. Take a few test shots on your camera. As I mentioned before, this project works best at night, otherwise, you won’t get much of a result at all – just blown out exposures. In addition, the variety of lights will be much more apparent at night, with a good mix of color and shape.

Next, try to familiarize yourself with the car’s handling so you can expect certain lumps or bumps and the car’s response. I’m not saying you have to become a car-psychic, but higher cars behave differently from one to another. The interior of a car also has an impact on how your photographs will turn out. You may have to incorporate a dashboard or interior lighting too. I chose to keep the dashboard lighting in my images to maintain the process of the photograph.

The next step is all experimentation! You’ll get an endlessly diverse result with every exposure. I recommend setting your camera to ISO 100 so you can use shutter speeds between 10 and 30 seconds. If you have a shutter release, give the B (Bulb) setting a try too. Just take a few moments to find a comfortable position. You can keep your tripod a little steadier if you brace yourself against the legs of the tripod and the front seat.

How to Photograph Light Trails from the Back Seat of a Car

In this image, the driver is making a turn which creates the horizontal lighting effect.

How to Photograph Light Trails from the Back Seat of a Car

You can choose to include your friend in the review mirror. Just make sure you warn them in advance and don’t obstruct their visibility for too long.

How to Photograph Light Trails from the Back Seat of a Car

You can tell how rough this section of road was due to to the jagged lights. You can also see the illuminated settings on the dashboard. I felt that including them adds to the final image and the process leading up to each photograph.

How to Photograph Light Trails from the Back Seat of a Car

By swiveling the camera to focus on a different area of the car you can record light sources from two angles of the frame.

How to Photograph Light Trails from the Back Seat of a Car

On a rainy night, the windshield gets a little fogged, diffusing the lights at this interchange.

How to Photograph Light Trails from the Back Seat of a Car

By unfocusing your camera, you can create some colorfully abstract patterns and bokeh.

How to Photograph Light Trails from the Back Seat of a Car

Conclusion

Photographing light trails inside the car is a quick and easy way to capture a unique perspective. We know the world outside the windshield is a wonderful one, but sometimes it takes an abstract project like this one to truly bring it alive. While I’ll admit it ain’t Top Gear, it does have some pretty amazing results.  I would love to see some of your results below!

The post How to Photograph Light Trails from the Back Seat of a Car by Megan Kennedy appeared first on Digital Photography School.


Digital Photography School

 
Comments Off on How to Photograph Light Trails from the Back Seat of a Car

Posted in Photography


How to Create Dynamic Photos of Car Light Trails

09 Jan

Nothing says futuristic, dynamic, and dramatic like a well-done traffic light trail photo. This is a genre of photography that almost all landscape photographers will have dipped into, it’s like a right of passage. The kind of images you can create make others want to go out and buy their first tripod.

Indeed getting a good photo of light trails will justify carrying around that heavy tripod perhaps all day long. There are lots of things to consider when taking this type of photo, and in this article, you’ll learn straight away what it takes.

How to Create Dynamic Car Light Trail Photos

This photo was taken from a residential building overlooking this amazing traffic intersection in Shanghai.

Choosing the right location

The most important thing to creating light trail photos is to go to a place where there will be lots of moving lights! This should be obvious, but some places are better than others. In all cases, the light trails will be part of the frame and either the main subject or the leading lines that direct the viewer to your main subject. In most cases your location is going to be urban, so let’s look at the options.

How to Create Dynamic Car Light Trail Photos

This light trail photo of the Colosseum in Rome uses light from a passing bus.

1 – Down on the street

A busy main road can be a good place to take light trail photos. The chances are you’ll be photographing a famous landmark from your locale, and using light trails will give the photo a more dynamic feel.

  • Position yourself so the light trails either lead up to your landmark or disappear off into the distance beside it.
  • When a safe traffic island is available, experiment with photographing from the middle of the street. This will give you both white headlights, and red rear lights.
  • It’s easier to control the intensity of the light from rear lights. So it’s often best to position yourself to photograph light trails as the traffic is moving away from the camera.
  • Photograph during blue hour as much as possible, this should be the case for all cityscape photos.
  • The best light trails are produced when buses drive past. They have lights that will fill your frame, as these vehicles are taller and lit up more.
  • The height at which you have your tripod set can dramatically affect your results when photographing at street level. The lower the tripod, the “higher” the lights will appear in your frame.
  • If you don’t want the lights to paint across the entire photo, experiment with an external shutter release, and the bulb function on your camera. Bulb allows you to open and close the shutter when you choose, so you can close it and end the exposure before the moving vehicle completely moves through your photo.
How to Create Dynamic Car Light Trail Photos

In this case, the Bulb function was used so that the light didn’t paint over the building on the right.

2 – Get up high, and photograph from above

Taking photos from a high vantage point is often a sure fire way of getting good results. This is especially true when it comes to taking light trail photos. There are two choices when it comes to this, you can go to the public area, or try for the trickier private access.

  • Public area – The easiest and safest option, though this likely means 1000’s of other people will also visit the same spot. This will commonly be a pedestrian footbridge over a road, a viewpoint from a mountain, or perhaps a viewing gallery in a tall building.
  • Private property – The best policy here is to ask permission. The other approach is riskier, more clandestine, and more in keeping with a genre of photography called urbex. At this time access to private rooftops is becoming increasingly difficult, in no small part because some people enjoy filming daredevil stunts from such locations. So do your research on a location you would like to photograph, and be respectful if you are lucky enough to get access. In some cities, rooftop bars can offer great views, but if you wish to bring a tripod in then emailing the business ahead of time is advised.
How to Create Dynamic Car Light Trail Photos

This high vantage point was achieved by contacting a rooftop bar in advance and getting permission to photograph from their location.

3 – Embrace the great outdoors

Of course, anywhere there’s a road can be a good location for light trail photography. Roads that wind their way up a mountainside will look great in a photo, you just need a good vantage point. Even photos from a lower position can look nice with a single stream of light, which can create a nice minimalist feel to your photo.

Photos taken in these locations may require very long exposures to allow the vehicle to drive through the frame. The best solution here is to take a series of 30-second exposures, and then stack the results later in Photoshop (or use an ND filter to cut the light and get longer exposure times).

How to Create Dynamic Car Light Trail Photos

This location is in Taiwan. To reach the viewpoint there were several bits of rope I had to climb up, as the side of the mountain was steep.

How to take long exposures of car light trails

Once you have settled on your location it’s time for the fun to begin! Taking these photos well does require some technical knowledge, let’s break this down here.

  • Compose your photo, and ensure the light trails complement the frame you wish to produce.
  • Arrive around 30-minutes prior to sunset. This will give you time to plan your photo and to take additional photos for digital blending if needed.
  • Ensure the camera is steady, this is challenging in strong winds. To achieve this use a heavy tripod, and where possible hook your camera bag under the center column. The heavier the tripod, the less likely it will be moved by the wind. Avoid putting up the middle extension tube on the tripod, as this introduces more instability and movement.

  • You can focus the camera using Live View. In Live View, zoom (using the magnify view button + not zooming your lens) into an area of the frame such as a sign. Now set your lens to manual focus. Choose an object to focus on that is towards the back of the mid-ground in your photo. Keep the camera in manual focus, so that the camera doesn’t change focus when you press the shutter button.
  • An additional option is to use digital blending to balance the light throughout the scene. Digital blending is a post-processing technique that requires a set of bracketed photos at -1, 0 and +1 exposure (or -2, 0, and +2).
  • Using an aperture of f/11 or smaller will create a starburst effect on any street lights that are in your frame. But the larger the aperture the brighter the light trails will be, so a balance is needed.
  • Now everything is set for you to take your photo. The light trail photo needs to show continuous light moving along the road. Make sure your exposure is long enough for this to happen, usually this is at least 15 seconds. To avoid camera shake use an external shutter release, or the camera’s self timer. If the camera isn’t in Live View, use the mirror lockup, this prevents shake on dSLR cameras when they expose.
How to Create Dynamic Car Light Trail Photos

This frame required several stacked images to enhance the amount of traffic in the photo.

Enhancing your light trail photo in post-processing

As with all photography, you can enhance your image in post-processing to get an even better result. There are two principal techniques that can be used to achieve this.

  • Digital blending – In order to use this technique you will need a set of bracketed images to work with. This technique will allow you to balance the level of light throughout the scene.
  • Photo stacking – The next option, usually done in conjunction with digital blending, is photo stacking. You can use this to intensify the light trails within your photo. The concept is to take photos of multiple traffic light streams and overlay the images on top of each other.
How to Create Dynamic Car Light Trail Photos

There aren’t many better places to photograph light streams on boats than Venice!

Other types of light trail photos

There are lots of other ways to use light trails in your photography. Here are a few other ideas you can try, that will complement your other light trail photos.

  • Boat lights – Boats on the water produce beautiful light trails, with the added bonus of reflections. The speed of boats is much slower though. This means an exposure of around two minutes or stacking several photos together to complete the light trail.
  • Create your own – You don’t need cars to create light trails, in fact, you can just use a light source and make your own. To have the most fun with this purchasing a Pixelstick is a great idea.
  • Kinetic light painting – Static lights can be turned into light trails, you just have to move your camera! Try out zoom bursts, or camera rotation to see some amazing results.
How to Create Dynamic Car Light Trail Photos

The u-bein bridge in Myanmar is a classic photograph. You won’t see light trails here unless you make your own!

Time to hit the road, and get some light trails

Now it’s time to get out there and try this amazing style of photography. I’m sure many of you have taken car light trail photos, so share your best work with the community in the comments below.

What style of photo do you like best? Are there any further tips that you use for your photos that you’d like to share? As always share your thoughts, ideas, and work below and let’s talk about car light trail photography.

How to Create Dynamic Car Light Trail Photos

Time to get on your bike, and out there taking light trail photos!

The post How to Create Dynamic Photos of Car Light Trails by Simon Bond appeared first on Digital Photography School.


Digital Photography School

 
Comments Off on How to Create Dynamic Photos of Car Light Trails

Posted in Photography


Vape Trails: 12 Hot Vape Shops & E-Cigarette Retailers

31 Jul

[ By Steve in Design & Graphics & Branding. ]

E-cigarette and vaping supply shops have sprouted up like mushrooms in recent years but when it comes to branding, this youthful industry is still in a fog.

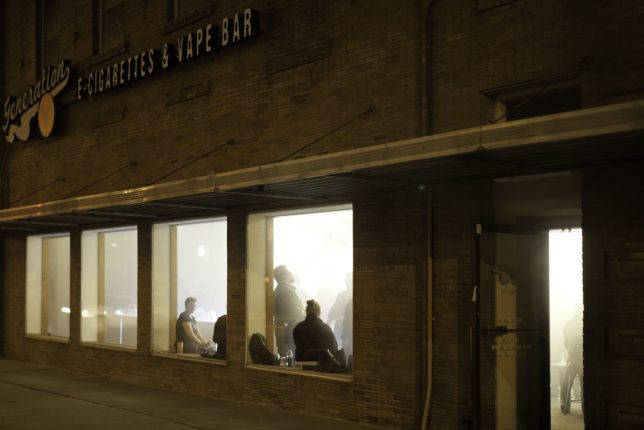
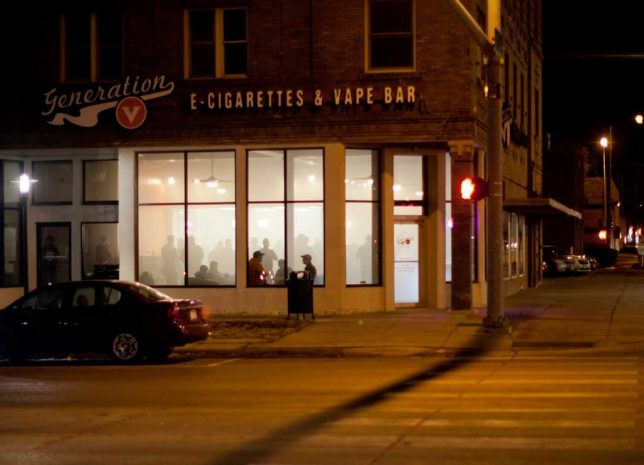
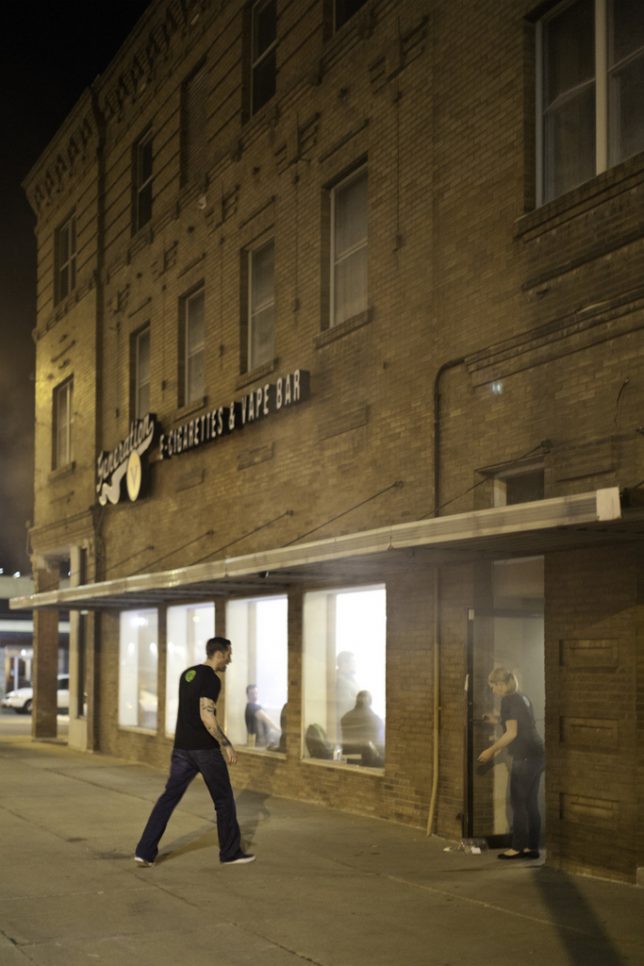
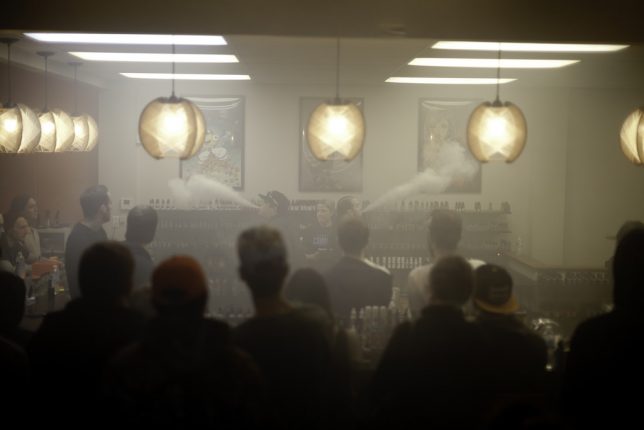
The electronic cigarette was invented in 2003 by a Chinese pharmacist and since then vaping, supplies shops and lounges catering to vapers have grown by leaps and bounds. As with any new type of business, however, vape shops have had to grapple with branding, advertising and generally making a good first impression on (in many cases) first-time customers. Take “Generation V”, an e-cigarette and vape bar in Lincoln, Nebraska. We have to assume Gen V has some deep-pocketed backers as the biz has hit the ground running with a good location, a spacious interior and signage that just oozes professionalism.

Flickr member Loren Rye (eL Bz) visited Generation V at its official grand opening on January 30th of 2016. Note the thick haze subsuming the interior – London’s infamous pea-soup fog’s got nuthin’ on a packed vape lounge hosting a creative cloud competition on a frosty winter’s night!

Make ‘Murica Vape Again

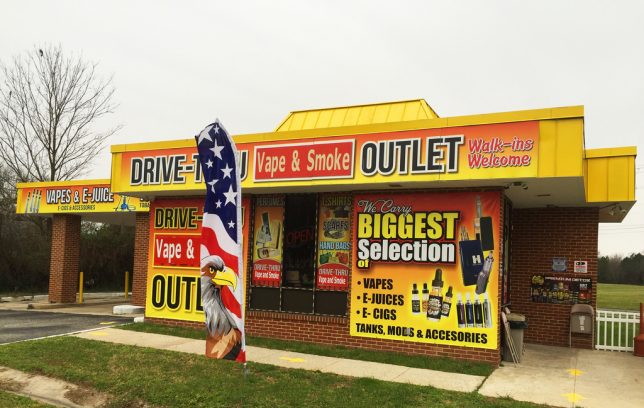
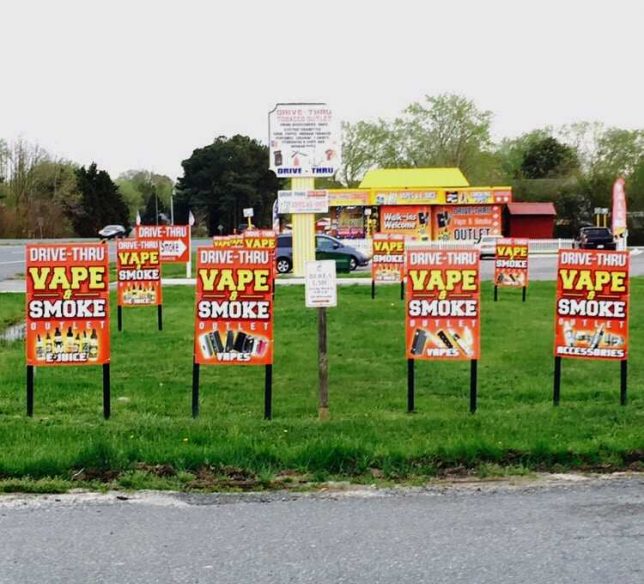
Stay classy, vape shops… and if you can’t be classy, be AWESOME! That appears to be the route taken by the above garish-as-can-be “Drive-Thru Vape & Smoke Outlet” shop in New Church, Virginia. One wonders whether the convenient drive-thru format allows customers to browse the shop’s boasted “biggest selection” of vaping supplies but hey – check out that patriotic banner out front. Kudos to Flickr member Judy Gallagher (judygva) for capturing the shop in all its glory – or Old Glory – on January 17th of 2016.

E Din’t Do Dat, Diddy?

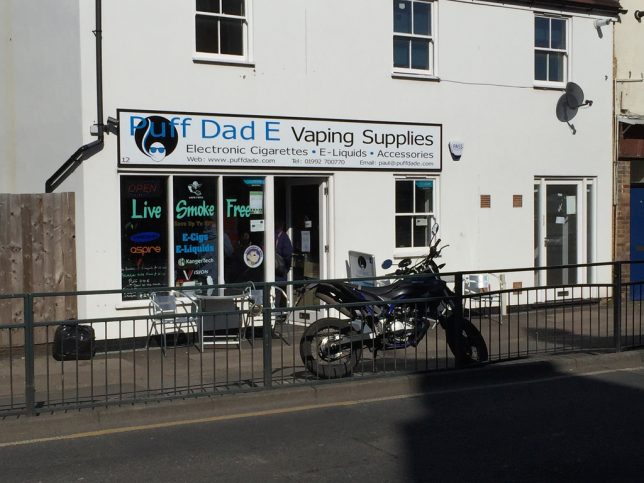
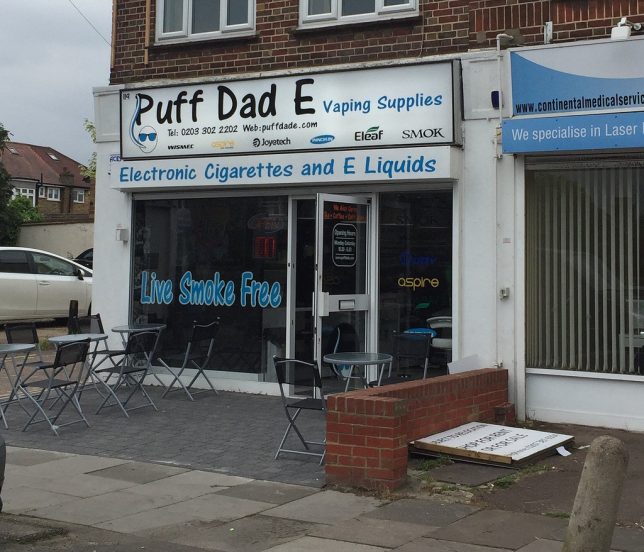
Leave it to the Brits (home of The Daily Mail) to push the envelope when it comes to punny shop names… and “Puff Dad E” is about as punny as it gets. Flickr member Matt Brown (Matt From London) just couldn’t resist snapping two store locations: in Waltham Abbey on March 14th of 2016 and in Osidge, London on May 18th of 2017. Time will tell if Sean “Puff Daddy” Combs can resist siccing his lawyers on the shop owners, whose website was still up and running at press time.

Come Up To The Lab

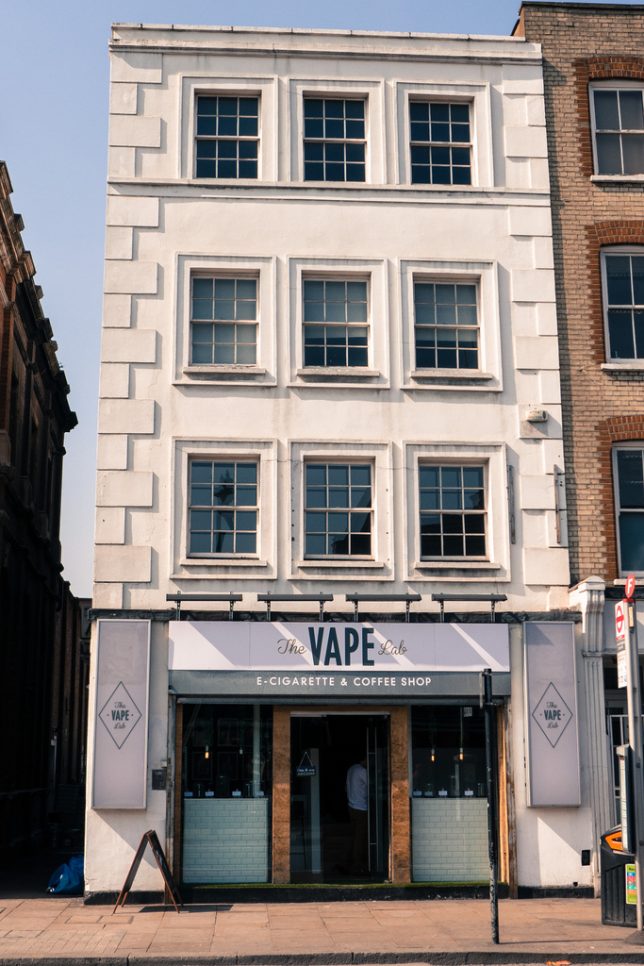
According to photographer ans Flickr member Ewan Munro (Ewan-M), the former Duke of Wellington pub in Shoreditch, London is now “The Vape Lab” e-cigarette and coffee shop. Munro visited The Vape Lab on March 29th of 2014 and the shop’s clean storefront, signage and spiffied-up exterior alludes to ongoing gentrification and social shifts in Shoreditch, an historic district in London’s East End.

Next Page – Click Below to Read More:
Vape Trails 12 Hot Vape Shops E Cigarette Retailers

Share on Facebook


[ By Steve in Design & Graphics & Branding. ]

[ WebUrbanist | Archives | Galleries | Privacy | TOS ]


WebUrbanist

 
Comments Off on Vape Trails: 12 Hot Vape Shops & E-Cigarette Retailers

Posted in Creativity


Happy Trails – 19 Adventuresome Images of Hiking

13 Jul

Summer is here in the northern hemisphere and a great activity that many participate in is hitting the hiking trails. It goes hand in hand with photography as hiking takes you to little-seen places and gorgeous vistas like this:

By Jeff Krause

By Justin Jovellanos

By Hernán Piñera

By citizen for boysenberry jam

By Nate Swart

By Ian D. Keating

By Douglas Scortegagna

By Deborah Lee Soltesz

By Ranch Seeker

By David Stanley

By Jeff Turner

By Marvin Chandra

By Adam Bautz

By will_cyclist

By Loren Kerns

By albedo20

By Patrick

By Tracie Hall

By veggiefrog

The post Happy Trails – 19 Adventuresome Images of Hiking by Darlene Hildebrandt appeared first on Digital Photography School.


Digital Photography School

 
Comments Off on Happy Trails – 19 Adventuresome Images of Hiking

Posted in Photography


Tips for Successful Star Trails Photography

06 Jul

Star trail photography – not so difficult with the correct planning and appropriate gear

In this short article I will show you, the night sky enthusiastic, that by using the right gear and proper planning, you too can make beautiful star trail photo.

Actually, shooting the stars is not that much different from any other kind of photography, and a decent composition is the key to an outstanding photo. Here are some star trail photography tips to help you.

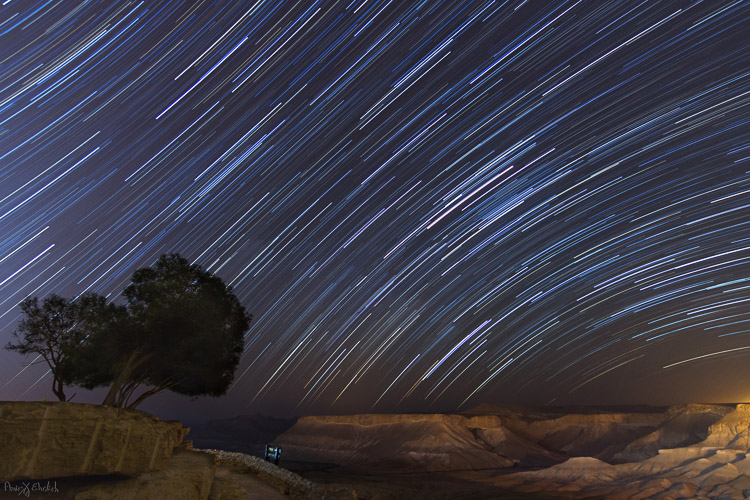
Camera pointed to NorthNorth West

Camera pointed to North/North-West with an artificially lit foreground.

Prepare your gear

  • A DSLR camera (or one that has Manual shooting mode) with fully charged battery.
  • Plenty of room on your memory card. I suggest shooting all in RAW as you’ll get better results later in post-processing.
  • A wide angle lens. Anything between 10-20mm will give you good results. You can shoot also with a longer focal length but the results will be less impressive. Using a wide aperture is also essential to allow lower ISO.
  • A strong, steady, tripod. When placing it, make sure nothing will cause it to shiver from a passing wind.
  • A remote control (preferably not wireless). If you have a way to program intervals in your camera, the remote is not necessary.
  • Stuff to help you pass the time – coffee set, snacks, a comfortable chair, etc.
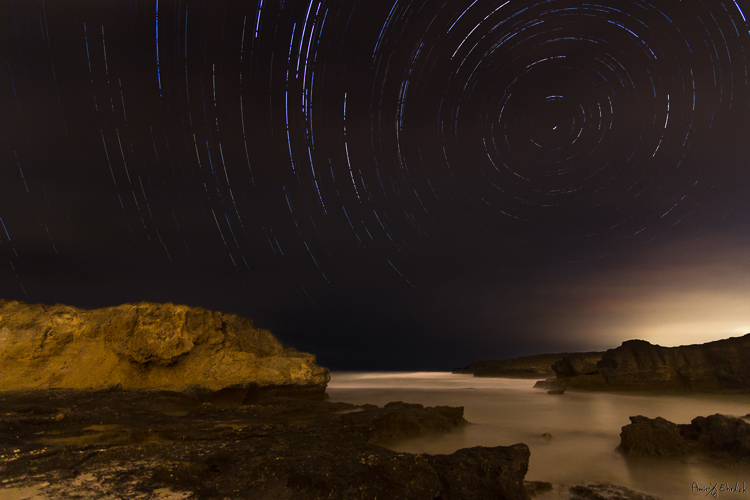
Camera pointed to North with an artificially lit foreground .

Camera pointed to North with an artificially lit foreground .

Planning ahead

Before going out there, you must consider there is some planning needed to be done.

  1. Choose your location carefully (there is no place for spontaneity). There are several things to consider, but most importantly you need a dark location, as far as possible from light polluted areas. Consider that city halos are visible at night for a very long distance, so get as far as possible from light sources. The darker the area you’re, the more stars you’ll see.
  2. Consider an interesting foreground item to be used as your anchor in the photo. It is not enough to shoot the stars, you want to have a nice foreground to make your photo interesting and unique. Find yourself a big tree, an interesting rock formation, a pier on a lake, or any other item to be used as your anchor.
  3. Learn about the weather and the moon phases – to get a good, clean shot you need a good, clear, dark sky. Choose that period of the month when the moon is not visible in the night sky (or is smaller like crescent moon), and make sure the forecast does not predict too many clouds. High humidity is also not good, as it may accumulate on your lens and result in blurry frames.
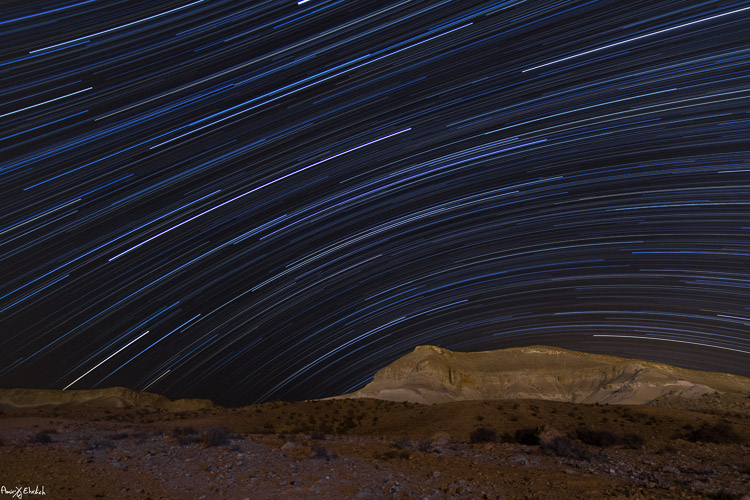
  4. Consider the rotation of the stars and the Earth, as this will determine the appearance of the final result. The best results (in my opinion) will be achieved by shooting to the North (photo above) or to the South-East (photo below). Since Earth and the North Star are moving in the same direction, at the same pace, it appears as if all stars are rotating around the North Star, so having it in your frame will result in getting circles of stars. Shooting to the South-East will grant you with an almost horizontal line, that is concave in one corner and convex in the opposite corner. The stars rotation speed is 15 degrees per hour around the North Star. That means that stars closer to the North Star will make a shorter distance in comparison to those further away (also, the longer you’ll shoot, the longer the lines will be).
Camera pointed to South East

Camera pointed to South-East with foreground lit by surrounding light pollution.

Getting started

#1 Pick a foreground anchor

Although you may want to show as much of the night sky as possible, it cannot stand alone. Your photo must rely on a “strong” anchor / foreground if you want your viewers to be really impressed.

#2 Get there before dark

In most cases, it will be quite difficult, to the verge of impossible, to build your composition at night, in total darkness. It is better to arrive before night falls and it gets too dark to see. The last minutes of the day are your best time to plan and build your composition.

#3 Compose your shot

This is now the moment you place your camera and composing your frame. Remember to consider not only the appearance of your foreground in the frame, but also the direction that the camera is facing (as explained above).

Camera pointed to North/North-West lit by surrounding light pollution. Trails looks fragrant due to passing clouds.

Camera pointed to North/North-West lit by surrounding light pollution. Trails looks fragmented due to passing clouds.

#4 Shoot for the foreground

Take the first shot which will be used as the foreground of the frame. If you want your foreground to be a silhouette then all is good. But, if you want details to be shown, you will need to have at least one frame lit up. This can be achieved if few ways

  • Shooting one frame during twilight
  • Use a high ISO and longer exposure
  • Using an outside light source such as flash (it is good to use a CTO gel for the right color temperature). Your goal here is to get one frame that has good detail of your chosen foreground. It is better to take few options using different ISO level / exposure time / lightning options to be able to choose the best result afterward. When satisfied, you can move on to do a test frame of the sky.

#5 Setup and test camera settings for the night sky

Change the settings of the camera to get the best result for the night sky, without interference of light pollution. You need to see as many stars as possible, and to make sure they are in focus. The camera needs to be in Manual mode (or Bulb if using intervals). White Balance needs to be decided by you, and not on Auto mode (preferably in Tungsten mode, it will give you more blue in your image). Aperture set as wide as possible and an exposure time of around 30 seconds (with intervals you can set it to longer, but not more than a minute, for the sake of your sensor – it gets too hot).

You can change the ISO to get lighter or darker sky as needed, but not too high to keep a smooth, clean frame. Once satisfied with the result, keep the settings and erase these test frames (just make sure to keep the foreground frames you did in step #4 above).

#6 Take a couple dark frames

Camera pointed to South-East with foreground lit by surrounding light pollution coming from behind.

Camera pointed to South-East with foreground lit by surrounding light pollution coming from behind.

Take one or two dark frames. This is done by putting on the lens cap, and shooting with the settings you chose in step #5 above. These frames will be used later in post-processing. Make sure you remove the cap once you’re done this part!

#7 Take your interval shots

Lock the shutter release controller or press start if doing intervals. Wait to see that it works properly, and a new exposure starts immediately after one ends. Now it’s time to let the camera work for as long as you decided, while you rest or go do something else, but make sure you keep a distance and are not adding light into your camera or composition. For a good result, it is advised to shoot for at least two hours, especially when shooting to the North.

#8 Take two more dark frames

Once your intervals are finished, before moving the camera, repeat on step 6 and take a couple more dark frames.

This is it, YOU made it! All is finished and you can go back home for the post-processing part.

Post-processing star trails

First, from the foreground frames, choose the one that looks the best and process it to your liking. In this frame you can ignore the look of the sky, and if possible, it’s even better to darken it. When you’re happy with it, convert to JPEG or TIFF.

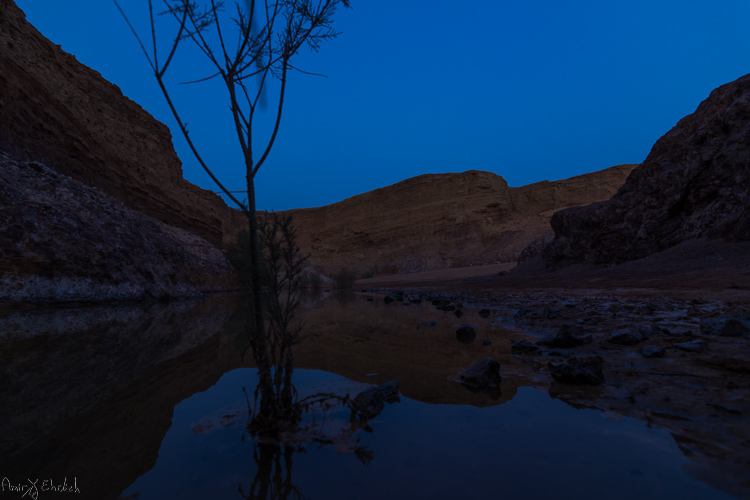
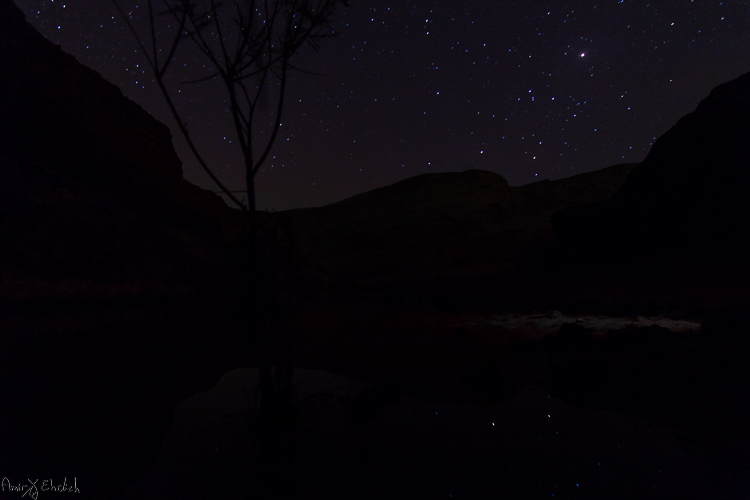
Foreground frame

A frame taken during blue hour to be used as foreground.

Next, move on to the sky frames. Process the first one to improve the appearance and visibility of the stars. In this frame you can ignore the look of the foreground, and if possible, it’s better to darken it. Synchronize your settings to the rest of the sky frames. Export or convert the files to JPEG or TIFF.

Sky frame

One of the frames taken for the stars.

If you did any lens corrections, apply them also to the dark frames, then convert them to the same format as the sky frames.

Move on to the software you use for combining the frames – you can choose StarStax (Mac and Windows) or Startrails (Windows only) which are both free, very easy, and efficient. Upload the frames to their dedicated location (dark frames goes separately – the software is using them to subtract burned pixels from the final result).

Stacked frame

The result of merging all the sky frames in Starstax.

The foreground frame can be handled in one of two ways – (a) placed together with all other sky frames or (b) left aside for merging it later to the final result, in Photoshop.

If you are working with StarStax, I recommend marking the Gap Filling option (in Startrails it is called: Lighten-screen-blend). It will make the processing time a bit longer, but the final result will be smoother.

If you chose to add the foreground image in when stacking the sky image, the result you’ll get is the final one and you may need only some fine-tuning to be done in Photoshop. Due to the time passed from the shooting of the foreground frame to the sky frames, you will notice a dot in front of every trail. These are the stars captured in the foreground frame. I see them as an interference in the overall look and erase them one by one.

If adding the foreground image in Photoshop later was your choice, then now is the time to put it all together. Load the foreground frame and the star trail frame as layers in Photoshop, and merge them into one using a layer mask. This option is better when the sky in the foreground frame is too bright.

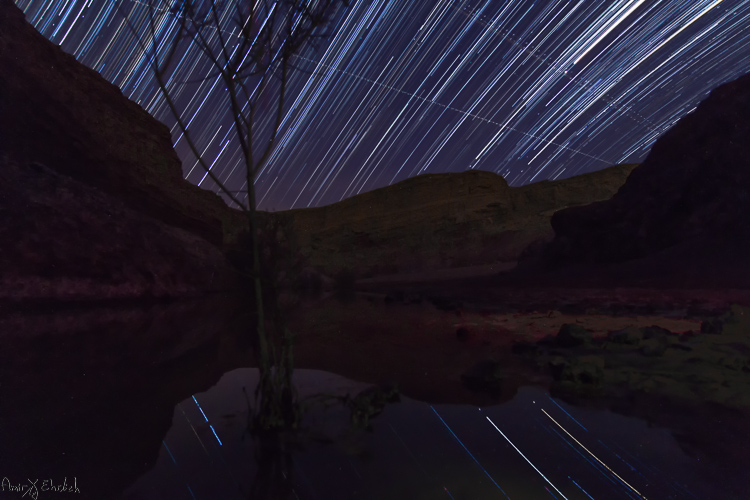
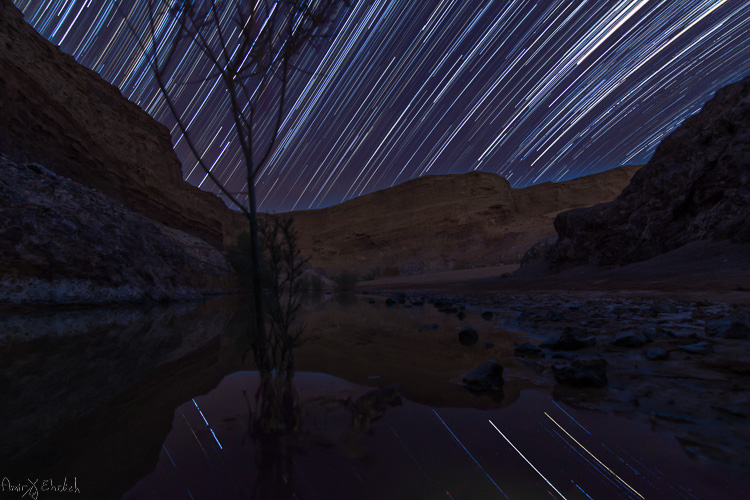
Final after merging and cleaning

The final frame after cleaning up any disturbing lights in the sky, and merging with the foreground.

googletag.cmd.push(function() {
tablet_slots.push( googletag.defineSlot( “/1005424/_dPSv4_tab-all-article-bottom_(300×250)”, [300, 250], “pb-ad-78623” ).addService( googletag.pubads() ) ); } );

googletag.cmd.push(function() {
mobile_slots.push( googletag.defineSlot( “/1005424/_dPSv4_mob-all-article-bottom_(300×250)”, [300, 250], “pb-ad-78158” ).addService( googletag.pubads() ) ); } );

The post Tips for Successful Star Trails Photography by Amir Ehrlich appeared first on Digital Photography School.


Digital Photography School

 
Comments Off on Tips for Successful Star Trails Photography

Posted in Photography


Stacking Light Trails for Night Photography Special Effects

18 Mar

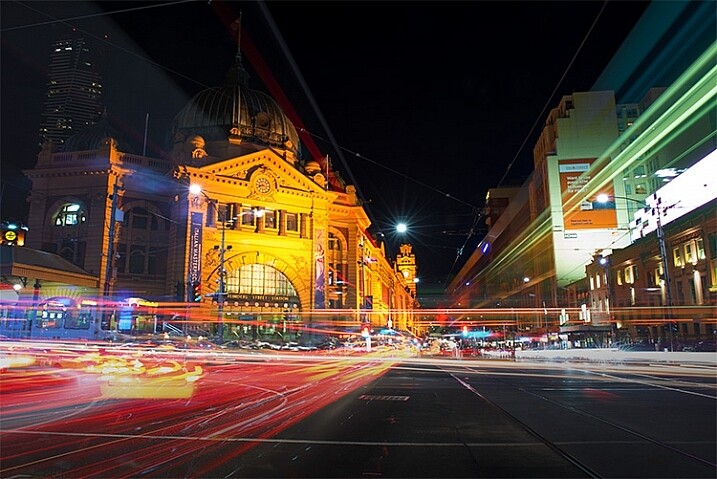
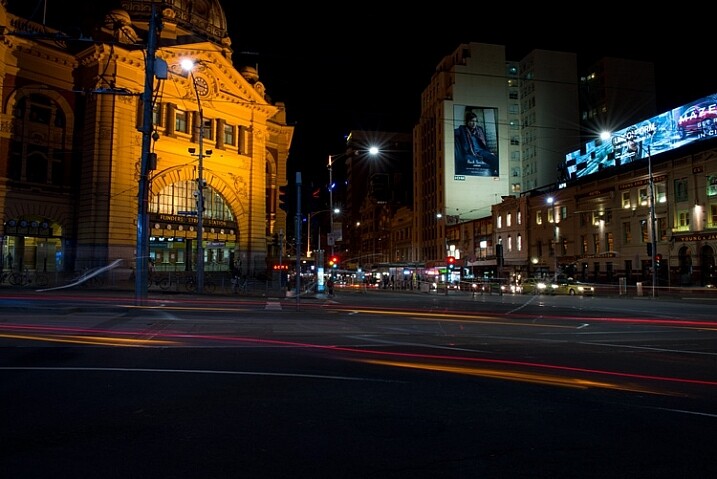
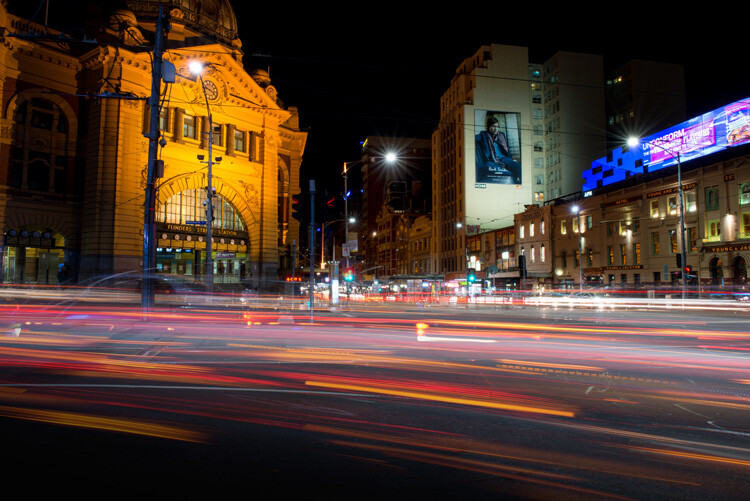
In Melbourne there is an intersection that’s iconic for taking light trails phtos. It is the corner of Flinders Street and Swanston Street, in front of Flinders Street Station.

15-Leanne-Cole-Light-Trails

Light Trails in front of Flinders Street Station. There are 23 images in this stacked light trail.

It isn’t a hard image to take, you just need a camera and a tripod. To get a really good photo, you want to pick a time when there is going to be a lot of traffic. You want the traffic to be moving, as cars caught in a traffic jam will not give you the light trails you’re after. The cars need to be moving constantly, and not standing still for too long.

Pick a place that you think will give you the best advantage. Set the camera up on the tripod, and try to take as long of an exposure as you can. To get the trails, you need to have exposures for several seconds, up to 30. You could do them for longer, but you would need other equipment (like a neutral density filter to cut the light). Most of the images shot for this article had an exposure of around eight to 10 seconds.

Sounds fairly easy, but there are many things that can make it hard. The time of year can inhibit you, as daylight savings will affect when the best time for traffic is, and how busy the roads are. If you go to a place on the weekend, you might find there aren’t as many cars as there would be during the week.

To get the light trails in front of Flinders Street Station, you need to be there at dusk, or after the sun has gone down. In summer that means not many cars or trams. However, there are ways to get around that.

Stacking Light Trails

One of the best ways to get light trails, is to stack many images together.

From the intersection that was mentioned previously, the corner in front of St Paul’s Cathedral is the most popular. There are other places, but that seems to be the one that most use. You will have to work out a great place to photograph them where you live.

14-Leanne-Cole-Light-Trails

A single image, and as you can see there aren’t that many light trails.

Set your camera up on the tripod, this is necessary so you will get identical photos. Set the aperture to what you want. The ISO can be low, on 100 or 200, so you can get longer exposures. If you want longer, remember you can put your aperture to the smallest possible, like f/22.

Once you have a shutter speed that is several seconds, it is time to start taking your photos. Take one photo, then repeat until you have at least 10. You can do this with as many images as you like, however, Adobe Photoshop might not like you using too many. I’ve done it with four images, and as many as 23.

When you get home

Put all your photos onto your computer. You can use Lightroom to do this, but to do the actual stacking you will need Adobe Photoshop or any program that allows you to use layers.

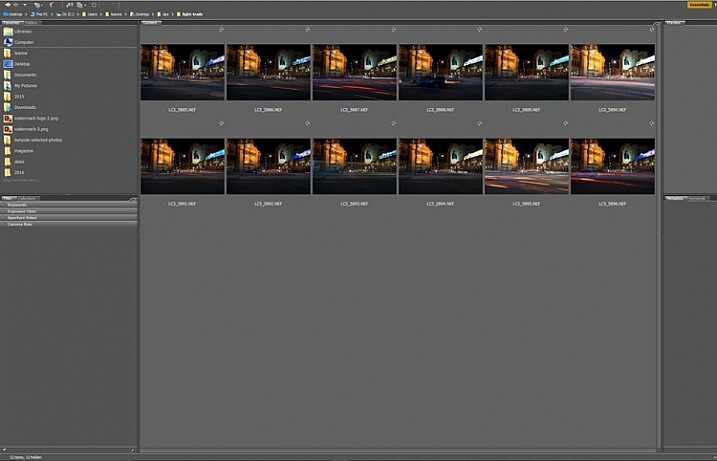
Once you have all the images ready to use, select all the ones you want. If you are using Lightroom to begin with, go to: Photo > Edit in > Open as Layers in Photoshop. In Photoshop open Bridge and select the images you want to use.  Go up to Tools > Photoshop > Load files into Photoshop Layers.

01-Leanne-Cole-Light-Trails

Select all the images you want to use for the light trails.

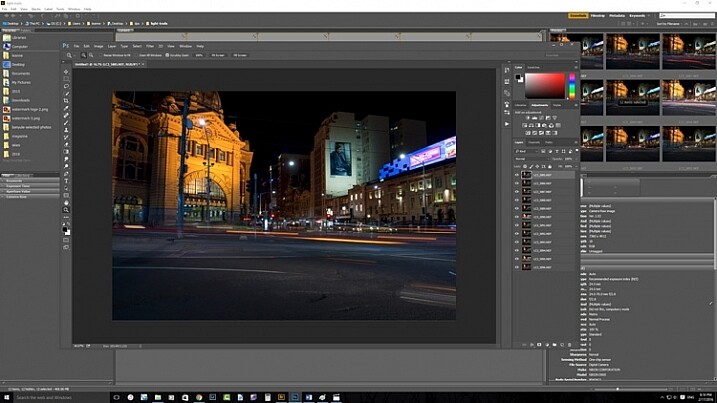
It can take some time for the layers to all open, especially if you are using raw files, and there are a lot of them.

02-Leanne-Cole-Light-Trails

All the layers are opened in Photoshop.

The magic happens

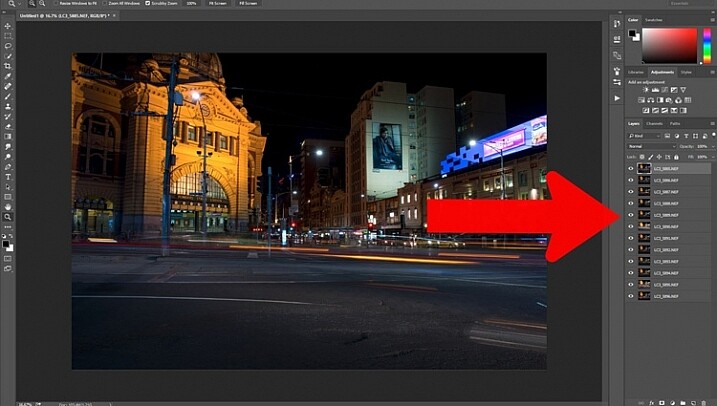
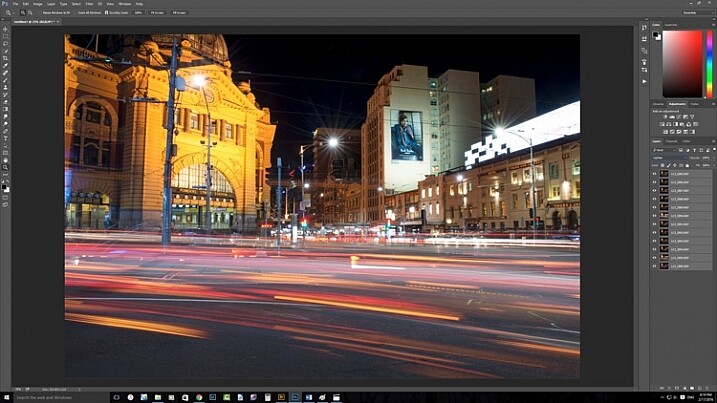
Once the layers are all loaded, you need to select them all. You can do this by selecting the bottom layer, then pressing the shift key and clicking on the top layer. This will select them all.

03-Leanne-Cole-Light-Trails

Select all the layers so they can be used.

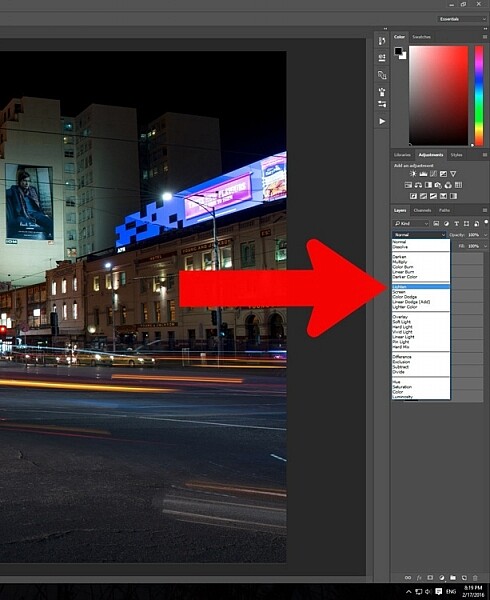
Once selected, go to the Blending Mode Options in the Layers panel. The default setting is Normal. Click on it for the drop down menu, select Lighten, and click.

05-Leanne-Cole-Light-Trails

Select the lighten blend option.

You should notice that the image now has far more light trails. All the trails, from all of the images have come through now.

06-Leanne-Cole-Light-Trails

Lots more light trails apply.

You now have a stacked light trail image.

Getting rid of unwanted lights

Sometimes when you do this, it can change a lot more than just the light trails, it may lighten other buildings too much as well. You can correct this.

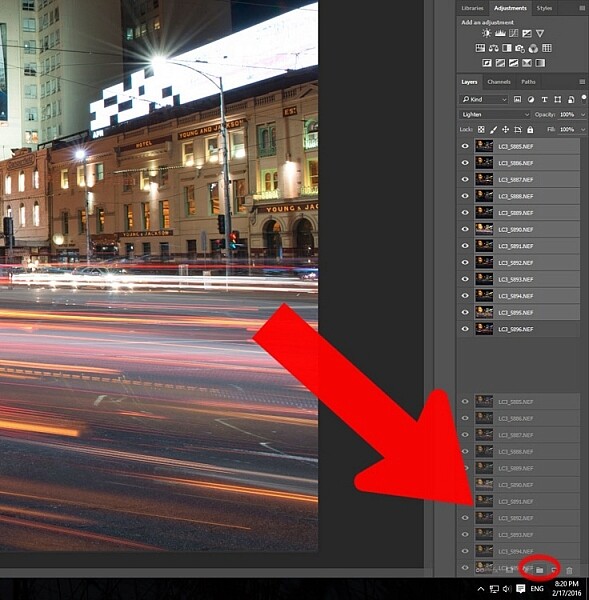
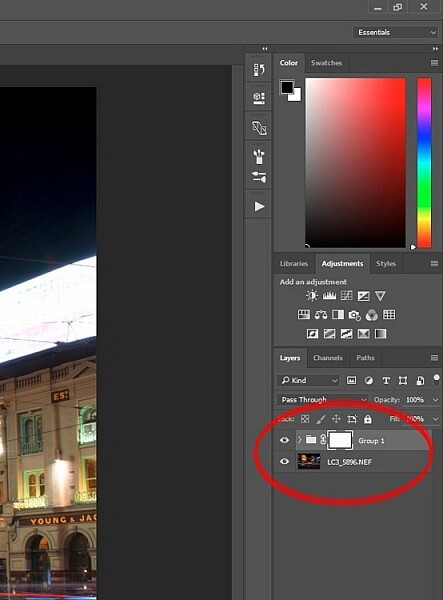
Select all the layers, except the bottom one, and put them into a group. You can do this by dragging them down to the group icon at the bottom of the panel, or right click on the select layers, and when the menu pops up click on Group from Layers.

07-Leanne-Cole-Light-Trails

Put all the layers, except for the first one, into a group.

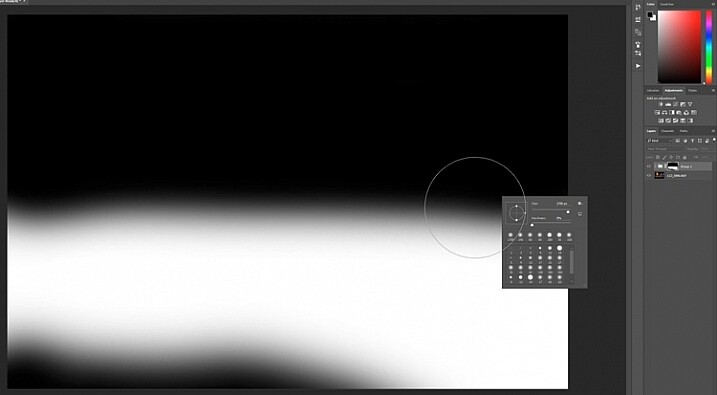
Add a mask to the group from the bottom of the Layers panel. Select the brush from the tools on the left, or press Ctrl b (just B on Mac). Make sure foreground colour is set to black. Making sure the mask is selected, paint over the areas where there is too much light to mask those areas.

08-Leanne-Cole-Light-Trails

Once the mask is added you can use the brush to remove the unwanted lights.

10-Leanne-Cole-Light-Trails

If you alt click on the mask you can see what you have done. The black is where you have removed the unwanted lights.

Finishing the image

The image is now completed, unless you want to do more to it. But, as far as the light trails go, you really don’t need to do any more.

11-Leanne-Cole-Light-Trails

The final image.

This is a great technique which can be applied to many areas. You could use it for ships on the water, or trains going in and out of the city. It can also be used on waterfalls to make them seem fuller. Why don’t you try and see how else you can use this technique.

Here are some other images to give an idea of how to use this technique.

12-Leanne-Cole-Light-Trails

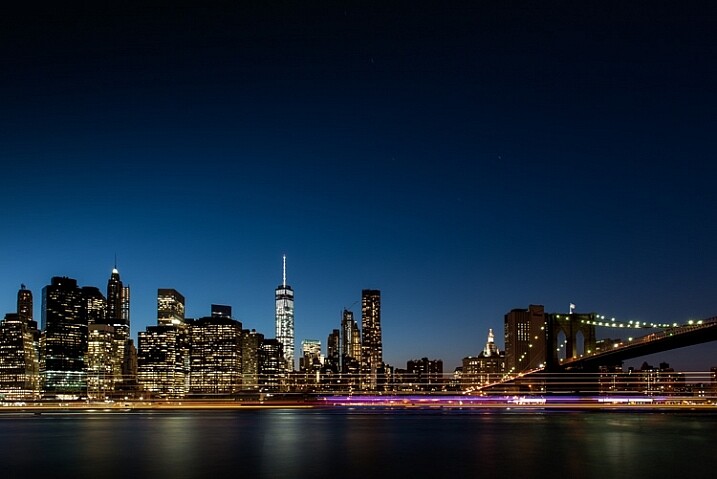
Boats on the water in the foreground of the Manhattan skyline. Four images.

13-Leanne-Cole-Light-Trails

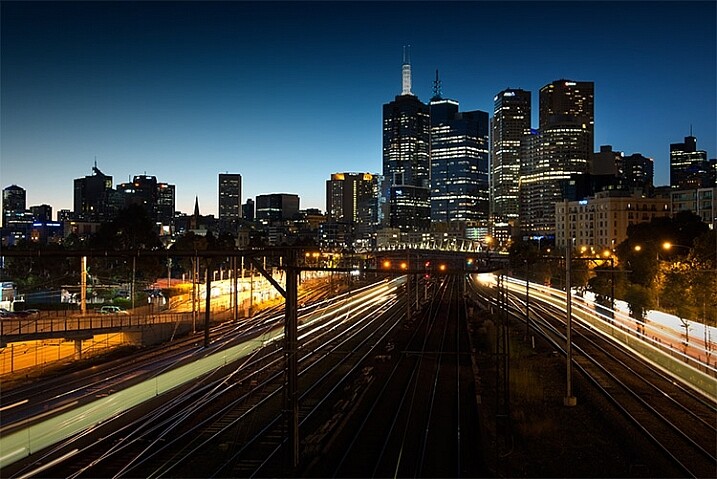
Trains coming into and out of the city. Three images.

This article is part of a series that we will be featuring this week on dPS all about special effects. Check out the others that have already been published here, and look for another new one every day:

  • How to Photograph the Full Band of the Milky Way
  • Fire Spinning with Steel Wool – A Special Effects Tutorial
  • Special Effect – How to Create Multiple Flash Exposures in a Single Frame

googletag.cmd.push(function() {
tablet_slots.push( googletag.defineSlot( “/1005424/_dPSv4_tab-all-article-bottom_(300×250)”, [300, 250], “pb-ad-78623” ).addService( googletag.pubads() ) ); } );

googletag.cmd.push(function() {
mobile_slots.push( googletag.defineSlot( “/1005424/_dPSv4_mob-all-article-bottom_(300×250)”, [300, 250], “pb-ad-78158” ).addService( googletag.pubads() ) ); } );

The post Stacking Light Trails for Night Photography Special Effects by Leanne Cole appeared first on Digital Photography School.


Digital Photography School

 
Comments Off on Stacking Light Trails for Night Photography Special Effects

Posted in Photography