RSS
 

Posts Tagged ‘Star’

Star Stacker lets you create star trail images and timelapses on iPhones, iPads

05 May

Star Stacker, an astrophotography app available for iOS, allows users to create star trail images and timelapses on their phone, computer or tablet. Michael Webb, the developer, posted about his latest creation on Reddit’s r/LandscapeAstro community. To demonstrate a final result from using the app, Webb posted the image, seen above, and explained how he achieved it in the post’s comments section.

Using a Sony a7R III camera and Rokinon 14mm M2 lens, Webb captured 170 15-second exposure images with an ISO of 640 and an F4.0 aperture. Webb then copied the 170 RAW files to his phone using an SD card adapter and stacked the images in the app. To be clear, you can also import JPEG, .tiff or .png images from your iPhone or iPad’s photo app into Star Stacker. Pixelmator was used to combine images of the foreground and stars together for a final product.

After importing your selected photos, you can start creating images or timelapses with the following effects:

  • Full trails – shows every star at full brightness.
  • Faded trails – stars get brighter as the process runs.
  • Shooting star – similar to faded trails but the last image is brighter than the previous, giving off a shooting star effect.
  • Warp modezooms into the image stack slowly creating a warped effect. This will also impact the foreground so post processing may be required if the images have the foreground included.

Astrophotographers typically take a series of images in the same place and stack them to reduce noise. Is 170 necessary? Likely not. This video from Milky Way Mike breaks explains how many photos you should stack and why.

The app isn’t available for Android yet though Webb mentioned he would ‘certainly consider making an Android version depending on how popular this version is.’ One Reddit user pointed out that Star Trails, available on Google Play, could be a decent alternative. Star Stacker is available for $ 1.99 in the App Store for the Mac, iPhone and iPad.

Articles: Digital Photography Review (dpreview.com)

 
Comments Off on Star Stacker lets you create star trail images and timelapses on iPhones, iPads

Posted in Uncategorized


20 Star Planetarium Projectors for Astrophotographers

03 Apr

Astrophotography is one of those types of photography that when done right can produce some stunning photos. Just like any type of photography, understanding the scene and subject matter that you are photographing enables you to capture better images. This is why more and more astrophotographers are turning to star planetarium projectors, as they allow you to learn the locations Continue Reading
Photodoto

 
Comments Off on 20 Star Planetarium Projectors for Astrophotographers

Posted in Photography


Astronomers capture first-ever image of two exoplanets orbiting a 17M year-old Sun-like star

27 Jul

The European Southern Observatory’s Very Large Telescope (ESO VLT) has captured the first-ever image that captures two exoplanets orbiting a Sun-like star.

As the ESO explains in its blog post on the impressive feat, observing systems with multiple exoplanets is ‘extremely rare’ and, until this image, astronomers had never ‘directly observed’ multiple planets orbiting a young star.

Credit: ESO/Bohn et al.

In this groundbreaking image, captured by the SPHERE instrument onboard the ESO VLT, two ‘giant’ exoplanets are shown orbiting the star TYV 8998–760–1, which is estimated to be 17 million years old. Scientists captured the image by using a coronagraph to block the light from the young star, allowing for the light bouncing off the fainter planets to be seen.

The two gas giants are approximately 160 and 320 times as far away from their host star as the Earth is to the Sun. ‘This places these planets much further away from their star than Jupiter or Saturn, also two gas giants, are from the Sun; they lie at only 5 and 10 times the Earth-Sun distance, respectively,’ reads the blog post.

This chart shows the location of the TYC 8998-760-1 system. This map shows most of the stars visible to the unaided eye under good conditions and the system itself is marked with a red circle.

You can find information on this image and future findings by heading over the the ESO website.

Articles: Digital Photography Review (dpreview.com)

 
Comments Off on Astronomers capture first-ever image of two exoplanets orbiting a 17M year-old Sun-like star

Posted in Uncategorized


Beginners Tips for Night Sky and Star Photography

21 Jul

The post Beginners Tips for Night Sky and Star Photography appeared first on Digital Photography School. It was authored by Phillip Van Nostrand.

Star Photography

My favorite type of personal photography is taking night shots of the stars (long exposure pictures). I am often busy shooting pictures of people at weddings, or apartments, or models, and it’s important for me to make sure I take pictures for fun regularly. Taking pictures for no one other than myself is highly rewarding, soul filling, and fun! I also love taking travel photos and HDR photos, in this article we will take a close look at exactly how you can take your own epic star photographs.

star photography
30 seconds at f/2.8, ISO 1250

What you need to take jaw-dropping pictures of stars

To take your star pictures, you only need three things:

  1. a full-frame camera (for better ISO capabilities)
  2. a fisheye lens (for the widest view of the sky)
  3. a tripod (for stability during 15 second photos)

(Note: You can do this with a cropped sensor camera, without a tripod, and without a fisheye lens. It will just be a little harder and slightly less jaw-dropping)

star photography
25 seconds at f/2.8, ISO 1600

Camera settings

You can nail this shot almost every time with these settings:  25 second exposure, f/2.8, ISO 1600

If your lens doesn’t open up to f/2.8 you can try 30 seconds at f/4 with ISO 1600.

Note: this kind of photography won’t work if there is a full moon out (or even a half moon). Don’t compete with large light sources, the stars will be over powered. The best location for star photography is way out in nature, away from city lights that cause “light pollution.”

star photography
13.0 seconds at f/2.8, ISO 1600

Why to use these settings

The most important component of these settings is the 25-second exposure. An exposure longer than about 25 seconds will start to show star trails. Photographing star trails is a legitimate type of photography on its own, but not the type of photography you are trying to do here. Since you are limited to about 15-25 seconds max shutter speed, you still need to let in more light.

The largest aperture you can find on a fisheye lens is f/2.8, and still, your picture might not be quite bright enough to look stunning. So this is where the ISO comes into play. On a full-frame camera like the 5D Mark III or the Nikon D800, you can bump the ISO up to around 2000 without seeing much noise.

You’ll learn how to reduce noise in Lightroom in the next section for a super clean photo.

star photography

Editing in Lightroom

I do extensive retouching in Lightroom after I take my photos. I’ll usually boost the exposure up by a stop or more, and I’ll use Noise Reduction under the Detail section to reduce any unwanted “noise” (those pesky extra white, red or blue pixels that show up when you push the ISO too high).

Here is a standard star photo of mine and the Lightroom settings I used to create it:

star photography
25 seconds at f/2.8, ISO 1600

Here are the Lightroom settings I used to edit the above photo:

star photography
star photography

1) You can see in the first panel that I bumped the whites up to +46 and brought the blacks down to -52. I really wanted to emphasize the stars against the dark sky and this is a good way to do that. Pushing the clarity up to +55 also helps define the stars against the sky, making them nice and crispy. I boosted the saturation to bring out any colors that are in the sky.

2) In the second panel, you can see that I sharpened up the image a bit, also to emphasize the stars. At the same time, I brought up the noise reduction to 33 to smooth out some of the noise that might show up, and I brought up the color to 25 for the same reasons.

Pro tips

star photography

Here is where you can have fun with the editing. Play around with the split toning sliders to make the colors in your sky appear magical. In the photo above you can see a little bit of turquoise in the lower part of the sky, and that comes from boosting that color in the Shadows of the Split Toning slider here:

You can also affect the color of the sky by playing around with the temperature and hue sliders to get some pretty magnificent looking star photos. Take a look at this one photo rendered three different ways:

star photography

Another pro tip that you may have noticed in all of the photo examples I gave here is this – shoot your stars in context. It really tells a great story to see a silhouette of a pine tree or a house in the background, and it shows the magnitude of the scene when you have an object in the foreground to compare to the stars.

Lastly, make sure you know which direction the Milky Way is. You can use an app like Sky Map to see exactly what stars are in the sky above you.

Have fun shooting, and please share your pictures below!

star photography

The post Beginners Tips for Night Sky and Star Photography appeared first on Digital Photography School. It was authored by Phillip Van Nostrand.


Digital Photography School

 
Comments Off on Beginners Tips for Night Sky and Star Photography

Posted in Photography


Report: Stalker used eye reflections in online photos to locate, assault pop star

15 Oct
Screenshot from the NHK World-Japan newscast.

A news report from NHK World-Japan claims a crazed fan used eye reflections in images uploaded to social media, among other things, to track down a famous Japanese pop star’s condominium in Tokyo where he allegedly assaulted her.

The report claims Hibiki Sato admitted to figuring out which train station the star left to walk home by studying the light direction visible in some of her videos, as well as a reflection of the station visible in her eyes in an image she uploaded to social media. Equipped with those details, Sato allegedly waited at the station for the pop start to arrive, followed her to her residence, and assaulted her.

Though the situation is bizarre, the idea of high-resolution images inadvertently revealing information via eye reflections isn’t new. In 2013, for example, a study published in PLOS revealed that it is possible to extract images of identifiable bystanders from eye reflections captured in high-resolution images. The technique was presented as a potential tool for helping law enforcement gather data as part of investigations, but it’s clear the concept can be used by anyone for nefarious reasons as well.

Articles: Digital Photography Review (dpreview.com)

 
Comments Off on Report: Stalker used eye reflections in online photos to locate, assault pop star

Posted in Uncategorized


RawTherapee 5.7 update brings new Film Negative tool, improved star ratings

13 Sep

Free, Raw image developing app RawTherapee has been updated to version 5.7, gaining a Film Negative tool for processing raw images from film negatives, as well as support for viewing XMP/EXIF rating tags in RawTherapee’s own star rating system. New features aside, RawTherappe 5.7 also brings hundreds of bug fixes, according to the software’s changelog.

RawTherapee is free and open-source for users on Windows, macOS and Linux. The software is non-destructive, offering a variety of advanced editing tools for adjusting lighting, colors and details, including Film Simulation, Haze Removal, Color Toning, Defringe and more.

Articles: Digital Photography Review (dpreview.com)

 
Comments Off on RawTherapee 5.7 update brings new Film Negative tool, improved star ratings

Posted in Uncategorized


How to Use Lightroom Star Ratings to Improve Your Editing Workflow

12 Mar

The post How to Use Lightroom Star Ratings to Improve Your Editing Workflow appeared first on Digital Photography School. It was authored by Ian Johnson.

Editing photos is time-consuming! The rule of thumb that it takes an hour of editing for every hour of shooting is not an exaggeration. You may find that sorting and grading your photos right after a shoot is one of the most tedious parts of your entire workflow – I know I do. Whether you are coming in from a long weekend of shooting wildlife or a busy day shooting a wedding, it is no small task to determine which photos to keep, edit, and store for later from a batch of a 1000 or more. Adobe Lightroom has several tools allowing you to sort, grade, and attribute your work to help you efficiently edit and store a photo. I will walk you through how I use the star-rating system to sort images for my editing workflow and long term archival storage.

Lightroom, Stars, Workflow, Help

My basic workflow is to import my images, use stars to curate the collection, edit the collection based on their ratings, keyword the collection, and then archive it.

Hot key stars

If you are thinking of stars as those little icons you click under an image to set the rating, let me change your world! Each star rating of 1-5 you can assign directly from your keypad! These “hot keys” are what makes the star rating system so convenient.

Your first assignment:

Open up Lightroom and select an image in your catalog. Now hit the “1” key on your keyboard. Lightroom tells you the image has now been assigned a rating of 1. With values ranging from 1-5, you can assign each value to an image for different things. Below, I’ll provide examples of how you may use these different values.

As a side note, Lightroom has hotkeys for everything. Learning them speeds up your workflow significantly; no matter which set of tools you are using to develop or print.

Lightroom, Stars, Workflow, Help

Lightroom has a star rating system which can be accessed under the thumbnail of each image in Grid View (G hotkey) in your Lightrom Library. Each image can be assigned a star rating of 1-5 by simply pressing the corresponding number on your keyboard. Using hotkeys will help improve your speed and make editing large photo shoots easier and faster!

Sorting files for deletion and advancing images to editing

Whether you are shooting wildlife, weddings, sports, or portraits the most important question you have after your import is: what photos do I keep? When shooting wildlife, you may have dozens of the same subject in slightly different settings or poses. At a wedding, you have many of the dance, but only a select few are going to make the cut to show your client, friends, or family.

You can use the star rating system to assign images for deletion. Why I prefer this over the “rejection” flag system is you can simultaneously start choosing what files to edit and which to delete using the range of values from 1-5 rather than the binary “yes” and “no” of the flag system.

Lightroom, Stars, Workflow, Help

There’s a lot going on during a wedding. When the day is all said and done you need to import the photos and then choose which you’ll keep, which you’ll develop, and which you’ll delete. Lightroom Stars can help you there.

Using Lightroom Stars to sort your work is easy and efficient.

Here’s a hypothetical situation: you import your photos and determine that a value of “0” (i.e., no rating) as photos to delete. You then decide that images assigned “1” are saved, but are a low priority for editing – perhaps these are b-roll images for applying general presets. You determine images set to “2” are developed immediately and images set to “4” are your best images. This multiple tier system ensures you only have to go through the images once and ideally not more than twice. That’s a huge time saver when dealing with large quantities of images!

I would recommend you avoid using “5” in your workflow. Reserve this for only your very highest quality images (more on that in the “Archiving content/ creating smart collections” section below.)

Once you’ve assigned ratings to all of the images, you can filter the image using the “attributes” filter while in grid view. Filter for all images = 0 stars to delete the images you no longer want and filter all images = 2 to start developing your shots.

Lightroom, Stars, Workflow, Help

Once you’ve chosen which photos to keep (rating 4) you can filter for them using the attributes filter in the Lightroom Library. Simply click “Attribute” and then set the rating to the image set you’d like to view.

Separating image content for keywording

If you are a wildlife photographer, and in particular if you are a bird photographer, it is very typical to change subjects (species) throughout the day. This may occur as much as every other shot. Once you’ve imported those images, it can be daunting to go about keywording your work so you can find them later. The star rating system can help you sort through them quickly!

Assign each star to a species and use your hotkeys to assign the star rating to that species. Once you’ve finished coding the species with stars, filter them using the attributes filter in Grid View and complete your keywording. You can then remove the star rating by highlighting the images and pressing the “0” key. There are many photography scenarios where you can apply this!

Lightroom, Stars, Workflow, Help

The diversity of birds creates a diversity of shots. It is critical to keyword your collection if you ever hope to find the images again. I used the star ratings assigned to different species to help sort them and keyword them.


Lightroom, Stars, Workflow, Help

Once a star rating has been set for a species filter for it to see all images with that rating. In this case, Marbled Godwit were given a temporary rating of 4, keyworded, and then the stars were reset for the image.

Archiving Content / Creating Smart Collections

Undoubtedly, you will create images you are proud of and want to save for future reference, printing, or portfolio work. As I eluded to above, these images should be assigned a value of 5 in your collection. Only a small percentage of your shots should achieve a rating of 5.

You can compile a portfolio of your best shots by establishing a smart collection in Lightroom. The smart collection automatically compiles all images in your catalog with a given attribute.

To create a smart collection right click on “Smart Collections” in Lightroom. Select create a new smart collection and then add the criteria for your collection. You can create a collection set from any attribute you can assign in Lightroom (e.g., stars, flags, keywords, etc.). As you go through the years, your 5-star collection set will continue to grow and document your progress and story.

Lightroom, Stars, Workflow, Help

You can create a smart collection to house your best work for printing or display by giving only your best images a rating of 5.


Lightroom, Stars, Workflow, Help

To create a smart collection you need to right click on Smart Collections and select create a new smart collection. Assign the attribute to the collection that you’d like it to contain. Simple as that!

That is it! I hope you see the value in using Lightroom’s star rating system in your workflow.

I’ll end by saying these steps are what work for me, but what works for you? Leave your thoughts on workflows in the comments below so we can learn together.

As I always say, “pixels are cheap!”. Be sure to make lots of them and then sort through them using Lightroom Stars.

The post How to Use Lightroom Star Ratings to Improve Your Editing Workflow appeared first on Digital Photography School. It was authored by Ian Johnson.


Digital Photography School

 
Comments Off on How to Use Lightroom Star Ratings to Improve Your Editing Workflow

Posted in Photography


Samsung Malaysia caught using DSLR image to advertise Galaxy A8 Star ‘Portrait Mode’ feature

04 Dec

Samsung has again been caught using an image captured with a DSLR to advertise its mobile camera capabilities. The discovery was recently detailed on DIY Photography by writer and photographer Dunja Djudjic, who took the image and made it available for sale on EyeEm.

After receiving an alert that the image had been sold, Djudjic used a reverse image search and found the image on Samsung Malaysia’s website, where it features a different background and is used to advertise the Galaxy A8 Star’s Portrait Mode feature.

Samsung Malaysia displays two iterations of the image on its website, one with a sharp background replacing the original, another with a blurred background supposedly demonstrating the handset’s Portrait Mode capabilities.

Djudjic contacted EyeEm in an attempt to confirm whether Samsung purchased the image, but the company hadn’t yet received the sales data and was unable to confirm the buyer. Getty, which is partnered with EyeEm, was also contacted to determine whether the sale took place through its platform, but didn’t respond to the inquiry.

Djudjic attempted to contact Samsung Malaysia and Samsung Global, but was unable to get a response about the image’s use.

This isn’t the first time Samsung has been caught passing off stock images to advertise its mobile camera capabilities. In August, Samsung Brazil’s Twitter account tweeted two stock images advertising its Galaxy A8 camera capabilities, but later removed them after being called out.

Competitor Huawei was also previously caught using images captured with a DSLR to advertise its mobile camera capabilities. In 2016, the company used an image captured with a Canon 5D Mark III to advertise its P9 smartphone’s camera. Later in August 2018, the company published a video with images seemingly taken by the nova 3 and nova 3i, but that were later revealed to have been captured with a Canon DSLR.

In addition to EyeEm, Djudjic’s work can be found on Flickr and Behance.

Articles: Digital Photography Review (dpreview.com)

 
Comments Off on Samsung Malaysia caught using DSLR image to advertise Galaxy A8 Star ‘Portrait Mode’ feature

Posted in Uncategorized


7 Tips for Shooting and Processing Star Trails

08 May

Have you ever looked at an image of the night sky where the stars leave long, arching trails? These images, called “star trails”, record the movement of the stars as the earth spins around its axis. This is a compelling way for you to capture a phenomenon not observable to the human eye.

As with many creative photography techniques, there are can be a steep learning curve for shooting star trails. A basic understanding of the night sky, knowing the impact of focal length, and composition can help you maximize a night out with the goal of shooting star trails.

Star Trails, Alaska, Tutorial, Starlapse - 7 Tips for Shooting and Processing Star Trails

This star trails shot adds to the native art of the Hoonah Tlingit.

Some fairly simple post-processing techniques can help you perfect your shot once home. I will walk you through the basic technique of photographing star trails, help you think about how your gear affects the outcome, and highlight two post-processing techniques that I find useful.

1 – Basic Technique for Shooting Star Trails

The concept of the shooting star trails is actually pretty simple. Set up your camera on a tripod and then compose the shot. I recommend disabling autofocus at this time. Once you have your composure right, set the exposure on your camera. In general, you will want to expose the shot for as long as possible without over-exposure. You can check the histogram of your image to decide if it has been overexposed or not.

On dark nights without a moon or light pollution, you can start in Manual Mode, ISO 800, f/2.8 (or lower/wider), and 15-seconds. Modify these settings to best capture your scene. Once you are happy with the exposure, you will need to set your camera to take pictures at a steady interval. You can do this by setting your camera’s internal interval meter or by attaching an external intervalometer.

Each camera model has different intervalometer connections or internal settings (or may not have this feature), so consult your camera’s manual to get this set up correctly. As you set up your camera, think about the number of shots you want to take. The more shots you take the more the stars will move – with many lenses you will start to capture significant movement in about 8 minutes.

Below I will go through a couple scenarios where fewer or more shots may be better. As a rule of thumb, I shoot for a minimum of 45 minutes and as long as several hours. Let your camera shoot and enjoy the night sky!

Processing or Stacking the Star Trails

Once I am done with the shoot, I import the photos to Lightroom and Photoshop (using Adobe Bridge). There are other star-stacking programs that you can experiment with, but I like Photoshop for this task. To import the photos from Adobe Bridge open the program and then navigate to where the photos are stored. Highlight the photos you want to include in the star trail and then go to Tools –> Photoshop –> Load Layers into Photoshop As Layers.

Once the layers have loaded into Photoshop you may want to use the Auto-align feature (disregard this if you are certain your tripod did not shift) by highlighting the layers in the right panel and then going to Edit –> Auto-Align Layers –> Auto. The final step is the use the “lighten” blend mode in the Layers panel and apply it to all the layers.

The lighten function examines all of the overlapping layers and then keeps only the lightest pixel. Keep that in mind as you can use it to your advantage (examples of that below). To complete the image export it to a lossless format (I like TIFF). You may then continue to edit the new TIFF in Lightroom or Photoshop.

2 – Shooting Tips

Know the North Star

Having a basic understanding of astronomy will aid you as you compose your shot. The North Star is often the focus of star trails because it does not move in the sky as the earth spins on its axis. To find it, locate Ursa Major (e.g., The Big Dipper) and then follow the line created by the stars at the end of the dipper to locate the North Star.

Star apps on your phone are also a great way to locate the dipper or the North Star. Once you know where it is, you can use it in your shot. I often like to bury the North Star behind a piece of a foreground element giving the final image a pinwheel effect.

Polaris, North Star - 7 Tips for Shooting and Processing Star Trails

Knowing the north star will help you with your star trails! In this image of Ursa Major, I have circled the stars of the constellation in red and the north star in green.

Star Trails, Alaska, Tutorial, Starlapse - 7 Tips for Shooting and Processing Star Trails

I buried the north star behind this black spruce and shot for nearly three hours to make this shot. The resulting image has a pin-wheel effect.

Star Trails, Alaska, Tutorial, Starlapse - 7 Tips for Shooting and Processing Star Trails

I put the north star behind a Sitka Spruce and shot this image at 14mm providing many stars in the shots and a pinwheel effect.

3 – Find Some Foreground Elements

Foreground elements are always important for landscape photography. When shooting star trails, think about foreground elements that capture the essence of the scene or that you can place prominently and by themselves.

By this, I mean objects that stand away from the background of the image. You may also want to choose elements that can be lit by the light of the moon or by using light painting. I like to think of star trails as telling the story of the night and the objects that you include in that frame will aid you in that storytelling.

Star Trails old barn, Minnesota, Tutorial, Starlapse - 7 Tips for Shooting and Processing Star Trails

I chose this old barn because the moonlight helped light up its character and I felt it captured the essence the Minnesota field in which it stands.

4 – Use Light Painting

Using Adobe Photoshop’s Lighten blend mode provides a lot of options for creativity when shooting star trails! Remember, that Lighten only keeps the lightest pixels in the whole stack of images. So by using light painting, you can selectively lighten objects in the frame.

Illuminate the foreground with your phone, headlamp, or another light source. You can light up the whole thing or selectively light elements of it. Experiment with lighting angles, intensities, and colors. If you don’t like the lighting of a certain exposure simply remove it from the layers that you import into Photoshop. I usually spend the first 10-20 frames lighting the foreground to make sure that I capture the lighting that I want and then let the camera take the rest of the shots.

Star Trails, Alaska, with american flag - 7 Tips for Shooting and Processing Star Trails

Here I used light painting to illuminate this flag that I placed in the foreground. I lit the flag in several different ways and then chose the best frame to include in the final shot.

Star Trails, Alaska, evergreen trees - 7 Tips for Shooting and Processing Star Trails

In this image, I used light painting the softly illuminate the snow-covered trees in the foreground of this shot.

5 – Pick Your Lens Focal Length Wisely

Focal length will strongly impact the amount of time it takes for the stars to move in your shot. Shorter focal lengths (e.g, 14mm) will take longer for the stars to have trails than longer focal lengths (e.g., 50mm). Knowing this will help you plan your shot. The three images below emphasize this effect.

MThe wide-angle of my 14mm wide-angle lens allowed me to capture the North Star and a distant mountain landscape, but I stood there for three hours to get the amount of movement in the stars that I wanted. The second shot was taken at 50mm and only 45-minutes elapsed before significant movement in the stars occurred. The third shot is an extreme example, shot at 300mm. The green streak is Comet Lovejoy and shows only a couple minutes of movement.

Star Trails North Star - 7 Tips for Shooting and Processing Star Trails

This image was shot at 14 mm, full frame and captures about three hours of star movement.

Star Trails landscape night - 7 Tips for Shooting and Processing Star Trails

Shot at 50mm, this image took 45 minutes to capture the star movement.

Star Trails 300mm lens - 7 Tips for Shooting and Processing Star Trails

This image was captured at 300mm on a crop sensor (effective 600 mm) and shows only a couple minutes of movement. The green streak is Comet Lovejoy.

6 – Play with Exposure Times

The length of your exposure will strongly influence the final image that you create. There are no guidelines to what is the right length, instead, you should be guided by what looks good to your eye. As a tip – you can always choose to use fewer shots than you captured so by default I would take as many images as you think you’ll need and then modify the amount once you import them into Photoshop.

Which of the images below do you like better? The longer exposure or the shorter one?

Star Trails, Alaska, - 7 Tips for Shooting and Processing Star Trails

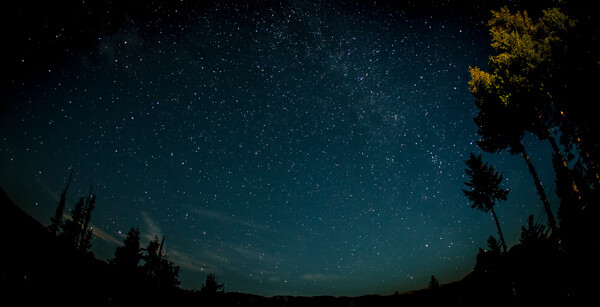
This image captures about 45 minutes of star trails at 50mm and I like how the falling arc of the stars lead my eye to the subtle mountains in the background.

Star Trails, Alaska dock - 7 Tips for Shooting and Processing Star Trails

This image captures 30 minutes of star trails at 24mm. I felt that including any more stars would take away from the dock in the foreground.

7 – Compositing Tips

Photoshop gives you a lot of flexibility to mask and preserve or remove elements of the shot. Since star trail shots are composite images and thus art, I do not worry about these alterations from an ethical standpoint. The two techniques below may help you improve the final shot. They assume you are familiar with masking and healing in Adobe Photoshop. If not you will find the linked articles helpful!

Masking a Foreground

Once you compile the images you may find elements that draw your eye away from the phenomenon you are trying to capture. Since the horizon and foreground are the same for all of the images you can choose which foreground looks best to you. Use that foreground to create a selection and convert the selection to a mask.

You can use that mask and exported TIFF file to maintain the foreground you like. In the images below, I wanted to remove the hikers that walked up to the lava flows in Volcanoes National Park and the bright highlights of the lava which became overexposed as the lava moved. I used a mask to preserve the foreground elements I liked.

Star Trails, Hawaii, Tutorial, Starlapse

Editing out Planes and Satellites

Almost all dark nights will have a plane or a satellite come through your frame. Fortunately, these are very easy to remove! Use the Healing Brush tool and set the tool to replace and content aware. You can draw a linear line with the tool over the track of the satellite or plane. Voila! The offending track will disappear.

Star Trails, Alaska, Tutorial, Starlapse

Star Trails, Alaska, Tutorial, Starlapse

I used the healing brush to remove the satellites and planes from the final image above. Can you tell the difference?

Summary

So there you go! I hope this article can help you get out there on your first night of shooting star trails. Remember, knowing your stars, picking a foreground and playing with exposure length will help bring the shot you imagine to reality.

Once you process the stacked images you have lots of flexibility in Photoshop to fix parts you do not like. As I always say, pixels are cheap. So make lots of them as you learn to shoot and process star trails.

The post 7 Tips for Shooting and Processing Star Trails appeared first on Digital Photography School.


Digital Photography School

 
Comments Off on 7 Tips for Shooting and Processing Star Trails

Posted in Photography


ESA unveils most detailed 3D star map ever captured

04 May

The European Space Agency (ESA) Gaia mission has released a new star map of the Milky Way, giving us the most detailed view of our galaxy to date.

Launched in December 2013 from Kourou, French Guiana, the mission of the Gaia space observatory is to create the largest and most detailed 3D space catalog in existence. To do this, it uses what the ESA calls the ‘largest digital camera in the Solar System,’ a one-billion-pixel camera made up of more than 200 CCD sensors.

Gaia’s sky in colour. Image provided by ESA

This new set of data, released on April 25th, details the location and movement of more than 1.3 billion stars. For context, the first set of data released by the ESA in May 2016 contained similar information of a mere two million stars. It’s not only the position and movement of the stars either.

As well as positions, the data include brightness information of all surveyed stars and colour measurements of nearly all, plus information on how the brightness and colour of half a million variable stars change over time. It also contains the velocities along the line of sight of a subset of seven million stars, the surface temperatures of about a hundred million and the effect of interstellar dust on 87 million.

The new information will be used for many years to come by scientists all over the world. “Gaia will greatly advance our understanding of the Universe on all cosmic scales,” says Timo Prusti, Gaia project scientist at ESA, in the announcement blog post. “Even in the neighbourhood of the Sun, which is the region we thought we understood best, Gaia is revealing new and exciting features.”

The ESA expects many more datasets to be released in future years, with the full and final catalogue set to be published sometime in the 2020s. Originally, Gaia was only set to operate until mid-2019, but the ESA has already approved an extension to its mission that should see it functioning well into 2020.

You can access the data from Gaia’s first release on the ESA’s archive site and view a collection of 360-degree videos in a dedicated VR page.

Articles: Digital Photography Review (dpreview.com)

 
Comments Off on ESA unveils most detailed 3D star map ever captured

Posted in Uncategorized