I love paddling on the Horsetooth Reservoir in cold season. Boat ramps are closed, no power boat traffic, usually quiet and calm. Snow and ice can enhance scenery. A great time to paddle, train, relax or photograph. The Horsetooth stays […]
paddling with a camera
Posts Tagged ‘Stand’
Winter Stand Up Paddling on Horsetooth Reservoir
20
Feb
Flat Lay Photography – How to Make Yours Stand Out from the Rest
18
Feb
The post Flat Lay Photography – How to Make Yours Stand Out from the Rest appeared first on Digital Photography School. It was authored by Lily Sawyer.

If you’re on social media, you may have come across flat lay photographs. They have become very popular over recent years and can be successful scroll-stoppers on sites such as Instagram when done properly.
What is flat lay photography?
Simply defined, flay lay photography means a photograph where the subject/s are arranged on a flat surface and photographed from above. It is also sometimes called the bird’s eye view.
The surface and the lens are positioned parallel to each other from a vertical distance apart, and therefore, no angles are visible. The surface is flat, and the image shows a singular dimension taken from a parallel position above the surface.
However, this does not mean that your image should look flat. This article will discuss factors that contribute to achieving interesting flat lay photographs without the image looking necessarily flat, especially if that is not your intention.

f/2.8 ISO 1000 SS 1/125
What can you shoot in the flat lay style?
Because flat lay photography is a style or a format, you can shoot just about anything! The only consideration is the size of the subject.
If you had a drone camera, for example, then you can shoot landscapes and mansions in a flat lay fashion, much like aerial photography.
However, drone photography is not only limited to aerial photography. You can use a drone to capture normal objects in flat lay format. What is generally available to us are mobile phones and digital cameras, which are small. So they can limit the size of what we can shoot given the vertical distance requirements.
People
You can photograph people lying down on the grass or on the bed from above, and that would be considered flat lay.
Newborns are easier to photograph from this angle because they are small. You can capture their entire bodies plus a background from a short distance, such as the newborn images below.

f/4 ISO 1000 SS 1/125 Off-camera flash in a strip softbox to the side and a reflector on the opposite side
Objects
You can photograph just about any object in the flat lay style. Smaller objects grouped into a space together is the simplest way of doing this.
The photo below required very little styling, and I photographed it in a bright and evenly-lit space; hence there are no dominant shadows in the photo.

f/1.8 ISO 400 SS 1/160
Food
One of the most common subjects photographed in this style is food. A plateful of food is small enough to snap a picture of so quickly. It often requires minimum styling, especially if you are dining in a restaurant, as often the food is already presented well on the plates.
Instagram is peppered with food photos, both styled and unstyled, and flat lay can add the wow factor without much effort.
The photos below are unstyled and are quick snaps of the food served at a reception. I photographed these indoors with directional on-camera flash as the rooms had little light.

f/4 ISO 2000 SS 1/125
Flowers
I love photographing flowers. They are packed with texture and color and offer limitless styling possibilities. The top photo below, I shot on the floor in a hotel room. I wanted to capture the invitations styled with the flowers and needed more distance, so I used a wide-angle lens 24-70 at around 35mm.
Below is a photo of two bouquets taken from the bird’s eye view. These bouquets are fairly big, so I had to stand up and take the shot with the bouquets on the floor.
When taking flat lay photos using a DSLR and a heavy lens, it is quite difficult to keep all the gear steady while shooting straight down without a tripod. This is the reason why I rarely go below 1/125 sec shutter speed when doing so.

f/2.8 ISO 1000 SS 1/160
Jewelry
Another one of my favorite subjects to use when photographing flat lay style is jewelry. I love juxtaposing jewels and metallic textures next to soft fabrics of various kinds. The layering of textures injects lots of interest in an image.
This brings us to some tips on how to enhance flat lay images, so they don’t look boring and too flat.

f/2.8 ISO 400 SS 1/160
Tips
In my opinion, the handiest and easiest equipment to use when doing flay lay photography is your mobile phone. It’s light, has a versatile lens (which also has a fairly wide-angle), and you don’t even have to set the settings yourself! It’s super easy.
However, some phone cameras are better than others, so you can’t guarantee how good your photos turn out – especially when available light is fairly low.
Lighting
Whatever camera you use, the first, and in my opinion, the most important consideration to take is lighting. Make sure there is ample light, so your subject is well lit. You can opt for a bright and airy look with hardly any shadows, or choose a moodier look using shadows.
I like having directional light that casts some shadows because I feel they add another dimension to an image. The easiest way to check where your dominant light is coming from is to look at where the shadows fall.
On the baby photo below, the room was bright and airy. I positioned the baby on the bed, away from the window. However, the main light comes from a huge window on the left. As you can see, the shadows fall on the right. However, because it is quite a large light source, the shadows are subtle.

f/4 ISO 800 SS 1/160
I snapped the photos below using natural light coming from a window, but a smaller window this time to achieve a dark moody look.

f/2.8 ISO 400 SS 1/160
If you want to eliminate shadows altogether, you can use a reflector opposite the main light to counteract the shadows. Alternatively, use a lightbox to light the space evenly.
Layers
The photo below is a social media advert for a brand. I shot it with a mobile phone that has a mediocre camera. While I have applied a filter to it, both resulted in rather grainy photos. However, they were clear enough for the brand to be happy with them.
In terms of lighting, ample light came from a side window and a velux window above. However, I wanted more of an impact, so I created layers of color and objects.
There’s the dark blue background as the first bottom layer, the fairy lights and decorations on the table as the second layer, the product as the third layer, and finally, hands as the fourth and top layer.
Layering increases the dynamic in a photo and makes it more interesting.

mobile phone photo
Another way of creating layers is to use a very shallow depth of field. This creates an illusion of infinity for the background.
The below photo is of a rose on a vase with centrally-positioned rings to be the topmost layer of the image. However, you can’t see the surface where the vase sits because of the shallow depth of field and the use of a macro lens. In this case, I used the 60mm and shot at close range, which when using a macro lens, produces background compression and bokeh.

f/7.1 ISO 1000 SS/ 1/125
Composition
Composition is of utmost importance as it can make or break a photo.
Every photo has a certain type of composition used in them, whether intentionally or unintentionally.
Well-executed composition elevates the level of success of a photo because composition plays a significant role in engaging and connecting with the viewer.
The photo below uses the rule of thirds – one of the simplest yet strongest compositional structures there is. Alternatively, the photo below it shows a centered composition.

f/1.8 ISO 400 SS 1/200
It is easier to play around with composition when you have a variety of objects to use. Take the photos below where the labels and invitations were used along with the flowers to create different compositions.

f/2.8 ISO 200 SS 1/250
Color and contrast
The key to creating successful visual images when you are limited to a flat lay dimension is color and contrast.
A darker background creates a strong contrast against lighter or brighter objects, thereby allowing enough separation to give an illusion of multi-dimensionality, as shown in the photos below.

f/4 ISO 1000 SS 1/200
Where color might be too subtle to create a bold pop, utilize contrast with a variety of textures instead.
As shown in the photos below, delicate flowers lay against a weathered wood grain and pastel-colored invites against rough concrete.

f/2.8 ISO 200 SS 1/200
Style
There are a plethora of styles you can use when photographing flat lay. Illustrated in the photos below are two opposite styles: elegant and minimalist (top two photos) and homely and maximalist (bottom photo).

f/5.6 ISO 800 SS 1/200

f/ 5.6 ISO 2000 SS 1/160
For website purposes, I shot the photos below as a clean branding style against a seamless white background.

f/5.6 ISO 400 SS 1/125 using off camera flashes
Conclusion
I hope this article has given you ideas on the different ways you can capture an image using the flat lay photography style. Flay lay photography is a super-creative medium – the possibilities are endless. You can achieve some high impact photos if done successfully.
Do you have any other flat lay photography tips you’d like to share? Alternatively, do you have some flat lay photographs you’d like to share? If so, please share them with us in the comments section.
The post Flat Lay Photography – How to Make Yours Stand Out from the Rest appeared first on Digital Photography School. It was authored by Lily Sawyer.
6 Ways to Make Your Photography Stand Out
20
Jun
The post 6 Ways to Make Your Photography Stand Out appeared first on Digital Photography School. It was authored by Karthika Gupta.
When was the last time you googled your city and your genre photographer? I tried this the other day, and I used ‘Chicago lifestyle’ and ‘travel photographer.’ The search results returned 18.5K results. Yes, that is ‘K’ as in thousands.
Photography is an extremely competitive field and it can be difficult to make your photography stand out. Low cost of entry in terms of gear, free online tutorials and a pool of clients who want everything for ‘free’ or ‘low budget’ means there is work for anyone who wants to get into the field. Sure, some genres are harder to get into than others, perhaps. But the reality is that if you want to get paid to take photos for someone else, chances are you will be able to do that relatively easily.

Now, I am not against any of this. We all start somewhere, and I had also done the ‘free’ photoshoot when I was starting to get my feet wet. I understand all that is needed to become a photographer.
But I quickly learned that the $ 50 or $ 100 photoshoots are not worth my time, effort, and talent. As a photographer, there are many expenses such as:
- gear insurance
- business registration
- taxes
- administrative overheads including website domain name and hosting
- travel costs etc.,
I was effectively paying people to let me take their photo.
That math did not add up and made no sense what so ever.
If you want to make it long term in the photography industry, there are several things you need to do to get yourself on the right track and stand out from the rest of the crowd when it comes to your skill, your business practices and your presence – on and offline!
1. Consistency
Don’t be a one-hit wonder. Consistently create and produce new work. Even if that work is just for you, personal projects or collaborative projects.
If you have to do ‘free’ or ‘low budget’ shoots, have a plan on when, how, and what you are going to get and give from these shoots. Spending 6 months providing free shoots or low-cost shoots to build up your portfolio is okay, but taking 2 years to do so is a bit much.
Also, realize that free/low-cost shoots tend to look very different from clients who are willing to spend $ 1000 or more on a family photo shoot. So be practical with your goals.

It took me years of practice to find a style that I liked and that worked with my personal asthetic – a clean, bright style of imagery.
2. Authenticity
A lot of photographers offer styled photo shoots and portfolio-building photoshoots. This is where a bunch of photographers walk through a styled setup and create work that they can showcase on their portfolio. There is nothing wrong with this but only if you use this as a way to build your skill.
For example, you are editing clients of different skin tones, learning how to photograph in challenging light or how to pose and interact with clients. Don’t use these images as ‘your’ work. You are better off indicating images from a styled shoot as such than you are in showcasing work/styling that isnt your own.

I love 1:1 styled shoot because they give me creative freedom and a chance to create unique images.
Instead of consistently looking for styled shoots for building a portfolio, invest in one of your own. It doesn’t have to be elaborate or fancy. Loop in a few vendors and see if you can set something up that can fit your brand and theirs. This is a win-win for all involved. That way, you create unique images and also make friends in the industry.
3. Play well with others in this space
This relates to number 2. Make friends in the industry. I belong to many FB groups and Whatsapp groups for creatives and photographers. We meet, chat, connect over business issues as well as offer advice and help as needed. I also am a part of a group with many different kinds of entrepreneurs to build a community of like-minded people and professionals. I have gotten a lot of business from these groups but have also made some life long friends and mentors. People who are always there for me because I am always there for them.

A collaborative photoshoot with a fellow photographer to create portfolio and editorial photos. The image is a triple exposure on film.
No matter what level of business you are at or even if you are just a hobbyist, there are always people who are just like you and are looking for the same things as you – friendship, love for photography and camaraderie. Give out as much as you can, be helpful and uplift others who are on this journey with you. The more you put out there, the more you will receive from the universe.
4. Patience is key
Photography is a very competitive industry. At any given point in time, there are bound to be people who can do something better than you. And that is totally okay. Know where your strengths lie and use those to your advantage. Aim to be in it for the long haul and not just the short term gigs that are one and done deals. Build relationships with your clients so that they will refer you and come back time and time again for quality results.
Success doesn’t happen overnight. Be consistent and be patient, and things will happen in their own time.
5. Success your way
Whether you choose to be in business or not, be true to your art. Get inspiration from other photographers and daily life. There are many amazing things around us at any given point in time. Just because no-one else photographs it, does not make it boring. Similarly, think outside the box. Just because everyone photographs something a certain way, does not mean you have to follow the pack.

When you are starting out, don’t obsess over clients, getting work, and making money. Yes, they are absolutely important but take the time to perfect your art (to the point where you are confident charging money for your photography). Then, money and fame will follow.
6. Have a 360 approach to your career
When I used to work in Corporate America many many years ago, one of the companies I worked for had a 360-degree approach to annual performance evaluation. My performance was judged by how effective I was in four areas: my peers in my team and across teams, my managers, and those who worked for me. Apply this approach to your photography. No matter where you are committed to helping those just starting out, collaborate with your peers, learn from those who are where you want to be. This can be in terms of meetups, workshops, and conferences or even just meeting for a cup of coffee to connect with others.

I started teaching technique at conferences and love meeting and connecting with other photographers who have become good friends.
Your photography career and mindset around your work and your art will grow in leaps and bounds when you have a mindset of abundance instead of scarcity.

Conclusion
If you have read through this article in its entirety, you would have noticed that I talked nothing about camera brands, lens, lighting, models, posing etc.
In my opinion, the tips for making your photography stand out from the crowd focus on things that are more important. Your attitude towards yourself and others, your mindset, your willingness to get help and help others, and your long term vision for where you want to be, are far more important than your skill with the camera. After all, almost anyone can take a picture – simply point and shoot. It takes a lot more to become a successful photographer who consistently creates art.

The post 6 Ways to Make Your Photography Stand Out appeared first on Digital Photography School. It was authored by Karthika Gupta.
5 Tricks to Make Your Landscape Photos Stand Out
15
Feb
Are you passionate about portrait photography? Do you love sharing images of your trips and landscape photos? Or maybe you spend your free time capturing the streets of your city?
Let me tell you something you might not know about yourself. Every now and then you are a landscape photographer, too. Everyone is. Let’s be honest, you couldn’t resist that beautiful mountain view you photographed a few weeks ago on a hike. Your social media feeds are full of your friends’ photos of canyons, lakes, and forests. Even your grandma sent you a picture of a sunset from her backyard the other day.

The amount of landscapes captured and uploaded every day is overwhelming. So how can you make people stop and look at YOUR images? How do you make YOUR landscape photos stand out?
Here are some useful tips and tricks to help you. Save them for later, and the next time you are photographing a beautiful view make sure to follow them. You will have a much better chance of taking a good picture and making it noticed.
1. Less is more
“A designer knows he has achieved perfection not when there is nothing left to add, but when there is nothing left to take away.” – Antoine de Saint-Exupery

This famous quote also applies very well to landscape photography. I know you are excited to show the whole world how beautiful nature is around you. However, often showing everything is equal to showing nothing.
For instance, look at the image below. It is simple and straightforward. You clearly know what the photographer tried to show.
Now, imagine there is a road below the greenery, two smaller mountains on the right and little pond on the left. You could capture all of that instead; it would give much more information about the location. However, then your viewer wouldn’t know where to look.

Your viewer is exposed to thousands of images every day (social media, streets banners, TV, online advertising, etc.). Don’t give him any more work. Seeing your photo should be an effortless and enjoyable process. Here is how to get rid of the unnecessary parts of your images:
- If you have a zoom lens, zoom into the frame.
- Reposition yourself. Sometimes you have to walk closer to your subject or choose a different point of view.
- As a last resort – crop your image later. Generally, It’s not advisable to crop more than 20% of your images. This rule will keep you more disciplined about your choices in the field. Also, it will help you keep your images in high resolution in case you decide to print them one day or participate in photography contests. (Many contests don’t allow cropping more than 20%).
2. Avoid distractions
Now you’ve decided which part of the scene is the most compelling. But before you click the shutter, make sure that these technicalities are in check:
A) Check that the horizon is straight. Turn on the grid in your camera to help you with that.


B) Position your subject away from the middle of the frame. Most of the time you will find yourself following the rule of thirds

.Sometimes following the rule, precisely.

Sometimes, not so much.
C) Get your settings right to avoid overexposed, underexposed, blurry, or noisy images.
3. Look for color contrast
This is an extremely important concept that you need to be familiar with.
Our brains are wired in a way that when we look at a picture, we first respond to contrasts in color and light, then to the shape, size and other characteristics of the scene.
Make sure you know the theory of color contrast. The general rule is that cold and warm colors work well together. Here are some examples:


4. Test a thumbnail of your image
In a perfect world, you would make a large format print of your image and people would come and spend hours savoring every detail of it. In reality, your picture will be one of many tiny thumbnails on someone’s social media feed. (If you don’t post your images online, you can skip this part.)
A great exercise is to look at your image as a small thumbnail. Can you tell what’s on it? Would you pay attention to it if you saw it on your Instagram timeline or would you scroll past it? You’ll notice, that simple images with high color and/or light contrast stand out the most.
Can you guess which of the images from the grid below got the most amount of interaction on Instagram?

5. Is the image good or does it make YOU feel good?
You just came back from a trip and that sunset you observed with your partner was amazing. You still remember the sound of the waves and the warm wind coming from the sea. Time to share that memory with the world!
99% of the time, that’s fine if you want a snapshot of a holiday, but not if you want people to see an artistic value in it. A great image should be great by itself, regardless of what emotions you have attached to it.
A good practice is to look through your photos weeks, or sometimes months after you took them. You will be surprised at how your selection will change compared to the day of the shoot.
Here are a couple more images that follow the tips above.


Over to you
Do you have some images that reflect the points of this article? Share them in the comment section so that others can learn from you.
The post 5 Tricks to Make Your Landscape Photos Stand Out by Maria Sahai appeared first on Digital Photography School.
Pumpkin Photo Stand DIY
29
Sep
Warning: preg_replace(): The /e modifier is no longer supported, use preg_replace_callback instead in /home/forge/content.photojojo.com/content.photojojo.com/wordpress/wp-content/plugins/ozh-better-feed/inc/feed.php on line 134
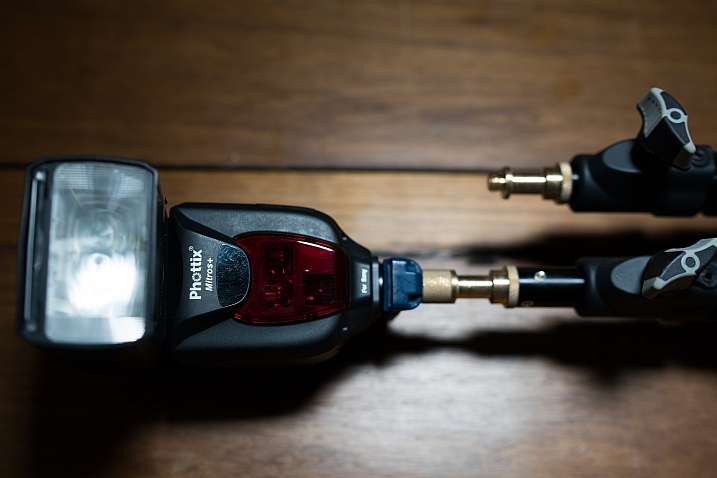
Nissin announces Super Light Stand LC-50c: The world’s lightest light stand
15
Sep
 |
Nissin has released a new light stand that it claims is the lightest in the world. The Super Light Stand LS-50C uses carbon fibre for its central column to keep its total weight down to just 575g/1.2lb. But even at that featherweight, it can still hold 1.5kg/3.3lb and extends to a maximum height of 200cm/79in.
Packed away, it stores at a minimum length of 48.5cm/19in.
As these stands are generally static, the idea of using carbon fibre to make them lightweight is mainly to reduce the weight of the photographer’s kit when traveling, but also to make assistant’s work a little easier—whether carrying to and from a shoot, or holding during one.
The centre column uses a collar-style rotary locking mechanism more often seen on tripods, which the company says makes tightening easier and more effective than standard locking nuts and handles. Nissin has also come up with an interesting design for the leg clamps that allows them to be extended to a flat position on the ground for added stability.
The Nissin LS-50C will go in sale in the next couple of days priced 13,500 yen plus tax (approx. $ 130). For more information see this translated version of the Nissin product page.
Articles: Digital Photography Review (dpreview.com)
Late Summer Stand Up Paddling with Olympus TG-5 Camera
04
Sep
After paddling a heavy expedition paddleboard in Missouri River 340 race I returned back to my racing board – 14×30 All Star by Starboard. It is definitely more fun for short 4-6 mile workouts. Of course, I wonder how my […]
paddling with a camera
How to Make Your Photos Stand Out Using Color Contrast
04
Aug
A great way to make your photograph look attractive is to make it pop! One of the best ways of making your photo pop is to use eye catching colors your image. Those colors will have even more impact when paired with a contrasting color, so in this article, we’ll look at how you can apply this idea. There is a simplicity to these kind of photos, and learning which colors pair well together will help a lot. Let’s take a look at contrast, and color contrast photography to see why this works.


Red and blue, one of the strongest color contrasts, was used in this still life.
Why does contrast work in photography?
Opposites work well together in an artistic sense, concepts like old versus new are good photographic subject matter. One of the simplest forms of contrast is black and white, which is why photographs that were taken in this style look so effective. The best black and white photos often have strong contrast which makes them stand out.
The aim of many photos is to isolate your subject, and by doing so, tell a story. The use of contrast is one way you can isolate a subject from the background, or bring out a strong repeating pattern in a texture photo. It’s also possible to have color contrast as well, but only certain color combinations work well together.

The warm glow of street lights against the blue hour sky is a color contrast.
What is color contrast photography?
Getting color contrast is a bit more complex than it is with black and white photography. Color can be broadly split into two groups, cold colors, and warm colors. Color contrast happens when a cold color is paired with a warm color. You can also use complementary colors – that is when warm colors and cold colors (opposite on the color wheel) are in the same photo.
An easy way to visualize this is by looking at a color wheel, which shows colors that are opposite each other. It’s not uncommon to see color contrast occurring naturally in nature with things like fruits and flowers often displaying this concept. The classic color contrasts are yellow/purple, red/green and orange/blue. Using the color wheel can you come up with some yourself and apply them to your images?

Using this wheel you can see which colors are opposite each other. Image credit Todd Weed. Creative commons.
How to take photos that have color contrast
The world is full of color, but it’s often a mess of many different colors. So how do you go about taking photos that have color contrast, if there are so many other colors in the frame? The following are ideas you can use to do color contrast photography.

Finding a good location
Look for places with a solid color, walls often provide this. A red brick wall can contrast against green or blue colors. In some neighborhoods you might find a wall that has been painted blue or wood paneling that is a particular color. Artistic areas of town are often good hunting grounds. Once you have a strong color background you will need to find something or someone that has the contrasting color.

The vendor knew to lay out their wares using color contrast to attract more customers.
Create your own color contrast
Color contrast photography is creative, so how about creating your own contrasts? This could mean asking a model to wear a particular color of clothes, or you can create still life photos that display color contrast. A quick trip to a local crafts store to buy colored paper will allow you to play with contrast.

In this photo, the opposing colors of purple and green have been used.
Finding color contrast in nature
Flowers, especially orchids, have natural color contrast, meaning you don’t need to create it yourself! Another subject with strong colors are fruits, so head to the market and see if you can find contrasting colors with the food on display!

The strong color contrast of red and blue gives this street scene more impact. Even the stalls are red and blue.
Let’s see your examples of color contrast photography
The world is much better in color, so let’s see examples of your photos! The chances are you already have some photos of this type in your archive. So which color combinations worked best for you? When you next challenge yourself to try something new with your photography how about using color contrast as a central theme? Go out and get some new photos, post them here, and share your experiences! This is a fun form of photography that anyone can try no matter what camera you’re using, so let’s see some color contrast photography!
When you next challenge yourself to try something new with your photography how about using color contrast as a central theme? Go out and get some new photos, post them here, and share your experience in the comments section. This is a fun form of photography that anyone can try no matter what camera you’re using, so let’s see some color contrast photography!

The yellow wall makes the women who are wearing blue stand out more.

In this photo, the color contrast was created. I used a pixelstick to paint first in red, then in blue.
The post How to Make Your Photos Stand Out Using Color Contrast by Simon Bond appeared first on Digital Photography School.
Want your sports photos to stand out from the crowd? Use a strobe
03
Jun
How to get these shots
Garrett Ellwood’s body of work speaks for itself. He’s a seasoned sports photographer and, according to his website, has been the official team photographer for the Charlotte Hornets, Carolina Panthers, Denver Nuggets and Colorado Rapids. Since 1995, he’s photographed 19 NBA Finals. So he’s got some experience.
While Ellwood’s more ‘standard’ action shots are well executed, images like the one above spark a lot of interest and attention because they’re different. Ellwood is still capturing a moment, a play in the game, but the result is evidence of greater pre-visualization and planning. Oh, and triggers, and very powerful strobes.
For those who aren’t sports shooters or who aren’t well-versed in using flash, here’s a quick breakdown of his (likely) setup.
The first thing you’d need for this sort of stuff is permission, and given Ellwood’s experience, he’s sure to have it. Next, you’ll need radio triggers; PocketWizard’s are the industry standard, and cost a pretty penny, but they’re reliable and have great range. You’ll then need to mount your strobe pretty high up in the rafters, and because of the distance from your subjects, it’d better be powerful.
We can also tell from these images that it’s likely a bare bulb (evident in the first image from the very hard shadows, the second image appears to have players more ‘filled in’ from light reflecting off the court). It looks to be in a cone-shaped reflector of some sort, or behind a grid – we can see this from the pronounced falloff midway up the court. Ellwood could have underexposed the background in two ways; first, he could have used a very narrow aperture, or he could have used high-speed sync, or a combination of the two. From there, just pump up the flash power to your desired level, and fire away.
The result is a decidedly different and dramatic look. The moral of the story? You don’t have to keep the strobes relegated to staged portraiture or studio shots – experiment with how your particular setup allows you to balance with ambient lighting scenarios, and have fun!
For more: Garrett Ellwood’s Instagram, portfolio, and a slideshow of additional images from NBA.com.
Articles: Digital Photography Review (dpreview.com)
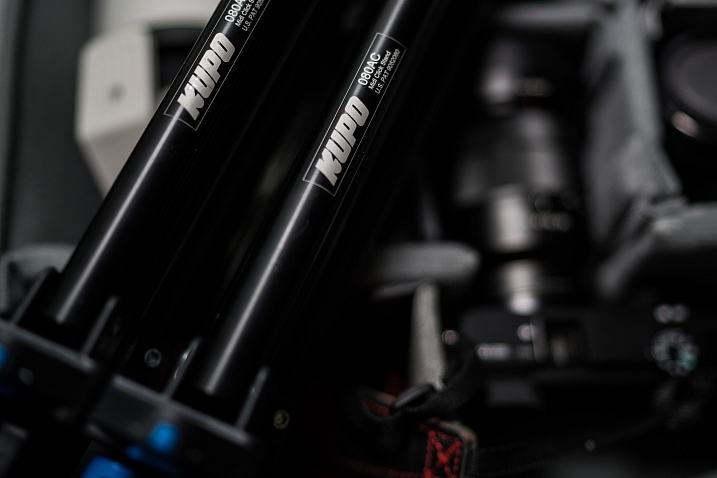
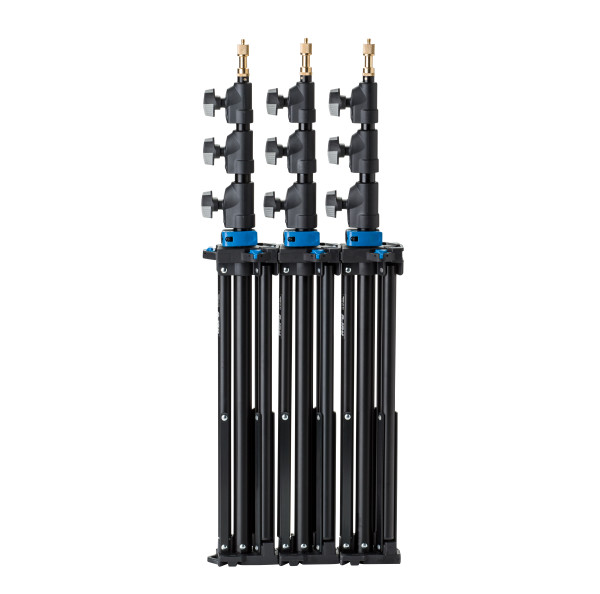
Quick Review of the Kupo Click Stackable Light Stand
02
Feb
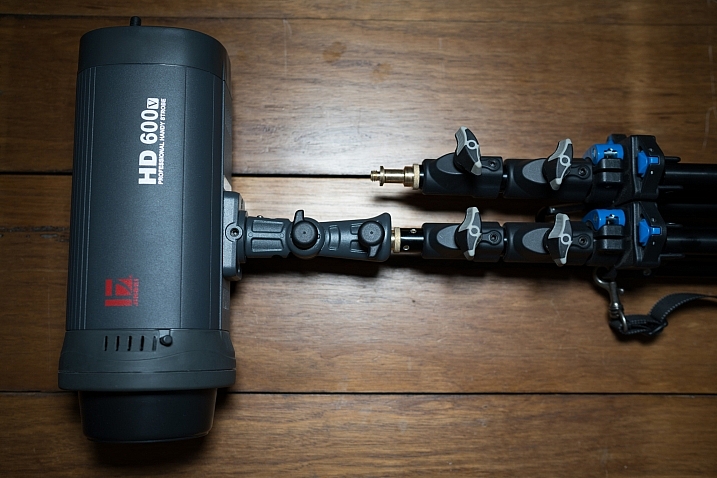
I’ve recently started using a pair of Jinbei HD600 studio lights for my photography and what I love about them is that they are self-contained units. They don’t have any requirements for power cables, etc., as they’re battery powered, wireless studio lights. What was starting to bug me, though, was that I only had heavy light stands to mount them on. Not a problem when you’re working in a studio, but when you have to visit a client to do a headshot or a quick portrait of someone, having to take a C-Stand along isn’t always ideal (especially if you’re on public transport).
I wanted to stick with Kupo gear as I’m very happy with the quality and innovation of their products, so I asked the crew at ProTog what my options were. They suggested I hold out for the Kupo CLICK stackable lighting stands. I did and I’m very happy I did. Here’s my review…
Check out the Kupo Click Light Stands on Amazon or on B&H Photo’s website.
My wish list
I had a few simple ideal specs for the stands that I was after:
- I wanted them to be light enough to sling over my shoulder when I was on the go.
- They need to not suffer from bad build quality due to being light weight.
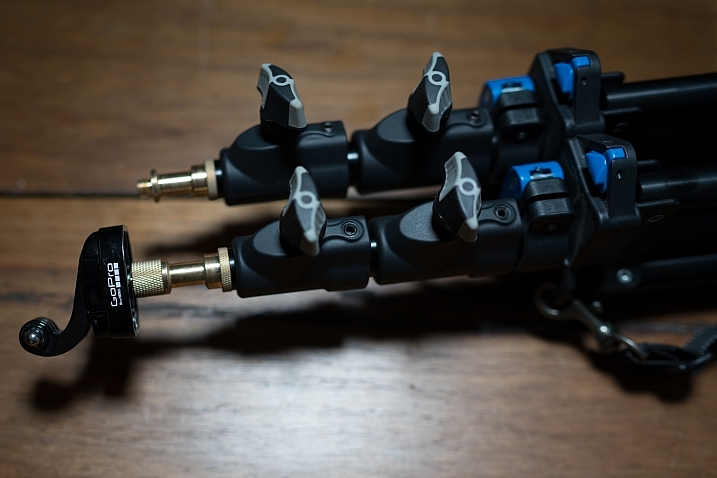
- I wanted to be able to quickly use them for either a well-placed strobe on an outdoor shoot, a quick portrait in an office or studio, and maybe even to mount a GoPro on to run a quick timelapse of a session.
Features of the Kupo Click
The Kupo Click had everything I wanted in a portable light stand. Let’s take a look through the feature list.
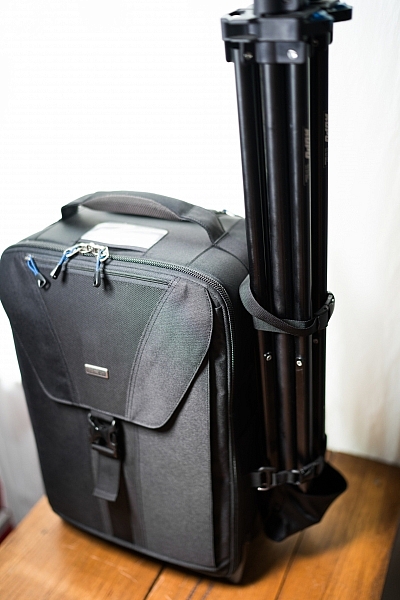
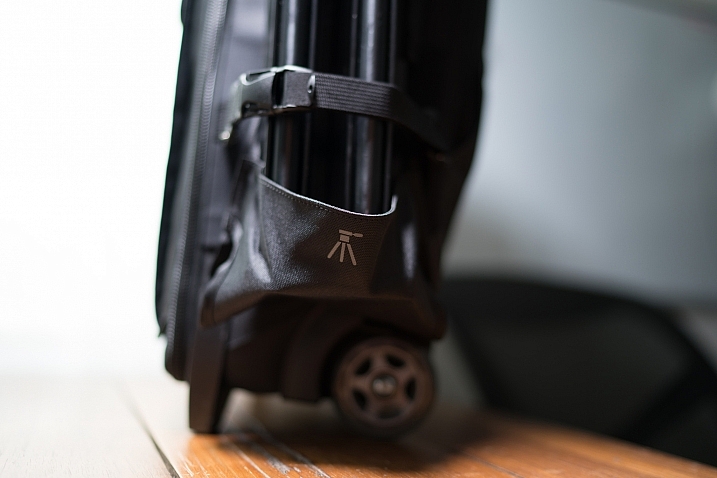
- Coming in at 1.3kg (2.9 pounds), the weight was just fine, easily able to attach a pair of stands to the side of my ThinkTank Airport TakeOff roller.
- In terms of load, the diminutive stands were capable of holding a 5kg (11 pounds) payload, more than I’d need to place atop the aluminum light-weights.
- The tubes are also double pinned to the threaded ends, this makes them a lot less likely to fail when compared with my old stands, after a few months of heavy use, the stands haven’t loosened up in the slightest.
The Click
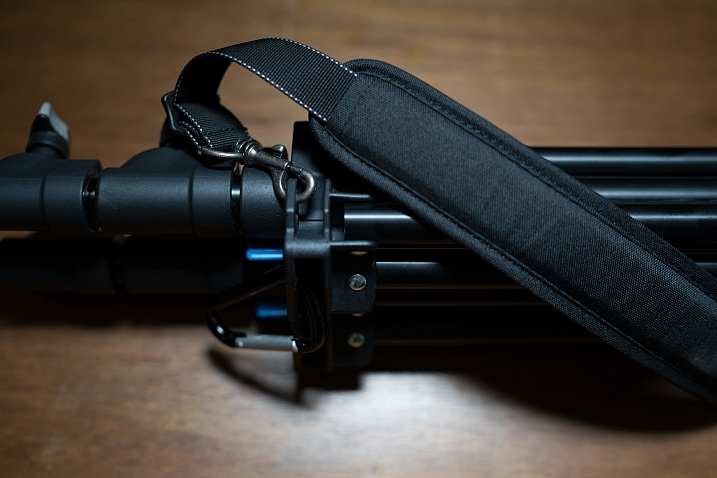
The Kupo Click light stands allow you to click them together either side by side or on top of each other. So you can essentially have one of them flat on each side of your bag with some little attachment straps, or you can have them side by side (above) and sitting in the tripod cup on your rolling camera bag, or you can use a strap (sold separately, I didn’t get one as I used a regular strap with a clip attached to sling mine over my shoulder, see below)
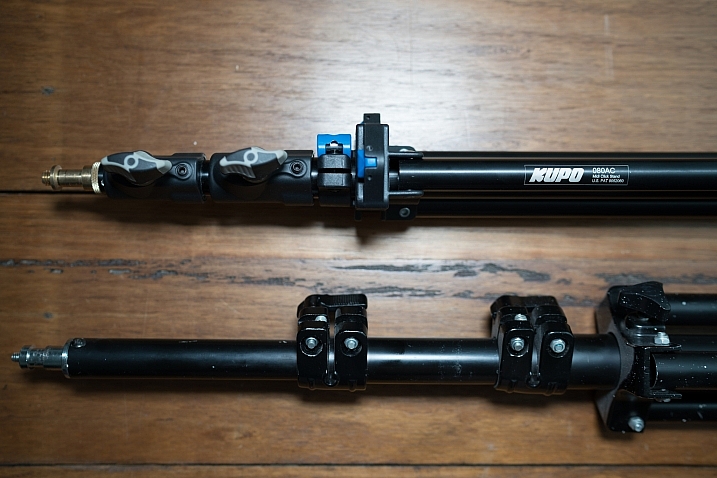
The stands have a sweet built-in air damper that prevents damage to your lights if you accidentally undo the locks by cushioning the column on release. I have tested this and it works. The midsection is better than the top section at slowing descent, but it certainly does slow down the inevitable crash and ultimately a replaced flash tube!
Attaching your lights
The stands are equipped with a 5/8″ top stud with a 3/8″ threaded, plus a removable 1/4″-20 threaded top, this lets you mount a whole raft of lighting gear, as well as Sony ActionCam / GoPro mounts (The 1/4 20″ adaptor) which I like to use often on a shoot, or just to pop a camera up high for some reason or other – you can attach a regular ball head and mount your camera on that.
Bottom line
I’ve had these stands a few months now and have had many chances to use them and abuse them. They pack away well, they’re all the things I was after in a light stand. I can’t fault these stands and for the price, I’d say they’re one of the best on the market and well worth your hard earned coin. Five stars.
googletag.cmd.push(function() {
tablet_slots.push( googletag.defineSlot( “/1005424/_dPSv4_tab-all-article-bottom_(300×250)”, [300, 250], “pb-ad-78623” ).addService( googletag.pubads() ) ); } );
googletag.cmd.push(function() {
mobile_slots.push( googletag.defineSlot( “/1005424/_dPSv4_mob-all-article-bottom_(300×250)”, [300, 250], “pb-ad-78158” ).addService( googletag.pubads() ) ); } );
The post Quick Review of the Kupo Click Stackable Light Stand by Sime appeared first on Digital Photography School.
You must be logged in to post a comment.