RSS
 

Posts Tagged ‘Softbox’

Flash Softbox Diffuser Review

27 Apr

The post Flash Softbox Diffuser Review appeared first on Digital Photography School. It was authored by Jackie Lamas.

flash-softbox-diffuser-review

In this article, we’re reviewing this budget-friendly flash softbox diffuser that fits over your external flash so that you too can have a great tool to add to your camera bag.

Flash Softbox Diffuser Review
The softbox diffuser only works for flashes with a larger head. The smaller Polaroid flash wasn’t compatible.

About the flash softbox diffuser

While the diffuser that comes with most external flashes gets the job done, this attachable softbox will work much better to spread light more evenly and create a softer light source for your portraits or other types of photography.

The softbox has no poles to assemble or extra equipment that might get lost in transport or by using it. It folds out, and you can straighten it into shape by simply using your hands. This is a plus when it comes to setting up and tearing down, which saves you much time and not having to worry about fiddling with assembly parts.

Flash Softbox Diffuser Review
The flash softbox diffuser attaches to your flash and you can use it on a stand or on your camera. 1/80 of a second, f4.5, ISo 400

The flash diffuser softbox comes with a case and holding strap. This allows you to attach it to your bag without any extra attachments or worrying about bending it while using it.

Flash Softbox Diffuser Review
The flash softbox diffuser comes with a handy bag. 1/100 of second, f/4.5, ISO 400

At Although the material the softbox is made out of is a clear indicator that it won’t stand up to longterm wear and tear, the softbox, measuring at 30cm length and 20 cm wide, it does what it’s supposed to diffuse and spread evenly the light of your external flash.

On camera, it adds nothing to the weight of your camera. It stays in place by using an elastic band that wraps around the flash head and is secured by a strip of Velcro.

Flash Softbox Diffuser Review
The flash softbox diffuser has a simple and easy opening for the flash head to place the flash head in. 1/125 of a second, f/4.5, ISO 400

On the inside, the flash diffuser softbox has a silver lining to help bounce light back out. It also has an added diffuser that crosses the front of the flash that is secured by Velcro. This can be useful in situations where you need softer light.

Flash Softbox Diffuser Review
There is an added diffuser inside the softbox too. 1/125 of a second, f/4.5, ISO 400

The universal size makes it perfect for one-light portraits, tabletop and product photography, and using it on or off your camera.

Flash Softbox Diffuser Review
1/160 of a second, f/7.1, ISO 400

Main features

  • The size and weight make it easy to set up and use.
  • No additional hardware or accessories needed with the Velcro closure.
  • It’s universal and fits most models of external flashes.
  • Additional diffuser inside of the softbox.
  • You can use it on-camera or off-camera.
  • Budget-friendly costing no more than US$ 10 dollars.

Ease of use

The soft box is really simple to use. It comes in its own zippered pouch ready to use right away as it easily unfolds. With a little pull, it shapes into the flash softbox diffuser you see in the photos.

Flash Softbox Diffuser Review
1/200 of a second, f/5.6, ISO 100 Flash at 1/8 power.

It has no wires, poles, or additional hardware making it really easy to set up and use on the go, in a studio, or anywhere your flash goes.

Does it really work?

Flash Softbox Diffuser Review
The first image has the flash pointed directly at the subject. The second photo is with the flash softbox diffuser. The third image is with the additional diffuser inside of the softbox. Taken at 1/60 of a second at f/5.6 with an ISO of 400.

Using the flash softbox diffuser for your flash is really easy, given that it simply pops out and attaches quickly.

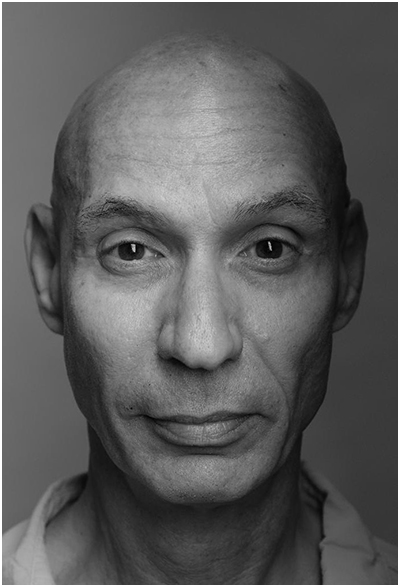
You can notice how the light gets softer just by adding the softbox to your flash. It goes further in softening the light with the additional white diffuser strip that is inside of the softbox.

Flash Softbox Diffuser Review
In the catchlights, you can see where the softbox is positioned. 1/125 of a second, f/5.6, ISO 125 with flash at 1/8th power angled down at the subject.

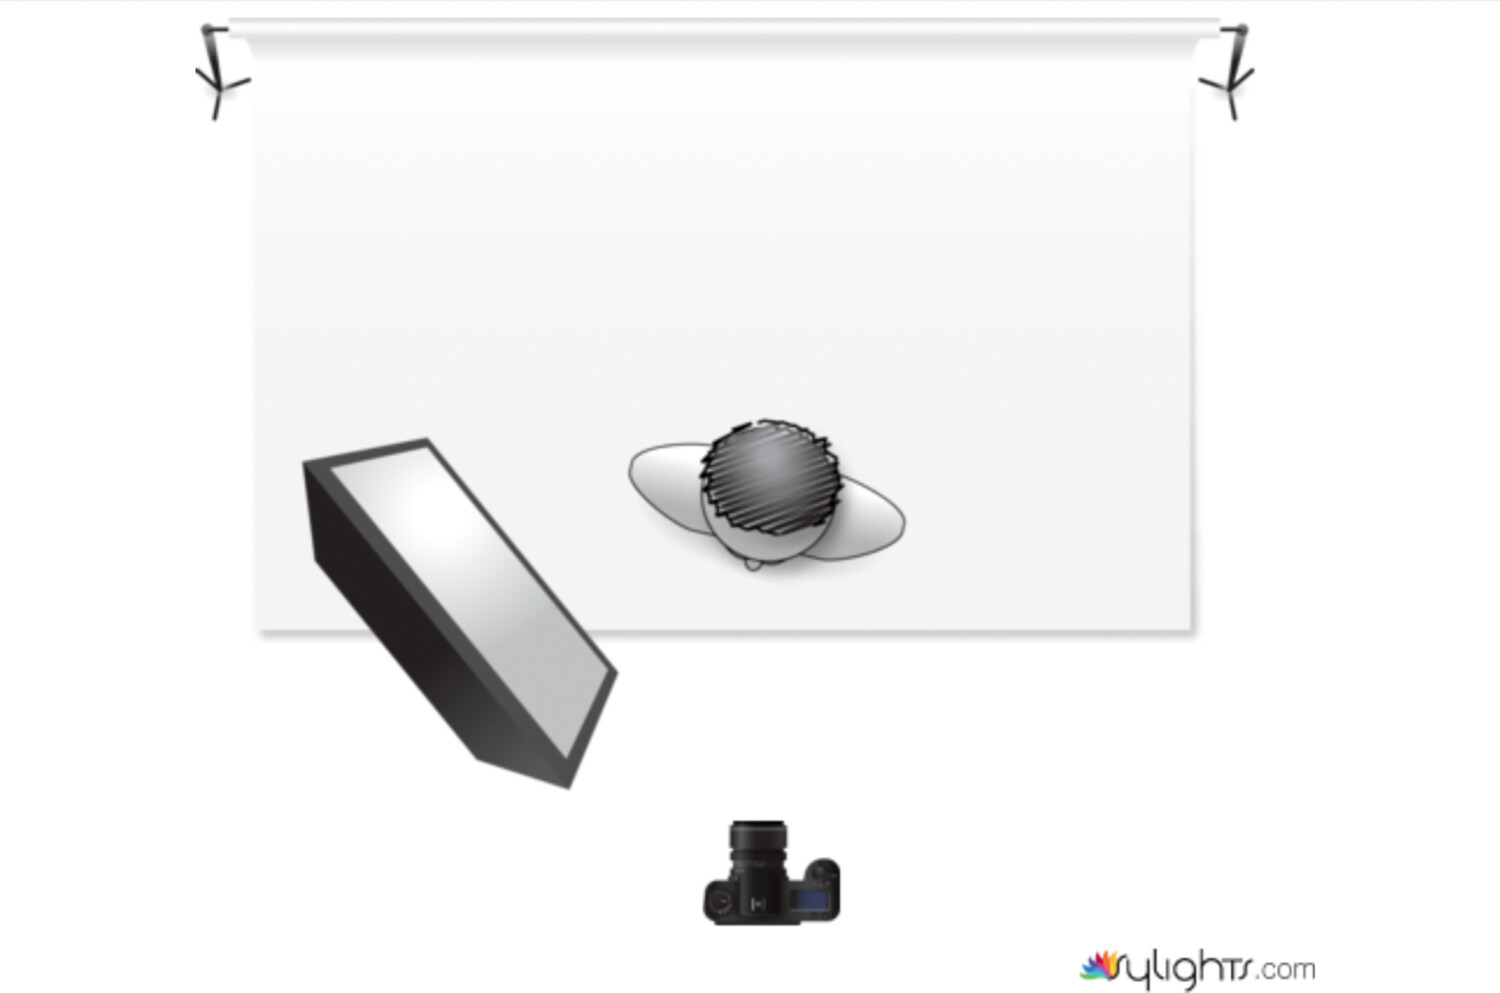
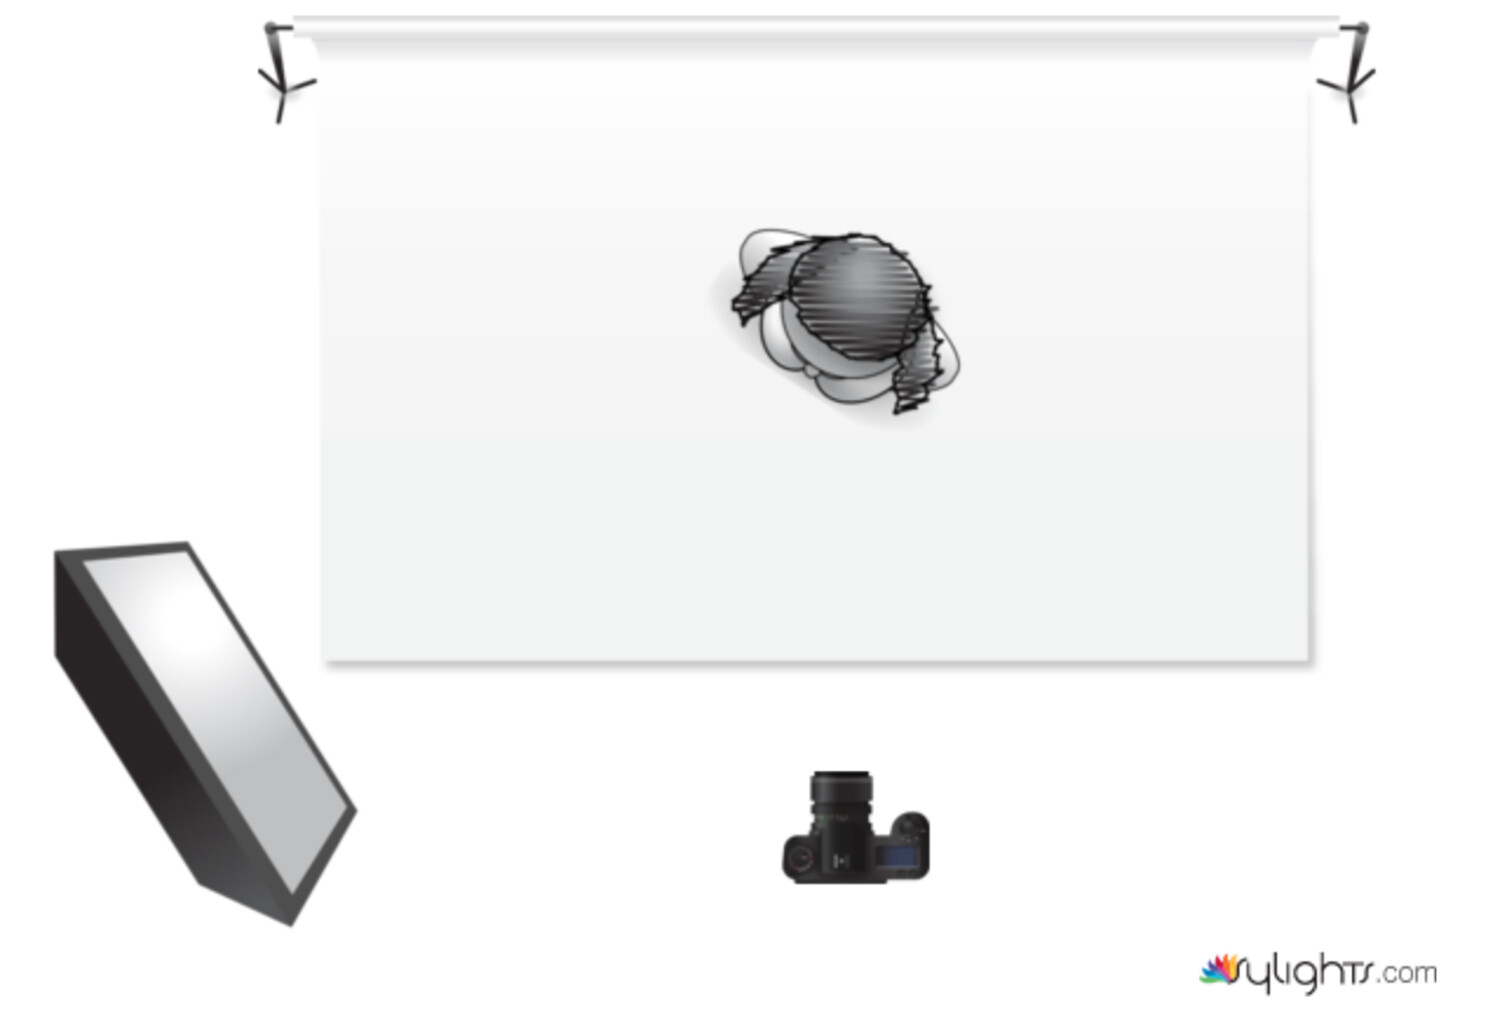
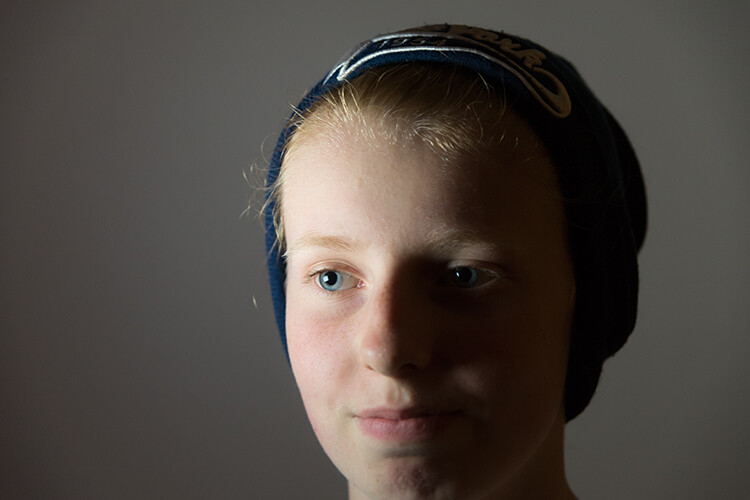
In the images above and below, I angled the flash down at my model in a small bathroom. Using the flash softbox diffuser allowed me to be in a small space and use directional light on the subject without it being too harsh or creating undesired shadows.

Flash Softbox Diffuser Review
1/125 of a second, f/5.6, ISO 125 with flash at 1/8th power angled down at the subject.

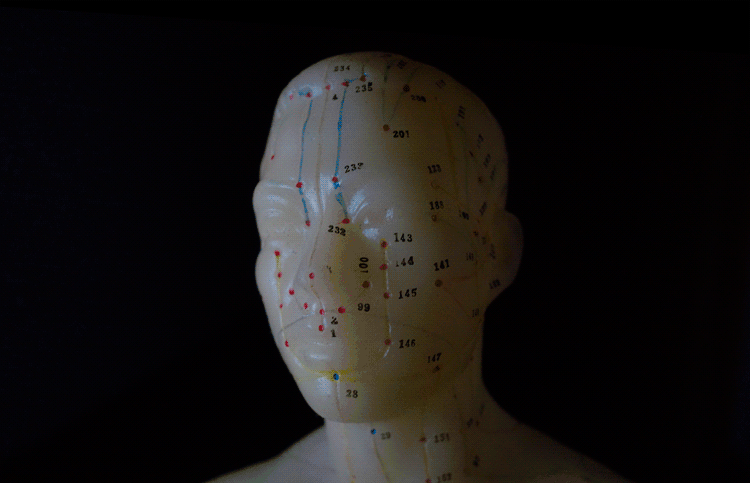
In the following images, I placed the subject in harsh sunlight to see how the softbox would fill in shadows or otherwise light the subject.

Flash Softbox Diffuser Review
Without the diffuser, with the softbox, with the extra diffuser inside the softbox. 1/100 of a second, f/8.0, ISO 100

For these photos, I directed the flash straight onto the doll without the diffuser. The middle image is with the softbox diffuser on, and the third image is with the softbox diffuser and the added diffuser inside.

Flash Softbox Diffuser Review
1/100 of a second, f/8.0, ISO 100 with flash at 1/8 power with softbox diffuser on flash off-camera.

You can see a big difference in how the light from the flash got softer. These are not retouched and straight out of the camera.

Flash Softbox Diffuser Review
Flash power at 1/16th power with the flash softbox diffuser. 1/200th, f/7.1 ISO 400.

Here I used the flash at 1/16th power to fill in the shadows on the child. I also got really nice catchlights in his eyes that make the portraits pop a little bit more. The flash softens the catchlights making them appear more natural like a big window.

Flash Softbox Diffuser Review

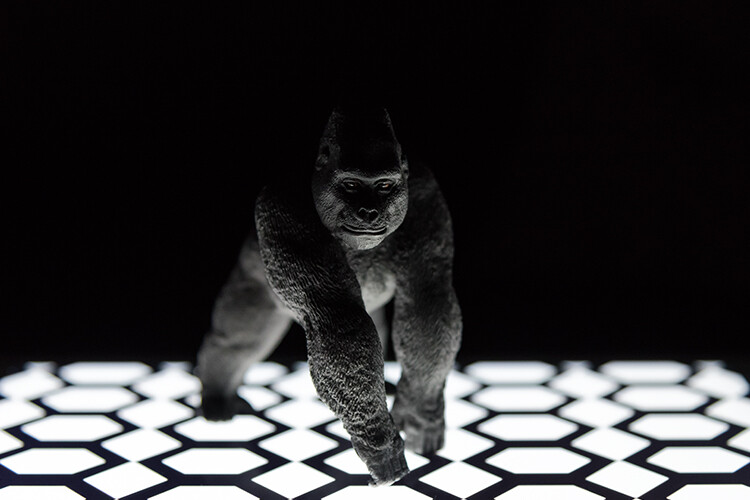
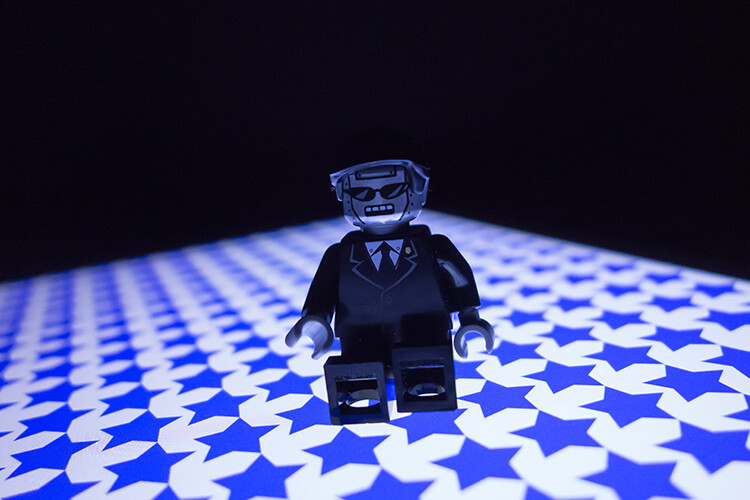
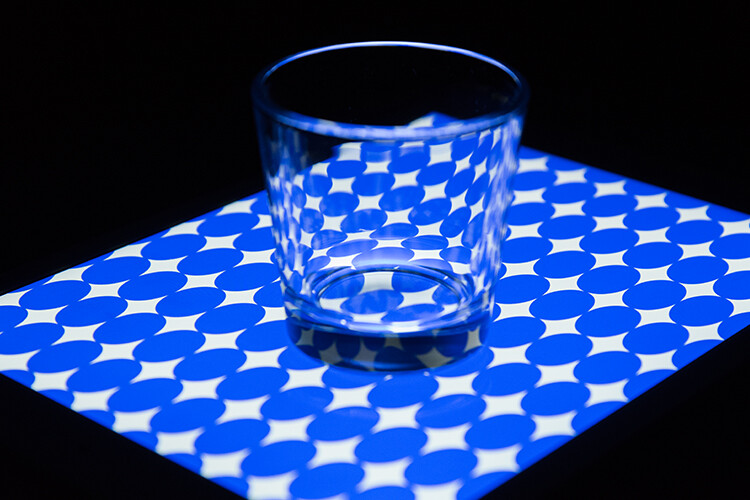
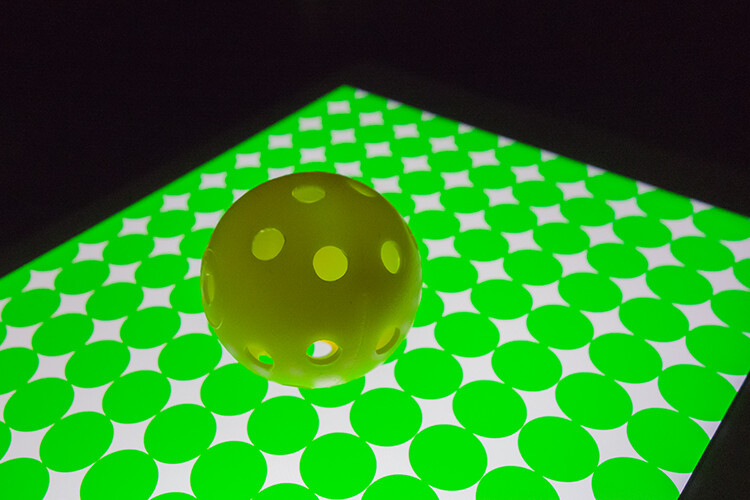
Using the flash in darker lighting situations also proves effective. I photographed the toy in a dark room and used the flash off-camera and on-camera.

Flash Softbox Diffuser Review
1/200 of a second, f/8.0, ISO 160 flash was set to ETTL.

Pros

  • Easy to set up and to use. The softbox works, does its job well, and has an added diffuser inside to help soften the light more if needed.
  • It’s really affordable, lightweight, and convenient to transport and use on-location.
  • It does the job of softening the light. Most of the control is either in the flash or in the camera settings.
  • Fits most flash systems due to the universal build.
  • Folds flat and comes with a pouch.

Cons

  • The material on the outside is a little cheap.
  • The size means it’s not going to give you a large light source so you’ll get some fall off if you’re photographing larger groups.

Who is this flash softbox diffuser for?

This flash softbox diffuser is perfect for someone who is just getting into flash photography and learning about how to control and modify light. It is for someone who perhaps doesn’t have a lot of space to set up a full studio with bigger strobes or flash systems.

Flash Softbox Diffuser Review
1/200 of a second, f/5.6, ISO 100

Being that the diffuser is lightweight and can be taken outdoors, it is also perfect for the photographer who shoots outside a lot. For example, on the beach, macro photography to get close to the subjects, or someone who shoots tabletop and still life.

It’s perfect for the photographer who likes to keep their equipment simple and light when shooting or traveling.

The flash softbox diffuser would also be a perfect addition for a tabletop and product photographer who shoots in small spaces or travels for shoots.

Final verdict

The flash softbox diffuser works as is expected and does soften the harsh light the external flashes sometimes gives.

While the material the flash softbox is made from isn’t too convincing of its longevity, it is a great starter light modifier to help photographers control and soften lights for portraits.

Flash Softbox Diffuser Review

It is rather small in terms of size, which is a good thing and a bad thing. If you’re looking for something lightweight and portable, this is a good buy. However, the size limits the spread of light, then again perhaps with more flashes it could give a better effect.

Flash Softbox Diffuser Review
1/150 of a second at f/2.2, ISO 125, flash output power at 1/16 power.

For the price, at less than $ 10, it is an interesting purchase to play with and experiment without making a major investment.

The softbox diffuser would be more ideal for tabletop and product photography given the size.

Flash Softbox Diffuser Review
1/160 of a second, f/7.1, ISO 400 with flash a 1/16 power.

Either way, it’s a fun accessory to add to your bag in the event you are starting to experiment with flash and light modifiers. And you can’t beat the price!

The post Flash Softbox Diffuser Review appeared first on Digital Photography School. It was authored by Jackie Lamas.


Digital Photography School

 
Comments Off on Flash Softbox Diffuser Review

Posted in Photography


Elinchrom launches new Rotagrid accessory for its signature Rotalux softbox line

25 Oct

Elinchrom has unveiled Rotagrids, a new lineup of add-on grids designed specifically for the company’s Rotalux softboxes. As is the case for most every grid modifier, the Rotagrid accessories create a more direct light for greater control while also minimizing light spill.

The Rotagrid attachments offer 30-degree beam angle grids and are made from what Elinchrom describes as a lightweight but durable fabric that will hold its shape over time. The grid uses hook and loop fasteners to attach to the front of Rotalux softboxes and can be stored in a pouch when not in use.

Elinchrom is offering the Rotagrid modifiers in every shape and size for the Rotalux softbox line, including the Octa, Square, Strip and other shapes. Prices vary based on the model; the smaller 35 x 100cm (14 x 35in) Rotagrid Strip, for example, is priced at $ 79 / €69, whereas the large Rotagrid Octa 135cm (69in) is priced at $ 249 / €199.

Articles: Digital Photography Review (dpreview.com)

 
Comments Off on Elinchrom launches new Rotagrid accessory for its signature Rotalux softbox line

Posted in Uncategorized


How to Make a DIY Photography Softbox [video]

07 Jun

The post How to Make a DIY Photography Softbox appeared first on Digital Photography School. It was authored by Caz Nowaczyk.

In this video by DIY FixMan, you’ll learn a cool, easy way to make a DIY photography softbox!

Materials and tools

What you will need to make your own DIY Photography Softbox:

  • A lamp
  • A cardboard box
  • Knife
  • Hot glue
  • Aluminum foil
  • Spray Paint (optional)
  • an hour of your time

Steps to making your DIY Photography Softbox

  1. Cut out your cardboard to a size that will fit your lamp.
  2. Ensure you cut the angles of the sides so they are the same so that they will piece together.
  3. Get your foil and cut it to the size of your cardboard pieces (use your cardboard as a template to trace around.
  4. Attach your foil to the individual pieces of cardboard. Masking tape works fine for this.
  5. Attach one of the longest sides to a short side using the hot glue gun. Then attach the other sides – holding in place until set.
  6. Once set, take your lightbox frame to a well-ventilated area and use your spray paint to paint it.
  7. Once dry, fix in your long lamp.
  8. Attach to a stand using a bracket.

Editors Note: You could also cut a piece of white material and attach it to the front of the softbox with velcro so you can diffuse the light.


You may also find the following helpful:

  • Try this DIY Neutral Density Filter for Long Exposure Photos
  • DIY Photography Backlighting for Beginners
  • How to Make a DIY Lens Hood to Eliminate Lens Flare
  • How to Make Easy and Affordable DIY Food Photography Backdrops
  • How to Make Your Own DIY Light Box with Tape, Paper and a Window


The post How to Make a DIY Photography Softbox appeared first on Digital Photography School. It was authored by Caz Nowaczyk.


Digital Photography School

 
Comments Off on How to Make a DIY Photography Softbox [video]

Posted in Photography


Review: Pixapro 105cm 16-Sided Easy-Open Rice-Bowl Softbox

01 May

The post Review: Pixapro 105cm 16-Sided Easy-Open Rice-Bowl Softbox appeared first on Digital Photography School. It was authored by John McIntire.

Studio photographers, and other users of off-camera flash, are living through a bit of a renaissance. New, innovative and (maybe most importantly) affordable lights and modifiers are popping up all the time – and a lot of them are fantastic. One of the companies that is at the forefront of this movement is Godox.

The Rice Bowl is a large softbox with an unusual shape.

It seems that every time you turn around, there’s something new being released. Enter the Pixapro 105cm (41.34″) 16-Sided Easy-Open Rice-Bowl Softbox (Say that five times fast). Pixapro is Godox rebranded for the UK market. As soon as I saw this thing, I was entranced. Not only is it massive, but its shape means that it’s almost perfectly round (for all intents and purposes) and, as such, will shape light quite differently to your bog standard rectangular softboxes and octaboxes. I bought it and as this review will show you, it was not a mistake.

What is it?

To simplify it, the Rice Bowl is a large umbrella softbox. It’s called an umbrella softbox because it opens like an umbrella, but functions as a softbox thanks to two layers of diffusion material that cover the front. The reason this is a big deal, is that it takes away the massive pain that is putting together and pulling apart standard softboxes. I have more than a few that I’ve put together and then vowed that they would stay that way until the end of time. With the Rice Bowl, all you have to do is pull on the metal rod and open it up like an umbrella and screw the reflector plate into place. It takes seconds.

While the shape of an umbrella, the two layers of diffusion make the Rice Bowl an effective and portable softbox.

As mentioned, the shape of the Rice Bowl also sets it apart from it’s cousins. Because it’s 16 sided (That’s called a hexadecagon by the way. If you want to call it a hexadecabox, I won’t judge you if you don’t judge me), it almost appears completely round. This means that the way it shapes the light and wraps it around your subject is quite different to other softboxes, which can provide you with another tool in your lighting kit.

Pros

The Rice-Bowl softbox does do a few things well.

Size

The Rice Bowl is massive which makes the quality of light it produces wonderful for portraiture.

Here, the Rice Bowl is compared to 22″ beauty dish.

At over 41″ (that’s just under four feet), the rice-bowl is a massive modifier that still packs away in a portable package. Sure, there’s always giant octaboxes and parabolic umbrellas for when you need really soft light, but they don’t pack away anywhere near this easy. For fans of large modifiers, this means two things:

  • Once your done with it, you can pack it away and store it neatly with ease.
  • It travels well and is quite light, so it shouldn’t weigh you down in normal circumstances. I probably wouldn’t hike several miles to a location with it, but short distances should be just fine.

Shape

The 16 sides of the Rice Bowl make it almost perfectly round, which will shape the light differently to rectangular and square softboxes.

The Rice Bowl’s unique hexadecagon shape gives you a rounder source of light than your traditional softbox. The light it produces is gorgeous and soft and ideal for all kinds of portrait lighting. If you have a thing against square and rectangular catchlights, then this might be the modifier for you.

Easy to setup

Setting up the Rice Bowl is dead easy. Just pop it open, secure the reflector into place and attach the two layers of diffusion to the velcro.

As mentioned, setting up the rice bowl is as easy as opening an umbrella. Beyond that, you have to screw on a bit at the end of the rod to keep it secure and attach the diffusion panels. It doesn’t take very long. Add to that that there’s no awkward loose rods to bend and manhandle into place and nothing to pop out with great force and hit you in the eye. The Rice Bowl is a real treat.

Carry bag included

Not only does the Rice Bowl come with a convenient carry bag, but it also fits back into it with ease.

Since it’s well suited to location, it should be no surprise that the Rice Bowl comes in it’s own carry bag. An extra bonus here, is that unlike other modifiers that collapse, once it’s out of the bag, it’s easy enough to get back in and it still fits.

Price

At a price of $ 110, this thing is fairly cheap. Massive modifiers (especially ones this well made) usually come at a massive price. Just compare the Rice Bowl to any offering from Elinchrome and Broncolor if you’re in any doubt.

Adaptability

Because I am invested in the Bowens system (RIP), I opted for the S-mount. Pixapro offer mounts for just about any system that you could want.

Pixapro sell the Rice Bowl with just about any mount you want, so no matter your preferred lighting system, you should have no problem using this modifier.

Cons

Perhaps nothing can be too perfect, and that is the case with the Rice Bowl. Fortunately, the list of cons is a short one.

Depth

Because of its shape, when it’s mounted on a normal light stand, you cannot get much of a downward angle with the Rice Bowl.

In terms of the light it produces, the depth and shape of the Rice Bowl is fine. Where it lets it down is when it’s on a light stand. Because it’s so deep and large, when it’s on a normal light stand you can’t point it in a downward angle very easily. This is quite limiting when it comes to designing your lighting with it. Certain lighting patterns like butterfly lighting will become a challenge.

To get around this, you’ll need to buy (or already own) a light stand with a boom arm. This isn’t that big of a deal, but if you want to get the very most out of the Rice Bowl, you may have to be prepared to make other purchases.

To get the absolute most out of the Rice Bowl, you will want to have a boom arm to ensure that you can place it at any angle that you want.

That one screwy bit

The screw that secures the reflector into place is small and easy to lose.

Remember I mentioned that you had to screw a bit of metal on to secure the Rice Bowl once it’s setup? That one piece is very small and very easy to lose. I’m keeping a very close eye on mine.

Examples

At the end of the day, I can talk about the Pixapro 105cm Rice Bowl Softbox all I want, but what really matters is the proof. Here’s a few examples of what the Rice Bowl can produce in the studio.

That’s it

At the end of the day, I love this thing. Not only does it produce gorgeous light that is flattering to a whole host of subjects, it is light, easy to set up and just a pleasure to use. I would definitely recommend the Rice Bowl to any photographer who wants to add something else to their lighting kit. If you think the 105cm version might be a bit big for you, Pixapro do make a smaller version that comes in at 65cm for $ 90.


The post Review: Pixapro 105cm 16-Sided Easy-Open Rice-Bowl Softbox appeared first on Digital Photography School. It was authored by John McIntire.


Digital Photography School

 
Comments Off on Review: Pixapro 105cm 16-Sided Easy-Open Rice-Bowl Softbox

Posted in Photography


A Love Letter to the Humble Softbox

08 Oct

When it comes to shaping and modifying your light, there are so many options available it can be hard to stay in one place for long. In the beginning, you’ll use the basics such as a softbox or an umbrella. But as you get comfortable with noticing the tiny differences in light, you’ll quickly graduate to more specialized modifiers. Beauty dishes, reflectors (the kind that fits to a strobe), octaboxes and striplights all do wonderful things to your light. And you can easily get caught up in the ways these and other modifiers can be used.

Overlooked

Despite all these options, I feel the basics can sometimes be overlooked. Have you ever stopped to think why the humble softbox has become so universal? No doubt there are many answers to that question, but an important one is that it works – and works well.

To be clear, I’m talking about the basic rectangular photographic softbox around 3′ x 4′. Not too large, and not too small. (Popup softboxes have their place, but we’re not talking about them in this article.) With the right techniques, these workhorses of the photographic studio can give you beautiful, soft light that suits just about any subject you can think of.

Basics

You probably already know the basics of how a softbox works. But for the sake of posterity, let’s go through it again.

A softbox is mounted on the front of the strobe to shape and more evenly distribute the light. They’re often fitted with silvery material on the inside to help bounce the light around and ensure it spreads evenly through the diffusion material at the front. This diffusion material effectively becomes your light source. Because your light source is now much bigger than the bare strobe, the quality of light changes from hard to soft (hence the name ‘softbox’).

Manipulating the quality of the light gives you much more flattering light for almost any subject, especially portraits.

Never Forgotten

For these reasons a great deal of photographers start their camera lighting with a softbox. They’re cheap, easy to find and use, and provide excellent results. But as their skills increase, and new and more complicated techniques open up, it can be hard to resist the allure of fancy, niche modifiers.

For a few years I used nothing but a beauty dish. Even now I tend to favor large octaboxes for portraits. But in this article I want to show you that just because you’ve moved on to other things doesn’t mean you should forget the basics. As I said, there’s a reason the softbox has become so universal.

Examples

Here are several examples of what you can achieve with a simple 3′ x 4′ softbox that cost around $ 35.

Note: As you’ll see in the annotations, for some of these shots a 5-in-1 reflector ($ 15) was also used.

1.

In this example, the softbox is directly in front of and offset slightly from the subject. This results in a lighting pattern called ‘loop lighting’. Because the light source is so close, the resulting soft light is ideal for portraits.

2.

Like the previous example, the softbox for this image is really close to the subject. But this time, it’s placed at 45 degrees and slightly above. Look at the catchlights in his eyes, and you can see exactly how close the light source is. Again, the light here is really soft, and you can see this quality in the smooth tonal transitions from the highlight areas to the shadow areas.

3.

This setup is almost the same as the previous setup, except the softbox is slightly further away and there’s a white reflector at camera right.

Placing the light further away reduces the speed of the light falloff, which in this case means that the shadows don’t dominate as quickly as in the previous example. The reflector also helps with this.

4.

Medium-sized softboxes are well suited to clamshell-styled setups. Simply place your softbox directly in front of and above your subject, pointed down at 45 degrees. Then place a reflector underneath and pointed upwards at 45 degrees. (Without a reflector this would be called ‘butterfly lighting’.)

5.

Softboxes can be used to great dramatic effect when used as side lighting. Deep shadows and soft highlights can really add a lot of depth to your images.

6.

The previous examples all had the softbox in close for the softest possible light. You can also pull your light source back to make use of harder light to good effect. But pay close attention to the clearer transitions between the shadow and highlight areas.

The End

I’m not telling you to limit yourself to a softbox. By all means, go out and use and explore every modifier you can get your hands on. Just remember that as you’re planning your lighting for any given situation, sometimes the ease and simplicity of the basics might give you the results you need.

The post A Love Letter to the Humble Softbox appeared first on Digital Photography School.


Digital Photography School

 
Comments Off on A Love Letter to the Humble Softbox

Posted in Photography


SLC-OE-03: How to Choose a Softbox for your Speedlights

23 Aug

Umbrellas are a great first light mod: cheap, easy to use, easy to transport. But softboxes can give you more control, both in the beam's edge and with reduced light leakage. The photo above was shot with a single speedlight and a small softbox.

Today we'll look at how to choose a softbox that will marry well with your speedlight, and do so without spending a lot of money.

Read more »
Strobist

 
Comments Off on SLC-OE-03: How to Choose a Softbox for your Speedlights

Posted in Photography


MagnetMod launches Kickstarter for new ‘revolutionary’ softbox system

27 Jun

MagnetMod has launched a new crowdfunding campaign for a trio of new products that makes up what it calls a ‘revolutionary new softbox system,’ The three new products are the MagShoe, MagRing and MagBox and as the naming scheme suggests, these products are made to work together to create an easy-to-use studio setup on the go.

The first piece of the puzzle is the MagRing. Designed to simplify softbox setup times, the MagRing is a magnet-based speedring that lets you mount one or two speedlights to a tripod in a matter of seconds. The MagRing is constructed of a metal base with two locking plastic doors to keep your speedlight(s) in place.

Next up is the MagBox, ‘the world’s first magnetic softbox,’ according to MagnetMod. Hyperbole aside, the MagBox is a 24-inch octabox that includes a built-in gel holder, a zipper for easily swapping out gels, and a unique set of diffusers to help you get just the look you’re going for.

Specifically, the MagBox includes a standard cloth diffusion panel that you’d find inside most soft boxes. However, it also includes what MagnetMod calls the FocusDiffuser. This internal diffuser is designed in such a way that it supposedly recreates the look of a gridded softbox or beauty dish without the light loss you’d get actually using a grid. Based on the GIF below, it appears to work as advertised.

If you’re worried about magnets being the only thing holding the MagBox to the MagRing, there’s not much reason for concern. As MagnetMod shows, the hold is strong enough that a small ‘Magnetic Field Disrupter’ is needed to release the MagBox from the MagRing. In the words of MagnetMod, ‘even if you tilt your softbox at a deep angle or (for some reason) shoot inside a wind tunnel, the MagBox and the MagRing are staying put.’

The last of the three new products is the MagShoe, ‘the baller coldshoe of the future.’ This redesigned coldshe attachment improves upon traditional mounts in almost every way imaginable. Speedlights lock into place with a simple twist of a lever and a squeeze trigger makes it easy to tilt back and forth to get the angle you want. It even has a built-in hole for mounting an umbrella.

As will all of MagnetMod’s past Kickstarter campaigns, this new trio of products has surpassed its $ 100,000 goal with 57 days to go. Pledges start at $ 49, which will get you a single MagShoe, and go up from there. To find out more and secure your pledge, head on over to the Kickstarter campaign.

Articles: Digital Photography Review (dpreview.com)

 
Comments Off on MagnetMod launches Kickstarter for new ‘revolutionary’ softbox system

Posted in Uncategorized


How to Use a Small Softbox With Your Flash to Transform Your Portraits

26 Aug

Typically I prefer to carry minimal photographic equipment when I am out to make a series of photos or portraits. If I’m on assignment for a client or creating new stock photos I will take more gear with me so as to better cover any challenging situations that may arise. One of my favorite accessories I have come to rely on is a small collapsible softbox for my flash.

How to Use a Small Softbox With Your Flash to Transform Your Portraits

Day time use of a small softbox can help to even out shadows on your model’s face.

Unmodified flash tends to be pretty harsh. A strong burst from a small light source produces some ugly shadows and extreme highlights. Whether your flash is on or off camera if the light is direct and unfiltered the results you see will be unnatural looking. I’ve experimented some with various small flash modifiers and not found any that produce pleasing light, mostly because of their size. They are too small to produce a reasonably even, soft light.

Pop-up Softbox

My pop-up softbox is just 60cm (about 2 feet) square, lightweight, and very portable. Having someone to assist with it is helpful, so it can be easily positioned just where you want, but I have often used it on location mounted on a light stand. Placing the flash in the mouth of the softbox effectively increases the output size of the light and softens it with two nylon diffusers. The light from your flash will be scattered, resulting in softer shadows and reduced highlights.

Night Portraits

How to Use a Small Softbox With Your Flash to Transform Your Portraits

Adding a soft light to night time portraits can create evenly lit photographs.

Photographing portraits at night can be challenging, especially if you have to rely on available light. Adding a light source you have some control over, will make night portraiture a much more enjoyable experience. Often at night, available light sources will not provide a pleasant, even light for your subject and direct flash will produce unflattering results. Using a softbox to spread and soften the light will avoid hard edged shadows and blown out highlights.

Often at night, available light sources will not provide a pleasant, even light for your subject and direct flash will produce unflattering results. Using a softbox to spread and soften the light will avoid hard edged shadows and blown out highlights.

Indoor Portraits

Looking down at a woman standing next to traditional northern Thai sausages at a market. How To Use A Small Soft Box With Your Flash To Transform Your Portraiture

Adding a soft light to one side of my model has helped brighten up the scene.

Likewise, when photographing indoors and relying on available light, it can be challenging to achieve pleasing results. By adding a soft light to your subject you are able to create natural looking images.

The slightly larger surface of the softbox throws light over a wider area so more of your subject is affected and also some of the surroundings will benefit from a little more illumination.

How to Use a Small Softbox With Your Flash to Transform Your Portraits

Careful flash output and exposure setting have enabled me to capture this traditional Thai new year blessing activity effectively.

Outdoor Daytime Portraits

Outdoors, during the day, is when I enjoy using this softbox the most. Having an additional light source that’s powerful enough without being too harsh can help you make portraits that look natural. Being able to reduce shadows by adding a soft fill light will produce a much more flattering result than if you are using an unmodified flash or relying only on available light.

Balance is the Key

I have found manually setting my flash output gives more consistent results than setting it on TTL or other automatic settings. Being in control of the output will allow you to balance the nice soft light from the softbox with the available light. This is important if you want to produce natural looking photos. If your flash produces too much or too little light it will overpower the ambient light or have little to no effect.

I used to use an external light meter to measure the ambient light and then set my flash so it was producing an equivalent output. Now it’s easy enough to just use the information your digital camera provides on the screen, the histogram and blinkies. With a little trial and error, it does not take long to find a setting that gives you a good exposure.

Asian woman taking a photograph - How To Use A Small Soft Box With Your Flash To Transform Your Portraiture

Using the flash and softbox to balance the back lit subject with just the right amount of filtered light.

Light Position and Background

At times you might want to balance the flash so that the background remains very bright and your subject is still pleasantly lit. Dialing in the flash output to slightly less than the value of the background illumination will achieve this when your camera’s exposure is set for your model’s skin, (which is being lit by your flash).

Think of your softened flash as a second light source. Position your model so the brightest ambient light source is behind them and place your softbox to one side in front of them. This can result in studio-like portraits. Again, in this situation, balance is the key. Too much or too little output from your flash will create an unbalanced light and an unnatural looking photograph.

How to Use a Small Softbox With Your Flash to Transform Your Portraits

Filling in with a strong, soft light when the light behind your subject is strong can provide very natural looking portraits.

The softbox was positioned to camera left for this shot.

Modify for Success!

Many of our students avoid using their flash, mostly because they have failed to achieve good results in the past. A small, direct light source is rarely going to provide pleasing light. Using a small softbox to modify the light from your flash and learning to balance that with the ambient light, will help transform your portraits.

As always, when you are trying some new technique with unfamiliar equipment make sure you can afford to make mistakes. Making mistakes is a great way to learn, but you don’t want to do that when you have someone relying on you for the photos. Practice when the only consequence of messing up is that you’ll learn from your experience and not let someone else down.

The post How to Use a Small Softbox With Your Flash to Transform Your Portraits by Kevin Landwer-Johan appeared first on Digital Photography School.


Digital Photography School

 
Comments Off on How to Use a Small Softbox With Your Flash to Transform Your Portraits

Posted in Photography


How to Use an iPad as a Softbox or Custom Background

30 Aug

What I really like about the iPad is the retina display screen; the quality of the images displayed on it is simply stunning. The brightness emitted from the screen is also quite powerful, so I was curious to see what apps are available in harnessing the light to aid photographers and see if the iPad can be used as a small softbox.

A glass tumbler shot on an iPad. I created the custom pattern using Photoshop.

For this article, I wanted to see how useful some of these apps on the iPad are for photographers. In particular, if you are only starting out in photography and you need to understand more about lighting. Or you are stuck in a hotel room, and you want to have a bit of fun experimenting with a light source.

Can an iPad be used as a Softbox? Or is it just an interesting alternative light source to explore your photography skills?

I will also demonstrate a simple step-by-step Photoshop tutorial on how to create simple pattern preset images for your iPad or tablet, that you can use as creative backgrounds for your shots.

If you are not interested in creating your own, you can simply download the free ones I’ve created specially for this article. Please click on the download button at the bottom.

What is a softbox?

A softbox is really only a light modifier, similar to an umbrella. However, a softbox controls the shape and direction of light more so than an umbrella does. A softbox has the flash (strobe) enclosed behind a diffuser, which prevents light-spill from occurring. They come in different shapes and sizes. The more common ones are square, rectangular and octagonal.

Softboxes also have the advantage of being able to produce natural-looking light by mimicking the shape of a window. As the name suggests, they produce a soft light for all types of shooting, be it food, product, portraiture, and so forth.

The regular size iPad has 9.7 inch (1536x2048px) display, and most softboxes range from small (12″) to quite large (four by six feet). This makes the iPad a very small softbox. A good rule of thumb is the bigger the light source relative to distance to the subject, the softer the light.

How to use a soft box?

A quick on search on iTunes and I came up with the following apps:

  • Photo Soft Box Pro HD – $ 2.99
  • Soft Box Color – FREE
  • SoftBox Pro for iPad – $ 2.99
  • Photo Light HD (SoftBox) – $ 1.99
  • Refboard – FREE (This app acts more like a board reflector)

As I can’t make the iPad bigger, I’m going to use the iPad as a softbox in four different ways:

Head shot using an iPad as a soft box

My daughter shot with an iPad I used the Photo Light HD (Softbox) app

As a main light source

The first method is using the iPad as my main light source. I had the iPad on a tripod, close to my daughter’s face. You do need to turn off all other light sources. Having the iPad on a tripod made it easier for me to direct my subject. I downloaded the Photo Light HD app to test it out.

photo-light-HD-app

The Photo Light HD (SoftBox) app comes with 24 preset pattern images.

preset-image-photo-light-HD-app

One of the preset images that comes with the Photo Light HD (Softbox) app

It comes with 24 preset images. I used the second one here (see above photo). I was also able to use my iPhone as a remote with this app. I wanted a more dramatic portrait, where half of her face is illuminated, and the other half falls off to darkness. I did bump up the ISO quite high, as I handheld my camera.

Tip: You can mount your camera on a tripod and reduce the ISO, which will also help reduce noise in your photos.

Of course you don’t have to download this app. You could try out the Refboard or Soft Box Color apps instead, which are both free.

color-softbox-app

The Soft Box Color app is free to download.

Set the background color to white. Use a willing subject or object, and experiment by moving the iPad nearer or closer. You will see how the light wraps around the subject. Pay attention to how the shadows appear and drop off. See animated gif below.

meridian-man

By moving the iPad nearer or further away from your subject. You can determine how soft or hard the light will be.

Monster lighting

The second method is called Monster Lighting. This is done by placing the main light directly underneath the subject. So I positioned a toy gorilla on the iPad, and displayed a patterned image that I created to add more drama to the photo.

toy-gorilla

Monster Lighting – where the light source is directly underneath the subject.

lego-figure-blue-stars-background

Another example of the Monster Light effect. The reflection of the pattern image highlighted just under the mouth of the Lego figure adds to the drama. I wish I could say that this was intentional but it was purely experimental.

In the photo of the Lego figure above, I used a different pattern. You can download this one for free along with two others. See the link at the bottom.

Colored patterns as a backdrop

For the third method, I used colored patterns on the iPad as an illuminated backdrop. I created my own in Photoshop, see the step-by-step tutorial below demonstrating how I created them. This is where you can get really creative, and have fun taking these types of shots.

By placing an ordinary tumbler on the iPad with a preset pattern image, you can get really interesting refractions in the glass. Experiment by moving your camera position slightly up or down, to find the angle that best suits your shot.

glass-tumbler-on-blue-circles-background

I love the way the pattern image is distorted by the glass.

I also shot this small plastic yellow ball, placed on another preset pattern of green circles, to create an abstract composition.

yellow-ball-on-green-circles-background

A small yellow plastic practice golf ball, shot on another custom pattern image on the iPad.

Create a silhouette

Creating a silhouette is simple to do. Use the Soft Box Color or the Refboard app, set to white. They are both free to download. Just make sure your brightness level on your iPad is set all the way to the right (brightest) in Settings. In the example below, I used a toy ostrich to create a silhouette.

ostrich

A toy Ostrich silhouetted against an iPad, using the Soft Box Color app, set to white.

Creating your own patterned images in Photoshop

In this quick Photoshop tutorial I will show how easy it is to make these patterned image,s by using the Step and Repeat technique in Photoshop.

Start by opening a new document 2048px by 1536px. You can ignore the DPI setting. This only matters when you want to print your images. You will be saving this file as a PNG format which discard pixel density. Our concern here is pixel dimensions. I’m going to leave the background as white. You can choose any color you want.

resolution-72dpi

In this example, I’m going to name the document “Circle Pattern” and click OK.

Make a shape

Click-and-hold on the Rectangle tool in the Toolbox and choose the Ellipse Tool from the menu. If you want a different shape, for example a star or diamond shape, you can select the Custom Shape Tool. There are many preset shapes to choose from.

ellispe-tool

Ellipse tool

Custom shapes

Custom shapes

Then, up in the Options Bar, make sure the Shape Layers icon is selected. Choose whatever fill color you want. For this tutorial, I chose Black (with no stroke).

Hold down the Shift key and draw out a circle. The Shift key keeps the aspect ratio 1:1. I chose 154px, but again choose whatever size circle you want. With the Move tool (shortcut V on the keyboard) place the circle in the very top left corner of the new document file. Have the Info Panel open. Go to Window>Info.

Duplicating your shape

Pressing CMD/CNTL+T on your keyboard brings up the Free Transform Tool. But instead, hold down the Alt key as well so: CMD/CNTL+Alt+T. This is the important step, move the cursor over the circle shape. The cursor becomes a black arrow head. Hold down the Shift key and move the duplicated circle shape over by 154px, or equal to the width of your circle or shape. Look at your info panel when moving the circle shape. Release and click on the commit transform button or press Enter. That is the “Step” part of this technique.

To repeat this shape, hold down CMD/CNTL+Alt+Shift+T again. Keep holding down CMD/CNTL+Alt+Shift while pressing T multiple times, to create a line of circles across the document. Make sure the last circle goes beyond the document boundary (off the edge).

In your layers panel, you’ll notice that we have only the one layer and not duplicated layers for each circle. To create a new line of circles. Hold down the Shift+Alt keys and drag down by 154px. Continue all the way down the document until you have a document full of circles. Now go over to the Layers panel and select all the layers and put them into a group folder.

Creating a custom pattern image using the Step and Repeat technique in Photoshop.

Creating a custom pattern image using the Step and Repeat technique in Photoshop.

select-layers

Select all your shape layers

select-layers-into-group

Make a group of all the shape layers

You can now use the Free Transform tool to hold to scale the shapes (CMD/CNTL+T ), so that they are all contained within the document boundaries to create a seamless pattern effect.

Go to File>Save for the Web. Choose PNG-8 for the file format and click Save. Another pop dialog box appears. Name your file and select the location on your computer and click Save.

save-as-a-png-8

You now have a pattern preset image to transfer to your iPad or tablet.

If you haven’t got Photoshop, feel free to download the preset images by downloading the ones I made below, enjoy (just right-click and choose “open link in new tab”, then right click and choose “Save Image As”).

green-circles

diamonds

blue-stars

Summary

Can an iPad be used for photography? Well not in the professional world. If you a beginner to photography and experimenting with artificial light for the first time, give it a try if you have an iPad or tablet. But I wouldn’t suggest going out to purchase an iPad for this reason only.

I am great believer in using whatever light source(s) are available, to explore different shooting techniques and styles. So if you don’t have an iPad/tablet or photography lights, why not experiment with just a flashlight or LED light!

Do you have an iPad/tablet? If so what photography apps have you used? Please leave your comments below.

googletag.cmd.push(function() {
tablet_slots.push( googletag.defineSlot( “/1005424/_dPSv4_tab-all-article-bottom_(300×250)”, [300, 250], “pb-ad-78623” ).addService( googletag.pubads() ) ); } );

googletag.cmd.push(function() {
mobile_slots.push( googletag.defineSlot( “/1005424/_dPSv4_mob-all-article-bottom_(300×250)”, [300, 250], “pb-ad-78158” ).addService( googletag.pubads() ) ); } );

The post How to Use an iPad as a Softbox or Custom Background by Sarah Hipwell appeared first on Digital Photography School.


Digital Photography School

 
Comments Off on How to Use an iPad as a Softbox or Custom Background

Posted in Photography


Broncolor launches range of softbox edge masks for rim light effect

26 May

$ (document).ready(function() { SampleGalleryV2({“containerId”:”embeddedSampleGallery_2696643628″,”galleryId”:”2696643628″,”isEmbeddedWidget”:true,”standalone”:false,”selectedImageIndex”:0,”startInCommentsView”:false,”isMobile”:false}) });

Swiss lighting brand broncolor has announced a range of diffuser panels for its softboxes that help to create a rim light effect when the subject is positioned in front of the softbox. The Edge Masks feature a large black panel in the center of the diffuser that prevents light from passing, but leaves strips all the way around the panel for the flash to pass through. The idea is that people posed in front of the panel will appear on a black background but highlighted with a rim of light all around them.

The panels are designed to replace the usual white diffuser of the softbox, which is removed when the Edge Mask is in place. The effect is relatively easy to achieve using any softbox and a panel of black material, but these are a bit more convenient and look more professional.

The company has also launched a 110cm parabolic umbrella that can be used to vary the focus of the reflected light. The umbrella has a particularly long arm that allows the light source to be placed at a range of distances from the reflective material.

The Edge Masks come in a range of sizes and are available now, as is the Focus 110 umbrella. The Edge Masks are priced from £42/$ 54 to £84/$ 113, while the umbrella costs £150/$ 210.

For more information visit the broncolor website.


Press release:

New Light Shaping Tools – Edge Masks & Focus 110

Hot on the heels of the new Siros L battery powered studio monobloc, broncolor have also released two brand new lights shaping tools – the Edge Mask diffuser and Focus 110 umbrella.

Edge Masks
Using the broncolor range of softboxes just became even more creative and flexible. The new Edge Mask helps turn the rectangular sizes of the softboxes in to a rim light, allowing for subjects to be photographed in-front of and against the softbox, with the light wrapping around the subject from behind. This is a popular technique previously only created by flagging off the softbox with a board, but the Edge Mask provides a professional, easy and uniform method for creating the effect. Simply attach the Edge Mask to your existing softbox as you would an external diffuser.

Focus 110
The new parabolic Focus 110 umbrella (110cm diameter) provides a quick an easy way of producing a focusable parabolic light effect. Simply pop it up and use the lamp heads umbrella holder to slide and focus the shaper.

Pricing and availability
The new Edge Masks and Focus 110 are ready and available to ship now!

33.612.00 – Edge Mask for Softbox 35 x 60 – £35 ex. VAT
33.613.00 – Edge Mask for Softbox 60 x 100 – £40 ex. VAT
33.614.00 – Edge Mask for Softbox 90 x 120 – £50 ex. VAT
33.615.00 – Edge Mask for Softbox 120 x 180 – £70 ex. VAT

33.576.00 – Focus 110 – £125 + VAT

Articles: Digital Photography Review (dpreview.com)

 
Comments Off on Broncolor launches range of softbox edge masks for rim light effect

Posted in Uncategorized