RSS
 

Posts Tagged ‘Situation’

How to Choose the Perfect Focus Mode For Every Situation

16 Jun

The post How to Choose the Perfect Focus Mode For Every Situation appeared first on Digital Photography School. It was authored by Jaymes Dempsey.

dps-how-to-choose-the-perfect-focus-mode

Do you struggle with choosing a focus mode? Do you want to know how to choose the perfect focus mode, every single time you pick up your camera?

You’ve come to the right place.

Because while it may seem to difficult to choose the best focus mode for the situation, there are a few guidelines you can use to ensure you nail focus, consistently.

Let’s dive right in.

little blue heron choosing a focus mode
Canon EF 400mm f5.6L USM lens | 400mm | f/6.3 | 1/1000s | ISO 200

The three key focus modes

Most cameras are equipped with three key focus modes:

AF-S, also known as One Shot.

AF-C, also known as Continuous, also known as AI Servo.

Manual (sometimes abbreviated as M).

Note that some cameras include an additional focus mode, known as AI Focus, also known as AF-A. But it’s a mode that I never use, and I certainly don’t recommend to others (it’s frequently finicky, and not very effective).

Instead, I suggest learning how to use the modes listed above, and you’ll do just fine!

So how do each of these key focus modes work?

Assuming that you use the shutter button to activate focusing:

When set to AF-S, your camera will acquire focus as soon as you half-press the shutter button. And that point of focus will lock until you let go of the shutter.

When set to AF-C, your camera will begin to acquire focus when you half-press the shutter button. But it will continue to refocus as your subject moves (or as your camera moves).

jumping person choosing a focus mode
AF-C is very helpful for tracking moving subjects, like the leaping girl in this image.
Canon EF-S 24mm f2.8 STM Lens | 24mm | f/5.6 | 1/800s | ISO 320

Note that you can tell a camera in AF-C to track a subject as it moves through the frame, or to continuously acquire focus at the center of the image, etc.

When set to manually focus, your camera won’t focus at all. You have to do all the focusing work via the focus ring on your lens.

Make sense?

So, to recap:

AF-S focuses and locks.

AF-C focuses and keeps focusing, potentially even tracking a subject as they move.

And manual leaves control over focus to you, the photographer.

But when should you use each of these focus modes?

Read on to find out!

When should you use your AF-S focus mode?

AF-S focus mode is my go-to, and the mode I use most frequently. When choosing a focus mode, AF-S is my first thought. And if you’re more of a still photographer (i.e., not an action/sports/wildlife shooter), I recommend you use AF-S mode all the time.

This is because it has so many applications, from landscape to street to portrait and more.

choosing a focus mode
I used AF-S to capture this simple image of a bike tire.
Canon EF 50mm f1.8 Lens | 50mm | f/1.8 | 1/320s | ISO 200

Basically, whenever you’re shooting a non-moving subject, AF-S is the way to go. You can set the focus point to the center of the frame, half-press the shutter button to lock focus, and then compose the shot however you like.

(This is often referred to as the focus and recompose technique.)

For instance, if you’re photographing a street scene, you can focus on a prominent element, such as an interesting poster. Then you can carefully compose the scene. And, as soon as all the elements come together (e.g., a person walks through in just the right place), you can take the shot!

I’m also a fan of using AF-S for handheld landscape photography. I’ll often find myself wanting to put elements off-center, so I’ll lock focus in AF-S, then shift the composition slightly.

tree at sunset
I used the focus and recompose method to capture this landscape shot at sunset.
Canon EF 100mm Macro f2.8L Lens | 100mm | f/8 | 1/1250s | ISO 200

And then, when I take the shot, it looks exactly the way I envisioned.

Really, AF-S is an extremely useful mode and the one I recommend you use it whenever you’re shooting a motionless scene.

When should you use your AF-C focus mode?

You should use AF-C focus mode whenever you’re shooting action.

ibis in the water choosing a focus mode
An action shot like this is a lot easier in AF-C!
400mm | f/7.1 | 1/1250s | ISO 200

You see, AF-C mode allows you to focus and refocus, or focus and track a subject as it moves throughout the frame.

This is invaluable when shooting sports, where players rarely stay still long enough to allow for easy focusing.

AF-C mode is also great for wildlife and bird photography because you’re frequently faced with fast-moving subjects at high magnifications.

And if you’re an insect photographer, you’ll also want to use AF-C mode, assuming you’re shooting an active subject such as a butterfly.

Even pet and street photographers can profit from using AF-C a lot of the time (though I recommend switching between AF-C and AF-S, depending on the situation).

dog image captured using AF-C mode
Animals tend to move fast, so AF-C can be a big benefit.
50mm | f/2.8 | 1/640s | ISO 200

You should also be aware that AF-C often offers quite a few useful AF Area Modes (which are mostly used for tracking). These allow you to specify whether a subject should be tracked at a single autofocus point, by a single point and nearby surrounding points, or across the entire frame.

So, bottom line:

If you’re choosing a focus mode when shooting action, pick AF-C.

sanderling in the water choosing a focus mode
400mm | f/7.1 | 1/1600s | ISO 200

When should you use your manual focus mode?

macro flower close-up in manual focus mode
100mm | f/3.5 | 1/320s | ISO 200

Manual focus is often a mode of last resort, and the one that you go to when AF-S and AF-C fail.

Manual focus is very, very slow. It can also be frustrating if you’ve not had much practice with it before. But it’s the only mode that is consistently accurate, no matter the lighting, and no matter the size or color of your subject.

You see, there are some situations where AF-C and AF-S just don’t work well.

  • When the light is low
  • When your subject is heavily backlit
  • When your subject includes very little contrast
  • When you’re working at very high magnifications
choosing a focus mode
The backlighting was causing my camera to struggle, so I switched to manual focus for this image!
50mm | f/2.8 | 1/1000s | ISO 200

Whenever you’re confronted by these situations, your autofocus will hunt like crazy.

Until you switch to manual, that is!

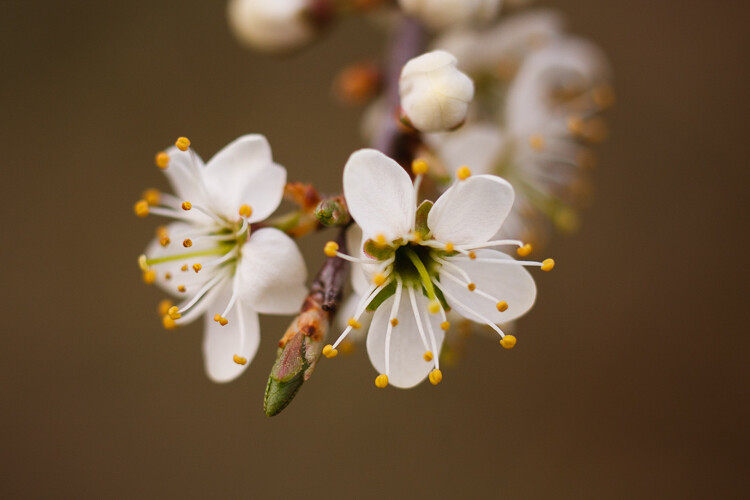
For instance, I do all of my macro photography in manual focus mode. My lenses just can’t handle focusing at such close distances.

dahlia close-up
Shots like this require manual focus; otherwise, I’d be there all day waiting for my lens to lock onto a petal!
100mm | f/2.8 | 1/250s | ISO 200

I also do still life photography while focusing manually, because I often work in dim light (with a couple of flashes).

I’ve also used manual focus when photographing birds, because my AF-S and AF-C modes struggle when shooting backlit silhouettes.

Note that manual can also be used for finer control over your point of focus. Many landscape photographers use manual focus mode for this very reason. It allows you to choose a point of focus that maximizes your depth of field, and it even allows you to do precise focus-stacking with ease.

dahlia close-up
If you’re trying to maximize depth of field throughout your frame, then manual focus is a great choice.
24mm | f/11 | 1/4s | ISO 200

So don’t think that manual focus is only for a few specialized genres of photography. It can be useful in a number of different situations, and it pays to practice frequently.

That way, next time you’re in a situation where your autofocus isn’t working, you can quickly switch over to manual and nail the shot.

How to choose the perfect focus mode: Conclusion

choosing a focus mode restaurant sign
50mm | f/4 | 1/250s | ISO 200

Now that you’ve finished this article, you know that choosing a focus mode doesn’t have to be hard.

Because you know about AF-S (which is great for still subjects).

You know about AF-C (which is perfect for action photography).

And you know about manual focus, which is useful in quite a few scenarios (including macro, landscape, and still life).

Now over to you:

Which focus mode is your favorite? And how do you go about choosing a focus mode? Let me know in the comments!

The post How to Choose the Perfect Focus Mode For Every Situation appeared first on Digital Photography School. It was authored by Jaymes Dempsey.


Digital Photography School

 
Comments Off on How to Choose the Perfect Focus Mode For Every Situation

Posted in Photography


How to Adapt to any Situation for Portrait Photography

09 Jul

We all make plans and we all have expectations. Then when portrait photography, we want these plans to work well. We’ve got customers to please, memories to create and stories to tell. Plus clients have expectations. They want their pictures to look a certain way. They’ve hired you to recreate that vision.

As a professional, you need to be ready for anything

So when the best-laid plans fall apart, you’ve got to adapt. If you’re shooting portraits professionally, you need to remember that part of the reason you are being paid is you can produce great images no matter the circumstance. This is the difference between you and an amateur. You have the skills and know how to make any situation work.

How to Adapt to any Situation for Portrait Photography

I used the white sheet and the black couch for this family portrait. Then in post-processing added a vintage feel to the image.

Have a plan and a backup plan

I can’t stress this enough. It’s important to meet with clients and discuss plans for the shoot. Among the topics, you should discuss a backup plan. What will do if the weather doesn’t cooperate for an outdoor shoot? What if the children won’t cooperate by sitting in a tree? There are all sorts of possibilities, and you need to discuss the fact that sometimes the plans may have to change.

How to Adapt to any Situation for Portrait Photography

I had the benefit of a large window behind me but because it was so grey and dark outside I also needed to use my lights.

Sometimes the simple solution is setting an alternate date in case of weather issues. Other times you might discuss the need to use a different location. I love shooting family sessions outdoors. I’ll be honest, I prefer it. Natural light is my best friend, and I have very little patience for setting up studio lights. If at all possible I shoot outdoors. But recently I had a situation where I was unable to set up a “rain date”. The family had only one day together, and if the session didn’t occur on that specific date, well it just wasn’t going to happen. But, I made a mistake, I forgot to discuss alternate plans.

The need to adapt quickly

On the date of the session, the weather was cold, grey, blustery and very unpleasant. We could have shot the session outdoors but the wind wasn’t going to help my cause, and it was too cold outside for their small children. I don’t think the kids would have cooperated. I was lucky, my clients were flexible, and we quickly worked to discuss an alternate plan.

How to Adapt to any Situation for Portrait Photography

The boys loved being able to crawl all over the couch and be silly. I made sure I had mom’s permission first.

They had a beautiful, large bay window. So we shifted some furniture, hung up my large white sheet as a backdrop, and used a large couch as a prop. It wasn’t an ideal setting, but it did the trick. My clients were happy with the results, and that’s all that matters.

How to Adapt to any Situation for Portrait Photography

The boys weren’t centered on the couch but I wasn’t worried, as it was more about capturing their relationship.

Suggestions for making it work on the fly:

  1. Think outside the box. Be creative and look for places that will suit your purpose and still create an eye-catching image. You might use a bedroom or fireplace if you have to shoot indoors. Outdoors, maybe you could shoot underneath a large umbrella or veranda. The front door of a house can be quite attractive as well.
  2. Don’t get nervous. Be calm and confident. This will ensure your clients that you are confident in your abilities. They, in turn, will relax and give you those amazing relaxed smiles you’re looking for and that you want to capture so much.
  3. Always take a portable lighting kit to every session. You never know when you will need it. As much as I hate using the lights they’ve saved me so many times.
  4. Make sure you have a really large backdrop and a white sheet. The white sheet can be pinned to the wall in a pinch or used as a large reflector if need be. I’ve even used the sheet to cover up an ugly floor.
  5. Reassure clients that they are not the first to have plans change suddenly. Even if it is the first time, it’s ever happened to you, tell them it’s no big deal.
  6. Go with the flow. Don’t be rigid, let things unfold as they will. If you always come to a photo shoot with a very specific plan, you may get easily flustered. Just relax and see what happens.
  7. Rely on your skills, they are your biggest asset. Use all the knowledge you’ve gained to help you produce amazing images. Never forget all you’ve learned.
How to Adapt to any Situation for Portrait Photography

In this case, he lay on the floor near the window so we accessed all the light we could possibly get.

Conclusion

Portrait photography is often unpredictable but isn’t that the fun of it all? You never know what’s going to happen. Enjoy the rush that comes from turning a potential disaster into an amazing opportunity. Let it test your skills and push the limits of your creativity. Leave us some your tips for managing the unexpected in the comments section below. Tell us your anecdotal stories. We want to hear it all.

Leave us some your tips for managing the unexpected in the comments section below. Tell us your anecdotal stories. We want to hear it all.

How to Adapt to any Situation for Portrait Photography

He loved to pose for the camera so I let him. I later used a filter to create the vintage film look.

How to Adapt to any Situation for Portrait Photography

The parents relaxed when they saw how much fun the kids were having during the session.

The post How to Adapt to any Situation for Portrait Photography by Erin Fitzgibbon appeared first on Digital Photography School.


Digital Photography School

 
Comments Off on How to Adapt to any Situation for Portrait Photography

Posted in Photography


7 Questions to Help You Choose the Best Lens For Any Situation

07 Apr

Cameras and lenses – in fact, anything to do with gear – often spark heated debates amongst photographers. People love to discuss which lenses you should buy or use in certain situations. So I thought it would be interesting to look at a few common scenarios and ask what lenses you might want to use in each of them.

This article presents a slightly different perspective on the debate as the answers are led by creative considerations rather than the subject. Lens choice is often subjective – what might be right for one photographer may be the wrong choice for another.

7 Questions to Help You Choose the Best Lens For Any Situation

Here, then, are some of the things you need to think about when it comes to using lenses. Of course, in practice, your choice is limited by the lenses you actually own. But these considerations are still useful and will help you decide which lenses to buy in the future.

Question 1: Do you want to get the entire scene in focus?

The types of photos where you might want to get the entire scene in focus include; landscape photography, street photography, travel photography, and environmental portraiture.

The depth of field, and how much of it you want in your image, is a creative decision. Once you’ve made that decision you can think about the type of lens you need to use to make that happen.

Wide-angle lenses are the natural choice when you need a wide (lots of it) depth of field. There are exceptions – for instance, you could focus on something distant with a telephoto lens and use a small aperture to make sure everything included in the frame is sharp.

But generally speaking, wide-angles are the best choice. They also help you include more of the scene. Some photographers refer to wide-angle lenses as story telling lenses. The phrase describes the way you can use the lens to include enough detail to give your subject context. This approach is most likely to be used in character portraits and documentary work.

7 Questions to Help You Choose the Best Lens For Any Situation

I used an 18mm wide-angle lens to capture the entire scene in sharp focus.

7 Questions to Help You Choose the Best Lens For Any Situation

I used a 40mm lens (strictly speaking, not a super wide-angle lens on a full-frame camera, but wider than normal) to capture this scene and the rock formation the group is standing in front of. The environment is as important in this image as the musicians so I wanted it to be sharp.

Question 2: Do you want bokeh?

If you don’t want to get the entire scene in focus then perhaps you intend to go the other way and use bokeh in the composition. You can do this with zoom lenses, but you really need a telephoto lens with a maximum aperture of f/2.8 or f/4.

It’s easier to create bokeh with a prime lens as the aperture is much wider. You also have more choice. You can use the widest aperture of the lens for an ultra-shallow depth of field, or a more conservative setting such as f/2.8 that still blurs the background but gets more of the subject in sharp focus.

If bokeh is your thing, then use a prime lens.

7 Questions to Help You Choose the Best Lens For Any Situation

I made this photo with an 85mm lens set to f/1.8. The wide aperture completely blurred the background behind the lizard.

Question 3: How close can you get to your subject?

Telephotos are essential for most types of wildlife and sports photography. They even have their uses in street photography. If there is something that stops you getting physically close to your subject, then you need a telephoto lens to bridge that distance.

7 Questions to Help You Choose the Best Lens For Any Situation

I needed a telephoto lens to photograph this jousting tournament. It wasn’t possible to get any closer to the horse and rider.

Question 4: How much weight do you want to carry?

Sometimes it’s tempting to take an array of lenses on a shoot to cover every conceivable situation. The problem is that carrying too much weight can tire you out. This makes it harder to concentrate, be creative, and make good photos.

It’s something to think about whether you’re taking photos on the street for a few hours, or going away for a month. Think carefully about the number of lenses you need to take with you while traveling. The more you have, the heavier your camera bag gets and the more difficult it is to carry everything around. Two or three lenses is often all you need.

Of course, there are times when you do need a lot of lenses. This applies to pros in particular who take lots of gear on commercial shoots to cover every eventuality. That’s part of the job and has to be done. But you’re unlikely to need a lot of gear for personal work.

7 Questions to Help You Choose the Best Lens For Any Situation

I used my 35mm lens for over 73% of the photos taken during a recent trip to China (the above photo is one of them). Another 10% were taken with my 18mm lens. I could easily have got by with just these two lenses.

Question 5: Will you be shooting in low light without a tripod?

If you are, then you need to consider how you are going to cope with the low light levels. Luckily, the high ISO performance of many cameras is so good that you can probably push ISO to 6400 or beyond (depending on your camera). This will help greatly when it comes to achieving shutter speeds fast enough to take sharp photos.

But there are a couple of other things you should think about. A prime lens will also help by letting you shoot at wide apertures if you need to.

7 Questions to Help You Choose the Best Lens For Any Situation

The Leica Noctilux M 50mm lens has a wide aperture of f/0.95 – over five stops faster than the f/5.6 aperture of a typical kit lens. It may be too expensive for most (over $ 10,000 if you’re curious) but it will certainly help you work in low light.

A lens with some sort of image stabilizer (if your camera doesn’t have it built into the body) will also help you take sharper images at slower shutter speeds. But remember that while the background will be sharp at slower shutter speeds, anything that moves (such as people) won’t be.

Wide-angle lenses also help as they require slower shutter speeds for safe hand-holding (using the one of the focal length rule). For example, when I used my 56mm lens (on an APS-C camera) I prefer to set the shutter speed to at least 1/250 second to guarantee sharpness. But with my 18mm wide-angle I can comfortably use 1/60 second – a two stop difference.

Question 6: Will you be shooting portraits?

If so, then you need to decide what approach to take. One option is to use a telephoto lens. The flatter perspective flatters your model and helps isolate her from the background.

Another is to use a wide-angle lens for a documentary style. But don’t get too close with this type of lens unless you deliberately want to distort your model’s face.

7 Questions to Help You Choose the Best Lens For Any Situation

I used an 85mm lens to isolate the model from the background in this portrait.

Question 7: Do you need a specialty lens?

There are times when you may need a specialty lens such as a macro, a fisheye lens, a tilt-shift lens or a Lensbaby. If you know that you may need a specialized optic for a shoot (or an accessory like extension tubes), then you can plan in advance to buy, borrow, or rent one if you don’t own it already.

7 Questions to Help You Choose the Best Lens For Any Situation

I made this photo with an 85mm lens fitted with an extension tube to get close to the small flowers.

Conclusion

Rather than tell you that a certain lens is required for a specific situation, I prefer to take a different approach and get you to think about what you want to achieve before the shoot, so you can select the most appropriate lens. It’s a different, less prescriptive approach to lens selection that puts creative considerations in front of technical ones.

What lenses do you like to use and why? Please let us know in the comments – I’m curious to see your answers.


Andrew is the author of the ebook Mastering Lenses: A Photographer’s Guide to Creating Beautiful Photos With Any Lens.

The post 7 Questions to Help You Choose the Best Lens For Any Situation by Andrew S. Gibson appeared first on Digital Photography School.


Digital Photography School

 
Comments Off on 7 Questions to Help You Choose the Best Lens For Any Situation

Posted in Photography


This Is Not Your Father’s Hostage Situation

29 Dec

A former child star takes Lucy and the magazine staff hostage.
Video Rating: 0 / 5

Agniputhri 12-07-12
Video Rating: 1 / 5

 
Comments Off on This Is Not Your Father’s Hostage Situation

Posted in Photography Videos


I’ll Make the Best of This Situation

16 Oct

I'll Make the Best of This Situation


Thomas Hawk Digital Connection

 
Comments Off on I’ll Make the Best of This Situation

Posted in Photography