RSS
 

Posts Tagged ‘Setups’

Simple Portrait Setups You Can Create on a Tight Budget

28 Mar

In this article, I’ll show you several easy and simple portrait setups you can create even on a tight budget.

Find a model to trade with

Getting started in the photography business is difficult, especially if you have a tight budget and not a lot of extra cash floating around. The same can be said for starting a modeling career. The trick is to get noticed and get your name out there. You need to show people what you can do. That means you need to create a portfolio of work. People need to see what you are capable of creating.

Simple Portrait Setups You Can Create on a Tight Budget

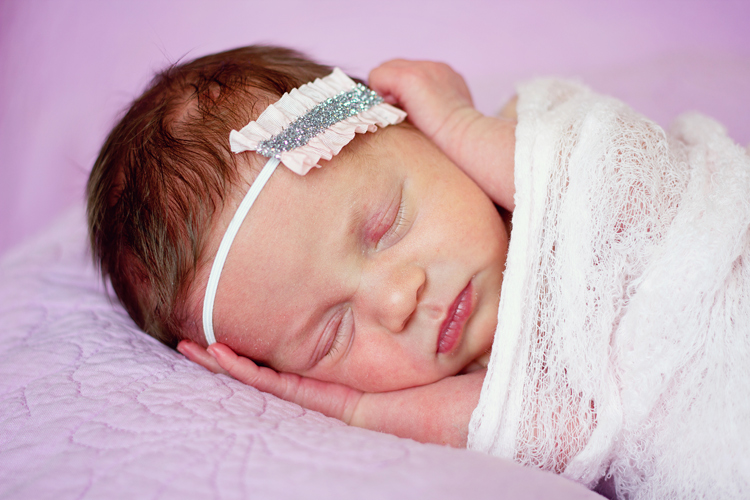
One of the images from the shoot. I used just the one light and the flash.

Ironically, models need the same types of experiences. They need a portfolio they can show off. If you are just starting out in either industry, one of the best things you can do is find someone who is willing to trade services with you. Find a model looking to build their portfolio and then work with him or her to help you create a body of work that shows off your abilities.

It’s a win, win situation for both of you. The trick when starting out is to find ways to network and connect with people so that you are creating mutually beneficial relationships. My main focus has always been natural light and fine art photography. I do shoot family portraits and sporting events as well, but the majority of my focus is on natural portraiture and creating art.

Recently, I met a young woman who was interested in modeling. We got to talking and agreed to help each other out. I would supply her with finished images for an Instagram feed she wished to start. In exchange, she would help me with several upcoming projects and also help me create some images for my stock portfolio.

Simple Portrait Setups You Can Create on a Tight Budget

In this shot, we added props found at a thrift shop. You can see the wainscoting we used as flooring.

Doing it on a budget

The trick then became how to complete the project on a tight budget. I don’t own a strobe light or any beauty dishes. I use sunlight to create my portraits, and I own one flash which I rarely use. The reality is I prefer natural light. Given a choice between studio lighting or natural light, I will always choose the later.

Open shade is one of my favorite ways of creating beautiful soft even light that flatters every type of skin. The model in question wanted to create several different looks, and after discussing the images with her, I realized I would need some lighting. There was no way we could create those different looks she wanted using just natural light.

The project became more about following through with our plans on a very limited budget. Meghan, the model, agreed to be in charge of planning the wardrobe and finding the props. I needed to provide the photography expertise. Between the two of us, we created 10 different looks for less than $ 200.

Let’s take a look at the set up for three of those shots.

Simple Portrait Setups You Can Create on a Tight Budget

Cheap lights don’t have a lot of power. In this shot, you can see how close I had to position the lights.

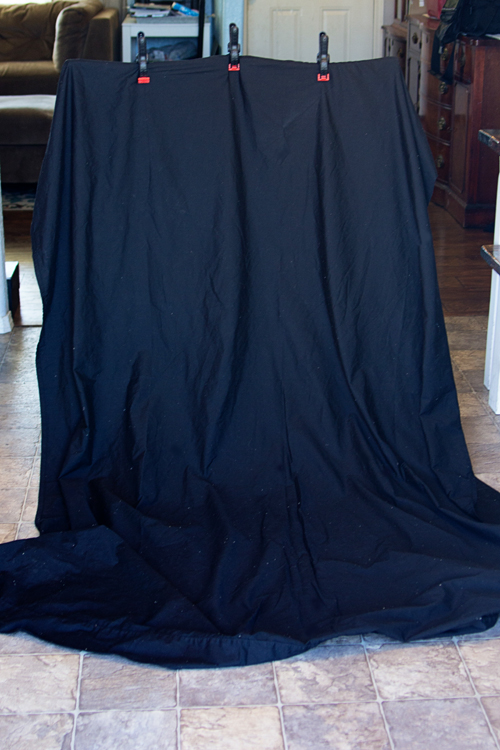
Any artificial lighting used in the following images was created using a very cheap continuous lighting kit (under $ 100), my Canon Speedlite and a large piece of white styrofoam we used as a reflector. The backdrops are all old table clothes, the flooring we used is two pieces of wainscoting purchased from a local home reno store, and

Meghan’s wardrobe was a combination of her clothing, some borrowed from friends and items found at thrift shops.
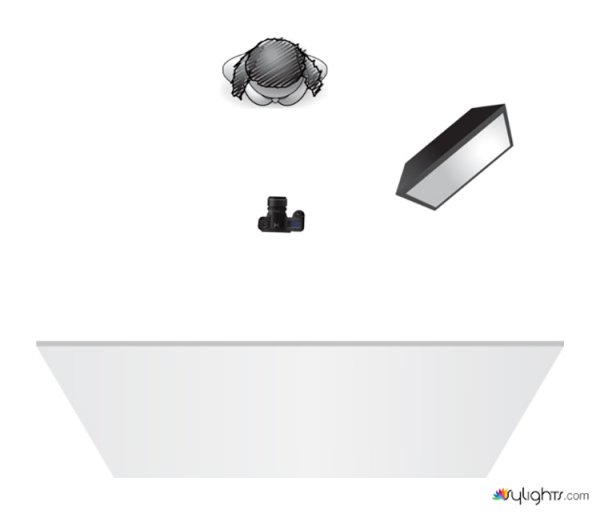
Setup #1

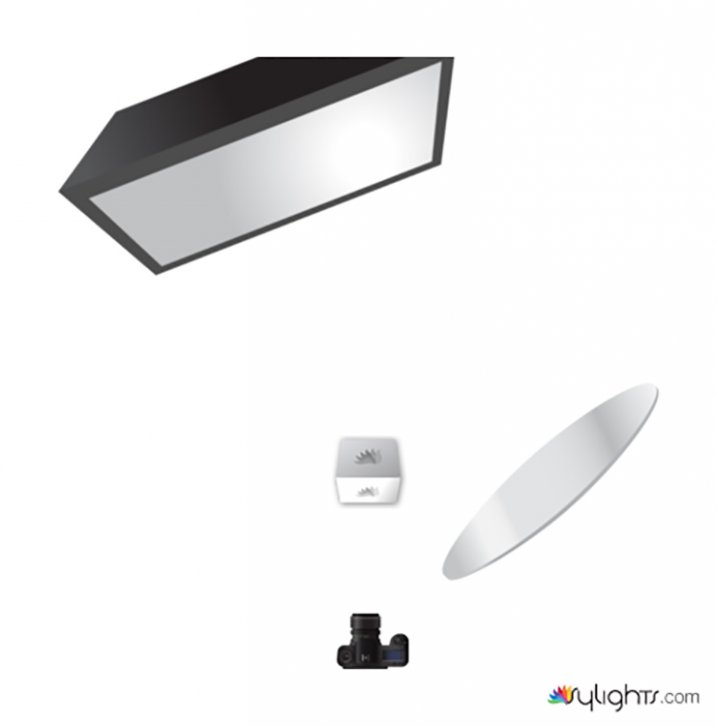
This image was shot using natural light. I am very lucky to have a 9-foot wide window in my studio that never receives direct sunlight. It makes for lovely soft directional lighting. The backdrop was set up at a 90-degree angle to the window.

Then one of the small continuous lights was used to illuminate the backdrop. Meghan’s blue pants needed some separation from the blue background. Without the light, it would have been easy to lose her clothing in the backdrop.

Simple Portrait Setups You Can Create on a Tight Budget

The whole shoot took place in my house in my studio which I have converted from a living room.

One advantage to shooting indoors in a protected space is the luxury of tethering the camera to the computer so you can assess the images before shooting a bunch of different poses. In this case, the first few shots were created and assessed through a tethered camera but then once we had the settings correct we shot the remainder of the images untethered.

Here are the results of this first setup.

Simple Portrait Setups You Can Create on a Tight Budget

In this image, I edited the background and took the wrinkles out of the tablecloth. Please note this is my favorite type of light, natural.

Here’s the untouched image. Despite our best efforts to iron the backdrops before use, the wrinkles were quite evident. It’s a lot of work to remove the wrinkles.

Simple Portrait Setups You Can Create on a Tight Budget

Here is the file with the wrinkles. I do think that sometimes a less than perfect backdrop can add depth to an image.

Setup #2

The goal when creating a portfolio is to show some diversity, especially for the model. A model needs to adapt to different situations and be able to morph into different types of looks.

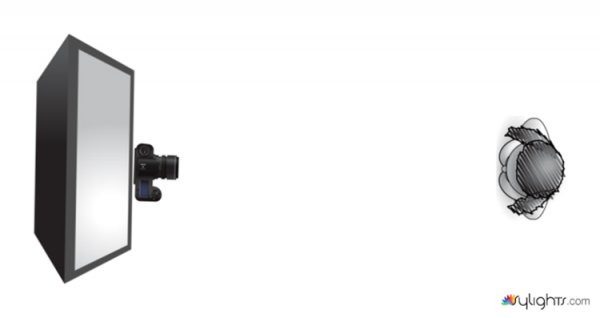
So with this in mind, this second set up is much different from the first set of shots. Natural light plays far less heavily into the look. In this case, the flash was used. The flash was aimed upwards and back at a piece of white styrofoam which bounced and diffused the light.

In this setup, the flash cast a large shadow on the backdrop. So to lessen the shadow on the backdrop, the large continuous light was once again placed behind and to the side of the model – this time to light the backdrop. This second look is far darker and different from the first set we created.

Simple Portrait Setups You Can Create on a Tight Budget

There are some slight changes to the lighting in this setup.

Simple Portrait Setups You Can Create on a Tight Budget

This is a much more dramatic look.

Simple Portrait Setups You Can Create on a Tight Budget

Here’s a headshot of the same clothing set up. The lighting was only changed slightly.

Setup #3

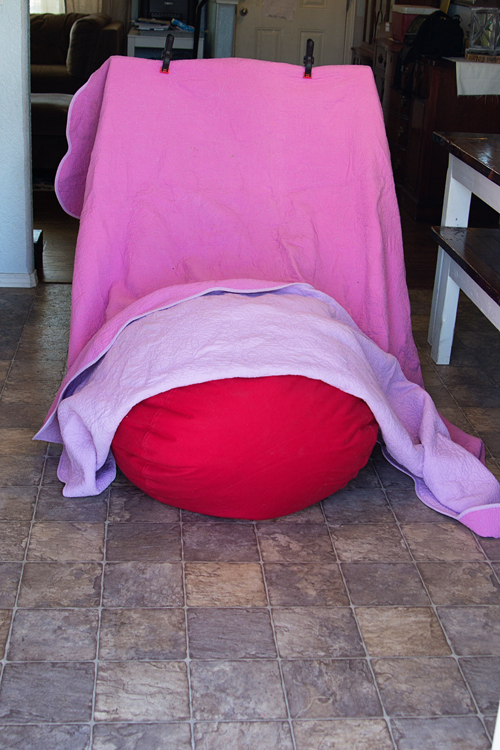
This final image was shot without the use of natural light at all. By this time it was 9 pm, and the light was completely gone.

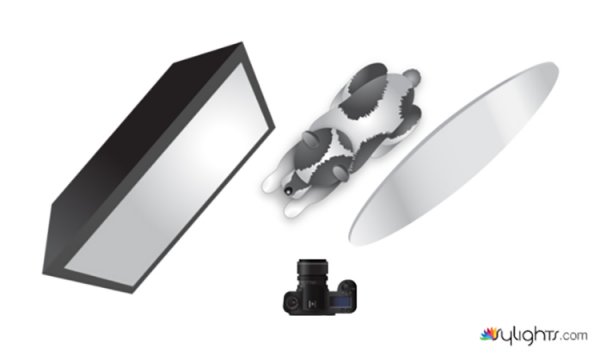
The setup utilizes two continuous lights as well as the flash. One light was placed behind the backdrop. It shone through the red backdrop to create a vignette of sorts. The second light was placed on the left side of the model and illuminated her face.

The goal of this shot was to create something fairly dramatic. Once again a few simple adjustments allowed for a totally different look. The end of the softbox around the continuous light was also included in the frame again trying to create a diverse look.

The light placed behind the backdrop created a pretty glow and a natural vignette.

In Conclusion

The changes to the setup took very little time. We shot lots of different outfits and poses using just a few simple principles.

  1. Be diverse in the looks created.
  2. Highlight the beauty of the model.
  3. Be picky and get the best photo possible using the equipment available to you.

Setting up a photo shoot doesn’t have to be complicated. Be smart! Plan ahead! Find ways to make something that could potentially be an expensive endeavor work to your advantage.

Below is a collection of some of the other images we shot that day. It was hard work, but it was also a lot of fun.

Same clothing and backdrop as setup #3 but we moved both lights around the front and used the flash. Again a different look.

Converting images to black and white and using dramatic lighting is a lot of fun to try.

The post Simple Portrait Setups You Can Create on a Tight Budget appeared first on Digital Photography School.


Digital Photography School

 
Comments Off on Simple Portrait Setups You Can Create on a Tight Budget

Posted in Photography


5 Lighting Setups You Can Do Using an Octabox

06 Nov

Choosing a lighting modifier is always tough because it’s inherently limiting. Do you go for a large soft source or something with a little more contrast? Or something that plays well with the modifiers you already own? One modifier that appears limiting is the Octabox, because generally, they’re a pretty large source.

You could literally point them anywhere in the region of your subject and get an acceptable photo. I’ve even heard them referred to as “idiot lighting” because they work so well, you don’t have to be clever to use them. It’s not really an insult, it’s more of a reflection of how easy they are to use.

But that doesn’t mean that you can’t use them more subtly though. That’s what we’re going to look at in this article. Your first setup will be the default one most beginners use with lighting. This is a good thing. It gives you a good handle on what the light looks like. But before you begin, let’s talk about the quality of light.

Quality of Light

Generally, when you refer to the quality of light, you’re referring to how hard or soft is the light source.

There are two parts to it though. First, there’s the actual size of the light. A large source is softer, like your typical 4-5 foot Octabox, while a small source, like a 7″ reflector is quite hard.

Soft light

Second, you have the distance to the source. An Octabox placed far from your subject will appear as a smaller source, and become quite hard looking. It’ll also need more power to reach the subject because the light will fall off. This brings us to the concept the f relative size of the light source.

Relative Size of a Light Source

The larger the source of light is in relation to your subject (you may be lighting a still life), the softer your light will appear. A medium source close to your subject will appear softer than a large one further away. So how do you make a larger source softer? Easy, bring it as close to your subject as you can without it appearing in the frame.

Which Octabox?

I currently own three Octaboxes. An Elinchrom 135cm (53″), a Godox 120cm (47″) and an Elinchrom Deep Octa 70cm. For this article, I’m using the more expensive, but really versatile 135cm. You could use the much cheaper Godox. It’s not as soft, but still more than useable.

Setup #1: Light Position to the Front and Side

How to do 5 Lighting Setups Using an Octabox

The Octabox lights both the face and the background in this position.

This is the basic one-light setup. It’s the typical light at 45º to your subject arrangement. Put the light in front of your subject and off to the side (either side, though I opted for the right side for my example).

Your subject can be straight on, or face either direction and still be lit acceptably. You could use a meter aimed towards the light to determine your aperture, but as it’s one light, you could just look at the back of the camera to determine your preferred exposure.

Depending on your preference, anywhere from f/4 to f/11 will work fine, just set the light power to match what you want. The larger aperture of f/4 will give you a softer look overall, while f/11 will have much more in focus.

It should go without saying, but you should always focus on the eye that’s nearest the camera for the most pleasing look.

How to do 5 Lighting Setups Using an Octabox

A behind the scenes image, shot from the side.

How to do 5 Lighting Setups Using an Octabox

Setup #2: Light Position to the Back and Side

How to do 5 Lighting Setups Using an Octabox

With the octabox moved around, the light on the subject is more dramatic. Because it’s no longer aimed at the background, the background goes dark.

For this setup, you just move the light 90º towards the background. This time you have to be more careful about your subject position. They’ll need to be turned towards the light more.

This gives us a short lighting pattern, which is more dramatic. You’ve seen this look before if you’ve read my article about lighting positions. It’s a really slimming look that adds more drama to a portrait.

You’ll also notice that compared to the previous setup, the background is much darker. Because the light is now angled away from the back wall, less of it is lit by your light, rendering it much darker. In the case of these two shots, the subject hasn’t moved, just the light.

How to do 5 Lighting Setups Using an Octabox

How to do 5 Lighting Setups Using an Octabox

Setup #3: Lighting From Behind (Backlight)

How to do 5 Lighting Setups Using an Octabox
This a little more exotic, as you’re letting the light wrap around the subject. Your subject will need to be right against the Octabox for this. Allow the light to wrap around and expose for the subject’s face.

How to do 5 Lighting Setups Using an Octabox

Behind the scenes shot.

How to do 5 Lighting Setups Using an Octabox

Bonus Tip:

You can also add a second light to create a high-key portrait here. Technically high-key has all tones above middle grey, so really, you’re just using the Octabox to create a white background.

Move the subject away from the Octabox a little bit. Make sure that the light from the back isn’t flaring over the shoulders to lose definition. If you use a light meter, make sure the aperture reading aimed at the Octabox is the same or lower than the one aimed at your front light.

How to do 5 Lighting Setups Using an Octabox

Adding a second light will create the white background look that’s currently popular. Technically with high-key, all the elements are above zero, so the black in the dress means this isn’t actually a high key shot, though this lighting can provide that look.

How to do 5 Lighting Setups Using an Octabox

How to do 5 Lighting Setups Using an Octabox

Two lights and one reflector used here.

Setup #4: The Tabletop

How to do 5 Lighting Setups Using an Octabox

This is a very popular look with fashion and editorial portraits. The front of the Octabox should be parallel to the floor above your subject.

The subject should be placed at the edge of the octa, even back from it slightly. This allows the light to wrap down and around the body. A reflector should be used to aim light back into the face as well to fill in shadows.

How to do 5 Lighting Setups Using an Octabox

How to do 5 Lighting Setups Using an Octabox

Setup #5: Lighting From the Front with No Diffuser

For a much edgier look, pull off the front diffusion panel. As I’m using an Elinchrom, I’ve swapped my inner diffusion panel for the white deflector that comes with the 135cm. You can just use the inner diffusion panel. With the Godox, just remove the diffusion panel.

How to do 5 Lighting Setups Using an Octabox

Stand in front of the Octabox and make sure your body or head is blocking the center of the light to minimize any hotspots from the light. Because you’ve allowed the silver part of the Octa to be visible, you get way more contrast in the light.

It’s still a large light source, but you get more highlights on the skin from this look. It also acts like a huge ring light, so you get diffuse shadows all around the subject, for a very cool look.


How to do 5 Lighting Setups Using an Octabox

Get Shooting

Even if you’re just running with a speedlight and a Godox, you’ll still be able to get more options from your light using these five setups.

Remember to keep the center of your light above the subject’s face where possible. Have fun and feel free to post your octabox shots in the comments below!

An Octabox can be used on location as well.

The post 5 Lighting Setups You Can Do Using an Octabox by Sean McCormack appeared first on Digital Photography School.


Digital Photography School

 
Comments Off on 5 Lighting Setups You Can Do Using an Octabox

Posted in Photography


3 Lighting Setups for Photographing Headshots

28 Apr

I do a lot of corporate and actors headshots around Washington, DC and I wanted to share some of the simple but effective lighting setups that I use over and over, which you can easily copy and use yourself.

lighting for headshots

The One Light Wonder

My standard setup consists of a large soft light source to the left or right of the subject, a reflector under the face, and another reflector opposite the main light source. I shoot hundreds of headshots per year using this simple setup. I use a Paul C. Buff Einstein unit with a large octabox in my studio, but you could easily put together something similar with a cheap speedlight, an umbrella, and a couple of $ 20 reflectors.

You can see this setup in the photo below, with my poor wife Karen standing in as a subject. She was just coming downstairs to make some tea, and got ambushed!

headshots lighting

Reflectors and adjustments

Once my subject is in place, I do some tweaking. First I will adjust the light source so it is slightly above their eye level. For most people, I think it looks best to have the light coming from above to cast subtle shadows under the chin, accentuating the jaw and helping to hide any double chin.

Then I will adjust the reflector underneath their face and bring it up to about their mid-chest level. This reflector helps fill in shadows on the face and provides a really nice extra catch light in the eyes. Some folks will use another (powered) light source down here, but I find the reflector to be much simpler to set up, and it also has the virtue of being idiot proof.

For example, if you have another light instead of a reflector below the subject, and you accidentally overpower it (so it is more powerful than the main light), you have created some horrible Frankenstein lighting! It is physically impossible to do this with a reflector, which can save from you from costly mistakes.

headshots lightingYou can see the side reflector in my studio in this photo (it’s just to Karen’s left).

Finally we have the reflector opposite the light source. For this one, I will often use a black-sided panel to create a darker shadow on that side of the face. This effect can be very dramatic, and has added benefit of slimming the face. The downside is that if your subject is very wrinkly, you’re not filling those wrinkles with light from that side. So it doesn’t work for everyone.

Here’s an example where of a headshot where I used this effect to create a nice dramatic edge:

headshots lighting

Some additional tweaks

With this simple setup, it’s very easy to make tweaks and see what works best with a particular person’s face. Often I will leave the basic setup in place with the black reflector, but a few examples where I might make changes are:

  1. The subject has a double chin, so I really want to define the jaw. In this case, I may raise the light up extra high to cast more shadow under the chin (make sure you don’t go too high and lose your catchlights), and/or lower or remove the under reflector.

headshots lighting

  1. The subject has long dark hair. In this case, the dark reflector is not necessary because we already have a dark edge there from the hair. So in this case I would go with a white reflector on the side or bring in a hair light from behind (more on that in the next section)

In the photo below, you can see a lot of detail in her hair on the shadow side. That’s because I brought my big white reflector in close.

headshots lighting

  1. Subject has deep set eyes. We want to fire more light into those sockets or our poor subject will end up looking like a serial killer or a cave man! In this case, I might lower the main/soft light so it is right at eye level.

Two Lights

You could run a whole business just using the one light system, but if you’re anything like me you get bored and like to try new things. So let’s bring in a second light.

The second light for me is usually a “kicker” (also called a rim or accent light) coming from behind and opposite the main light. I use this to accentuate the jaw, especially in men, or hair in women. It’s especially nice to create a little highlight on darker hair.

In the photo below, I needed a way to separate this young man from the dark background. My kicker light did the trick!

Headshots lighting

In my studio, I use a strip softbox for this purpose, but you could also use a bare head with a grid or even an old speedlight with a paper towel roll taped to it to make a simple snoot. The important thing is that you want to control the light so it doesn’t spray into your lens and create flare or lack of contrast.

You can see my kicker light in this setup shot with Karen.

headshots

Three and Four Lights

I use lights three and four to create a clean white background. You can either use one light fired at the background from just behind the subject, or two lights off to either side.

The white background is my favorite look these days for a lot of reasons. I think it looks super bright, modern and happy, and really pops on LinkedIn and other online profiles. It is also a great way to go for companies because it is easy to replicate and get a consistent look from shoot to shoot (for example, when photographing a new employee months after the initial shoot, or replicating the same look with shoots done across the country by different photographers).

headshots lighting setups

headshots lighting setups

headshots lighting setups

headshots lighting setups

Whether you use one or two lights for the background depends on your budget and the space where you are working. Two lights can give you a larger more even spread of light, whereas with one light you might have some fall off around the edges that you need to clean up in post-production. So I usually stick to two lights unless I’m on location somewhere and space is tight.

Conclusion

So I hope you all found this article helpful and you can use the lighting setups for your headshot. I look forward to your comments and questions!

The post 3 Lighting Setups for Photographing Headshots by Dennis Drenner appeared first on Digital Photography School.


Digital Photography School

 
Comments Off on 3 Lighting Setups for Photographing Headshots

Posted in Photography


Broncolor ‘How To’ site details how to replicate lighting setups and more

14 Mar

Broncolor, maker of photography lighting equipment, has launched a ‘How To’ section on its website, including some helpful diagrams detailing the lighting setups used to create a variety of sample photographs. The tutorials cover many shooting scenarios, including portraits, outdoor scenes and product photography. Both written and video guides are offered.

The how-to content on Broncolor’s website is provided free of charge. There is, for example, a 20-part video how-to series detailing lighting with topics like ‘Cutlery,’ ‘White on White,’ ‘Still Life,’ and ‘Baseball swing,’ among others. Photographers seeking details on using specific lighting products can find guides under the site’s ‘Use this Light Shaper’ section, and there’s also a two-part ‘Eye school’ section detailing types of lighting. 

The full array of how-to content can be found here.

Via: DIYPhotography

Articles: Digital Photography Review (dpreview.com)

 
Comments Off on Broncolor ‘How To’ site details how to replicate lighting setups and more

Posted in Uncategorized


7 Smart Lighting Setups for Portraits Taken at Home

30 Nov

Let’s get one thing clear – you’re not going to learn how to shoot perfect portraits overnight. There are many things you need to learn first. When it comes to portrait-shooting, no factor is more important than lighting. Even if you’re planning a home portrait session, you can still make the most from various lighting setups to achieve great results. Continue Reading

The post 7 Smart Lighting Setups for Portraits Taken at Home appeared first on Photodoto.


Photodoto

 
Comments Off on 7 Smart Lighting Setups for Portraits Taken at Home

Posted in Photography


3 Newborn Posing Setups Anyone Can Master

06 Oct

newborn-posing-setup

Are you interested in trying newborn photography, but just aren’t sure where to start in terms of posing? Have you ever looked at a newborn photo and been totally unsure how the photographer set it up?

In this article, I’ll walk you through three easy newborn posing setups. We’ll start with pull-backs (behind the scenes shots) of each posing setup, along with brief instructions as to how you can recreate it at home. Then I’ll show you what the final images might look like from that setup. All three setups are simple, versatile, and I promise that absolutely anyone can master them. All three also have the benefit of being setups that you can typically use even in small spaces, which is a huge benefit if you ever shoot in clients’ homes, and don’t know what you’re walking into until you get there.

Setup #1: The Crib Mattress

newborn-posing-setup-1

This setup really could not be any easier. Simply take a crib mattress, find a fun fitted sheet for it, and put it on the floor near a window, or sliding glass door. My preference is always to set up the crib mattress at about a 60 degree angle to the window. Sometimes the space may easily allow you to set up exactly as you would prefer, and sometimes like in the case of my very small kitchen above, it may require thinking outside the box.

For this particular session, I kept the mattress at a 90 degree angle to the window, as mom walked over and placed the sleeping baby on the mattress. Once baby was warm and settled, I sat on the floor and pivoted the mattress just enough so that I’d be able to achieve some shadows and depth in the photo.

newborn-posing-setup-2

This is also the setup that I typically use whenever I am incorporating flowers, greenery, or sports equipment into the photo because it gives me a nice flat surface to work with, and it’s also low to the ground, so it’s easier to shoot from above.

newborn-posing-setup-3

Setup #2: The Black Sheet

newborn-posing-setup-4

Next, try taking a twin or full sized black sheet and clamping it to the back of some chairs. I prefer to use bar stools whenever possible, but a regular high backed chair will also work. If you can’t track down a chair, simply have mom and dad hold the sheet up in the air, and let it pillow at the ground. Again, place yourself near a large window. Then you can place the baby in a basket on top of the sheet on the floor, or even have mom or dad stand in front of the sheet and hold the baby in his or her arms.

Bonus Tip: Use a lint roller on your black sheet before you start taking photos – it will save you a ton of time in post-processing!

newborn-posing-setup-6

I find this particular setup to be really versatile, and it’s an easy way to create a high-contrast photo that has a more formal look, compared to the first setup which usually tends more towards lifestyle images. This setup does require a bit more time in post-processing to get that nice uniform black background, but it is absolutely worth the investment!

newborn-posing-setup-5

From a safety perspective, this is a great setup to use any time you want a shot where it appears that the baby is hanging in the air. In the above photo, the scale that the baby is on was actually sitting directly on the black sheet on the floor. I had grandma hold the hook of the scale taught as I took the photo.

Even as newborns, babies are wiggly and will sometimes try to shoot themselves off a prop, so I just don’t think it’s worth the risk to actually allow a newborn to hang from something in the air during a session. This particular setup is a nice alternative for parents who would like to achieve that look, while also greatly minimizing the risk involved.

Setup #3: The Beanbag

newborn-posing-setup-7

The beanbag is by far the most common approach for newborn photography. You’ll want either a beanbag specifically designed for photography, or extra “beans” to over stuff a standard beanbag. Trust me on this one! Place the beanbag on the floor and drape a large blanket over it, once again clamping to some tall-backed chairs near a light source. If you think that you’ll primarily be using this setup for a session, you can also layer multiple blankets over the beanbag before clamping.

Bonus Tip: If you layer blankets on the beanbag, I highly recommend putting diaper changing pads (or piddle pads for pets) in between each blanket on the bean bag just to be safe!

newborn-posing-setup-8

This setup is a great option if you have a baby that’s having a difficult time settling, and can be very versatile in terms of the number of photos you can achieve from just one pose. You could easily swing a portrait, closeup of fingers and/or toes, and a full-body pullback without moving the baby at all using this set.

newborn-posing-setup-9

The world of newborn photography is so nuanced, and there are so many tips, tricks, and safety precautions to know, and be aware of. This particular post is really just the tip of the iceberg, but will hopefully give you a good starting point in terms of understanding how to execute three newborn posing setups, as well as what types of images you may be able to achieve with each one.

Have you tried any of these newborn setups before? Which is your favorite? Share your images and any other posing setups you’ve used in the comments below.

googletag.cmd.push(function() {
tablet_slots.push( googletag.defineSlot( “/1005424/_dPSv4_tab-all-article-bottom_(300×250)”, [300, 250], “pb-ad-78623” ).addService( googletag.pubads() ) ); } );

googletag.cmd.push(function() {
mobile_slots.push( googletag.defineSlot( “/1005424/_dPSv4_mob-all-article-bottom_(300×250)”, [300, 250], “pb-ad-78158” ).addService( googletag.pubads() ) ); } );

The post 3 Newborn Posing Setups Anyone Can Master by Meredith Clark appeared first on Digital Photography School.


Digital Photography School

 
Comments Off on 3 Newborn Posing Setups Anyone Can Master

Posted in Photography


5 Easy Studio Setups With One Light

13 May

Studio lighting is one of the most versatile tool sets available to you as a photographer. Apart from 24 hour access to a quality light source, there is a vast quantity of modifiers, accessories, and techniques that allow you to design and shape the light exactly as you need to fulfil your creative vision. However, all of this choice that is available to you can often result in confusion and indecision. The sheer amount of stuff available can also lead you to believe you need more than you already have.

Fortunately, in the case of lighting, less is often really more. In this tutorial I am going demonstrate five ways to use a single light source to good effect, with a variety of subjects. Even though each of these images was created with a specific modifier, each setup will work with most any modifier of your choice. For example, you could swap a softbox for a beauty dish. This will alter the shape and softness of the light but you will still get good results. Some of the techniques also use a silver reflector.

If you don’t have a reflector, you can get a large piece of cardboard and glue a sheet of aluminium foil to it. Another option is to use a mirror. You don’t even need a strobe or flash to make these techniques work; window light, with a bit of extra effort can produce the same effects.

Here are five easy studio setups with one light you can try yourself.

Setup #1

Amb john mcintire photography 0049

Simplicity in technique is the aim of this first image. The light source is a strobe fitted with a medium sized softbox. It is positioned about five feet away from the subject, elevated about four feet above, and pointed down at a 45 degree angle. The camera is directly under the softbox (this is called Butterfly lighting).

lightingdiagram1

Lighting diagram for light placement

The centre of the softbox is pointed to the left of the model (camera right) with only the edge of the light source directly falling on her. This technique is called feathering. It is useful for controlling and fine-tuning the light in a scene, and helps to soften light from a harder modifier such as an 110 degree reflector.

If you don’t think you’re ready to try feathering just yet, try to aim your light source at your subject’s nose instead.

Setup #2

Greyhounddalmatian john mcintire photography 0795

lightingdiagram2

To create dramatic lighting in your photos, try lighting your subject from behind. This image of my dog is lit by a softbox placed at a 45 degree angle behind her at camera left. The softbox is just out of the left-hand side of the frame and is very close to the subject. Because she is black and white, there is a huge amount of contrast in the scene. This left the shadow areas closest to the camera very dark. To fix this, you would introduce a reflector. The reflector is also only just out of the frame on the right-hand side. Bringing it in close allows you to increase the amount of reflected light filling in the dark shadows.

Setup #3

Pastry john mcintire photography 6968

For added versatility, you can combine the previous two techniques. This image is again lit by a softbox six feet behind the pastry and elevated about five feet above. Instead of pointing the light source at the pastry, it is aimed straight ahead so that the softbox is not directly illuminating the subject. This is a more extreme version of feathering that creates beautifully soft light.

lightingdiagram3

When you feather the light in this way, be aware that you are lighting the scene with a only a tiny fraction of your flash’s output. You will need to compensate by altering your ISO, increasing the flashes power output or altering your aperture.

To fill in the shadows created by the backlighting, use your silver reflector.

Setup #4

Romey john mcintire photography 0971

lightingdiagram4

If you want to create images with more contrast in your light than a softbox provides, try using a silver beauty dish. The light source in this photo is slightly to the right of the camera and is three feet away from the subject. The bottom edge of the beauty dish is lined up with the top of the model’s head, again creating the feathering effect. To fill in the shadows, ask your model to hold the reflector pointed towards her chin and just out of the frame.

Setup #5

Monika john mcintire photography 5347

If you prefer really soft light, you need to increase the size of your light source in relation to your subject. The obvious ways to do this are to move your light source closer to your subject, or to use a bigger modifier.

Alternatively, you can bounce your light into a wall or a ceiling, converting that surface into your light source.
To imitate the lighting in this image, fit your light source with a bare reflector and point it into the corner of a room. Be wary of off-coloured walls though; the slightest deviation from white can cause colour casts in your images that take a lot of time to correct. If you’re shooting black and white, then colour casts are irrelevant and you can bounce your light from just about any surface you can imagine.

lightingdiagram5

As you can see, you don’t need piles of equipment to get the most out of the studio. A single strobe, a modifier or two, and a reflector will provide you limitless creative opportunities for your photography. Go ahead and alter these suggestions to suit your needs and style and don’t be afraid to experiment, there really are an infinite number ways to use this modest amount of equipment.

googletag.cmd.push(function() {
tablet_slots.push( googletag.defineSlot( “/1005424/_dPSv4_tab-all-article-bottom_(300×250)”, [300, 250], “pb-ad-78623” ).addService( googletag.pubads() ) ); } );

googletag.cmd.push(function() {
mobile_slots.push( googletag.defineSlot( “/1005424/_dPSv4_mob-all-article-bottom_(300×250)”, [300, 250], “pb-ad-78158” ).addService( googletag.pubads() ) ); } );

The post 5 Easy Studio Setups With One Light by John McIntire appeared first on Digital Photography School.


Digital Photography School

 
Comments Off on 5 Easy Studio Setups With One Light

Posted in Photography


Studio Lighting Setups for Portrait Photography: Part II

23 Jan

This is another in a series of articles on studio lighting that I put together with help from Karl Leopold at ImagesForever.net in Melbourne, Florida. Karl graciously opened his studio to me and patiently went through the basics of lighting a studio portrait. Last time we went over a fairly basic three-point lighting setup for studio photography and that was Continue Reading

The post Studio Lighting Setups for Portrait Photography: Part II appeared first on Photodoto.


Photodoto

 
Comments Off on Studio Lighting Setups for Portrait Photography: Part II

Posted in Photography


Studio Lighting Setups for Portrait Photography

04 Jan

This begins a series of articles on studio lighting that I put together with help from Karl Leopold at ImagesForever.net in Melbourne, Florida. Karl graciously opened his studio to me and patiently went through the basics of lighting a studio portrait. Portrait lighting is one of those deceptive subjects where it’s easy to grasp the concept, but can take years Continue Reading

The post Studio Lighting Setups for Portrait Photography appeared first on Photodoto.


Photodoto

 
Comments Off on Studio Lighting Setups for Portrait Photography

Posted in Photography