RSS
 

Posts Tagged ‘PortraitPro’

PortraitPro 21 Review: A Comprehensive Editor for Portrait Photographers

14 Jan

The post PortraitPro 21 Review: A Comprehensive Editor for Portrait Photographers appeared first on Digital Photography School. It was authored by Carl Spring.

PortraitPro 21 review a comprehensive editor for portrait photographers

It was only a few months ago that I reviewed Anthropics PortraitPro 19, where the ease of use, the speed, and the AI technology really impressed me. Here we are only a few months later, and Anthropics has introduced PortraitPro 21. I was lucky enough to get my hands on a copy to see what has improved, what is new, and whether the updated software is worth the investment.

Also, spoiler alert: We have a special offer at the end of this PortraitPro 21 review, so make sure you take a look!

PortraitPro 21 review

What’s new in PortraitPro 21

As always with Anthropics, there’s a long list of new features that really make PortraitPro 21 stand out. These include:

  • Sky replacement
  • Lighting brushes
  • Clone tool
  • Denoising/Sharpening
  • History tool
  • Color styles
  • Color copying
  • Hair highlights

There are actually even more new features, including a master slider for skin lighting and coloring, layer presets, optimized color-space handling, the ability to move catchlights, SVG backgrounds, new layers, backgrounds and overlays, free stock photos, and new tutorials from the creators.

If I offered an in-depth discussion of every new feature, you would probably be reading this for days. Instead, why not go and download your free trial of the software on the website? That way, you can check out the program for yourself. 

In the meantime, let’s look at some of the new PortraitPro 21 features in greater detail.
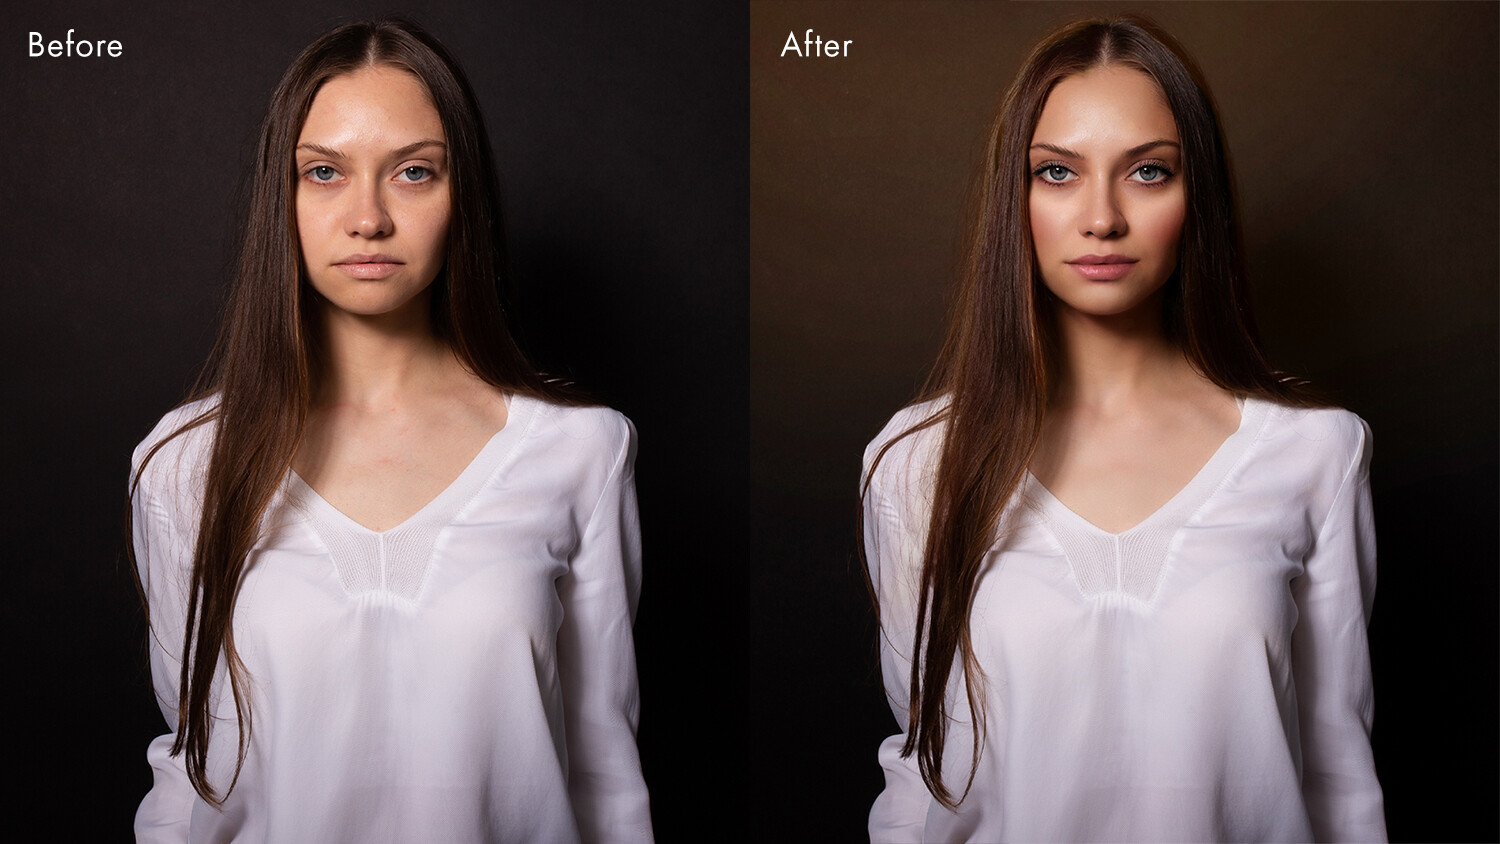
PortraitPro 21 review before and after

Sky replacement

This feature is one that portrait photographers will love. There is nothing worse than capturing amazing shots against a blank sky, knowing you will need to edit them later. Swapping the sky on multiple images can be laborious and time-consuming. But in PortraitPro 21, replacing skies can be done with the click of a button.

Using technology from Anthropics LandscapePro software, this feature does not simply mask and drop in the new background. It also changes the color and tone of the image to match the new sky, giving a more natural result.

PortraitPro has quite a few skies for you to choose from, but if you are looking for something specific, you can always add in your own. 
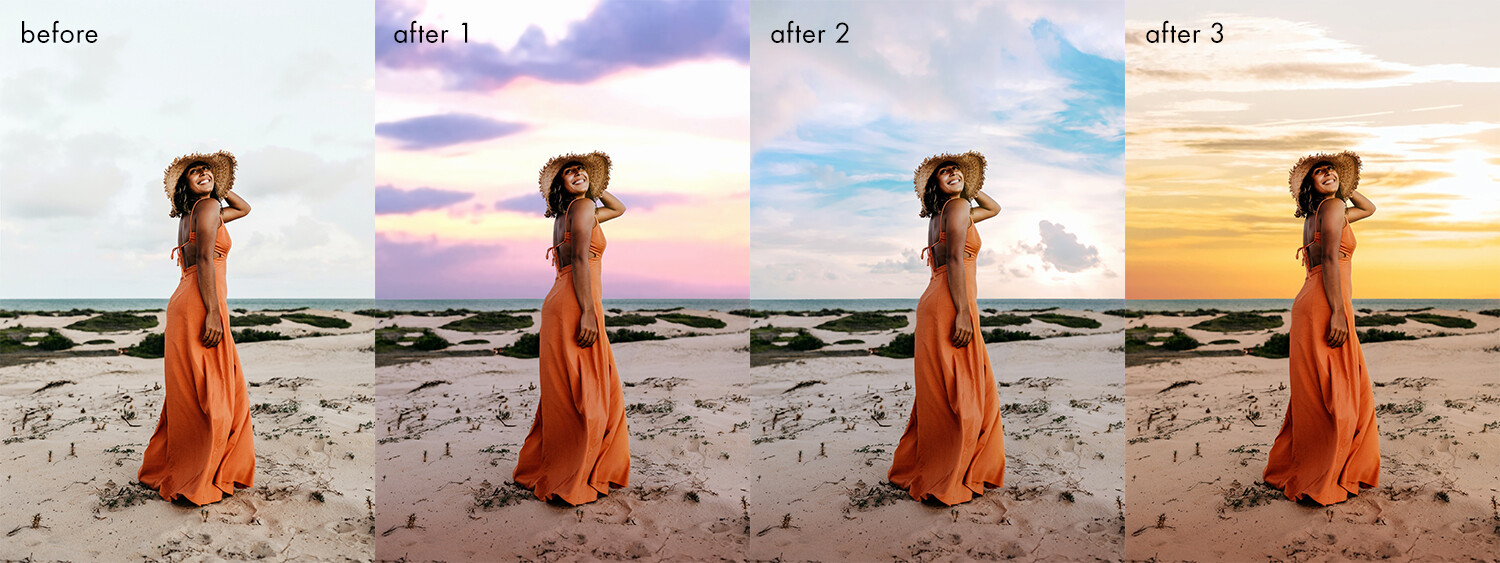
Sky replacement examples

Lighting brushes

PortraitPro 21 includes a series of lighting brushes. These can be used to create specific effects such as light streams or realistic relighting elements. 

You are able to select exact colors and alter the strength of the brushes, which allows you to quickly get the perfect effect. These brushes are able to separate the background and foreground for you, so you can really get creative. 

Lighting brush effects PortraitPro 21

Clone tool

The addition of the Clone tool means you can remove troublesome areas from your photos. And the presence of the Clone tool means there is no reason to use other software to perfect your edits.

As with all tools in PortraitPro 21, the Clone tool is easy to use and allows completely adjustable precision so you can get the exact result you want.

Ultimately, it’s a great addition to the feature set of PortraitPro. And while it is a tool that most will recognize and is not as groundbreaking as others, it’s one that will be hugely appreciated by all users.

Using the clone tool in PortraitPro21

Denoise/Sharpening

Denoise and sharpening tools are another new addition to this version of PortraitPro.

Yes, these tools are available in other editing programs. But as you are probably beginning to see, the addition of these features to PortraitPro 21 means that you have no real need to switch between programs to get your final result – making PortraitPro 21 a more all-in-one editing solution for portrait photographers.

PortraitPro 21 review

History tool

The History tool continues the trend of the Clone tool. It’s a feature that users of other editing software will be well aware of, and it’s highly valuable.

Specifically, it allows you to move back to a specific point in your edit so you can rework an image without needing to start over. 

The history brush in PortraitPro 21

Color styles

Filters will be familiar to everyone who reads this, because we frequently have these in our social media apps.

PortraitPro now includes a series of color styles that can dramatically change your image in just a few clicks.

Color styles examples in PortraitPro 21

Hair highlights

PortraitPro 21 features a variety of new tools for working with hair.

These include tools that add highlights, as well as change hair color and vibrance. And you can fine-tune these to achieve “salon-level” results.

Hair highlights in PortraitPro 21

PortraitPro 21 review: Performance

As always, I spent some time getting to grips with PortraitPro 21. Having used previous versions, I was familiar with the interface. But as with PortraitPro 19, I was amazed by Anthropics’s excellent tutorials. 

In fact, there are many more tutorials in PortraitPro 21, which give new users confidence right away. Even as a previous user of PortraitPro, it was good to go through a series of tutorials on the new features. These allowed me to immediately understand what is possible in PortraitPro 21. 

I started with the hair tutorial, which gave convincing results quickly and easily. From there, I fine-tuned to my liking. 

Hair features
I loved how the tutorials helped me get started, but then I fine-tuned to my own taste.

After that, I experimented with the new sky replacement feature. Due to my lack of outdoor photography over the last 12 months, I used the tutorial image as a starting point for this feature, and the results were impressive.

Changing the sky on the test image highlighted the importance of choosing your replacement sky wisely. Certain skies won’t work on certain images.

However, Anthropics has included so many different skies for you to choose from that, for every situation, there will be a replacement sky that matches your scene. Again, the ability to fine-tune really allows you to dial in the detail and increase the realism. 

Sky replacement in PortraitPro 21
There are so many different sky options built into the software.

Using TIFF files

After working on the many image tutorials, I wanted to use some of my own images. I always feel this is the real test.

And I was hugely impressed.

My images worked exactly the same as those in the tutorials. Everything was fast, and the software’s AI technology picked features out flawlessly. The highest compliment I can pay the software is to say that I didn’t notice any slowdown between the images I used myself and those in the tutorials. 

Face selection AI demo in PortraitPro 21
Even with a shallow depth of field, PortraitPro 21 picked out the face almost perfectly.

To push the software, I used 16-bit TIFF files in the Adobe RGB color space. The images opened fast, and PortraitPro 21 picked out the features flawlessly. Applying presets took a little longer than the test images, but considering I was working on 16-bit TIFF files, I was really impressed. 

I loved the fact that little tips popped up in the bottom corner of the screen, reminding me of how to tweak things. I used an image with an incredibly shallow depth of field to test the feature-finding abilities, and again, I was very impressed.

For the first image I tested, I used the Clone tool to remove a couple of small blemishes. Even though I was editing TIFF files, the software worked perfectly.

With the blemishes cloned out, I simply added a preset and tweaked it to taste. I had a finished image in less than 5 minutes. This was much quicker than when I edited the image manually. One quick and simple export later, I had a beautiful image ready to go.

Before and after retouch
This full retouch only took 5 minutes.

The only thing I will say is that some of the presets are a little more extreme than my personal style. However, the great thing about PortraitPro is that you can create your own presets simply and easily.

In fact, I tend to do this on a shoot-by-shoot basis, starting with a preset and tweaking it to suit the shoot I am working on. I can then apply these presets quickly and easily to the whole set of images from the shoot before sending proofs to a client.

Working with presets is taken to a whole new level with the Studio Max version of PortraitPro 21, where you can batch process several images in seconds.

Batch processing

Setting up a batch of images in PortraitPro
Import images, select your style, and click Go. Batch processing is an incredibly powerful feature in PortraitPro 21.

For a working photographer, the batch processing in Studio Max is a huge timesaver when you need a consistent retouch across a range of images. PortraitPro’s face recognition means that you can trust the software to pick up the face and apply the retouch for you automatically.

To test this feature, I exported full-sized JPEGs from a styled shoot. After creating a look with a single image, I used the batch feature of Studio Max to apply this style to a group of ten images. In less than one minute, all the images had saved and were ready to go. I simply clicked two buttons.

This feature alone changes how I deliver portrait and headshot proofs to clients. For so many working photographers, batch processing is going to be a game-changer. Imagine being able to deliver headshot proofs to clients with such little effort.

batch of images from a wedding photoshoot
A variety of poses didn’t fool the software. Everything was ready to deliver in under a minute.

Who is it for?

In my last review of PortraitPro, I said, “PortraitPro is an amazing tool for those who are new to retouching portraits. It is simple yet incredibly powerful, and gives you pleasing results within seconds. However, it offers much more and encourages you to go back to the software and personalize your retouching.“

So much has changed since then. In fact, PortraitPro 21 has more features that make it even easier for me to recommend. It is possibly the most feature-rich portrait editing software out there. 

If you’ve loved previous versions of PortraitPro, then you will love this even more – especially with the special offer for dPS readers (see below!).

Note that there are three PortraitPro 21 versions: Standard, Studio, and Studio Max.

PortraitPro 21 Standard is great for many people. It is a standalone software that allows you to work with JPEG or 24-bit TIFF files. For many photographers, this will be perfect. 

By upgrading to PortraitPro Studio, you get the Photoshop/Lightroom plugin that so many of you will love, as well as the ability to work with RAW, DNG, and 48-bit TIFF files. It also has color-space conversion. 

Finally, for those who shoot professionally or need the ability to retouch a batch of images in a few clicks, the Studio Max version of PortraitPro 21 will save you so much time (and professionals all know time is money!) that I cannot help but recommend it. 

Sounds amazing! How do I get it?

You can download your free trial of PortraitPro 21 right here.

But if you’re thinking about purchasing the software, note that there is a 50% off launch offer, plus dPS readers get an extra 15% off with the coupon ZC1990. So click here to grab your discounted copy of PortraitPro 21!

Anthropics is a paid partner of Digital Photography School.


The post PortraitPro 21 Review: A Comprehensive Editor for Portrait Photographers appeared first on Digital Photography School. It was authored by Carl Spring.


Digital Photography School

 
Comments Off on PortraitPro 21 Review: A Comprehensive Editor for Portrait Photographers

Posted in Photography


Image Editing Software Review: PortraitPro 15

15 Jun

mWhen it comes to portrait photography, there seem to be two predominant schools of thought. The first says that retouching is bad, that people should be presented as they are and retouching is a no-no. The second school of thought says that when people have their portrait taken, it should be an idealistic representation of the person, flattering the subject and minimizing any flaws.

The truth, however, probably lies somewhere in the middle. When people have their portrait taken, they want the photographer to make them look as good as possible. Most portraiture requires some level of retouching, and truth be told, retouching was in vogue long before the digital age. Digital photography, however, has brought with it some new tools. One of those tools is PortraitPro 15, from Anthropics Technology.

An example of a portrait retouched using PortraitPro 15

An example of a portrait retouched using PortraitPro 15.

Overview of PortraitPro 15

PortraitPro 15 is available as a standalone application, or as a plugin for Photoshop, Lightroom, or Aperture. There are three different versions available; Standard, Studio, and Studio Max. PortraitPro Standard is the standalone version, which also has a few other limitations. PortraitPro Studio and Studio Max can both be used as plugins, and they also offer a variety of other options including RAW file support, color profile support, the ability to read and write TIFF and PNG files in 16-bit mode, and a batch dialog. The Studio Max version also offers a Full Batch Mode to greatly speed up your workflow. Compare all editions of PortraitPro 15 here.

Before and after using PortraitPro 15

Before and after using Portrait Professional 15

Getting started with PortraitPro 15

Getting started in PortraitPro 15 is simple. If you’re using the standalone application, simply open the file you wish to work on. From Photoshop (if you’re using the Studio or Studio Max version), go to the Filters menu and Select Anthropics > Portrait Professional.

Once your image is open, PortraitPro 15 will detect the facial outline of the subject. It will sometimes detect gender and age, or it may ask if the subject is male or female or a young girl or boy under 12. You will then be shown a side-by-side comparison, with the image on the left showing the outlines of the face that the software will use for its retouching. These outlines can be adjusted to provide better accuracy, but the software does a pretty good job of selecting facial features on its own. On the right is a preview of what the subject will look like after the retouching is applied.

On the far right, you will see a navigator window that allows you to move around the image easily. Beneath that is a list of presets so you can easily apply a particular look to your subject. Beneath the presets is a group of “Portrait Improving Sliders”. These sliders include;

  • Face Sculpt Controls
  • Skin Smoothing Controls
  • Skin Lighting Controls
  • Makeup Controls
  • Eye Controls
  • Mouth and Nose Controls
  • Hair Controls
  • Skin Coloring Controls
  • Picture Controls

Each of these groups of sliders affects different aspects of the image and provide an incredible amount of control over the retouching process.

Before and after using PortraitPro 15

Before and after using PortraitPro 15.

Some of these sliders, particularly Face Sculpting may seem a bit controversial. Like most digital photo editing tools, you can certainly go too far with its use. But, there are times when it has come in handy and improved the subject, such as when one eye may not be fully open. As with all things, moderation is the key to using these sliders.

The Basic Retouch

Gender Selection in PortraitPro 15

When you open an image using PortraitPro 15, the application will ask you to confirm the gender and age of your subject.

Whether you choose to use the plugin version or the standalone version, the workflow is the same. From Photoshop you’ll select Portrait Professional from the Filters menu, and from Lightroom, you’ll select “Edit In”, which will open the current image in PortraitPro 15. If using the standalone version, simply go to File > Open.

Facial features selection

PortraitPro 15 will try to automatically detect the age and gender of your subject and try to select their eyes, nose, and mouth. If it is unable to detect the gender and age, or any facial features, you will be prompted to do this. Selection, if needed, is easy. You’ll click the outer corner of the left eye, hit next, then click the outer corner of the right eye. Hit next again, and you’ll be prompted to click the tip of the nose. You’ll continue until the eyes, nose, and mouth are selected. PortraitPro will then find the top of the head and the jawline.

The main screen of PortraitPro 15

The main screen of PortraitPro 15

First editing steps

Once the selection is made, PortraitPro will automatically adjust your image using the Standard settings. From here, you are free to choose a different preset or start moving the sliders to better retouch your portrait.

The first slider I adjust is the Face Sculpt Controls. I will say that I’m not a huge fan of this adjustment so normally I just turn it off. There are times it can get too aggressive and will really alter the look of the subject’s face. You can minimize the amount of adjustment using the Master Fade slider to amend the overall look, or the individual sliders to only affect certain features. For instance, I will often set all the sliders to zero but then use the Eye Widening slider if the subject happens to have a sleepy eye. I do try and keep the digital plastic surgery to a minimum.

Skin Smoothing

The next slider group is the Skin Smoothing Control. This set of sliders does a nice job of minimizing wrinkles and removing blemishes. You do need to be careful when you have a subject with freckles or beauty marks that you want to retain. Again, adjusting the individual sliders will help you find the right amount of smoothing without making things look too plastic, and the Touch Up Brush will allow you to remove strong blemishes without affecting the overall skin texture.

Skin Selection PortraitPro 15

If you need to adjust the area affected by skin smoothing and lighting, you can manually paint in your selection.

PortraitPro offers some quick tips when you select the various sliders. In addition, you may notice that the application hasn’t quite selected all of the skin you want to be retouched, due to changes in tone. Or, conversely, that it has selected areas which you don’t want to be affected, such as clothing with colors close to the skin tone, or hair. You can adjust the skin selection by clicking View/Edit Skin Area and adding or subtracting from the skin selection using a brush, similar to applying a selection by using a layer mask in Photoshop.

Before skin smoothing

Medium skin smoothing applied.

Heavy skin smoothing applied.

Skin Lighting

The Skin Lighting slider controls can actually adjust the lighting on your subject. This is another set of sliders that are best used with care, but a judicious adjustment can help improve your image. Going too far with it, on the other hand, will result in images that have a definitive fake look to them. You have the ability to adjust shadows to the left or right, a kick light to the left or right, and even adjust the angle of your main light.

Before skin lighting effects applied.

Skin lighting medium applied.

Skin lighting heavy applied.

Makeup

The Makeup Controls sliders allow you to add digital makeup to your subject. Everything including lipstick, mascara, eye shadow and eyeliner can be added or enhanced here. As with the Face Sculpting and Lighting Controls, you will want to be careful not to overdo things here. But again, I’ve had occasions where a little eyeliner or a change in lipstick color has helped the image.

By the same token, if you are taking a portrait as a starting point, you can create some incredibly different looks by changing the subject’s makeup. This makes it an excellent tool if you are creating a digital illustration from a photo.

Skin Smoothing Controls PortraitPro 15

The skin smoothing controls inside PortraitPro 15

Before make-up applied using PortraitPro 15.

Make-up added.

Make-up added heavily, this is over done.

Facial feature control sliders

The Eye Control sliders do a nice job of enhancing the subject’s eyes and bringing them out. Brightening the irises, sharpening the eyes, and whitening them are all done here. You can even change the eye color and add catch lights. The biggest mistake I’ve made (and seen others make) is going too far with the whitening, giving the eyes an unnatural glow. Eyes can be adjusted individually, so you have a lot of control over their look.

Before eye controls applied.

Eye controls medium applied.

Eye color change applied.

Mouth & Nose Controls are sliders to enhance the mouth and nose. Here you can adjust the saturation of the lips, their brightness, and contrast. You have the ability to make the same adjustments to the nose.

Hair and skin sliders

Hair Controls is a set of sliders that I like a lot. You have the ability to re-color hair, adjust the shine, reddening, and vibrance. In addition, as with the skin selection, you can adjust the hair selection. Especially cool is the Hair Tidying Mode, which allows you to smooth and soften the hair. It can give the hair an almost painted look, which is one I tend to like, but again, it is possible to go too far.

Skin Coloring Controls allow you to adjust skin color, add a glow, or a bit of a tan. In addition, you can add cheek coloring here and adjust the exposure on the face.

Before skin coloring

Tan skin coloring applied.

PortraitPro 15

On the right side of the application window, you’ll find a navigator, a list of presets, and the Portrait Enhancement Sliders.

Picture Controls

Finally, the Picture Controls slider allows overall adjustment of the color temperature, tint, exposure, contrast, and vibrancy. You can also crop here. If you’re using Photoshop or Lightroom, these adjustments are better handled there, after retouching. But if you’re using the standalone version, this is an excellent way to finish off your image.

Once you’ve finished with the face you’re working on, you click the Next button at top right, and either click “Return from Plugin”, or “Enhance Another Face”, if you have more than one subject in your photo.

Pros of PortraitPro 15

PortraitPro 15 is an excellent application for quick and easy retouching of portraits. Blemish retouching, eye enhancing, and cleanup of hair is simple and can PortraitPro 15 can provide a nice finished look to a portrait. In addition, the ability to adjust lighting can give added pop and make a flatly lit portrait much more interesting. The same goes for the ability to add or enhance makeup. It’s easy to see the effects of the changes you make usingPortraitPro and compare them to the unretouched photo, so you can judge the edits as you work.

Before and After

Before and After

Cons of PortraitPro 15

My biggest issue with PortraitPro 15 is that it’s easy to go too far with an adjustment and suddenly your image looks fake or digitized, almost like a 3D animation. Like most photo-enhancing filters, a little goes a long way and moderation is required. In the right hands, PortraitPro can be an awesome editing tool. In the wrong hands, it can return some ugly results. Additionally, PortraitPro appears to have some issues when one eye is covered by hair or a hat, or when the face is at a 3/4 angle to the camera. So in those situations, you’ll need to pay extra attention to your selections, and in the case where one eye is hidden, set all sliders for that eye to zero.

My other issue with PortraitPro is that it does seem to be a resource hog. As soon as I enter the plugin from Photoshop, the fan on my 2014 iMac (with the max amount of RAM) starts up and keeps going until I’m done. Some of the adjustments are slow, and on my machine, adjusting the outlines takes a moment as my computer catches up.

Before & After PortraitPro 15

Before & After

Bottom Line

Overall, I love PortraitPro 15 and the ability it has to retouch portraits quickly and easily. While I prefer not to use all of the features all of the time, such as face sculpting or skin lighting, things such as skin smoothing and eye retouching really help give my portraits a finished look. The learning curve is not terribly high and it is fairly easy to tell when you’ve gone too far. It’s become an essential part of my portrait workflow.

See the three editions available on Amazon. The Studio version is a great value.

Before & After PortraitPro

Before & After PortraitPro

Before & After PortraitPro

Before & After PortraitPro

The post Image Editing Software Review: PortraitPro 15 by Rick Berk appeared first on Digital Photography School.


Digital Photography School

 
Comments Off on Image Editing Software Review: PortraitPro 15

Posted in Photography