RSS
 

Posts Tagged ‘Panorama’

How to Shoot and Stitch a Panorama Photo

21 Apr

Sometimes the landscape is just too big. Sometimes, just one image won’t do the trick. Then it’s time to create a panorama!

How to Create a Panorama photo

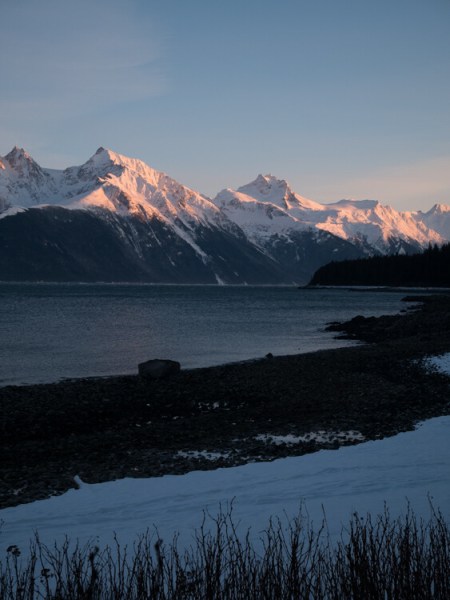
I’m fortunate to spend a lot of time in the grand landscapes of Alaska. But often, camera in hand, I’ve stood there, unable to create the image I wanted. There was just too much going on, or things were happening in a way that just didn’t match a typical single-image format. I was photographing along a gravel beach near Haines, Alaska this winter, while the alpenglow was lighting up the peaks across the inlet. The glaciers and spires were painted in peach light. Going super wide to capture it all, with my 14mm, made the mountains too small and distant, and left too much empty space. I wanted the details in the

I was photographing along a gravel beach near Haines, Alaska this winter, while the alpenglow was lighting up the peaks across the inlet (see image above). The glaciers and spires were painted in peach light. Going super wide to capture it all, with my 14mm, made the mountains too small and distant, and left too much empty space. I wanted the details in the mountains while maintaining a sense of the vast landscape. A panorama was the only way to go.

How to Create a Panorama Photo

Panoramas are hardly a novelty, Smartphones and many point and shoots can create them in-camera. But stitching together images from a DSLR or other high-resolution camera will yield better results if you do it right. Sadly, panoramas are easy to screw up. Here are a few tips for making an effective panorama from a series of images.

What lens to use to make a panorama

Making a panorama isn’t the time to use a wide angle lens. The optical distortion inherent in these lenses tends to mess with the process of stitching them together. Pick a standard lens or a short telephoto; something between 40mm and 100mm will work well, though I’ve occasionally gone as high as 200mm if the situation warrants.

How to Create a Panorama

Remove all filters from your lens, especially polarizers. They can cause gradations across an image that are impossible to work with later, so get that thing off your camera.

Cameras and settings

I shoot all panorama images in RAW format. This allows me greater flexibility in post-processing to make sure that exposures, white balance, and other settings match from one image to the next. That said if you are careful in-camera, and manually select all your settings from ISO to exposure and white balance, you can get by with JPGs.

How to Create a Panorama Photo

Exposure

Take a few sample shots of your subject. If you are shooting a landscape that varies in tones, meter off the brightest part of your scene and make the image as bright as possible without blowing out the highlights. Take note of those numbers (exposure settings), then using Manual Mode set your aperture and shutter speed accordingly.

How to Create a Panorama Photo

Focus

Turn off autofocus. As you pan across your scene, you don’t want your camera grabbing a new focus point each time. Set the focus so that your subject is sharp, then don’t touch it again until you’ve finished the series.

How to Create a Panorama Photo

White Balance

There are two options for white balance. The first, and easiest, is to set your white balance in camera, using one of the presets. Don’t use auto white balance, because the camera may decide each image varies slightly, and the colors will shift within the final panorama. Pick something appropriate and stick with it. The second option is to set the white balance of your RAW images in post-processing (see below).

How to Create a Panorama Photo

Making the images for the panorama

Composition

Almost all of my panoramas are created using vertically formatted photos (i.e. the camera is oriented vertically). First, this allows me to stitch together a greater number of photos for the same scene. Second, it allows me to compose with more negative at the top and bottom. This dead space is important to allow for cropping later.

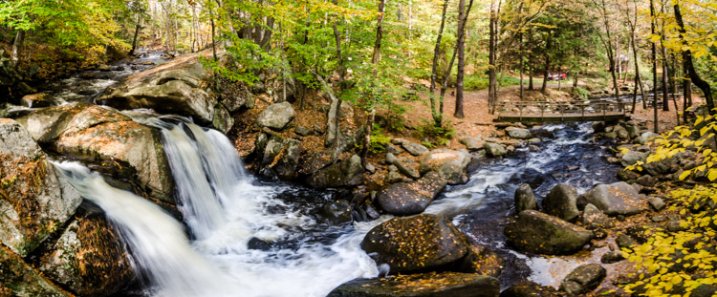
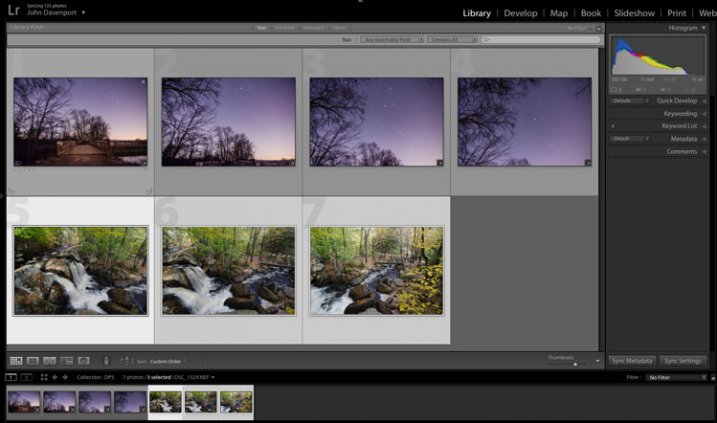
Here is a series and final image to show you how I took the shots:

Notice how there is overlap from one image to the next, and they are all shot vertically. So nine images were stitched to make this final panorama image.

Shooting

How to Create a Panorama Photo

A level tripod is very useful, but not absolutely essential. If you are using a tripod, level it. With a level tripod, as you pan, your camera’s angle will not shift up and down. If you are hand-holding be very careful to keep your camera level as you move across your scene shooting your images for the panorama.

Start a full frame to the side of where you expect your final image to begin. This assures that you have some negative on the sides of the image. Then begin making your series as you pan right or left. Overlap each shot by between a third to one-half of the frame each time. The overlap is what allows the computer to detect which images go where and line them up, so make sure to leave plenty of overlap.

Move across the scene making as many images as necessary to fully capture the landscape. Take a breath.

How to Create a Panorama Photo

Post-processing your panorama

Continuity

In the computer (I use Lightroom), go through each your series and confirm that the white balance of each image is identical. If you shot in RAW, assuring white balance continuity is as easy as checking that they each have the same color tone. Check the numbers, if they aren’t all exactly the same, change them so that they match. If you set your white balance in camera, you can skip this step.

How to Create a Panorama Photo

Don’t edit the images separately, leave your photos as they are out of the camera (except to make sure the white balance is the same). Any additional post-processing is best done once the panorama has been created.

Stitching

There are many programs that can create panoramas. These include specialty programs like PTGui, which is designed to create enormous images involving hundreds of individual photos. However, both Photoshop and Lightroom have merge to panorama capabilities which work great in most situations. As an example, I’ll go through the steps in Lightroom:

Select your images by clicking the first one in your series, pressing and holding the Shift key, then selecting the final image. All the ones in between will now be selected as well.

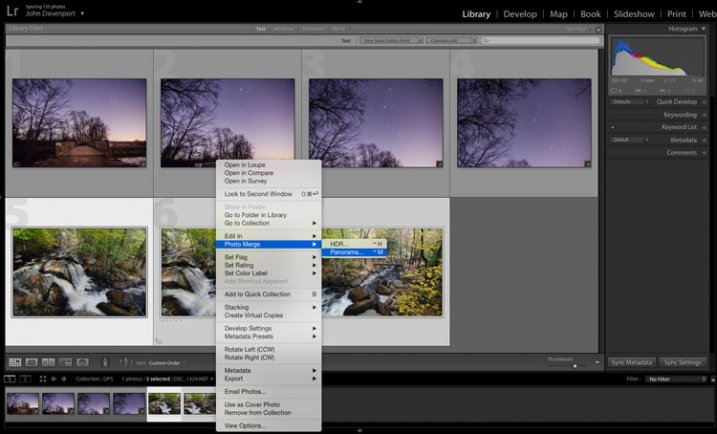
Right-click (PC) or Control-Click (Mac) and select Photomerge > Panorama.

How to Create a Panorama Photo
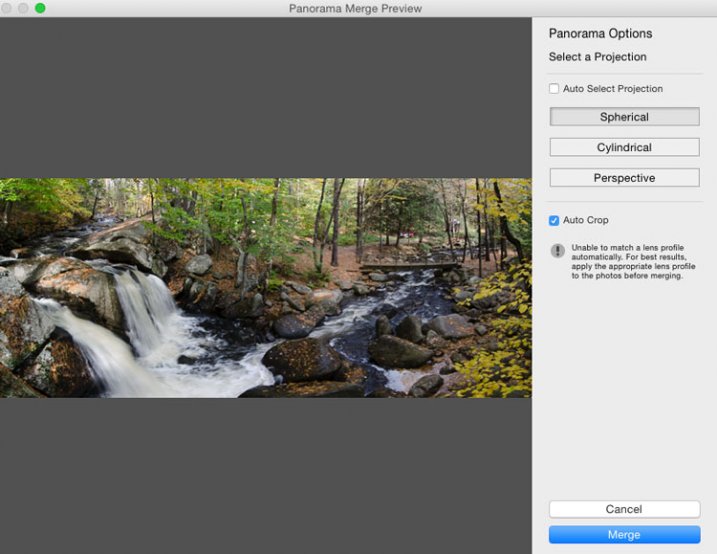
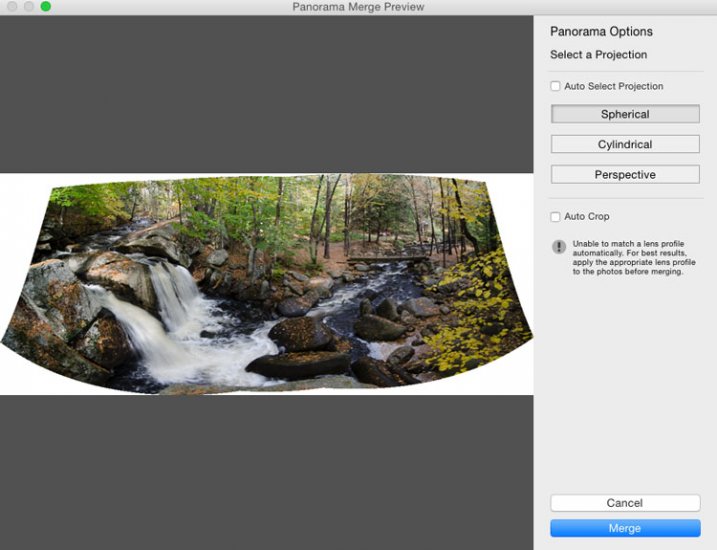
A preview window will pop up offering three options; Spherical, Cylindrical, and Perspective. For most simple panoramas, Cylindrical will work, but feel free to click back and forth between these options to find the best option for your image. Click Merge.

How to Create a Panorama Photo

The stitched image will appear in your Lightroom Library, or as a new image in Photoshop. The result will likely have some jagged edges from your base images not quite lining up. Select the crop tool and cut the jagged edges away. (This is why the negative space I noted earlier is so important.) Note: you can also check off “Auto Crop” in the panorama popup box and it will be done automatically for you. 

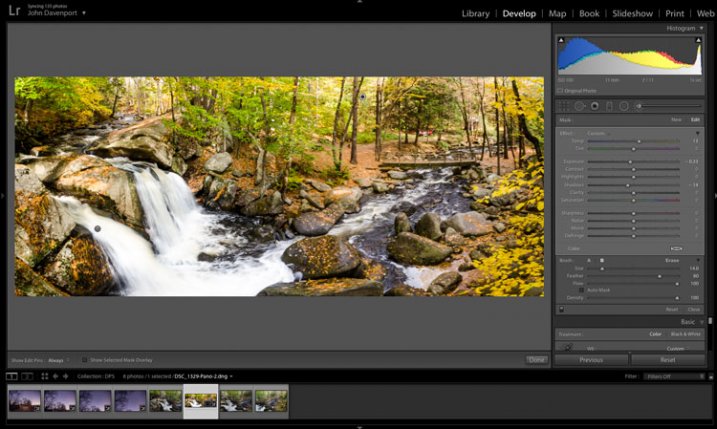
Once you’ve got your image cropped you can post-process as you would any other photo in your collection.

How to Create a Panorama Photo

Conclusion

Panoramic photos, while definitely not the best option in all scenarios are a great tool to keep in mind for those moments when a landscape is just too big, too dramatic, or too epic to be captured in a single photo. When I first started shooting panoramas many years ago, I regularly overlooked simple things like remembering to remove my polarizer, or failing to assure the same white balance from image to image. Screw up a setting or forget a filter and the final image just won’t work, and there is nothing you can do about it. Pay attention to those annoying little details and you won’t miss your chance to create some epic panorama images.

Do you shoot panoramas? If so, show them off below, or share some of your own tips for success.

The post How to Shoot and Stitch a Panorama Photo by David Shaw appeared first on Digital Photography School.


Digital Photography School

 
Comments Off on How to Shoot and Stitch a Panorama Photo

Posted in Photography


Step by Step Using Merge to Panorama in Lightroom

09 Jun

Do you ever find yourself struggling to include everything you want to capture in a single frame? Well then, panoramic photography might be exactly what you need to solve this problem. With the new release of Lightroom 6, Adobe has made it possible to take multiple single frames of a panorama and stitch them seamlessly together with a few clicks of the mouse.

trap-falls-pano-2

Before we dive into the post production aspect of making a panoramic photograph, let’s take a step back and make sure you have a basic understanding of what you’ll need to capture in order to create an panoramic photograph.

Panoramic Photography 101

A quick guide to capturing suitable images

You’ll need at least two different frames to stitch together to create your panorama, but three to five will give you more to work with, and allow for a much richer image. When capturing these frames make sure to overlap each frame by about 30% or so to allow enough information for the algorithms to match each image with its neighbor.

A few other quick pointers to make it as simple as possible for yourself when you get back to the computer include:

  • Use a tripod to line up each shot.
  • Manually set your white balance, ISO, aperture and shutter speed as consistency between each frame is extremely important.
  • Make sure your area of focus remains consistent throughout the series of shots. Use back button focus, or autofocus and then switch to manual to lock it.

Of course, that was only a quick taste of what it takes to capture images for a panorama. For more on the subject of capturing the images read these two great dPS guides:

  • How to shoot panoramas
  • Getting started in panoramic photography

Panoramic Photography with Lightroom 6

Once you’ve captured a set of images for a panoramic photograph, and imported them into your Lightroom library, Adobe makes creating the panoramic photograph about as easy as: select, click, done. Let’s walk through the process.

Step #1 – Select the images you want to merge

panoramic photography

Here I’ve selected the three separate frames that make up the panorama attached at the top of this article. It doesn’t matter if you’re in the Develop module or the Library as you’ll be able to create the panoramic image from either place.

Step #2: Right click and select Photo Merge > Panorama

panoramic photography

Yep! It’s really that simple!

Once you’ve selected Panorama you’ll be brought into a new window called the Panorama Merge Preview. There you’ll be able to see what the resulting panoramic photograph will look like, and you’ll have a few options for customizing it.

panoramic photography

The settings here are not exactly self explanatory, and Lightroom doesn’t really provide any popup hints to help you out – so here’s the basic rundown of these options.

You have three options to choose from as to how you want your image to be projected as a panorama: Spherical, Cylindrical, and Perspective. This setting will determine how Lightroom merges the single frames together to control the distortion of the image.

Spherical – Great for wide panoramas and essentially transforms your selected images as if they were placed on the inside of a sphere.

Cylindrical – Similar to the spherical algorithm except that you’re images are now placed on the inside of a cylinder. In this case the vertical lines will remain straight.

Perspective – Great for architectural photography as it will try to keep all straight lines straight, however, wide panoramas may experience excessive distortion.

By selecting Auto Set Projection you can take the guess work out of this process by allowing Lightroom to pick the best option for you based on the images you’ve selected. In my experience Lightroom usually does a good job at choosing.

Finally, inside of the preview window you have the option to tell Lightroom to automatically crop the image. If left unchecked this is how the waterfall image above would have looked.

panoramic photography

However, even if you leave the Auto Crop box checked, using the crop tool once you’re back inside Lightroom will allow you to get back the uncropped image should you want to change anything at a later time.

Step #3 – Final Touches

Once you’re done merging your image it will be brought back into Lightroom, ready for you to finalize as you desire. Here I’ve just made a few small tweaks to bring out the colors and brighten the image up a bit.

panoramic photography

Another example – if you prefer video

Don’t forget that you can also use Lightroom to create panoramic images of a vertical scene as I’ve done here with this photograph below.

panoramic photography

Because everyone learns differently I’ve also created a simple video walkthrough of the process explained above, using this photograph to demonstrate the process click for click. Watch it below.

See more of Lightroom 6’s new features here.

googletag.cmd.push(function() {
tablet_slots.push( googletag.defineSlot( “/1005424/_dPSv4_tab-all-article-bottom_(300×250)”, [300, 250], “pb-ad-78623” ).addService( googletag.pubads() ) ); } );

googletag.cmd.push(function() {
mobile_slots.push( googletag.defineSlot( “/1005424/_dPSv4_mob-all-article-bottom_(300×250)”, [300, 250], “pb-ad-78158” ).addService( googletag.pubads() ) ); } );

The post Step by Step Using Merge to Panorama in Lightroom by John Davenport appeared first on Digital Photography School.


Digital Photography School

 
Comments Off on Step by Step Using Merge to Panorama in Lightroom

Posted in Photography


Adobe Camera Raw 9 released with Merge to HDR and Panorama features

23 Apr

With the launch of Lightroom 6 and Lightroom CC, Adobe has released Camera Raw 9 with some of the some added features. Merge to HDR and Panorama are now available in ACR, using Raw image data to automatically assemble HDR and panoramic images, which are output as DNG files. This eliminates the need to edit files before merging them in Photoshop. Read more

Articles: Digital Photography Review (dpreview.com)

 
Comments Off on Adobe Camera Raw 9 released with Merge to HDR and Panorama features

Posted in Uncategorized


Adobe rolls out Lightroom CC and Lightroom 6 with HDR and panorama tools

21 Apr

Adobe has announced standalone and Creative Cloud versions of its image management and Raw conversion software, Lightroom. Among other new features the latest versions gain simple HDR and Panorama merging tools that create 16-bit DNG files from the merged results.  Read more

Articles: Digital Photography Review (dpreview.com)

 
Comments Off on Adobe rolls out Lightroom CC and Lightroom 6 with HDR and panorama tools

Posted in Uncategorized


Microsoft Image Composite Editor 2.0 offers new panorama features and improved interface

09 Feb

Microsoft’s Research’s Interactive Visual Media Group has announced the release of Image Composite Editor 2.0. The software’s latest update, taking advantage of the company’s Photosynth technology, can seamlessly stitch together ‘gigapixel images’, create panoramas from video, and automatically fill in areas of missing photographs. Read more

Articles: Digital Photography Review (dpreview.com)

 
Comments Off on Microsoft Image Composite Editor 2.0 offers new panorama features and improved interface

Posted in Uncategorized


Small world: NASA and Gigapan release ‘Global Selfie’ panorama

24 May

nasa_gigapan_1.jpg

In a unique spin on the typical Gigapan panorama we’ve come to know and love, the company teamed up with NASA on Earth Day this year for something big – an image comprised of self-portraits captured by citizens all over the world. When zoomed out, it resembles an image of Earth from space. The final product has been released, with submissions coming in from every continent. Take a look

News: Digital Photography Review (dpreview.com)

 
Comments Off on Small world: NASA and Gigapan release ‘Global Selfie’ panorama

Posted in Uncategorized


A Step By Step Guide to Making Your First Panorama Photo

08 May

Image 4

While visiting an art gallery or a photography exhibition, at times you may have noticed certain landscape photographs have extremely elongated fields of view. They seem quite impossible to have been photographed with a standard camera. If you wonder how such elongated photographs are made, you are not alone. I had my first encounter with a panoramic image of the Himalayan mountain range being displayed at Das Studios in Darjeeling, a Himalayan resort town in West Bengal, India. That photograph had a huge impact on me and it led me to searching for ways and means to photograph panoramic images.

During my initial search I figured panoramas were probably made with highly specialized cameras and lenses. But, to my surprise I found that panoramic photographs can be made with any kind of camera at your disposal. All you need is a camera, preferably one capable of shooting in Manual mode. Yes, with certain cameras and Smartphones you can get Apps for recording a panorama in a sweep but I never found the results quite satisfactory. Shooting your own panorama gives you the creative freedom and a sense of satisfaction.

How to shoot a panorama

A panorama is a combined set of individual photographs, in which two adjacent photographs have at least 20% overlapping areas. These two, or more, overlapping photographs are “stitched” with the help of software to produce extremely elongated fields of view. The overlapping is required as the software is able to understand the common areas in two adjacent photographs and hence can eliminate duplication of a scene by stitching the same into a single photograph.

Image 1

Before shooting a panorama, you need to plan out well. Here is a list of guiding factors for creating your own panorama.

#1 Shoot in Manual Mode

Since a panorama is shot over a large field of view where lighting conditions can be different, it is imperative to shoot in Manual mode with Manual Focus. This will ensure all the photographs shot have an exact exposure value and focus throughout all the images. Shooting in Automatic, Program or Semi-Automatic modes (like Shutter priority or Aperture priority) will result in different exposure values for each photograph, which in turn may cause the final merged photograph to have varied exposure and color casts in different parts of the photograph.

#2 RAW or JPEG

While you generally want to shoot in RAW, it is preferable to switch to JPEG for panoramas. Shooting in RAW is absolutely fine, but since the photographs will not be edited individually (we will see this at a later stage) and to reduce shutter lag, shooting in JPEG is preferred. A word of caution – as we will be shooting in JPEG make sure the exposure values are correctly adjusted.

#3 Tripod or handheld?

If the weight of your tripod is not a factor, carrying it is always preferable. However on a bright day you can very well rely on your own hands. A steady posture, or using your camera bag or any sturdy object available to rest the camera on, will save you the weight of carrying a tripod.

#4 Horizontal or vertical

We are generally accustomed to shoot in Landscape (horizontal) mode. Shooting in Landscape is fine but the resulting panorama will be short in height, since Landscape photographs will be stitched together. Additionally, during the stitching process there will be a lot of redundant or blank areas (you will see later during the post-processing) which need to be cropped out. This will further reduce the height of the panorama. To overcome this issue you may choose to shoot the panorama in Portrait (Vertical) mode. This will help in achieving a greater image height which can be cropped out as per requirement, say for printing or aesthetics.

#5 Be fast

Be very quick in shooting since light conditions change fast. Additionally if you are shooting a cityscape, a populated beach or a scenario where there is movement, be cautious. If you are not shooting fast enough, you will find moving objects (e.g., people, cars, bikes) will be duplicated across the frames. You would not want to see the same object twice across the panorama.

# 6 Plan it out well

Stand at the selected spot and plan the number of shots in advance. This will help you in keeping a control of the number of shots rather than shooting randomly. Be sure to do a mock round without actually shooting.

When you are ready, start shooting from left to right. Make sure you have at least 20% overlapping areas in two consecutive photographs. An visual estimate will suffice. Look through your viewfinder and shoot. Do not look at the individual photographs on your LCD screen until you finish shooting. Before leaving the scene turn on the LCD screen and review the photograph series. If you are not happy, shoot again.

Image 2

Stitching your panorama

The sext step is stitching your panorama. There are plenty of panoramic stitching software available on the internet. I will put a list of links to some of the best software at the end of this article. The stitching process is similar across software but as of now we will use the standard photo editing tool – Adobe Photoshop. The stitching process in Adobe Photoshop is fully automated.

Since you may have shot more than one panorama series, for the purpose of identification it would be easier to store each series in a separate folder. You may have shot in JPEG or RAW but make sure you do not edit individual photographs.

Steps to stitch a panorama:

  1. Open Photoshop
  2. Click File > Automate > Photomerge
  3. “Auto” is the default Layout option. Photoshop analyzes the source images and applies either a Perspective, Cylindrical, and Spherical layout, depending on which produces a better Photomerge. Choose “Auto” if it is not selected by default.
  4. Check “Blend Images Together”
  5. Next Click “Browse” and locate the separate Folder where you have put in your panorama series. Select the series and click “Ok”

Image 3

  1. Depending on the number and size of the photographs, it may take a while for Adobe Photoshop to stitch together the images.
  2. After the stitching process is completed you will find a roughly shaped panorama (with a few redundant spaces). Refer to the image above
  3. Right click on a Layer in the Layers panel and click Merge Layers
  4. The next step is to use the Crop Tool to trim out the redundant portions of the panorama
  5. After the final touches you are done with your very own first panorama

Image 4

Links to panorama stitching software:

  • AutoStitch
  • pTGui
  • Hugin
  • Autopano
  • Microsoft Image Composite Editor

If this is the first time you are creating your panorama, I would love to receive your feedback or to share your panorama in the comments below.

The post A Step By Step Guide to Making Your First Panorama Photo by Soumya Shankar Ghosal appeared first on Digital Photography School.


Digital Photography School

 
Comments Off on A Step By Step Guide to Making Your First Panorama Photo

Posted in Photography


MindShift Gear’s rotation180 Panorama Rotating Backpack – a Review

04 Apr
The rotation180 Panorama from MindShift Gearis designed around the needs of outdoor photographers.

The rotation180 Panorama from MindShift Gear is designed around the needs of outdoor photographers.

Last time I checked, I think I had something like 14 camera bags. I think it was when I got #8 or #9 that my wife asked me how many would be enough. I made the egregious mistake of replying with something along the lines of, “I don’t know. How many pairs of shoes will be enough?” Thankfully, I have quick reflexes and was able to dodge the flying stiletto and we’ve never spoken of our addictions again.

Seriously, though. Regardless of whether you are a professional photographer or an avid enthusiast, at some point along the way it becomes abundantly clear that a single camera bag is simply insufficient. Sometimes the bag that gets the gear to the gig is too big and cumbersome for the actual assignment. Sometimes you need to travel light with a bag that can handle a few essential pieces of equipment. Two of my bags don’t hold cameras or lenses at all, having been reconfigured for lights and cables. The point is, there’s no shame in being a camera bag addict. Between my shoulder bags, rolling bags, backpacks, and belt systems, I’m fairly well-covered for every eventuality. There is one type of bag, however, that I’ve wanted for a very long time. Unfortunately, it didn’t exist until just recently.

Photo backpacks are great for travel and location shooting, but they are rarely designed to allow room for anything but camera gear. Even when they are, though, you still have to deal with the inconvenience of stopping, taking off the backpack, getting the camera out of the bag, taking the shot, putting the camera back, closing the bag, putting it back on, etc. The backpack I’ve been craving can handle both the gear for a day’s photography outing, as well as plenty of room for a jacket, lunch, gloves, or other essentials…without having to stop and take the pack off my back.

Enter MindShift Gear and their rotation180° backpacks. Founded just a couple of years ago by the creators of Think Tank Photo and conservation photographer Daniel Beltrá, MindShift currently has two backpacks– the rotation180° Professional and the rotation180°Panorama– that solve the problem of accessing the gear without taking off the backpack or even missing a stride.

mindshift-panorama-camera-bag-dps-review-001

Panorama beltpack, containing Nikon D90 (85mm prime attached), 16-35mm lens, spare cards and batteries, lens cloth, and Hoodman Loupe (not shown).

rotation180° Panorama Backpack – the Specs

Weight

  • Backpack: 2.o lbs (0.9 kg)
  • Beltpack:  0.9 lbs (0.4 kg)
  • Total:  2.9 lbs (1.45 kg)

Dimensions

  • Backpack Exterior: 9.8″ W x 20.5″ H x 8.3″ L (25 x 52 x 21 cm)
  • Beltpack Interior: 9.4″ W x 7.5″ H x 4.7″ L (24 x 19 x 12 cm)
  • Beltpack Exterior: 9.8″ W x 8.2″ H x 5.1″ L (25 x 21 x 13 cm)

Volume

  • Backpack:  329 cubic inches or 5.4 litres
  • Beltpack:  1013 cubic inches or 16.6 litres
  • Total:  1342 cubic inches or 22 litres
The zipper pulls are definitely high-quality and built to last, but got a little awkward while wearing gloves. Just took a little getting used to.

The zipper pulls are definitely high-quality and built to last, but got a little awkward while wearing gloves. Just took a little getting used to.

First Impressions

It’s obvious as soon as this bag comes out of the box that it boasts the same high-quality construction and attention to detail as its cousins at Think Tank. The all-fabric exterior is treated with a durable water-resistant coating, while the fabric underside is treated with polyurethane for superior water resistance when you put it down on a wet trail. While I’m not a huge fan of the zipper pulls on this bag – they were a little tough to grip with gloves on – the YKK zippers themselves are fairly indestructible, which is a huge plus. Available in either Charcoal or Tahoe Blue, it’s nice having a bag that goes beyond the basic black that takes up most of the space in my gear closet. With plenty of pockets and storage space, this bag seems to address every aspect I’ve been looking for in a photo day pack – especially the fully rotating beltpack and dedicated hydration pocket that can hold up to a three-litre reservoir.

mindshift-panorama-camera-bag-dps-review-003

The dedicated hydration pocket can hold up to a three-litre reservoir (not included)

The Beltpack

It’s the rotating beltpack that makes this bag really special. Without it, it’s just another camera backpack that doesn’t fully address my needs. Secured in the lower section of the backpack with a sliding magnetic clasp, retrieving your camera, binoculars, maps, or other essentials is as easy as unhooking the clasp and pulling the beltpack around to the front. As an added bonus, the beltpack can be completely removed and used by itself for shorter outings or location shooting.

mindshift-panorama-camera-bag-dps-review-005

The sliding magnetic clasp is easy to release, but holds the beltpack securely in place.

mindshift-panorama-camera-bag-dps-review-006

Hitting the Trails

Beyond the quality of its materials and components, it’s once the Panorama is loaded and on your shoulders that you realize just how comfortable it is. Obviously, this is a pretty important factor. If a bag is designed around the concept of not having to take it off as often, it had better be comfortable. Starting out at a lightweight 2.9 pounds empty, the Panorama includes load-lifter straps on both the beltpack and shoulder harness, as well as a breathable padded airflow harness and curved back panel for increased stability. All this translates into a bag that can hold a lot of stuff, while keeping the load balanced, comfortable, and secure.mindshift-panorama-camera-bag-dps-review-007

Additional Accessories

While the Panorama is an awesome bag straight out of the box, MindShift has obviously given a great deal of thought to the needs of outdoor photographers. There are several accessories available which have been designed to enhance the overall experience of this bag. Each is sold separately, including:

  • Photo insert that fits the upper compartment of the bag. providing additional padded gear storage.
  • Two-piece rain cover for the main bag and beltpack
  • Tripod suspension kit
  • Filter Hive
  • Lens Switch Case
  • Contact Sheet ground tarp
  • For more information on the rotation180° Panorama and accessories, check out the MindShift website.

mindshift-panorama-camera-bag-dps-review-008

Wrap-up

The best thing I can say about any product I review is that it does what it says it does, and does it well. The rotation 180° Panorama Backpack from MindShift Gear is just such a product. Designed around the special needs of outdoor photographers and enthusiasts, this bag is going to set a new standard–one that takes into account not only how you transport your gear, but also how you use it along the way.

Have a favorite bag? Or a wish list of features in your ideal bag? Share your comments with us below.

The post MindShift Gear’s rotation180 Panorama Rotating Backpack – a Review by Jeff Guyer appeared first on Digital Photography School.


Digital Photography School

 
Comments Off on MindShift Gear’s rotation180 Panorama Rotating Backpack – a Review

Posted in Photography


Motrr Galileo puts new spin on iPhone panorama photography

09 Dec

DSC00424.jpg

The Motrr Galileo works in combination with the Sphere iOS app to automate the panorama capturing process with much more precision than handheld shooting allows. This speeds the entire process up considerably and should, at least in theory, lead to better image results. We put it to the test on connect.dpreview.com.

News: Digital Photography Review (dpreview.com)

 
Comments Off on Motrr Galileo puts new spin on iPhone panorama photography

Posted in Uncategorized


Sending Panorama Sequences from Lightroom to Photoshop

09 Nov

Sending Panorama Sequences from Lightroom to Photoshop

In addition to being able to send single images from Lightroom to Photoshop for editing you can also send a series of images to Photoshop to assemble into a panorama. This is a useful because the Photoshop panorama merge feature is pretty good (certainly since the improvements in Photoshop CS3 & CS4) and other Photoshop tools such as Content Aware Fill and the Lens Correction Filter are handy for finishing your panoramas. When you are done, click Save and the completed panorama will be sent back to Lightroom for further processing.

To see how this is done, begin inside Lightroom and select the images to assemble into a panorama. I like to put these into a collection so they are handy if I want to try multiple panorama options to select the best of them. I don’t typically process the images before sending them to Photoshop and, instead, I process the completed panorama when it returns to Lightroom. One exception to this is fixing the white balance if it were incorrectly set on the camera at capture time, for example.

Photoshop can assemble panoramas both vertically and horizontally and it can also take a mix of images such as I used here. This sequence is six shots horizontally across the front of a building and one extra shot to handle the building’s tower which wasn’t captured in the original sequence. If I’d been thinking, I would have captured some extra sky to use but we can solve that in Photoshop.

Sending Panorama Sequences from Lightroom to Photoshop 1

Select the images, right click and choose Edit In > Merge to Panorama in Photoshop.

Sending Panorama Sequences from Lightroom to Photoshop 2

Photoshop will open with the images you sent to Photoshop listed in the Photomerge dialog. Now you need to determine the Layout to use. In most cases the Auto setting will be a good choice – when you select this, Photoshop will analyze the images and determine the best of the other layout alternatives: Perspective, Cylindrical and Spherical to use.

Sending Panorama Sequences from Lightroom to Photoshop  3

Check the Blend Images Together checkbox so that the images will be seamlessly blended together – then you won’t have to do it yourself. You can also click Geometric Distortion Correction to remove the effect of any barrel, pincushion or fisheye distortion in the original images. If the edges of your images have some edge vignetting click Vignette Removal. If you’re unsure what to choose, check all three checkboxes. Click Ok and wait as the images are aligned and blended.

Once the panorama is assembled you can straighten the image if desired. To do this select all the layers and target the Ruler tool. Now drag along a line in the image which should be perfectly horizontal – you won’t be able to click the Straighten Layer button to rotate the image because you will have multiple layers selected. Instead, choose Image > Image Rotation > Arbitrary and click Ok to straighten the entire image to the angle of the Ruler line.

Sending Panorama Sequences from Lightroom to Photoshop  4

Most panoramas will then need to be cropped to a rectangle to eliminate uneven areas around the edge of the image. However, before you do this you may want to fill in some of the empty areas of the image using the Content Aware Fill tool so you can crop larger than you would otherwise be able to do. To do this you’ll either need to flatten the image to a single layer or you will need to create a new layer with the entire image on it to use. To flatten the image choose Layer > Flatten Image. To make a new layer with the image on it (but still retain the individual layers below) click the topmost layer and press Control + Alt + Shift + E (Command + Option + Shift + E on the Mac).

Sending Panorama Sequences from Lightroom to Photoshop  5

Select the area that you want to fill and then choose Edit > Fill, from the Use list choose Content Aware and click Ok. Photoshop will attempt to fill the missing area with details from the image around it. If the image contains sufficient detail you should be able to build up missing areas of sky and foreground, for example.

If you encounter problems with the Content Aware Fill feature this post will show you how to mask a layer to get better results when using it: http://digital-photography-school.com/smarter-content-aware-fill-in-photoshop. Crop the image when you have filled the edge area.

Sending Panorama Sequences from Lightroom to Photoshop 6

To fix unwanted distortion in an image you can use the Lens Correction tool. This tool works on a single layer and you run it by choosing Filter > Lens Correction > Manual. Adjust the Horizontal Perspective slider to fix problems with an image which has not been captured face onto the point of interest. Use the Vertical Perspective slider to adjust for keystoning – generally you will drag this slider to the left. Use the Geometric Distortion slider to remove barrel and pincushion distortion.

Sending Panorama Sequences from Lightroom to Photoshop 7

Once you have finished assembling the panorama choose File > Save to save the image and return to Lightroom where your panorama will be ready for further editing.

LR PS panoramaMerge 8

If you are not using Lightroom you can assemble a panorama from Bridge or from inside Photoshop. In Bridge select the panorama sequence and choose Tools > Photoshop > Photomerge in Bridge. In Photoshop, first open the images to use then choose File > Automate > Photomerge and click the Add Open Files button. In either case you will probably want to fix the image in Photoshop once the panorama is complete. If you are using Lightroom you may prefer to finish processing the panorama in Lightroom.

Layout Options

Each of the panorama Layout options in Photoshop results in a different looking panorama. Choosing Auto tells Photoshop to select the best of the options Perspective, Spherical and Cylindrical for your particular sequence of images.

Here is the result of each of the other Layout options used with our image sequence, these results haven’t been edited except to straighten the image and brighten it a little. You may want to experiment with any given sequence of images to see which of these options gives you the most pleasing result:

Perspective Layout

The panorama is assembled in relation to the middle image of your sequence of images. The middle image is placed in position and the other images arranged either side of it and skewed and repositioned as needed. This often results in edges which are taller than the middle giving rise to the term ‘bow-tie” distortion.

LR PS panoramaMerge perspective

Cylindrical Layout

This layout avoids the bow-tie distortion by showing the images as they might look if placed on an unwrapped cylinder.

LR PS panoramaMerge cylindrical

Spherical Layout

This layout arranges the images as if to cover the inside of a sphere. It is a good choice for 360 degree panoramas and can also give good results with other shorter panorama sequences.

LR PS panoramaMerge spherical

Collage Layout

This layout aligns the images matching overlapping content. If necessary, image layers are transformed and rotated.

LR PS panoramaMerge collage

Reposition Layout

This layout aligns the images matching overlapping content but without transforming or rotated the images.

LR PS panoramaMerge reposition

Post originally from: Digital Photography Tips.

Check out our more Photography Tips at Photography Tips for Beginners, Portrait Photography Tips and Wedding Photography Tips.

Sending Panorama Sequences from Lightroom to Photoshop

The post Sending Panorama Sequences from Lightroom to Photoshop by Helen Bradley appeared first on Digital Photography School.


Digital Photography School

 
Comments Off on Sending Panorama Sequences from Lightroom to Photoshop

Posted in Photography