RSS
 

Posts Tagged ‘Mountain’

15 Mountain Landscape Photography Tips for Stunning Images

16 Apr

The post 15 Mountain Landscape Photography Tips for Stunning Images appeared first on Digital Photography School. It was authored by John McIntire.

15 mountain landscape photography tips for stunning images

Of all of the undertakings you can make with your camera, mountain landscape photography can be one of the most rewarding. Apart from the fact that mountains are straight-up beautiful, their imposing nature makes them a great landscape photography element. 

This article will give you 15 quick tips – so you get better results the next time you go chasing after mountains. 

1. Fill the frame

Mountains, by nature, are huge. You don’t have to get the entire thing in the frame. It’s just as acceptable to fill the frame with a certain element that draws your attention. This will make the mountain the background in your images.

Yes, it can be tempting to try and get a huge vista in the frame. But if you take a moment to look for smaller details that could make an interesting photo, you might find something unexpected.

15 mountain landscape photography tips
Although the entirety of the mountain isn’t in the frame, it is still clear that the background is a mountain, and the tight crop gives a clue to just how big it is.
Canon 5D Mark III | Canon EF 70-200mm f/4L IS USM | 200mm | f/5.6 | 1/2000s | ISO 200

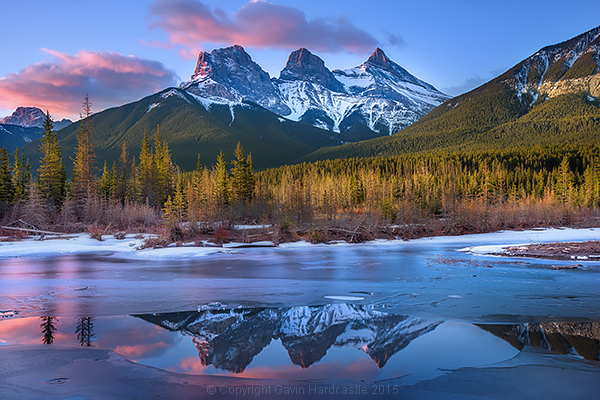
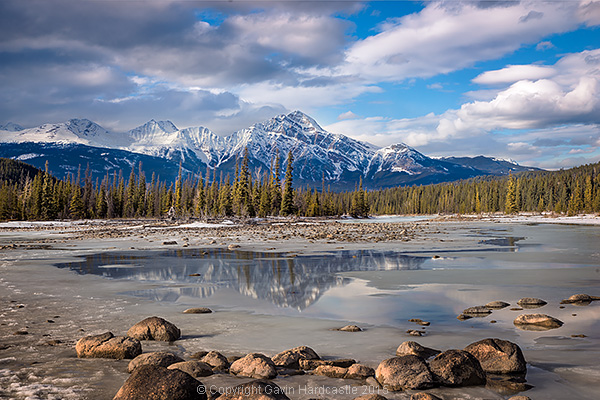
2. Use reflections when possible

mountain landscape photography lake reflection
Using reflections in your compositions is a great way to show off mountains.
Canon 7D | Canon EF 35mm f/2 | 35mm | f/16 | 1/50s | ISO 100

If the mountains you are photographing are near a body of water, you already have a ton of visual interest to use in your foregrounds.

If you can, wait until the water is still. Then you can use the reflections of the mountains in your composition. This may be personal taste, but it is always a winning combination in my book. 

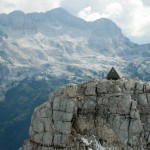
3. Show scale with smaller elements

village on a mountaintop
This tiny village near the top of a mountain in Spain shows just how enormous the landscape is.
Canon 7D | Canon EF 35mm f/2 | f/11 | 1/60s | ISO 100

Again, mountains tend to be huge, but when you shoot with an ultra-wide-angle lens, you wind up pushing the perspective back. And this makes it difficult to give your viewers a true sense of just how large things are within your frame.

You can combat this by including an element that shows the scale of things in the scene. Buildings, people, and animals all work well.

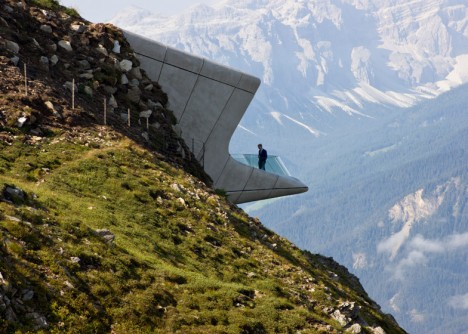
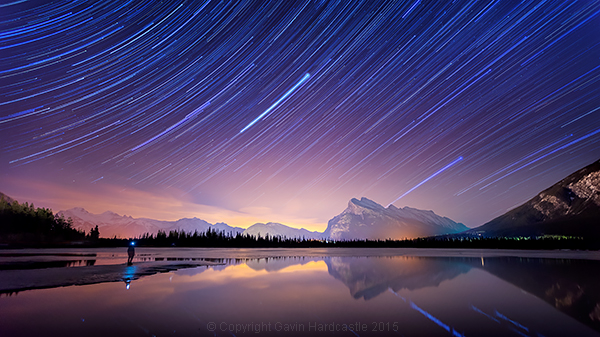
4. Include people in the landscape

As with the previous point, putting people in your mountain landscape photography can convey just how big the mountains are.

It does more than that, however. Because with the inclusion of a human element, you are adding something that your viewers can relate to. 
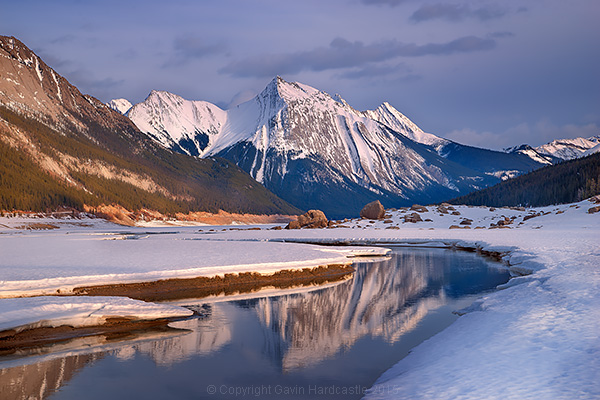
5. Try a panorama

lake reflection with mountains
Stitching several images together into a panorama is a great way to ensure that you capture the entire scene.
Canon 7D | Canon EF 35mm f/2 | f/16 | 0.4s | ISO 100

When you are photographing mountains, don’t be afraid to take a sequence of shots that you can stitch together as a panorama.

Mountain ranges tend to suit the panorama format especially well because there is just so much to see!

6. Fill your foreground

This may be standard landscape photography advice, but it still applies when shooting mountains. If you’re using a wide-angle lens, you will have plenty of space in your foreground – and you’ll need to fill it with something interesting.

So pick a foreground subject and get up close to it. This could be flowers, an interesting rock formation, or something simple like a sign. 

Then take a shot that combines the interesting foreground and a beautiful mountain background, like this:

mountain landscape photography foreground flowers with mountains in the background
Having lots of visual interest in the foreground of your images can help your viewers stay engaged.
Canon 7D | Sigma EF 10-20mm f/3.5 | 10mm | f/11 | 1/60s | ISO 100

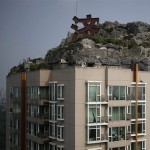
7. Include a human element

mountain landscape photography village
Not all mountains are wild places. Including signs of human habitation can be a good way to capture something interesting.
Canon 5D Mark III | Canon EF 70-200mm f/4L IS USM | 169mm | f/11 | 1/60s | ISO 100

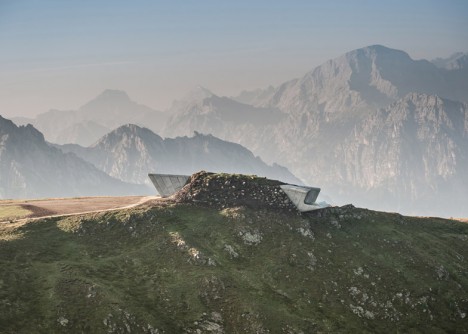
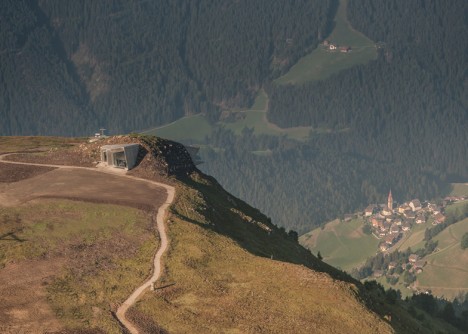
By human element, I don’t mean people. Instead, I advise you to find something human-made that will show your viewers how the people that live nearby incorporate the mountain into their lives.

On their own, mountains are impressive. But as part of our world, they are also part of our lives. If you can show this in your images, you might be able to convey an interesting narrative.

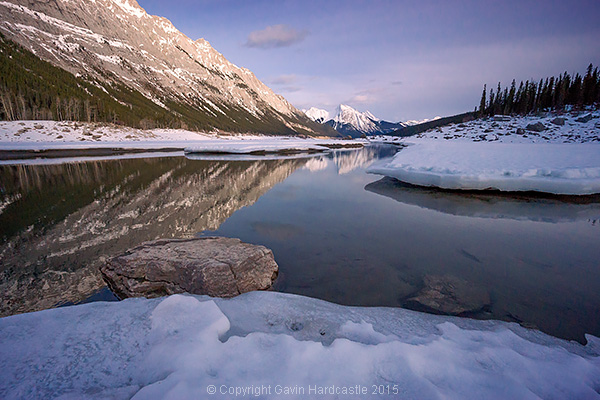
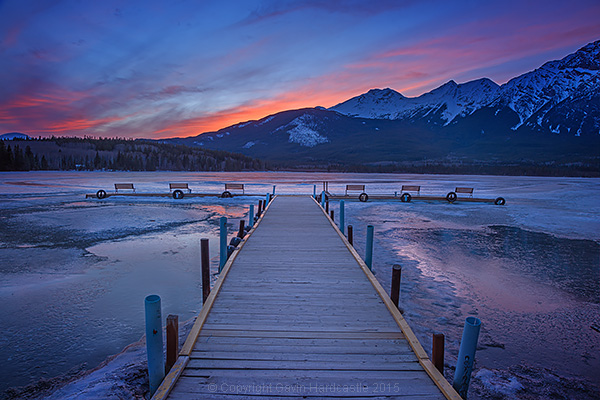
8. Use a different focal point

mountain landscape photography
In mountain landscape photography, the mountain doesn’t need to be the focal point of your image. Even in this case, where there’s a mountain, a glacier, and a volcano!
Canon 7D | Canon EF 35mm f/2 | 35mm | f/11 | 0.5s | ISO 100

In your mountain landscape photography, the mountain does not need to be the focal point of your image. Instead, you can find a different focal point and use the mountain as environmental information.

Of course, you can still take a photograph of the sweeping vista. But once that is done, look smaller – and see if there are other subjects to be found in the scene.

9. Use your GND filters

mountain with farm fields
Graduated neutral density filters are a great way to control your exposures.
Canon 7D | Sigma EF 10-20mm f/3.5 | 10mm | f/16 | 0.3s | ISO 100

To help you get good exposures while in the field, don’t forget to pack your graduated neutral density filters. These will allow you to even out your exposures at the time of capture, making it easier to process your images when you get back home. 

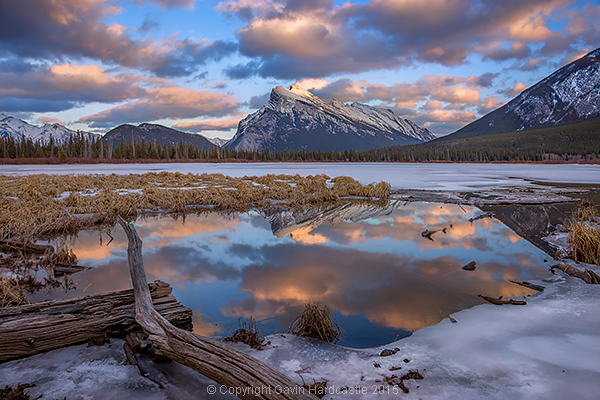
10. Wait for the light

foggy mountain lake
Here, I waited from 4 AM to 8 AM for the fog to break. If you can, always, always try to wait out the weather.
Canon 7D | Sigma EF 10-20mm f/3.5 | 11mm | f/16 | 0.5s | ISO 100

This tip cannot be understated. If you want the best-looking mountain landscape photography images that you can produce, wait for the light to be at its best. If you get on location early and find the composition that you want, don’t be afraid to stay until the light shifts – even if it takes a couple of hours.

Yes, I know it can seem boring, and it’s hard to justify the effort, but please, trust me. It is very much worth the time and effort. 

11. Use longer lenses

When you are packing for your trip into the mountains, don’t forget to take your longer lenses with you. Standard-length primes can be great for panoramas, but telephoto lenses can help you pick out smaller details in your scenes.

In other words:

There is a lot of room in landscape photography for lenses aside from the wide angles that dominate the genre.

12. Plan for the light

With the technology available to us, it’s easier than ever to know exactly which direction the light is going to come from on any given day of the year.

So once you know when and where you are going, do your research and figure out where the sun is going to rise or set. Then plan your shots based on that. 

13. Plan for the weather

Like planning for the light, it’s also a good idea to plan for the weather. Knowing the weather will help you determine if you need to pack any extra gear like rain covers and waterproof clothing.

Of course, it’s also in the best interest of personal safety to have an idea of when snow or rain might appear. This is even more important if you intend to be on the mountain, especially after golden hour. 

14. Don’t avoid bad weather

moody mountain landscape photography
After an entire day of low visibility, the fog broke for a total of five minutes, just long enough for a shot. Don’t avoid bad weather, even if you ultimately fail to get a photo.
Canon 7D | Sigma EF 10-20mm f/3.5 | 20mm | f/16 | 1/30s | ISO 100

While planning for bad weather is good, you don’t always need to stay indoors. Many times, the most interesting photos will come in the worst weather.

In fact, some of the best light I have ever seen has been during a break in a storm; these breaks allow just enough light to make things look like a fairytale.

And if you lock yourself away when the weather is bad, you’ll never get to experience such moments.

15. Be safe

Above all, strive for safety. Mountain landscape photography can be incredibly rewarding, but don’t risk your personal well-being for a great shot.

Watch where you’re going, take weather-appropriate clothing, be aware of the forecast, and tell somebody where you are going to be. And if you’re going to stay out until after blue hour, make sure you know exactly how to get back. 

Mountain landscape photography: the end

I hope this article has inspired you to get out and create your own mountain landscape photography.

The next time you’re out shooting mountains, remember these tips – and have fun!

Have you photographed mountains before? Do you have any tips of your own? Share them in the comments below!

What type of lens is best for mountain landscape photography?

All lenses have their uses. Wide-angle lenses are the most popular, but standard and telephoto lenses can work, too.

What’s the best time of day to photograph mountains?

It entirely depends on where the light is hitting the mountain. The golden hours are best as long as the sun isn’t behind your mountain.

How do you show how big a mountain is in a photograph?

You include an element that is easy for the viewer to identify, such as a person. This will give your images a sense of scale.

Why do the mountains in my photographs look so far away?

Wide-angle lenses distort perspective, and this can push everything back in the frame. Use a standard focal length (35mm to 50mm) for a perspective close to the human eye’s. To include more in the frame, consider shooting in a panoramic format.

The post 15 Mountain Landscape Photography Tips for Stunning Images appeared first on Digital Photography School. It was authored by John McIntire.


Digital Photography School

 
Comments Off on 15 Mountain Landscape Photography Tips for Stunning Images

Posted in Photography


Almost human: photographing critically endangered mountain gorillas

11 Nov

I’ve recently returned from a visit to Africa, where I spent three days photographing mountain gorillas in Uganda. It had been a long while since I’d last photographed animals. I started my way in the photography world shooting wildlife, but for many reasons I quickly became obsessed with landscape photography and went on to devote most of my time, attention and resources into this field. I have been wanting to revisit wildlife photography for ages, and when two friends of mine mentioned they were going to photograph mountain gorillas, it seemed like a sign that the time had come for me to take the first step back into that world.

Mountain gorillas are a critically endangered species only found in central Africa (Rwanda, Uganda and DR Congo). After coming back from the brink of extinction with numbers as low as 254, massive conservation efforts have resulted in their numbers slowly rising, and they have recently topped the 1000 figure. Still, these numbers are very, very low and they are dependent on conservation efforts to survive.

A silverback mountain gorilla in a striking pose. Their similarity to humans, in so many aspects, is astounding.

To avoid too much human contact, the Uganda Wildlife Authority (UWA) allows people to be with the gorillas for no more than one hour a day. That hour comes at a cost of hundreds of dollars. Multiply that by the number of shoots you want to conduct, and you get the cost for the permits. Not cheap at all, and keep in mind that hotels, food and a car with a driver have to be added to the cost, not to mention (well-deserved) tips for the gorilla tracking crew.

A mountain gorilla toddler trying its strength at eating the bamboo shoots his elders love so much.

Every morning, after a drive to the park, we met our porters, handed them our photo bags, and walked for a few minutes to reach the ranger’s hut. After undergoing a safety briefing, we started the hike. A gorilla tracking team had already located the gorillas, and were in touch with the ranger to let him know where to go.

The hike isn’t particularly difficult, but it is uphill. We usually reached the gorillas after 1.5 or 2 hours, depending on the gorillas’ location and on the pace of hiking. When getting closer to the gorillas, we could hear the chest-pounding and smell the overwhelming and unmistakable gorilla body-odor (wow).

Two mountain gorilla toddlers play-fighting over a branch. They are developing their skills for years later when they’re adult silverbacks fighting for life itself and the right to procreate.

After years without doing any serious wildlife photography, I was a bit concerned that the learning curve would be too moderate. On one hand, my composition skills have been well trained by shooting landscapes. On the other hand, landscape doesn’t move that much or face away, and wildlife shoots are much more dynamic. I made peace with the possibility that some of the precious time with the gorillas would be partially wasted on regaining my wildlife shooting instincts. I knew I had to try to learn on the fly as well as I could, and most importantly, be very focused on the mission and make the best out of my time among the gorillas.

This juvenile mountain gorilla was trying on a tough stance and some chest-pounding. Others in the group were not impressed.

The gorillas are much more incredible in real life than can ever be shown with an image. The sheer size of the silverback males is astounding – they weigh in at over 200kg, without a gram of fat on them. Their heads are as big as watermelons, and their hands are huge. To maintain that bulk, they have to eat about 35kg of vegetation every single day.

The toddlers and juveniles love fooling around, dangling from branches and making funny faces. You are not allowed to approach the gorillas too closely, but that doesn’t mean a curious youngling can’t take interest and inspect the strange creature with the shiny thing!

With his mother lazily watching, this toddler came very close to my lens when I was lying on the ground, trying to get an angle. This resulted in an interesting wide-angle perspective.

The very dynamic and playful nature of the toddlers often made the situation very chaotic. It was difficult following them when dangling from the branches, getting a focused shot while maintaining good composition. This was the biggest challenge, and I feel I didn’t perform perfectly in this aspect. Still, I got a few lucky shots.

A seemingly frustrated mountain gorilla mother frowns as her very mischievous toddler dangles from nearby branches.

The conditions were not easy. A thick cloud cover offered beautiful soft light, but also made it quite dark, with the thick vegetation not helping. To add to this, the gorillas often stay beneath trees. High ISO is extremely important in such conditions – I often found myself shooting at 3200, 6400 and even 12800. Even that was often not enough.

I had brought most of my lens arsenal to this shoot, but found myself mostly shooting with my Canon 70-300mm F4-5.6L IS (for faraway animals and for close portraits) and with my Canon 16-35mm F2.8L III (for closer encounters and for multiple gorillas in one shot). I almost always used wide open aperture, for obvious reasons.

I took this image at ISO 12800, and to get a proper exposure, a shutter speed of 1/25 sec was needed at 70mm, F4.

To get interesting shots, good compositions are important. While in landscape photography compositions are relatively easy to pre-visualize, wildlife doesn’t always cooperate. It is up to the photographer to find the opportunities when the animals position themselves in a compelling way within their surroundings.

This silverback male sat in a way that framed him with leaves.

It’s important to use the nearby elements, to connect the subject with its surroundings.

I think the most captivating thing that the gorillas offer is a glimpse into us as a species. In my personal opinion, there is simply no way you can see them in reality and still think we’re not related. The look in their eyes, their grumpiness after the rain, their fingerprints – everything about them is so (almost) human.

All in all, photographing the gorillas was an excellent experience for me, a perfect return to the world of wildlife photography and one that encouraged me to shoot much more wildlife in the future. The excitement and many challenges kept me focused and helped me give it my best efforts. I hope you’ve enjoyed the images, and perhaps you will consider making the effort and visiting these magnificent relatives of ours yourself.


Erez Marom is a professional nature photographer, photography guide and traveler based in Israel. You can follow Erez’s work on Instagram and Facebook, and subscribe to his mailing list for updates.

If you’d like to experience and shoot some of the most fascinating landscapes on earth with Erez as your guide, take a look at his unique photography workshops in The Lofoten Islands, Greenland, Namibia, the Faroe Islands and Ethiopia.

Erez offers video tutorials discussing his images and explaining how he achieved them.

Selected Articles by Erez Marom:

  • Parallelism in Landscape Photography
  • Winds of Change: Shooting changing landscapes
  • Behind the Shot: Dark Matter
  • On the Importance of Naming Images
  • On Causality in Landscape Photography
  • Behind the Shot: Lost in Space
  • The Art of the Unforeground
  • Whatever it Doesn’t Take

Articles: Digital Photography Review (dpreview.com)

 
Comments Off on Almost human: photographing critically endangered mountain gorillas

Posted in Uncategorized


Pro mountain filmmaker Jimmy Chin takes the DJI Mavic 2 Zoom to Greenland

09 Nov

Professional mountain photographer and filmmaker Jimmy Chin has worked on all seven continents, in some of the most remote places on earth. A hugely experienced climber, Chin has had more than his fair share of brushes with disaster in the mountains, where every ounce of weight counts when it comes to getting great shots – and getting down in one piece.

Jimmy Chin’s current film ‘Free Solo’ follows climber Alex Honnold as he became the first person to ever free solo climb Yosemite’s 3,000ft high El Capitan Wall last summer. Only slightly less hazardous was a more recent trip to Greenland for DJI, with professional ski mountaineer Kit Deslauriers.

Over a more than 20-year career, Chin is still inspired by the challenge of “going to new places and exploring mountains in remote places”. For the Greenland trip, alongside his normal DSLR kit Chin brought along DJI’s newest consumer drone, the 4K-capable Mavic 2 Zoom to capture footage of their adventure.

Chin describes the Mavic 2 Zoom as a “multi-tool”, which he used for everything from high production-value shots to scouting locations

The DJI Mavic 2 comes in two versions – the high-end ‘Pro’ with a 1-inch sensor, and the less costly but more flexible ‘Zoom’, which offers an optical zoom lens. Chin describes the Mavic 2 Zoom as a “multi-tool”, which he used in Greenland for everything from high production-value ‘dolly zoom’ and tracking shots to scouting locations and routes. When you’re shooting in the mountains, it might take hours to get up to a certain peak, but with the Mavic 2 Zoom, he could go in search of great-looking locations – and look out for hazards – remotely.

Speaking of remote, in such extreme conditions, gear needs to be reliable, but it also needs to be easy to use. In Chin’s words, “you need equipment that’s intuitive, and which you don’t have to spend a bunch of time figuring out how to make it work” because, as he says, “a lot of your mental bandwidth is taken up by making sure you’re being safe”.

Behind the scenes in Greenland with the DJI Mavic 2

Among Chin’s favorite shots from the trip are the aerial tracking sequences, showing Deslaurier descending down the mountain slopes. In the past, Chin says, “I couldn’t have got those shots in the past without a helicopter. They’re very difficult angles to get when you’re high up in those remote areas. Traditionally, those kinds of shots are expensive, they’re high production-value shots, and being able to create them with a drone I can carry in the top of my pack is incredible”.

As well as its portability, Chin praises the quality of the video that the Mavic 2 Zoom can capture. “You need a camera which offers high quality, because shooting in a location like Greenland, you know it might not be possible to ever go back. Every shot is potentially a once-in-a-lifetime shot”.


This is sponsored content, created by DJI. What does this mean?

Articles: Digital Photography Review (dpreview.com)

 
Comments Off on Pro mountain filmmaker Jimmy Chin takes the DJI Mavic 2 Zoom to Greenland

Posted in Uncategorized


Behind the scenes: Photographing mountain hares in Scotland

04 Mar

The high winds blow the snowflakes into my face, and the stinging feeling in my eyes forces me to look down as I continue to walk forward. I remove the snow that has gathered in the lens hood on my Nikon 200-500mm and, with my binoculars, I search the landscape in front of me.

Nothing to see. Not a single mountain hare.

I am in a total whiteout of blowing snow, and it’s only because of the more clear and calm weather of a few hours ago that I’m aware of the the beauty of this Scottish landscape I am surrounded by here in the heart of the Cairngorms National park.

Who I Am

My name is Morten Hilmer and I am a full time professional wildlife photographer and former special force soldier in the Arctic Dogsled unit – the Sirius Dogsled Patrol. I am specialized in photographing in the Arctic regions and since 2005 I have spent more than 4 years in the amazing high Arctic nature.

(You can read more about my time in the Sirius Dog Sled Patrol on the BBC Earth website).

Beside the many publications, my photographs have been awarded in the Wildlife photographer of the year and European Wildlife Photographer of the Year photo competitions. And in Spring 2017, I published my first book: Silence of the North.

Wildlife photography for me is all about fascination, getting close to nature, feeling its authenticity, and sometimes even feeling reunited. Through my work, it is my mission to share my fascination and raise awareness of the importance of taking care of this awesome planet and all creatures living on it.

Nature Photography is also about adventures—whether the adventure is an expedition to the desolated freezing ice desert of North Greenland, or a shorter trip to the local forest. For me one is never better than the other.

Photographing Mountain Hares

A short break in the snowfall gives me just enough visibility to skim the landscape in front of me and just enough time to get a glimpse of a movement about 50 meters in front of me. I kneel down to support my arm on my knee to keep the binocular more steady. It is the the mountain hare. Instantly I feel excited and extremely lucky.

Slowly, I walk closer while concentrating on the hare and keeping my movements as slow and invisible as possible—I don’t want to scare this little guy. Not only will it destroy my opportunity to get some good shots, but more importantly, it will disturb this little hare that already has a hard time finding enough food to get through the winter.

I am now quite close and I decide to leave my camera bag behind to make it easier to crawl the last distance. I grab an extra battery and my card holder, and get my vlogging camera ready with the microphone. I fell the need to share this moment, even though it adds another challenging element that I have to record myself at the same time as I am working.

What’s In My Bag

For a trip like this, I need to be able to cary everything on my back, which means all of my equipment has to fit into one Lowepro Pro trekker 600 AW. Therefore, I decided to leave my big Nikon 600mm F4 at home and instead bring the smaller, lighter and more flexible Nikon 200-500mm.

As for the camera, I am using my Nikon D5—primary because of its durability in cold, wet conditions like this one. I was tempted to bring the D850 because of the superb image quality, but I have had a few moisture problems when I’ve really challenged it with snow and heavy rain.

I have also brought the Nikon 16-35mm VR and, of course, some extra batteries, cards, cleaning equipment etc.

As for my vlogging camera, I am currently using a Panasonic GH5 with the Røde Videomicro and the 42.5mm and 12mm Leica lenses. I charge the batteries for this camera with power banks.

If you want to dive deeper into my equipment, I explain it in a little more depth in this video.

How I Set Up My Camera

Everything is ready and I move a little bit closer. Through the viewfinder, I can sometimes see the hare and sometimes it disappears, hidden by the blowing snow.

I find myself using almost the exact same camera setup and setting whenever I capture wildlife photography, regardless of which camera and brand I am using. I primary shoot with Nikon, but I have also worked with the Canon 1D X Mark II, the Canon 5D Mark IV, and the Sony A7S.

My camera is set to manual exposure, and because of the constantly changing light I turn on auto ISO. I use this setting because I want to be able to set both the aperture and shutter speed myself to get the perfect level of blurred background, and at the same time use the shutter speed that gives me the exact level of movement in the blowing snow that I want.

This way, I get the best from both the worlds of aperture and shutter priority programs, allowing only the ISO to be the variable factor. Yes, I do run the risk of noise, but I always keep and eye on how high the ISO goes as I shoot.

I set my AF to 3D, and assign the function button on the front to single point AF—I am ready.

An Amazing Experience

It is interesting how looking into the viewfinder can make everything else around me disappear. I reckon all photographers know this feeling. Only me and the little hare—nothing else exists. I watch how he sits there in his little snow bed and, only every now-and-then, he moves a little bit. I don’t dare to take my eyes from the viewfinder.

Suddenly, the hare raises and stretches his long leg and then, without warning, he rolls around in the snow. The time he gives me to react is too short but what did I expect—this is what us wildlife photographers have to deal with all the time, and I assume it’s also one of the things that makes us keep going out again and again… all these photos that we have seen but haven’t been able to capture.

I manage to get a few shots of the rolling hare, but already before I look at them, I know they are not totally in focus. This is fantastic—so intense.

The little fellow sits for a moment looking at me and I pray that he will not run away. He decides to stay. He starts eating the sparse vegetation and with his small paws he scrapes away the snow on top.

I don’t know for how long I have been here, but it is getting quite dark and I am getting colder laying in the snow. My thoughts starts to travel to the side pocket of my backpack where I keep my thermal with warm coffee.

As I walk down the mountain I think about this little hare who is still sitting up there on the mountain in the blizzard, patiently waiting for the Spring. It is so fascinating how they manage to survive in such conditions. It is my first time photographing wildlife in Scotland, but definitely not the last. It has been an absolutely fantastic experience to spend some time with the hares in highlands of this amazing country and tomorrow I am going further up north to find and hopefully photograph the impressive stags.

A Few of My Favorite Settings

Set custom button to preview

One of the most important things for me is that I want to have my left hand on the lens— at the ready to zoom in or out, and to take over manually when autofocus fails. Therefore, I always set one of the custom buttons to preview the image, and another to zoom the image 100%.

I like to have the preview button as the lowest function button on the front of the camera, so that I can press it with one of my fingers without having to move my index finger from the shutter and the thumb from my AF-lock button.

Predefined AF on custom button

Before I start photographing, I alway choose the autofocus method that I believe will do the best job. In my case, it is often the 3D AF on the Nikon D5—either that, or single point AF. Then I try to predict which other AF method I will need, and I set the top button on the front of the camera to use this method as long as it’s pressed.

Auto ISO on/off

Because of the option of doing exposure compensation in manual mode with auto ISO on, I use either this setting or full manual almost all the time. I call Manual with Auto ISO: MAI. To be able to make a quick switch between M and MAI, I setup one of the custom buttons near the release button to toggle Auto ISO on/off.

Behind the Scenes Videos

In November 2017, I started a new video project that takes other photographers and nature enthusiasts behind the scenes on my travels. In a series of 4k YouTube videos, I share my experiences from my trips and expeditions around the world.

Below are Part 1 and Part 2 of Photographing Mountain Hares:


Morten Hilmer is a professional wildlife photographer and former Danish special forces soldier in the Sirius Dog Sled Patrol, an Arctic dog sled unit. For the past 13 years, he’s specialized in capturing Arctic landscapes and wildlife. You can find more of his work on his website, or by following him on Instagram and Facebook.

Articles: Digital Photography Review (dpreview.com)

 
Comments Off on Behind the scenes: Photographing mountain hares in Scotland

Posted in Uncategorized


Water in Red Mountain Open Space – Fat Bike Exploration

30 Nov

As a paddler I am always looking for water. Anytime! Anywhere! In November 2017 I made several visits to Red Mountain Open Space north of Fort Collins with my new Salsa Mukluk fat bike. I covered all possible trails. Technically, […]
paddling with a camera

 
Comments Off on Water in Red Mountain Open Space – Fat Bike Exploration

Posted in Photography


Behind the scenes: Mountain bike self-portrait under the Milky Way

03 Sep

Here in Marlborough, New Zealand, I’ve been able to indulge two of my passions: night sky photography and mountain biking. But my time in this part of the world is almost up, and lately I’ve been wondering how I can combine these. So a couple of weeks ago I did a bit of location scoping around the outlying hills. I jogged to the top of the mountain bike park, and ended up at a spot that I might be able to make something of.

Back in front of the PC I consulted the planetarium software, Stellarium, and checked the moon phases. Conditions looked OK in just a couple of days, but would the forecast cloud cover hold off?

On the day I set my internal alarm and had a glance outside, almost hoping there would be cloud so I could retreat under the covers. Not to be, so I leapt on the bike and put the hammer down to get up the hills in time. I really had to shift it as the galactic arc was dropping rapidly—anything too long after 3:30am would be too late. After a brutal hill climb in subzero conditions (and the odd wrong turn in the dark) I made it to the spot. Time: 3:31am.

I allowed myself a minute to catch my breath and then set up the equipment for the panorama. The idea was to radio trigger the flashgun and position it on the fence line, but with frozen fingers and a lack of time I decided to keep the strobe in the hotshoe instead. To get myself into the frame I simply used the self-timer.

A number of attempts were needed to position myself and then get the flash output on point. Because I had decided to shed my heavy jacket for the shoot, there was a degree of urgency before I froze solid. Finally I was satisfied, and then there was the dicey descent back to civilization.

The great thing about night sky photography is the surprise that awaits back at the PC when you stitch the images together. Not bad, I thought. It would have been nice to have a bit more moonlight on the singletrack, and the arc a bit higher, but for a first time Milky Way Mountain Bike Self Portrait… I’ll take it. Thanks Marlborough.


Sarnim Dean is a photographer and loyal DPReview reader who has been featured previously in a reader showcase here on DPR. To see more of his work, be sure to visit his website.

Articles: Digital Photography Review (dpreview.com)

 
Comments Off on Behind the scenes: Mountain bike self-portrait under the Milky Way

Posted in Uncategorized


Great heights: Tim Kemple’s aerial mountain photography

13 Nov

$ (document).ready(function() { SampleGalleryV2({“containerId”:”embeddedSampleGallery_8811300677″,”galleryId”:”8811300677″,”isEmbeddedWidget”:true,”standalone”:false,”selectedImageIndex”:0,”startInCommentsView”:false,”isMobile”:false}) });

Adventure photographer Tim Kemple has made a project of photographing some of the world’s tallest peaks from high-altitude planes and helicopters. ‘I’ve always been fascinated by the mountains. Call it a genuine obsession honestly,’ he tells Resource Travel. 

Given the potential risks – and great expense – to fly near these behemoths, Kemple has been working on his passion project slowly, crossing locations off his list one by one. When he’s done, he hopes to have captured each of the seven summits and a number of his favorites photographed. We’d say he’s off to an excellent start.

Read the full interview and see more of Kemple’s photos at Resource Travel

Articles: Digital Photography Review (dpreview.com)

 
Comments Off on Great heights: Tim Kemple’s aerial mountain photography

Posted in Uncategorized


Snow Cover: Subterranean Museum Pierces Alpine Mountain Peak

06 Aug

[ By WebUrbanist in Architecture & Public & Institutional. ]

mountain museum overhang

Buried within a mountaintop nearly 7,500 feet above sea level, this remarkable semi-subterranean mountaineering museum, designed for a unique client – the first man to scale Everest without oxygen.

mountain peak museum

musem picture windows

Designed by Zaha Hadid (images by Werner Huthmacher), the Messner Mountain Museum Corones refers to Reinhold Messner. Located atop Mount Kronplatz in Italy, it is the first in a series of planned mountaintop museums, each designed to create a sense of journey and adventure for its visitors.

mountain view out

In this case, one arrives from the side then continues below the surface before emerging to discover a dazzling view of the surrounding landscapes and peaks, framed by huge windows or enjoyed from a balcony jutting over the edge.

museum curved forms

museum interior design

As one travels through the building, the focus shifts from artifacts and exhibits within the museum back to the outdoor world that inspired this famous climber to become the first to ascend all fourteen of the world’s tallest peaks. The signature curves of Hadid’s work guide one through narrowing and widening spaces, slopes and steps, each shaping the experience.

mountaintop museum plan

From the architects: “A composition of fluid, interconnected volumes, the 1000 sq. m. MMM Corones design is carved within the mountain and informed by the geology and topography of its context. A sharp glass canopy, like a fragment of glacial ice, rises from the rock to mark and protect the museum’s entrance”

mountaintop museum

Without further landscaping, it is hard to say whether the building in reality reflects the mountain-piercing concept, but a freshly-constructed work of architecture is rarely finished until more greenery (and maybe in this case some additional dirt) comes back into play.

museum from above

mountain museum balcony

More from Messner on the museum itself: “On Kronplatz I present the development of modern mountaineering and 250 years of progress with regard to the equipment. I speak of triumphs and tragedies on the world’s most famous peaks – the Matterhorn, Cerro Torre, K2 – and shed light on alpinism with the help of relics, thoughts, works of art, and by reflecting the outside mountain backcloth in the interior of MMM Corones.”

Share on Facebook


[ By WebUrbanist in Architecture & Public & Institutional. ]

[ WebUrbanist | Archives | Galleries | Privacy | TOS ]


WebUrbanist

 
Comments Off on Snow Cover: Subterranean Museum Pierces Alpine Mountain Peak

Posted in Creativity


f-stop gear introduces four additions to its Mountain Series of tough terrain bags

28 May

f-stop gear, maker of rugged camera bags, has introduced three new models and a refreshed existing model to its Mountain Series. The Ajna, Sukha, Shinn and Tilopa offer increased durability and ripstop Nylon shells for weather-proofing. Read more

Articles: Digital Photography Review (dpreview.com)

 
Comments Off on f-stop gear introduces four additions to its Mountain Series of tough terrain bags

Posted in Uncategorized


9 Tips for Photographing Mountain Lake Reflections

26 Apr

How to Photograph Mountain Landscapes

There’s something ultimately alluring about lake and river reflections in landscape photography, especially when surrounded by majestic snow capped mountains that glow hot from the light of the setting sun.

Here’s a little time-lapse video I put together using some of my recent lake reflection still shots in Alberta, Canada. Each frame is from a still image shot with a small mirrorless digital camera. Read on to learn the methods I use when trying to capture stunning lake and river reflections in my photography.

1 – Don’t shoot super wide

Regardless of whether your camera is full frame, APS-C or MFT (micro four thirds), it’s important to realize that when shooting mountain reflections you might not need your widest lens to capture the most pleasing composition.

A lot of the time I shoot in the super wide realm but that doesn’t work so well when shooting mountain reflections. A super wide lens tends to reduce the epic size of the distant mountains and magnifies the foreground.

That’s great when you can get fairly close to my central subject, but when that subject is a snow capped mountain a few kilometers away, it’s time to strap on a lens that gets you closer to the action.

At my most recent visit to Banff and Jasper in Alberta I found that I rarely shot with anything wider than 35mm on full frame. In many cases I was zoomed in past 50mm, and often beyond 100mm. Here’s an example.

This first shot is at a focal length of 70mm.

How to shoot mountain lake reflections

This second shot is at 16mm, super wide. There are a few minutes of light change in between the shots but otherwise it’s the exact same scene, from almost exactly the same position. I don’t know about you, but I much prefer the simpler, cleaner composition of the first, zoomed image.

How to shoot mountain river scenes

2 – Fill your frame with what’s cool

This is good advice for any kind of photography but with mountain lake reflections it’s easy to get wowed by the colourful clouds that are reflecting in the mirror surface lake. If they really are doing something impressive then by all means, devote some frame space to the clouds.

You’ll find however, that when you zoom closer to fill your frame with your most impressive mountain range and reflection, your image may have much more impact. At times this isn’t too obvious when you look through the viewfinder or LCD but when you view that zoomed image back on a large computer screen it often has more wow factor than your wider, cloud filled image.

How to Photograph River Landscapes

3 – Waiting for the wind to stop

If you’re out on a gale force windy day, don’t expect any lake reflections. You need that water to be perfectly still for good reflections. A mild, occasional wind is fine, just stick around and wait for it to periodically die down. You only need a few minutes. Bring a camp chair and thermos, then chill out while you wait for the perfect moment. It’ll come.

4 – Shoot two versions – adjust the polarizer

If you shoot lake scenes without a polarizer you’ll get a lovely mirror-like reflection, but you might be missing out on some interesting details under the water in the foreground. I like to take at least two shots with my polarizer in different positions. One shot will give me the maximum reflection while the other shot will reduce that reflection to reveal the details under the water.

I can then easily blend these two exposures in Photoshop to get the best mixture of reflection and water detail.

5 – Interrupt the reflection

Vermillion Lakes, Banff - Mirror World by Gavin Hardcastle

I have a thing for the interrupted reflection. I find it more interesting to have my mountain reflection interrupted by ice formations, river bends, rocks and branches as apposed to a completely whole and perfect reflection. Try and avoid that obvious BAM reflection. Be a bit clever and put some thought into how you can make the reflection more interesting.

6 – Get down low

I like to pick the most interesting point of my mountain range then find a spot in my foreground that reflects that interesting point. I often need to get the camera down lower to achieve this, sometimes adjusting the tripod to its lowest point. At times you might not need to get so low and maybe just step back a few feet to place your reflection where you need it to be.

You can’t change where the mountain is, but you can change your position relative to it to capture the most interesting foreground and reflection.

7 – Look for framing elements in the foreground

If possible, try to incorporate elements in your foreground than frame the scene. It creates a window into your scene that we humans find very appealing.

8 – Look for leading lines in your foreground

Lake Photography Tutorial

Try and find foreground elements that suck the eye in to the centre of your image. Use rocks, logs and branches to blatantly point at the mountain scene in your image. Obviously you’ve got to work with what you have but there’s almost always something there.

9 – Star reflections are gold

If you’ve got a calm, clear night that is the perfect chance to capture the Milky Way or star trails in your lake reflection. Place a colossal mountain range in the centre of that and you’ve got yourself a killer shot. For tips on how to shoot star trails like this, view my tutorial How to Shoot a Star Trails Selfie.

Star Trails Selfie Tutorial

googletag.cmd.push(function() {
tablet_slots.push( googletag.defineSlot( “/1005424/_dPSv4_tab-all-article-bottom_(300×250)”, [300, 250], “pb-ad-78623” ).addService( googletag.pubads() ) ); } );

googletag.cmd.push(function() {
mobile_slots.push( googletag.defineSlot( “/1005424/_dPSv4_mob-all-article-bottom_(300×250)”, [300, 250], “pb-ad-78158” ).addService( googletag.pubads() ) ); } );

The post 9 Tips for Photographing Mountain Lake Reflections by Gavin Hardcastle appeared first on Digital Photography School.


Digital Photography School

 
Comments Off on 9 Tips for Photographing Mountain Lake Reflections

Posted in Photography