As a paddler I am always looking for water. Anytime! Anywhere! In November 2017 I made several visits to Red Mountain Open Space north of Fort Collins with my new Salsa Mukluk fat bike. I covered all possible trails. Technically, […]
paddling with a camera
Posts Tagged ‘exploration’
Water in Red Mountain Open Space – Fat Bike Exploration
30
Nov
Urban Exploration Photography 101 With Miki Lansdowne
29
Jan
Urban exploration is one’s exploration of man-made structures that are typically abandoned ruins or elements of the man-made environment that are not readily seen by most people. You may have seen TV shows documenting urban exploration, but it’s not a subject we’ve really tackled in-depth at Photodoto…until now, that is. Recently, I was contacted by Miki Lansdowne, an urban exploration Continue Reading
The post Urban Exploration Photography 101 With Miki Lansdowne appeared first on Photodoto.
Urban Exploration Photography – Urbex
28
Jan
Urban Exploration Photography
Dark halls, narrow wet cold rooms, rusted metal, chains hanging from the ceiling – it`s like you`re moving through a horror movie setting. It appears to be a pictorial journey through a strange world – a nightmarish world of shadows and darkness as after an asteroid impact.

Lost places, abandoned buildings and infrastructure are my favourite locations to take pictures. “Urban Exploration” also known as “Urbex” is the exploring of urban, (mostly) abandoned structures.
In this article I will tell you how I became an urban explorer, and show you how you can take pictures like you see here and on my website yourself. Hopefully you’ll be inspired to go outside to find more of those lost areas.

STEP ONE – FINDIN A LOCATION
The first step is to know the location of such abandoned places. When I got started with this hobby there was nothing on the internet about urbex or lost places. I had to search the locations for my pictures myself. But since then, a few things have changed. If you have a quick look on pages like Google Earth or FlickR you will soon find some adequate places to go. Of course you can also find them by walking attentively through the town you live in.
Ok, you have found some interesting places, and you are the owner of a DSLR or a camera to adjust exposure and aperture – now let’s get started!

SHOOTING
For most of my urbex photos I take more than just one picture of the same scene with different camera settings to create an HDR later, so it’s important to use a tripod. With this you can set your camera’s f-number (aperture value) to a higher level around f/8 or f/16. This affects the depth of field. Using a tripod makes it possible to take shots from exactly the same spot, important for the HDR in the post-processing.
You can manage the brightness of the exposure with the shutter speed. It’s easy and the result is a much sharper picture. For example your camera settings might look like this:
- Aperture: f/14
- ISO: 50/100
- Shutter speed: variable, of course
Now you can take six or more shots with various exposure times. Sometimes three is enough, sometimes you need more than six. This depends on the differences of brightness (from shadows to highlights) in the certain situation.
The exposure time is a variable value which can not be set in a tutorial. But let me give you an example:

To take this indoor scene of the Car Parking Space image you see above, I took 8 different shots; the brightest one was 10 seconds (to get shadow detail) to the darkest one at 1/30th second (to get the details in the windows).
POST-PROCESSING
After the “outdoor work” is done you can start the post-processing. I take my shots in RAW Format, so I start editing in the Raw Converter. However, that is another tutorial. For the HDR I use PhotoMatix to edit the pictures.
Here you have to try different settings. I usually create a tone mapped image and save the result as a TIF file. After this I start Photoshop and the creative work begins…
In PS I work with different layers, contrast and tone correction, color changing etc. Here you have to be creative and find your own style to make your picture a unique one.

ADDING LIGHT
To take photos in bunkers like my series of the Maginot Line, you need to bring all the light to the place by yourself. The technique is nearly the same as in a “normal” abandoned place. You will just need additional flashlights and lamps in your bag to create the lightning you want. The trick is to set up the lamps and flashlights so they do not shine directly (flares!) back toward the camera, while still brightening the space evenly.


SUMMARY
The most important part of the process is shooting at the location. That is where your photo comes into existence. You will need a little operating experience to figure out how it works. It’s all about continuing to practice and experimenting.
I hope I was able to bring you a bit closer to my way of working . More inspiration you can find on my website.

Editor’s Note
Do have any Urbex places you’ve discovered that you’d like to share? Please do so in the comments below.
Need more information on doing HDR – check out these resources:
- Five Minutes to Realistic HDR using Lightroom and a 32-Bit Plugin
- 5 Tips for Successful HDR Photos
- How to Create Realistic Looking HDR Photographs
- Tips for Great HDR Sunsets
- The 10 Steps Every HDR Photographer Goes Through
- HDR and Beyond – Seeing is Believing!
- Setting Up Your Digital Camera For HDR Shooting-Part one of a 3 part series – follow the links to read part two and three also
The post Urban Exploration Photography – Urbex by Ben Schreck appeared first on Digital Photography School.
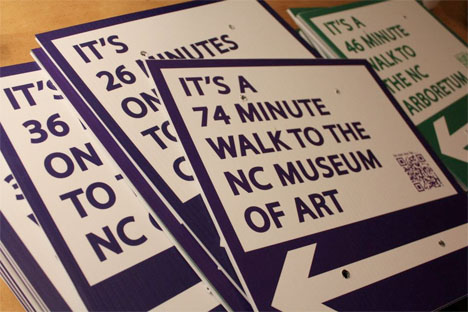
Guerrilla Wayfinding: User-Powered Signs Aid Exploration
01
Oct
[ By Steph in Gaming & Computing & Technology. ]
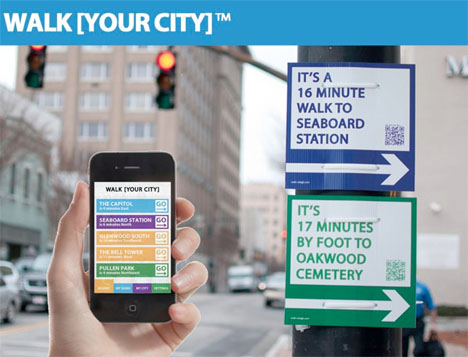
What are you missing out on in your own city by sticking to your established routes each day, or driving instead of walking? Sometimes it’s easy to forget how close any number of interesting locations are to the places you visit on a regular basis, even by foot – and walking can be the best way to truly experience any given city. Walk [Your City] aims to encourage that kind of exploration with a combination of user-powered custom street signs and online tools.
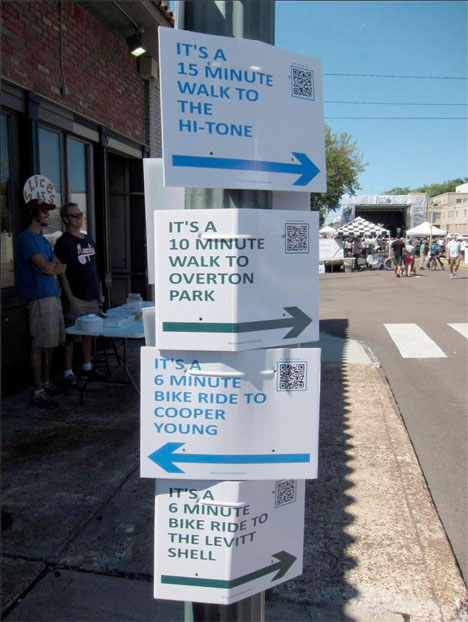
The signs tell pedestrians how close certain attractions are by foot. Scan the QR code, and you’ll get an entire walking route that gives you the walk or cycle minutes to points of interest along your path. You can join in the process by ordering your own custom-made sign and putting it up yourself.
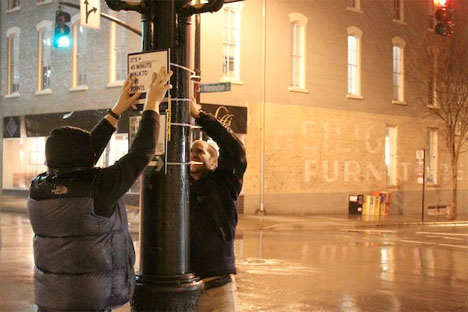
The project started in North Carolina with Walk Raleigh, a guerrilla wayfinding operation that posted 27 signs at three major intersections throughout the city in January 2012. The signs weren’t legally sanctioned by the city, so they were taken down – but the project caught the attention of officials, who are now making Walk Raleigh a permanent feature.
New York City has gotten behind the project officially, too. WalkNYC kicked off in June 2013 and aims to be “the citywide standard for pedestrian wayfinding.” Other cities around the nation and in Canada are following suit. If you’re interested in implementing Walk [Your City] in your own community, you can simply go ahead and make your own signs at WalkYourCity.org.
![]()


[ By Steph in Gaming & Computing & Technology. ]
[ WebUrbanist | Archives | Galleries | Privacy | TOS ]
![]()
     |
Abandoned App Leads You to Local Urban Exploration Sites
26
Feb
[ By Steph in Gadgets & Geekery & Technology. ]
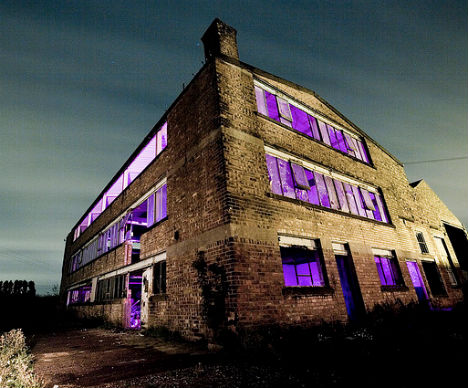
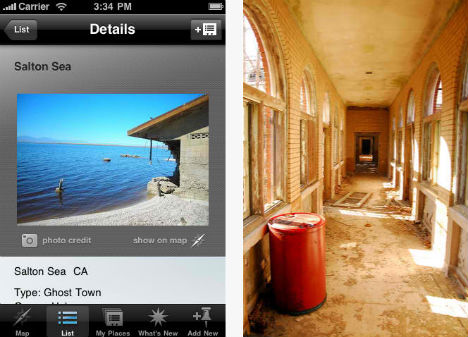
Half the fun of exploring abandoned places is the hunt – stumbling upon obscure sites, or determining the precise location of better-known ones with a collection of vague clues from previous urban explorers. It’s not a great idea to have hordes of curious people descending upon crumbling ruins and dilapidated structures for obvious reasons, ranging from trespassing laws to dangerous conditions. But for abandoned places aficionados who’d rather cut to the chase, the ‘Abandoned’ iPhone app by THE FORM pinpoints locations on a map.
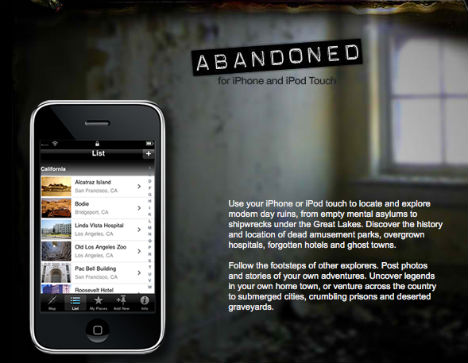
The community-based app relies on user input to determine where abandoned sites are located. And beyond mere maps, the app allows you to post photos and stories of your own adventures. Not only does this help fill out the lore of interesting places, it can help people avoid dangerous areas or give precise instructions for easy access.
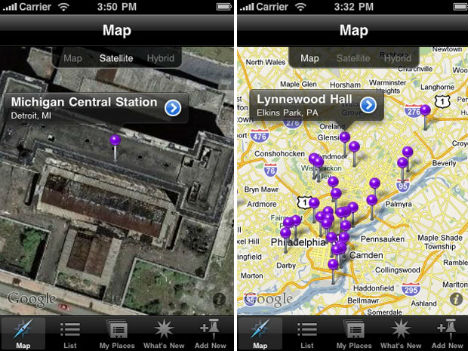
GPS mapping automatically locates and displays abandoned sites near you, and you can store a private log of your own locations if you don’t want to share with others. Rate sites from one to five stars, share your comments and contribute to locations submitted by others.
Urban exploration has long relied upon word-of-mouth. In many cases, people in the know share information about certain sites only with others who can be trusted not to damage the site, call attention to themselves, or take risks that could result in injuries. For that reason, this app might receive mixed response from dedicated urban explorers, and those interested in keeping certain sites secret from the public at large. But on the other hand, a lot of abandoned sites are in serious need of attention, and the sooner they’re saved, the more of their history can be preserved. Get it at iTunes.
via Pop Up City; top image via nocturne
![]()
[ By Steph in Gadgets & Geekery & Technology. ]
[ WebUrbanist | Archives | Galleries | Privacy | TOS ]
![]()
 |
 |
IMA Solutions – 3D exploration from CT scan datas of ancient egyptian mummies – Siggraph 2009
11
May
Here is the non 3D stereoscopic version in 720p of the IMA Solutions FullHD 1080p 3D stereoscopic original movie that will be displayed for the Panel Session: “A Journey From Outer to Inner Space: Scientific and Biomedical Stereoscopic Visualization” at SIGGRAPH 2009, New Orleans the Thursday 6 of August 2009 at 3:45pm, room 271-273. Come in to explore ancient Egyptians mummies using the last CT scan and computer graphics technologies and discover their hidden secrets. Animations, production and special effects: IMA Solutions, Benjamin Moreno and Julien Arrué Original soundtrack, compositor and sound engineer: Olivier Lafuma, www.myspace.com/ollaf Curator of the Archeology department of the Musée des Beaux-Arts et d’Archéologie de Besançon: Agathe Legros CT scan performed by: MD. Samuel Mérigeaud, Radiologist, CHU Montpellier CT scan of the two egyptian mummies performed at the CHU de Besançon, France Special thanks to all the people working at the Musée des Beaux-Arts et d’Archéologie de Besançon.
James Cameron’s AVATAR the game (PC) Various footage from the game showing the stereoscopic 3D graphics of the game. All graphics settings maxed, DirectX10. Rendered on ATI Radeon HD5870 Recorded with a Blackmagicdesign Intensity hdmi capture card 3D is rendered with the native 3D rendering integrated into the game, works on PC for both Ati and Nvidia graphics cards and also works on HD consoles for both PS3 and Xbox360. The game does not come with anaglyph (red/blue) glasses, In order to see the 3D effect in the game, you need a proper stereoscopic 3D display. Check the stereoscopy FAQ at Ubisoft forums to see a list of supported displays : forums.ubi.com Youtube only displays 30fps, for the full 60fps framerate download the original file : all links at Meant-To-Be-Seen forums : www.mtbs3d.com Meant To Be Seen : consumer driven stereo-3D advocacy group www.mtbs3d.com
Video Rating: 4 / 5
You must be logged in to post a comment.