RSS
 

Posts Tagged ‘Dirty’

Doing Our Dirty Work: Crows Trained to Clean Up Cigarette Butts

10 Oct

[ By SA Rogers in Gadgets & Geekery & Technology. ]

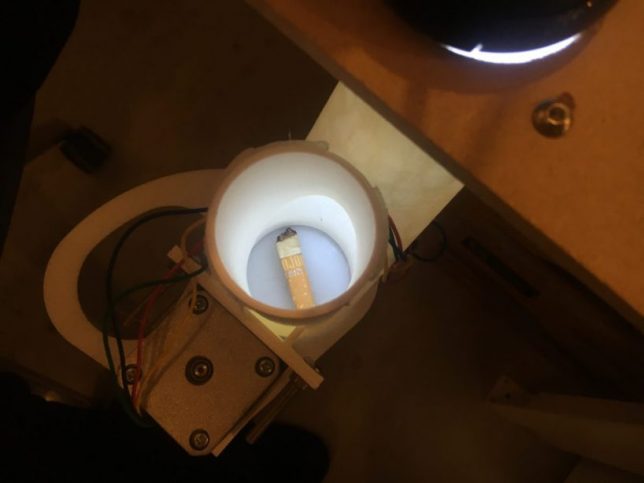
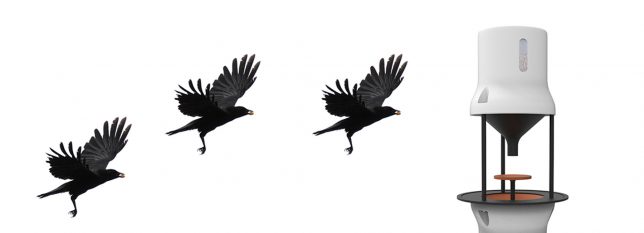
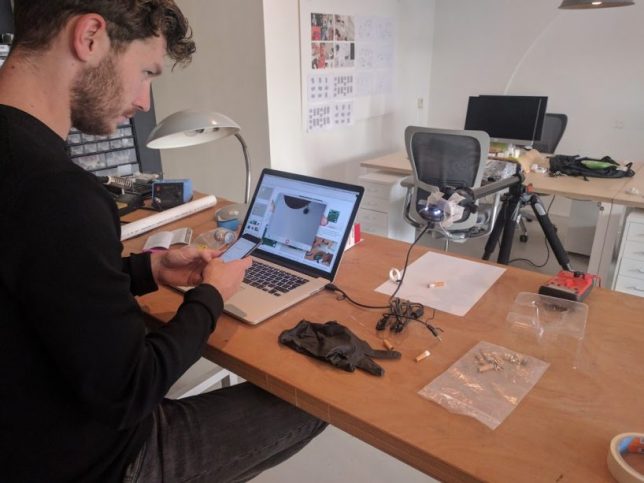
Should we really be training ultra-smart birds to do our dirty work for us, picking up cigarette butts all over our cities in exchange for treats? One Dutch start-up hopes their clever ‘Crowbar’ will be an easy and mutually beneficial way to deal with the ongoing problem of this specific kind of urban litter, making use of the corvid’s unusual intelligence. Crowded Cities proposes hanging smart machines around the city that train the birds to clean up butts.

‘Crowbar’ is based on the ‘Crow Box,’ an open-source project that gives crows peanuts in exchange for coins. The birds learned that they only get rewarded for inserting a particular kind of object. The Crow Box is just one example of humans testing crows’ ability to understand cause and effect and documenting the results.  They explain the process as follows:

“The crows bring a cigarette filter to the Crowbar, where they drop it into the bottom funnel to get it checked. After the camera has recognized the cigarette filter as  a filter, it returns a bit of food to the table in front of the crow. The crow goes out telling others, or keeps his secret to himself – we are not sure.”

Apparently we’ll find out, as the team finishes assembling the CrowBar and puts it out into the world. In the Netherlands, more than 6 billion cigarette filters are tossed onto the street each year, and each one takes 12 years to degrade. It’s not hard to imagine this project seeing some kind of success – have you ever had a crow drop a nut right in front of your car while you’re driving, in the hopes that your tires will act as giant nutcrackers? They’re incredibly smart.

But it’s a bit disturbing to imagine crows being repeatedly exposed to the carcinogens present in cigarette butts, potentially punishing them in the long term for a stupid human behavior. Plus, it’s only a matter of time before the crows start snatching lit cigarettes right out of people’s hands.

Share on Facebook


[ By SA Rogers in Gadgets & Geekery & Technology. ]

[ WebUrbanist | Archives | Galleries | Privacy | TOS ]


WebUrbanist

 
Comments Off on Doing Our Dirty Work: Crows Trained to Clean Up Cigarette Butts

Posted in Creativity


Marketing isn’t a dirty word (but camera companies are not your friends)

06 Aug
Marketing departments work to develop products that people will want. They aren’t always trying to make the best product for you, though.

Camera companies are not your friend but they’re also not trying to trample on your dreams. It seems like an obvious statement, but a misunderstanding of how markets and marketing work sometimes leads to exactly this sort of misconception. A look at the role marketing plays can help explain why ‘your’ brand sometimes makes decisions you hate.

Making a profit is not the same as profiteering

Brand loyalty sometimes prompts people to forget that every significant camera company is a large, profit-driven corporation. The fact that they make tools for a very personal, expressive, creative purpose and are often staffed by people who really care about photography (even in the marketing departments), shouldn’t obscure the fact that they’re trying to make money. But that isn’t the same thing as profiteering: it’s in their interest to make products that you want. And it’s the marketer’s role to work out what that product would be.

Marketing isn’t the enemy

Product development isn’t about virtuous engineers who create lovely things and evil marketing people who take them away. It’s usually a back-and-forth to create models that suit a specific audience without overwhelming them with tools and features they don’t necessarily want or producing cameras they can’t afford.

It’s true that, without the input from marketers, engineers can produce Formula One race cars. However, most people find a Ford Focus, Honda Civic or BMW 3 Series much more affordable and considerably more convenient for collecting the weekly shop. Still, if you wait long enough, some of that Formula One know-how may well make an appearance in your family hatchback.

It’s a process called market segmentation: identifying large enough groups of people with similar enough needs and disposable income, then making models specifically for them. If you get it right, you end up with a range of cameras that appeals to a broad range of people and makes it obvious to each buyer which model is best for them. Most of us aren’t racing drivers, after all.

It might not be for you

The upshot of this is that not every model is aimed at you. You may have read my car analogy and found yourself thinking ‘I’d never drive a Ford Focus.’ But, whether that’s a matter of taste or because it doesn’t suit your needs, this doesn’t mean the Focus isn’t a good product.

It is common to assume that your needs are universal or, at least, typical. However, just because you find a feature to be indispensable doesn’t mean that everybody else does. It follows then, that a company may not be wrong to remove it. So before you find yourself stating “no xxxx, no sale,” it’s worth thinking whether the product in question is aimed at you and whether it might be a good fit for other people. It could be that the sale to you was never expected.

Just because you find a feature to be indispensable doesn’t mean that everybody else does

For instance, there are a lot of people who are very vocal about the absolute necessity of viewfinders, but if you look back to the days when people actually bought compact cameras, you’ll notice that the majority of them didn’t have one. Most manufacturers would offer one or two models simply to capture the refusenik dollar, but the vast majority of users bought the cheaper model without one and did the same when replacement time came around.

D7500: desirable or debacle

The D7500 is a great example of the challenge of market segmentation. By resuscitating its high-end Dx00 line, suddenly the D7200 successor has to fit between two models rather than sitting as the best APS-C camera Nikon offers. Cue cries of outrage from people who decide that the features omitted to squeeze it into the gap were absolutely essential. To them.

Nikon reintroducing its high-end Dx00 series, means the D7500 is targeted at a slightly different group of people compared with its predecessor.

Nikon will have done its market research and presumably it’s concluded that most D7x00 users don’t want, need or use a second card slot or lenses that need metering tabs. It may also have concluded that most users who still want these features will either also want/need the other additional features that the D500 offers and will, however grudgingly, pay the extra money to step up, or decide that they can, regretfully, live without them and buy a D7500 anyway. After all, companies don’t try to pitch their products at the price you want to pay, they set them at the amount you’re willing to pay.

Companies don’t try to pitch their products at the price you want to pay, they set them at the amount you’re willing to pay

The other way of looking at it, of course, is that the D7500 is a faster camera than the D7200, with a bigger buffer and 4K video capability as well as some AF upgrades. So there are likely to still be plenty of people who’d never buy a D500 but who will find the D7500 offers them an awful lot of camera at a price they’re willing to pay, just as the D7200 did before it.

This isn’t to say marketing departments and market are always right, though. Confuse the customer or play things too conservatively, and you risk your company’s whole future.

Getting the message across

A clear example of unclear messaging is Sony’s a6x00 series. With its a6000, a6300 and a6500, Sony makes three fairly different cameras for fairly different users, yet there are lots of people confused about which models ‘replaces’ which and how Sony can justify apparent price increases.

The problem seems to be that the physical similarities and the naming convention are enough to convince some people that they are successive, rather than complementary, sister models. Step back and look at the pricing and the differentiation of feature sets though. The a6000 is the mass-market, circa $ 700 model. For a bit more money you get a better viewfinder, 4K video and faster shooting in the a6300. Then, at an even higher price point, you get the in-body stabilization, touchscreen control and deeper buffer of the a6500.

The pattern isn’t so different from that of Nikon’s D5x00, D7x00 and Dx00 series, or Canon’s 77D, 80D, 7D Mark II lineup, yet it’s one that causes a lot more angst and uncertainty.

Canon, competition and complacency

Then there’s the behavior of Canon, which is often criticized for making ‘uncompetitive’ models. Don’t they get it?

There’s something to these charges, perhaps. Companies with less market share will try to cram extra features in or set more aggressive prices to catch the eye of customers who’d otherwise gravitate towards market leaders. There isn’t the same pressure on the market leader to do the same.

People may decry the Rebel series as being dull or underspecced, but they’re a good enough fit for their target audience that Canon still sells a bucket load of them, irrespective of whether another brand offers a better feature set or that a mirrorless camera might be more convenient. And for many of their users, they are very good cameras.

But there’s risk in such caution. Ignore your smaller competitors for too long and you risk discovering they’ve eaten your lunch. While I’d take Sony’s claims of being number 2 in ILCs with a fair amount of salt*, it’s fair to say that the company that brought you the Walkman and the Playstation is also making significant inroads into the high-end camera market.

I don’t believe the continued absence of 4K from most of Canon’s models is purely a question of market segmentation. Or of complacency.

It seems unlikely to me that Canon hasn’t noticed this, which is why I don’t believe the continued absence of 4K from most of its models is purely a question of market segmentation. Or of complacency. Yes, Canon wants videographers with a project budget to buy into its Cinema EOS system. But the absence of 4K across much of the company’s lineup and the heavily cropped, yet still rolling-shutter prone, implementation on the EOS 5D IV (a camera nominally targeted at video shooters) suggests the company is also facing technological challenges in providing it.

The EOS 5D Mark IV (now available with Log gamma) is Canon’s most video-centric DSLR and yet its 4K capture is somewhat limited by significant rolling shutter. It seems extremely unlikely that this has been done with an eye on Cinema EOS sales.

Similarly, I doubt that Canon intentionally held back the dynamic range (DR) on the EOS 6D II to push people to buy the EOS 5D IV. It’s much more likely that it was cheaper to iterate on an existing design or to spread the cost of an older, coarser production line over one last generation of sensors because they don’t think the end user will mind. Or, at least, not enough to stop them buying the camera.

It’s worth not making the mistake of thinking that one brand must to offer a feature just because its rivals do.

As we tried to stress in our write-up, DR is not the sole significant factor in image quality, and the addition of Dual Pixel AF will represent a major benefit to a lot of 6D II buyers. So it’s worth being careful not to fall into the ‘no xxxx, no sale’ trap or making the mistake of assuming that one brand must offer a feature or capability just because its rivals do. Maybe the vigorous defenders of Canon’s honor are correct. Maybe the 6D II will be good enough, given the camera’s price. The alternative is that more competitive rivals will step in and dislodge the Canon from its dominant position. Ultimately, the market will decide.

You can’t always get what you want…

It can be frustrating to watch a camera company create products that don’t quite fit your need, worse still to see another brand offer something that’s closer to what you want, especially if you have enough money tied up in lenses to preclude swapping system or when it means having to spend more money to get the feature you want.

However, let me make a suggestion. Think about the camera you owned five or ten years ago, what it could do and how much it cost. Now have a look at the one you currently own.

If you feel that your current camera is a better match for your needs and skills than the one it replaced, that’s thanks to, not in spite of, the efforts of the marketing department. And, with this thought in mind, why not wander outside and make use of that capability? Because that’s what the engineers and marketers were all working towards.


*I’m not questioning whether the claim is true, just querying its significance. Outselling Nikon in terms of value of sales over a very select period, immediately after a stretch of not being able to supply cameras, when you’ve released several high-value cameras much more recently isn’t quite the same is saying “Sony is #2 now.”

Articles: Digital Photography Review (dpreview.com)
 
Comments Off on Marketing isn’t a dirty word (but camera companies are not your friends)

Posted in Uncategorized


Quick and Dirty Method of Using the Photoshop Spot Healing Brush Tool

21 Jul

Let’s say you use Lightroom and you’ve tried and tried to get rid of those distracting spots using Lightroom’s Spot Removal Tool but no matter how you set it – using Clone or Heal or changing the Opacity or increasing the Feather – you have a giant, obvious repair on your image. Not good!

Photoshop Spot Healing Brush Tool - wild horses

This is my final, processed image but I had to dive into Photoshop to get there.

You’re a good photographer

For kicks, let’s agree that in addition to knowing your way around Lightroom, you’re a skilled photographer. You also subscribe to Adobe CC, but honestly, you don’t use Photoshop much. Perhaps you’re even a little bit afraid of it. You loaded the software and update it whenever Adobe tells you to but other than the PS icon looking cool and professional in your dock, you don’t actually use it.

You just don’t use Photoshop

I mean, Layers, Masks, Blending? Ugh. I know. I do 90% of my work in Lightroom. No one has ever called me out on that so I keep on keepin’ on with Lightroom. I love Lightroom but – and it’s a great big but – LR’s Spot Removal Tool is no match for Photoshop’s Spot Healing Brush Tool.

Because I know this issue affects so many of us, I’m going to teach you the quick and dirty method for how to Spot Heal in Photoshop. No layers. No tricky stuff. Just easy, quick simple repairs for the problem areas in your images.

Practice as you read this

Grab an image that has a problem area that you can’t seem to fix in Lightroom and follow along with me. Practice is the best way to learn so repeat these steps a few times today. After you Spot Heal a few images in PS, it will naturally become part of your image processing tool kit.

Step #1 – Process the image in Lightroom

In Lightroom, process your image as normal. Here’s my RAW  image before I’ve made any adjustments.

Photoshop Spot Healing Brush Tool - raw image

Canon 7D Mark II, 70-200 plus 1.4x @ 280mm, f/6/3, 1/1600, ISO 400.

Below is a screenshot of all the adjustments I’ve made on my image. I started with a pretty aggressive crop. You can see the White Balance and Basic adjustments but I also dropped in several Radial Filters to add clarity and brightness to key elements like the horses’ eyes. However, I struggled to get rid of the flecks of mud around the black horse’s eye.

Photoshop Spot Healing Brush Tool - Lightroom adjustments

Step #2 – Edit in > Photoshop

Right-click on your image. Select Edit in Adobe Photoshop CC.

Photoshop Spot Healing Brush Tool - Edit in Photoshop

It is very important that you don’t skip this step. Do not open your image directly in Photoshop. For the down and dirty method to be most effective, you must start this process in Lightroom.

NOTE: If you haven’t updated to PS CC 2017 or if you use an older version of PS, you might need to modify these steps. Instead of Edit in Adobe Photoshop CC 2017, you might see Edit a Copy in PS.

Step #3 – Select the Spot Healing Brush

It takes a minute, but eventually, your image will appear in the Photoshop window. Here’s the image I’m working on. Check and make sure your screen looks pretty similar to mine.

Photoshop Spot Healing Brush Tool - PS interface

Click on the Spot Healing Brush Tool. It looks like a band-aid except that it has a little semi-circle handle over it.

Photoshop Spot Healing Brush Tool - band-aid icon

If you can’t find this tool, count seven icons down on the tools pallet and right-click on that. Once you right-click, you should see the rest of the tools. Hover your cursor over the band-aid icon that says Spot Healing Brush Tool. Click to select it. It will now show as the active tool.

Step #4 – Setup the Spot Healing Brush

Review the settings for the tool bar that runs across the top of your Photoshop window.

Photoshop Spot Healing Brush Tool - mode and type

If your Spot Healing Brush Tool doesn’t default to these settings, change them to:

  • Mode = Normal
  • Type = Content Aware

Step #5 – Zoom in

Zoom in and increase the size of your image so you can see the problem area more clearly. Click the Command/Alt key and the + (plus) key simultaneously. Click again to zoom in more. If you’ve zoomed in too far, click the Command/Alt Key and the – (minus) key simultaneously to zoom back out. Grab the drag bars on the bottom and right side of the image to reposition the problem area so that it’s in the middle of the screen and easy to see and repair.

Photoshop Spot Healing Brush Tool - zoom in

Zoomed into 200%, I can see the problem area clearly.

Step #6 – Size the Brush Tool

Hover the Spot Healing Brush Tool over the problem area. You may need to change the size of the brush. The easiest way to do that is to use the square bracket keys on your keyboard.

  • Click the Left Bracket Key [ to decrease the size of the brush.
  • Click the Right Bracket Key ] to increase the size.

Notice that as you click on the bracket keys, the Size number in the bar that runs across the top of your image increases or decreases. (If you click on that number, you’ll get more tool options. Don’t worry about those for now.)

Photoshop Spot Healing Brush Tool - 20px brush

Using the Left Bracket Key, I adjusted my Spot Healing Brush Tool to 20 pixels and started making small repairs around the eye.

Step #7 – Brush over the bad area

After you’ve adjusted the size of your brush, start clicking on the area of your image that you want to repair. You can also drag the brush to make short strokes.

Photoshop is smart and should fill in the area with an appropriate selection but if it doesn’t, click Edit > Undo Spot Healing Brush in the top menu (or Cmd/Ctrl+Z will also undo). That will undo the last thing that you did.

If you want to undo multiple things, go to Edit and click Step Backward repeatedly till you’re at the last point that you liked. Step Backward does have limitations so work slowly and check your repair work often. Note: you can aslo open the History panel and go back to any previous step.

Photoshop Spot Healing Brush Tool - undo

Step #8 – Save

Evaluate your work. Do you like the repairs? If Yes, go to File > Save in the top menu. Photoshop defaults to saving images as a TIFF file. If it doesn’t, select the TIFF option if/when the menu pops up. This will also import the newly edited image into Lightroom.

Photoshop Spot Healing Brush Tool - save

If you don’t like the repairs you made, quit Photoshop without doing anything. Photoshop will ask if you want to save your work. Just say No. Go sip some coffee and try again another day when you’re fresh.

Step #9 – Head back to Lightroom

Almost done!

Go back to Lightroom. You’ll still be in the Develop Module with the original RAW image that you were working on still open. Press G for Grid which will take you to the Library Module. Check to make sure that next to your original RAW file is a new TIFF file. Select the two images and view them in Survey Mode so that you can look at them side by side (N on your keyboard).

If the two files don’t show up right next to each other in Lightroom resort your images by Capture Time (or file name), or drag and drop so that they do.

Photoshop Spot Healing Brush Tool - compare

Side by side of RAW file adjusted in LR (on the left) and TIFF with the addition of spot healing (on the right).

Wait, don’t you have to use layers in Photoshop?

That’s the down and dirty part. When you’re doing simple fixes like this, you don’t need to worry about layers. Why? Well, layers are excellent if you’re doing quite a few things to your image and you want to be able to turn different effects on and off. They’re also important so that you preserve your original image in a background layer (non-destructive editing).

But with this method, you still have your original RAW file. That’s why you want to start in Lightroom and then open your image from there into Photoshop. Lightroom sends a copy of your image to Photoshop. When you save your work in Photoshop in step #8, Photoshop generates a totally separate image file. That new TIFF file shows up in your Lightroom catalog next to your original RAW file.

NOTE: If you haven’t updated to PS CC 2017 or if you use an older version of PS, you might need to modify these steps. You might need to select “Edit a copy” and not “Edit Original.”

Photoshop Spot Healing Brush Tool - final image

This is a wild horse so I didn’t go too crazy fixing every little thing, but the distracting mud around the eye and on the neck is cleaned away nicely, don’t you think?

What if the down and dirty method doesn’t work?

This might not work for your image. Some repairs are finicky and this is definitely a hack method that won’t work for everything. My advice is to experiment. Remember the other tools that were grouped with the Spot Healing Brush Tool? Try one of those. Or, keep using the Spot Healing Brush Tool but change the Mode from Normal to Replace or even Multiply.

Remember when we clicked the Size number? Click that again and adjust the Hardness of the brush or the Roundness. Make only one change at a time and make notes on what each change does. If something works, click File, then Save and remember what you did. If nothing works, exit out of Photoshop without saving (and go have more coffee).

You can always experiment again another day because you still have your RAW image. It’s cataloged in Lightroom right next to the TIFF file. As long as you always start in Lightroom, you’ll be able to try again later.

Photoshop Spot Healing Brush Tool - Essaouira cafe

In this image of an outdoor seafood market in Essaouira, I experimented with a variety of tools to zip out the distracting bit of tree on the left, the construction equipment and the light posts. The RAW image, with Lightroom only adjustments, is on the left. The spot-healed TIFF is on the right.

Share with the dPS community: What hack or down and dirty methods do you use when you process your images?

The post Quick and Dirty Method of Using the Photoshop Spot Healing Brush Tool by Lara Joy Brynildssen appeared first on Digital Photography School.


Digital Photography School

 
Comments Off on Quick and Dirty Method of Using the Photoshop Spot Healing Brush Tool

Posted in Photography


Dirty Car & Truck Art: Moscow Street Artist Adds Critters to Filthy Vehicles

14 May

[ By WebUrbanist in Art & Street Art & Graffiti. ]

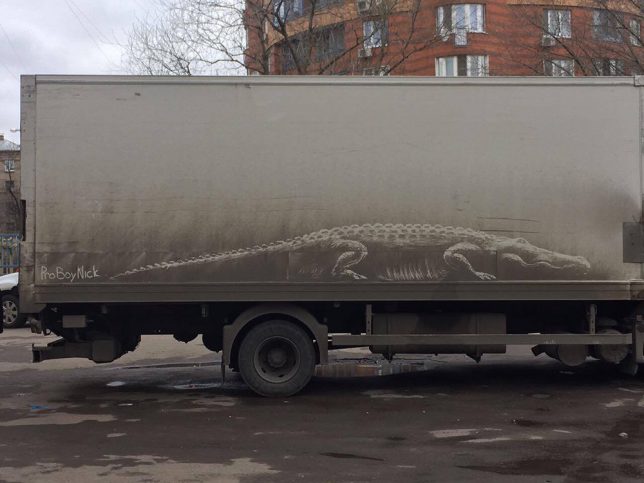
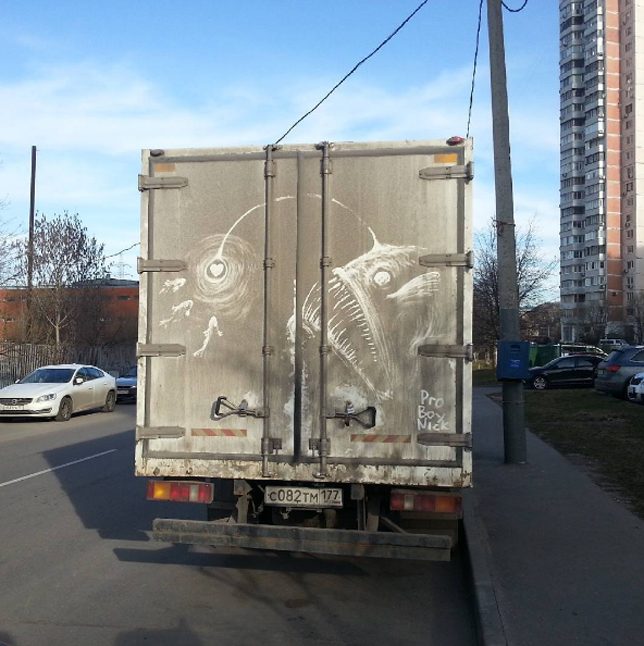
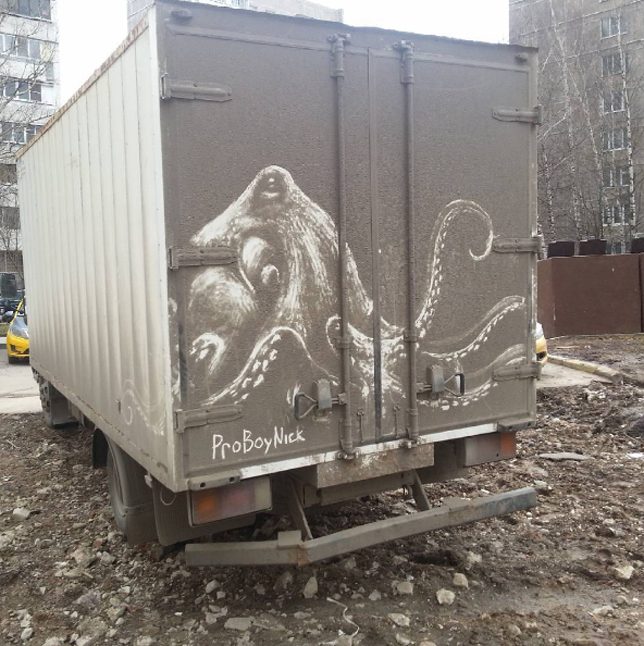
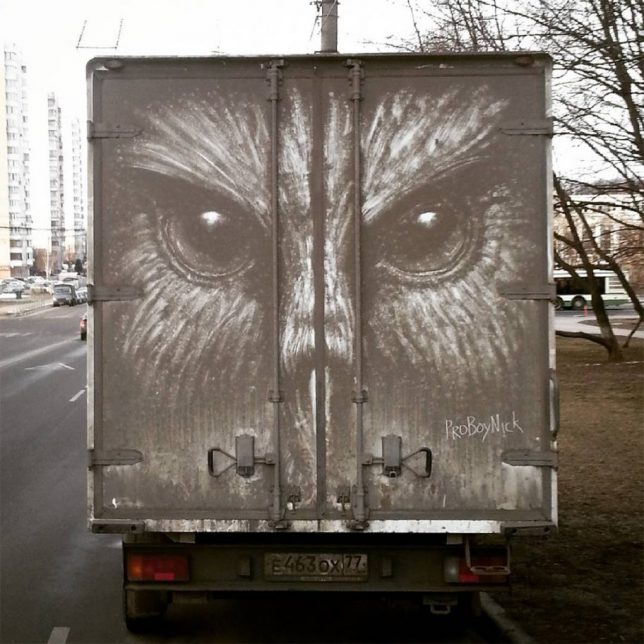
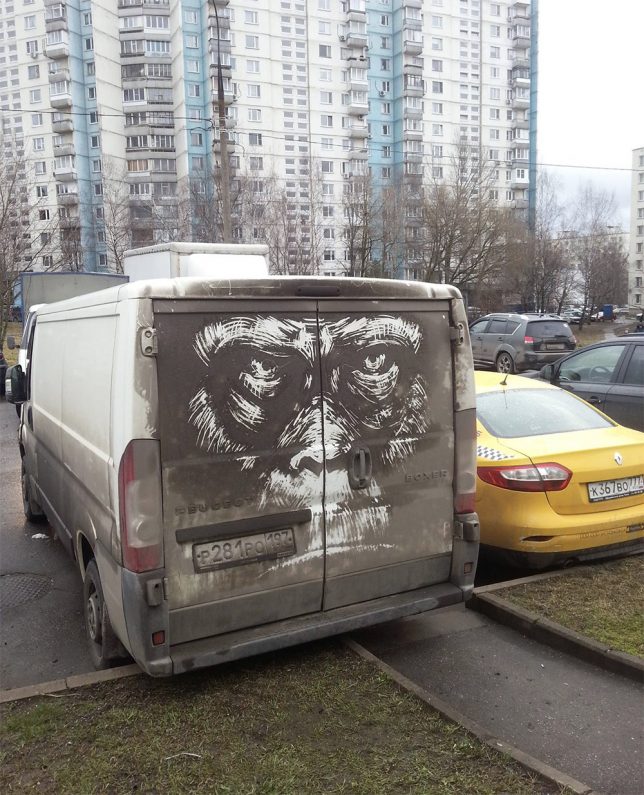
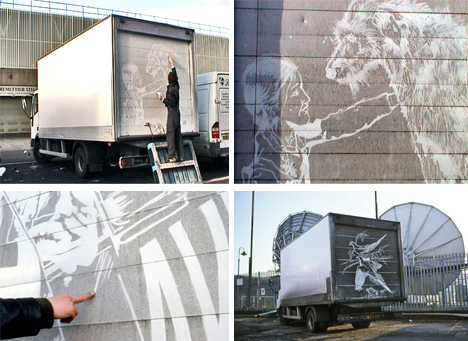
Massive deep sea monsters, jungle predators and swamp creatures lurk in the grimey shadows on the backs of trucks, thanks to interventions by illustrator Nikita Golubev. Most of the featured critters are of the potentially creepy variety, including a deep-sea angler fish, octopus, shark, alligator, lion, owl and orangutan.

Based in Russia, the artist works on cars sometimes as well, but finds the broad doors and long sides on larger vehicles particularly inviting as blank canvasses for light-on-dark works of art.

As a subtractive strategy, there is less risk associated with these impermanent pieces as well — at worst, some truck driver may be less than amused to find their dirty vehicle highlighted in such a way.

Reverse graffiti is nothing new, but most artists who work in that vein operate at smaller scales, cleaning up sections of door and rear windows rather than tall trucks. Naturally, these pieces are all temporary, destined to come off in the wash or rinse out in the rain (but live on in photographs).

Share on Facebook


[ By WebUrbanist in Art & Street Art & Graffiti. ]

[ WebUrbanist | Archives | Galleries | Privacy | TOS ]


WebUrbanist

 
Comments Off on Dirty Car & Truck Art: Moscow Street Artist Adds Critters to Filthy Vehicles

Posted in Creativity


Video: Getting our hands dirty with the Canon EOS 5D Mark IV

26 Aug
 
Want to learn about the highlights of the Canon EOS 5D Mark IV in 138 seconds? We certainly thought you might, so we put together a video with everything you need to know.

Read more about the 5D Mark IV

Articles: Digital Photography Review (dpreview.com)

 
Comments Off on Video: Getting our hands dirty with the Canon EOS 5D Mark IV

Posted in Uncategorized


Dirty Camp 30: Canadian POW Camp Battles Neglect & Decay

17 Nov

[ By Steve in Abandoned Places & Architecture. ]

abandoned camp 30 barracks
Camp 30, located east of Toronto, was one of Canada’s main World War II POW camps and although named a National Historic Site, continues to be neglected.

abandoned camp 30 entrance sign

abandoned camp 30 windows

The community of Bowmanville, Ontario, is home to just over 40,000 people, many of whom work in Toronto and commute daily via Highway 401. Only a tenth as many made Bowmanville their home in 1941, however, when the Canadian government ordered the Bowmanville Boys Training School (a “school for unadjusted boys who were not inherently delinquent”) to vacate the site. By the end of the year, the former school and its environs had been converted into Camp 30 and the first German prisoners of war arrived. (credit AlexLuyckx with the above images)

abandoned camp 30 sunset

abandoned camp 30 cafeteria red door

abandoned camp 30 turn around graffiti

Many of these prisoners were considered “high profile” – the reasoning being, the farther they were from Nazi Germany, the less chance of them returning there after a successful escape. Among the more notable Camp 30 prisoners were U-boat commanders Wolfgang Heyda and Otto Kretschmer, the latter credited with sinking 47 ships (totaling 274,333 tons) between the start of the war and his capture in March of 1941. (credit Courtney McIntosh with the above images)

Shallow End

Paint Chips

In stark contrast to the treatment doled out to Allied POWs in German prison camps, those prisoners sent to Camp 30 enjoyed a wealth of freedoms and amenities. As Camp 30 was a former boy’s school, prisoners were allowed to use the indoor pool as well as the soccer and football fields. If that wasn’t enough, authorities approved requests to build a tennis court and a mini zoo! (credit ckocur with the above images)

abandoned camp 30 pool blue

abandoned camp 30 electric

abandoned camp 30 pool graffiti

These perks and much more (read about Camp 30 in detail at the unofficial Camp 30 website) didn’t stop the prisoners from carrying out their duty to escape, and at least a half dozen attempts – some quite elaborate and well-planned – were foiled by guards. (credit Rick Harris with the above images)

Next Page – Click Below to Read More:
Dirty Camp 30 Canadian Pow Camp Battles Neglect Decay

Share on Facebook


[ By Steve in Abandoned Places & Architecture. ]

[ WebUrbanist | Archives | Galleries | Privacy | TOS ]


WebUrbanist

 
Comments Off on Dirty Camp 30: Canadian POW Camp Battles Neglect & Decay

Posted in Creativity


Down and Dirty Guide to Milky Way Photography

16 Sep
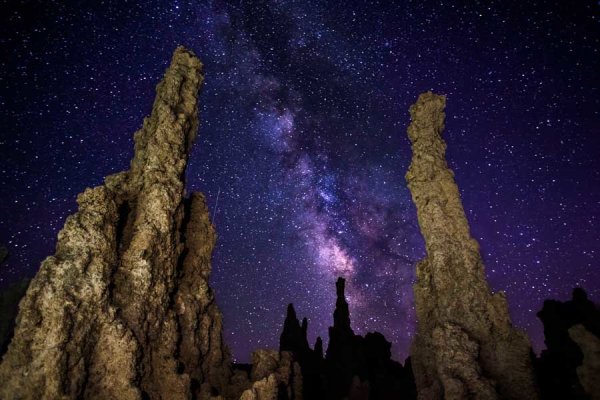
Another World | Mono Lake, California

Milky Way Over Mono Lake | James Brandon

Seeing the Milky Way with your own eyes is a life-changing, mind-blowing experience. It will put your place within the universe in to perspective and remind you just how small and insignificant we all are. The sad part is that most people have never seen it. Over half of our planet’s population lives in cities where seeing the Milky Way is all but impossible.

Even when people get out of the city and have a good view of the stars, they usually don’t focus on them long enough to find the Milky Way. It’s something that you either stumble onto by accident, or something that you have to plan ahead of time. Here’s a few quick tips for getting the Milky Way in your viewfinder and exposing it properly – your guide to Milky Way photography.

Research, Research, Research

Benjamin Franklin said so brilliantly that, “By failing to prepare, you are preparing to fail”. And it was Antoine de Saint-Exupéry that said, “A goal without a plan is just a wish”. So it goes with Milky Way photography. Sure, you can make a point to go out at night and see what you can find, but chances are you will be wasting your time.

saint-john-milky-way-2

The Milky Way by Hemispheres

The Milky Way is only visible in your respective hemisphere during certain months of the year. If you’re in the northern hemisphere your best time to photograph the Milky Way is in the summer, with July being the peak month. Unfortunately, the summer months aren’t typically the best times for clear skies because of the heat and the clouds from all the storm systems. Summer nights are also short, therefore limiting access further to the night sky. Folks in the southern hemisphere have it better, with the winter months being the best time.

Don’t Forget the Moon!

The moon can make or break your Milky Way shots. This is why planning is so important! Don’t make the mistake of finding a perfect subject, waiting for the Milky Way to line up, and then discovering that the moon is right in the middle of the celestial center. Having the moon obstructing the view of the Milky Way will, quite simply, ruin your shot.

There are two ways the moon can help your shot. One is by its total (or nearly total) absence in the sky. The other is by having the moon behind you, with the Milky Way in front of you (thereby providing a light source for your foreground).

The Best Astro App EVER

photo

Oh no! The moon is in the way!

All you need to do to plan a perfect night of Milky Way photography is a beautifully designed app called StarWalk 2 (sorry Android users, you’re simply out of luck here. I have an Android phone and I absolutely hate that I don’t have access to this). Luckily I have an iPad and it works beautifully on there.

StarWalk lets you interactively view the night sky from either your position, or any other position on earth, at whatever time of day you choose. As you change the time of day, the entire sky will magically begin to revolve around your position, revealing or concealing the Milky Way, the constellations and the moon.

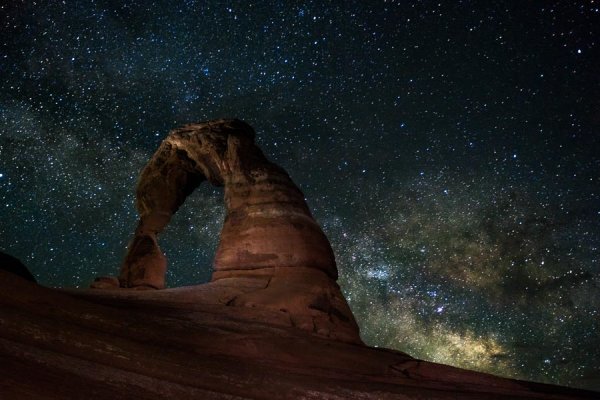
So let’s say you decide to photograph Delicate Arch in Arches National Park. You discover through research that from beneath the arch looking toward it you will be facing east. All you really need to do now is choose a location in that general area, make the app point east and then scroll through the hours in the day to find when the Milky Way will rise above the horizon.

One of the jaw-dropping cool features of this app is that you can actually use it in the field with an image overlay. You can hold your iPad or iPhone out and the app will turn the camera on and look at what you’re seeing. It will then overlay the night sky onto your image so you can see what that view will look like at a certain time of day or night! How cool is that!?

The Milky Way Over Delicate Arch | James Brandon

The Milky Way Over Delicate Arch | James Brandon

Having a Dark Sky is Crucial

While it’s not impossible to photograph the Milky Way in light polluted areas, it’s certainly not ideal. I live in the heard of the Dallas – Fort Worth metroplex and to really get a great view of the Milky Way I have to drive about three to four hours west. A great resource for locating extremely dark skies is the International Dark-Sky Association. They’ve got a list of locations that host some of the darkest skies in the world. Planning a trip to any of these places during the right time of the year will give you some of the clearest views of the Milky Way you will find anywhere. Trust me, you haven’t lived until you’ve stood beneath a Milky Way so bright that it lights the landscape in front of you. It’s truly a spiritual thing to witness.

Camera Settings

Photographing the Milky Way is quite different from any other subject you will attempt to capture. Like I said before, it really is a magical experience. Seeing the Milky Way with your own eyes is one thing, but wait until you see it appear on your camera’s LCD screen! You will quite possibly, literally jump for joy the first time you see it.

ISO is the first thing we’ll cover. In short, it needs to be set as high as possible while still maintaining a useable image quality. While this doesn’t mean that you need a pro level SLR, having one that performs exceedingly well in low light will certainly help. If your camera can produce quality images at ISO 1600 or even ISO 3200 you are going to be in great shape. If ISO 6400 or ISO 12800 is still workable, then you are going to knock it out of the park. Having your ISO set high means that your cameras sensor will be as sensitive as possible so that the maximum amount of light can be collected (which is very important at night).

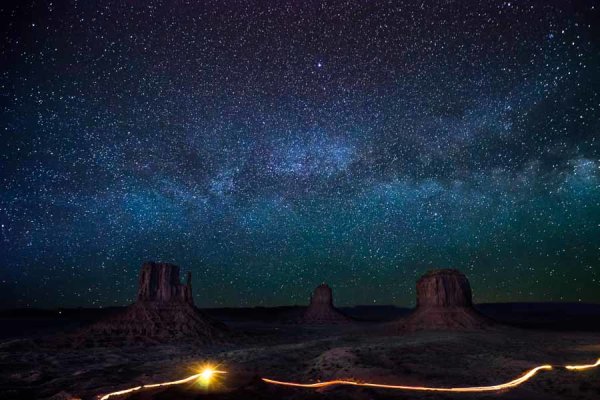
Milky Way Over Monument Valley | James Brandon

Milky Way Over Monument Valley | James Brandon

Next, select a shutter speed. Anywhere between 20-30 seconds is ideal. If you can get away with super high ISO levels, then go with 20 seconds. If you’re around ISO 1600-3200 then you may want to stick with 30 seconds. The only downside to 30 seconds is that you will have just the slightest hint of trails in your stars from the rotation of the earth. Not really a big deal though.

Finally, you need to set your aperture to be wide open, or very close to it. This is where having a lens that can open up to f/2.8, or larger, is really helpful.

All of these settings combined have one goal – to bring as much light as possible back to the cameras sensor.

Other Gear to Consider

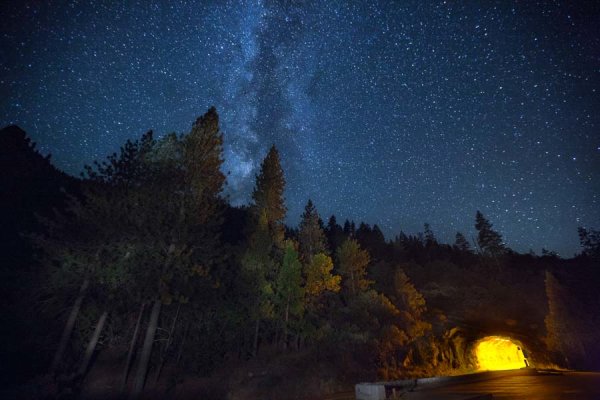
The Milky Way At Tunnel View In Yosemite

The Milky Way At Tunnel View In Yosemite

A good and sturdy tripod is worth its weight in gold. That is almost a literal statement if you go with something like a Really Right Stuff tripod, hehe. I got mine about a year ago (after saving up for quite a while) and will never consider another one. Having a good tripod means that your camera will be steady throughout the entire long exposure. If your tripod is cheap and made from plastic, or just a very flimsy aluminum or carbon fiber tripod, you will definitely have a hard time with long exposures. If your tripod has a hook underneath the center column, be sure to utilize it by hanging your camera bag there to weigh the whole thing down!

You’ll also want to set either a two second timer or use a cable release (remote trigger). Both of these methods get your hands off the camera for the entire duration of the exposure. If you try and press the shutter button down for a 30 second exposure, you will not be happy with the results.

Conclusion

The Milky Way is one of the most challenging and rewarding things you can get out and photograph. Doing it well requires planning and more planning. Don’t leave anything to chance. If you have more tips to add, questions or thoughts about the article, let me know in the comments below.

The post Down and Dirty Guide to Milky Way Photography by James Brandon appeared first on Digital Photography School.


Digital Photography School

 
Comments Off on Down and Dirty Guide to Milky Way Photography

Posted in Photography


Drawn in Dust: The Great Traveling Dirty Truck Art Exhibition

05 Sep

[ By WebUrbanist in Art & Street Art & Graffiti. ]

dirty car road art

Typical art travels inside, safely stowed in carefully-packed containers to prevent damage – these drawings do the opposite, playing up the folk-artsy practice of scribbling into built-up grime on vehicles.

dirty truck back travel

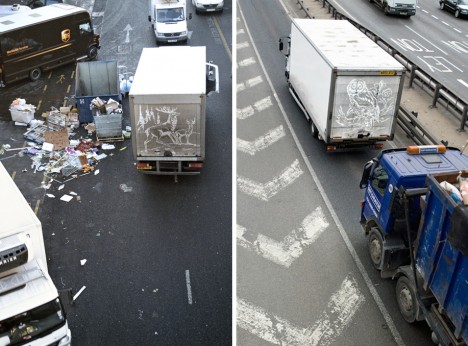
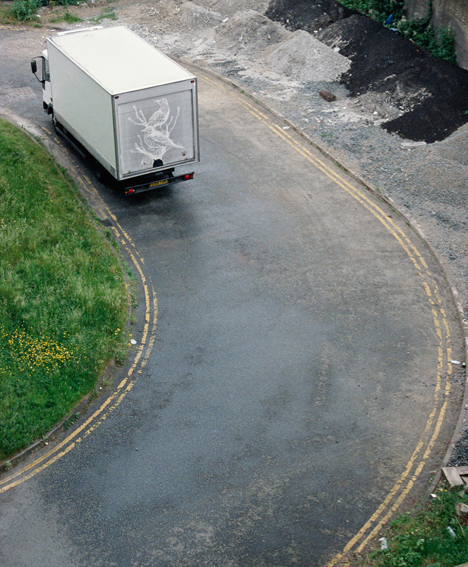
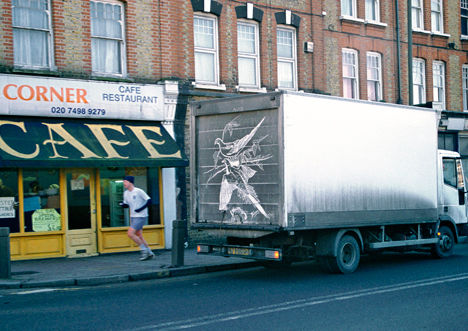
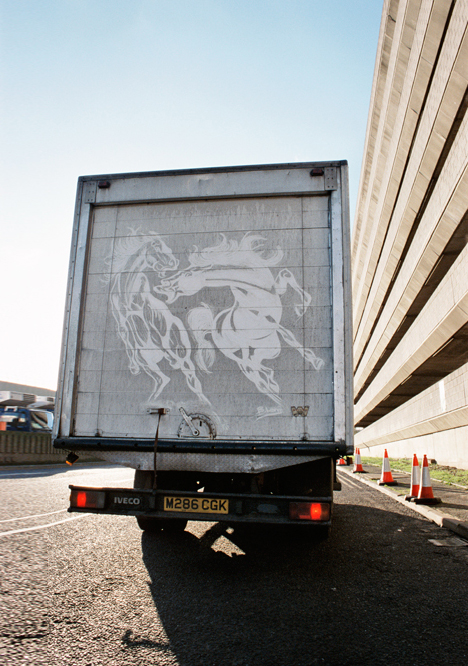
“Using his finger to scribe into the layer of dirt built-up from exhaust emissions,” Ben Long “creates elaborate drawings on the rear shutters of white haulage trucks. In this on-going series, collectively entitled The Great Travelling Art Exhibition, he expands upon the daubing and crude slogans that commonly adorn commercial freight vehicles.”

dirty truck art process

Some of the pieces will be rapidly wiped away by rain or vandals, but others have survived for as long as six months and on long cross-country road-trips made by their drivers. Like street art, these reverse graffiti works are susceptible to the elements and necessarily temporary.

dirty vehicle art city street

The artist’s motivations are various, but include a desire to make his work more accessible outside of traditional gallery spaces, reduce the costs of creative expression by using free materials and obviating the need for a studio space in which to create.

dirty truck road art

At the same time, there are a lot of artistic conventions still in play here – hallmarks of the ‘high art’ world, as it were. Long crafts these compositions within (and with reference to) a fixed frame, much like a canvass, and signs the pieces as well.

Share on Facebook


[ By WebUrbanist in Art & Street Art & Graffiti. ]

[ WebUrbanist | Archives | Galleries | Privacy | TOS ]


WebUrbanist

 
Comments Off on Drawn in Dust: The Great Traveling Dirty Truck Art Exhibition

Posted in Creativity


The Rotten Apple Project: Quick and Dirty Urban Hacks

05 Apr

[ By Steph in Art & Installation & Sound. ]

Rotten Apple Urban Hacks 1

Sometimes, a reclaimed piece of junk is all it takes to make a bus stop, bike rack, subway station or virtually any other urban setting more comfortable and fun. The Rotten Apple project consists of incredibly fast and cheap urban interventions that anyone can replicate in their own cities, from a simple hinged wooden board that turns a bike rack into a folding seat to improvised tools that transform scaffolding into a musical instrument.

Rotten Apple Urban Hacks 2

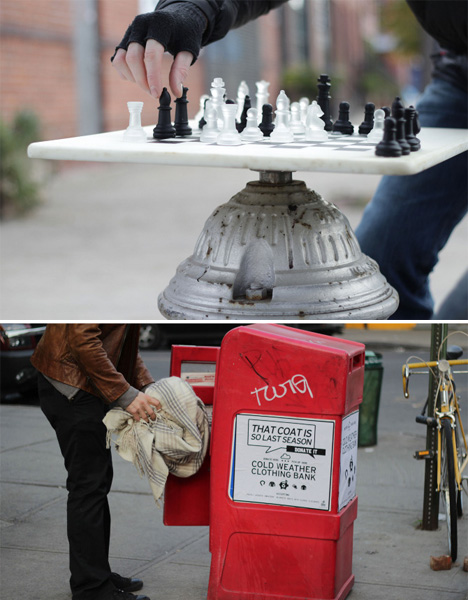
A piece of scrap wood and some chess pieces, fitted onto the top of a fire hydrant, becomes a public game board. An old, unused newspaper dispenser is a cold weather clothing bank with the addition of a sticker.

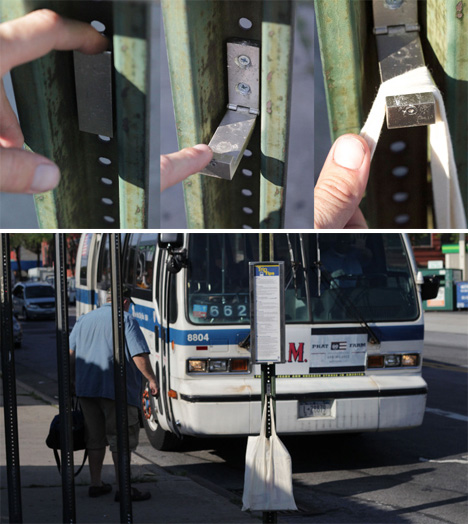
Rotten Apple Urban Hacks 3Commuters waiting on the bus have a place to hang their bags thanks to an old IKEA clothes hook added to a street sign. Other signs were modified into sidewalk tetherballs or double-height bike racks.

Rotten Apple Urban Hacks 4

Rotten Apple Urban Hacks 5

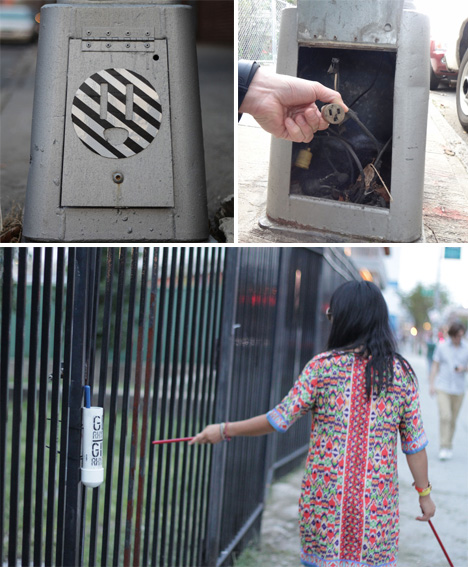
Magnetic boards on the subway platform aren’t just a fun way to pass the time, they can also brighten up someone’s day with a cheerful message. A window of an abandoned building, bricked up long ago, is a public bookshelf, and a sticker applied to an electric main notifies passersby that there’s an outlet hidden inside so they can charge their phones.

Rotten Apple Urban Hacks 6

The people who run Rotten Apple have chosen to remain anonymous, leaving only this quote from Victor Pananek as a clue to their motivations: “Design, if it is to be ecologically responsible and socially responsive, must be revolutionary and radical in the truest sense. It must dedicate itself to… maximum diversity with minimum inventory… or doing the most with the least.”

Share on Facebook


[ By Steph in Art & Installation & Sound. ]

[ WebUrbanist | Archives | Galleries | Privacy | TOS ]


WebUrbanist

 
Comments Off on The Rotten Apple Project: Quick and Dirty Urban Hacks

Posted in Creativity


Sony a7R teardown! Roger Cicala gets his hands dirty

30 Jan

1.jpg

When it comes to the (literal) nuts and bolts of cameras and lenses, Roger Cicala at Lens Rentals is the man to ask. This week he’s been busy disassembling Sony’s flagship mirrorless camera, the Alpha 7R. We’re in the middle of our review right now, and we must admit – some of the pictures of his detailed tear-down make us wince. But we can’t… look… away. Click through for an edited selection of images from the whole gory process. 

News: Digital Photography Review (dpreview.com)
 
Comments Off on Sony a7R teardown! Roger Cicala gets his hands dirty

Posted in Uncategorized