RSS
 

Posts Tagged ‘Designing’

Japan Camera Hunter is designing a 35mm ‘premium compact’ camera

30 Sep

During last week’s Save Analog Cameras live broadcast, it was announced that Bellamy Hunt of Japan Camera Hunter (JCH) is working on a new 35mm compact camera project, according to Kosmo Foto. This revelation follows Hunt’s recent launch of the JCH StreetPan 120 B&W film, which itself followed JCH’s first film launch about a year and a half ago.

Hunt reportedly didn’t reveal much about the planned 35mm camera, though he did refer to it as a ‘premium compact,’ indicating what potential future buyers can expect. The project aims to fill a growing void in the camera market, giving analog enthusiasts a modern compact 35mm option, although it could be many months before the camera actually launches.

Kosmo Foto reports that the camera may be ready for testing some time next year, though they didn’t mention whether they got that information directly from Hunt or elsewhere. Hunt discussed the topic of compact film camera scarcity in a blog post earlier this year, saying, among other things:

I would dearly love to make a compact camera, and I know what I want too … A simply [sic] point and shoot with a decent 28mm or 35mm lens, flash, iso selector and manual override. As simple as possible and made from metal for durability. The less electronic components the better, so that it can be easily serviceable and less prone to breaking down.

Whether the camera discussed last week will follow these design principles is yet to be seen, but we’ll definitely be keeping a eye out for Hunt’s creation.

Articles: Digital Photography Review (dpreview.com)

 
Comments Off on Japan Camera Hunter is designing a 35mm ‘premium compact’ camera

Posted in Uncategorized


Designing for Disaster: 15 Ideas for Preparedness & Response

10 Mar

[ By Steph in Design & Products & Packaging. ]

disaster design pop up 2

Aesthetics may not be the first consideration when it comes to emergency items like survival kits, post-disaster housing and relief supplies, but good design can make the difference between clunky, inefficient objects that hamper adequate response and the items that save as many lives as possible, as quickly as possible. Often created after designers witnessed disasters close to home, many of these solutions attempt to build preparedness into our daily lives, making it easy to grab a minimalist kit by the door or pack up a panicked pet at the last minute.

Pet Earthquake Emergency Bag

disaster design earthquake pet

disaster design earthquake pet 2

disaster design earthquake pet 3

Have you thought about what you’d do with your cat or small dog if a disaster hit and you had to flee on foot? Transporting them in a standard pet carrier would be cumbersome and maybe even impossible. Enter the Pet Earthquake Bag Kit, created in response to the last major earthquake in Japan. Special pockets and straps make it possible to carry up to two household pets. It come sin two sizes and includes a human/pet emergency kit with water, treats, bandages and calming oils.

Minim-Aid Emergency Kit
disaster design minimaid

disaster design minimaid 2

disaster design minimaid 3

disaster design minimaid 4

disaster design minimaid 5

disaster design minimaid 6

This slim and minimalist stainless steel tube kit by Nendo takes up very little space hanging in a closet or on a hook by the door, but contains a raincoat, radio with gadget charger, lantern, drinking water and whistle. Waterproof and capable of floating, it would be easy to grab and carry at the last minute.

Reaction Housing System Flat-Pack Emergency Shelters
disaster design reaction 1

disaster design reaction 2

disaster design reaction 3

disaster design reaction 4

Stackable and easy to ship, the Reaction Housing System is made up of two easy-to-assemble pieces that can be used alone for a single unit or connected to multiple units. Each one can be configured as a living space or office and contain single beds that fold down from the wall and portable power generators. Twenty of them can be stacked on one semi-truck or C-130 Hercules plane, and 1,940 could be moved across the country on a freight train to house 7,760 survivors as quickly as possible. At $ 5K each, they’re far cheaper than most other solutions, like the ones FEMA currently uses.

Life Desk
disaster design life desk

disaster design life desk 2

disaster design life desk 3

The Life Desk was developed after a number of students were seriously injured or killed by the tables they were hiding under during earthquakes in China. The heavy duty high-strength-steel and nylon desk provides a long-lasting work surface for students and can be quickly folded for shelter in an emergency.

PATCH Urban Survival Kit
disaster design patch 1

disaster design patch 2

disaster design patch 3

Looking like a small thermos on a key fob, PATCH is an urban survival kit designed specifically for city dwellers in the 21st century, containing all the core elements of a first-aid kit and adding a phone charger, multi-tool, zip ties, emergency blanket and other items you’d be likely to need if some kind of disaster made your surroundings unsafe.

Next Page – Click Below to Read More:
Designing For Disaster 15 Ideas For Preparedness Response

Share on Facebook


[ By Steph in Design & Products & Packaging. ]

[ WebUrbanist | Archives | Galleries | Privacy | TOS ]


WebUrbanist

 
Comments Off on Designing for Disaster: 15 Ideas for Preparedness & Response

Posted in Creativity


Designing the Perfect Camera – What Features are on Your Wish List?

18 Feb

The perfect camera doesn’t exist, but if I were a camera designer, I know exactly what sort of camera I would make for myself, and how I’d improve on the one that I’ve already got. I’m not asking for the impossible either – all these ideas could be implemented using current technology. Really, what I would do is take the camera I already own – the Fujifilm X-T1 – and add the best bits from other cameras, to make a kind of super-camera, or at least one that is better tailored to my own needs.

1 – Sensor size

Let’s start with the sensor. The X-T1’s sensor uses the same 3:2 aspect ratio as other APS-C and medium format cameras. This often works well when taking photos in the landscape orientation. But it doesn’t work nearly so well when taking photos in the portrait orientation (with the camera turned on its side).

Aspect ratio

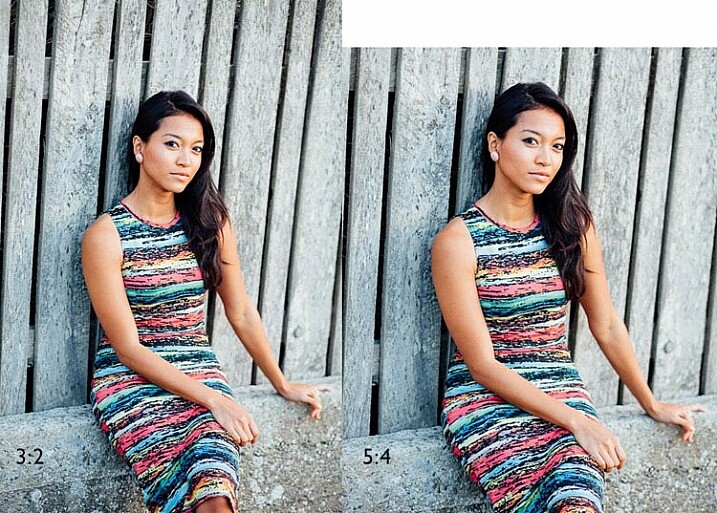
The portrait on the left has an aspect ratio of 2:3 (width always comes first), the same as the sensor on the X-T1. The portrait on the right shows how it would look if the sensor had a 4:5 aspect ratio. The area is the same, but the width and height are different.

It’s surprisingly hard to create a good composition that utilizes all the space in the frame well, especially for landscapes and portraits. It’s much easier with a shorter rectangle, such as those found in large format cameras (aspect ratio 5:4), some medium format film cameras (7:6) and Micro four-thirds cameras (4:3).

For example, check out the landscapes of Joe Cornish. He uses a large format camera for a lot of his work, and he uses the portrait orientation a lot. It works really well with the short rectangle.


My proposal is this. Ditch the 3:2 aspect ratio sensor and place it with one that uses the 5:4 aspect ratio. But keep the area of the sensor – don’t make it bigger or smaller. This would give you several benefits:

  • It’s easy to compose images within the 5:4 aspect ratio.
  • If you crop to a square (as I often do because I love the square format) you use more of the sensor than when you crop the current APS-C sensor.
  • You get a slight improvement in image quality, especially at wide apertures, because you are using the centre part of the lens to create the image.
Aspect ratio

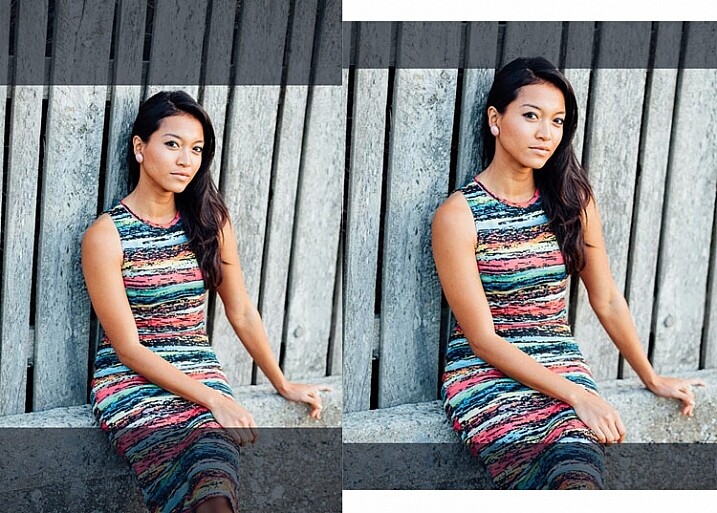
The above two photos, cropped to a square. The dark grey area shows the unused part of the sensor. You lose less information captured from the 5:4 sensor than you do from the 3:2 one.

What I don’t want to see, is a full-frame camera introduced into the Fujifilm range. The problem with having two sensor sizes in the same range, is that it greatly complicates the process of making, and buying lenses. It’s far better, as Fujifilm has done so far, to use a single sensor size throughout the range (in my opinion).

2 – In-Camera Image Stabilization

I think this is a fantastic idea, and I’d like to see it in Fujifilm cameras. The advantage of having Image Stabilization in the camera is that you can use it with any lens. That includes wide-angles, which you can then potentially hand-hold at shutter speeds like 1/4 or 1/8 second, giving all sorts of interesting creative possibilities when it comes to recording movement. Sony and Olympus have got this one right.

Fast shutter speed

I took this photo with a 35mm lens at 1/180 second to freeze movement. This lens doesn’t have Image Stabilization, but if it were built into my camera, I could try taking the photo at a shutter speed as slow as 1/15 or 1/8 second. The man would be a blur, creating a different image entirely. Image Stabilization lets you try this with a hand-held camera, so you don’t have to use a tripod.

3 – Quick control dial

Mid-range and high-end Canon cameras have a quick control dial – a thumbwheel on the back of the camera, that you can move while looking through the viewfinder. The big advantage of the quick control dial is that you can adjust exposure compensation without removing your eye from the viewfinder.

Quick control dial

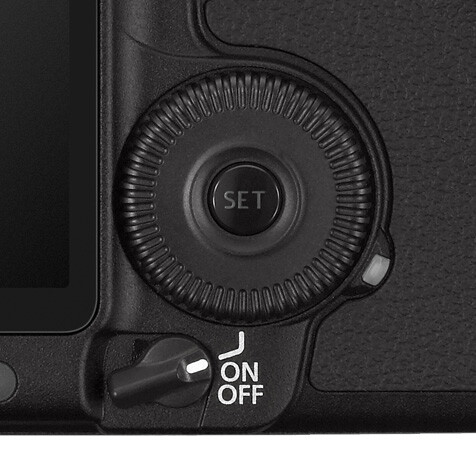
The quick control dial on the EOS 5D Mark II. Its position means that it’s easy to move with your thumb, while looking through the viewfinder.

The X-T1 can already display a histogram in the viewfinder. With a quick control dial you can adjust exposure compensation (when in an automatic mode like aperture priority, shutter priority or program) as you go, to get the histogram where you want it. All guesswork regarding exposure is gone. The current exposure compensation dial is too hard to move while looking through the viewfinder, and reduces the usability of the camera.

The joystick added to the X-Pro 2 for quick movement through the autofocus points would also be a welcome addition.

4 – Dual card slots

Probably coming in the XT-2, but essential for backing up photos. Good quality memory cards are virtually indestructible. If your camera saves a copy of each photo on two different cards this makes backing up photos much easier, especially while travelling.

So Fujifilm, if you’re listening, I know I’m only one user among many, but I’d love it if you could give some consideration to these ideas. Especially the one about sensor size, which I think could revolutionize the way we use cameras.

Your turn

If I could add just one feature to my X-T1 it would be the 5:4 aspect ratio sensor. So here’s a question for you – if you could add just one feature to your camera, which would it be and why? I’m looking forward to reading your answers, this should be interesting.


Mastering Lenses photography ebookMastering Lenses

My new ebook Mastering Lenses: A Photographer’s Guide to Creating Beautiful Photos With Any Lens shows you how to get the best from the lenses you own already. A comprehensive guide to exploring the creative potential potential of wide-angle, normal and telephoto lenses, it’s also the ultimate buying guide for readers thinking about purchasing a new lens for their camera. Please click the link to learn more or buy.


googletag.cmd.push(function() {
tablet_slots.push( googletag.defineSlot( “/1005424/_dPSv4_tab-all-article-bottom_(300×250)”, [300, 250], “pb-ad-78623” ).addService( googletag.pubads() ) ); } );

googletag.cmd.push(function() {
mobile_slots.push( googletag.defineSlot( “/1005424/_dPSv4_mob-all-article-bottom_(300×250)”, [300, 250], “pb-ad-78158” ).addService( googletag.pubads() ) ); } );

The post Designing the Perfect Camera – What Features are on Your Wish List? by Andrew S. Gibson appeared first on Digital Photography School.


Digital Photography School

 
Comments Off on Designing the Perfect Camera – What Features are on Your Wish List?

Posted in Photography


Microsoft PowerPoint 2010 – Toggle Gridlines, Guides, and Rulers When Designing Slides

22 Sep

Use rulers, drawing guides, and / or gridlines to arrange objects inside slides in PowerPoint 2010 presentations.

Designing complicated slide layouts in Microsoft PowerPoint 2010?

It might prove useful to show items to aid in arranging text, images, graphs, and other objects on a slide. With a couple of clicks you can view horizontal and vertical rulers, gridlines on which objects are aligned, and adjustable drawing guides….

Read more at MalekTips.
New Computer and Technology Help and Tips – MalekTips.Com

 
Comments Off on Microsoft PowerPoint 2010 – Toggle Gridlines, Guides, and Rulers When Designing Slides

Posted in Technology


Microsoft Publisher 2010 – Designing a Document for the Screen? Show Pixels in the Ruler

06 Aug

If you are designing a document in Microsoft Publisher 2010 that is meant for on-screen display rather than as a hardcopy, change the ruler measurement units to pixels.

Are you designing a document in Microsoft Publisher 2010 that is meant to be displayed onscreen rather than printed?

If so, the default ruler measurement units of inches or centimeters may not make much sense. With a simple tweak, you can change Publisher 2010’s on-screen rulers to show measurements in pixels….

Read more at MalekTips.
New Computer and Technology Help and Tips – MalekTips.Com

 
Comments Off on Microsoft Publisher 2010 – Designing a Document for the Screen? Show Pixels in the Ruler

Posted in Technology