RSS
 

Posts Tagged ‘Craft’

Researchers craft tiny wireless camera that can be attached to beetles

17 Jul

Researchers at the University of Washington have developed a tiny camera that can ride aboard a beetle, offering us a distinct and new view of the world. The lightweight wireless camera can stream video to a connected smartphone at 1 to 5 frames per second and can even pivot up to 60 degrees.

The small camera, which has been used in the real world on Pinacante and death-feigning beetles, records black-and-white images and can even be used in very low light. While an impressive achievement, the specs of the camera itself are nothing to write home about. The monochrome camera streams images that are 160 x 120 pixels.

The device communicates with a smartphone via Bluetooth from up to 120 meters away. In addition to viewing footage, researchers can also remotely control the mechanical arm attached to the camera via an electrical charge. When a high voltage is applied, the material used for the arm bends to the desired position. After the voltage is reduced or altogether removed, the arm will relax back to its original position, like how a human can only keep their head turned for a limited amount of time before needing to return to a natural resting position.

Co-lead author Vikram Iyer, a UW doctoral student in electrical and computer engineering. Image credit: Mark Stone/University of Washington

The tiny camera is a huge feat of engineering; the entire camera system, including the mount, arm and necessary electronic components, weighs about 250 milligrams, which is roughly half the weight the subject beetles can carry naturally. Fortunately, the camera has been designed in such a way that it doesn’t limit the mobility of the beetles or harm them.

At this point, you may be wondering what scientific applications there are for attaching a camera to a beetle. The first-person view from a beetle has allowed researchers to better understand how the subject responds to various stimuli and how it uses vision to approach its environment.

Further, by leveraging its incredibly small camera system, the team also built the world’s smallest terrestrial power-autonomous robot with wireless vision. The robot is ‘insect-sized’ and uses vibrations to move. The team hopes that future versions of the autonomous robot camera could be made without a battery or be solar-powered.

The world’s smallest terrestrial power-autonomous robot with wireless vision. Image credit: Mark Stone/University of Washington

Unsurprisingly, with a such small device, finding a way to power it proved challenging. Researchers turned to the world of insects for inspiration. Flies, for example, dedicate 10 to 20 percent of their total resting energy to power their brains, which are primarily busy with visual processing. In order to efficiently use its limited energy, a fly has a small portion of their overall vision area which sees with high fidelity. In order to see different areas with good detail, a fly must move its head.

This is where the researchers got the inspiration for a movable arm for their tiny beetle camera. Co-lead author of the study, University of Washington doctoral student in electrical and computer engineering, Vikram Iyer, said the following: ‘One advantage to being able to move the camera is that you can get a wide-angle view of what’s happening without consuming a huge amount of power. We can track a moving object without having to spend the energy to move a whole robot.’ To further conserve energy of the system, the camera system includes an accelerometer, which allows the camera to only record images when the beetle moves. In the end, battery life is between 6 and 10 hours.

For more information, members of the American Association for the Advancement of Science can view the full article in the latest volume of Science Robotics. If you’re interested in other electronics-equipped insects, researchers at the University of Washington attached sensors to bees in 2018.

Articles: Digital Photography Review (dpreview.com)

 
Comments Off on Researchers craft tiny wireless camera that can be attached to beetles

Posted in Uncategorized


Craft brewery partners with Kodak to create a beer that doubles as film developer

21 Mar

Delaware craft brewery Dogfish Head has teamed up with Kodak to create SuperEIGHT, an analog-inspired Super Gose beer designed specifically to develop film.

Sam Calagione, founder and CEO of Dogfish Head Craft Brewery, was recording an episode of The Kodakery, a podcast created by Kodak, when he learned that with the right levels of acidity and vitamin C, it would be possible to create a beer capable of developing film. Coincidentally enough, the research and development team at Dogfish was already working on a beer with properties that would align perfectly with those needed for developing film, and so SuperEIGHT was born.

After further developing the ‘super-refreshing, sessionable Super Gose,’ the Dogfish Head team sent a few batches over to Kodak for testing and sure enough, it worked. The resulting footage, seen in sample footage above, isn’t nearly as impressive as dedicated developers, but for a beer we’d say it’s pretty darn impressive. Kodak and Dogfish Head even shared a recipe for the development, which can be downloaded and printed off.

As for the beer itself, SuperEIGHT has an alcohol content of 5.3% and ‘is made with eight heroic ingredients including prickly pear, mango, boysenberry, blackberry, raspberry, elderberry, kiwi juices and a touch of quinoa, along with an ample addition of Hawaiian sea salt.’

Dogfish Head Craft Brewery will start shipping six packs of 355ml (12 fl oz) cans in April 2019.

Articles: Digital Photography Review (dpreview.com)

 
Comments Off on Craft brewery partners with Kodak to create a beer that doubles as film developer

Posted in Uncategorized


How to Use Neutral Tones to Craft Realistic Edits for Landscape Photos

24 Jul

When you look at a white wall, how does it make you feel? Dingy? Cold? Warm and radiant? Modern? Sophisticated? Clean?

White and light gray, sometimes referred to as “neutral tones”, are some of the most powerful colors in the spectrum. We can distinguish many shades of white, and bounced light from a neutral source influences the tint of every other color nearby.

Neutral tones set the mood of an image more than any other colors. You’ve probably transferred a photo to your computer where the white balance was noticeably off: a night shot where everything was too green and cool, or an indoor photo that was orange. White balance is an easy fix in most photo editing software, but neutrals don’t end there: by tweaking them creatively, you can take your photos to the next level.

Sella towers - How to Use Neutral Tones to Craft Realistic Edits for Landscape Photos

What are the sources for neutral tones?

It’s possible to have a photo without white and grays, but most of the time scenes are full of them. These are some of the more common sources in landscape photography.

Clouds

Those water-saturated cotton balls do a great job of reflecting light. On a sunny day they tend to be slightly warm, while storm clouds are a fantastic source for chilly gray tones. However, clouds are not a good source for neutrals when shooting after golden hour or before sunrise.

Overblown sky

When shooting after sunrise and before sunset, the sky will typically be overexposed if you properly expose the rest of the image. It’s not usually desirable, but in a few instances an overblown sky is a good source of white.

Sass de putia - How to Use Neutral Tones to Craft Realistic Edits for Landscape Photos

Water

Lakes and shorelines are my favorite method to introduce strong neutral tones to landscape photos. You can use bodies of water to reflect an overcast sky, and along the coast, you can shoot a long exposure to blur the white foam from the waves.

Both tend to create pure neutrals, so you can completely change the mood of an image with tiny adjustments.

Man o war - How to Use Neutral Tones to Craft Realistic Edits for Landscape Photos

Fog

The most powerful way to introduce mystery and dreariness, fog is often the largest source of gray tones in your image.

Hohenwerfen castle - How to Use Neutral Tones to Craft Realistic Edits for Landscape Photos

Snow

Winter photography enjoys the most magical source for neutral tones. Tinting snow just a bit cooler or warmer profoundly impacts the scene’s mood.

Mount hood - How to Use Neutral Tones to Craft Realistic Edits for Landscape Photos

Moon and stars

When shooting astrophotography, the stars tend to cast a cold white light, and the moon a warmer light.

Gimmelwald - How to Use Neutral Tones to Craft Realistic Edits for Landscape Photos

Haystack rock - How to Use Neutral Tones to Craft Realistic Edits for Landscape Photos

Architecture

Man-made structures that ought to be white or gray such as; lighthouses, white-washed brick houses, winding gravel roads, and expansive castles — are often the subject of an image. Consequently, they make a compelling neutral source.

South stack lighthouse - How to Use Neutral Tones to Craft Realistic Edits for Landscape Photos

Why are neutral tones important?

Out of the camera, even after editing, your neutral tones may not really be neutral. They may be heavily tinted. Introducing off-white into your neutral sources is an important technique for crafting compelling edits.

Keep in mind that the viewer will expect those subjects to look neutral, so if you push the white balance too far or don’t balance the warms and cools, it will begin to look over-edited. A tiny change in neutrals has 10 times the power of changing your colors and blacks.

So, in general, start with subtle adjustments and revisit the photo often under different lighting conditions. Some of the most common ways to pollute neutral tones are:

  • Pushing saturation or vibrance.
  • Over-saturating an image shot at a high ISO.
  • Shifting the white balance too far from pure white to bring out colors in the sky or a dark foreground.

With those caveats in mind, here are four ways your neutral tones can support the rest of the image.

Strumble head lighthouse - How to Use Neutral Tones to Craft Realistic Edits for Landscape Photos

1. Neutral tones root an image’s color palette

With strong neutrals, viewers can believe almost any edits in an image: sunsets that pop, overly blue skies, or glassy teal water. But the moment you introduce color into an element that should obviously be white or light gray, the image’s believability disintegrates.

This is why split toning is rarely a magic pill for making a great photo. Toning the highlights and mid-tones often ends up tinting your neutral sources.

The foam in this shot of Spirit Falls (below) is pure white, but the rest of the image has been significantly warmed and tinted green to bring out the beautiful colors. The contrast between the pure white foam and warm greens creates the impression that the water is refreshingly chilly.

Spirit falls - How to Use Neutral Tones to Craft Realistic Edits for Landscape Photos

2. Neutral tones help you resurrect the colors you remember

After shooting a stunning sunset, it can be disappointing to open the RAW image in your editing software and find that the colors are missing. In most cases, the detail and colors are there, but it’s up to you to revitalize them. Neutral tones will help.

Start by identifying elements in the photo that ought to be white or gray, then adjust white balance and tint accordingly. This will give you a great starting point.

It may still be underwhelming, but now that your neutrals are about right, start selectively bumping the saturation, temperature, and tint on the colorful subjects in your composition. You might add a graduated filter to the sky portion of the image and warm or cool it to help them pop.

Roads end - How to Use Neutral Tones to Craft Realistic Edits for Landscape Photos

Sunsets create a powerful contrast between the warm sky and cool shadows. The image of Road’s End above is primarily cool since the most of the image is in shadow.

However, the sea foam reflects both the warms and cools, so in post-production, I played with the global white balance until both tones came out. Afterward, I introduced a strong magenta cast to bring out the pinks in the sky and foreground.

3. Neutral tones set the overall mood

In reality, neutral tones are rarely neutral. By slightly tinting neutrals, you can communicate aspects of the scene. Here are some examples.

Time of day

Night photography is typically cooled, while sunset or midday photos are warmed. This shot of Mount Bachelor was taken after during civil twilight, so the only source of warm light was the grass in the foreground and hints of alpenglow on the snow. Everything else was left cool.

Mount bachelor - How to Use Neutral Tones to Craft Realistic Edits for Landscape Photos

Temperature

An overly warm image can communicate a hot day, and on chilly days, the overall white balance can be left cool. This is especially powerful if your image has a small, warm light source to draw the viewer’s eye.

Morning fog over this lake in Snowdonia introduced a neutral source and warming the color raises the perceived temperature.

Snowdonia - How to Use Neutral Tones to Craft Realistic Edits for Landscape Photos

Weather

Clear days can be tinted slightly pink to warm the scene, while an incoming storm should incorporate a greener tint.

Oregon is rich with various biomes, and Smith Rock State Park feels like a desert on a clear day. The strong magenta cast brings out colors in the rocks and reinforces the cloudless sky.

Smith rock - How to Use Neutral Tones to Craft Realistic Edits for Landscape Photos

Clarity

When the fog rolls in, it tends to chill the image and evoke mystery. A hazy day adds depth and layers to an image and tends to warm the image at golden hour.

In this shot from Bavaria, the haze on the mountain range adds warmth and communicates just how distant the mountains are.

Geroldsee - How to Use Neutral Tones to Craft Realistic Edits for Landscape Photos

4. Neutral tones help to bring out or tone down a region

Neutrals don’t have to be the same color or white balance! They can help root the mood and color palette of a local section of the image.

For example, snow beneath some trees in the foreground should be cool, and snow on a mountain under sunrise should be warm.

The different white balances communicate the temperature contrast between the foreground and background. Furthermore, since cool colors recede while warm colors pop forward, the warm snow in the background entices the viewer’s eye up from the ice-covered lake in the foreground.

Lost lake -- How to Use Neutral Tones to Craft Realistic Edits for Landscape Photos

What if my image doesn’t have any neutral tones?

It’s not impossible to realistically edit images without strong neutrals. But since your viewer has no neutral reference to root the color palette, you will need a compelling balance of warms and cools to convince the viewer you didn’t artificially crank up the white balance.

This shot from the village of Brunate (below) doesn’t have any substantial neutrals. Although the fog could be considered a neutral source, it strongly reflects the colors in the sky. However, the overpowering warmth in the top left sky is balanced by cooler tones in the rest of the image, which keeps the white balance from being entirely warm and pink.

The contrast also draws the viewer’s eye from the village in the foreground to the beautiful sky in the background.

Brunate - How to Use Neutral Tones to Craft Realistic Edits for Landscape Photos

Conclusion

Crafting realistic edits in landscape photography is a subjective experience. But by carefully preserving your neutrals, you grant yourself almost unlimited creative liberties in the editing process.

So next time you want a fall photograph to feel like a shot from Rivendell, identify the sources of neutral tones in your image and apply these techniques.

The post How to Use Neutral Tones to Craft Realistic Edits for Landscape Photos appeared first on Digital Photography School.


Digital Photography School

 
Comments Off on How to Use Neutral Tones to Craft Realistic Edits for Landscape Photos

Posted in Photography


Logitech’s new Craft keyboard includes a dial for photo and video editors

06 Sep

Computer accessory maker Logitech has introduced a new keyboard designed specifically for ‘creators.’ It’s called the Craft keyboard, and it features a dial that will hopefully make life a little easier for stills and video editors.

The Crown dial on the Craft keyboard offers three-way touch, tap and turn functions that can tune-in to the tools of editing applications and allow mouse-free adjustments and selections. The company suggests using the Craft keyboard with Adobe’s Photoshop, for example, so the dial can be used to adjust brush sizes, turn saturation up or down, or to scroll through tool settings quickly and with greater accuracy.

But you’re not limited to Photoshop. A software package called Logitech Options will allow custom profiles to be installed that are specifically designed for individual applications, and which extends the range of controls that can be accessed. The Crown can also be used with Microsoft Office applications, and you can use it to take control of standard PC functions such as screen navigation as well.

The Logitech Craft is expected to go on sale in October priced $ 200/£170. For more information, check out the video below and visit the Logitech website.

Press Release:

Logitech CRAFT Advanced Keyboard with Creative Input Dial Sets New Standard for Desktop Control

Flagship Keyboard Improves Creativity and Productivity

“The creative input dial gives you instant access to the functions you need, the moment you need them, allowing you to increase your productivity by simply touching the dial. CRAFT puts you in your creative element – every time you sit at the desk.”

Today Logitech (SIX: LOGN) (NASDAQ: LOGI) announced CRAFT, an advanced keyboard with a creative input dial, setting a new standard for computer keyboards. CRAFT looks and feels better than anything you have typed on and offers a whole new way to immediately access context-specific computing tools with a smart aluminum dial. For example, with a touch, tap or turn you can adjust image brightness, contrast and saturation in Adobe Photoshop, or create and adjust charts in Microsoft Excel®. The creative input dial gives you the ultimate control and input at your desk for precision, efficiency and uninterrupted creative flow.

“Our new flagship Logitech CRAFT keyboard is for all creators who spend a lot of time designing and creating – who want to work with greater precision and feel connected to their work,” said Art O’Gnimh, global head of keyboards at Logitech. “The creative input dial gives you instant access to the functions you need, the moment you need them, allowing you to increase your productivity by simply touching the dial. CRAFT puts you in your creative element – every time you sit at the desk.”

The touch-sensitive aluminum creative input dial, called the Crown, recognizes the apps you are using and gives instant access to the tools you need. With a slight touch of the Crown you can instantly access context-specific functions — like brush size, brightness, chart type, font size — tap to change the function and turn to change the selected function’s value. Installing custom profiles in Logitech Options™ Software maximizes the creative process when working with Adobe Photoshop CC, Adobe Illustrator CC, Adobe Premiere Pro CC, Adobe InDesign CC and Microsoft PowerPoint®, Excel® and Word® (Microsoft functionalities work on PC only at this time). The Crown brings comfort, immediacy and convenience to your creative process and allows for increased two-handed interactions. You can also have access to global controls – giving you the ability to change desktops, navigate between apps, or adjust volume – and assign one additional Crown function in each of your favorite apps.

CRAFT also features smart illumination with backlighting that detects your hands and adjusts lighting automatically depending on the room conditions. The keys are crafted for comfort, in a full-size familiar layout, with each individual key engineered for stability and precision. CRAFT looks great alongside other premium desktop accessories by Logitech, such as the Logitech MX Sound, Logitech Spotlight Presentation Remote and Logitech MX Master 2S.

Additionally with the touch of an Easy-Switch™ button, you can easily switch between – and type on – any three connected devices, whether you are using a Windows® PC or Mac®. Select from either a Logitech Unifying™ USB or Bluetooth® Low Energy technology to connect to your computer.

Pricing and Availability

The Logitech CRAFT Advanced Keyboard is expected to be available in October 2017 at Logitech.com and select retail stores for a suggested retail price of $ 199.99. For more information, please visit Logitech.com, our blog or connect with us on Facebook, Instagram and Twitter.

Articles: Digital Photography Review (dpreview.com)

 
Comments Off on Logitech’s new Craft keyboard includes a dial for photo and video editors

Posted in Uncategorized


5 Festive Ways to Craft Your Engineer Prints

17 Nov
Extra photos for bloggers: 1, 2, 3

Want seriously impressive seasonal decor?

Some lo-fi black and white Engineer Prints may be just what you’re looking for!

They’re super BIG (3 feet x 4 feet!) but lightweight and therefore perfect for decorating/crafting.

So check out our five ideas on how to use your prints around the house this holiday season. They’ll look amazing whether you keep them larger than life or cut ‘em down in size.

5 Ways Your Prints Can Spread Cheer This Season

p.s. Know a friend who loves crafts as much as we do? Put a smile on their face by putting an Engineer Print Gift Kit under their tree!

(…)
Read the rest of 5 Festive Ways to Craft Your Engineer Prints (614 words)


© Taylor for Photojojo, 2014. |
Permalink |
No comment |
Add to
del.icio.us

Post tags:


Photojojo

 
Comments Off on 5 Festive Ways to Craft Your Engineer Prints

Posted in Equipment


DIY: Craft Custom Rubber Stamps from Photos

14 Feb

Extra photos for bloggers: 1, 2, 3

You’ve probably got a bag of them stashed away with old envelopes and Mr. Sketch markers.

Rubber stamps. The classic currency of Valentine’s Day and letters from your penpal.

Stamps don’t have to be boring or cheesy. They can be classy, and they can even be art.

Especially if you design them from your very own photos!

Follow along with our DIY stamp project as we take you from the pixel to the pad without breaking a sweat.

Make a Custom Photo Stamp!

p.s. Need Photoshop skillz? creativeLIVE is hosting a week of Photoshop classes. You can take over 40 different online classes taught by pros for free!

p.p.s. Happy V-Day! Sign up for Phoneography 101 and add your sweetheart (or pal) on us. TODAY ONLY!

Why it’s cool:

before

Remember that feeling of opening the mailbox and actually finding a letter addressed to you?

Give facebook a rest and show the world that snail mail isn’t dead!

Turn up the fun on your postcard with a stamp of your fat cat, or make that party invitation fancy with a stamp of people dancing.

The possibilities are endless so why not send someone a little love for the price of a stamp!

THE GOODS:

  • A stamp worthy photograph
  • A computer with Photoshop or similar
  • Some carving material, this Speedy-Cut rubber block is a great option
  • A cutting tool, this Speedball linoleum cutter is the stamp carvers weapon of choice
  • A No. 2 pencil
  • Tracing paper
  • An ink pad
  • An X-Acto knife or box cutter
  • A paint brush
  • Newspaper or a cutting mat
  • A block of wood or similar for mounting your stamp
  • Super glue

A NOTE ABOUT THE PHOTO:

beforeWhen choosing a photo for your stamp aim for an image with high contrast and a plain background. The best designs will have strong lines and simple geometries.

STEP 1: GENTLEMAN, START YOUR STENCIL

beforeImport your image into photoshop and turn up the contrast as needed. The more defined the lines of your photo the easier it will be to carve.

Now turn it black and white by going to Image>>Adjustments>>Desaturate.

STEP 2: ERASE THE EXTRAS

beforeUse your eraser tool to get rid of any distracting background elements from your photo leaving a clean white backdrop.

Trickier portions you may want to select with your lasso tool and delete. When using the lasso just select, hit the delete key, and set the color to white.

STEP 3: SLIM IT DOWN NOW

beforeTo get that Banksy stencil effect go to Image>>Adjustments>>Threshold and adjust the toggle until you’ve got the prefered balance of black and white.

If you don’t get the perfect lines from your adjustment, you can always clean up your image with the brush and eraser tools.

Then you’re gonna tape your watercolor sheet of paper on top of the print out.

STEP 4: DE-DIGITIZE YOUR DESIGN

beforePixels? Where we’re going, we don’t need pixels.

We’ve reached that magical time where we’ll take your pic off the computer and onto your carving surface. Start by printing your design in the size that you would like to carve, and grabbing your tracing paper and a No. 2 pencil.

Trace over your printed design using a dull pencil to give you thicker lines. Also, try and leave out any tiny details which will be too tricky to carve.

STEP 5: RUB IT IN

beforeNow it’s time to break out a bucket of elbow grease for our transfer step. Place your tracing paper graphite side down onto a corner of your eraser and use the back of your cutting tool to rub over your design.

Make sure to hold down your tracing paper securely so it doesn’t slippity slide. Voilà! It transfers just that easy.

STEP 6: CUT IT OUT

beforeUse your exacto knife or box cutter to trim down your stamp block to just the area surrounding your image. Be careful: These things are sharp!

Start with the smallest blade of your cutting tool, carving around the outside edges of your stencil. You may also want to carve any small details first just in case your lines start to smudge. Apply only light pressure when making cuts. You can always go back and cut deeper if you need to.

Once you have your outline carved, you can switch to a larger blade to carve out unfilled space. Your paint brush will help to clear off the dusty rubber bits that build up while carving.

Hint: If you’re not sure whether to cut something out or not, don’t! Wait until after you’ve tested your design to see how your stamp looks. Its a lot easier to take pieces off afterwards then to glue them back on!

STEP 7: TEST THE INKY WATERS

beforeInk up your carved creation with your ink pad and press it firmly into a piece of scratch paper. This will show you any stray dots or dashes that may need to be removed.

Excess rubber bits will show up black after you’ve tested your stamp and can be easily airbrushed out with your cutting tool.

STEP 8: MOUNT YOUR MASTERPIECE

beforeA little super glue and a wooden block will work wonders to class up that already ravishing stamp of yours.

Don’t limit yourself though, mount your stamp however you like: on a domino, an oversized lego, a serving spoon, or on the back of an old pattern block.

KEEP STAMPING

  • Use your new cutting tools to carve the ultimate pumpkin!
  • Turn your stamp into a fashion statement! Use it to design t-shirts, make earrings, or decorate your kicks.
  • Use your stamp to create a custom iPhone case. Get yourself a clear plastic case, cut out a template, and stamp away.
  • Take your game up tp the next level with linoleum printing (think rubber stamps, just on a bigger scale).

Related posts:

  1. Mykea: Photos + Ikea = Custom Furniture Art Darn you Ikea: so easy on the wallet, so hard…
  2. Make Custom-Printed Fabric Using Your Photos Don’t miss our second New York Photo Safari this Sunday!…
  3. Turn your photos into a custom sketch: The best $ 1 you will ever spend The almighty dollar doesn’t go as far as it once…


Photojojo

 
Comments Off on DIY: Craft Custom Rubber Stamps from Photos

Posted in Equipment


Craft 35mm Film Bows for Holiday Gifts

20 Dec
Extra photos for bloggers: 1, 2, 3

Your stockings are hung, your halls are decked, and it’s time to wrap up all of those presents. But you’ve got a problem. You’re tired of boring old candy cane paper and ribbons.

We’ve got an answer for this holiday head-scratcher, the 35mm film bow!

Get excited to wrap, this DIY will you have your showing off your festive craftiness AND your love of photography at the same time. It’s nothing short of a holiday miracle!

Make Gift Bows Out of 35 mm Film

p.s. Get free 2-Day shipping for U.S. orders over $ 100 in the Photojojo Shop!

Why it’s cool:

Upcycling is everywhere, and this is a crafty, simple, and creative way to take all of those negatives that might otherwise sit in a closet or on a shelf for years and put them to use! Plus, we can’t think of a more impressive way to top of a gift for a photo-loving pal.

Best of all, you might even have everything you need to make them around the house already. Mark our words, film bows are gonna be all the rage this year.

What you’ll need:

paint-sm

  • Film Negatives
  • Double Sided Tape
  • Scissors

STEP 1: Develop

paint-smHere’s the best part of this step – you might not even have to do it!

If you already have negatives laying around in a box somewhere, pull ‘em out! If not, you can shoot new ones, or even have blank film developed.

(You can even give your favorite friendly local film developers a call and see if they have any cast offs or abandoned negatives that were never picked up.)

For the project, you’ll need 6 standard sized strips about 6” long each.

Step 2: Stick some shapes

paint-sm To make each petal you’ll  want a strip of double sided tape around 1″ long.

Stick it down ?” from the short edge of your negative strip, remove the backing, then bend the strip over so the edges are even with the tape sandwiched between them. Squeeae it to make sure the adhesive sticks.

Go ahead and keep going at this step until you have five pieces.

Step 3: Spiral stack

paint-sm Next, you’re making a flower shape with the five petals. One at a time, add a piece of double sided tape near the flat end of a petal, remove the tape’s backing, then stack another piece on top.

Do this until you’re out of petal pieces.

A tip: each petal will need to be less than 90 degrees from the previous one in order for all five to fit evenly.

Step 4: AKA the cherry on top

paint-smNow for that last lonely negative strip.

Cut it down to a shorter size, about 5″, then use another strip of double sided tape, but this time make a circle instead of a petal.

Add one last strip of tape to middle of your flower, and press the round piece down on it.

Step 4: Decorate!

paint-smJoy to the world, you’re done with your bow! Now’s the time to stick it on a gift, then sit back and enjoy some gingerbread.
Why Stop There?

  • Make adorable minis with just parts of your negatives.
  • Use different types of film (like black and white) for different colors of bows.
  • Wear one on your head as a fascinator.
  • Use a film bow on a gift wrapped in photo-wrapping paper for a DIY double whammy!

Related posts:

  1. DIY: Make Easy & Fun 35mm Film Stickers! Extra photos for bloggers: 1, 2, 3 Everyone loves stickers,…
  2. How to Make Film Canister Holiday Lights! Extra photos for bloggers: 1, 2, 3 Free shipping on orders over $ 50!…
  3. DIY Photo Wrapping Paper — Wrap Gifts in Your Very Own Photos! Extra photos for bloggers: 1, 2, 3 Free shipping on orders over $ 100!…


Photojojo

 
Comments Off on Craft 35mm Film Bows for Holiday Gifts

Posted in Equipment


Math + Paper Craft: Computer Scientist Creates 3D Origami

26 Oct

[ By Steph in Art & Sculpture & Craft. ]

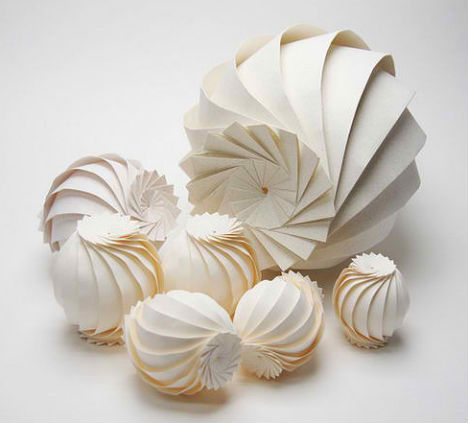
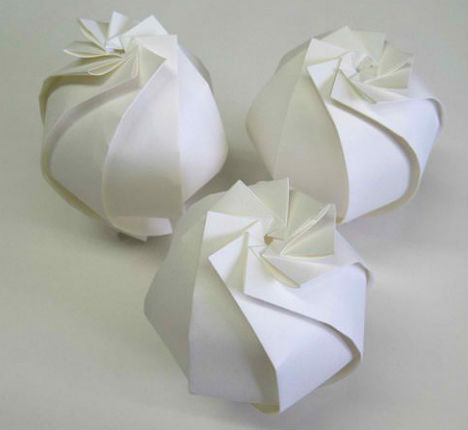
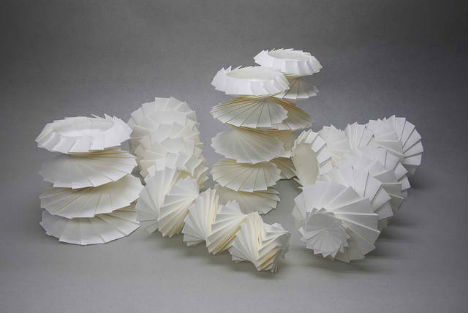
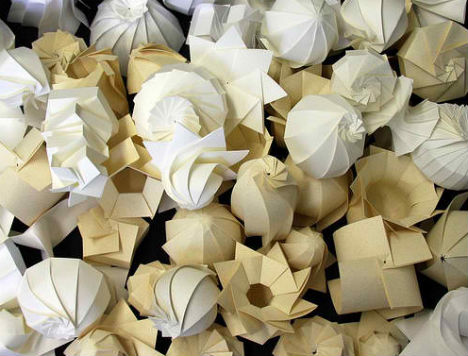
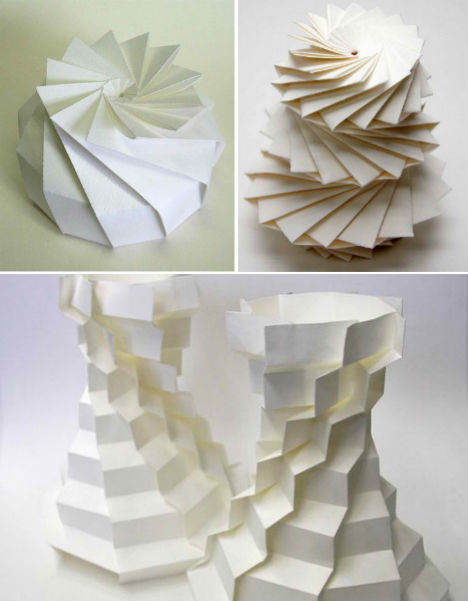
A single sheet of paper becomes a complex three-dimensional object in the hands of Jun Mitani, a computer scientist who uses geometric modeling software to aid him in his designs. Mitani has been studying algorithms and user interfaces for generating 3D shapes that can be realized with folding paper in a twist on the traditional craft of origami.

Not only does Mitani fold these mathematical origami objects himself, he also designs computer software to come up with the shapes. Mitani’s origami designs have ‘rotational symmetry’, meaning they look the same after a certain amount of rotation.

Mitani scores folding lines in a sheet of paper and then folds it by hand. While large sheets of paper don’t work well for complex origami shapes due to a lack of structural strength, Mitani is beginning to experiment with other materials, collaborating with industrial companies. That might reduce one issue that plagues Mitani in his work – he has suffered from, he says, “a few thousand” paper cuts.

“When I was a kid, I didn’t have much interest in folding origami, but in papercraft,” says Mitani in an interview with The Creators Project. “I fabricated a lot of paper models, such as cars, ships, buildings, and animals, etc. by cutting and gluing pieces of paper. I felt that origami, just folding, was too restricted. On the other hand, I was enthusiastic about the computer, which my father bought when I was a first-year student in elementary school. As a fusion of two objects of interest, papercraft and computer, the theme of my Ph.D. thesis became a method for designing paper models with the computer.”


Want More? Click for Great Related Content on WebUrbanist:

Unfolding Interior Design: Origami-Inspired Furniture

These 12 origami-inspired furniture and home decor designs bring the grace and elegance of this ancient paper art into functional use for the home.
4 Comments – Click Here to Read More »»


Elod Beregszaszi: Paper Master Cuts to Create Art

Elod Beregszaszi is a master of paperwork, but not in the normal sense. He cuts, folds, embosses and sculpts amazing work out of paper.
6 Comments – Click Here to Read More »»


Share on Facebook


[ By Steph in Art & Sculpture & Craft. ]

[ WebUrbanist | Archives | Galleries | Privacy | TOS ]


WebUrbanist

 
Comments Off on Math + Paper Craft: Computer Scientist Creates 3D Origami

Posted in Creativity


Digital Outback Photo publishes The Art and Craft of HDR Photography

26 Nov

UweHDR.jpg?v=1230

Digital Outback Photo has published ‘The Art and Craft of HDR Photography’ by Uwe and Bettina Steinmueller. The 100 page e-book, written and published by the authors of dpreview.com’s ‘The Art of HDR’ series of guides, can be downloaded as a printable pdf. It is available for an introductory price of $ 15.95, rather than the usual $ 19.95.

News: Digital Photography Review (dpreview.com)

 
Comments Off on Digital Outback Photo publishes The Art and Craft of HDR Photography

Posted in Uncategorized