RSS
 

Posts Tagged ‘coloring’

hand coloring in lightroom

06 Jun

I’ve always loved hand-colored photos.   They have such a great look, very unique, very interesting.  For those who don’t know, “hand coloring” refers to any process where a photographer uses pigment, dye or paint of some sort to manually add color to a black and white photo.   Historically this was done in the 1800s by photographers using pigment and gum arabic on daguerreotypes!  The technique persisted in one  form or another throughout the years until it was supplanted by actual color photography.  Of course, just because it is no longer necessary to get color in such a way doesn’t mean it can’t be used for asthetic effect.

I shoot a lot of black and white film, which I generally scan and process in lightroom rather than wet printing.  Now if you’ve used lightroom, you are probably familiar with the brush tools for things like exposure, clarity or even skin smoothing.  However, the oft overlooked “tint” option can be used to easily paint in color to a black and white image for a “hand colored” effect.

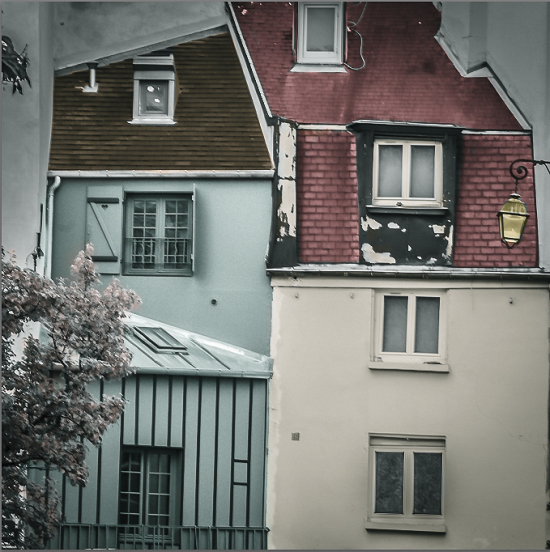
let’s take this image.

This was shot on film (with a holga!) during a vintage pin-up shoot.  In other words, there is no actual color information in the file etc…

Now I’m going to hand color it to approximate the actual colors of the scene.  First we start by going into the lightroom brush tools.  Make sure all the adjustment sliders are set to zero (we are just painting on color here, not adjusting the photo itself)   Click on the tint box at the bottom right to bring up the color picker.

A little trick with the color picker is that if you hold the mouse button down you can drag the eyedropper out of the little selection window and  sample color from *anything* on screen.  One useful trick with this is to have a “reference photo” open separately and sample your colors for hand coloring from that.

Since the couch in this shot was a green color, I grab a nice rich green and begin painting my mask.  I find it more accurate to paint with the red overlay on (click “O” to toggle the overlay on or off).  You’ll want to use a separate mask for each area of color.  Here’s the green mask for the couch all done.

yeah, it’s not perfect, but close enough ?

I then do separate masks for her shirt (pink) and her skin.   With hand coloring, I like to leave a portion of the image uncolored which gives it it’s signature b/w+color look, different from “selective coloring”

and the final result:

Now this may be kind of a “niche” technique, and certainly not suited for all photos but it’s quick and easy and yields a very unique effect.  Overall it’s a nice trick to have in one’s toolbox.

Tweet This Post Stumble This Post


F/1.0

 
Comments Off on hand coloring in lightroom

Posted in Photography


Creative Abstract Photography with Food Coloring and Milk

10 Apr

The post Creative Abstract Photography with Food Coloring and Milk appeared first on Digital Photography School. It was authored by Megan Kennedy.

Creative Abstract Photography with Food Coloring and Milk featured image

Like any art form, photography thrives on experimentation. Creative abstract photography with food coloring and milk is a simple process, but it produces vibrant and immediate results. Using ingredients sourced from the pantry and the fridge, this is a fun project with plenty of room for creativity.

photography with food coloring and milk
f/5.0 1/125 ISO 100 x 2

A bit of history…

Ever since they were discovered, humans have been enamored by the creative possibilities of dyes. Dyed flax fibers found in the Republic of Georgia in a prehistoric cave have been dated to 36,000 years BP.

The earliest dyes were obtained from animal, mineral and vegetable sources. Rare resources that produce brilliant and permanent colors like Tyrian purple and crimson were highly sought-after in the ancient and medieval world. As technology progressed, so did artistic mediums, creating more accessible and safe dyes and pigments.

Creative Abstract Photography with Food Coloring and Milk
f/2.0 1/50 ISO 500

The practice of adding colorants to food itself is thought to have started in Ancient Egypt around 1500 BC. Candy makers would add wine and colored extracts to their wares to make them more visually appealing to customers.

Nowadays, a variety of safely consumable dyes are readily available in grocery stores, cooking shops, etc. The vibrancy and behavior of these colorants has fascinated many, with food dyes being adopted for artistic purposes too.

How to make abstract photography with food coloring and milk

You will need:

  • a camera with a macro lens or extension tubes etc
  • a tripod (optional)
  • 1/4 of a cup or so of plant-based or dairy milk
  • food dye in a range of colors
  • dish soap (optional)
  • a white dish or bowl
  • a mixing utensil or two
  • paper towel or a sponge or cloth to clean up any spills

Setting up

The first step to creating abstract photography with food coloring and milk is to prepare your canvas – the milk!

Sit your dish or bowl on a level surface exposed to a decent amount of natural light (or you could use flash).

Pour your plant-based or dairy milk into the dish so that the dish is covered by a few millimeters of liquid. Make sure you have a sponge or cloth at the ready to wipe up any spills.

food coloring and milk photography
f/5.6 1/200 ISO100

Next, set your camera up. You want it primed and ready for action as you drop the food dye into the milk.

For this project you can use a tripod to keep the camera steady, freeing up a hand to adjust the dye. You can also hand-hold your camera, whichever feels more comfortable. You can angle the camera any way you like, just as long as it is focused on the milk-filled dish.

Now for the dye!

Once your camera is ready, add a few drops of dye into the milk. Start taking photographs, gradually introducing more dye as needed.

As the dye spreads, try adding different colors to create a more layered effect. You can also stir the dye with a mixing utensil, cultivating intriguing shapes and forms.

Creative Abstract Photography with Food Coloring and Milk
F/8.0 1/125 ISO 400 | f/19.0 1/125 ISO 400

To create a sense of movement in your abstract creations, try blowing on the milk/dye through a straw, or fanning the concoction with a fan.

You can even add a little water, dish soap or vegetable oil to create separation within the dye and milk mixture.

Creative Abstract Photography with Food Coloring and Milk
f/8.0 1/125 ISO 400 | f/13.0 1/125 ISO 400

Once you are finished with a batch of food dye and milk, you can start again with a fresh bowl! Just remember to add the dye gradually so as not to over-saturate the mixture too quickly.

photography with food coloring and milk
f/3.5 1/250 ISO 400 | f/22 1/125 ISO 400

Conclusion

Photography with food coloring and milk renders visually fascinating results. With a few simple ingredients, photo-worthy abstract images are created in a whirl of unrepeatable patterns and layers.

I’d love you to try creating abstract photography with food coloring and milk and share your results in the comments below!

The post Creative Abstract Photography with Food Coloring and Milk appeared first on Digital Photography School. It was authored by Megan Kennedy.


Digital Photography School

 
Comments Off on Creative Abstract Photography with Food Coloring and Milk

Posted in Photography


How to Use Spot Coloring in Your Photos

14 May

What is spot color in an image?

Some people refer to it as selective coloring. However, these two techniques are not the same thing.

Traditionally, selective coloring is something that is done in post-production. Photographers would highlight a certain area of the image, or a certain object, and leave it as the only thing that has colored in the frame.

They would turn the rest of the image into monochrome, or on occasion increasing the color saturation of that object while lowering it in the rest of the photograph. This is to call attention or focus to that particular part of the image.

Spot coloring in photography - dried roses against a white backdrop

Do you remember the days of black and white prom dresses with red corsages? Or, do you remember a black and white image of a model with red lips? Those are classic examples of selective coloring.

Difference between spot coloring versus selective

Spot coloring uses the available colors in a scene and then composes the image so that one color stands out from the rest of the frame. Spot coloring is a technique that is used in-camera (done by the photographer). It works by placing a color against other colors that allow it to stand out in the composition.

Selective coloring is a technique where one color is prominent in the final shot whereas all the other colors have either been changed to monochrome or had their color saturation levels lowered during post-production.

Spot coloring in photography - purple flower against green trees

The key with spot coloring in camera is to look for naturally occurring examples of color pops as opposed to making changes in post-production to highlight a particular color. This purple flower pops against the green of the leaves.

Before we move forward on this subject, I have to say that I am not downplaying or downgrading selective coloring versus the spot color technique. If there is one thing that this photography journey has taught me, it is that there is a market for every style of photography.

Each style of photography has its fans and its critics – that’s just the way the industry works. You just have to decide which camp you want to be in and run with that. I use spot coloring as I compose my shots in-camera. Unfortunately, rarely do I see a good use of selective coloring in post-production.

Spot coloring in photography - woman in red sari against yellow brick house porch - 2

My lovely client, in her red sari, stood out against this historic yellow brick building. This is a perfect example of spot color. By placing the bright red clothing against the reduced color tone and vibrancy of the building, the eye is directed right toward the subject.

I don’t know about you, but being in front of the computer for an extended period of time editing my images is not the most productive use of my time. If I can get the shot as close to how I envision it to be in-camera, then post-production is just about adding the finishing touches so it becomes relatively easy.

Here is a link to another recent dPS article about tips for quick editing. For me, spot coloring is a way to achieve an effect that fits my brand, my aesthetics, and my style of photography. Also, note that a spot color in your frame doesn’t have to be bright and vibrant. Sometimes, color contrast or a change in color hue is enough to move the eyes to the subject.

Advantages of Spot Coloring In-Camera

Spot coloring in photography - two hands holding gelato cones in pleasing colors in Rome

Colorful Italian gelato against the brick façade gives the right amount of soft color pop in this “subtle” use of spot color.

Spot coloring in-camera, if done correctly, can help you in the following ways:

#1 – It provides a clear definition of your subject.

By isolating your subject by way of color, you give a clear definition of the subject and help it stand out in an otherwise busy/crowded frame.

#2 – It helps you understand the relationship between colors.

Some colors work together, and others just don’t. Understanding the relationship between complementary colors and opposing colors can go a long way to creating images that are aesthetically pleasing and on point for your brand and your portfolio.

When practicing your spot color technique, keep a copy of the color wheel with you when you are creating images or studying the images of others to see how colors work together or against each other. You can print a color wheel off of the internet or find one in your local art supply store.

Ryb-colorwheel

By No machine-readable author provided. Bwilliam assumed (based on copyright claims). [GFDL, CC-BY-SA-3.0 or CC BY-SA 2.5 ], via Wikimedia Commons

#3 – Spot color makes images more impactful, images that have strong clear subjects.

These are more impactful when compared to images that are busy and cluttered and don’t give the viewer a sense of what is happening in the frame.

#4 – It slows you down to observe first and then click later.

When you observe a scene intentionally for the play of colors, patterns, and textures, you automatically slow down and learn to see first and then click the camera. Often, we are so focused on just clicking and getting something captured as opposed to photographing the right subject the right way.

If nothing else, this process will help you get away from the “spray and pray” mentality (photograph multiple frames at once and hope one of them works). Trying to use spot color can help you to slow down and analyze your scene. Ultimately, this will help you develop as a photographer instead of relying on the “spray and pray” technique.

Creative spot coloring can be done for any genre of photography: portraits, travel, and still life. Of course, some are easier than others, but this look is achievable in all these areas.

Spot Coloring in People Photography and Portraits

Spot coloring in photography - family portraits in red colored clothes against the snow

By choosing a pallet that complements the background, I was able to bring focus to my clients instead of having them blend into the frame. Here the red clothing worked really well against the white of the snow. This example is a bright, vibrant use of spot color. Note that they are not all wearing the same colors – but they do all have some common elements of the red which collectively looks well matched.

When you are photographing people (e.g. families and kids), a simple tool like a style guide can go a long way. I proactively send a style guide, or what-to-wear for your portrait tips list, to my clients where I suggest clothing options and colors – basically, pieces that I know will photograph well according to the season and location.

For example, if we will be shooting outside in a park or out in nature, I will suggest colors and outfits that will not compete with all the greenery. During the fall season when we have gorgeous colors in the trees, I will suggest colors that go well with the oranges, browns, and reds that Mother Nature shares with us. This way, when I am composing my shots and directing my clients, I will use poses that will ensure the photos are aesthetically pleasing and that do not have too many competing colors in the frame.

This is a “professional use” of spot color. I am going to coordinate the colors so that my client stands out from the background while looking pleasing at the same time.

Now, before you accuse me of manipulating the client experience, I have to point out that in all my eight years of being a family photographer, I have yet to come across a client who does not appreciate the what-to-wear tips that I send them when they book my photography services.

Most people are extremely uncomfortable being in front of the camera and get stressed out on what to wear and how to dress. Anything that can help alleviate that pain is going to be a welcome and much-appreciated thing. They have no idea that it’s actually a technical and aesthetic consideration on my part. It makes my job easier!

Spot Coloring in Travel Photography

Spot coloring in photography - roman vatican guard in costume standing guard

This colorful costume of the guards in the Vatican, Rome really stands out against the pastel colors of the building facade and the iron gate.

One of the key considerations to creating compelling travel images is to be aware of what is going on around you. Location is just as important as light. When you get to a scene, take a quick look around and do a quick mental assessment of everything that is happening around you. Colors, textures, light, and the subject all play a very important role in the final outcome of the image.

Think about how spot color could work for your shot. If you are in a location that has generally muted tones and colors, look for a subject that is a contrasting color to the rest of the scene. If framed correctly, that subject will carry the entire weight of the image, and the other colors will work in harmonizing the overall image around that subject.

On the other hand, if you were to choose a subject more or less similar in tones and colors to the background, the subject will likely blend in and the entire image may lack that oomph that you were hoping for. If you are in a busy, colorful location with lots of activity, try to isolate your subjects against a monotone background, thereby giving the subject a chance to stand out from the commotion.

Spot Coloring in Still Life Photography

Spot coloring in photography - still life flat lay with ruby red grape fruit and grapes

I love photographing food because that means I get to munch on it after as opposed to snacking on junk food! Plus, there is no better learning tool for the spot color technique!

This is one of the easiest genres of photography where you can practice spot color easily. Why? You have complete control over all of the color elements.

Remember when I said spot color is an exercise in understanding the color pallet? When you are planning your still life imagery, you can choose the colors (from opposite ends of the color wheel) to add that element of color pop to your images. You will also learn how effectively different colors work together to create a composition.

Spot color can be used with any genre of photography. However, the still life genre is a particularly useful learning experience because you have plenty of time and you control all of the colors that will be introduced into the picture!

Summing Up

I hope these examples help you to understand that just like many other techniques, spot coloring is a way to add creativity and fun to your images. Do you use spot color in your images? Share in the comments below.

The post How to Use Spot Coloring in Your Photos appeared first on Digital Photography School.


Digital Photography School

 
Comments Off on How to Use Spot Coloring in Your Photos

Posted in Photography


Golden Ratio in Action: Coloring Book & Animations of Geometric Illustrations

01 Mar

[ By WebUrbanist in Art & Drawing & Digital. ]

butterflies

The Golden Ratio has been a source of inspiration (and contention) for thousands of years, lurking behind great works of design. Venezuelan architect and illustrator Rafael Araujo is fascinated with patterns of nature and their applications to built environments, but as his artwork shows, is particularly interested in the Golden Ratio as found in natural settings.

3d drawing

hand drawn

These painstakingly created drawings trace this ratio into reality, animating everything from fluttering bird wings to the formation of seashells. Some of these sophisticated works take days or even weeks to complete — fans can also get in on the action with his recently created coloring book.

coloring book

coloring book interior

coloing book back

This coloring book provides a version of his pieces as frameworks for others to complete. The artist got the idea after fans started asking for prints, seeing it as a way to bring them into the process rather than simply giving them a framed product.

process

art

Using pencils, rulers, compasses and protractors, he spends as much as 100 hours on a given illustration of these mathematical expressions. Leftover lines, like those found faded in architectural drawings, give extra depth to each piece while also highlighting the geometry that goes into it.

3d drawing

His work shows how the geometric formulas of the Golden Ratio can be found in spirals of plants as well as the delicate flights of butterflies, all through hand drawings of each phenomenon. And as fascinating as they are in their finished form, animated images and process videos of the works in progress are especially intriguing.

shell

Part of the challenge in his representations is their three-dimensional nature — showing complex organic curves accurately in 3D is an incredibly difficult feat of science applied to art. At the same time, something would be lost if these creations were simply done using computer programs (h/t Colossal).

Share on Facebook


[ By WebUrbanist in Art & Drawing & Digital. ]

[ WebUrbanist | Archives | Galleries | Privacy | TOS ]


WebUrbanist

 
Comments Off on Golden Ratio in Action: Coloring Book & Animations of Geometric Illustrations

Posted in Creativity


Ideas for Photo Fun With Water & Food Coloring

21 May

“Wow! Oh my gosh! Cool!”

This is what your friends will say when they see your gorgeous photos of food coloring in water.

These shots are not only incredible but surprisingly easy! And with our setup tips and ideas you’re gonna get the most vibrant and unique results possible.

Just don’t get so mesmerized by all those dancing colors that you forget to take the shot!

Make Photo Magic with Food Coloring

(…)
Read the rest of Ideas for Photo Fun With
Water & Food Coloring (630 words)


© Taylor for Photojojo, 2015. |
Permalink |
No comment |
Add to
Water & Food Coloring”>del.icio.us

Post tags:


Photojojo

 
Comments Off on Ideas for Photo Fun With Water & Food Coloring

Posted in Equipment


Fantastic Cities: 48-Page Urban Coloring Book Made for Adults

19 Apr

[ By WebUrbanist in Art & Drawing & Digital. ]

fantastic aerial view

Coloring books are no longer just for kids, as this one designed for adult colorists illustrates in beautiful black and white. Showing urban scenes both real and imagined, these fictional, actual and hybrid views could take hours each for enthusiasts to fill in, and, psychologists argue, may even profit mental health benefits beyond the fun of simply reliving a childhood activity.

fantastic citiesss

fantastic cities book

Canadian artist Steve McDonald, the man behind Fantastic Cities, is known for works of a similar style, but these have historically been found in galleries and collections: “small on-site studies that are usually done with pencil/chalk on colored paper and large format studio work which is usually done with pencil & charcoal/chalk with acrylic washes on paper. Steve has also gained a lot of attention for his highly detailed ‘ bird’s eye view ‘ renderings of villages, cities and rural scenes as well as his compositions of machinery and his popular flying vehicle series.”

fantastic landscape

fantastic filled in color

In this book, Steve selected scenes from major cities like New York and San Francisco, providing aerial drawings of real places but also stylized works based on the architectural and urban character of other cities, all with extreme levels of detail that leave readers with much to color.

fantastic cities urban cityscape

There may even be psychological benefits to coloring: “by engaging multiple parts of the brain, coloring allows us to focus on the lines, movements, and colors in front of us, use our imaginations and be creative, and de-stress.” More about the book: “This unique coloring book features immersive aerial views of real cities from around the world alongside gorgeously illustrated, Inception-like architectural mandalas. Available July 7th from Chronicle Books.”

fantastic cities books

fantastic cities black white

Nor is this an isolated piece – according to the New York Times, “major publishers are seizing on the trend. This year, Little, Brown will release four illustrated coloring books for adults, all subtitled ‘Color Your Way to Calm.’ The books, ‘Splendid Cities’ by the British artists Rosie Goodwin and Alice Chadwick and three titles by the French illustrator Zoé de Las Cases, feature detailed cityscapes with famous landmarks, cafes and street life. Promotional materials for the books emphasize the health benefits of ‘mindful coloring,’ noting that the activity “has been shown to be a stress reliever for adults.”

Share on Facebook


[ By WebUrbanist in Art & Drawing & Digital. ]

[ WebUrbanist | Archives | Galleries | Privacy | TOS ]


WebUrbanist

 
Comments Off on Fantastic Cities: 48-Page Urban Coloring Book Made for Adults

Posted in Creativity


How to Apply the Look of Hand Coloring in Lightroom

27 Mar
Give a photo the look of a hand tinted image in Lightroom

Give a photo the look of a hand coloring in Lightroom

Before there were color photos there were black and white photos, colored by hand using paints or dyes. Today, courtesy of any good photo-editing program, you can apply your own hand coloring effect to your photos.

Here’s how to apply the look of hand coloring in Lightroom.

To get started, open the image in the Lightroom Develop module. You will want to make the usual basic edits to the image so it shows a good tonal range and contrast.

Before colorizing the image, make sure to adjust the tonal range and contrast.

Before colorizing the image, make sure to adjust the tonal range and contrast

Then convert the image to a black and white by clicking B&W panel and adjust how the underlying colors in the image are converted to black and white using the sliders. Lighter areas will show the color better and darker areas will show a more subtle tint.

Use B&W to create a black and white image.

Use the B&W panel to create a grayscale or monochromatic image

When you’re ready to add color to the image, click the Adjustment Brush and return all the sliders to zero by double clicking on the word Effect at the top of the panel (circle in red below).

Double click Effect to reset all the Adjustment Brush sliders.

Double click Effect to reset all the Adjustment Brush sliders

Click on the color sampler and choose a color to use.

Select a color to tint the image with from the Color selector

Select a color to tint the image with from the Color selector as shown here

Now click on the area that you want to recolor to set an Edit Point. Paint over the area to apply the color to it. As you paint with the Adjustment Brush a layer of partially opaque color is applied to the image.

Select the Auto Mask checkbox if you are working on an area of the image that has distinct edges. Doing this makes it easier to limit the painting to only the desired area. The roof tops and buildings here are good examples of areas with distinct edges.

Selecting Auto Mask helps paint in areas with defined edges.

Selecting Auto Mask helps paint in areas with defined edges (stay within the “lines”)

When painting an area that is less defined, disable the Auto Mask checkbox. The tree in this image has less defined edges so you should disable Auto Mask when coloring this area.

The buildings have defined edges so use Auto Mask when painting them. The tree does not, so disable Auto Mask when painting it.

The buildings have defined edges so use Auto Mask when painting them. The tree does not, so disable Auto Mask when painting it.

If you mistakenly paint over an area and want to undo the painting click the Erase brush link or hold Alt to select Erase and paint to remove the mistake.

To zoom into the image press Z on the keyboard and click on the image to zoom in or out. To move the image hold the spacebar so the mouse pointer turns into a hand and drag on the image.

Size the brush using the Size slider

Size the brush using the Size slider

To resize the brush either use the [ and ] keys on the keyboard or adjust the size using the Size slider.

When you have finished working with the first color, click New to set a new Edit Point. Select a different Color and paint that onto the image.

Continue creating a new Edit Point for each color until the coloring is complete.

If desired, you can alter a color or adjust a painted area by selecting the Adjustment Brush and then click the Edit Pin for that adjustment. You can then change the color using the color picker.

Give a photo the look of a hand tinted image in Lightroom

Give a photo the look of a hand tinted image in Lightroom

Do you have some other tips:

If you have some other ways of doing this technique in Lightroom please share. Or share your images if you give it a try!

For more Lightroom tips and tutorials try these:

  • Processing an Image in Lightroom 5 – a Video Tutorial
  • 6 of Lightroom’s Hidden Treasures
  • Why Lazy Photographers Should Use Lightroom Smart Collections
  • 3 Uses for the Radial Filter Tool in Lightroom 5
  • Lightroom 5 Tips – Hidden Gems

The post How to Apply the Look of Hand Coloring in Lightroom by Helen Bradley appeared first on Digital Photography School.


Digital Photography School

 
Comments Off on How to Apply the Look of Hand Coloring in Lightroom

Posted in Photography


How to Apply the Look of Hand Coloring in Lightroom

23 Mar
Give a photo the look of a hand tinted image in Lightroom

Give a photo the look of a hand coloring in Lightroom

Before there were color photos there were black and white photos, colored by hand using paints or dyes. Today, courtesy of any good photo-editing program, you can apply your own hand coloring effect to your photos.

Here’s how to apply the look of hand coloring in Lightroom.

To get started, open the image in the Lightroom Develop module. You will want to make the usual basic edits to the image so it shows a good tonal range and contrast.

Before colorizing the image, make sure to adjust the tonal range and contrast.

Before colorizing the image, make sure to adjust the tonal range and contrast

Then convert the image to a black and white by clicking B&W panel and adjust how the underlying colors in the image are converted to black and white using the sliders. Lighter areas will show the color better and darker areas will show a more subtle tint.

Use B&W to create a black and white image.

Use the B&W panel to create a grayscale or monochromatic image

When you’re ready to add color to the image, click the Adjustment Brush and return all the sliders to zero by double clicking on the word Effect at the top of the panel (circle in red below).

Double click Effect to reset all the Adjustment Brush sliders.

Double click Effect to reset all the Adjustment Brush sliders

Click on the color sampler and choose a color to use.

Select a color to tint the image with from the Color selector

Select a color to tint the image with from the Color selector as shown here

Now click on the area that you want to recolor to set an Edit Point. Paint over the area to apply the color to it. As you paint with the Adjustment Brush a layer of partially opaque color is applied to the image.

Select the Auto Mask checkbox if you are working on an area of the image that has distinct edges. Doing this makes it easier to limit the painting to only the desired area. The roof tops and buildings here are good examples of areas with distinct edges.

Selecting Auto Mask helps paint in areas with defined edges.

Selecting Auto Mask helps paint in areas with defined edges (stay within the “lines”)

When painting an area that is less defined, disable the Auto Mask checkbox. The tree in this image has less defined edges so you should disable Auto Mask when coloring this area.

The buildings have defined edges so use Auto Mask when painting them. The tree does not, so disable Auto Mask when painting it.

The buildings have defined edges so use Auto Mask when painting them. The tree does not, so disable Auto Mask when painting it.

If you mistakenly paint over an area and want to undo the painting click the Erase brush link or hold Alt to select Erase and paint to remove the mistake.

To zoom into the image press Z on the keyboard and click on the image to zoom in or out. To move the image hold the spacebar so the mouse pointer turns into a hand and drag on the image.

Size the brush using the Size slider

Size the brush using the Size slider

To resize the brush either use the [ and ] keys on the keyboard or adjust the size using the Size slider.

When you have finished working with the first color, click New to set a new Edit Point. Select a different Color and paint that onto the image.

Continue creating a new Edit Point for each color until the coloring is complete.

If desired, you can alter a color or adjust a painted area by selecting the Adjustment Brush and then click the Edit Pin for that adjustment. You can then change the color using the color picker.

Give a photo the look of a hand tinted image in Lightroom

Give a photo the look of a hand tinted image in Lightroom

Do you have some other tips:

If you have some other ways of doing this technique in Lightroom please share. Or share your images if you give it a try!

For more Lightroom tips and tutorials try these:

  • Processing an Image in Lightroom 5 – a Video Tutorial
  • 6 of Lightroom’s Hidden Treasures
  • Why Lazy Photographers Should Use Lightroom Smart Collections
  • 3 Uses for the Radial Filter Tool in Lightroom 5
  • Lightroom 5 Tips – Hidden Gems

The post How to Apply the Look of Hand Coloring in Lightroom by Helen Bradley appeared first on Digital Photography School.


Digital Photography School

 
Comments Off on How to Apply the Look of Hand Coloring in Lightroom

Posted in Photography


Make Rad Abstract Photos From Milk and Food Coloring

18 Jul

Extra photos for bloggers: 1, 2, 3

Picasso had his paint brush, Michelangelo had his marble, Escher had his sketchbook, and now you have a milk carton?

Strange as it may sound, you can make twisted tie-dye swirls and churning volcanos of color by simply mixing milk, soap, and a little food coloring.

This is the stuff of dreams if you are one of those photographic Jackson Pollocks who gets their jollies from abstract snaps.

Plus, you don’t need any fancy gear and all it costs is lunch money.

Poke your head in the pantry, swing by the fridge, check under the sink, and in minutes you’ll be making your own Moona Lisa.

Make a Modern Milksterpiece

p.s. We’re hiring for an amazing opening at Photojojo. We’re looking to re-invent what/how/where we publish online, and we’re seeking one amazing somebody to lead the charge. Learn more and apply for our Editorial & Community Lead.

Why It’s Cool:

Your fifth grade baking soda volcano may not have turned out so well, but take our word for it this experiment is an easy and fun way to make abstract art!

You never know what creations will come out of this churning rainbow wonderland and it’s good times for everyone from kids to Great Aunt Edna.

And although it’s quick and easy to clean up, it won’t be short on the wow factor.

Milk swirls in Action from Photojojo loves you on Vimeo.

The Ingredients:

  • Whole or 2% milk
  • Dinner Plate
  • Food coloring (red, blue, green, yellow)
  • Dish-washing soap (Dawn seems to work well)
  • Q-tips

STEP 1: Pour the Milk

beforeSet your dinner plate somewhere level and safe from getting knocked over, and then pour in a layer of milk.

A thin coat will do, you don’t need to go overboard.

STEP 2: Add a Dash of Color

beforeGrab your droppers of food coloring and add a few drops of each color to the center of your plate of milk.

The food coloring will allow you to see the reaction that happens in the next step so feel free to experiment with the placement of your dye drops for different effects.

STEP 3: Get Soapy

beforeApply a good dollop of dish soap to one end of a clean Q-tip.

Twirl the soap around a bit to make sure the whole cotton swab is coated.

STEP 4: Dip Your Q-Tip

beforeDab your soapy swab into your milk and dye mixture and watch the colorful explosion!

You can keep dipping your Q-tip and reapplying soap to create new shapes, colors, and textures.

STEP 5: Capture the Color

beforeGrab a phone, compact, or DSLR and start snapping.

We found that increasing the saturation, contrast, and sharpening, helps to get pictures that really pop.

If you are using a phone, you can do this after the fact with an app like Photoshop Express or Pixlr.

Try using a macro lens with your phone or DSLR for super close ups.

Also, using a fast shutter speed will help prevent the moving colors from blurring.

You can experiment with new color combinations, try using a different type of milk, drop colors around at random, use two or three Q-tips at once, or anything else you can think of to spice up your pics.

Taking It Further

  • Setup your milk and dye in a glass dish and shine a bright light through the bottom for an illuminating effect.
  • See what other experiments you can turn into works of art like steel wool lightpaninting, create photos using plants, or develope film with coffee!
  • Try photographing your food coloring dropped into water for some fantasticly abstract results.

Many thanks to Casetofoane for use of their song ’90′ in our video!

Related posts:

  1. How to Create Coloring Book Pages Using Your Very Own Photos! Extra photos for bloggers: 1, 2 Imagine a world where…
  2. Coloring Pages from Your Photos in 3 Easy Steps So we were walking around Toys R Us the other…
  3. Photo Food Tags: A Thanksgiving DIY Project Extra photos for bloggers: 1, 2, 3 Thanksgiving at your…


Photojojo

 
Comments Off on Make Rad Abstract Photos From Milk and Food Coloring

Posted in Equipment


Creative Coloring in Lightroom – Weekly Lightroom Edit w/ Post Production Pye – Episode 7

06 Nov

Purchase the Season One Lightroom 3 DVD for at – www.slrlounge.com Season One Lightroom 3 DVD Includes: – 20 Episodes – All exercise and catalog files – Popup Shortcut Tooltips – Full HD 1080p – No advertisements View article at – www.slrlounge.com Welcome to Episode 7 of our Weekly Lightroom Edit. In this Lightroom Tutorial episode we are going to work on doing some creative coloring and enhancing on this image that was shot out in China.
Video Rating: 5 / 5

 
Comments Off on Creative Coloring in Lightroom – Weekly Lightroom Edit w/ Post Production Pye – Episode 7

Posted in Retouching in Photoshop