RSS
 

Posts Tagged ‘Calibrate’

X-Rite’s i1Photo Pro 3 Plus profiler can calibrate for difficult surfaces, brighter displays

22 Aug

Calibration tool manufacturer X-Rite has announced an updated i1Photo Pro profiler that it says is designed to provide greater accuracy when measuring from heavily textured and high gloss papers. The professional-grade i1Photo Pro 3 spectrophotometer has a larger measuring aperture to compensate for imbalances caused by uneven surfaces and uses a polarizer to cut through reflections on high-gloss papers and on textured surfaces such as canvas.

The profiler is also now able to read from much brighter displays when performing screen calibrations, with a maximum of 5K NITs allowed for. The i1Photo Pro 3, along with the i1Profiler software, can also be used to emulate M0, M1 and M2 conditions after a single scan to demonstrate how images will look under various types of lighting when optical brighteners are present in the target paper.

X-Rite says the device has been developed in response to the broadening of the range of surfaces now being printed on, and the increasing brightness and resolution of backlit displays.

X-Rite has also launched a new calibration table for those really serious about print accuracy. The i1iO Automated Scanning Table allows automated patch reading for reflective and transparent materials, and can work with a thickness of up to 33mm.

The X-Rite i1Photo Pro 3 Pro costs $ 2199/£1750, while the i1iO Automated Scanning Table costs $ 2995/£2400. For more information see the X-Rite website.

Press release:

X-Rite Now Shipping i1Photo Pro 3 Plus

The new i1Photo Pro 3 Plus from X-Rite is an ultra-precise spectral colour measurement solution that is optimised for Colour Perfectionists who print digitally on a wide range of specialised materials and surfaces.

Birmingham, UK, 15th August 2019 – X-Rite Incorporated, the global leader in colour science and technology, is now shipping the new i1Photo Pro 3 Plus, a spectral colour measurement solution specifically designed for professional photographers who print on challenging textured and glossy photo media looking for the most accurate colour in their RGB print workflows. i1Photo Pro 3 Plus combines the new i1Pro 3 Plus spectrophotometer and i1Profiler software to deliver the ultimate professional-level colour management for displays, projectors, scanners, RGB printers and cameras.

Current profiling solutions are limited in their ability to measure textured, rough, or uneven surfaces and cannot accommodate various material thicknesses. Many devices do not have the resolution required to ensure the highest colour quality when printing detailed patterns, metallic effects, or photography images. This leads to costly colour errors and rework, which impacts a photographer’s bottom line.

“The i1Photo Pro3 Plus builds on the success of the i1 Family and removes the variability to create accurate ICC profiles on a broader range of photographic materials,” said Liz Quinlisk, Photo and Video Business Unit Manager, X-Rite. “Photographers will see the immediate value by incorporating the i1Photo Pro 3 Plus into their RGB print workflow, resulting in more accurate, repeatable colour and improved shadow detail, as well as a reduction of waste and an increased return on investment.”

New in the i1Pro3 Plus spectrophotometer:
Larger 8mm aperture supports new materials and substrates used in digital printing.

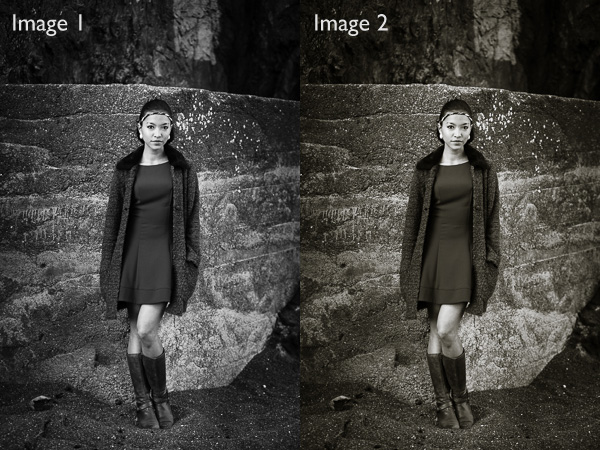
Polarisation Filter (measurement condition M3) that reduces specular highlights and shadows to provide “better blacks” and richer colours on rough surfaces and glossy media, like canvas prints and fine art photo papers.

High Brightness Measurement up to 5K NITs for ultra-bright displays.

Simultaneously measure M0, M1 and M2 in a single pass to account for optical brighteners so photographers can quickly predict how colours printed on optically brightened substrates will look under different lighting conditions.

New LED illuminant that improves device reliability. The i1Pro3 Plus allows for four measurement conditions (ISO 13655 M0; M1: D50; M2: UV Excluded, M3Polarised).

Transmission scanning support for backlit materials.

Longer scanning ruler to support wider charts.

“We are used to seeing bumpy shadow measurements from unpolarised devices on glossy textured media like canvas. With the new polarisation feature in the i1Pro 3 Plus, our M3 measurements are dramatically smoother in the shadows – perfect in fact,” commented Scott Martin, Founder, Onsight, a leading workflow consultant for print, prepress, design and photography.

New X-Rite iO Table
In addition, X-Rite announces a new i1iO Automated Scanning Table that supports the i1Pro 3 Plus hardware. This hands-free test chart reader offers automated colour profiling on a variety of substrates with reduced risk of colour measurement errors. It is ideal for colour perfectionists who want to speed up and automate the measurement process and eliminate manual strip reading. The new i1iO table can be used with a variety of materials including canvas, textiles, ceramics, corrugated, etc. and supports materials up to 33mm thick, with the optional z-axis spacer. It also supports transparencies and backlit materials.

Additional i1Pro 3 Plus Solutions
In addition to i1Photo Pro 3 Plus, X-Rite is now shipping these new i1Pro 3 Plus solutions:
i1Basic Pro 3 Plus – includes monitor calibration and quality control for monitors and printers
i1Publish Pro 3 Plus – includes CMYK+ printer module and all features of i1Photo Pro 3 Plus

Articles: Digital Photography Review (dpreview.com)

 
Comments Off on X-Rite’s i1Photo Pro 3 Plus profiler can calibrate for difficult surfaces, brighter displays

Posted in Uncategorized


X-Rite unveils i1Studio: An all-in-one spectrophotometer that can calibrate all your devices

31 Oct

X-Rite has launched the i1Studio, an all-in-one spectrophotometer designed to make it easy to color calibrate a variety of devices—including projectors, scanners, monitors, printers, and mobile devices. The spectrophotometer is joined by new i1Studio software, the ColorTRUE Mobile App for calibrating iOS devices, and the ColorChecker Calibration for Cameras, a standard 24-patch target.

The i1Studio offers dedicated profiling for the aforementioned devices, as well as Black & White prints. Module features include ambient light measurement, Flare Correct, adaptive profiling technology, support for several video standards including NTSC and PAL, multiple monitor profiling, and extended user controls over luminance, gamma, contrast ratio, and white point.

The device’s related software is based on the platform X-Rite used for its 1Profiler software, promising a “perfect balance” between controls and automation alongside what X-Rite describes as a “streamlined user experience.” ColorMunki Photo & Design customers are offered a complimentary i1Studio software update, as well.

The kit is available now from X-Rite for $ 490 USD.

Press Release

X-Rite Announces its New i1Studio for Expert Color Results from Capture-to-Print

All-In-One color control solution with unmatched versatility for cameras, scanners, displays, printers, projectors and iOS mobile devices

X-Rite Incorporated, the world leader in color management and measurement technologies announces the i1Studio, an all new start-to-finish color management solution that delivers expert results from capture through to print.

The i1Studio enables exceptional color accuracy for photographers, filmmakers and designers of all levels to achieve consistent and predictable results across their workflow – saving time and money. The package comprises the i1Studio all-in-one spectrophotometer, i1Studio software, X-Rite’s market leading ColorChecker camera calibration tools and the ColorTRUE mobile app.

“Photographers tell stories with their pictures. Along with light, color plays an essential role in telling these stories. We want to make sure that your story is told as perfectly as possible, whether it’s color or black and white. Managing color should be easy with getting accurate repeatable results every time as the ultimate goal. i1Studio provides an intuitive, start-to-finish color management solution for every device in our users’ workflow so they can easily achieve this goal and get amazing results.”

Liz Quinlisk, Marketing Director Photo & Video, X-Rite.

The i1Studio package comes with:

  • i1Studio Device: The all-in-one i1Studio spectrophotometer is the only device creatives will need to profile their monitors, projectors, scanners, mobile devices and printers.
  • NEW i1Studio software for Displays, Projectors, Scanners and Printers: The i1Studio software, based on X-Rite’s award winning i1Profiler software, provides an easy to navigate interface that delivers expertly calibrated and profiled monitors (including video pre-sets), projectors, scanners and printers, including a new dedicated Black & White print module for creating custom profiles for five unique B&W looks.
  • ColorChecker Calibration for Cameras: The included industry standard 24 patch target allows creatives to create custom camera profiles, set a custom white balance and have a neutral starting point no matter what light photographers are shooting in for a more streamlined editing process. (Also includes Adobe® Lightroom® Plug-In)
  • ColorTRUE Mobile App for iOS Devices: A simple way to calibrate Apple® iOS mobile devices for a true mobile to desktop color match of all images. (Downloadable from Apple App Store)

X-Rite’s i1 brand has long been the choice for color perfectionists around the world and is now extended to the i1Studio.

Amongst its wide array of features, i1Studio includes dedicated profiling for Black & White prints, scanners, mobile devices and video monitors. The new i1Studio software is engineered on the same platform as X-Rite’s i1Profiler, offering a streamlined user experience with the perfect balance of automation and creative controls. This gives users more options and more control, while delivering prints perfectly matched to their creative vision.

X-Rite’s i1Studio is now available through our global reseller network and on xritephoto.com, xritephoto.eu and xrite.com.

Existing ColorMunki Photo & Design customers can obtain a complimentary upgrade to i1Studio software at xrite.com/geti1Studio.

Articles: Digital Photography Review (dpreview.com)

 
Comments Off on X-Rite unveils i1Studio: An all-in-one spectrophotometer that can calibrate all your devices

Posted in Uncategorized


How to Calibrate your Monitor with the Spyder 4 Express

16 Aug

Monitor calibration with Spyder 4 Express

If you want to obtain accurate colours in your photos in Lightroom (or indeed any other software), no matter what you may read elsewhere, you need to calibrate your computer monitor. If you don’t, the colours in your photos won’t be accurate, and you will never produce a print (or any other form of output, such as a Blurb book) that matches the colours on your screen. If you undertake client work, or sell your photos through stock libraries, it is essential to calibrate your monitor so that you know the colours of your photo are as intended.

The reason for this is simple. When monitors are manufactured, the colour is set incorrectly. Most monitors have a strong blue colour cast. The only exception seems to be Apple Mac computers. They still have a colour cast, but it’s not as strong.

I have no idea why this is. Whenever I’ve searched for the answer all I find is vague references to blue computer screens looking better in the shops, or that the blue colour cast suits graphic designers. Neither of these ideas seems credible to me.

Regardless, even if monitors were calibrated prior to shipping, you would still need to calibrate your monitor yourself at regular intervals because the colour of monitors drifts over time.

Take a look at these two black and white images. One is completely neutral in tone, the other isn’t. Can you tell which is which?

Monitor calibration with Spyder 4 Express

If you answered that Image 1 is neutral, you are correct. But it’s very difficult to tell on an uncalibrated monitor. If your monitor is uncalibrated (making everything look bluer than what it is) you probably picked Image 2 as the neutrally coloured one.

Using monitor calibration devices

The only way to calibrate your monitor accurately is to buy (or borrow) a device that measures the colours emitted by your monitor. They are called colorimetric devices and connect to your computer via the USB port.

If you research the topic online you will find articles that tell you how to calibrate your monitor without a colorimetric device. Pay no attention to them, their techniques don’t work. The only way to do it properly is with the correct device.

Colorimetric devices are easy to use, and come with software that guides you through the calibration process. It shows you where to place your device on the screen, then displays a series of colour patches for the device to measure.

It then compares the colour values recorded by the device, against the true colour values of the colour patches and creates a profile that compensates for the inaccuracies of the monitor. The profile is saved on your hard drive and used by your computer’s operating system to control the way colours are displayed on your monitor.

Computers and colour profiles

Once you have calibrated your monitor you can relax, knowing that the colours you see on your screen are as accurate as your monitor can render them. At least, that’s the idea. In real life, it’s a little more complex.

Mac owners will be fine. The Mac operating system (OS X) works very well with colour. Every program you use works with the monitor profile and displays accurate colour. It’s one of the reasons that many professional photographers use Apple computers.

If you have a Windows PC however the story is different. The operating system knows the monitor profile is there, but not all programs use it. It’s possible to have the same photo open in two programs, and for the colours in one to appear different to the other. One program is using the monitor profile, and the other isn’t.

All the professional level programs you use, such as Lightroom and Photoshop, utilize the monitor profile and display colours accurately. But not all software does. An example is ACDSee. It doesn’t use the monitor profile and won’t display colours accurately. If you’re unsure whether your software uses the monitor profile, a Google search should reveal the answer.

Just to make things even more complex, some PCs won’t load the monitor profile you created in the first place. It seems to be a problem with Windows Vista and Windows 7. This excellent article describes the problem in more detail and gives you a work around.

Another thing to watch out for is that the colours on your monitor drift over time. For that reason it’s a good idea to calibrate your monitor at monthly intervals, or before you carry out any critical work. The software that comes with your device can be set up to give you a reminder.

How to choose a monitor calibration device

Colorimetric devices are made by several manufacturers. The main players seem to be Datacolor (who make the Spyder models) and X-Rite (which makes Colormunki).

For many photographers, the least expensive model in each manufacturer’s range is probably sufficient. That’s good news because it means that you don’t have to spend a lot of money in order to calibrate your monitor.

But before you rush out and buy the cheapest device you can find, ask yourself these questions. Some photographers will require the features found in more expensive models.

  • Do you use a dual monitor set up? Some colorimetric devices only profile a single monitor.
  • Do you have a printer to profile as well? Some devices can calibrate printers as well as monitors, although they are a lot more expensive.
  • Do you want to adjust the gamma or white point of your monitor? Not all monitors let you do this, but if you have a monitor which allows it you will need a more advanced device to enable this feature.

The Spyder 4 Express

I use a Spyder 4 Express to calibrate my monitor. Here’s how the process works. If you have a different device, the process will be similar.

1. Run the Spyder4Express software that comes with the device

The first screen gives directions. The important points are that you should let your monitor warm up for half an hour before calibration and that there should be no intense light falling on the screen.

It also asks you to reset the contrast setting and set white balance to 6500K. This isn’t possible on all computers, especially laptops, so don’t worry about these settings if you can’t adjust them. The device will still work.

Monitor calibration with Spyder 4 Express

2. Then it asks you which type of display you have

Monitor calibration with Spyder 4 Express

3. Next enter the manufacturer and model of your display

I selected Apple and the display model was filled in automatically. The Color LCD setting seems to be sufficient (confirmed by checking the monitor specs in System Information).

Monitor calibration with Spyder 4 Express

4. Set the Gamut

This next step is very important. Gamut is fairly easy. You’ll know if you have a wide gamut monitor because it will say so in the specs (that’s probably why you bought it). In fact, I tried setting wide gamut here to see what would happen and the software recognised that I didn’t have a wide gamut monitor and sent me back to change it.

The backlight setting is crucial. The instructions recommend that if you’re not sure what type of backlighting you have that you should set it to Unknown. I tried that and even I could see with my naked eye that the colour was wrong (the screen had a magenta cast).

If your monitor has the model number printed on it, simply Google the model number. You should find the spec sheet for the monitor which will tell you exactly what type of backlighting it has.

If you have a laptop it’s harder to verify. I found these instructions for my Macbook Pro. I’ve been unable to find any for Windows laptops, so if you how to do this I’d be grateful if you could let us know in the comments. Once you have the model, you can Google it for the spec sheet. That’s how I confirmed my laptop has a White LED backlight.

Monitor calibration with Spyder 4 Express

5. Placement of the device

The next screen shows where to place the Spyder 4 Express unit. It has a counterweight to hold it in position.

Monitor calibration with Spyder 4 Express

6. The software then displays a series of colour patches for the device to measure

Monitor calibration with Spyder 4 Express

7. A new profile is created

When it’s finished, the program creates a new monitor profile that’s used by the computer from that point on. It also lets you switch between calibrated and uncalibrated versions to see the difference.

Monitor calibration with Spyder 4 Express

8. Gamut comparison

Finally, the program shows a graph comparing the colour gamut of the monitor compared to sRGB, NTSC and AdobeRGB colour spaces.

Monitor calibration with Spyder 4 Express

Conclusion

Monitor calibration is an essential part of your workflow as a photographer. Indeed, it’s an essential part of all post-processing. There’s no way around it, but luckily the process doesn’t have to be difficult or overly expensive.

I use the Spyder 4 Express, and it’s a great little unit. It’s easy to use and relatively inexpensive. The only potential sticking point seems to be working out what type of backlighting your LCD monitor has. It’s crucial to get that right or the calibration won’t be accurate. Also, if you need more advanced features, such as the ability to profile more than one monitor or set the colour temperature or white point, then you need a more advanced model of device.

Have you used a different model to calibrate your monitor? How did the device perform and how did you get on? Let us know in the comments.


Mastering Lightroom: Book Four – The Photos ebookMastering Lightroom: Book Four – The Photos

My new ebook Mastering Lightroom: Book Four – The Photos takes you through ten beautiful examples of photography and shows you how I processed them step-by-step in Lightroom. It explores some of my favourite Develop Presets and plug-ins as well as the techniques I use in Lightroom itself. Click the link to learn more.

The post How to Calibrate your Monitor with the Spyder 4 Express by Andrew S. Gibson appeared first on Digital Photography School.


Digital Photography School

 
Comments Off on How to Calibrate your Monitor with the Spyder 4 Express

Posted in Photography