RSS
 

Posts Tagged ‘Batch’

How to Batch Resize in Photoshop: A Step-by-Step Guide (2021)

12 May

The post How to Batch Resize in Photoshop: A Step-by-Step Guide (2021) appeared first on Digital Photography School. It was authored by Helen Bradley.

how to batch resize in Photoshop: a guide

What’s the easiest way to batch resize in Photoshop?

In this article, I’m going to take you through a simple, step-by-step process for resizing your images. It’ll take seconds – and when you’re done, you’ll be able to resize dozens (or hundreds!) of photos at once.

Let’s get started.

Batch resizing in Photoshop: step by step

Batch resizing isn’t hard, and it takes very little knowledge.

To start, make sure you open some files in Photoshop (though note that you don’t need to open all the files you’re aiming to resize; a random file or an empty canvas will do just fine). As you can see below, I’ve opened a blank document:

a blank canvas in Photoshop

I’m going to cover the Image Processor method of batch resizing. Pretty much anyone can do it, and it generally works well. However, if you have more complex batch resizing requirements, consider writing an action; that way, you can tailor the resizing to your particular needs.

Now let’s take a closer look at the batch resizing process, starting with:

Step 1: Open the Image Processor

Choose File>Scripts>Image Processor.

selecting the Image Processor option

The Image Processor dialog box will open, where you’ll see a simple, four-step process for resizing your images:

the Image Processor dialog box

Step 2: Select your images for batch resizing

In the first section of the Image Processor dialog box, you’ll need to identify the images you want to batch resize.

You can choose to resize all open images by selecting Use Open Images:

how to batch resize in Photoshop choosing the images

Or you can pick a folder from your hard drive via the Select Folder button:

choosing the images to batch resize

If you do select a folder, you can tell Photoshop to resize images in all subfolders as well; just hit the Include All sub-folders checkbox:

selecting the Include All sub-folders option

Step 3: Determine your export location

Now it’s time to determine where you want your resized images to go.

To save the resized versions alongside the originals, simply select Save in Same Location:

selecting the location for the resized images

Then, when the resizing begins, Photoshop will create a subfolder next to the original files. (Because your resized versions will retain the names of the original files, creating a subfolder – rather than simply saving the images in the original folder – prevents any overwriting.)

Alternatively, you can select a different folder for the resized files:

choosing an export location

Step 4: Input your preferred image sizes

This is the most important step of the entire process:

The moment where you dial in resize settings for your files.

First, determine your output file type. You can choose from JPEG, PSD, and TIFF (JPEG is the default and generally works well, but if you’re working with layered files, then PSD is a good choice).

selecting Save as JPEG

If you do decide to save JPEGs, you can adjust the output quality; 12 will give you large, great-looking photos, whereas 1 will give you tiny, low-quality results.

For better color when displaying your photos on the web, select Convert Profile to sRGB:

selecting Convert Profile to sRGB

I also recommend checking the Include ICC Profile box at the bottom:

selecting Include ICC Profile

Finally, select Resize to Fit, and type in your preferred file size!

selecting Resize to Fit

Note that the dimensions you dial in are maximums. So if you type in 300 for the width and 300 for the height, the files will be resized so that the longest side of every image is 300 pixels.

(In other words, the images won’t be cropped or skewed to fit your preferred dimensions; they’ll be scaled up or down for the most natural-looking results.)

how to batch resize in Photoshop typing in a width and height

Also note that the width and height measurements don’t have to be the same. You could specify a width of 400 and a height of 300 – then all images would be constrained to a width of 400 or a height of 300, whichever comes first.

By the way, you do have the option to save your images in a second (or third) format, as well. Just select the Save as PSD or Save as TIFF checkboxes, and PSD and/or TIFF folders will be created alongside your JPEG folder!

Step 5: Run the script

When you’re ready, click Run.

hit the Run button

The images will be automatically opened (if they’re not open already), resized, saved, and closed again.

To find your resized images, simply head to the folder you specified in Step 3 (above). If you chose to save JPEGs, the images will be in a subfolder called JPEG; if you chose to save TIFFs, the images will be in a subfolder called TIFF, etc.

Like this:

finding the resized photos

How to batch resize in Photoshop: final words

how to batch resize in Photoshop

Well, there you have it:

The easiest way to batch resize your images in Photoshop.

So whenever you need to resize a lot of images for uploading on the web, use the Photoshop Image Processor.

It makes the job quick and painless!

Now over to you:

Do you have a favorite method of batch resizing images in Photoshop? If so, share it in the comments below!

The post How to Batch Resize in Photoshop: A Step-by-Step Guide (2021) appeared first on Digital Photography School. It was authored by Helen Bradley.


Digital Photography School

 
Comments Off on How to Batch Resize in Photoshop: A Step-by-Step Guide (2021)

Posted in Photography


RAW Power 2.0 for Mac and iOS launched with batch editing, new adjustment tools, Dark Mode

20 Nov

A year ago, Nik Bhatt, founder of Gentlemen Coders and a former lead developer for Apple’s Aperture and iPhoto team, released RAW Power, an iOS-based Raw photo editor. Today, a year after its initial launch, RAW Power 2.0 has been released and with it comes updated adjustment tools, batch editing, and more.

RAW Power for Mac 2.0

RAW Power for Mac 2.0 operates as both a standalone app, as well as an extension for Apple Photos. The updated version brings new adjustment tools including chromatic aberration correction, perspective correction, a black and white mode, a vignette tool, and a new enhance module.

Batch processing has also been adding. Now, users can apply filters and adjustments in bulk and copy edits from one photo to another. A new custom naming tool has been added for better organization upon exporting photos.

RAW Power for Mac 2.0 has also received a few UI tweaks. It now includes a full file browser, multiple window and tab support, a thumbnail grid view, Quick Look support, improved metadata information, and a new dark look to go along with maxO Mojave’s Dark Mode.

RAW Power for Mac 2.0 works with macOS High Sierra and Mojave. It retails for $ 29.99 as a one-time purchase, but Gentleman Coders is currently offering it for $ 26.99 throughout the month of November. Version 2.0 is a free update for existing RAW Power for Mac 1.0 users.

RAW Power for iOS 2.0

RAW Power for iOS 2.0 claims to be ‘the first app to combine Raw image editing with seamless iOS and iCloud library integration.’ Like its macOS counterpart, this update brings along the same new adjustment tools (some of which are hidden behind a $ 1.99 in-app purchase) including chromatic aberration correction, perspective correction, a black and white mode, a vignette tool, and a new enhance module. Gentleman Coders says these adjustments are 100 percent compatible with the macOS version and will sync through iCloud Photo Library if you have it enabled.

Batch processing is also present in the iOS version. Users can now ‘apply presets, paste adjustments, revert to original, and generate JPEG previews for [Raw photos] for multiple images at a time.’ The UI has also been updated across the board, including a customizable adjustment panel and a new option to share and export directly to the Photos app in various formats.

RAW Power for iOS 2.0 is available for $ 2.99 in the iOS App Store with two optional in-app purchases for $ 1.99: Advanced Adjustment Pack 1 and 2. Advanced Adjustment Pack 1 includes Depth Effect, Curves, and white balance adjustments. Advanced Adjustment Pack 2, a new pack for version 2.0 of the app, includes chromatic aberration, vignette, perspective, and black and white adjustments.

RAW Power for iOS 2.0 supports iOS 11 and 12 and ‘does not support iPhone 5s, 6, or 6 Plus, or iPad mini 3 or earlier.’

Articles: Digital Photography Review (dpreview.com)

 
Comments Off on RAW Power 2.0 for Mac and iOS launched with batch editing, new adjustment tools, Dark Mode

Posted in Uncategorized


How to Batch Resize Your Images Quickly Using Photoshop

17 Nov

While it’s relatively easy to write an Action to resize a series of images in Photoshop, it’s easier still to get Photoshop to do all the work for you. Photoshop comes with an image processor script that will open, resize, and save a series of images for you – very quickly. Here are the steps to make the batch resize process work for your images.

How to Batch Resize Your Images Using Photoshop

Batch resizing images in PS CC 2019 is fast and easy – no need to run an action. You can just run a script in the Image Processor menu option.

Step 1 – Image Processor

How to Batch Resize Your Images Using Photoshop

The Image Processor option lives under the Scripts tab in the main File menu of Photoshop.

Choose File -> Scripts -> Image Processor. The image processor dialog shows a simple four-step process for resizing the images.

Step 2 – Choose images

In Section 1 of the Image Processor dialog, select to either resize the images already open in Photoshop (if you have them open) or click ‘Select Folder’ and choose a folder of images to resize. Select ‘Include all Subfolders’ if you wish to also include them.

How to Batch Resize Your Images Using Photoshop

I prefer to open my images prior to resizing in Photoshop. That way I am not hunting for the folder I need. But if you have all your images organized in a folder you can choose the ‘Select Folder’ option in Step 1 of the Image Processor window.

Step 3 – Save images location

In Section 2 of the Image Processor dialog box, you can select where to save the images. When selecting ‘Save in Same Location,’ Photoshop creates a subfolder to save the images in so you don’t have to worry about overwriting them. When a subfolder of the same name already exists with images of the same names in it, Photoshop saves to that folder but adds a sequential number to the file. That way, you won’t lose your other files. Alternatively, you can select a different folder for the resized images.

How to Batch Resize Your Images Using Photoshop

Indicate where you want Photoshop to save the resized images.

Step 4 – File Type and Size

In Section 3 of the Image Processor dialog box, select the file type you want Photoshop to save your image as. For the web ‘Save as JPEG’ is the obvious choice. You can set a Quality value in the range 0 to 12 where 12 is the highest quality and 0 the lowest.

For better color on the web, you can also select ‘Convert profile to sRGB.’ Ensure that ‘Include ICC Profile’ at the foot of the dialog is checked so the profile will be saved with the image.

How to Batch Resize Your Images Using Photoshop

Option 3 in the Image Processor dialog box is where you can select the type of file you want to save the resized image. You can choose the size in terms of W (width) and H (height) in pixels.

To batch resize the images, select the ‘Resize to Fit’ checkbox. Set the desired maximum width and height for the final image. For example, if you type ‘300’ for the width and ‘300’ for the height, the image will be resized so that the longest side of the image (whether it be in portrait or landscape orientation) will be 300 pixels.

The images are scaled in proportion so they aren’t skewed out of shape. If desired, you can save in another format as well. Just select its checkbox so you can save the same image in different formats and at different sizes in the one process.

The Width and Height measurements do not have to be the same. So you could, for example, specify a Width of 500 and a Height of 700 and no image will have a width greater than 500 or a height greater than 700.

Step 5 – Run Action

In Section 4 of the Image Processor panel, you can also select ‘Run an Action’ on the images if desired.

Step 6 – Run

Once you’re ready, click ‘Run’ and the images are automatically opened (if they are not already), resized, saved, and closed.

To see your resized images, choose File -> Open and navigate to the folder that you specified the images to be saved to. If you chose to save as a JPEG, the images will be in a subfolder called JPEG. PSDs are in a folder called PSD and so on.

How to Batch Resize Your Images Using Photoshop

In conclusion, whenever you need to resize a large number of images for uploading to the web, for example, the batch resize in the Photoshop Image Processor script makes the job fast, efficient, and painless.

The post How to Batch Resize Your Images Quickly Using Photoshop appeared first on Digital Photography School.


Digital Photography School

 
Comments Off on How to Batch Resize Your Images Quickly Using Photoshop

Posted in Photography


Pixelmator Pro 1.2 brings smart photo enhancements, batch processing and more

18 Oct

Pixelmator today released Pixelmator Pro 1.2 Quicksilver, a major update to its image editing app that brings support for macOS Mojave, machine-learning-powered automatic photo enhancement, and batch image processing among other new features.

“Users love Pixelmator Pro for making such powerful image editing tools so incredibly easy to use,” said Saulius Dailide, one of the founders of the Pixelmator Team. “And the new ML Enhance is our most powerful feature yet — it lets you dramatically improve the look of any photo with a single click, thanks to a machine learning algorithm trained on millions of professional photos.”

The new ML Enhance feature automatically adjusts color and exposure locally in the frame. The goal is to give the user an optimized starting point for their own edits. The feature was developed using a set of millions of photos to train the machine learning algorithm which analyzes photos to detect objects and scenes and applies the adjustments.

There’s also a new option to use a light-colored user interface in addition to a refresehed version of the dark theme, allowing for easy adaption to the light and dark modes in macOS Mojave. The app is also capable of automatically switching to adapt to the current appearance of macOS.

A lot of the new and existing features can now be applied via the Automator batch processing tool, making work with large numbers of files less stressful. Other improvements include support for colorful SVG Fonts, a Continuity Camera camera, an Eraser Mode for the Pixel Paint tool, as well as a range of performance improvements and bug fixes.

Pixelmator Pro 1.2 Quicksilver is available from the Mac App Store and can currently be purchased for $ 29.99, 50% off the regular price. More information is available on the Pixelmator website.

Press Release:

Pixelmator Pro gets major update with AI-powered photo enhancement tools

Vilnius, Lithuania — October 18, 2018 — The Pixelmator Team today released Pixelmator Pro 1.2 Quicksilver, a major update to the fast and powerful image editor for Mac. The update adds support for macOS Mojave, including an all-new light appearance, Core ML-powered automatic photo enhancement, batch image processing via the Automator app, and much more.

“Users love Pixelmator Pro for making such powerful image editing tools so incredibly easy to use,” said Saulius Dailide, one of the founders of the Pixelmator Team. “And the new ML Enhance is our most powerful feature yet — it lets you dramatically improve the look of any photo with a single click, thanks to a machine learning algorithm trained on millions of professional photos.”

The new ML Enhance feature in Pixelmator Pro automatically enhances photos — balancing the colors, evening out exposure, and making changes to individual color ranges — to give you the best starting point for making your own creative edits to a photo. Powered by Core ML and developed using a carefully refined set of millions of professional photos, the machine learning algorithm analyzes photos to detect the objects they contain, then enhances their colors and brings out missing details, leaving the final creative touches to the user.

The update also brings the option to use a gorgeous light appearance, giving users an entirely new way to experience Pixelmator Pro. In addition, Pixelmator Pro 1.2 Quicksilver includes a refreshed, much more native dark appearance, so the app now adapts seamlessly to the light and dark modes in macOS Mojave. And with automatic switching, Pixelmator Pro instantly updates to match the current appearance of macOS.

Automator support and five powerful, versatile actions now makes it possible to batch process images using the professional editing tools available in Pixelmator Pro. The Auto Enhance Images action uses the new ML Enhance feature to automatically improve photos, Auto White Balance Images automatically corrects white balance, Apply Color Adjustments to Images and Apply Effects to Images makes every single color adjustment and effect in Pixelmator Pro available in Automator, and Change Type of Images makes it a breeze to convert batches of images from one file format to another. So now, working with large sets of images and making repetitive edits becomes effortless.

Pixelmator Pro 1.2 Quicksilver includes many other improvements, including support for colorful SVG Fonts, the new Continuity Camera, an Eraser Mode for the Pixel Paint tool, as well as a range of additional performance improvements and fixes.

Pricing & Availability

Pixelmator Pro 1.2 Quicksilver is available exclusively from the Mac App Store and is currently on sale for $ 29.99, 50% off its regular price.

Pixelmator Pro requires macOS High Sierra and a Metal-compatible graphics card. Full system requirements and more information on Pixelmator Pro can be found at www.pixelmator.com/pro/

Articles: Digital Photography Review (dpreview.com)

 
Comments Off on Pixelmator Pro 1.2 brings smart photo enhancements, batch processing and more

Posted in Uncategorized


Speed up Your Workflow with the Accent AI Filter in Luminar and Batch Processing

03 Oct

It’s not uncommon for me to sit down at my computer with a memory card full of images and stare blankly at my ever-growing Lightroom catalog while my mind reels at the thought of editing each and every one of them. Many photographers have experienced this phenomenon and there are certainly some good methods of dealing with it such as using Presets in Lightroom, syncing edits across multiple photos, or even just copying and pasting a series of edits from one image to the next and then tweaking as you go.

Other programs offer similar tools for processing multiple images at once, but the Achilles Heel of this type of workflow is that the edits are often static in nature. You can choose from a predetermined set of values (e.g. Clarity +10, Saturation +5, Highlights -20, etc.) and then apply that to many images at one time. But what if some of your images require subtle changes to those parameters?

Lightroom and just about every image editor I have ever used for batch processing won’t tweak your editing parameters if a picture needs a little extra contrast boost or exposure adjustment. That’s where Luminar is different, and its unique Accent AI filter combined with the program’s built-in batch processing offers a great way for you to significantly speed up your workflow while producing outstanding images for yourself, your clients, or your fans on social media.

How to Speed up Your Workflow Using the Accent AI Filter in Luminar to do Batch Processing

After batch processing with the Accent AI filter in Luminar.

Accent AI Filter in Luminar

The Accent AI filter is new in Luminar Neptune, an update to Luminar that was released this summer. It works by using artificial intelligence to analyze your image and make adjustments depending on where it thinks the picture needs it most. Accent AI isn’t just a predetermined set of adjustments, but a series of tweaks and edits applied dynamically to the image, all controlled by a single slider that lets you control the overall intensity of the filter.

When I edit my images in Lightroom I often start with a custom preset that includes many alterations such as sharpness, highlights, shadows, tone curve, etc., and then adjust those on a per-image basis according to how I want them to be fine-tuned. It’s the latter part of that process which becomes tedious, and it’s precisely where the usefulness of the Accent AI filter really starts to show.

If Luminar thinks that an image might benefit from lowering the highlights, increasing shadow detail, altering the exposure, or any number of other editing parameters then it adjusts all of these at once instead of forcing you to edit individual sliders and change numerical values.

How to Speed up Your Workflow Using the Accent AI Filter in Luminar to do Batch Processing

Original unprocessed image. All I did to edit this into the image you see above was to use the Accent AI filter in Luminar and nothing else.

Applying the Accent AI Filter

Another example of the effectiveness of the Accent AI filter is this image of the Seattle skyline I took from the Sky View Observatory at the top of the Columbia Center Tower. I spent a lot of time using the various sliders in Lightroom to try to get a decent final result. But when opened the same picture in Luminar and used the Accent AI filter, I got a great finished photo in a matter of seconds.

How to Speed up Your Workflow Using the Accent AI Filter in Luminar to do Batch Processing

Original photo. Listen closely and you’ll hear a sad trombone playing in the background.

The first version, processed only using Lightroom. I spent about 10-15 minutes to achieve this in LR.

The Luminar version is so good I like it even better than the results I got from manually tweaking all sorts of sliders in Lightroom, and it literally took less than 10 seconds with the single Accent AI slider.

How to Speed up Your Workflow Using the Accent AI Filter in Luminar to do Batch Processing

Applying the Accent AI filter dramatically improved the image. The only thing I don’t like about this picture are the spots from dust on my lens in the top-left corner. Accent AI is great at many things, but it won’t fix blemishes like that. Luminar does include a powerful Erase tool to fix blemishes if you want to, but of course, it doesn’t work for batch processing.

Accent AI can also be used in combination with other filters in Luminar to enhance your images even more. You can get just the right combination of editing parameters to make your photos shine. I often use the Accent AI Filter as a starting point, usually adjusting the value to between 60 and 80, and then apply other edits as I need them like Vignette, Dehaze, or Soft Focus.

But the real power of Accent AI lies in how it can be used for batch processing wherein it can dramatically speed up and enhance the results of your photo editing workflow.

Creating Presets in Luminar

How to Speed up Your Workflow Using the Accent AI Filter in Luminar to do Batch Processing

Click the Add Preset button (shown here with a red circle around it) to create a new Preset that you can use when Batch Processing several images.

In order to use Accent AI for batch processing you must first create a preset, since you can’t just apply individual filters when going through a batch of images. Your mileage may vary but I’ve found that a good place to start when working with this type of operation is a value of 75. Set that, then click the icon third from the left (circled in red on the screenshot) and give your Preset a name, but make sure it’s descriptive like “Accent AI 75”.

Presets can contain as many filters as you like. I have create several for different types of images including: landscape, close-up, portraits, etc. All of them include the Accent AI filter and a combination of other filters in order to get the right look. The heavy lifting is done with the Accent AI filter, though. So I have a few different presets created with just that one filter set to different values like 60, 80, and 100 so I can quickly apply a single Accent AI adjustment to multiple images at once.

The Accent AI filter shines

Since the Accent AI filter examines each image individually and edits them based on where it thinks they need to be altered, I can generally trust it to give me good results and often don’t even need to use any other adjustments or filters.

Another way to approach batch processing with Accent AI is to open a single image from a collection of similar photos, apply the filter just as much as you want for that specific image, and then save that value as its own unique Preset. Then enter the Batch Processing mode and apply that Preset to all of your images at once.

How to Speed up Your Workflow Using the Accent AI Filter in Luminar to do Batch Processing

The thought of going through and editing each one of these pictures individually really bugs me. I created a preset called Cicada Accent AI 82 for editing these in a batch, which was nothing more than the Accent AI filter set to 82 Percent.

The major difference between using the Accent AI Filter in Luminar and syncing (or copy/pasting) edits in Lightroom is that Accent AI works dynamically to apply adjustments where they are needed. So each picture is edited individually rather than having all the same edits applied to all of them at once. That makes it ideally suited for batch processing in a way that is a step above what Lightroom and other programs have to offer. I’m not all that comfortable with applying a single preset in Lightroom to many pictures at once without then going through and tweaking all of them. But I’ve learned to trust the Accent AI Filter in Luminar and I’m quite pleased with its results.

Batch Processing

Once your preset is created, click the multi-file icon in the top-left of the Luminar interface to enter Batch Processing mode. Here you can set a variety of options such as export location, image format and quality, resizing, renaming, and more.

How to Speed up Your Workflow Using the Accent AI Filter in Luminar to do Batch Processing

In the example above I have loaded the Accent AI 75 Percent preset and ran a batch process on 50 photos of a cicada bug. Luminar processed all of them in about the amount of time it would have taken me to edit a single image in Lightroom.

How to Speed up Your Workflow Using the Accent AI Filter in Luminar to do Batch Processing

A quick caveat

As good as the Accent AI filter is for batch processing, it does have some important limitations that you should be aware of. I have found that it works best for nature, landscape, and architecture photography and generally prefer its results in those types of situations over portraits.

That’s not to say it isn’t useful for portraits, just that I’m a bit overly picky and tend to obsess over small details that even the advanced artificial intelligence in the filter can’t quite match. Also there can be a tendency to apply it a little too much, especially when you first start using it. My advice would be to hold back a bit to a value of 40 or 50, especially when batch processing. Sliding the filter all the way to the right can sometimes result in photos that look a little too over-edited and fake, so it might be best to start small and then find how you like to use it over time.

How to Speed up Your Workflow Using the Accent AI Filter in Luminar to do Batch Processing

Conclusion

Even if you don’t like the idea of trusting a computer to edit your photos for you, I would encourage you to at least give the Accent AI filter inside Luminar a try. Use it in combination with a couple other filters and see how it could save you a great deal of time, especially with batch processing or generating proofs for clients. You might be surprised at how much you like it.

The post Speed up Your Workflow with the Accent AI Filter in Luminar and Batch Processing by Simon Ringsmuth appeared first on Digital Photography School.


Digital Photography School

 
Comments Off on Speed up Your Workflow with the Accent AI Filter in Luminar and Batch Processing

Posted in Photography


4 Batch Processing Techniques to Speed Up Your Workflow in Lightroom

09 Jun

0 copy

Lightroom is a fantastic program for keeping your photos organized, but it also provides many tools to speed up your editing workflow. You can even process many photos at once with batch editing. These techniques are by far the biggest time savers Lightroom provides. Once you start using them you’ll wonder how you ever edited each image individually.

Technique 1: Applying presets on import

Presets are hugely popular, and for good reason. They allow you to apply frequently used edits and adjustments to photos, instead of having to manually adjust the settings for each new image. But did you know you can apply your favorite preset during import and cut out a lot of steps?

1 copy

Step 1: Start an import in the library module

2 copy

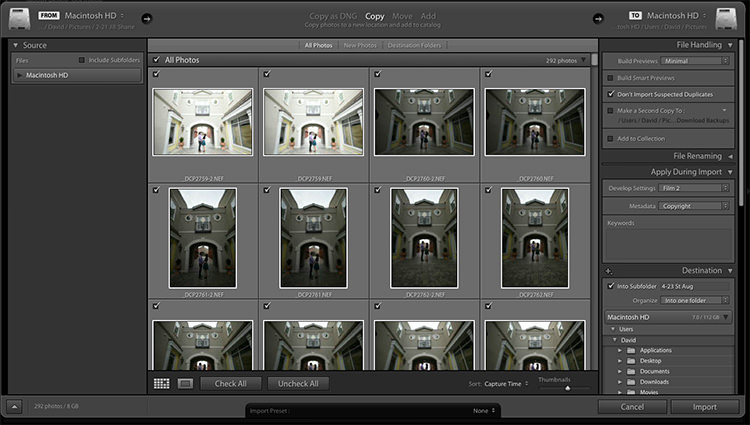
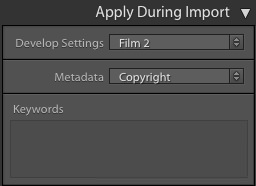
Step 2: On the right panel in the import dialog you’ll see the “Apply During Import” module.

Step 3: If you have a base preset, or a most commonly used one, select it here and click import to have it automatically applied to all of the photos as they are imported into Lightroom.

This not only skips a lot of clicks for you, but it applies them faster than selecting them individually in the develop module later.

Technique 2: Apply presets in the Library module

Applying presets on import is great if all the photos are similar, but you may need to use different presets on varying scenes, poses, etc. Instead of applying these one image at a time, you can select them in the library module and apply them in a group. This trick is great for weddings, or similar shoots where you may be inside then outside, or have constantly changing light conditions.

3 copy

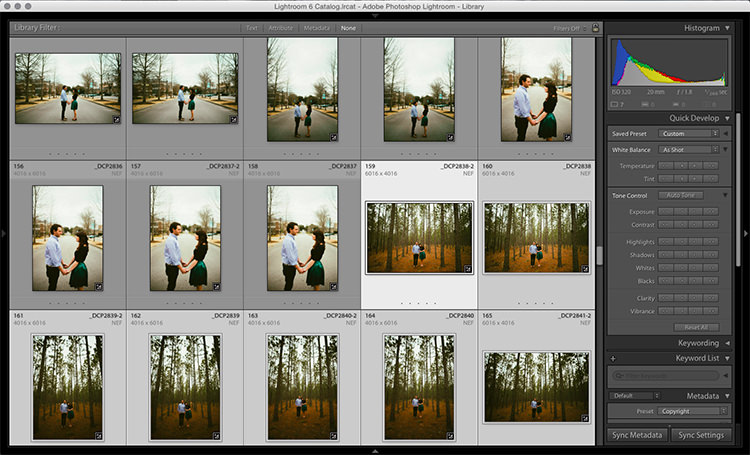
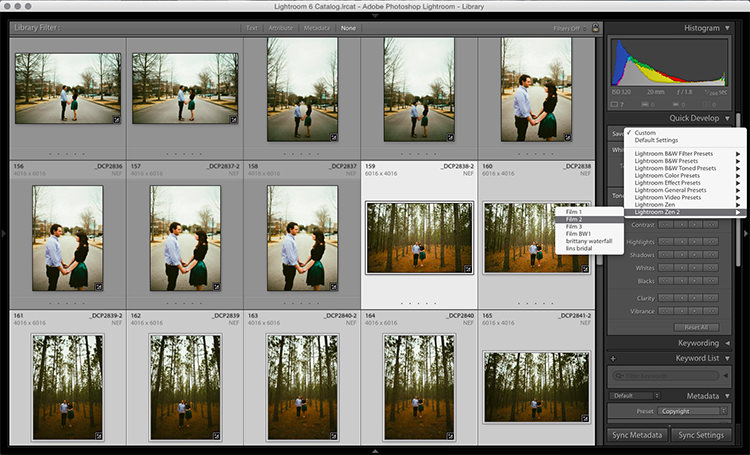
Step 1: Click the first image in the set, then hold down the Control button and click any others to which you want to apply the same preset.

4 copy

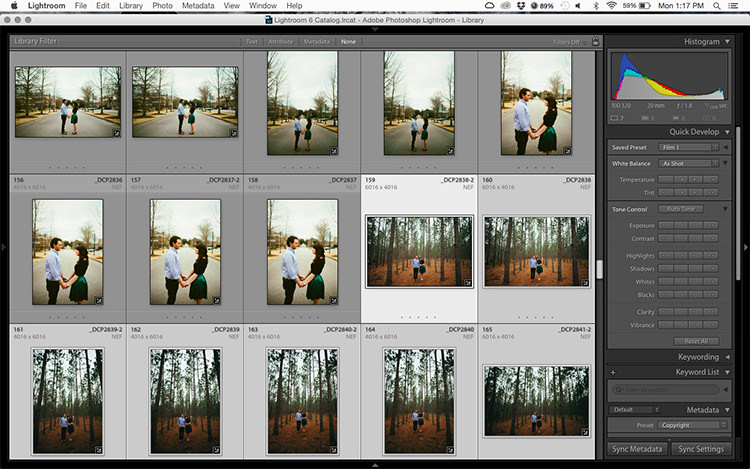
Step 2: At the top of the Quick Develop panel, click the drop down menu under “Saved Preset” and select the new preset. It will update the settings from that preset to all the selected photos.

5 copy

Step 3: Repeat for each changing scene as needed.

Technique 3: Edit in the Library module

The Library module runs much smoother, and processes changes faster than the Develop module. Since you have already applied your presets to the images, you will mostly need to make broad adjustments to your photos now. The Library module can edit the major adjustments like white balance, exposure, contrast, and more. Even better, you can apply these adjustments to multiple photos at once, making them more consistent, and saving you a lot of time.

6 copy

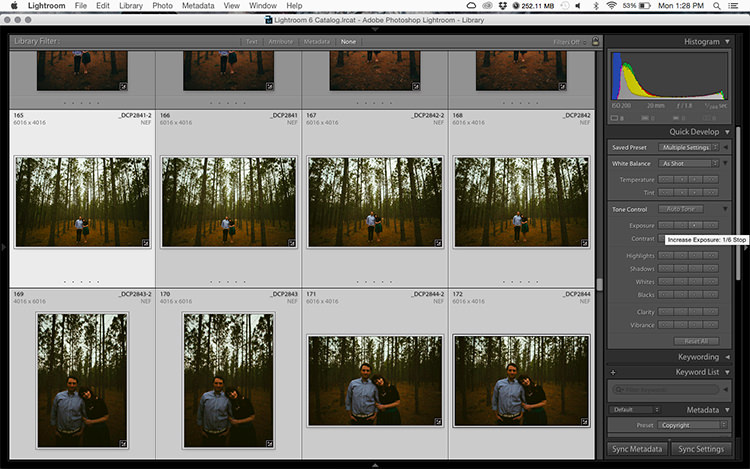
Step 1: Select a group of images as above (CTRL + click to add to your selection) in the Library module.

7 copy

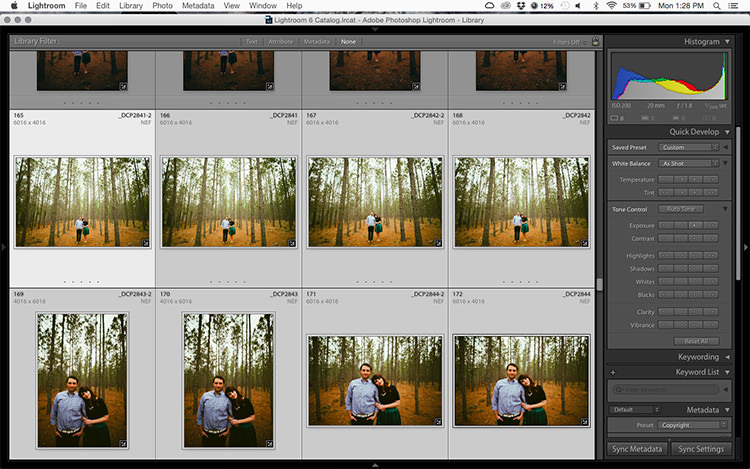
Step 2: In the Quick Develop panel on the right, click the arrows under Exposure, Contrast, and any other applicable options, to apply the changes to all selected photos at once.

Step 3: You can use the + and – key to enlarge or minimize the library view, allowing you to get a better view of the adjustments you are applying.

Technique 4: Sync adjustments across multiple photos in the Develop module

After applying the broad adjustments, you may need to fine-tune a few things in your images. These may include changes like a curve adjustment, add a gradient filter to fine tune a bright sky, etc. These are changes you have to make in the Develop module, but you can still apply them in batches, instead of doing them one photo at a time.

8 copy

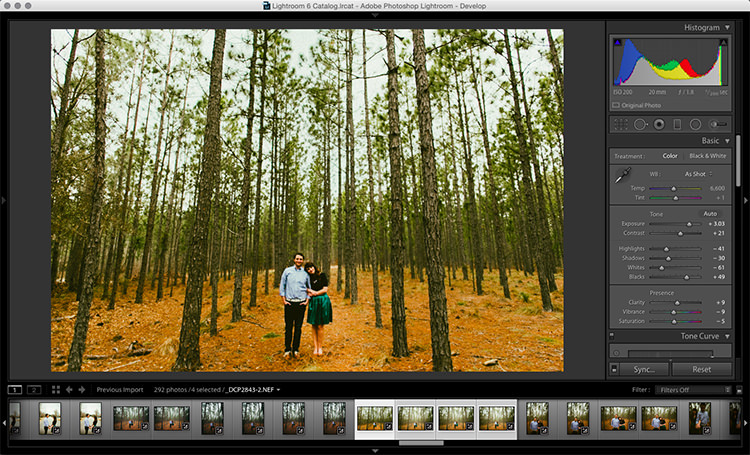
Step 1: In the Develop module, apply the adjustments to a single photo.

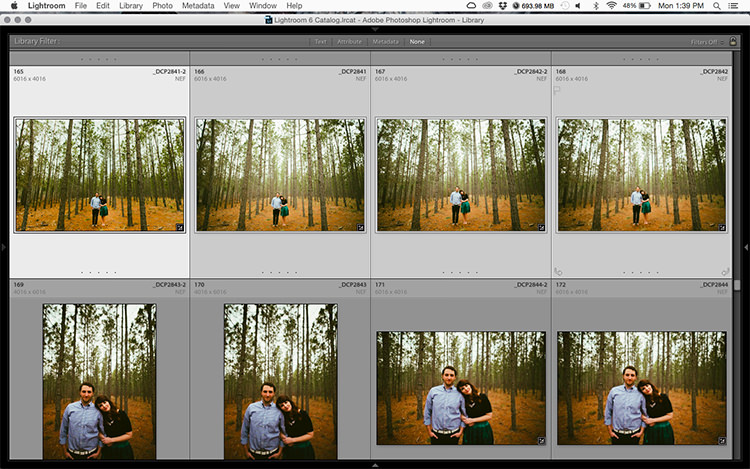
Step 2: In the Develop filmstrip or Library grid view, select multiple photos (CTRL + click).

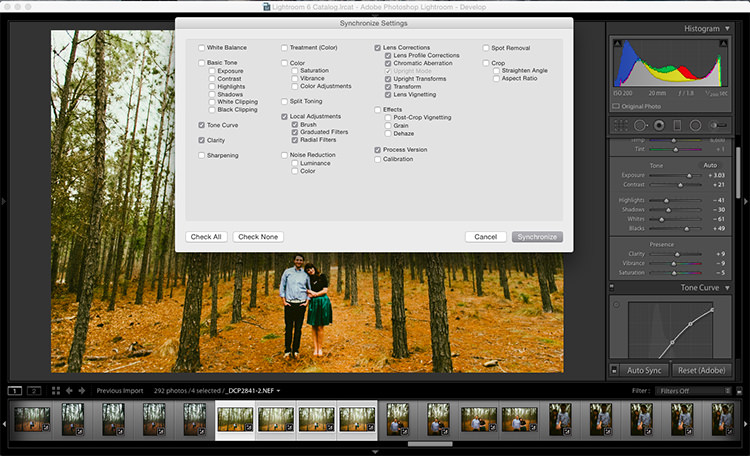
Step 3: At the bottom of the right hand panel, select “Sync”, it will be the left button beside “Reset”

9 copy

Step 4: Check the options that you want to sync with all the selected photos. These should include any adjustments you just made in the Develop module.

10 copy

Keep in mind

When batch editing, be careful you don’t sync anything that you don’t want applied to all of the selected images. If you use the adjustment brush on skin in one photo and sync that to another photo, chances are that the subject has moved slightly, and the brush will be applied to the wrong part of the image.

Stick with it!

Do you think these batch editing techniques have a spot in your workflow? For me, learning to batch edit allowed me to cut my wedding editing time down to a fraction of what it was before. You can focus on the big picture and style of each shoot, and not get lost spending 10-15 minutes on every image. Batch editing lets you get more work done in less time, and that is fantastic!

Do you have any additional tips to add? Please do so in the comments below.

googletag.cmd.push(function() {
tablet_slots.push( googletag.defineSlot( “/1005424/_dPSv4_tab-all-article-bottom_(300×250)”, [300, 250], “pb-ad-78623” ).addService( googletag.pubads() ) ); } );

googletag.cmd.push(function() {
mobile_slots.push( googletag.defineSlot( “/1005424/_dPSv4_mob-all-article-bottom_(300×250)”, [300, 250], “pb-ad-78158” ).addService( googletag.pubads() ) ); } );

The post 4 Batch Processing Techniques to Speed Up Your Workflow in Lightroom by David Childers appeared first on Digital Photography School.


Digital Photography School

 
Comments Off on 4 Batch Processing Techniques to Speed Up Your Workflow in Lightroom

Posted in Photography


Macphun updates Tonality with batch processing and Raw support for more cameras

09 Apr

Software manufacturer Macphun has announced an update to its Tonality application that introduces batch processing, free preset packs, as well as Raw support for a wider range of cameras.

The black and white image manipulation package designed for the Mac platform already offers 160 ready-made manipulation and effects settings, but will now offer between one to three extra settings per month, created by a band of professional photographers. The company has four contributing professionals at the moment and will add a new one each month to enlarge the collection of settings users can download for free. Users can, of course, create their own presets using the tools and controls provided and can then share these amoung themselves. Further pre-sets are available to purchase.

The update also brings raw support for owners of Canon PowerShot G1 X Mark II, Fujifilm FinePix HS50 EXR, Leica Q (Typ 116), Leica SL (Typ 601), Leica M Monochrom (Typ 246), Nikon D300S, Panasonic DMC-G7, Sony DSLR-A700, Sony DSC-RX100M3 and Sony DSC-RX10M2 cameras.

The company has also added a link to the 500px image sharing website to smooth the uploading of pictures directly from the program, and has also made it easier to export files to Adobe’s Photoshop and Lightroom applications.

The program is available in three forms, as a standalone application that is priced £15 (though £7.99 until 14th April), as part of the Tonality Complete Kit you get the Pro Version for £48.99, or as part of Creative Kit 2016 with five other Macphun applications for £89.99.

For more information see the Macphun website.

New Tonality updates brings amateur photographers closer to professionals

Ability to add free preset packs created by worldfamous photographers, 500px export integration, batch processing, new cameras support, and special discounts at Mac App Store

Macphun Software, a leading innovative photography app developer with over 30 million users worldwide, have today launched a major update to Tonality, their awardwinning black and white photo editor for Mac.
To celebrate the update, Macphun are offering a 50% discount and a free batch processing in the MAS version of Tonality for one week only (7th14th April) .

What are the key highlights of the update to Tonality?

Preset Packs from WorldFamous Photographers

Tonality users will now have access to a free preset library, created by professional photographers from around the world. To access the library, users simply need to click “Get more presets” from inside the software.

Macphun have enlisted the expertise of professional photographers, including Serge Ramelli, John Batdorff, Dan Hughes, Andy Krucezk and others to create exciting new preset packs exclusive to Tonality, which can be found at macphun.com/tonalitypresets.

Statistics show that since August 2014 (when the software was launched) Tonality users have processed over 7 million images , and applied over 50 million presets to their photos. Current favourite preset packs include Portrait, Architecture, and Dramatic.

500px Support plus 3month FREE membership

Macphun have teamed up with 500px to allow users to easily export images directly from Tonality to the global online photography community. Macphun are also excited to offer a 3month 500px membership for free as a bonus to Tonality.

More cameras supported

RAW file support has been improved and extended so RAW image files can now be opened from a variety of new cameras: Canon PowerShot G1 X Mark II, Fujifilm FinePix HS50EXR 100, LEICA Q (Typ 116), LEICA SL (Typ 601), LEICA M MONOCHROM (Typ 246), NIKON D300S, Panasonic DMCG7, Sony DSLRA700,
Sony DSCRX100M3, Sony DSCRX10M2.

What other new features and improvements can be expected?

Other improvements include ability to export images from Tonality to Aurora HDR, improved Lightroom and Photoshop export, improved language translation quality, and improved stability.

Standard version of Tonality (available on the Mac App Store)
In addition to all the updates listed above, the Mac App Store version of Tonality now includes batch processing as an InApp purchase. The batch processing inapp will be available for free between 7th and 14th April. Batch in Tonality allows users to process, rename and resize dozens of photos at the same time.

What is Tonality?
Tonality is a compelling black and white photo editor. It combines the authenticity of the
monochrome analog era and the cuttingedge colour technologies of the digital age. Reimagine your monochrome image editing with hundreds of presets, layers, unique digital controls, authentic grain and more.

Pricing and Availability:

Tonality is available as a standard version through the Mac App Store, a standalone Pro version direct from https://macphun.com/tonality , or as part of Creative Kit 2016 at macphun.com/creativekit . The standard version of Tonality is available via the Mac App Store at the 50% discount: £7.99 from 7th-14th April: https://itunes.apple.com/gb/app/tonality/id892581529?mt=12

Tonality CK standalone is available direct from https://macphun.com/tonality at £48.99. Creative Kit 2016, featuring Tonality and five other incredible Macphun apps, is available direct from macphun.com/creativekit at £89.99.

Articles: Digital Photography Review (dpreview.com)

 
Comments Off on Macphun updates Tonality with batch processing and Raw support for more cameras

Posted in Uncategorized


Topaz Labs DeNoise 6 adds standalone option, batch processing, camera profiles

02 Mar

Topaz Labs has released DeNoise 6, the latest version of its noise-removal software. This latest installment can be used as a standalone application in addition to functioning as a plugin for host software like Adobe Lightroom and Photoshop; it also adds batch image processing as well as profile presets for dozens of camera models.

Topaz Labs announced the software update last week and is offering it to new customers at a discounted $ 49.99 rate until March 20, after which the regular $ 79.99 price tag will apply. Existing DeNoise customers can update to version 6 for free. DeNoise 6 is available for 64-bit Mac OS X and Windows systems.

Via: Topaz Labs Blog

Articles: Digital Photography Review (dpreview.com)

 
Comments Off on Topaz Labs DeNoise 6 adds standalone option, batch processing, camera profiles

Posted in Uncategorized


5 Starter Steps to Batch Processing using Adobe Bridge

31 Jan

Post-processing can be a minefield. Beginners especially can feel overwhelmed when confronted by amazing software, that can do almost anything, like Photoshop for example. However, everyone starts from somewhere, and not everything is terribly confusing. I am personally a fan of simplicity, when it comes to technology. Let me share with you a few simple steps on how to get started batch processing using Adobe Bridge.
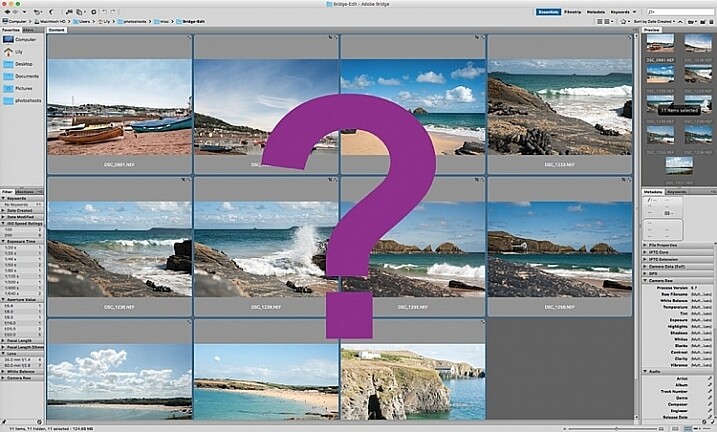
what-is-adobe-bridge_WEB

Editing in Bridge is super simple, and as easy as one – two – three. Open your file, edit your photo, save your file. I will walk you through it, and try to demystify the first step in post-processing, without touching Photoshop.

What is Adobe Bridge?

Bridge is part of Adobe’s Creative Suite, and is a media browsing application. It is an app that enables you to view your entire computer contents, manage and organize your digital files, and edit your photos without the need to import and file them in various catalogs elsewhere. For photographers specifically, Bridge simplifies the first step in the editing process, because within Bridge you can do the following easily, to name a few:

  1. Browse photos
  2. Rate photos
  3. Delete photos
  4. Rename, move, or copy multiple files at the press of a button
  5. Organize your files using various filters so you can perform your desired function in batches
  6. Watermark, copyright and manage metadata information
batch-editing-adobe-bridge-photography-tutorial

Adobe Camera Raw

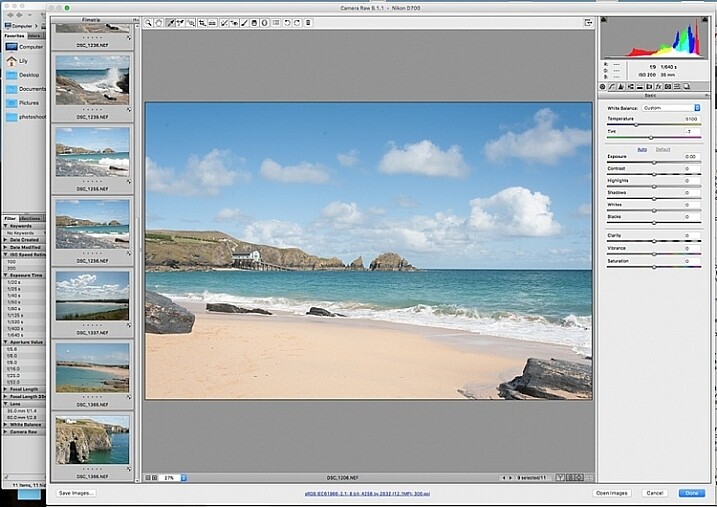
To edit photographs in Bridge, you need to have Adobe Camera Raw, a powerful plug-in that allows you to edit and enhance any photo, including JPGS. RAW files however, can only be opened, and read, in Adobe Camera Raw.

I would suggest that you shoot in RAW. Here is a good article about RAW vs JPGS which explains the benefit of shooting in RAW format. I shoot in RAW, and always edit from that format in Bridge, as my starting point. If you photograph in RAW, make sure you have downloaded Adobe Camera Raw, preferably the latest version, onto your computer before you can edit the files in Bridge.

A first word

This tutorial is a very basic suggested process of editing in Bridge, meant to aid your understanding if you have never used Bridge before. I do not claim it is the better way of editing nor the perfect way; it is one option, among many others available. Bridge is my personal preference over Lightroom, and I choose to use as much or as few of the functions in Bridge as I see fit for every image, or batch of images, that I edit. I like Bridge because, together with Adobe Camera Raw, it is straight-forward, hassle-free, and offers a non-destructive way of editing.

Loading your images

Before starting the batch processing, you need to load your images to a new folder on your computer.

My suggestion would be to download your images from your memory card, directly onto your computer. In my opinion, this is the safest, and most direct way, to copy over images from your memory card to your computer, without having to go through various software that potentially could complicate the copying process. Keep it as simple as possible to try and eliminate any malfunctions or errors right at the start. Use an external USB card reader to load your images into your computer, if it doesn’t come with a built-in one.

Put your images in a new folder clearly labeled so you know exactly where to find them. As an added step, when I copy a new set of images from a memory card on to my computer, I also immediately copy the same set to various external hard drives and cloud storage for back-up and safe-keeping. Always copy from the same memory card so you keep the transfer direct, and minimize potential errors. For example, if you copy your memory card images to a folder called Set A, do not then copy the images from Set A into another external hard drive folder; do not create this unnecessary step. Paste the same set of images from the memory card, directly where you want them stored on an external hard drive or on the cloud.

Once your images are safely copied, open Bridge. You will need to be subscribed to Adobe CC to have access to this. Subscriptions are now very affordable, compared to previous years when you had to buy a license of the very expensive full Adobe Suite just to use one software.
 batch-editing-adobe-bridge-photography-tutorial

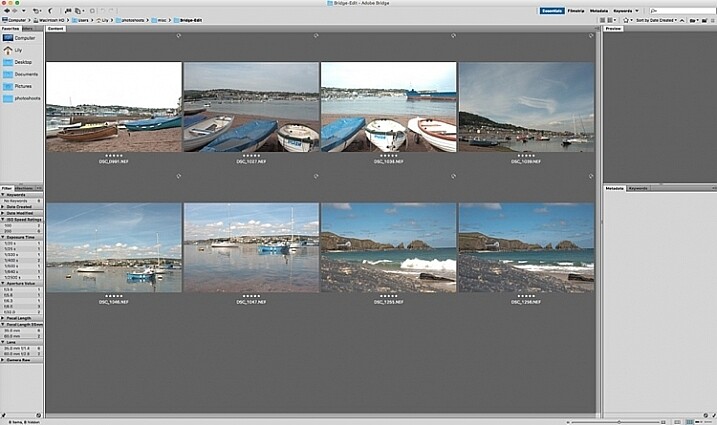
You will see the contents of your computer on the left side navigation menu. Find your folder, click on it and your images will be displayed on the main window. RAW files will be displayed as CR2 or CRW files for Canon cameras, NEF files for Nikon cameras and DNG for some other cameras (each manufacturer has a proprietary raw file format).

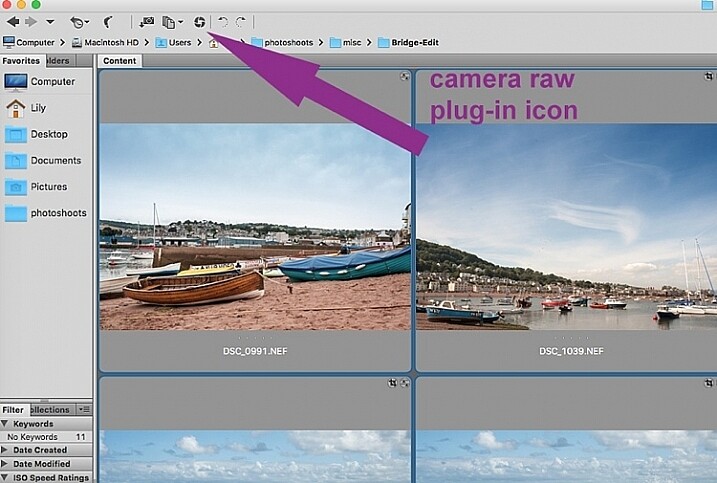
Select your RAW files, and open them by clicking the Camera Raw plug-in icon with the images selected.
 batch-editing-adobe-bridge-photography-tutorial

As a RAW file is an unprocessed image containing all the information the camera sensor sees. It can appear very flat, and darker than what you may have seen on your camera’s LCD screen, which displays a JPG preview of your image, and as such has already been processed by the camera for preview purposes.

An important note to consider when batch processing, is that it is most effective when used on images that are photographed using similar light and settings. The main thing to remember is that you are able to apply global edits in a few steps to multiple images, but the reality is that you may still have to tweak each image as appropriate before you save it.
sync-settings_WEB

Batch processing

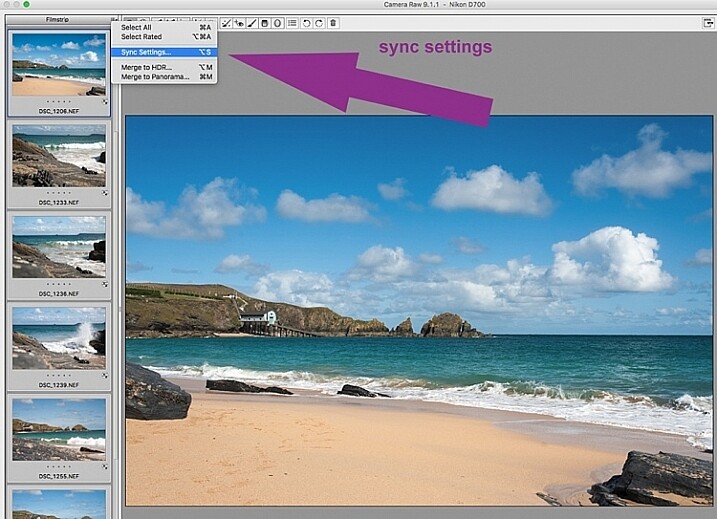
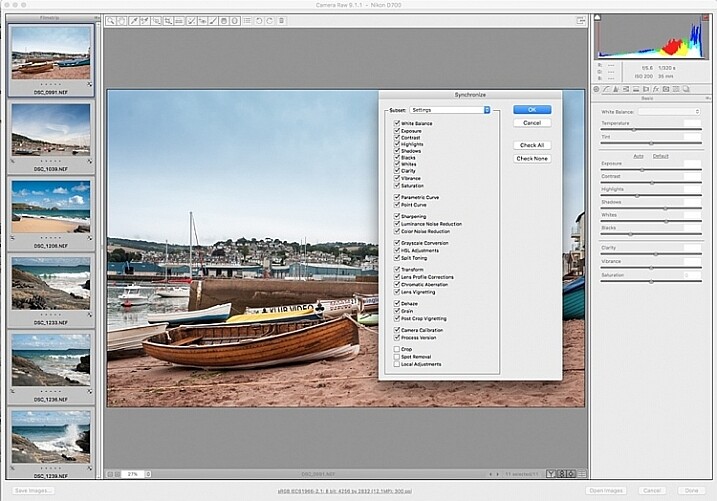
There are two ways of applying edits in batches. Below I make reference to selecting all images using cmd/ctrl+a, and making your adjustments by applying them to the images simultaneously – that is one way. The second way is to synchronize edits. To do this, use one image with all the adjustments made, then select all other images and click the synchronize button to apply the same adjustments to the rest of them.
 batch-editing-adobe-bridge-photography-tutorial

The idea behind batch editing is that you can apply a set of edits to multiple images, by only doing the adjustments once. To do this you can either select all the images you want to edit and make your adjustments while all the images are selected –  or you can edit one image first, followed by selecting all the images (making sure the edited image is the one highlighted with the blue box around it) then synchronizing the edits across all the images. A new window opens up with a series of boxes so you can check the settings you want to synchronize across the batch. I tend to uncheck the crop and local adjustments as those settings usually need to be specifically applied to each individual image.

Here is a key point to bear in mind when synchronizing your settings across the batches: It is important to note that you only want to do this with global adjustments that you want applied to the entire batch, and do it at an early stage of editing. If you use the synchronize function at the end of your edits, when you may have made various local adjustments to each individual image, any synchronizing action done then will overwrite previous adjustments (depending on what you select in the Sync settings popup box).

Step 1: Correct Lens Distortion and Chromatic Aberration
 batch-editing-adobe-bridge-photography-tutorial

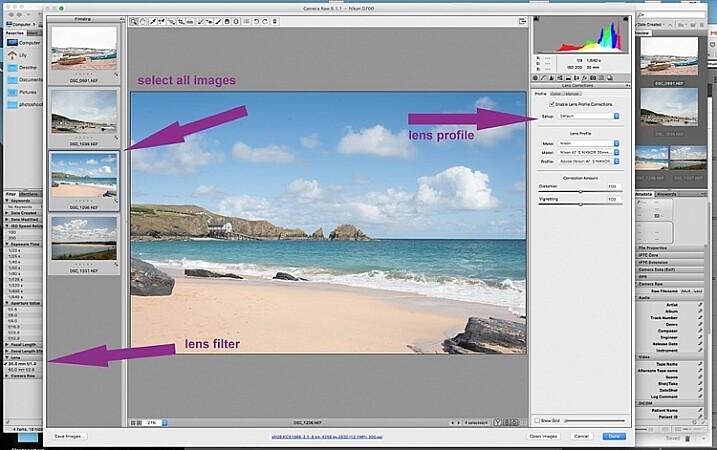
On the left hand navigation filter, choose Lens. A dropdown menu of the lenses used appears. I correct distortion on all images photographed around the 50mm focal length and under. By clicking on the specific lens, you are filtering the set so that only images photographed with that lens are shown in the thumbnail window. Select all the images by clicking cmd/ctrl+a . With the images selected, click the camera lens icon to open the Camera Raw plug-in and window. Select the images again by clicking cmd/ctrl+a, and go to the Lens Correction tab on the right hand navigation panel. On the Profile tab click the box that enables lens correction and choose your camera and lens details from the drop down menus. If your lens isn’t in the list, alternatively you can do this manually using the sliders on the Manual tab. Click done and your changes will automatically be saved.

Often with extreme lens distortions coupled, with straightening adjustments, you will need to crop your images. Type c (keyboard shortcut) and the crop box at the top will be highlighted. Hold down the crop icon to bring up the crop ratios. By doing this, your image will be constrained to the ratio you have chosenwhen you crop. Don’t forget to click done to save your changes.

Do this for all the lenses for which you want the distortions corrected. If you are only editing a batch photographed using one lens profile, you do not need to click done just yet. You can keep making further edits before clicking done.

Next correct any Chromatic Aberration. I only do this step if I know I have taken images in bright light using a very wide aperture such as f/2 or wider. The filtering and batch editing method is the same as above. However, I do this for each image individually at 100% view as each image would have various amounts of chromatic aberration and varyious color fringing.

Step 2: Correct your White Balance
 batch-editing-adobe-bridge-photography-tutorial

Once all the distortions on various lenses and focal lengths have been corrected, open your images again in the same way. Now you are ready to make batch edits.

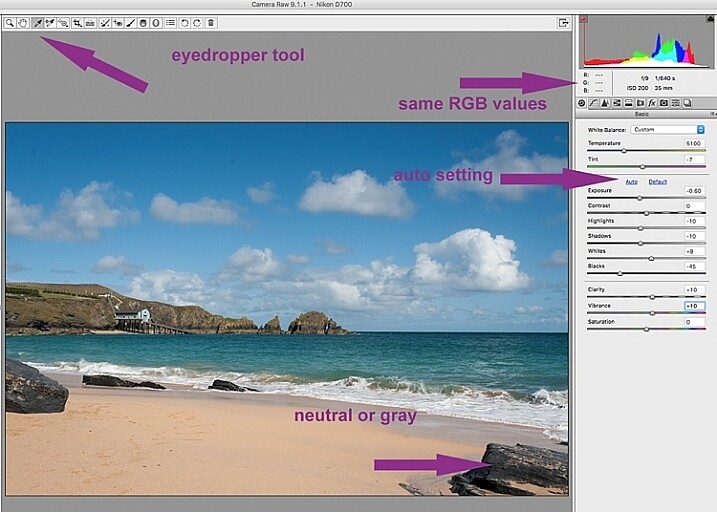
Once in Camera Raw, select a set of images that have been photographed in the same, or similar light. With the images selected correct the White Balance using the eyedropper tool. You need to find a neutral area (gray, or white) to click the eyedropper tool on and aim to get the RGB numbers to read the same, as much as possible. That way you know you are getting the most neutral color in the image. You can also correct White Balance by eye if you are confident enough to differentiate color temperature, although this will be less accurate than going with the RGB values.

You will notice that the White Balance changes on all the images you selected just by setting it on one image. Images that have been photographed in different light, or at varying times, will register a different White Balance. So, batch editing an entire set of images photographed in various places in this way, will produce irregular color results.

A solution to this is to use a gray card and have this set when photographing, or set your color temperature in-camera. By doing this the White Balance will be consistent throughout your images, for that time and setting. Here is a useful article on how to set your white balance in camera using a gray card. For more information on white balance and color temperature click here.

Step 3: Correct your exposure and make local adjustments
 batch-editing-adobe-bridge-photography-tutorial

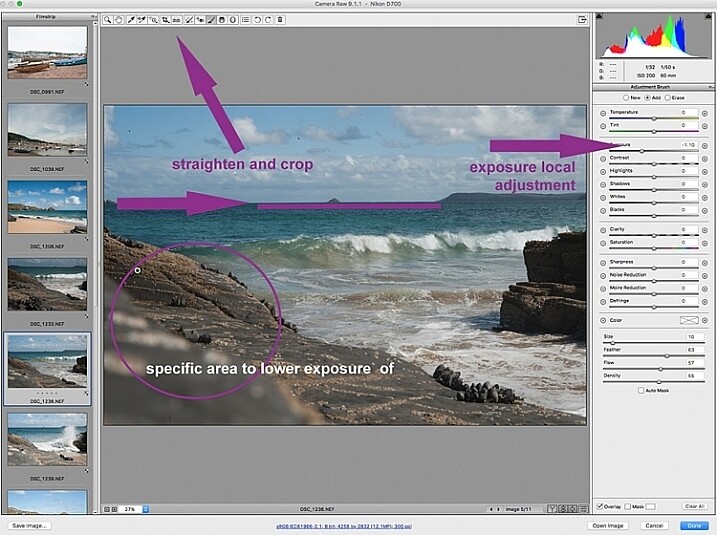
You may want to click Auto first, to see what Camera Raw’s suggested edits are, then start making your adjustments from there. To batch process, it is important to select sets of images shot in the same setting and light to make the most of this editing function. Batch editing images that have settings in opposite extremes will very likely add to your editing time, as you will need to go back and correct all the other images, thereby doubling your editing process. This is just one of the benefits of shooting in Manual mode where you have full control of your camera settings, rather than the camera making the decisions for you. If you are considering switching to Manual mode, in case you are still shooting in any of the other modes, see: How to Learn Your Camera’s Light Meter and Master Manual Mode.
 batch-editing-adobe-bridge-photography-tutorial

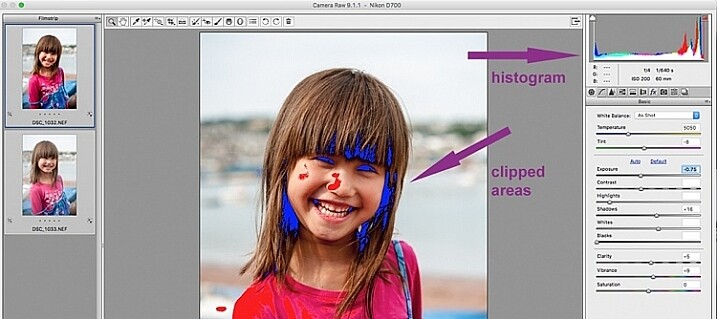
When making adjustments, it is important to keep an eye on the histogram, which is the coloured graph displayed on the upper right hand corner of Camera Raw. The histogram tells you if there is clipping occurring in the dark and light areas of your image. Clipping simply means that there is no detail left in that area, as the tonal values have fallen outside the minimum and maximum brightness boundaries, where detail can be represented in the digital image.

Type U and O together and the window will display any clipped bright areas in red. Type U and O together again to display clipped dark areas, and one more time to turn off the clipping warnings. You can then make adjustments by moving the sliders to eliminate the clipped areas. Remember to keep checking the histogram. You don’t want to clip either the blacks or the whites, you will see this on the histogram when the colours start climbing up on the left and right walls. Ideally you want the colours to be evenly distributed around the middle area until they are just touching the walls. Here is a link explaining: How to Read and Use Histograms.

Local adjustments

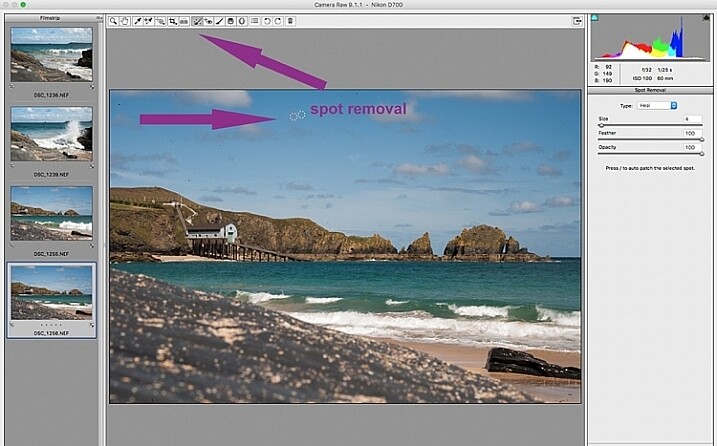
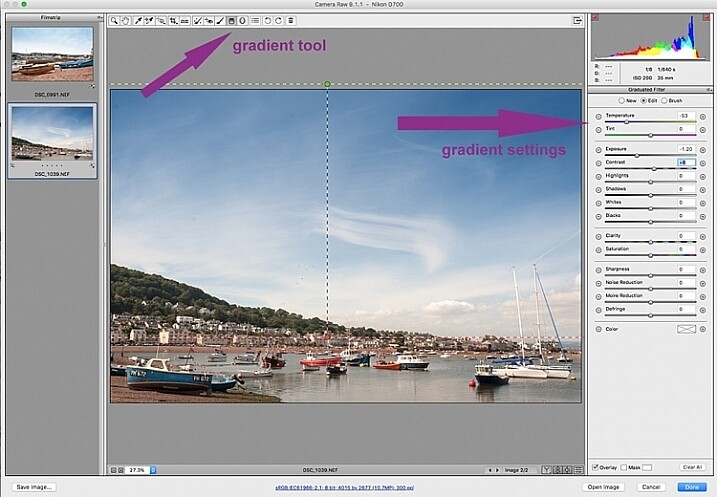
There are useful tools that you can use in Camera Raw, but which will not be beneficial in batch editing such as: spot removal and healing, adding gradients, straightening and cropping. However, you can edit smaller sets within the opened big batch, with ease using the same process. Regardless of the number of images, you can select consecutive images you want to edit in smaller groups, and apply specific batch edits to those images only, such as cropping and other local adjustments.
 batch-editing-adobe-bridge-photography-tutorial

 batch-editing-adobe-bridge-photography-tutorial

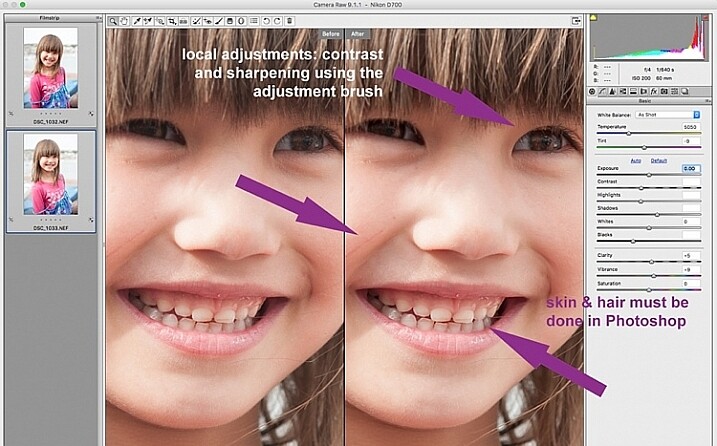
While I find local adjustments very useful, for instance brightening or darkening selected areas, warming up and cooling down specific parts of an image, and all the tools available on the adjustment brush panel, these tools need to be applied to each image individually, as necessary. Bridge and Adobe Raw can only go so far. If more fine tuning, and intricate edits need doing, you will need to take the image into Photoshop or a similar software to do so.
 batch-editing-adobe-bridge-photography-tutorial

Step 4: Remove Noise and Sharpen

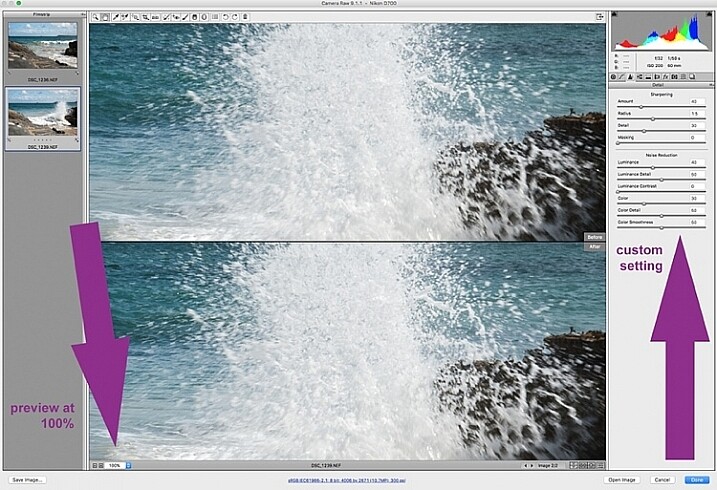
Adjusting the sliders to remove noise in an image is essential for all images, more so if you are shooting at a high ISO. Noise in a digital image is composed of the grainy look that you see, and the red, green, and blue spots that show through on the image, especially in the dark areas. The luminance slider fixes the grainy issue, and the color slider removes the dots, so move both sliders until you remove the noise.

An image shot at a very high ISO such as ISO 8000 will need a different noise reduction value than an image shot at ISO 400. If this is the case with your set of images, you can go back and filter your images again as in Step 1, but using the ISO speed ratings this time, then proceed with batch editing. This process can be tricky, but is worth the extra step, especially when dealing with higher ISOs. It is essential to view the images at 100% when removing noise, so the effects of the sliders are visible. A word of caution: do not go overboard with the noise reduction and sharpening settings when doing global batch edits. The danger is that you may end up removal detail and color. The best way to ascertain the noise removal settings appropriate for an image, is to do it on every single image, due to the ISO and exposure variables which greatly determine the amount of noise in an image. But there is no reason why you can’t apply a gentle global noise reduction setting to your batch of images, and adjust from there individually as needed.

It is always good practice to sharpen all your images, ready for output. Sharpening values vary according to the detail, and information in the image. You can apply your chosen sharpening values globally if you are confident that the values are gentle, and general enough for all the images in the batch. A little sharpening is better than nothing. Some images however, may need specific, more aggressive, sharpening values, and this is where you need to apply the appropriate value to each individual image. Similar to removing noise, the best practice is to custom sharpen each image one by one.
sharpen_WEB

Step 5: Save your images

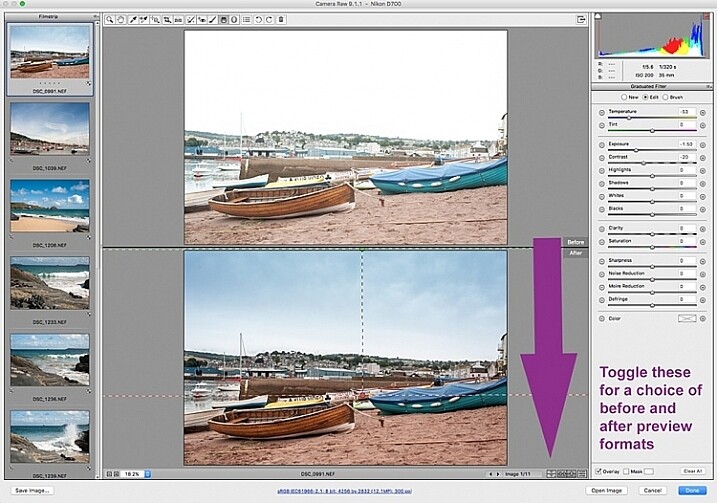
Once you have made global batch edits to your images, I suggest you go through them one at a time, in the same Camera Raw window, and make final local adjustments for each one. Type cmd+alt+p to toggle between before and after previews. There are a variety of preview formats, so play around with the options given, to choose your preferred format.

Now it’s time to save your images. This is one of the features of using Bridge with Camera Raw that, for me, trumps all others. Select all your images again, and click the Save image button. A window opens up where you can specify where you want the images saved, or create a new folder for them. You specify the format you want them saved in, as well as quality. You name the files once only, and voila they are saved. Don’t forget to click the done button to store all your adjustments. If you close the window without doing so, all your adjustments will not be saved. Always make sure your images are in sRGB and are saved in sRGB color profile.

Summary

These are only very basic steps to get you started, Bridge and Adobe Camera Raw have so much more to offer. Play around, experiment for yourself, and find out how your workflow can be even more simplified. Editing in Bridge and Camera Raw does have its limitations, especially when it comes to fine edits on skin, and blemish and hair removals, but with their batch editing functionality, you can get you to a place where you’re ready for finer edits in Photoshop, much faster than opening each image in Photoshop as a starting point, and applying the same edits one at a time.
 batch-editing-adobe-bridge-photography-tutorial

There you have it – a few simple tips for batch processing. By saving your images in a different format, you will have your new set of edited images, while your RAW files are safe in the original folder. When you open these RAW files again they will show the adjustments you have made, but you can reset at any time if you want to re-edit from scratch. Your edited images are now ready to be further edited in Photoshop, should you want to do more creative and artistic edits, or if there are more edits necessary like head swapping, skin blemishes and hair removal as mentioned above. Bridge and Camera Raw are only the beginning, they gives you a good clean edited image to build on.

A last word

Batch editing is not for every photographer, nor for every photograph. Neither is batch processing necessary for every photography job that comes your way. But it is an option that can be easily learned, and might just save your sanity one day when you need to edit thousands of images within a short time-frame.

Here are the two images before and after editing in Bridge and Camera Raw.

landscape-after-before_WEB

landscape-after_1_WEB

landscape-after_WEB

Do you have other smart tips to share when batch processing in Adobe Bridge?

googletag.cmd.push(function() {
tablet_slots.push( googletag.defineSlot( “/1005424/_dPSv4_tab-all-article-bottom_(300×250)”, [300, 250], “pb-ad-78623” ).addService( googletag.pubads() ) ); } );

googletag.cmd.push(function() {
mobile_slots.push( googletag.defineSlot( “/1005424/_dPSv4_mob-all-article-bottom_(300×250)”, [300, 250], “pb-ad-78158” ).addService( googletag.pubads() ) ); } );

The post 5 Starter Steps to Batch Processing using Adobe Bridge by Lily Sawyer appeared first on Digital Photography School.


Digital Photography School

 
Comments Off on 5 Starter Steps to Batch Processing using Adobe Bridge

Posted in Photography


Save Time with Batch Exposure Blending

10 May

A Guest Post by Nick Rains.

Do you ever shoot a bunch of exposure-bracketed shots and then never get around to blending them together?

Maybe you don’t shoot multiple exposures in the first place because you don’t want to spend hours in front of the computer blending together the individual images. If you are like me, the thought of individually exposure-blending a whole load of images is just not what photography is all about – I know I can produce better images with better tonal range this way but it seems like a lot of work in front of the computer.

What if I told you I do most of my exposure blends automatically?

Here’s how :

You need Lightroom and a Lightroom plug-in called LR/Enfuse.

This is free to download but is restricted to work only on low resolution images. The good news is that the full version is donationware and when you find out just how genuinely useful it is you’ll be happy to pay a modest amount. The guys who write these plugins do need support – I’d suggest $ 10 – $ 20 – but it’s up to you

So, here we go…

1. Shoot your exposure blend image sets as normal – I recommend using the two-second self-timer combined with auto-bracket so that you get all three shots with one press of the shutter button. I normally set the auto-bracket to plus and minus 2 stops which seems to cover most high contrast scenes.

2. Import the images into Lightroom as per usual.

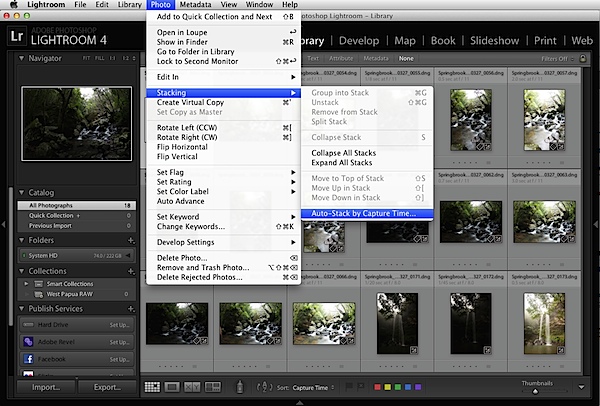
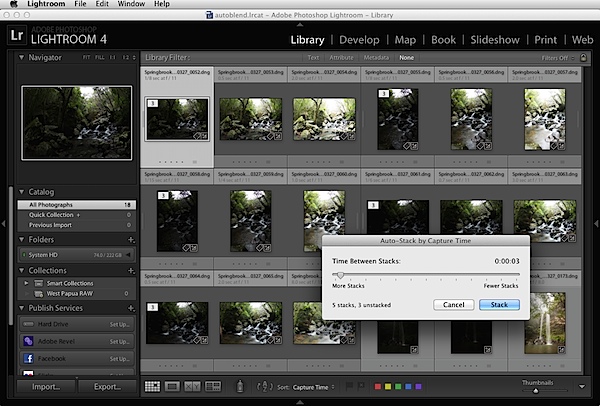
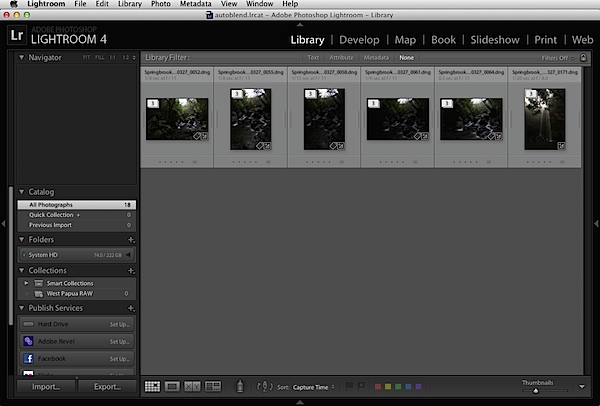
3. In the Library Module, view the folder of the images you just imported and choose Photo / Stacking / Auto-stack by Capture Time. Set this to about three seconds and Lightroom should collect all your sets of bracketed images into stacks because they will normally have been shot less than three seconds apart. Adjust the slider and you’ll see them stack and unstack in ‘real time’. Choose Photo / Collapse All Stacks and you should now see single stacks each containing the images which make up each exposure blend sequence.

Batch Exposure Blending 1.png

Batch Exposure Blending 2.png

Batch Exposure Blending 3.png

Auto-stacking is not foolproof, but you will soon get the hang of it – the trick is to make sure the folder only contains bracketed images that need stacking. If you mix them up with single captures it’s possible that you’ll get a few odd stacks.

4. Now select all the stacks that are made up of your three exposure brackets (command or control-click to multi-select).

5. Choose File / Plug-in Extras / Blend Exposures using LR Enfuse.

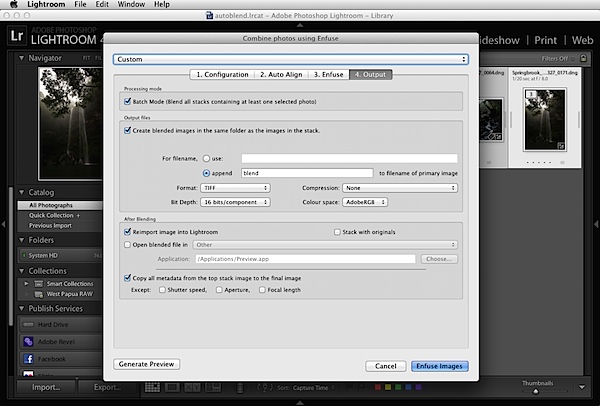
6. Use the default settings under the Enfuse tab but on the Ouput Tab check the box at the top called “Batch Mode”, check the box labelled “Create blended image in the same folder as the primary image in the set” and check the box labelled “Reimport image into Lightroom”.

Batch Exposure Blending 4.png

You can ignore ‘Auto-align’ if you used a tripod, otherwise, if you shot hand held, turn this one.

7. Hit the “Enfuse Images” button.

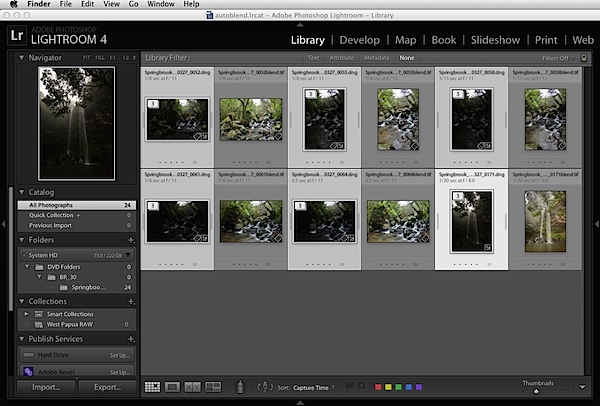
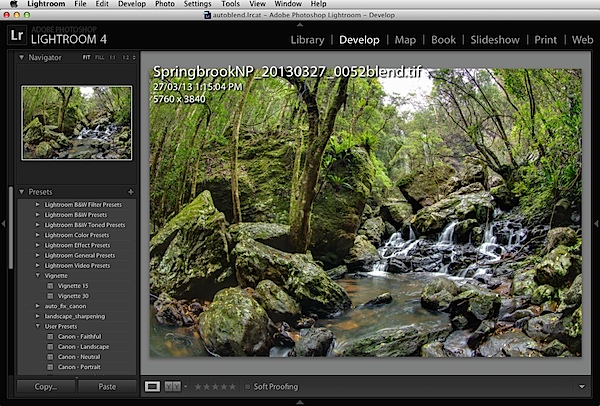
8. Go get a cuppa whilst LR/Enfuse works its way through each individual stack of images, converts them according to any raw settings in the Lightroom Develop Module, exposure blends them, saves the result into the same folder as the originals, and imports them back into the Lightroom catalogue. All on full automatic.

What you’ll see is one new file pop up next to each stack in the folder. These will be your exposure blended images.

Batch Exposure Blending 5.png

Batch Exposure Blending 6.png

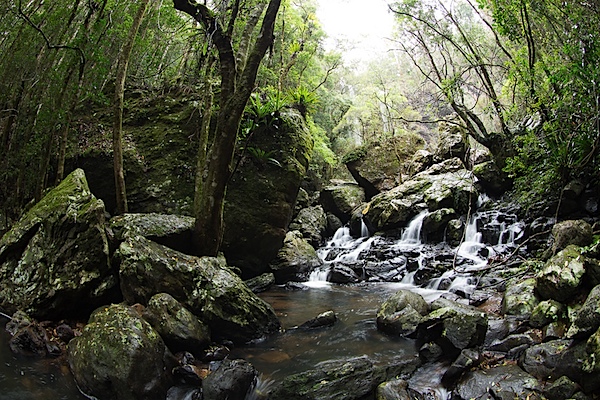
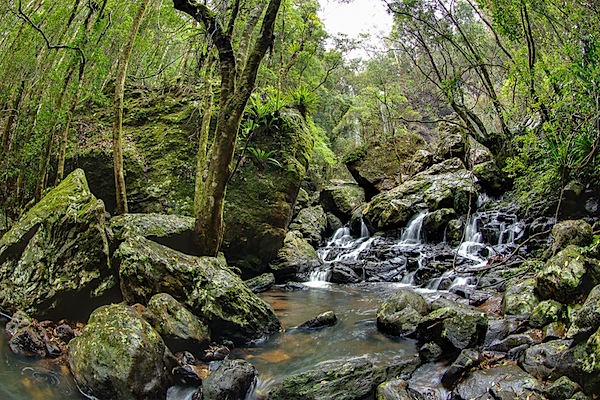
Pretty cool huh? Here’s the before (top) and after (bottom) of the image we processed (click to enlarge to full size).

Before.jpg

After.jpg

Images: Springbrook National Park, QLD – Twin Falls. Shot on a Canon EOS 5D Mk III – EF8-15F4L

This is only a quick run through the method, it’s not completely foolproof and occasionally you’ll have to go back and manually blend a difficult image using Photomatix or something similar, but, on the whole, LR Enfuse does a superb job.

One refinement would be not to do much adjustment in LR before blending, set LR/Enfuse to create 16bit TIFFs and then use LR’s extensive tone mapping tools to adjust the new output file to suit your tastes. I intend to go through this process in greater detail in a Lightroom eBook I am currently working on.

In the meantime, automating your workflow like this can save you a huge amount of time. Setting it up in the first place might take a bit of thought and effort but, believe me, it’s well worth it.

Nick Rains has been a professional photographer for almost thirty years, doing mostly editorial work for clients such as Australian Geographic and has made a point of keeping up to date with technology. His latest forays into the world of current technology have been shooting more and more video and creating an iPad app called Photique where he publishes articles and interactive eGuides as well as free image portfolios.

Post originally from: Digital Photography Tips.

Check out our more Photography Tips at Photography Tips for Beginners, Portrait Photography Tips and Wedding Photography Tips.

Save Time with Batch Exposure Blending


Digital Photography School

 
Comments Off on Save Time with Batch Exposure Blending

Posted in Photography