RSS
 

Archive for March, 2013

Drowned Out: 9 Abandoned Lifeguard Huts & Towers

31 Mar

[ By Steve in Abandoned Places & Architecture. ]

abandoned lifeguard towers
Battered by wind, waves and relentless weathering, these 9 abandoned lifeguard towers still stand watch though the watchers have long since left.

Genkai-jima, Japan

abandoned lifeguard tower genkaijima Japan(images via: Another Tokyo)

The island of Genkai-jima in southern Japan’s Hakata Bay has seen a lot of history, not least being two unsuccessful Mongol invasions almost 750 years ago. Situated off the Itoshima Peninsula on the bay’s western side, Genkai-jima offers an ideal lookout platform in general and, wonder of wonders, boasts a man-made lookout platform to boot.

Genkaijima Japan abandoned lifeguard lookout tower(image via: Catching Fish With Fish)

The abandoned lifeguard tower on Genkai-jima is rather luxurious as such constructions go, providing a windowed sheltering space beneath the topmost observation platform accessible via a poured concrete, railed staircase. An appreciable expense must have been expended to run an electrical power line to the hut, enabling the use of a powerful searchlight mounted on the roof. After all that, the tower was abandoned at some point and is inexorably deteriorating. Swim (or invade) at your own risk.

Koshkol, Kyrgyzstan

abandoned lifeguard station Koshkol Kyrgyzstan(image via: Wikipedia/Vmenkov)

Vladimir Menkov picked a picture-perfect day to document the current (well, 2007) state of the lifeguard station at the abandoned Lake Issyk Kul beach resort at Koshkol, Kyrgyzstan. Formerly patronized by vacationing Soviet-era poobahs, the resort and its facilities were caught between the fall of communism and the rise of Islamism.

Cape Town, South Africa

abandoned lifeguard hut Cape Town South Africa Innocent(images via: Sandra Maytham-Baily)

Sandra Maytham-Bailey used a Canon EOS 5D Mark II camera and some very creative processing techniques to bring out the best of this abandoned beachfront lifeguard hut. Cape Town’s beaches are both spectacular and dangerous – if the powerful riptides don’t get you, the local Great White Sharks will. Why’s this “Innocent” lifeguard HQ boarded up and abandoned, then? Perhaps potential lifeguards figured the hazards weren’t worth the pay.

Next Page:
Drowned Out 9 Abandoned Lifeguard Huts Towers

Share on Facebook


[ By Steve in Abandoned Places & Architecture. ]

[ WebUrbanist | Archives | Galleries | Privacy | TOS ]


WebUrbanist

 
Comments Off on Drowned Out: 9 Abandoned Lifeguard Huts & Towers

Posted in Creativity


3 Workouts to Improve your Photography

31 Mar

A Guest post by Jim Harmer of ImprovePhotography.com

Athletes would never consider showing up to a game without having practiced, so why is it that most photographers shoot for the “wall-hanger” photo every time they go out without ever practicing new techniques? Consider applying these new workouts in your photography routine and you will improve your skills and creativity.

The EXIF Drilldown

bayfrontNight_MG_2559.jpgIn my photography workshops, I often show my portfolio to introduce myself before the class begins. After showing a few pictures, someone will inevitably raise their hand and ask, “How did you shoot that one?” I tell them the answer, but then I show them how to practice guessing camera settings so they will know what to use in any situation.

The very best way to shoot like a pro is to analyse the work of the pros, and Flickr is just the place to look. Most photographers probably know that cameras save information about what camera settings were used to take a photo, and the information is saved in the jpeg image file. Some websites, such as Flickr, make this information easily viewable so photographers can see how other photographers created a photo.

To view this information on Flickr, find a photo and click the small text link on the top right of the screen that reads the name of the camera that shot the picture. Clicking this link will bring up a new page showing all of the camera settings the photographer used.

This photography workout simply requires going to Flickr or any other photo sharing website, finding good photos, and then carefully reviewing the EXIF data from the pictures. Ask intrinsically why the photographer chose those settings and what camera settings could change in order to improve the photograph.

When this photography exercise is implemented, the question, “How did he take that picture?” is asked much less often. With practice, knowing the correct camera settings is easy.

One Shot

cabin.jpg
Most photographers take tens of thousands of pictures over the course of a year, but only a handful of those photos really stand out enough to make their way to your portfolio of best images. Many good images may be captured during each time shooting, but rarely is an image captured that is truly stunning.

While all photographers understand this fact, their photography techniques rarely reflect it. Most photographers shoot hundreds of images and hope that some of them reach the level of quality necessary to make it into the portfolio.

Though this method of never missing the moment has some merit, it also teaches photographers that if the first or second photo of a scene does not turn out, it is acceptable to simply forgive and forget the mistakes and move on to something else. Therefore, this straight-forward exercise is designed to work that bad habit out of photographers: Go out and shoot, but do not return home with more than one photo. Click the shutter more times, yes, but delete each photo if it is not perfect.

Implementing this photography workout will teach photographers not to give up on a shot until it is perfect.

Ten Shots, One Subject

owl.jpg
This workout works almost the opposite of the second exercise, but it has a similar purpose—keep shooting to capture the perfect shot.

To practice this technique, find one subject and work to capture ten photos of that same subject before leaving. I recognized the need for this exercise while teaching my photography students landscape photography in Naples, Florida. We went to shoot the famous Naples Fishing Pier, but, not to my surprise, all of the students set up their tripods at the exact same spot immediately upon arriving at the beach. Their photo included all of the pier and the sunset behind it. This was a perfectly reasonable composition, but the students had a difficult time thinking of new ways to photograph the pier in an interesting way.

I asked the students to all take 10 different shots of the pier. They struggled at first, but eventually ended up with beautiful photos. They photographed tiny details on the pier, captured photos of the water splashing up against the pier pilings, and shot the pier as a silhouette against the sunset. Soon the students discovered their initial photo of the subject was not quite as strong as the photos they took as they forced themselves to try new things.

When something captures your eye, don’t leave until you have shot that same subject in ten different ways.

As you practice your photography skills rather than simply shooting and hoping to improve, you will feel more confident in your ability to come out of any shoot with creative and technically-correct photos.

Jim Harmer is the author of five photography instructional books and writes the ImprovePhotography.com photography blog.

Post originally from: Digital Photography Tips.

Check out our more Photography Tips at Photography Tips for Beginners, Portrait Photography Tips and Wedding Photography Tips.

3 Workouts to Improve your Photography


Digital Photography School

 
Comments Off on 3 Workouts to Improve your Photography

Posted in Photography


Thunderbolt Racing Kayak and Ice in Early Spring Paddling

31 Mar

I am reviewing my old forgotten paddling video clips and posting them to my YouTube channel. Here is one from March of 2007. First paddling that season with Thunderbolt-X kayak on Beaver Pond in Arapaho Bend Natural Area. I was just playing in a small area of free water and pushing the kayak through a soft ice.

I bought Thunderbolt designed and built by Doug Bushnell from West Side Boat Shop in December of 2006. You can find a lot of pictures of Tbolt, trip and race reports in this blog and in Fitness Paddling.

Camera: Pentax Optio W10 mounted on a front or stern deck with the single suction cup
paddling with a camera

 
Comments Off on Thunderbolt Racing Kayak and Ice in Early Spring Paddling

Posted in Photography


browserFruits März #5

31 Mar

Wir hoffen, Ihr findet Eure Süßigkeiten und Eier im Garten auch bei eher winterlichem Wetter. Wenn nicht, dann haben wir hier für Euch wie jeden Sonntag ein paar kleine Leckereien zusammengestellt. Frohe Ostern!


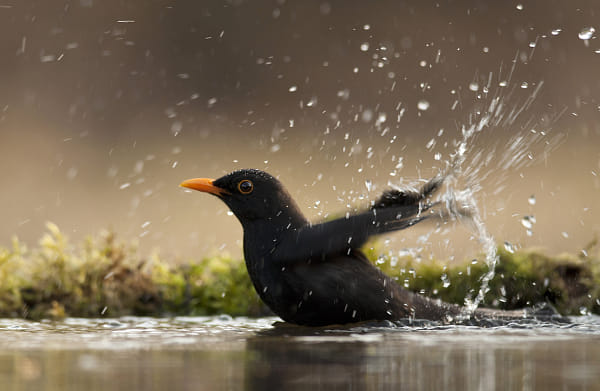
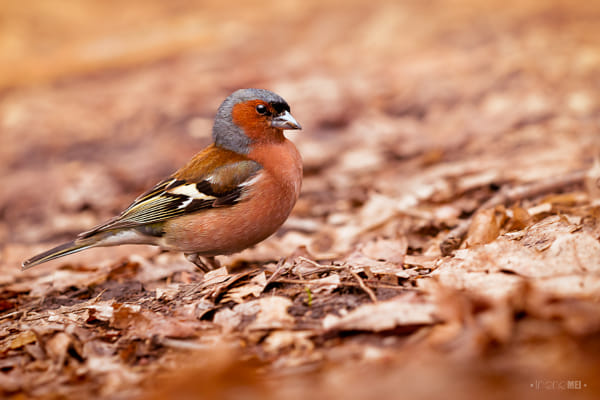
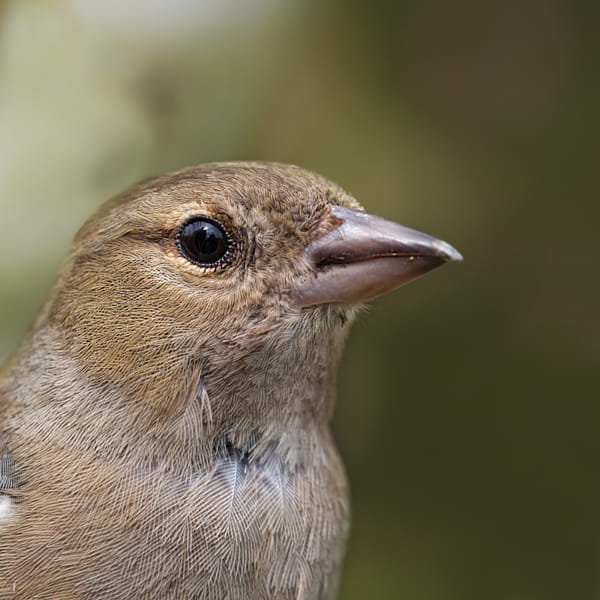
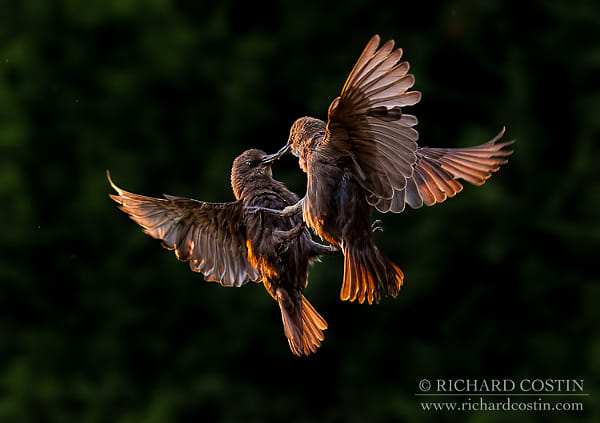
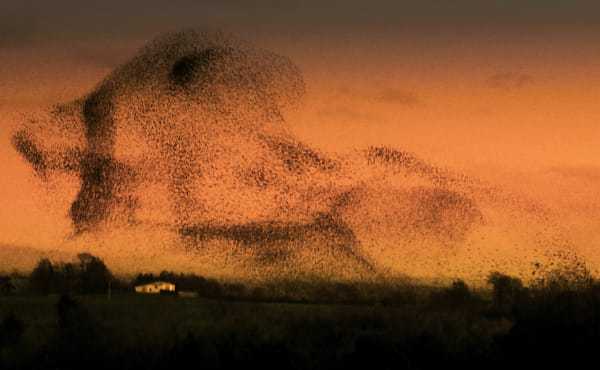
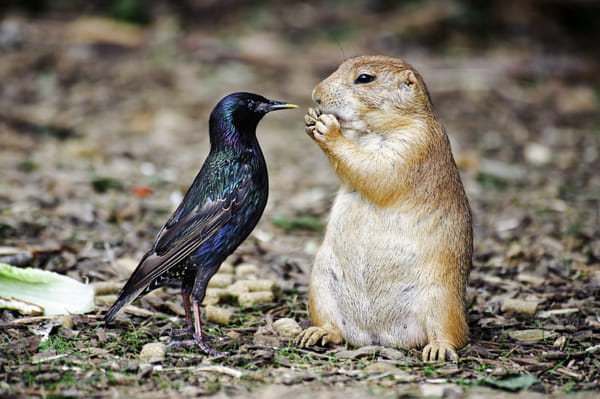
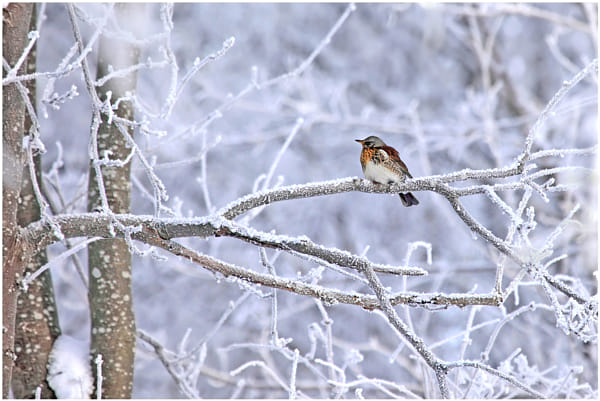
Fotospecial: „Alle Vöglein sind schon da …“

Flickr

500px


Deutschsprachig

• Der Körper als Erzählung: Ralf Mitsch fotografiert tätowierte Menschen und DIE ZEIT hat ihm ein Feature gewidmet. Übrigens sucht Mitsch für sein Buch noch einen Verleger.

• Vor zehn Jahren verlor eine US-Amerikanerin ihre Kamera beim Tauchen vor Hawaii. Jetzt kann sie sie in Taiwan wieder abholen.

• Die Fotografin Maya Alleruzzo hat berühmte Plätze Bagdads besucht und vergleicht Bilder von damals und heute.

• Was bleibt von einem Menschen, wenn er stirbt? Die Fotografin Sarah Hildebrand hat zehn Jahre lang Wohnungen besucht, ehe sie entrümpelt wurden.

• Der spanische Fotograf Joan Fontcuberta erhält den Hasselbladpreis für seine wirklich ganz großartigen Bilder.


International

• „Der Kampf, den wir uns nicht ausgesucht haben“: Schon kurz nach ihrer Heirat wird bei Jennifer Brustkrebs diagnostiziert. Ihr Mann hält die folgenden vier Jahre Leben mit seiner Frau und dem Krebs fotografisch fest.

• Ignant zeigt Honkey Kong von Christian Åslund – ein erheiterndes, von der 2D-Grafik früher Computerspiele inspiriertes Fotoprojekt.

• Popphoto zeigt, wie man aus einer knuffigen Nex eine digitale Mittelformatkamera macht.

• Kennt Ihr schon die Hyper-Collagen von Jim Kazanjian? Verblüffend real und doch nicht echt.

• Interieurfotografie mal anders. Menno Aden hat Berliner Innenräume aus der Vogelperspektive aufgenommen.

• Sun & Cloud: Die erste digitale Kamera, für die man dank Kurbel und Solarzelle nicht immer Ersatzakkus herumtragen muss.

• Tipps für Fotografen, die mit Modellen arbeiten: „Dear Photographer … Kindest regards, Model. xxx“

• Dieser Fotograf verwandelt rostige Feuerhydranten in Planeten.

• Urlaub geplant? Tauchkurs auch? Auf QKPix gibt’s dazu die passende Kurzanleitung zur Unterwasserfotografie.

• Landschaftsfotografie: Max Rive klettert in Europa über Berg und Tal und dabei entstehen wundersame Aufnahmen.

• Instant Addicts haben den neuen Großformat-Polaroid-Film PQ 8×10 Color Shade getestet, der von Impossible in einer sehr kleinen Auflage an Pioniere verteilt wurde.

• Wer Fotografen wie bezahlt, kannst Du in diesem Tumblr-Blog nachlesen. Da muss man erst einmal schlucken.


Neuerscheinungen und Tipps vom Foto-Büchermarkt

buchtipps

• Tim Hölschers „Experimentelle Wege zum Bild“* zeigt seine Werke von 2007 – 2012. Ob Bunker und Kirchtürme, die zur Lochkamera umgebaut wurden, lichtempfindliche Materialien oder einfach historische Tankstellen, die digital in ihren Originalzustand zurückversetzt wurden – der Buchtitel hält, was er verspricht. Für 19,80 € ist ein signiertes Exemplar auch beim Fotografen selbst erhältlich.

• Sabine von Breunig war in der „Geisterstadt: Sperrzone Wünsdorf“* unterwegs, die eine einhundertjährige militärische Geschichte hat und nun als nach und nach verfallender Ort auch fotografisch fasziniert. Tipp für Liebhaber des Genres Lost Places. Auf 160 Seiten gibt’s Fotos satt.


Videos

Galerie und Fotostudio zugleich – Photobooth in San Francisco portraitiert Menschen im Nassplatten-Verfahren.


Was für Sprüche man so als Fotograf während Shootings hört.


Einfach mal ein paar GoPro Heros nebeneinanderstellen und nette 3D-Effekt damit einfangen.


Ausstellungen

Gudrun Kemsa – Urban Stage
Zeit: 1. Februar – 5. April 2013
Ort: Galerie Bernd A. Lausberg, Hohenzollernstr. 30, 40211 Düsseldorf
Link

Man Ray | Christer Strömholm
Zeit: 2. Februar – 6. April 2013
Ort: Kicken Berlin, Linienstraße 161A, 10115 Berlin
Link

Ralph Schulz: „Rekonstruktion unbekannter Interieurs“
Zeit: 8. März – 6. April 2013
Ort: pavlov’s dog, Bergstraße 19, 10115 Berlin
Link

Hans-Christian Schink „T?hoku“
Zeit: 26. Januar – 6. April 2013
Ort: Galerie Rothamel, Kleine Arche 1A, 99084 Erfurt
Link

Robby Marias Booklet-Fotografien für sein neues Album „Metropolis“
Zeit: 23. März – 6. April 2013
Ort: Luxad, Mommsenstraße 42, Berlin
Link

Hartmut Neubauer. Eintracht Braunschweig in den 1970er Jahren
Zeit: 1. Februar – 7. April 2013
Ort: Museum für Photographie, Torhäuser, Helmstedter Straße 1, Braunschweig
Link

Begegnung der Bilder. 25 Jahre Sammlung Photographie
Zeit: 3. Februar – 7. April 2013
Ort: Stiftung Moritzburg, Friedemann-Bach-Platz 5, 06108 Halle
Link

AFORK: 10 Jahre – 10 Fotos
Zeit: 2. Februar – 7. April 2013
Ort: Museum Kunstpalast, Ehrenhof 4-5, 40479 Düsseldorf
Link

Oliver Kern – Die deutsche Aussicht.
Zeit: 28. Februar – 12. April 2013
Ort: FREELENS Galerie, Steinhöft 5, 20459 Hamburg
Link

angenommen, dass…
Zeit: 13. März – 12. April 2013
Ort: Galerie der Künstler, Maximilianstraße 42, 80538 München
Link

Von Freiheit zu Grenzen // 8 fotografische Positionen
Zeit: 22. Februar – 12. April 2013
Ort: Stadthausgalerie Münster, Platz des Westfälischen Friedens, 48143 Münster
Link

Jim Rakete – Vertigo
Zeit: 13. Februar – 13. April 2013
Ort: Münzing Claassen, Holsteinische Str. 29, 10717 Berlin
Link

Gerda Schütte „Photogrammes“
Zeit: 1. März – 13. April 2013
Ort: Semjon Contemporary, Schröderstr. 1, 10115 Berlin
Link

HINTERLASSENSCHAFTEN – André Baschlakow
Zeit: 3. März – 13. April 2013
Ort: kunstraum FRÖAUF, Fröaufstr. 7, 12161 Berlin
Link

ERIC MARRIAN Nude | Carré Blanc · Javel
Zeit: 14. März – 13. April 2013
Ort: immagis Galerie, Franziskanergasse 1, 97070 Würzburg
Link

Manfred Hamm – Konzerthäuser und andere Räume
Zeit: 16. März – 14. April 2013
Ort: Kunst- und Gewerbeverein, Ludwigstraße 6, 93047 Regensburg
Link

Kleiden – Verkleiden. Bilder aus der fotografischen Sammlung
Zeit: 2. Februar – 14. April 2013
Ort: Museum Folkwang, Museumsplatz 1, 45128 Essen
Link

Horst Hamann. AMERICA
Zeit: 22. März – 14. April 2013
Ort: AusstellungsHalle, Schulstraße 1A, 60594 Frankfurt/Main
Link

Mehr aktuelle Ausstellungen


* Das ist ein Affiliate-Link zu Amazon. Wenn Ihr darüber etwas bestellt, bekommen wir eine kleine Provision, Ihr bezahlt aber keinen Cent mehr.


kwerfeldein – Fotografie Magazin

 
Comments Off on browserFruits März #5

Posted in Equipment


Nice Visual Art photos

31 Mar

Check out these visual art images:

Une Grande Dame in Progress, by Millais
visual art
Image by Martin Beek
One of my big interests as an artist is the use made of photography by painters. Millais often used photographs both as a record and to make compositional decisions, this is interesting to see how he painted a typical "Fancy Picture" of 1880’s "Une Grande Dame"
The camera and the artist (set) about the relationship between photographic images and those painted. I hope to use examples from my own practice where photography has been used in both photo-realistic work as well as illustration and other art-forms.

I have used a number of artists whose work I have studied and look at the way photography informed and influenced their visual expression.

As I have scanned a lot of my old work I’m well aware that photography has played and still plays a significant role for me as an artist, indeed in recent years these two practices have overlapped and are no longer distinct paths.

 
Comments Off on Nice Visual Art photos

Posted in Photographs


Ergebnisse der Leseraktion: Eure Selbstportraits

31 Mar

Vor drei Wochen hatten wir dazu aufgerufen, Selbstportraits zu erstellen. Unsere Auswahl Eurer Fotos fiel uns alles andere als leicht, denn Euer Ideenreichtum und die Qualität der Bilder waren wie gewohnt sehr stark.

Ich habe irgendwo gelesen, dass Selbstportraits so ein Frauending wären. Umso schöner, dass wir diese Theorie mit Euch widerlegen konnten, denn unsere Auswahl zeigt vorrangig Männer. Der jüngste davon ist gerade einmal 14 Jahre alt und ziert unser Titelbild.

Jeder Redakteur hat für unsere Auswahl seine Favouriten ins Rennen geschickt und hier seht Ihr nun alle Bilder mit Mehrfachnennung – was wie immer nicht heißt, dass diese Bilder nach irgendeinem objektiven Maßstab die besten wären, sondern einfach nur, dass sie uns persönlich angesprochen haben.


Jan Plähn
Foto: Jan Plähn

Jan schrieb:

Als ich von Eurer Aktion gelesen habe, wusste ich sofort, was für ein Foto ich schießen möchte. Ich nahm mir einen der Stöcke, die wir normalerweise für Stockbrot verwenden und suchte im Schuppen meines Vaters eine passende Schnur. Ich schaute mir im Internet noch einige Bilder von Anglern an, da ich davon echt absolut keine Ahnung habe und fuhr dann mit meinem Fahrrad zu „Liesbeth eern Diek“, einem Teich, etwa fünf Kilometer von meinem Zuhause entfernt.

Dort angekommen merkte ich erst einmal, dass mir irgendwo auf dem Hinweg der Stockbrotstock vom Gepäckträger gefallen ist und ich suchte mir im Wald einen neuen geeigneten Stock. Ich knotete die Schnur an die Angel, zog mir Socken und Schuhe aus, krempelte meine Hose hoch und nach ein paar Versuchen und komischen Blicken der vorbeikommenden Waldspaziergänger war das Bild in der Tasche. – Den Fisch habe ich natürlich nachträglich eingefügt.


Petra
Foto: Petra Holländer

Petra schrieb:

Als ich diese Meeresschnecke zum ersten Mal sah, wusste ich sofort, dass ich mit ihr ein Foto machen musste. Und zwar in Verbindung mit nackter Haut. Ich hatte noch kein wirkliches Konzept im Kopf, aber ich wollte das Schneckenhaus unbedingt auf meinem Körper platzieren und so mit dem Licht arbeiten, dass harte Schatten entstehen. Besonders fasziniert hat mich das Aussehen der Meeresschnecke, da sie einerseits etwas furchteinflößend wirkt, anderseits aber auf der Innenseite wirklich schön ist und dort auch verletzlich wirkt.

Das entstandene Foto hat somit zweierlei Bedeutung für mich: Es geht, wie der Titel schon verrät, zum einen um die dunkle Seite eines Menschen, um grauenhafte Dinge, zu denen er fähig ist. Zum anderen stehen das Schneckenhaus und die nackte Haut aber auch für Verletzlichkeit und innere Schönheit.


david
Foto: David Uzochukwu

David schrieb:

Als ich von dieser Aktion gelesen habe, dachte ich mir: Das ist doch mal was für mich! Ich mache gerne Selbstportraits – oder wie Laura so schön geschrieben hat: Nichtichselbst-portraits. Wenn ich mich vor die Kamera stelle, will ich nachher nicht mehr mich im Bild sehen, sondern jemand ganz anderen – in dem dann aber meistens ein Teilchen von mir steckt.

Ich habe meistens ein ziemlich klares Konzept vor Augen, lasse mich dann aber beim Fotografieren und Bearbeiten einfach fallen und behalte das Thema im Hinterkopf. Auf jeden Fall hat mich diese Aktion dazu gebracht, mich mal wieder aufzurappeln, die elende Wintermüdigkeit abzuschütteln und ein Foto zu machen, mit dem ich zufrieden bin.


Thomas
Foto: Thomas Lüttig

Thomas schrieb:

Bereits vor einigen Tagen hatte ich Euren Aufruf hier gesehen und mir gedacht, da mache ich auch mal mit. Man macht als Fotograf ja gelegentlich auch mal ein ein Selbstportrait und sei es nur, um mal etwas zu testen… aber meist ist man mit seinen Fotos dann nicht wirklich zufrieden – zumindest mir geht das oft so.

Dann kam ganz schnell die Frage: Was mache ich für ein Selbstportrait? Ich saß also bei einem Kaffee in der Küche und dachte darüber nach und letztendlich kam ich auf die Idee, genau diese Situation zu fotografieren: Das Nachdenken über ein Selbstporträt, ein Moment der Reflexion über sich selbst und über die – naja, zweitschönste – Sache der Welt, das Fotografieren.

Die Bearbeitung sollte auch etwas mit mir zu tun haben und ich habe mich für diesen matten Schwarzweiß-Look entschieden. Warum? Seit meiner frühen Jugend bin ich immer noch beeindruckt von einigen Platten-Covern der Band „The Smiths“, die ich auch musikalisch immer noch sehr mag. Also kam dieses Bild heraus. Wie gesagt: Zu 100% zufrieden ist man wohl nie, aber ich mag es.


Martin
Foto: Martin Melcher

Martin schrieb:

Seit gut einem halben Jahr studiere ich nun Medienkunst und Gestaltung an der Bauhaus-Universität Weimar und habe dort im ersten Semester einen Fotokurs besucht, in dessen Rahmen wir verschiedene Aufgaben umsetzen sollten. Eine davon war die des Selbstportraits. Eine für mich zum damaligen Zeitpunkt kaum zu meisternde Aufgabe, da ich mich selbst nie auf einem Bild sehen konnte. Hiermit ist nicht gemeint, dass ich mich hässlich finde oder ähnliches, nur eben, dass die Person, die ich auf Bildern sehe, irgendwie nicht ich bin.

Im Rahmen meiner Abschlussarbeit für den Fotokurs arbeite ich nun seit Wochen ununterbrochen an einer guten Serie von Selbstportraits, um diese emotionale Hürde zu meistern, allerdings in einem anderen Kontext, und beschäftige mich in den Abendstunden sehr intensiv mit mir und meinem Gesicht und halte dies in Portraits fest.

Mittlerweile merke ich, dass ich selbstbewusster geworden bin; fange an mich zu sehen, beginne zu hinterfragen, wer ich wirklich bin, wie ich gesehen werde, gesehen werden möchte. Daher freue ich mich, hier auch einen Beitrag beisteuern zu können.

Wer sich an technischen Infos erfreut: Pentax K-5, ISO 80, 1/160 s, f/8, zusammen mit einem Yongnuo 560 II und Softboxschirm oberhalb der Kamera.


Michael
Foto: Michael Bergmann

Michael schrieb:

Ich habe mir den CamRanger für’s iPad zugelegt, um eigentlich Landschaftsaufnahmen mit ihm zu machen. Portraits sind meiner Meinung nach für diese Lösung geeignet. Nach mehreren Anläufen habe ich das Ganze doch noch einmal probiert – und zwar mit einem Modell, das entsprechend geduldig ist für Experimente. Und das war ich am Ende selbst.


Ljuba
Foto: Ljuba Gonchar

Ljuba schrieb:

Mit einem meiner Modelle hatte ich vor einiger Zeit bei mir zu Hause Fensterbilder gemacht, weil das Wetter einfach nur unglaublich schlecht war. Heute sah ich, dass Eure tolle Aktion abläuft und wollte unbedingt mitmachen. Draußen wütete der Wind bei knapp 3°C, also wollte ich solch ein Fensterbildchen von mir selbst ausprobieren. Alles viel leichter als gedacht…

Zunächst musste natürlich das neue Glätteisen ausprobiert werden. Zwei Stunden später und die Hälfte meiner Haare weniger, hatte ich es geschafft, mir zwei kleine Löckchen zu zaubern. Dann begann die richtige Arbeit. Ich bin fast wahnsinnig geworden bei der Fokussuche. Als Fokuspunkt musste meine halbtote Palme herhalten. Bei knapp 60 Bildern waren nur zwei scharfe dabei! Eines davon seht Ihr hier.


Benjamin
Foto: Benjamin Zapf

Benjamin schrieb:

Mit der Kamera in der Hand bin ich durchs Haus gelaufen und dann ist mir zufällig die Spiegelung in einer Glastür aufgefallen. Mit dem Gedanken an den Artikel hier wusste ich sofort: Das isses. Das 50mm war schon drauf, Kamera auf’s Stativ und mit Fernauslöser ein paar Testbilder gemacht, bis ich wusste, wo ich mich hinsetzen muss.

Um das Fokussieren zu erleichtern, habe ich eine Schnur mit einem kleinen Gegenstand am Ende an die Decke geklebt und dorthin hängen lassen, wo mein Kopf sein sollte. Dann noch ein paar Bilder mit unterschiedlichen Positionen gemacht und letztendlich habe ich mich für dieses entschieden.

Die Bearbeitung war überschaubar, eine einfache Konvertierung nach schwarzweiß in Lightroom, um das Bild auf das Wesentliche zu reduzieren.


pinhole
Foto: Tobias Pohl

Tobias schrieb:

Ich liebe Pinhole und der nächste World Pinhole Photography Day ist ja auch bald wieder. Was liegt da näher als ein Lochbild?

Damit es nicht völlig verwackelt, habe ich mit Pinhole und Blitz experimentiert. ISO: Keine Ahnung, aber verdammt hoch. Leitzahl 45 und volle Leistung aus ca. 1,5 Metern Entfernung. Aua, das flasht, aber es funktioniert…


Dass bei unserer Aktion leider viele Fotos, die wir auch super fanden, nicht Einzug in diese Auswahl erhalten haben, liegt in der Natur der Sache. Wir empfehlen Euch daher, selbst noch einmal die Kommentare und Einreichungen zur Leseraktion durchzusehen. Am besten mit einer Tasse Tee oder Kaffee.


kwerfeldein – Fotografie Magazin

 
Comments Off on Ergebnisse der Leseraktion: Eure Selbstportraits

Posted in Equipment


30. März 2013

31 Mar

Ein Beitrag von: Bernd Rettig

DigestingADreamWhileInhaling (c) Bernd Rettig


kwerfeldein – Fotografie Magazin

 
Comments Off on 30. März 2013

Posted in Equipment


Converting Images to Black and White Properly

31 Mar

Header Image

by: David Wahlman of Wahlman Photography

Recently I was asked about the process of converting images to black & white; namely when to know the image would be good for it. So in this post I’m going to talk about when to convert an image to black & white and then how to do it in Photoshop without loosing quality.

When To Create A Black & White Image

There are about three ideas that come to my mind when I evaluate whether I should convert an image to black & white (here on referred  to as b&w).

  1. First of all, and somewhat obviously, what is your desired outcome? Is your client specifically asking for b&w images? Are you entering a b&w photo contest? Are you doing a gallery set of b&w (because, generally speaking it doesn’t look too good to have just one or two b&w mixed in with colors. You want a good balance.)? Like I said, it should be pretty obvious that your outcome needs to be considered, but it was worth saying.
  2. Second, you should consider the value range of the image. In photography the term “value” speaks of darks vs lights. So when I say to judge the image’s value range, I’m talking about if you have deep blacks and bright whites. What’s your dynamic range like? For the most part, ‘flat’ images don’t look very good in b&w. Traditional b&w have good contrast and well spread value all across the histogram. So, if your image has these elements, then it may be a good choice for converting into a b&w.
  3. I’ll be doing a post soon on color theory and color relationship, but if you have odd colors or colors that don’t work well together, then it may be a good candidate for being converted to b&w. Let’s just face it, some colors don’t really work well together. B&w may be a good way to avoid these colors but keep the great shot.
  4. Just a tip, if you squint your eyes while looking at an image, you will see less color and more of the total value. This can be good for getting an idea of if your image has good value range.

How To Convert A Color Image To Black & White

Alright, now lets talk about how to convert your image, because there is a right and wrong way. You may get the same result, but if you do it wrong you actually loose quality (to be technical, you sacrifice bytes of information). For this article I’m going to be talking about using Adobe Photoshop. There is conversion software that you can buy, but for all intensive purposes, why pay extra when you can do it in Photoshop really easily.

Step 1

If you found an image that you want to convert, then step one would be opening the image in Photoshop. For my example, I’m using one of my wedding photographs that you may have seen on my website. It was shot during the first dance and I just really love this photo in b&w.

Screen Shot 2013 03 05 at 8 13 48 PM

Step 2

Screen Shot 2013 03 05 at 8 13 57 PMNext, most people would try to go to the top menu, go to Image>Mode and change the color profile to “Grayscale.”

Don’t do this!

Long story short, you’re actually changing the color profile, which means you will lose pixel information in your colors. You don’t want that; you want to retain as much information in your image as possible.

What you want to do is use the black & white adjustments. You can access this either by going to the top menu to Image>Adjustments>Black&White or in your side bar click on the adjustments button (as shown in picture) and then click on the b&w icon, which is the black and white box divided diagonally.

Step 3

Screen Shot 2013 03 05 at 8 14 10 PMOnce you’ve clicked this, you should see adjustments for the value of each color (see image). Notice that Photoshop has kept track of colors in the image. It’s just displaying them as b&w, but your keeping the information in tack.

This also gives you more control on editing your b&w cause you can adjust it by color section now. Be aware, that you don’t want to push the limits on these colors too much, you’ll start to see ‘clipping’ in gradient colors such as skies. You’ll see it in your preview as you do it, then you’ll know what I’m talking about.

Step 4

After this, you can use these other adjustments (which act as smart layers, if you know what that means. It’s a good thing) to adjust the image how ever you need; exposure, contrast, levels, curves, filters, etc.

Step 5

After you’ve done all the editing you feel you need to do you should hopefully have an image you’re pleased with as a final. From you there you can save it however you need and depending on your desired outcome. 

Screen Shot 2013 03 05 at 8 20 12 PM

If you found this article helpful or interesting, please share it with friends and family by using the media share buttons below. Thanks

David Wahlman is a wedding and portrait photographer from Redding, CA. He works all around California and is aiming to get into destination photography. You can see his best work at www.wahlmanphotography.com and follow his updates on his facebook page.

Post originally from: Digital Photography Tips.

Check out our more Photography Tips at Photography Tips for Beginners, Portrait Photography Tips and Wedding Photography Tips.

Converting Images to Black and White Properly


Digital Photography School

 
Comments Off on Converting Images to Black and White Properly

Posted in Photography


Hotel on Wheels: Portable Room Travels the World With You

30 Mar

[ By Delana in Boutique & Art Hotels & Global. ]

hotello portable hotel room

Cities all around the world have vast, empty spaces just going to waste – abandoned buildings, empty lots, decommissioned military barracks – but the Hotello wants to put those spaces to use. The Hotello is a tiny, portable hotel room that can go anywhere and provide a comfortable sleeping space no matter where you are.

hotel room on wheels

Designed by Antonio Scarponi and Robert de Luca for the Swiss firm daskonzept, the Hotello starts out as a rather nondescript wheeled trunk. It does the seemingly impossible by packing an entire 4 square meters room into a surprisingly small area – bed, desk, wardrobe and all.

hotello portable hotel room

Thanks to its wheels, the Hotello can be taken almost anywhere. You can set up the room in a matter of minutes by folding out the bed and setting up the metal structure that supports the sound absorbent privacy curtain. A small work space and stool let you catch up on work before bedtime, and the trunk itself acts as a storage area for clothing or other objects.

hotello

Several Hotellos could be placed together to create unique configurations if desired, but a single unit is perfect for the business traveler who simply needs a place to lie down for several hours before work starts again in the morning. Since the portable hotel room doesn’t come with a bathroom, though, it would be wise to plunk the Hotello down in a place near some public facilities.

hotel room in a trunk

Looking beyond the most obvious uses of the Hotello, though, it is clear that a solution like this would be ideal for housing victims of natural disaster. Similar, though hopefully more modest and cost-effective, solutions could be used to house homeless populations in otherwise-abandoned buildings. But of course, part of the project’s appeal is the idea that you can travel around the world with nothing  but a suitcase and a red trunk on wheels and always have a comfortable place to sleep at night.

Share on Facebook


[ By Delana in Boutique & Art Hotels & Global. ]

[ WebUrbanist | Archives | Galleries | Privacy | TOS ]


WebUrbanist

 
Comments Off on Hotel on Wheels: Portable Room Travels the World With You

Posted in Creativity


Accessory Review: Tamrac Evolution 9 Photo Backpack

30 Mar

tamrac.png

Since the quest for the perfect camera bag will likely never end, we continue ours with a look at the Tamrac Evolution 9, a larger bag that can be used as a backpack or slingpack. Capable of holding a pro digital SLR with a long zoom, a 17-inch notebook, plus several lenses and accessories, the Evolution 9 seemed durable and well designed. Click through for our review to learn how it held up in the field.

News: Digital Photography Review (dpreview.com)

 
Comments Off on Accessory Review: Tamrac Evolution 9 Photo Backpack

Posted in Uncategorized